目录
1.博客系统规划
2.基础服务搭建
3.登录接口
4.新增文章接口
5.查询文章接口
6.修改文章接口
7.删除文章接口
总结
1.博客系统规划
首先规划一下有哪些接口,从博客文章角度来看,需要如下接口:
- 新增文章接口,传递参数有文章名称、作者名、分类、标签、内容、发布时间、修改时间字段。
- 修改文章接口,可以对上述的任意字段进行修改,当然逻辑上发布时间不能被修改。
- 查询文章列表接口,提供分页和不分页两种数据返回。
- 查询文章详情接口,也就是根据文章ID来查询单篇文章接口。
- 删除文章接口,根据传递的文章ID删除文章,可以做成软删除,方便数据恢复,建议不直接做物理删除。
从用户登录管理角度,需要如下接口:
- 用户注册接口,需要填写用户名、密码、邮箱或手机、注册时间、账号状态、账号权限。
- 用户登录接口,通过密码和账号登录获取 Token。
- 用户退出接口,退出后注销相应的 Token。
2.基础服务搭建
采用 SpringBoot + Druid + MyBatis + Redis +Tomcat 架构,首先要安装相关依赖,如pom.xml,代码如下:
<?xml version="1.0" encoding="UTF-8"?>
<project xmlns="http://maven.apache.org/POM/4.0.0"
         xmlns:xsi="http://www.w3.org/2001/XMLSchema-instance"
         xsi:schemaLocation="http://maven.apache.org/POM/4.0.0 http://maven.apache.org/xsd/maven-4.0.0.xsd">
    <modelVersion>4.0.0</modelVersion>

    <groupId>org.example</groupId>
    <artifactId>myblog</artifactId>
    <version>1.0-SNAPSHOT</version>

    <properties>
        <maven.compiler.source>8</maven.compiler.source>
        <maven.compiler.target>8</maven.compiler.target>
        <project.build.sourceEncoding>UTF-8</project.build.sourceEncoding>
    </properties>
    <parent>
        <groupId>org.springframework.boot</groupId>
        <artifactId>spring-boot-starter-parent</artifactId>
        <version>2.3.9.RELEASE</version>
        <relativePath/>
    </parent>
    <dependencies>
        <dependency>
            <groupId>org.springframework.boot</groupId>
            <artifactId>spring-boot-starter</artifactId>
        </dependency>
        <dependency>
            <groupId>org.springframework.boot</groupId>
            <artifactId>spring-boot-devtools</artifactId>
            <scope>runtime</scope>
            <optional>true</optional>
        </dependency>
        <dependency>
            <groupId>org.projectlombok</groupId>
            <artifactId>lombok</artifactId>
            <optional>true</optional>
        </dependency>
        <dependency>
            <groupId>com.auth0</groupId>
            <artifactId>java-jwt</artifactId>
            <version>3.4.0</version>
        </dependency>
        <dependency>
            <groupId>org.mybatis.spring.boot</groupId>
            <artifactId>mybatis-spring-boot-starter</artifactId>
            <version>2.1.1</version>
        </dependency>
        <dependency>
            <groupId>org.springframework.boot</groupId>
            <artifactId>spring-boot-starter-web</artifactId>
        </dependency>
        <!--    引入处理的json依赖包    -->
        <dependency>
            <groupId>com.alibaba</groupId>
            <artifactId>fastjson</artifactId>
            <version>1.2.73</version>
        </dependency>
        <dependency>
            <groupId>mysql</groupId>
            <artifactId>mysql-connector-java</artifactId>
        </dependency>
        <dependency>
            <groupId>org.springframework.boot</groupId>
            <artifactId>spring-boot-starter-test</artifactId>
            <scope>test</scope>
            <exclusions>
                <exclusion>
                    <groupId>org.junit.vintage</groupId>
                    <artifactId>junit-vintage-engine</artifactId>
                </exclusion>
            </exclusions>
        </dependency>

    </dependencies>

</project>
然后是数据库准备,单独创建一个 my_blogs 数据库,并创建表结构。
使用者表my_user
role_id是角色ID,是对应的权限角色表my_roles中的主键,而password 需要进行MD5加密保存,所以将长度设置成 100 更为合理。
| 字段 | 类型 | 长度 | 默认值 | 是否为空 | 索引 | 备注 |
| id | int | 11 | 无 | 否 | 主键,自增 | 主键ID |
| name | varchar | 80 | 无 | 否 | 账号名 | |
| password | varchar | 100 | 无 | 否 | 密码 | |
| | varchar | 80 | 无 | 是 | 邮箱 | |
| role_id | int | 11 | 无 | 否 | 外键 | 角色ID |
| status | tinyint | 2 | 无 | 否 | 状态,1:正常,2:封禁 | |
| reg_time | int | 11 | 无 | 否 | 注册时间 |
文章表my_articles
其中category_id是外键,对应的是 my_artice_categories 表中的主键。
| 字段 | 类型 | 长度 | 默认值 | 是否为空 | 索引 | 备注 |
| id | Int | 11 | 无 | 否 | 主键,自增 | 主键ID |
| titile | varchar | 80 | 无 | 否 | 标题 | |
| author | varchar | 80 | 无 | 否 | 作者名 | |
| content | text | 无 | 是 | 内容 | ||
| category_id | int | 11 | 无 | 否 | 外键 | 分类ID |
| tags | varchar | 300 | 无 | 否 | 标签,以逗号分隔 | |
| is_deleted | tinyint | 1 | 1 | 否 | 是否删除,1表示未删除2表示删除 | |
| created | Int | 11 | 无 | 否 | 创建时间 | |
| modified | int | 11 | 无 | 否 | 修改时间 |
文章分类表my_artice_categories
Creator_id 对应my_users表中的主键,也就是创建人的id。
| 字段 | 类型 | 长度 | 默认值 | 是否为空 | 索引 | 备注 |
| id | int | 11 | 无 | 否 | 主键,自增 | 主键ID |
| name | varchar | 80 | 无 | 否 | 分类名称 | |
| creator_id | int | 11 | 无 | 否 | 创建人ID | |
| desc | varchar | 500 | 无 | 是 | 分类描述 | |
| created | int | 11 | 无 | 否 | 创建时间 | |
| modified | int | 11 | 无 | 是 | 修改时间 |
权限表my_roles
| 字段 | 类型 | 长度 | 默认值 | 是否为空 | 索引 | 备注 |
| id | int | 11 | 无 | 否 | 主键,自增 | 主键ID |
| name | varchar | 80 | 无 | 否 | 分类名称 | |
| creator_id | int | 11 | 无 | 否 | 创建人ID | |
| desc | varchar | 500 | 无 | 是 | 分类描述 | |
| created | int | 11 | 无 | 否 | 创建时间 | |
| modified | int | 11 | 无 | 否 | 修改时间 |
根据上面的设计在数据库中创建四个表即可。
四张表及外键的sql语句:
create database my_blogs;
use my_blogs;
create table my_user(
    `id` int(11) NOT NULL Primary Key AUTO_INCREMENT comment '主键ID',
    `name` varchar(80) not null  comment '账号名',
    `password` varchar(100) not null  comment '密码',
    `email` varchar(80) NULL  comment '邮箱',
    `role_id` int(11) NOT NULL comment '角色ID',
    `status` tinyint(2) NOT NULL comment '状态,1:正常,2:封禁',
    `reg_time` int(11) NOT NULL comment '注册时间'
);
create table my_roles(
    `id` int(11) NOT NULL PRIMARY KEY AUTO_INCREMENT comment '主键ID',
    `name` varchar(80) not null comment '分类名称',
    `creator_id` int(11) not null comment '创建人ID',
    `desc` varchar(500) NULL comment '分类描述',
    `created` int(11) not null comment '创建时间',
    `modified` int(11) not null comment '修改时间'
);
alter table my_users add constraint fk_roleId_myRoles foreign key (role_id) REFERENCES my_roles(id);

create table my_articles(
    `id` int(11) not null  primary key auto_increment comment '主键ID',
    `title` varchar(80) not null  comment '标题',
    `author` varchar(80) not null comment '作者名',
    `content` text NULL NULL comment '内容',
    `category_id` int(11) not null comment '分类ID',
    `tages` varchar(300) not null comment '标签,以逗号分隔',
    `is_deleted` tinyint(1) default 1 not null  comment '是否删除:1表示未删除,2表示删除',
    `created` int(11) not null comment '创建时间',
    `modified` int(11) not null comment '修改时间'
);

create table my_artice_categories(
    `id` int(11) not null primary key auto_increment comment '主键ID',
    `name` varchar(80) not null comment '分类名称',
    `creator_id` int(11) not null  comment '创建人ID',
    `desc` varchar(500) NULL comment '分类描述',
    `created` int(11) not null comment '创建时间',
    `modified` int(11) null comment '修改时间'
);
alter table my_articles add constraint fk_categoryId_myArticeCategories foreign key (category_id)
references my_artice_categories(id);


alter table my_artice_categories add  constraint  fk_createdId_myUsersId foreign key (creator_id)
references my_users(id);
-- 我自己拟定的权限规则,你也可以自己定义
insert into my_roles(name, creator_id, `desc`, created, modified) VALUES ('管理员权限','1','任何操作',0,0),('默认权限','1','可以上传文章,修改自己文章,查看文章',00000,000000),('低级权限','1','仅查看',0,0);
创建通用型 JSON 返回数据格式
package org.example.tools;

import lombok.AllArgsConstructor;
import lombok.Data;
import lombok.NoArgsConstructor;

@Data
@AllArgsConstructor
@NoArgsConstructor
public class JsonResultObject <T>{
    private String code;
    private String message;
    private String erroeMessage;
    private String errorCode;
    private T data;
}
保存登录密码在数据库中也是 md5 加密的,而登录时会对明文传递的密码进行 MD5化,所以要创建 md5 工具类
package org.example.tools;

import org.springframework.stereotype.Component;

import java.math.BigInteger;
import java.security.MessageDigest;
import java.security.NoSuchAlgorithmException;

@Component
public class Md5Utils {
    /**
     * 将字符串 md5化
     * @param plainText
     * @return 16进制表示的字符串
     */
    public static String stringToMD5(String plainText) {
        byte[] secretBytes = null;
        try {
            //使用MessageDigest类获取MD5算法实例,然后将输入字符串转换为字节数组并进行加密
            secretBytes = MessageDigest.getInstance("md5").digest(
                    plainText.getBytes());
        } catch (NoSuchAlgorithmException e) {
            throw new RuntimeException("没有这个MD5算法");
        }
        //将加密后的字节数组转换为BigInteger对象,并使用16进制形式的字符串表示
        String md5code = new BigInteger(1, secretBytes).toString(16);
        for (int i = 0; i < 32 - md5code.length(); i++) {
            //对字符串进行前补0操作,确保字符串长度为32位
            md5code = "0" + md5code;
        }
        return md5code;
    }
}
创建错误枚举类
package org.example.tools;

import lombok.AllArgsConstructor;

@AllArgsConstructor
public enum ErrorEnum {
    BAD_PARAM("1002","参数有错"),
    NOT_FOUNT("1003","资源不存在"),
    NO_PERMISSION("1004","权限不足"),
    BAD_INPUT_PARAM("1005","入参有问题");
    PASSWORD_OR_USERNAME_WRONG("1006", "密码或者用户错误");
    private String errorMsg;
    private String errorCode;

    public String getErrorMsg() {
        return errorMsg;
    }

    public void setErrorMsg(String errorMsg) {
        this.errorMsg = errorMsg;
    }

    public String getErrorCode() {
        return errorCode;
    }

    public void setErrorCode(String errorCode) {
        this.errorCode = errorCode;
    }
}
数据库连接池配置,代码如下:
server:
  port: 8080
spring:
  redis:
    host: 192.168.193.141
    port: 6379
    database: 0
    password: 123456
    jedis:
      pool:
        max-active: 50
        max-idle: 20
        max-wait: 3000
        min-idle: 2
    timeout: 5000
  datasource:
    url: jdbc:mysql://localhost:3306/spring_boot?useTimezone=true&serverTimezone=UTC
    username: root
    password: 123456
    driver-class-name: com.mysql.cj.jdbc.Driver
    druid:
      initial-size: 5
      min-idle: 5
      max-active: 20
      test-while-idle: true
      test-on-borrow: false
      test-on-return: false
      pool-prepared-statements: true
      max-pool-prepared-statement-per-connection-size: 20
      max-wait: 60000
      time-between-eviction-runs-millis: 6000
      min-evictable-idle-time-millis: 3000
      fiters: stat
      async-init: true
      connection-properties: druid.stat.mergeSql=true;druid.stat.SlowSqlMills=5000
      monitor:
        allow: 127.0.0.1
        loginUsername: admin
        loginPassword: admin
        resetEnable: false
  swagger:
    enable: true
mybatis:
  configuration:
    mapUnderscoreToCamelCase: true
除了数据库服务外,还需要Redis服务,如果有需要相关知识的请自行补充。
3.登录接口
登陆接口主要是传递参数账号和密码,然后通过和数据的匹配,完成认证并返回 Token 。这个 Token 有一定的有效时间限制,且用于发布文章等接口的权限操作,
由于登录参数可以对象化,所以创建 loginUser 类,代码如下:
package org.example.tools;

import lombok.AllArgsConstructor;
import lombok.Data;
import lombok.NoArgsConstructor;
@Data
@NoArgsConstructor
@AllArgsConstructor
public class LoginUser {
    //登录 ID
    private long id;
    //登录账号
    private String username;
    //登录密码
    private String password;
}
创建 my_users 表对应的 pojo 类
package org.example.pojo;

import lombok.AllArgsConstructor;
import lombok.Data;
import lombok.NoArgsConstructor;

@Data
@NoArgsConstructor
@AllArgsConstructor
public class MyUser {
    private int id;
    private String name;
    private String password;
    private String email;
    private int roleId;
    private String status;
    private int regTime;
}
创建 my_users 表对应的 Mapper 类
package org.example.mapper;

import org.apache.ibatis.annotations.Insert;
import org.apache.ibatis.annotations.Mapper;
import org.apache.ibatis.annotations.Select;
import org.example.pojo.MyUser;
import org.example.tools.LoginUser;

import java.util.List;

@Mapper
public interface MyUserMapper {
    @Select("SELECT * FROM my_users order by reg_time desc")
    List<MyUser> findAll();

    @Select("SELECT * FROM  my_users WHERE id = #{id}")
    MyUser findById(int id);

    @Select("SELECT * FROM my_users WHERE name = #{name}")
    MyUser findByName(String name);

    @Select("UPDATE my_users set status = 2 where id = #{id}")
    MyUser deleteUser(int id);

    @Insert("insert my_users(name, password, email, role_id, status, reg_time) values (#{name},#{password},#{email},#{role_id},#{status},#{regTime})")
    boolean add(MyUser myUser);

    @Select("SELECT id FROM my_users WHERE name=#{username} and password = #{password}")
    Integer doLogin(LoginUser loginUser);
}
编写对应的 Service 文件
package org.example.service;

import org.example.mapper.MyUserMapper;
import org.example.tools.ErrorEnum;
import org.example.tools.JsonResultObject;
import org.example.tools.LoginUser;
import org.springframework.beans.factory.annotation.Autowired;
import org.springframework.stereotype.Service;

@Service
public class LoginService {
    @Autowired
    MyUserMapper myUserMapper;
    public JsonResultObject doLogin(LoginUser loginUser){
        JsonResultObject result = new JsonResultObject();
        ErrorEnum enum1 = ErrorEnum.valueOf(ErrorEnum.class,"PASSWORD_OR_USERNAME_WRONG");
        result.setCode("200");
        result.setMessage("");
        result.setErrorCode("");
        result.setErroeMessage("");
        try{
            Integer userId = myUserMapper.doLogin(loginUser);
            if (userId == null){
                result.setErroeMessage("用户名或密码错误");
                result.setErrorCode(enum1.getErrorCode());
                result.setMessage(enum1.getErrorMsg());
            }else {
                result.setMessage("登录成功");
            }
        }catch (Exception e){
            result.setCode("500");
            result.setErrorCode("100211");
            result.setErroeMessage(e.getMessage());
        }
        return result;
    }
}
登录完成后生成 Token ,于是编写一个用于 Token 生成的 Service 类。
package org.example.service;

import com.auth0.jwt.JWT;
import com.auth0.jwt.algorithms.Algorithm;
import org.example.pojo.MyUser;
import org.springframework.stereotype.Service;

import java.util.Date;

@Service
public class TokenService {
    public String getToken(MyUser user){
        String token = "";
        //只有一个小时时间
        Date start = new Date();
        long currentTime = System.currentTimeMillis() + 60*60*1000;
        Date end = new Date(currentTime);
        token = JWT.create()
                .withAudience(String.valueOf(user.getId()))
                .withIssuedAt(start)//开始时间
                .withExpiresAt(end)//过期时间
                .sign(Algorithm.HMAC256(user.getPassword() + "MText!76&sQ^"));
        return token;

    }
}
下面继续编写处理注册和登录功能的 Controller,由于操作的实体类都和 my_users 表有关系,所以命名为UserController,代码如下:
package org.example.controller;


import com.alibaba.fastjson.JSONObject;
import org.example.pojo.MyUser;
import org.example.service.TokenService;
import org.example.service.UserService;
import org.example.tools.JsonResultObject;
import org.example.tools.LoginUser;
import org.springframework.beans.factory.annotation.Autowired;
import org.springframework.web.bind.annotation.PostMapping;
import org.springframework.web.bind.annotation.RequestBody;
import org.springframework.web.bind.annotation.RequestMapping;
import org.springframework.web.bind.annotation.RestController;

@RestController
@RequestMapping()
public class UserController {
    @Autowired
    UserService userService;
    @Autowired
    TokenService tokenService;

    @PostMapping("/register")
    public JsonResultObject register(@RequestBody MyUser user){
        return userService.register();
    }
    @PostMapping("/login")
    public JsonResultObject login(@RequestBody LoginUser loginUser){
        JsonResultObject result = userService.login(loginUser);
        if (result.getErroeMessage() != ""){
            return result;
        }else {
            String token = tokenService.getToken((MyUser) result.getData());
            JSONObject returnObject = new JSONObject();
            returnObject.put("token",token);
            result.setData(returnObject);
            return result;
        }
    }
}
在 UserController 中定义类注册接口 /register 和登录接口 /login ,把更多的业务逻辑封装在 UserService 中,而让 Controller 中只做服务调用操做,以达到业务解耦的作用。而UserService中的代码也很清晰。
package org.example.service;

import org.example.mapper.MyUserMapper;
import org.example.pojo.MyUser;
import org.example.tools.ErrorEnum;
import org.example.tools.JsonResultObject;
import org.example.tools.LoginUser;
import org.example.tools.Md5Utils;
import org.springframework.beans.factory.annotation.Autowired;
import org.springframework.stereotype.Service;

@Service
public class UserService {
    @Autowired
    MyUserMapper myUserMapper;

    /**
     * 注册
     * @param myUser 传递的用户数据
     * @return  JsonResultObject
     */
    public JsonResultObject register(MyUser myUser) {
        //md5 处理密码
        String password = Md5Utils.stringToMD5(myUser.getPassword());
        myUser.setPassword(password);
        long unixTime = System.currentTimeMillis()/1000L;
        int nowUnixTime = (int) unixTime;
        myUser.setRegTime(nowUnixTime);
        boolean addResult = myUserMapper.add(myUser);
        //初始化 JSON 返回对象
        JsonResultObject jsonResultObject = this.initJsonResultObject();
        if (addResult){
            jsonResultObject.setMessage("新建用户成功");
        }else {
            jsonResultObject.setErroeMessage("新建用户失败");
            jsonResultObject.setErrorCode("202311");
        }
        return jsonResultObject;
    }


    public JsonResultObject login(LoginUser loginUser) {
        JsonResultObject result = this.initJsonResultObject();
        ErrorEnum enum1 = ErrorEnum.valueOf(ErrorEnum.class,"PASSWORD_OR_USERNAME_WRONG");
        try {
            //md5处理密码
            String password = Md5Utils.stringToMD5(loginUser.getPassword());
            loginUser.setPassword(password);
            Integer userId = myUserMapper.doLogin(loginUser);
            if (userId == null){
                result.setErroeMessage("用户名或密码错误");
                result.setErrorCode(enum1.getErrorCode());
                result.setErroeMessage(enum1.getErrorMsg());
            }else {
                //创建一个MyUser对象
                MyUser currentUser = new MyUser();
                currentUser.setId(userId);
                currentUser.setPassword(password);
                currentUser.setName(loginUser.getName());
                result.setData(currentUser);
                result.setMessage("登录成功");
            }
        }catch (Exception e){
            result.setCode("200");
            result.setErroeMessage(e.getMessage());
            result.setErrorCode("100211");
        }
        return result;
    }


    private JsonResultObject initJsonResultObject() {
        JsonResultObject result = new JsonResultObject();
        result.setCode("200");
        result.setMessage("");
        result.setErroeMessage("");
        result.setErrorCode("");
        return  result;
    }


}
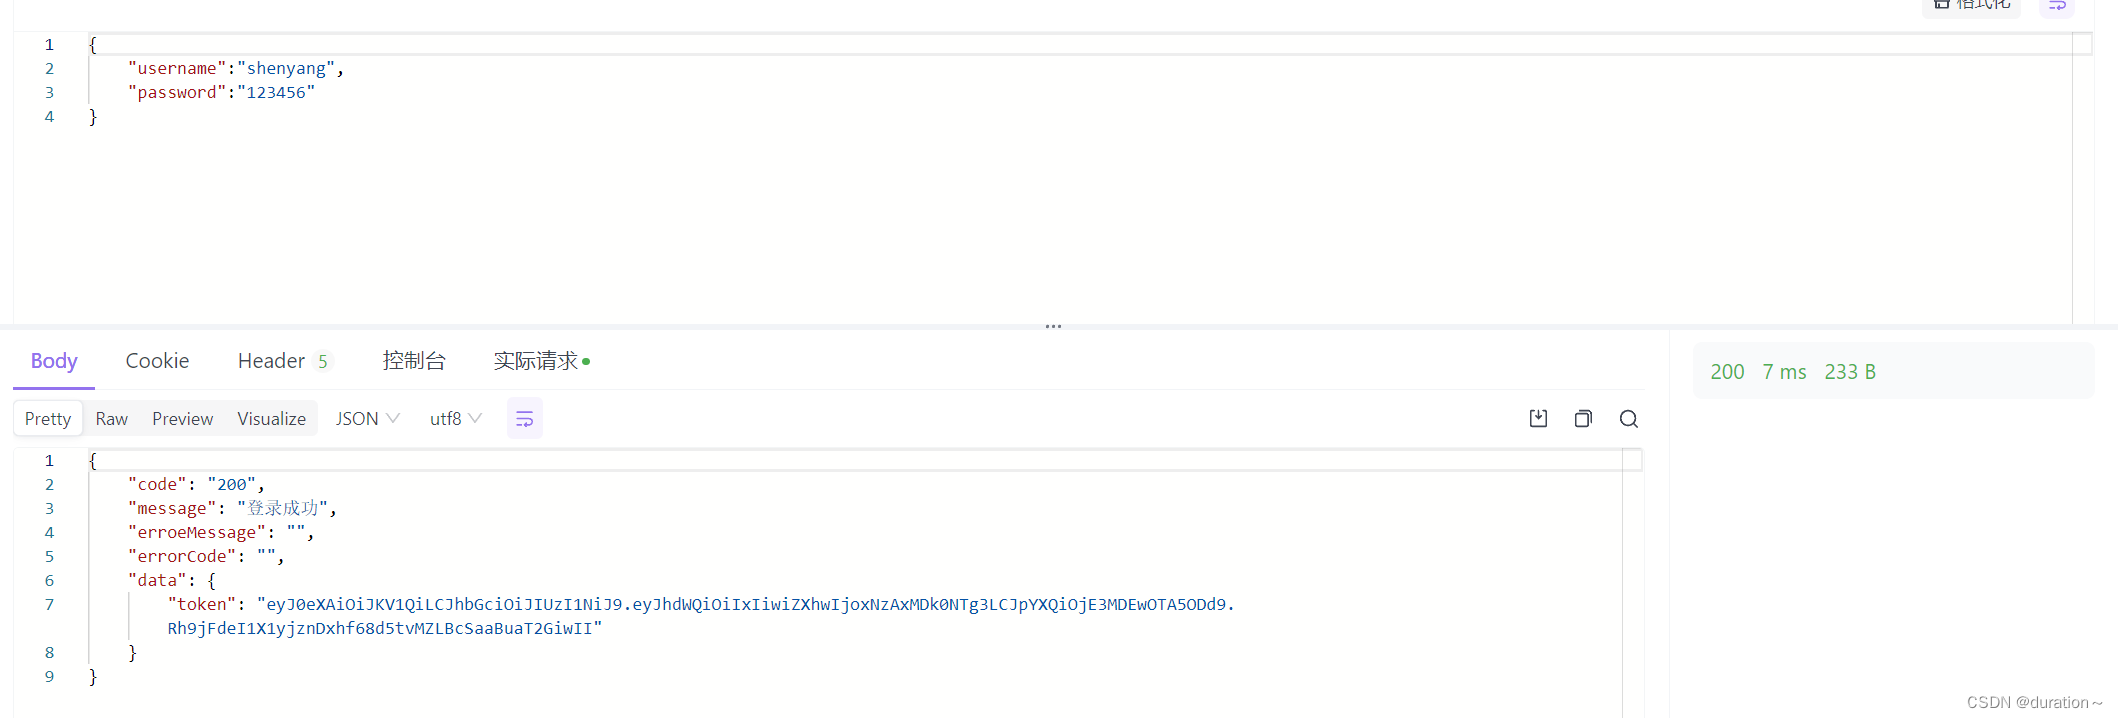
注册与登录成功

4.新增文章接口
在完成了登录注册功能接口后,开始编写文章相关接口,先从新增文章开始,设计接口交互。充分考虑各种条件,如:必须是登录的用户才能进行发布文章,所以该接口需要进行 Token验证,毕竟不是谁都能直接发布文章的,不然乱套了。
有人可能会想在接口逻辑中对 Hreader 中的 Token 进行检查,把判断写在 Controller 中,这相当于 hard code ,这样的处理并不优雅。这时,拦截器就是值得考虑的选择了。这里分别编写 UserLoginToken 和 PassToken 以及相关拦截器,接下来从现实的角度上编程,从 pojo 开始编写。
拦截器:
package org.example.intercepetor;

import com.auth0.jwt.JWT;
import com.auth0.jwt.JWTVerifier;
import com.auth0.jwt.algorithms.Algorithm;
import com.auth0.jwt.exceptions.JWTVerificationException;
import org.example.anno.PassToken;
import org.example.anno.UserLoginToken;
import org.example.common.BusinessException;
import org.example.pojo.MyUser;
import org.example.service.UserService;
import org.example.tools.LoginUser;
import org.example.tools.UserContext;
import org.springframework.beans.factory.annotation.Autowired;
import org.springframework.stereotype.Component;
import org.springframework.web.method.HandlerMethod;
import org.springframework.web.servlet.HandlerInterceptor;
import org.springframework.web.servlet.ModelAndView;

import javax.servlet.http.HttpServletRequest;
import javax.servlet.http.HttpServletResponse;
import java.lang.reflect.Method;

public class AuthInterceptor implements HandlerInterceptor {
    @Autowired
    UserService userService;
    //@Autowired
    //RedisUtil redisUtil;
    @Override
    public boolean preHandle(HttpServletRequest request, HttpServletResponse response, Object handler) throws Exception {
        String token = request.getHeader("token");
        //排除访问的是静态资源,而不是映射访问
        if (!(handler instanceof HandlerMethod)) {
            return true;
        }
        //获取访问的方法
        HandlerMethod handlerMethod = (HandlerMethod) handler;
        Method method = handlerMethod.getMethod();
        if (method.isAnnotationPresent(PassToken.class)) {
            PassToken passToken = method.getAnnotation(PassToken.class);
            if (passToken.requried()) {
                return true;
            }
        }
        if (method.isAnnotationPresent(UserLoginToken.class)) {
            UserLoginToken userLoginToken = method.getAnnotation(UserLoginToken.class);
            if (userLoginToken.requried()) {
                //判空
                if (token == null) {
                    throw new BusinessException("4001", "no token");
                }
                String userId;
                try {
                    //获取token的受众列表中的第一个受众,将其赋值给变量userId。
                    userId = JWT.decode(token).getAudience().get(0);
                } catch (Exception e) {
                    throw new BusinessException("4003", "decode token fails");
                }

                // Check the expire of token.
//                String tokenKey = userId + ":" + token;
//                boolean hasExisted = redisUtil.hasKey(tokenKey);
//                System.out.println("exist or not:" + hasExisted);
//                if (hasExisted == false) {
//                    throw new BusinessException("4005", "token expired!");
//                }
                int userIdt = Integer.parseInt(userId);
                System.out.println("userId is "+userIdt);
                MyUser myUser = userService.findUserById(userIdt);
                if (myUser == null){
                    throw new RuntimeException("user no exists");
                }
                try {
                    //验证JWT 令牌
                    JWTVerifier jwtVerifier = JWT.require(Algorithm.HMAC256(myUser.getPassword()+"MText!76&sQ^")).build();
                    //可以验证过期时间
                    jwtVerifier.verify(token);
                    //设置当前登录用户
                    LoginUser loginUser = new LoginUser();
                    loginUser.setId(userIdt);
                    UserContext.setUser(loginUser);
                }catch (JWTVerificationException e){
                    System.out.println(e.getMessage());
                    throw new BusinessException("4002",e.getMessage());
                }
            }
        }
        return true;

    }

    @Override
    public void postHandle(HttpServletRequest request, HttpServletResponse response, Object handler, ModelAndView modelAndView) throws Exception {

    }

    @Override
    public void afterCompletion(HttpServletRequest request, HttpServletResponse response, Object handler, Exception ex) throws Exception {

    }
}
注册拦截器
package org.example.intercepetor;

import org.springframework.context.annotation.Bean;
import org.springframework.context.annotation.Configuration;
import org.springframework.web.servlet.config.annotation.InterceptorRegistry;
import org.springframework.web.servlet.config.annotation.WebMvcConfigurer;
@Configuration
public class AuthInterceptorRegister implements WebMvcConfigurer {
    @Override
    public void addInterceptors(InterceptorRegistry registry) {
        registry.addInterceptor(authInterceptor()).addPathPatterns("/**");
    }

    @Bean
    public AuthInterceptor authInterceptor(){
        return new AuthInterceptor();
    }
}
对应的相关注解
//跳过验证
package org.example.anno;

import java.lang.annotation.ElementType;
import java.lang.annotation.Retention;
import java.lang.annotation.RetentionPolicy;
import java.lang.annotation.Target;
@Retention(RetentionPolicy.RUNTIME)
@Target({ElementType.TYPE,ElementType.METHOD})
public @interface PassToken {
     boolean requried()  default true;
}

//进行验证

package org.example.anno;

import java.lang.annotation.ElementType;
import java.lang.annotation.Retention;
import java.lang.annotation.RetentionPolicy;
import java.lang.annotation.Target;
@Retention(RetentionPolicy.RUNTIME)
@Target({ElementType.METHOD,ElementType.TYPE})
public @interface UserLoginToken {
    boolean requried()default true;
}
创建 my_articles 对应的 MyArticle.Java 文件
package org.example.pojo;

import lombok.AllArgsConstructor;
import lombok.Data;
import lombok.NoArgsConstructor;

import javax.validation.constraints.NotBlank;
import javax.validation.constraints.NotNull;

@Data
@AllArgsConstructor
@NoArgsConstructor
public class MyArticle {
    //文章ID
    private int id;
    //文章标题
    //使用注解实现字段检查 ,NotBlank用于验证字符串类型不为空
    @NotBlank(message = "文章标题不能为空")
    private String title;
    //文章作者
    @NotBlank(message = "作者名不能是空")
    private String author;
    //文章内容
    @NotBlank(message = "文章内容不能是空")
    private String content;
    //文章分类ID
    @NotNull(message = "分类ID不能为空")
    private int categoryId;
    //标签 以逗号分隔
    private String tags;
    //是否删除 1.表示删除 2.表示已删除
    private int is_deleted;
    //创建时间
    private int created;
    //修改时间
    private int modified;
}
然后在 MyArticleMapper.java 编写新建文章方法,代码如下。
package org.example.mapper;

import org.apache.ibatis.annotations.Insert;
import org.apache.ibatis.annotations.Mapper;
import org.example.pojo.MyArticle;

@Mapper
public interface MyArticleMapper {

    @Insert("INSERT INTO my_articles(title, author, content, category_id, tages, created,modified) VALUES (#{title},#{author},#{content},#{categoryId},#{tags},#{created},#{modified})")
    boolean add(MyArticle myArticle);
}
下一步创建对应的 ArticleService.java ,增加 add 方法。
package org.example.service;

import org.example.mapper.MyArticleMapper;
import org.example.pojo.MyArticle;
import org.springframework.beans.factory.annotation.Autowired;
import org.springframework.stereotype.Service;

@Service
public class ArticleService {
    @Autowired
    MyArticleMapper myArticleMapper;

    //创建文章
    public boolean add(MyArticle myArticle) {
        long unixTime = System.currentTimeMillis() / 1000L;
        int nowUnixTime = (int) unixTime;
        myArticle.setCreated(nowUnixTime);
        myArticle.setModified(nowUnixTime);
        return myArticleMapper.add(myArticle);
    }
}
最后创建 Controller ,只写一个创建文章的接口,代码如下。
package org.example.controller;

import org.example.pojo.MyArticle;
import org.example.service.ArticleService;
import org.example.tools.ErrorEnum;
import org.example.tools.JsonResultObject;
import org.springframework.beans.factory.annotation.Autowired;
import org.springframework.validation.BindingResult;
import org.springframework.validation.annotation.Validated;
import org.springframework.web.bind.annotation.*;

@RestController
@RequestMapping("")
public class ArticleController {
    @Autowired
    ArticleService articleService;

    @PostMapping("/article")
    //防止传入空参  默认会把处理的结果传给BindingResult对象。
    public JsonResultObject add(@Validated @RequestBody MyArticle myArticle, BindingResult bindingResult){
        try {
            if (bindingResult.hasErrors()){
                return new JsonResultObject("400","新发布文章失败!",bindingResult.getFieldError().getDefaultMessage(),"Bad Params",null);
            }
            boolean addResult = articleService.add(myArticle);
            if (addResult){
                return new JsonResultObject("200","新发布文章成功","","",null);
            }else {
                ErrorEnum enum1 = ErrorEnum.valueOf(ErrorEnum.class,"BAD_INPUT_PARAM");
                return new JsonResultObject("200","新发布文章失败",enum1.getErrorMsg(), enum1.getErrorCode(), null);
            }
        }catch (Exception e){
            return new JsonResultObject<>("400","发布最新文章失败!", e.getMessage(), "Bad Params",null);
        }
    }
}
测试成功:

可以加上 Token 验证,只需要在请求头中填写好 Token 信息。
5.查询文章接口
相比于新增文章接口,查询文章接口就比较简单,不用进行 Token 验证。查询分为两种:一种是查询文章列表,另一种是查询文章详情。
先在 Controller 文件中编写获取文章列表的接口,具体代码如下。
//获取文章列表 不分页
    @RequestMapping("/articles")
    public JsonResultObject getAll() {
        List<MyArticle> articles = articleService.findAll();
        JsonResultObject result = new JsonResultObject("200", "get   articles", "", "", articles);
        return result;
    }

    //获取文章列表 分页
    @RequestMapping("/articles/{pageNum}")
    public JsonResultObject getListByPageNum(@PathVariable int pageNum) {
        List<MyArticle> articles = articleService.getListByPageNum(pageNum);
        JsonResultObject result = new JsonResultObject("200", "get   articles", "", "", articles);
        return result;

    }
然后在对应的 Service 文件中增加对应的方法。
    //获取文章列表 不分页
    public List<MyArticle> findAll() {
        return myArticleMapper.findAll();
    }
    //获取文章列表 分页
    public List<MyArticle> getListByPageNum(int pageNum) {
        if (pageNum <= 0){
            pageNum = 1;
        }
        int offset = (pageNum-1)*30;
        return myArticleMapper.getListByPageNum(offset);
    }
最后在对应的 Mapper 文件中增加相应的方法。
    //查询文章列表 不分页
    @Select("select * from my_articles where is_deleted = 1")
    List<MyArticle> findAll();

    //查询文章列表 分页
    @Select("select * from my_articles where is_deleted = 1 limit #{offset},30")
    List<MyArticle> getListByPageNum(int offset);
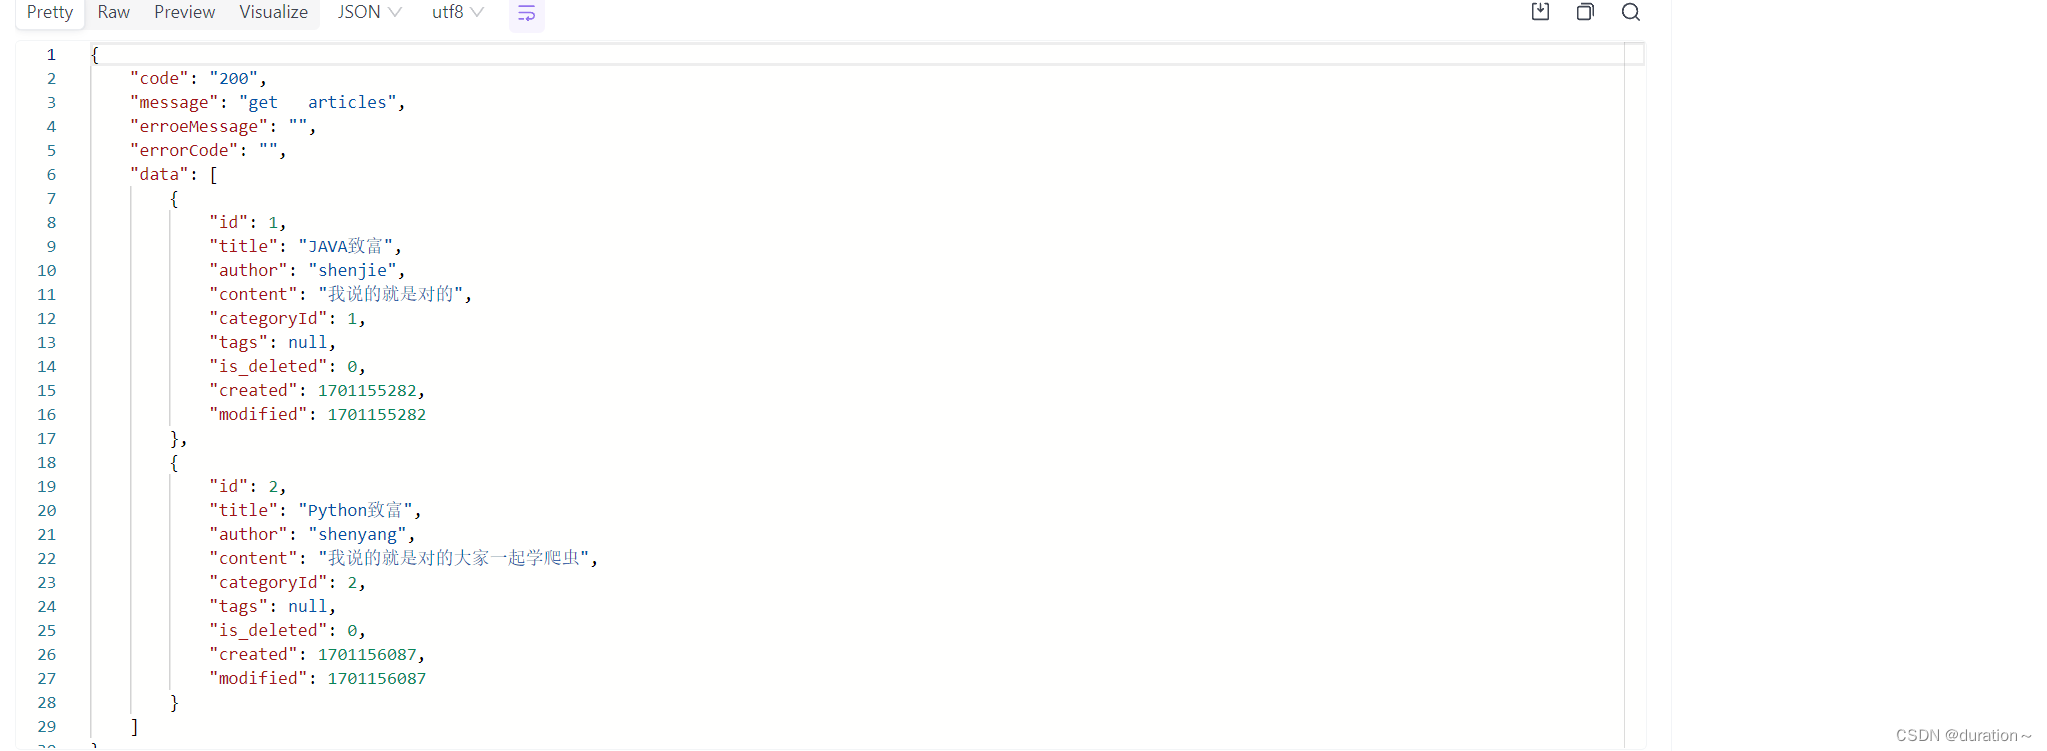
测试
分页
不分页

编写获取文章详情的接口
//获取文章详情的接口
    @RequestMapping("/article/{id}")
    public JsonResultObject detail(@PathVariable int id){
        MyArticle article = articleService.detail(id);
        JsonResultObject result = new JsonResultObject("200","get   articles","","",article);
        return result;
    }
对应的 Service 中代码如下
//文章详情
    public MyArticle detail(int id) {
        return myArticleMapper.detail(id);
    }
对应的 Mapper 中代码如下
    //获取文章详情
    @Select("select * from my_articles where id = #{id}")
    MyArticle detail(int id);
6.修改文章接口
修改文章接口需要传递包含 id 在内的文章数据,先编写 pojo 的修改文章。
    //更新文章
    @Update("update my_articles set author= #{author},content=#{content},category_id=#{categoryId},tages = #{tags},modified=#{modified} where id =#{id}")
    public boolean update(MyArticle myArticle);
Service文件中只需要添加如下代码即可
    //修改文章
    public boolean update(MyArticle myArticle){
        long unixTime = System.currentTimeMillis() / 1000L;
        int nowUnixTime = (int) unixTime;
        myArticle.setModified(nowUnixTime);
        return myArticleMapper.update(myArticle);
    }
在 Controller 中完成业务判断和调用,和 add 方法类似,只是使用的注解变成了 Put
    //修改文章
    @PutMapping("/article")
    @UserLoginToken
    public JsonResultObject update(@Validated @RequestBody MyArticle myArticle,BindingResult bindingResult){
        if (bindingResult.hasErrors()){
            return new JsonResultObject<>("400","修改文章失败!",bindingResult.getFieldError().getDefaultMessage(),"40002",null);
        }else {
            if (myArticle.getId()==0){
                return new JsonResultObject("400","文章修改失败!","no Id","40003",null);
            }else {
                boolean updateResult = articleService.update(myArticle);
                if (updateResult){
                    return new JsonResultObject<>("200","修改文章成功","","",null);
                }else {
                    ErrorEnum enum1 = ErrorEnum.valueOf(ErrorEnum.class,"BAD_PARAM");
                    return new JsonResultObject("200","修改文章失败", enum1.getErrorMsg(), enum1.getErrorCode(), null);
                }
            }
        }
    }
修改成功

7.删除文章接口
删除文章实际上是一种软删除,修改 is_deleted 字段为 2 。
先在 Mapper 文件中编写删除的映射方法,代码如下
    //删除文章 软删除
    @Update("update my_articles set is_deleted = 2 where id = #{id}")
    public boolean delete(int id);
然后在 Service 中增加调用的方法,代码如下
    //删除
    public boolean delet(int id){
        return myArticleMapper.delete(id);
    }
最后在 Controller 文件中增加删除的路由和调用代码。
    //Delet
    @DeleteMapping("/article/{id}")
    public JsonResultObject delete(@PathVariable int id) {
        boolean deleteResult = articleService.delet(id);
        if (deleteResult) {
            return new JsonResultObject("200", "删除文章成功", "", "", null);
        } else {
            ErrorEnum enum1 = ErrorEnum.valueOf(ErrorEnum.class, "BAD_PARAM");
            return new JsonResultObject("200", "删除文章失败!", enum1.getErrorMsg(), enum1.getErrorCode(), null);
        }
    }
删除成功

总结
ending.........


