十二、BGP常用属性
- 实验拓扑
- 实验需求及解法
- 1.IP 地址已配置,自行测试直连。
- 2.AS100 中运行 OSPF
- 3.AS200 中运行 ISIS
- 4.运行 BGP
- 5.发布 BGP 路由
- 6.修改起源属性 Origin
- 7.修改 AS-path
- 8.修改本地优先 Local-preference
- 9.修改 MED
实验拓扑
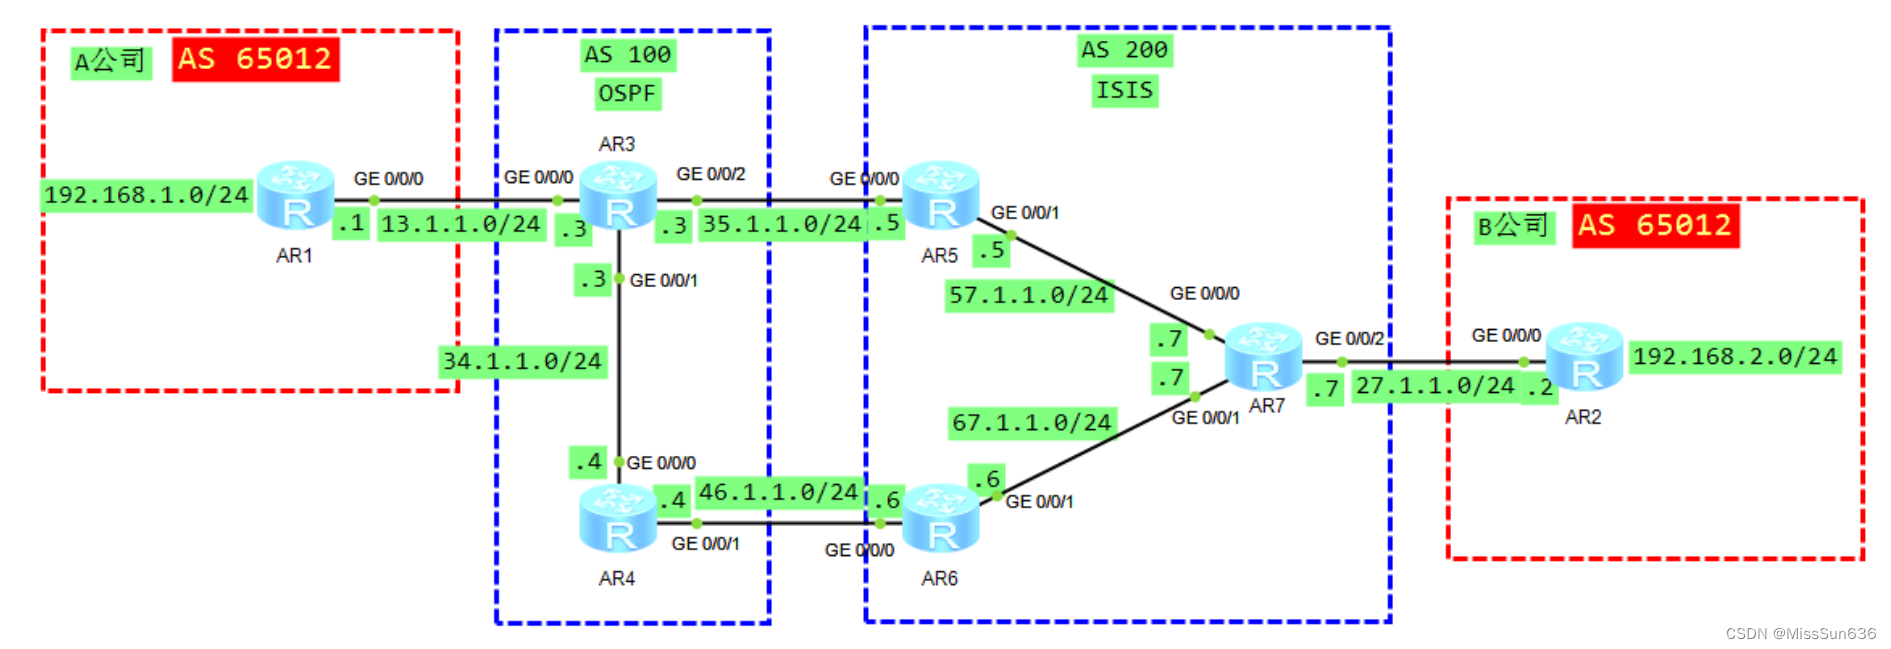
实验需求及解法
- 本实验模拟 A 公司与 B 公司因项目合作,使用 AS65012 传递私网路由。
- 其中 AS100 与 AS200 是 A/B 公司合作向 ISP 购买的专用网络,用于传递 AB 公司的路由并承载 AB 公司之间的流量。
1.IP 地址已配置,自行测试直连。
- 所有设备都有 Loopback0,用于建立 ibgp 邻居。
2.AS100 中运行 OSPF
- 2.1 进程号为 1,手动设置 RID 为 Loopback0 地址。
- 2.2 全部属于区域 0
- 2.3 network 命令使用通配符 0.0.0.0
- 2.4 不允许宣告与其他 AS 互联的网段。
R3:
ospf 1 router-id 3.3.3.3
area 0.0.0.0
 network 3.3.3.3 0.0.0.0
 network 34.1.1.3 0.0.0.0
R4:
ospf 1 router-id 4.4.4.4
area 0.0.0.0
 network 4.4.4.4 0.0.0.0
 network 34.1.1.4 0.0.0.0
3.AS200 中运行 ISIS
- 3.1 进程号为 1
- 3.2 区域号为 49.0200
- 3.3 系统 ID 分别为
- R5:0000.0000.0005
- R6:0000.0000.0006
- R7:0000.0000.0007
- 3.4 所有 isis 路由器均为 level-2.
- 3.5 不允许激活与其他 AS 互联的接口。
R5:
isis 1
is-level level-2
network-entity 49.0200.0000.0000.0005.00
interface LoopBack0
isis enable 1
interface GigabitEthernet0/0/1
isis enable 1
#
R6:
isis 1
is-level level-2
network-entity 49.0200.0000.0000.0006.00
interface LoopBack0
isis enable 1
interface GigabitEthernet0/0/1
isis enable 1
#
R7:
isis 1
is-level level-2
network-entity 49.0200.0000.0000.0007.00
interface GigabitEthernet0/0/0
isis enable 1
interface GigabitEthernet0/0/1
isis enable 1
interface LoopBack0
isis enable 1
4.运行 BGP
- 4.1 R1 和 R2 属于 AS65012
- R3 和 R4 属于 AS100
- R5/6/7 属于 AS200,配置 ibgp 全互联。
- 4.2 所有路由器手动设置 BGP 的 router-id 为 Loopback0 地址
- 4.3 所有 ibgp 都使用 Loopback0 建立邻居关系,所有 ebgp 都使用直连接口建立邻居关系。
- 4.4 确认各路由的 bgp 邻居关系建立完成。
R1:
bgp 65012
router-id 1.1.1.1
peer 13.1.1.3 as-number 100
#
R2:
bgp 65012
router-id 2.2.2.2
peer 27.1.1.7 as-number 200
#
R3:
bgp 100
router-id 3.3.3.3
peer 4.4.4.4 as-number 100
peer 4.4.4.4 connect-interface LoopBack0
peer 4.4.4.4 next-hop-local
peer 13.1.1.1 as-number 65012
peer 35.1.1.5 as-number 200
#
R4:
bgp 100
router-id 4.4.4.4
peer 3.3.3.3 as-number 100
peer 3.3.3.3 connect-interface LoopBack0
peer 3.3.3.3 next-hop-local
peer 46.1.1.6 as-number 200
#
R5:
bgp 200
router-id 5.5.5.5
peer 6.6.6.6 as-number 200
peer 6.6.6.6 connect-interface LoopBack0
peer 6.6.6.6 next-hop-local
peer 7.7.7.7 as-number 200
peer 7.7.7.7 connect-interface LoopBack0
peer 7.7.7.7 next-hop-local
peer 35.1.1.3 as-number 100
#
R6:
bgp 200
router-id 6.6.6.6
peer 5.5.5.5 as-number 200
peer 5.5.5.5 connect-interface LoopBack0
peer 5.5.5.5 next-hop-local
peer 7.7.7.7 as-number 200
peer 7.7.7.7 connect-interface LoopBack0
peer 7.7.7.7 next-hop-local
peer 46.1.1.4 as-number 100
#
R7:
bgp 200
router-id 7.7.7.7
peer 5.5.5.5 as-number 200
peer 5.5.5.5 connect-interface LoopBack0
peer 5.5.5.5 next-hop-local
peer 6.6.6.6 as-number 200
peer 6.6.6.6 connect-interface LoopBack0
peer 6.6.6.6 next-hop-local
peer 27.1.1.2 as-number 65012
5.发布 BGP 路由
- 5.1 在 R1 上引入直连路由 192.168.1.0/24,过滤其他路由,策略如下:
- 5.1.1 使用 ip-prefix,名称 1,index 10 ,仅匹配 192.168.1.0/24
ip ip-prefix 1 index 10 permit 192.168.1.0 24
- 5.1.2 使用 route-policy,名称 toBGP(注意大小写),node 10,匹配 prefix。
route-policy toBGP permit node 10
if-match ip-prefix 1
- 5.1.3 BGP 中引入直连路由,调用 route-policy。
bgp 65012
 import-route direct route-policy toBGP
- 5.2 在 R2 上使用 network 命令直接宣告 192.168.2.0/24。
bgp 65012
 network 192.168.2.0
6.修改起源属性 Origin
- 6.1 在 R3 上查看 bgp 路由表,确认 192.168.1.0/24 的起源属性为“?”
- 6.2 R3 上部署策略,将所有来自 R1 的路由,全部修改起源属性为 “i”
- 6.2.1 使用 route-policy,名称 formR1(注意大小写),node 10
- 6.2.2 匹配所有路由,修改起源属性为 igp。
route-policy formR1 permit node 10
apply origin igp
- 6.2.3 R3 的 bgp 视图下,接收 R1 路由时调用 route-policy。
bgp 100
 peer 13.1.1.1 route-policy formR1 import
- 6.3 再次查看 R3 的 bgp 路由表,确认 192.168.1.0/24 的起源属性为“i”
[R3]dis bgp routing-table

7.修改 AS-path
- 7.1 查看 R2 路由表,无法收到 192.168.1.0/24;查看 R1 路由表,无法收到 192.168.2.0/24而 R3/4/5/6/7 都能收到以上两条路由,请分析原因。
- 7.2 R2 配置以下命令,当从 R7 接收路由时,允许接收有本地 AS 号的路由,而不丢弃。 allow-as-loop
bgp 65012
 peer 27.1.1.7 allow-as-loop
- 7.3 再次查看 R2 路由表,确认已收到 192.168.1.0/24
<R2>dis bgp routing-table

- 7.4 R7 部署策略,当从 R2 接收路由时,覆盖 AS 号,删除 AS65012(不是丢弃路由)。
- 7.4.1 使用 route-policy,名称为 formR2(注意大小写),node 10
- 7.4.2 匹配所有路由,修改 as-path 为空。
route-policy formR2 permit node 10
apply as-path none overwrite
- 7.4.3 R7 从 R2 收路由时调用此策略。
bgp 200
 peer 27.1.1.2 route-policy formR2 import
- 7.5 再次查看 R1 路由表,确认已收到 192.168.2.0/24
<R1>dis bgp routing-table

8.修改本地优先 Local-preference
- 8.1 在 R7 上查看路由 192.168.1.0/24,发现最佳下一跳为 R5
[R7]dis bgp routing-table

- 8.2 修改 R6 的默认本地优先为 106。
bgp 200
 default local-preference 106
- 8.3 再次查看 R7 路由表,确认去往 192.168.1.0/24 选择 R6 为下一跳。
[R7]dis bgp routing-table

9.修改 MED
- 在 R3 上查看路由 192.168.2.0/24,发现最佳下一跳为 R5
- 此时 R2 去往 R1 路径为 2-7-6-4-3-1,而 R1 去往 R2 路径为 1-3-5-7-2
- 为确保来回路径一致,在 R5 上部署以下策略:
- 9.1 使用 ip-prefix,名称 2,index 10,匹配路由 192.168.2.0/24
ip ip-prefix 2 index 10 permit 192.168.2.0 24
- 9.2 使用 route-policy,名称 toR3,node 10,调用 ip-prefix,修改 cost 为 100。node 100,放过其他路由。
route-policy toR3 permit node 10
if-match ip-prefix 2
apply cost 100
route-policy toR3 permit node 100
- 9.3 当 R5 发送路由给 R3 时调用此策略。
bgp 200
 peer 35.1.1.3 route-policy toR3 export
- 9.4 再次在 R3 上查看路由 192.168.2.0,确认已选择下一跳为 R4,且从 R5 收到的 MED 为100.
<R3>dis bgp routing-table

- 分别在 R1 和 R2 上使用追踪命令,确认来回路径一致。

本篇实验拓扑及配置步骤参考资料来自思博教育
