Android 换肤之资源(Resources)加载(一)
本系列计划3篇:
- Android 换肤之资源(Resources)加载(一) — 本篇
- setContentView() / LayoutInflater源码分析(二)
- 换肤框架搭建(三)
看完本篇你可以学会什么?
-
Resources在什么时候被解析并加载的
- Application#Resources
- Activity#Resources
-
drawable 如何加载出来的
-
创建自己的Resources加载自己的资源
-
制作皮肤包"皮肤包"
-
加载“皮肤包”中的资源
tips:源码基于android-30
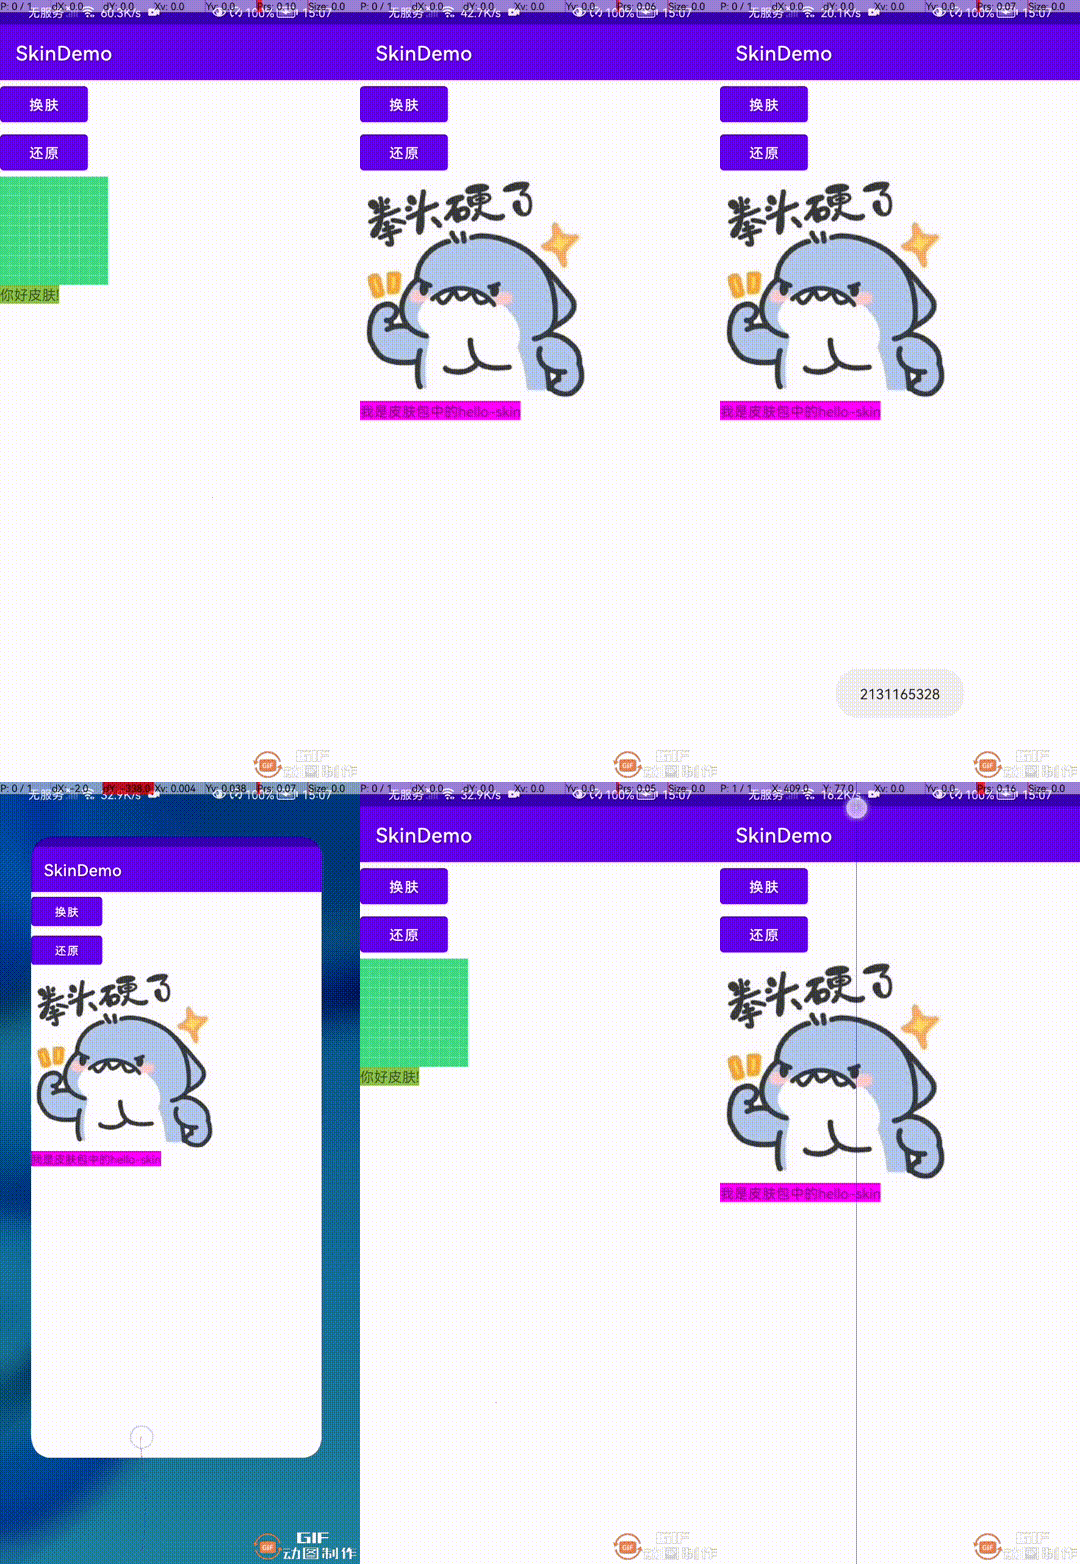
阅读源码后本篇实现的效果:

效果很简单,2个按钮
- 换肤
- 还原
效果很简单,重点是换肤的时候是加载“皮肤包”中的资源
Resources在什么时候被解析并加载的
Application#Resources
众所周知,java程序都是由main方法开始的,所以我们就从ActivityThread#main()方法开始阅读源码
在ActivityThread#main()方法中,我们经常会说到一些关于Looper,handler的逻辑代码,本篇不展开说Looper
#ActivityThread.java
public static void main(String[] args) {
....
// looper
Looper.prepareMainLooper();
// szj 创建 activityThread
ActivityThread thread = new ActivityThread();
thread.attach(false, startSeq);
.....
Looper.loop();
throw new RuntimeException("Main thread loop unexpectedly exited");
}
本篇重点不是Looper, 来看看 thread.attach(false, startSeq); 方法
#ActivityThread.java
private void attach(boolean system, long startSeq) {
if (!system) {
...
}else {
try {
// 很关键的一个类,用来分发activity生命周期
mInstrumentation = new Instrumentation();
mInstrumentation.basicInit(this);
// szj 创建Application Context
ContextImpl context = ContextImpl.createAppContext(
this, getSystemContext().mPackageInfo);
// szj 反射创建 application
mInitialApplication = context.mPackageInfo.makeApplication(true, null);
// 执行application的onCreate() 方法
mInitialApplication.onCreate();
} catch (Exception e) {
throw new RuntimeException(
"Unable to instantiate Application():" + e.toString(), e);
}
}
}
- 通过ContextImpl.createAppContext() 创建Context
- 通过反射创建application
- 创建好application后会调用 Application#onCreate()方法
接着执行ContextImpl.createAppContext()
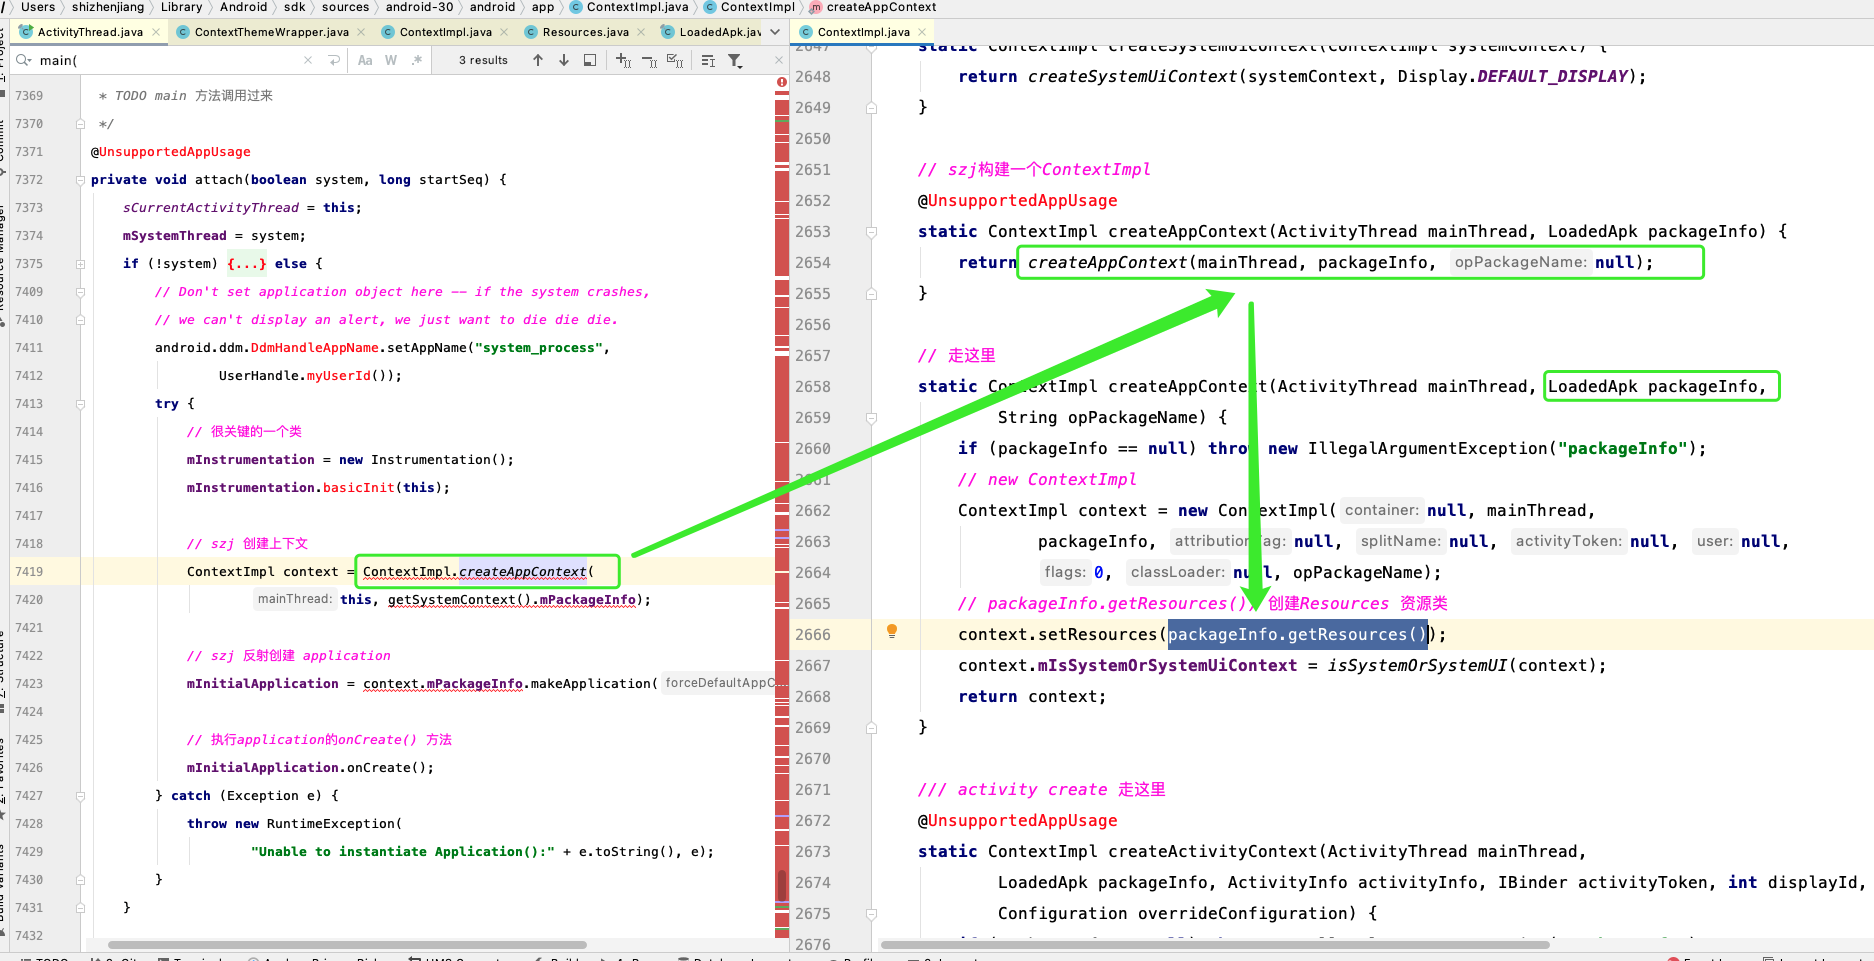
最终会走到LoadedApk#getResources() 上
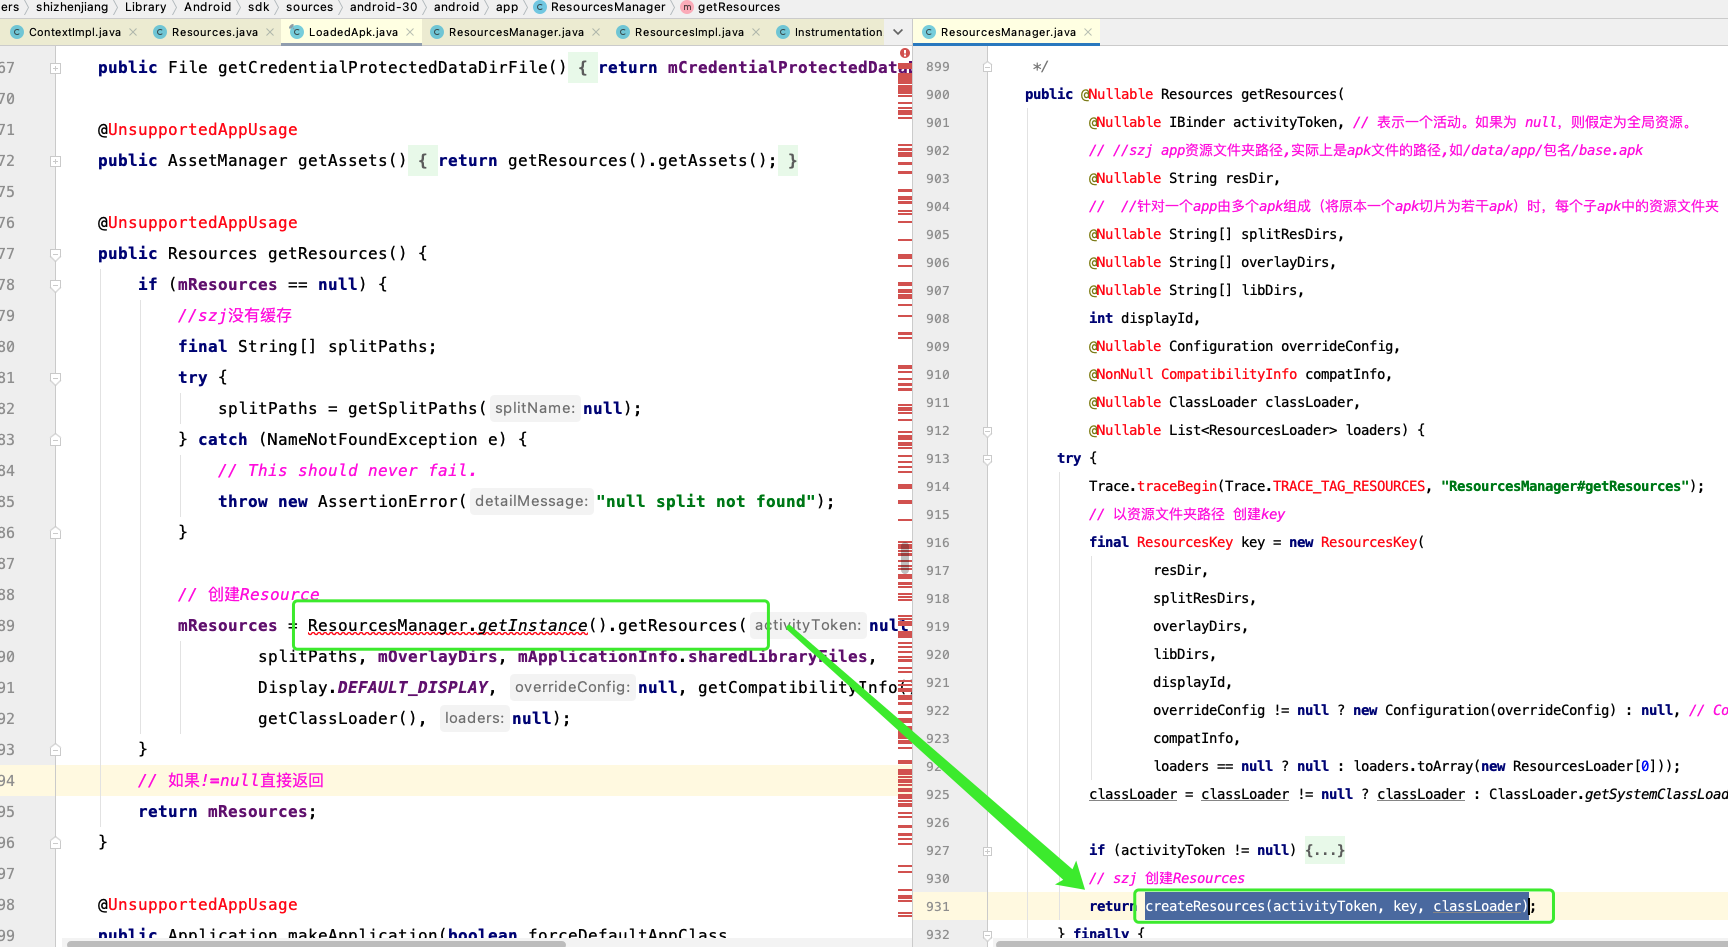
然后会从LoadedApk#getResources() 执行到 ResourcesManager#getResources()
最终在ResourcesManager中创建Resources
这段源码我们知道:
-
在程序运行到main方法的时候,我们会在
ActivtyThread.#attach()中创建Context,创建Application,并且执行Application#onCreate() -
然后会执行到
LoadedApk.getResources()去解析获取Resources()- LoadedApk.java 从类名我们就知道这个类是用来对apk信息解析的
-
最终解析Resources的任务交给了
ResourcesManager#createResources()
好了,读到这里就可以了,来看看Activity#Resources是如何解析并加载的
Activity#Resources
源码分析从 ActivityThread#performLaunchActivity()开始
为什么要从这里开始? 写完换肤之后开始framework系列,到时候具体聊~
#ActivityThread.java
private Activity performLaunchActivity(ActivityClientRecord r, Intent customIntent) {
.... 省略部分代码
// szj 创建 activity 的上下文
ContextImpl appContext = createBaseContextForActivity(r);
Activity activity = null;
try {
java.lang.ClassLoader cl = appContext.getClassLoader();
// 通过反射创建 activity 的实例
activity = mInstrumentation.newActivity(
cl, component.getClassName(), r.intent);
} catch (Exception e) {
.....
}
try {
if (activity != null) {
// szj 创建 PhoneWindow,设置windowManager等操作
activity.attach(appContext, this, getInstrumentation(), r.token,
r.ident, app, r.intent, r.activityInfo, title, r.parent,
r.embeddedID, r.lastNonConfigurationInstances, config,
r.referrer, r.voiceInteractor, window, r.configCallback,
r.assistToken);
activity.mCalled = false;
// szj 分发 onCreate() 事件
if (r.isPersistable()) {
mInstrumentation.callActivityOnCreate(activity, r.state, r.persistentState);
} else {
mInstrumentation.callActivityOnCreate(activity, r.state);
}
// 判断是否调用super.onCreate() 方法
if (!activity.mCalled) {
throw new SuperNotCalledException(
"Activity " + r.intent.getComponent().toShortString() +
" did not call through to super.onCreate()");
}
}
...
} catch (Exception e) {
...
}
return activity;
}
在performLaunchActivity()这段代码中有几个重点:
- createBaseContextForActivity() 创建ContextImpl
- mInstrumentation.newActivity(,); 通过反射创建Activity实例
- 然后会调用Activity#attach() 方法绑定window等操作
- 绑定了window之后会立即调用Activity#onCreate()进行页面初始化
本篇重点是Context,其他的先不关注,先来看看createBaseContextForActivity() 代码
# ContextImpl.java
@UnsupportedAppUsage
static ContextImpl createActivityContext(ActivityThread mainThread,
LoadedApk packageInfo, ActivityInfo activityInfo, IBinder activityToken, int displayId,
Configuration overrideConfiguration) {
....
/// szj创建Context
ContextImpl context = new ContextImpl(null, mainThread, packageInfo, null,
activityInfo.splitName, activityToken, null, 0, classLoader, null);
...
final ResourcesManager resourcesManager = ResourcesManager.getInstance();
/// szj 通过ResourcesManager创建Resources
context.setResources(resourcesManager.createBaseTokenResources(activityToken,
packageInfo.getResDir(),
....));
return context;
}
最终会调用到 ResourcesManager.getInstance().createBaseTokenResources() 方法
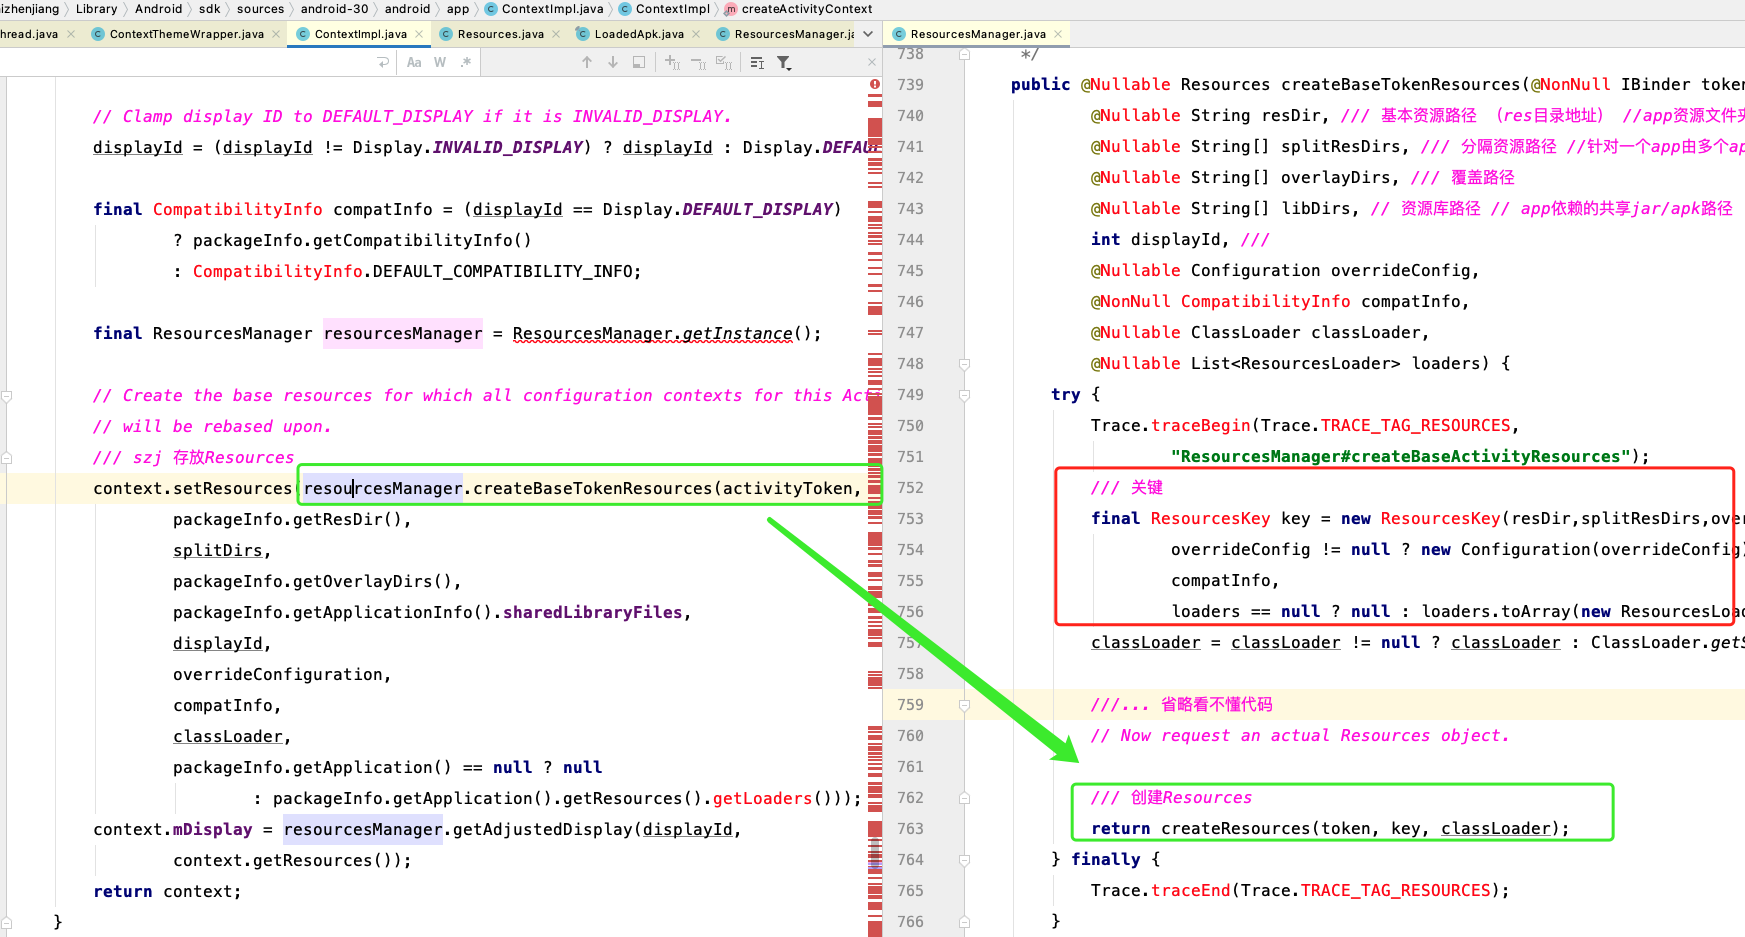
最终
- activity创建Resurces
- application创建Resurces
都是调用到ResourcesManager#createResources()来创建Resources
这里还用到了一个类:ResourcesKey 这个类主要作用就是来存储数据,以及做一些校验等
ResourcesManager#createResources()源码分析
#ResourcesManager.java
private @Nullable Resources createResources(@Nullable IBinder activityToken,
@NonNull ResourcesKey key, @NonNull ClassLoader classLoader) {
synchronized (this) {
//szj 从缓存中找 ResourcesImpl 如果不存在就创建
代码1: ResourcesImpl resourcesImpl = findOrCreateResourcesImplForKeyLocked(key);
if (resourcesImpl == null) {
return null;
}
if (activityToken != null) {
// 创建Resources
return createResourcesForActivityLocked(activityToken, classLoader,
resourcesImpl, key.mCompatInfo);
} else {
// 直接创建Resources对象
return createResourcesLocked(classLoader, resourcesImpl, key.mCompatInfo);
}
}
}
先来看findOrCreateResourcesImplForKeyLocked(key);
 #ResourcesManager.java

 private @Nullable ResourcesImpl findOrCreateResourcesImplForKeyLocked(
         @NonNull ResourcesKey key) {
     // szj查找与ResourcesImpl匹配的缓存资源
     ResourcesImpl impl = findResourcesImplForKeyLocked(key);
     if (impl == null) {
         // szj 创建ResourcesImpl
         impl = createResourcesImpl(key);
         if (impl != null) {
             // 加入到缓存中
             mResourceImpls.put(key, new WeakReference<>(impl));
        }
    }
     return impl;
 }
这段代码很简单,做了一些缓存,通过createResourcesImpl() 创建了ResourcesImpl
#ResourcesManager.java
private @Nullable ResourcesImpl createResourcesImpl(@NonNull ResourcesKey key) {
final DisplayAdjustments daj = new DisplayAdjustments(key.mOverrideConfiguration);
daj.setCompatibilityInfo(key.mCompatInfo);
// szj创建 AssetManager
final AssetManager assets = createAssetManager(key);
if (assets == null) {
return null;
}
final DisplayMetrics dm = getDisplayMetrics(key.mDisplayId, daj);
final Configuration config = generateConfig(key, dm);
// 根据assetManager 创建一个ResourceImpl
// 其实找资源是 Resources -> ResourcesImpl -> AssetManager
final ResourcesImpl impl = new ResourcesImpl(assets, dm, config, daj);
...
return impl;
}
关键点又来了:
创建ResourcesImpl需要4个参数:
-
参数一: AssetManager 具体资源管理
(重要) -
参数二: DisplayMetrics 屏幕的一些封装
- 通过getResources().getDisplayMetrics().density 获取过屏幕的密度
- 通过getResources().getDisplayMetrics().widthPixels 获取过屏幕的宽度等
-
参数三: Configuration 一些配置信息[对本篇来说不重要]
-
参数四: DisplayAdjustments 资源的兼容性等 [对本篇来说不重要]
createAssetManager方法:
#ResourcesManager.java
protected @Nullable AssetManager createAssetManager(@NonNull final ResourcesKey key) {
// szj 创建AssetManager对象
final AssetManager.Builder builder = new AssetManager.Builder();
// key.mResDir 就是apk在手机内存中的的完整路径
if (key.mResDir != null) {
try {
builder.addApkAssets(loadApkAssets(key.mResDir, false, false));
} catch (IOException e) {
return null;
}
}
....
if (key.mLibDirs != null) {
/// 循环lib中的资源
for (final String libDir : key.mLibDirs) {
// .apk
/// 只有.apk文件中才有资源,所以只要有资源的地方
if (libDir.endsWith(".apk")) {
try {
builder.addApkAssets(loadApkAssets(libDir, true /*sharedLib*/,
false /*overlay*/));
} catch (IOException e) {
}
}
}
}
...
return builder.build();
}
这段代码通过Builder设计模式,将多个资源文件下的资源都保存起来
多个资源指的是一个项目中的多个lib
来看看单个资源是如何加载的的(loadApkAssets):
#ResourcesManager.java
// path 表示当前apk在手机中的的完整路径
private @NonNull ApkAssets loadApkAssets(String path, boolean sharedLib, boolean overlay)
throws IOException {
....
// We must load this from disk.
/// 从磁盘加载apk资源
if (overlay) {
apkAssets = ApkAssets.loadOverlayFromPath(overlayPathToIdmapPath(path), 0 /*flags*/);
} else {
apkAssets = ApkAssets.loadFromPath(path, sharedLib ? ApkAssets.PROPERTY_DYNAMIC : 0);
}
....
return apkAssets;
}
最终通过静态方法创建ApkAssets:
# ApkAssets.java
public static @NonNull ApkAssets loadOverlayFromPath(@NonNull String idmapPath,
@PropertyFlags int flags) throws IOException {
return new ApkAssets(FORMAT_IDMAP, idmapPath, flags, null /* assets */);
}
public static @NonNull ApkAssets loadFromPath(@NonNull String path, @PropertyFlags int flags)
throws IOException {
return new ApkAssets(FORMAT_APK, path, flags, null /* assets */);
}
创建ApkAssets的时候就是通过
- 一个变量来标记当前是什么文件
- 并且保存文件路径
这个变量一共有4种类型:
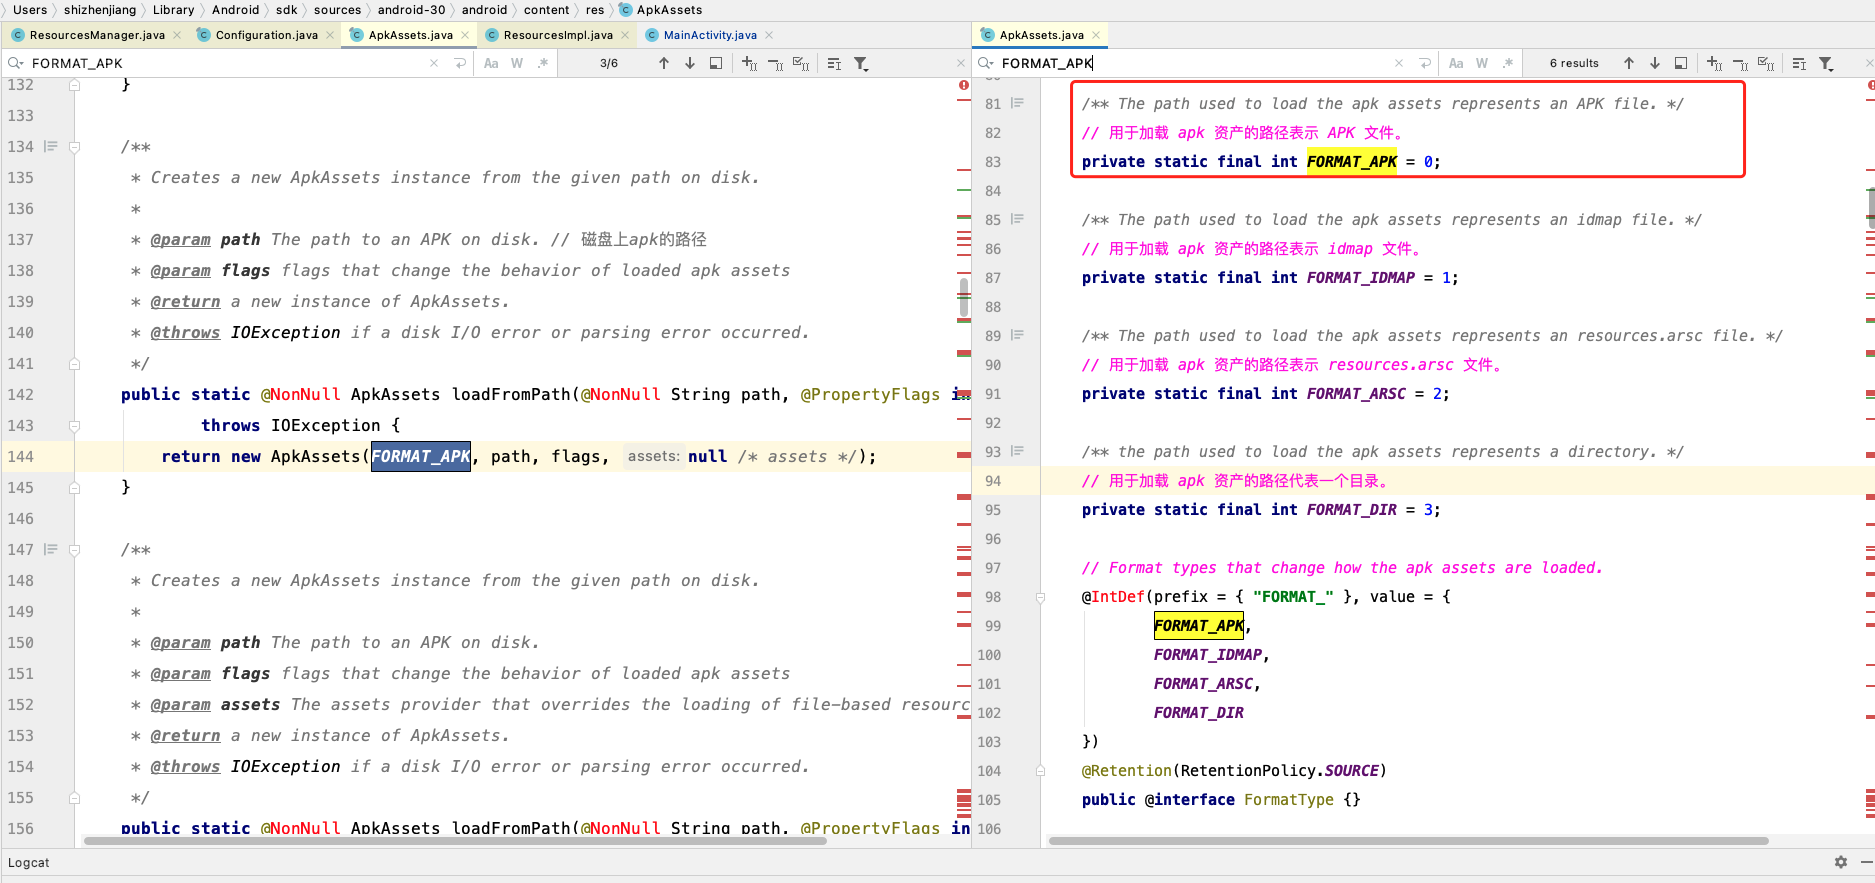
- FORMAT_APK 标记为apk文件
- FORMAT_IDMAP 标记为idmap文件
- FORMAT_ARSC 标记为 resources.arsc文件
- FORMAT_DIR 标记为是一个目录
默认都是标记为apk文件,因为默认加载的就是.apk文件
这里着重提一下 resources.arsc 文件
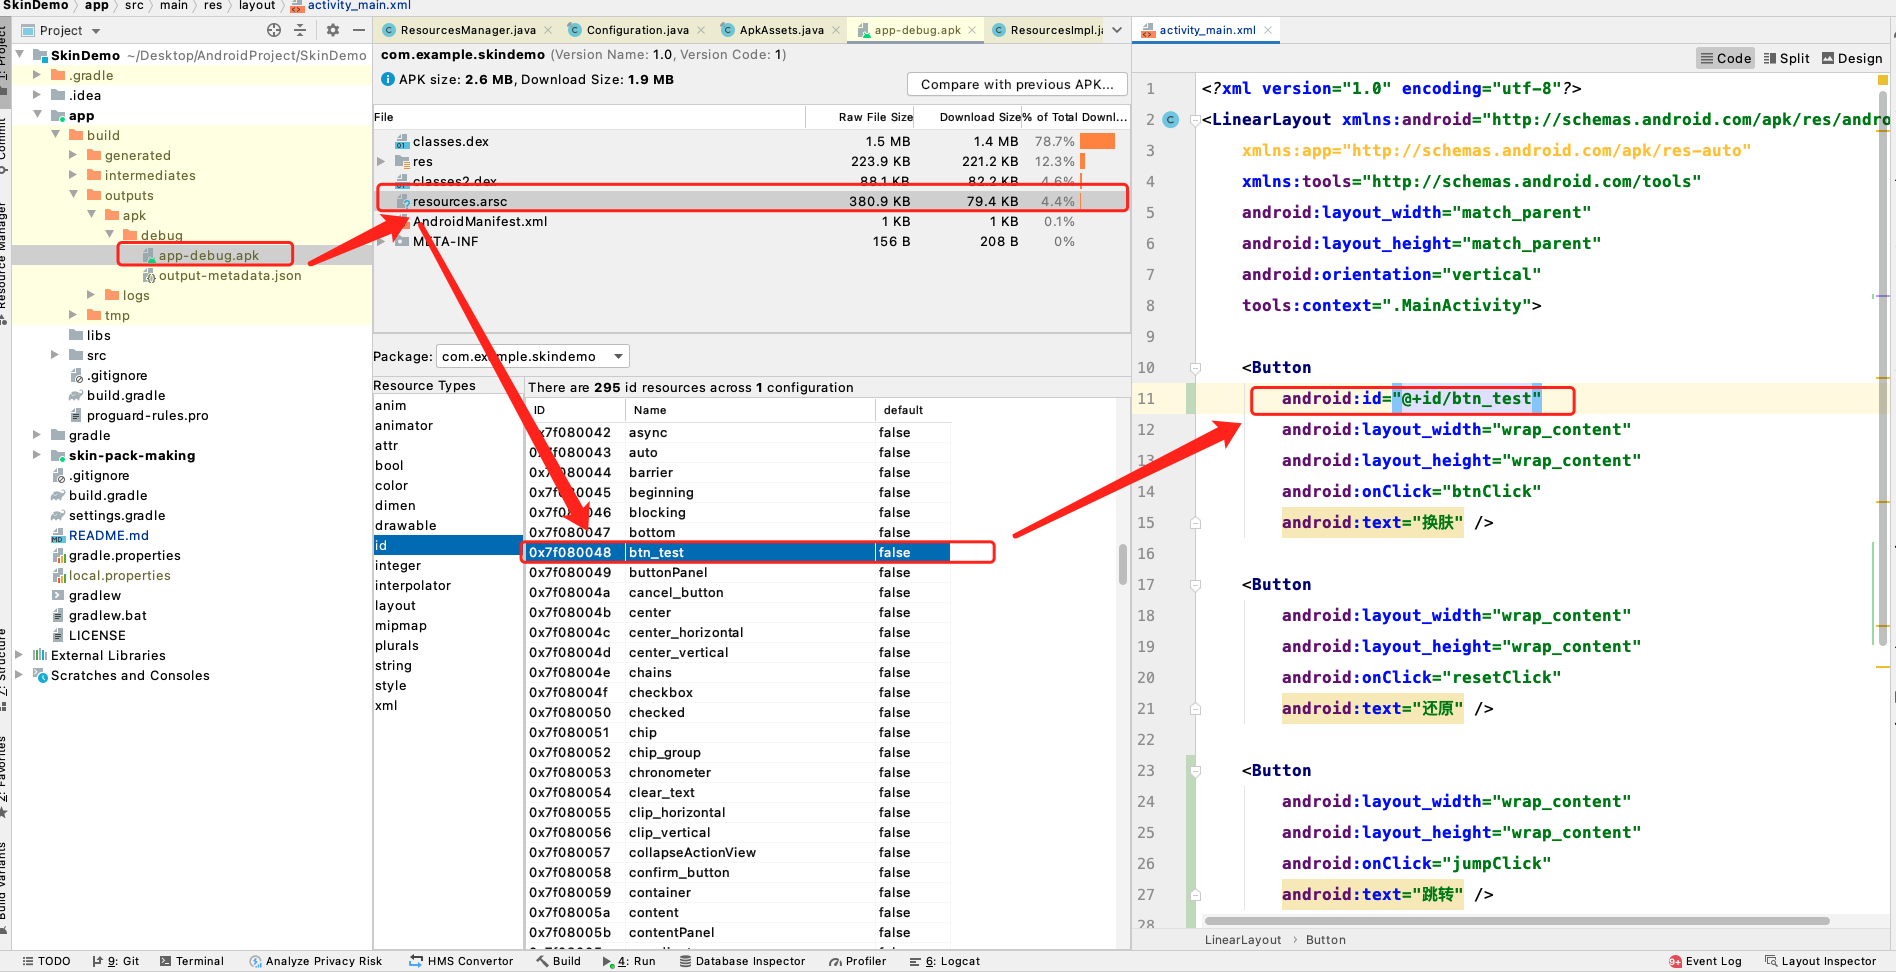
这个文件是打包的时候自动生成的,会存放一些资源下的信息,例如图中的id等等,全部资源都可以在这里面找到!
OK,回到主题,这里就不扯了
当解析了apk之后,就会调用 AssetManager.Builder#build()方法
#ResourcesManager.java
protected @Nullable AssetManager createAssetManager(@NonNull final ResourcesKey key) {
final AssetManager.Builder builder = new AssetManager.Builder();
if (key.mResDir != null) {
try {
/// 上面代码将apk路径都解析好了
builder.addApkAssets(loadApkAssets(key.mResDir, false, false));
} catch (IOException e) {
return null;
}
}
...
// 现在执行build()
return builder.build();
}
#AssetManager.Builder.java
public AssetManager build() {
....
final ApkAssets[] apkAssets = new ApkAssets[totalApkAssetCount];
....
final AssetManager assetManager = new AssetManager(false /*sentinel*/);
// 最终交给 nativeSetApkAssets() 来管理
AssetManager.nativeSetApkAssets(assetManager.mObject, apkAssets,
false /*invalidateCaches*/);
assetManager.mLoaders = mLoaders.isEmpty() ? null
: mLoaders.toArray(new ResourcesLoader[0]);
return assetManager;
}
最终通过AssetManager.Builder 来创建了AssetManager
并且由ApkAssets保存了apk的一些信息,例如路径,文件类型等
最终创建好AssetManager交给ResourcesImpl来管理
#ResourcesManager.java
private @Nullable ResourcesImpl createResourcesImpl(@NonNull ResourcesKey key) {
final DisplayAdjustments daj = new DisplayAdjustments(key.mOverrideConfiguration);
daj.setCompatibilityInfo(key.mCompatInfo);
/// 刚才通过AssetManager.Builder() 来创建的AssetManager
final AssetManager assets = createAssetManager(key);
if (assets == null) {
return null;
}
// 交给ResourcesImpl 来管理
final ResourcesImpl impl = new ResourcesImpl(assets, dm, config, daj);
return impl;
}
在退回到最外层:
#ResourcesManager.java
private @Nullable Resources createResources(@Nullable IBinder activityToken,
@NonNull ResourcesKey key, @NonNull ClassLoader classLoader) {
synchronized (this) {
/// 刚才走的这创建的ResourcesImpl
ResourcesImpl resourcesImpl = findOrCreateResourcesImplForKeyLocked(key);
if (resourcesImpl == null) {
return null;
}
if (activityToken != null) {
// 创建Resources
return createResourcesForActivityLocked(activityToken, classLoader,
resourcesImpl, key.mCompatInfo);
} else {
// 直接创建Resources对象
return createResourcesLocked(classLoader, resourcesImpl, key.mCompatInfo);
}
}
}
通过findOrCreateResourcesImplForKeyLocked() 中找或者创建 ResourcesImpl
最终将ResourcesImpl交给Resources来管理
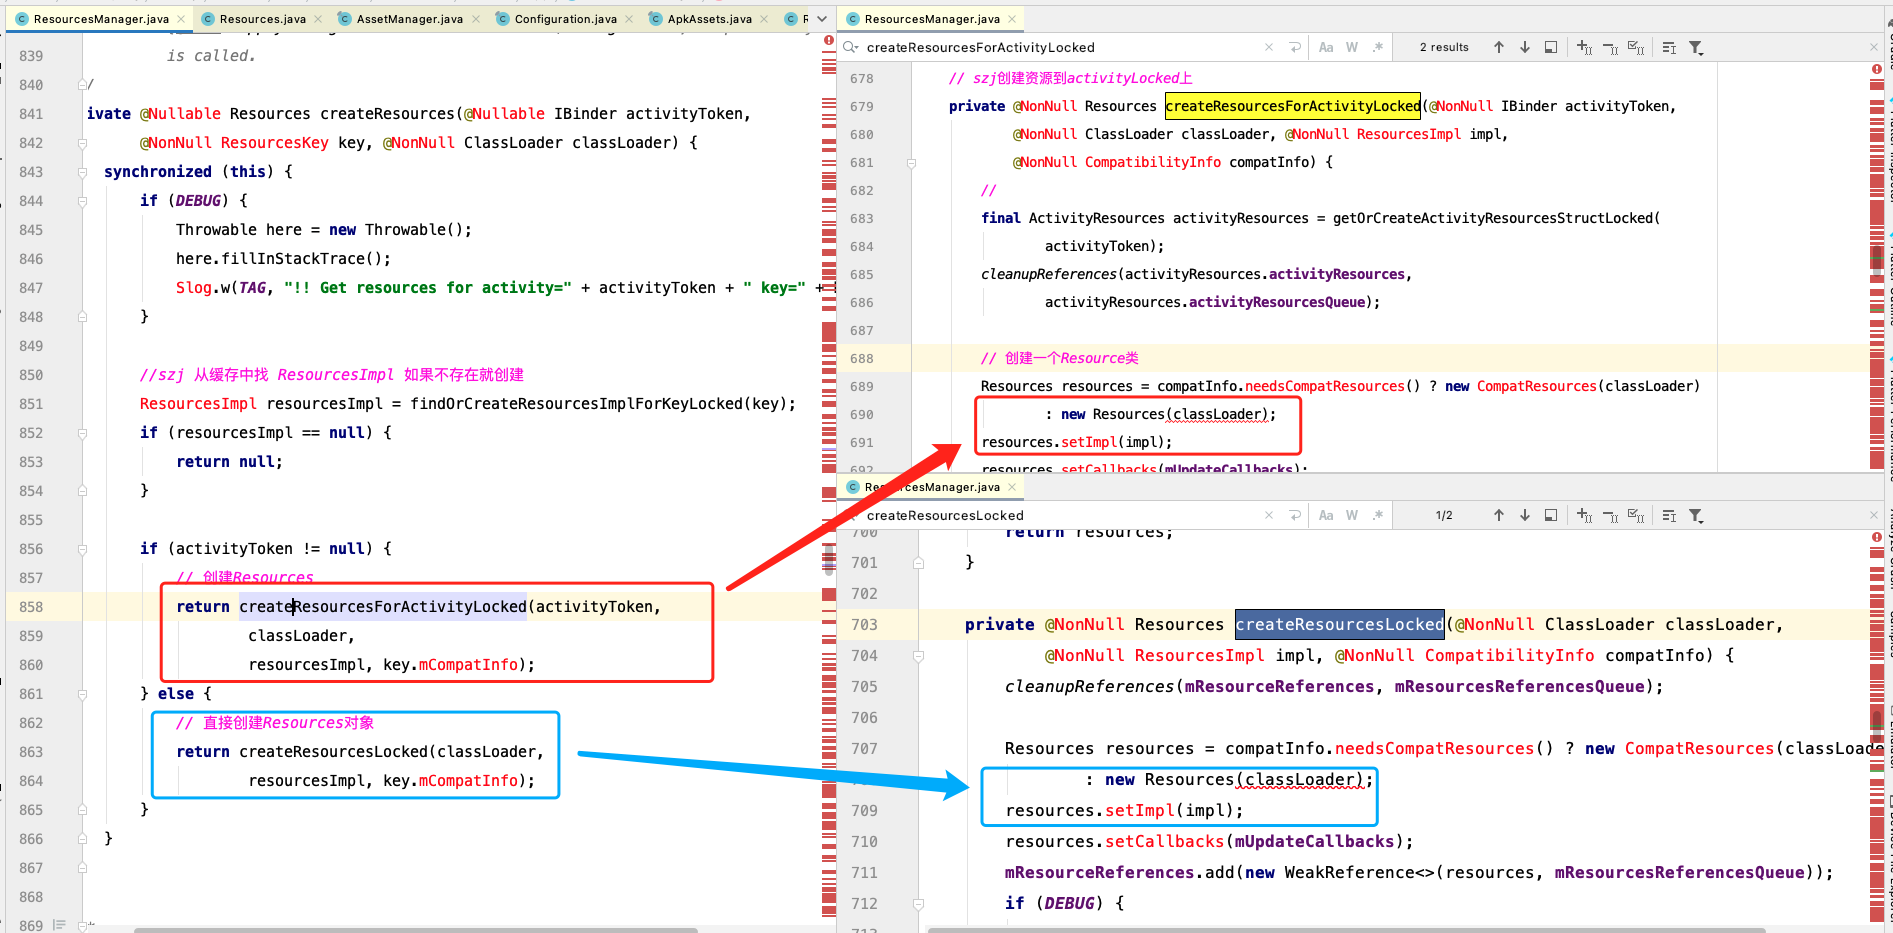
走到这里Resources就创建好了
这里有很多角色来捋一下:
- ResourcesManager 用来创建Resources
- ResourcesImpl 用来创建AssetManager,Resources的具体实现,用来具体读取资源
- AssetManager 管理apk,解析app/多个lib 下的资源
- ApkAssets 用来记录apk信息
- Resources 用来管理ResourcesImpl
drawable 如何加载出来的
相信大家在开发中经常写这种代码,这一小节来看看他是如何加载出来的
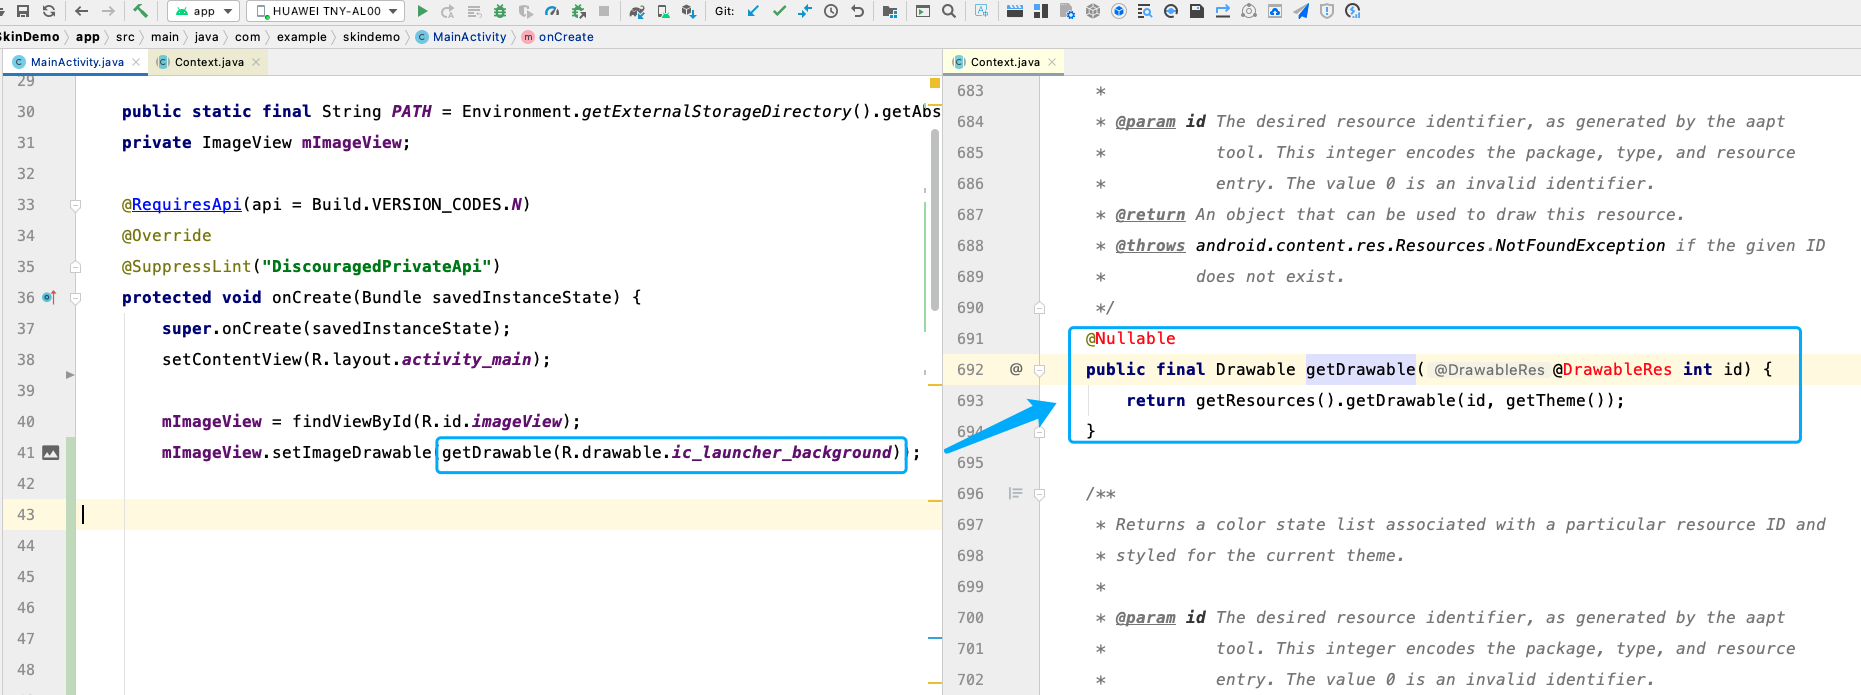
#Context.java
public final Drawable getDrawable(@DrawableRes int id) {
return getResources().getDrawable(id, getTheme());
}
#Resources.java
public Drawable getDrawable(@DrawableRes int id, @Nullable Theme theme)
throws NotFoundException {
return getDrawableForDensity(id, 0, theme);
}
public Drawable getDrawableForDensity(@DrawableRes int id, int density, @Nullable Theme theme) {
final TypedValue value = obtainTempTypedValue();
try {
...
return loadDrawable(value, id, density, theme);
} finally {
releaseTempTypedValue(value);
}
}
Drawable loadDrawable(@NonNull TypedValue value, int id, int density, @Nullable Theme theme)
throws NotFoundException {
/// 最终通过ResourcesImpl 来加载drawable
return mResourcesImpl.loadDrawable(this, value, id, density, theme);
}
 #ResourcesImpl.java

 Drawable loadDrawable(@NonNull Resources wrapper, @NonNull TypedValue value, int id,
             int density, @Nullable Resources.Theme theme)
             throws NotFoundException {

   ....
       Drawable dr;
     if (cs != null) {
       ....
    } else if (isColorDrawable) {
       dr = new ColorDrawable(value.data);
    } else {
       // szj走这里
       dr = loadDrawableForCookie(wrapper, value, id, density);
    }
 }
#ResourcesImpl.java
private Drawable loadDrawableForCookie(@NonNull Resources wrapper, @NonNull TypedValue value,
int id, int density) {
....
try {
....
try {
// 判断drawable是否是xml
if (file.endsWith(".xml")) {
final String typeName = getResourceTypeName(id);
/// 判断是否是颜色
if (typeName != null && typeName.equals("color")) {
/// 是颜色
dr = loadColorOrXmlDrawable(wrapper, value, id, density, file);
} else {
// 加载xml
dr = loadXmlDrawable(wrapper, value, id, density, file);
}
} else {
// 是图片
// szj mAssets = AssetManager()
// 打开这张图片
// 最终获取到的是stream
final InputStream is = mAssets.openNonAsset(
value.assetCookie, file, AssetManager.ACCESS_STREAMING);
final AssetInputStream ais = (AssetInputStream) is;
dr = decodeImageDrawable(ais, wrapper, value);
}
}
...
} catch (Exception | StackOverflowError e) {
...
throw rnf;
return dr;
}
- 加载颜色:
 #ResourcesImpl.java
 private Drawable loadColorOrXmlDrawable(@NonNull Resources wrapper, @NonNull TypedValue value,
         int id, int density, String file) {
     try {
       /// 加载颜色
         ColorStateList csl = loadColorStateList(wrapper, value, id, null);
         return new ColorStateListDrawable(csl);
    } catch (NotFoundException originalException) {
         // 如果报错就尝试当作xml中的drawable加载
         try {
             return loadXmlDrawable(wrapper, value, id, density, file);
        } catch (Exception ignored) {
             // If fallback also fails, throw the original exception
             throw originalException;
        }
    }
 }
- 加载xml中的drawable
 #ResourcesImpl.java
 private Drawable loadXmlDrawable(@NonNull Resources wrapper, @NonNull TypedValue value,
         int id, int density, String file)
         throws IOException, XmlPullParserException {
     try (
             XmlResourceParser rp =
                     loadXmlResourceParser(file, id, value.assetCookie, "drawable")
    ) {
         return Drawable.createFromXmlForDensity(wrapper, rp, density, null);
    }
 }
- 是图片,通过AssetManager来打开图片,获取到输入流,并转换为图片
#ResourcesImpl.java
final Drawable dr;
final InputStream is = mAssets.openNonAsset(
value.assetCookie, file, AssetManager.ACCESS_STREAMING);
final AssetInputStream ais = (AssetInputStream) is;
dr = decodeImageDrawable(ais, wrapper, value);
/// 将输入流的内容转换为drawable
private Drawable decodeImageDrawable(@NonNull AssetInputStream ais,
@NonNull Resources wrapper, @NonNull TypedValue value) {
ImageDecoder.Source src = new ImageDecoder.AssetInputStreamSource(ais,
wrapper, value);
try {
return ImageDecoder.decodeDrawable(src, (decoder, info, s) -> {
decoder.setAllocator(ImageDecoder.ALLOCATOR_SOFTWARE);
});
} catch (IOException ioe) {
return null;
}
}
再来一波小结:
Resources其实做的事情很有限,基本就是操控ResourcesImpl来控制AssetManager来获取资源
AssetManager会通过ApkAssets来存储apk信息,包括路径,类型等
然后AssetManager会通过apk的地址, 找到具体apk的文件,调用nativeSetApkAssets() 去解析apk中的具体资源
当我们加载一个drawable的时候
Resources会调用ResourcesImpl#loadDrawable() 来加载图片
然后会判断加载的drawable是一张图片,还是自定义的xml,或者drawable是一个颜色
- 如果是图片,就通过AssetManager#openNonAsset()来解析资源图片,获取到intputStream流,来解码成drawable
- 如果是xml,那么就通过XmlResourceParser来解析,最终生成drawable [这里面还有些细节,都是些if判断,就没看了]
- 如果是颜色,和xml类似,也是一点点解析
创建自己的Resources加载本地资源
正常我们加载资源是通过getResources().getDrawable() 来加载
现在想实现的是,用我自己的Resources,来加载我们自己的资源
那么首先就要获取到当前程序在手机内存中的路径
getApplicationContext().getPackageResourcePath()
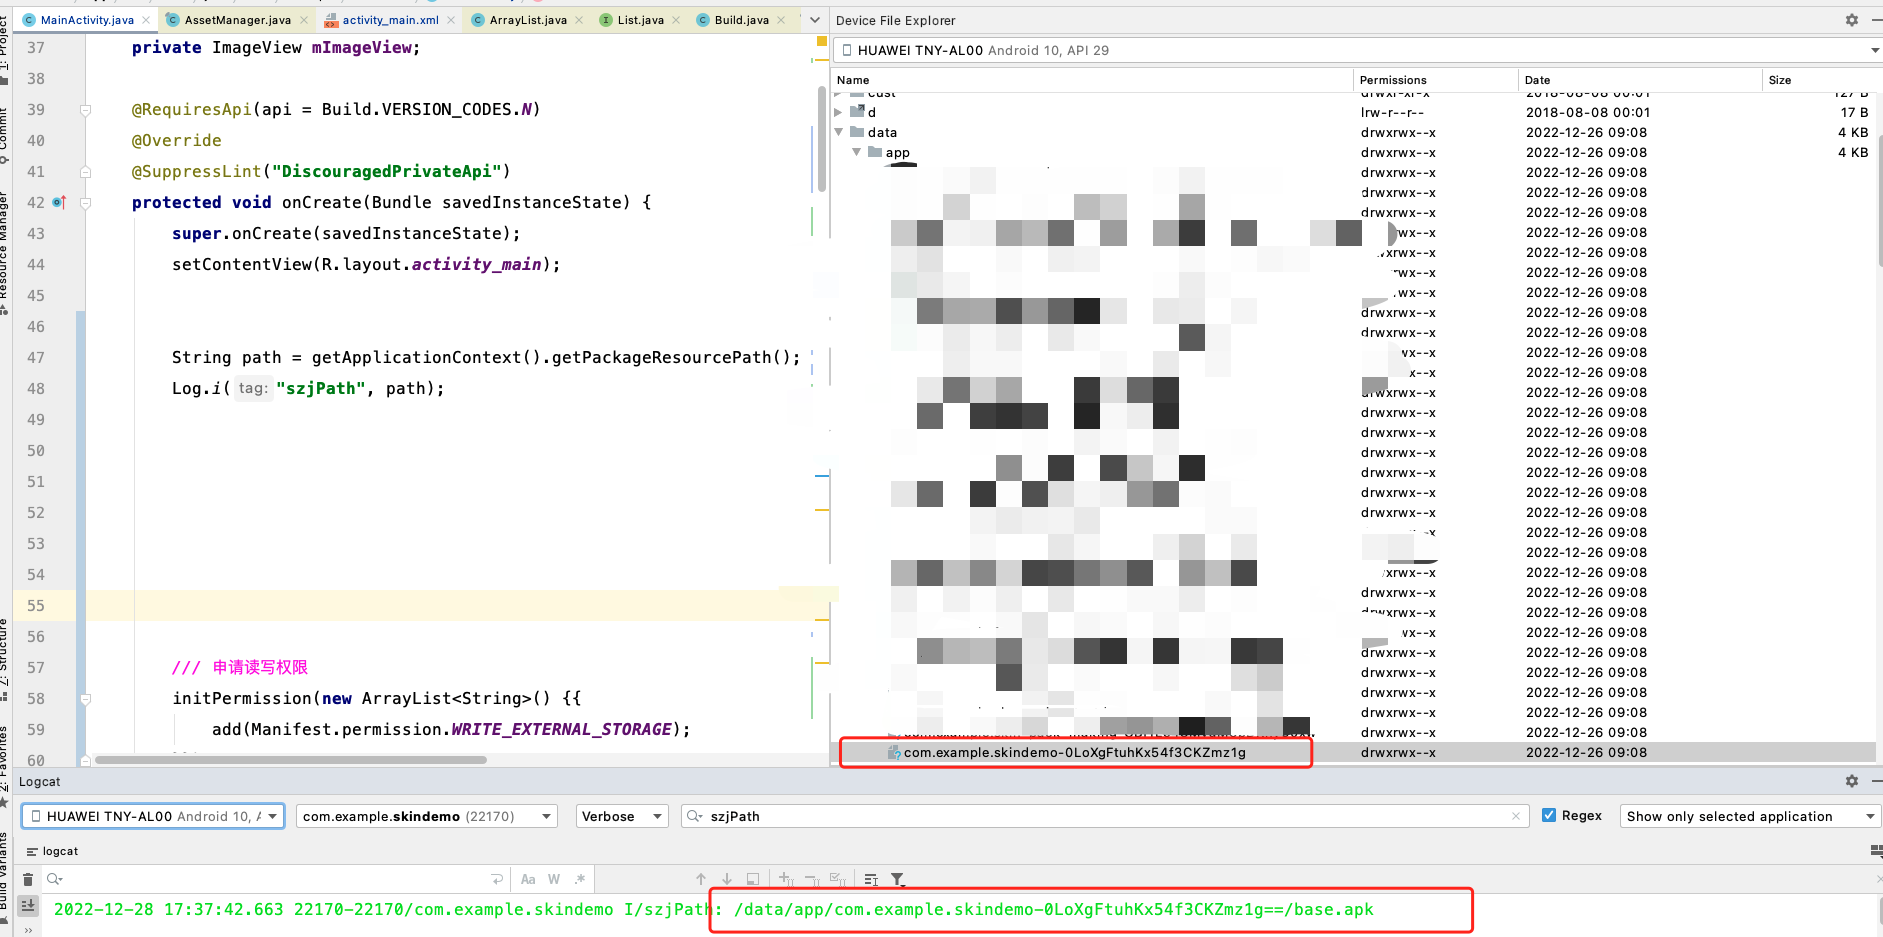
因为这是个隐藏文件夹,所以只能从这里看,在手机上是找不到的…
接下来创建一个AssetManager,用来解析apk中的资源等
在源码中,是通过AssetManager.Builder来构建AssetManager, 但是Builder类被隐藏掉了
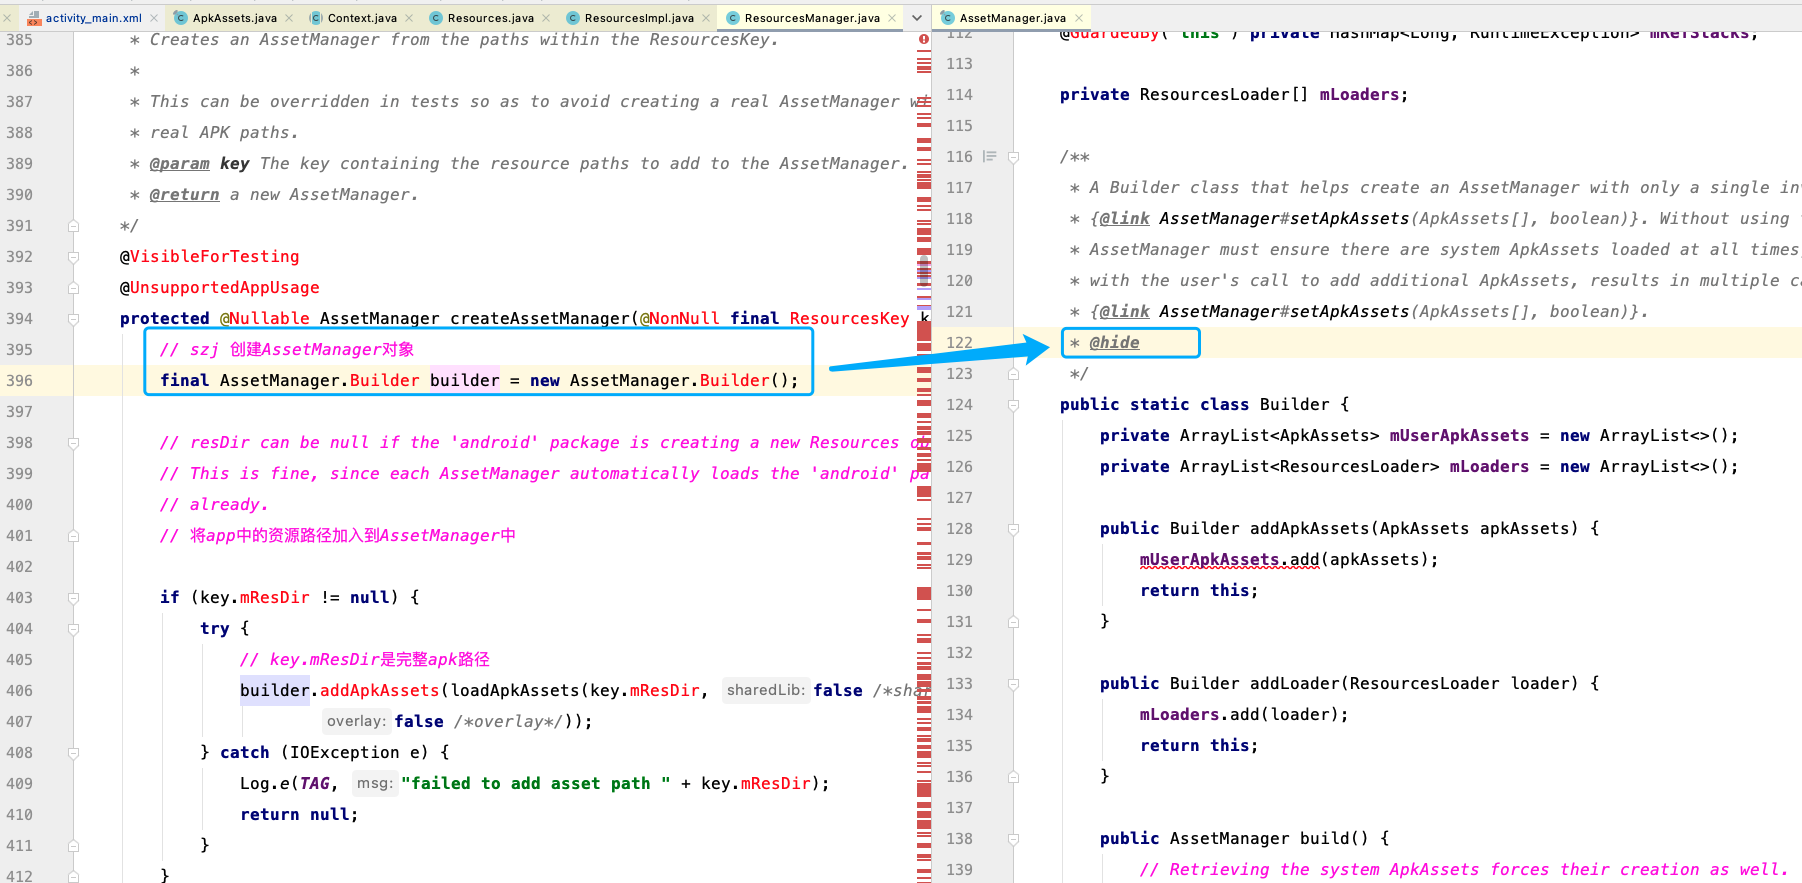
并且构造方法都被隐藏掉了,所以只能通过反射来构建AssetManager
构建AssetManager时,需要通过AssetManager#nativeSetApkAssets() 来解析apk中的资源
这里我们选择反射 addAssetPath() 方法
通过addAssetPath调用 addAssetPathInternal 最终调用到nativeSetApkAssets()
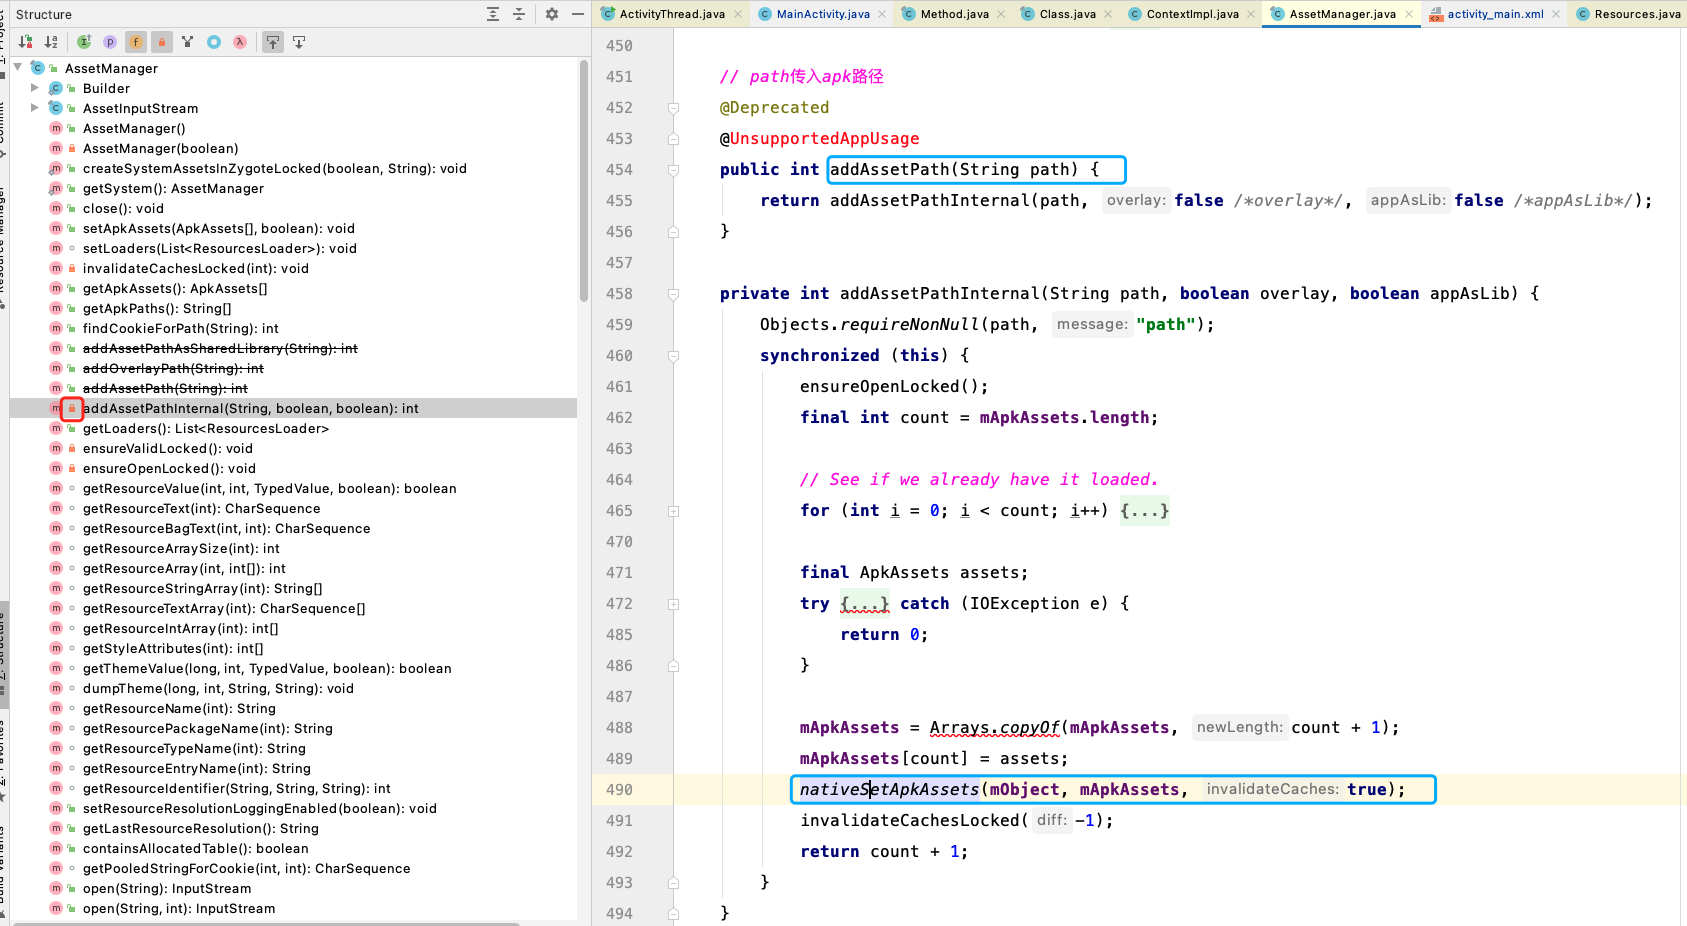
这里只需要传入一个apk在手机的路径即可
这里需要注意的是不能直接反射addAssetPathInternal(),可以看到图中addAssetPathInternal()左侧有一把锁,反射不了.
当前代码:
try (
// 创建AssetManager
AssetManager assetManager = AssetManager.class.newInstance()
) {
// 反射调用 创建AssetManager#addAssetPath
Method method = AssetManager.class.getDeclaredMethod("addAssetPath", String.class);
// 获取到当前apk在手机中的路径
String path = getApplicationContext().getPackageResourcePath();
Log.i("szjPath", path);
/// 反射执行方法
method.invoke(assetManager, path);
// 创建自己的Resources
Resources resources = new Resources(assetManager, createDisplayMetrics(), createConfiguration());
// 根据id来获取图片
Drawable drawable = resources.getDrawable(R.drawable.ic_launcher_background, null);
// 设置图片
mImageView.setImageDrawable(drawable);
} catch (Exception e) {
e.printStackTrace();
}
// 这些关于屏幕的就用原来的就可以
public DisplayMetrics createDisplayMetrics() {
return getResources().getDisplayMetrics();
}
public Configuration createConfiguration() {
return getResources().getConfiguration();
}
这样一来,就可以用我们自己的Resources来获取本身的资源了!
效果没啥好说的,就是一上来就加载
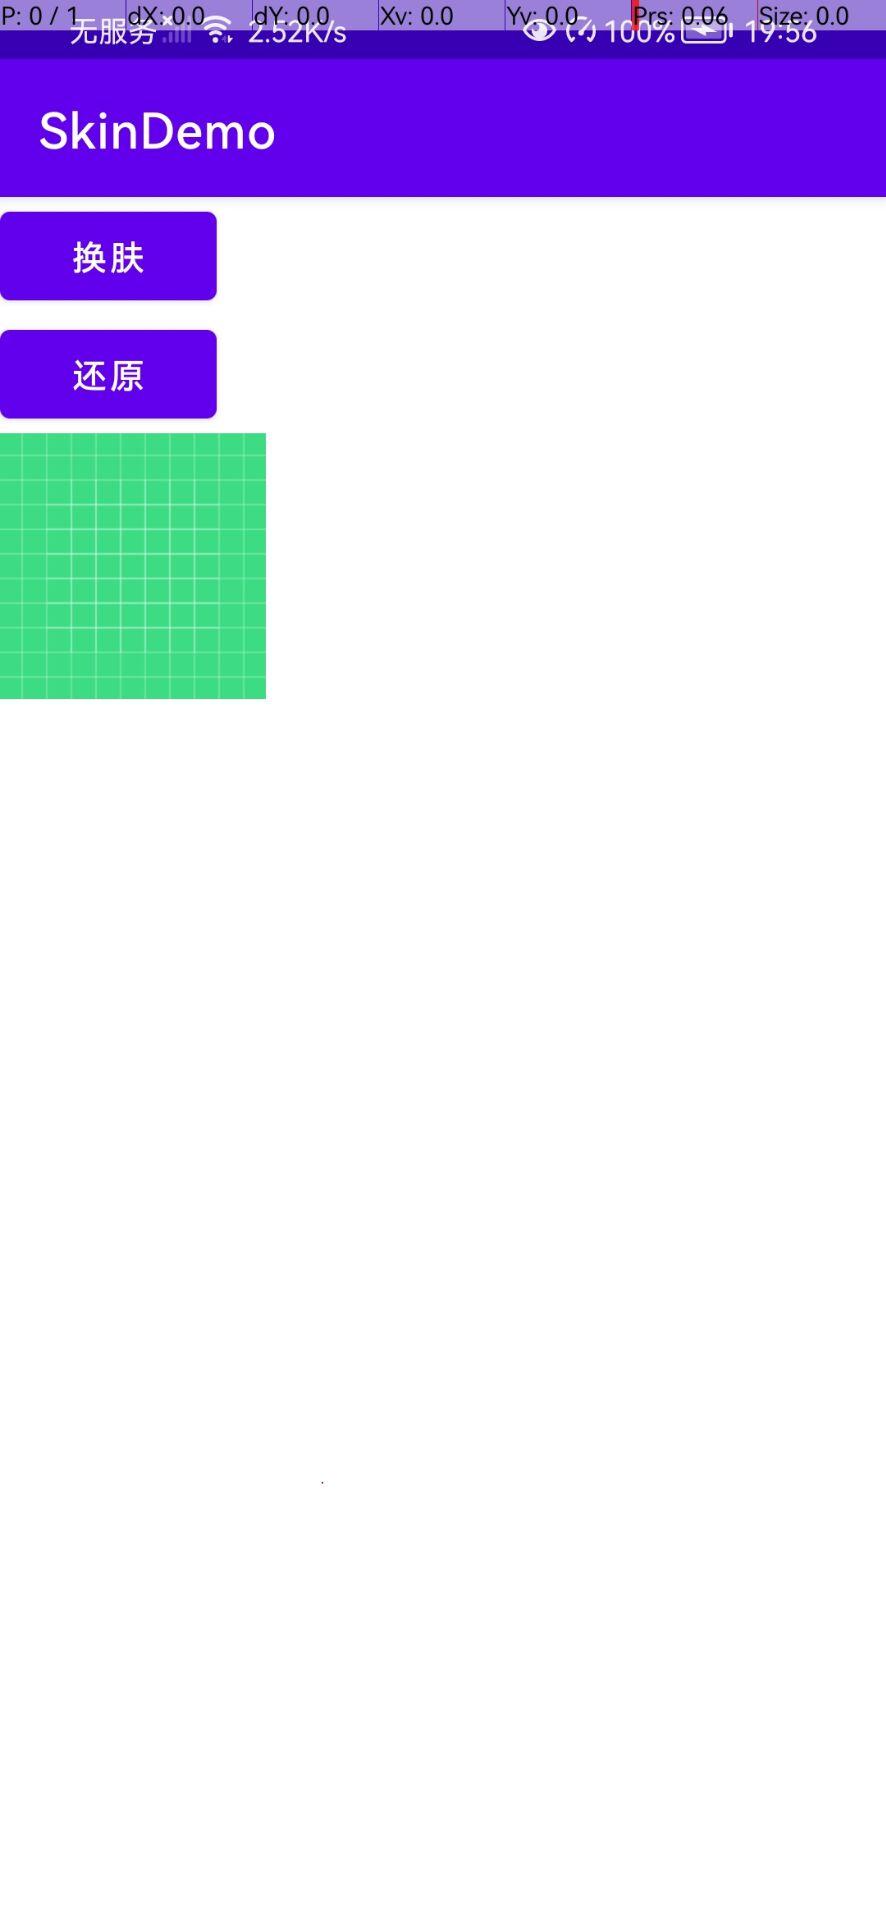
接下来我们尝试加载另一个apk中的资源
首先我们需要一个有一个apk让我们来加载,就是通常说的“皮肤包”
制作“皮肤包”
皮肤包就是一个只有资源文件的apk
可以新建一个项目,然后存放对应的资源即可
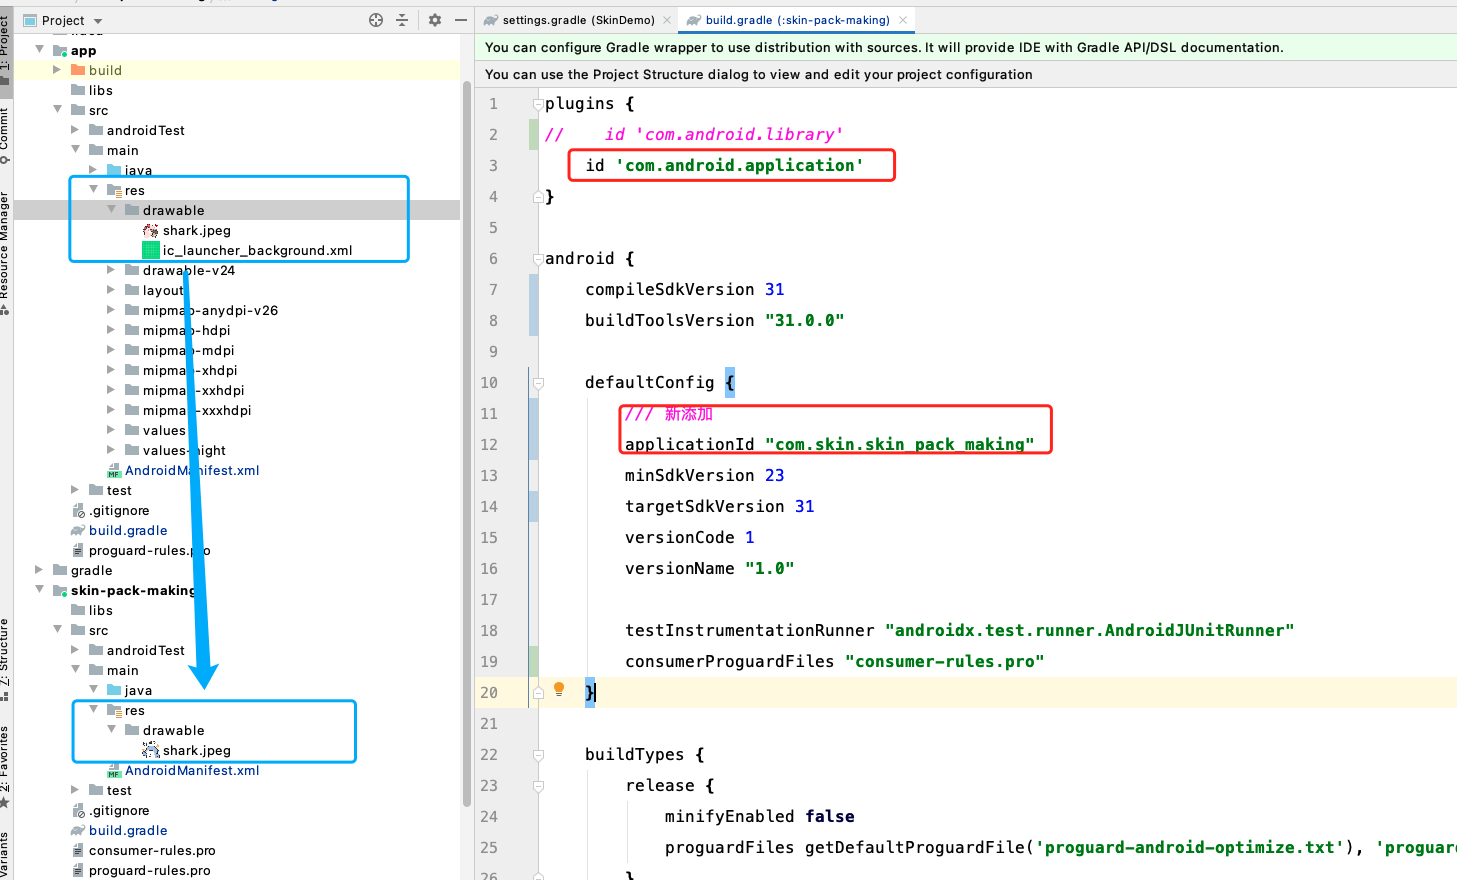
也可以在同目录下将lib改为application,为了好保管,我们就使用这种办法
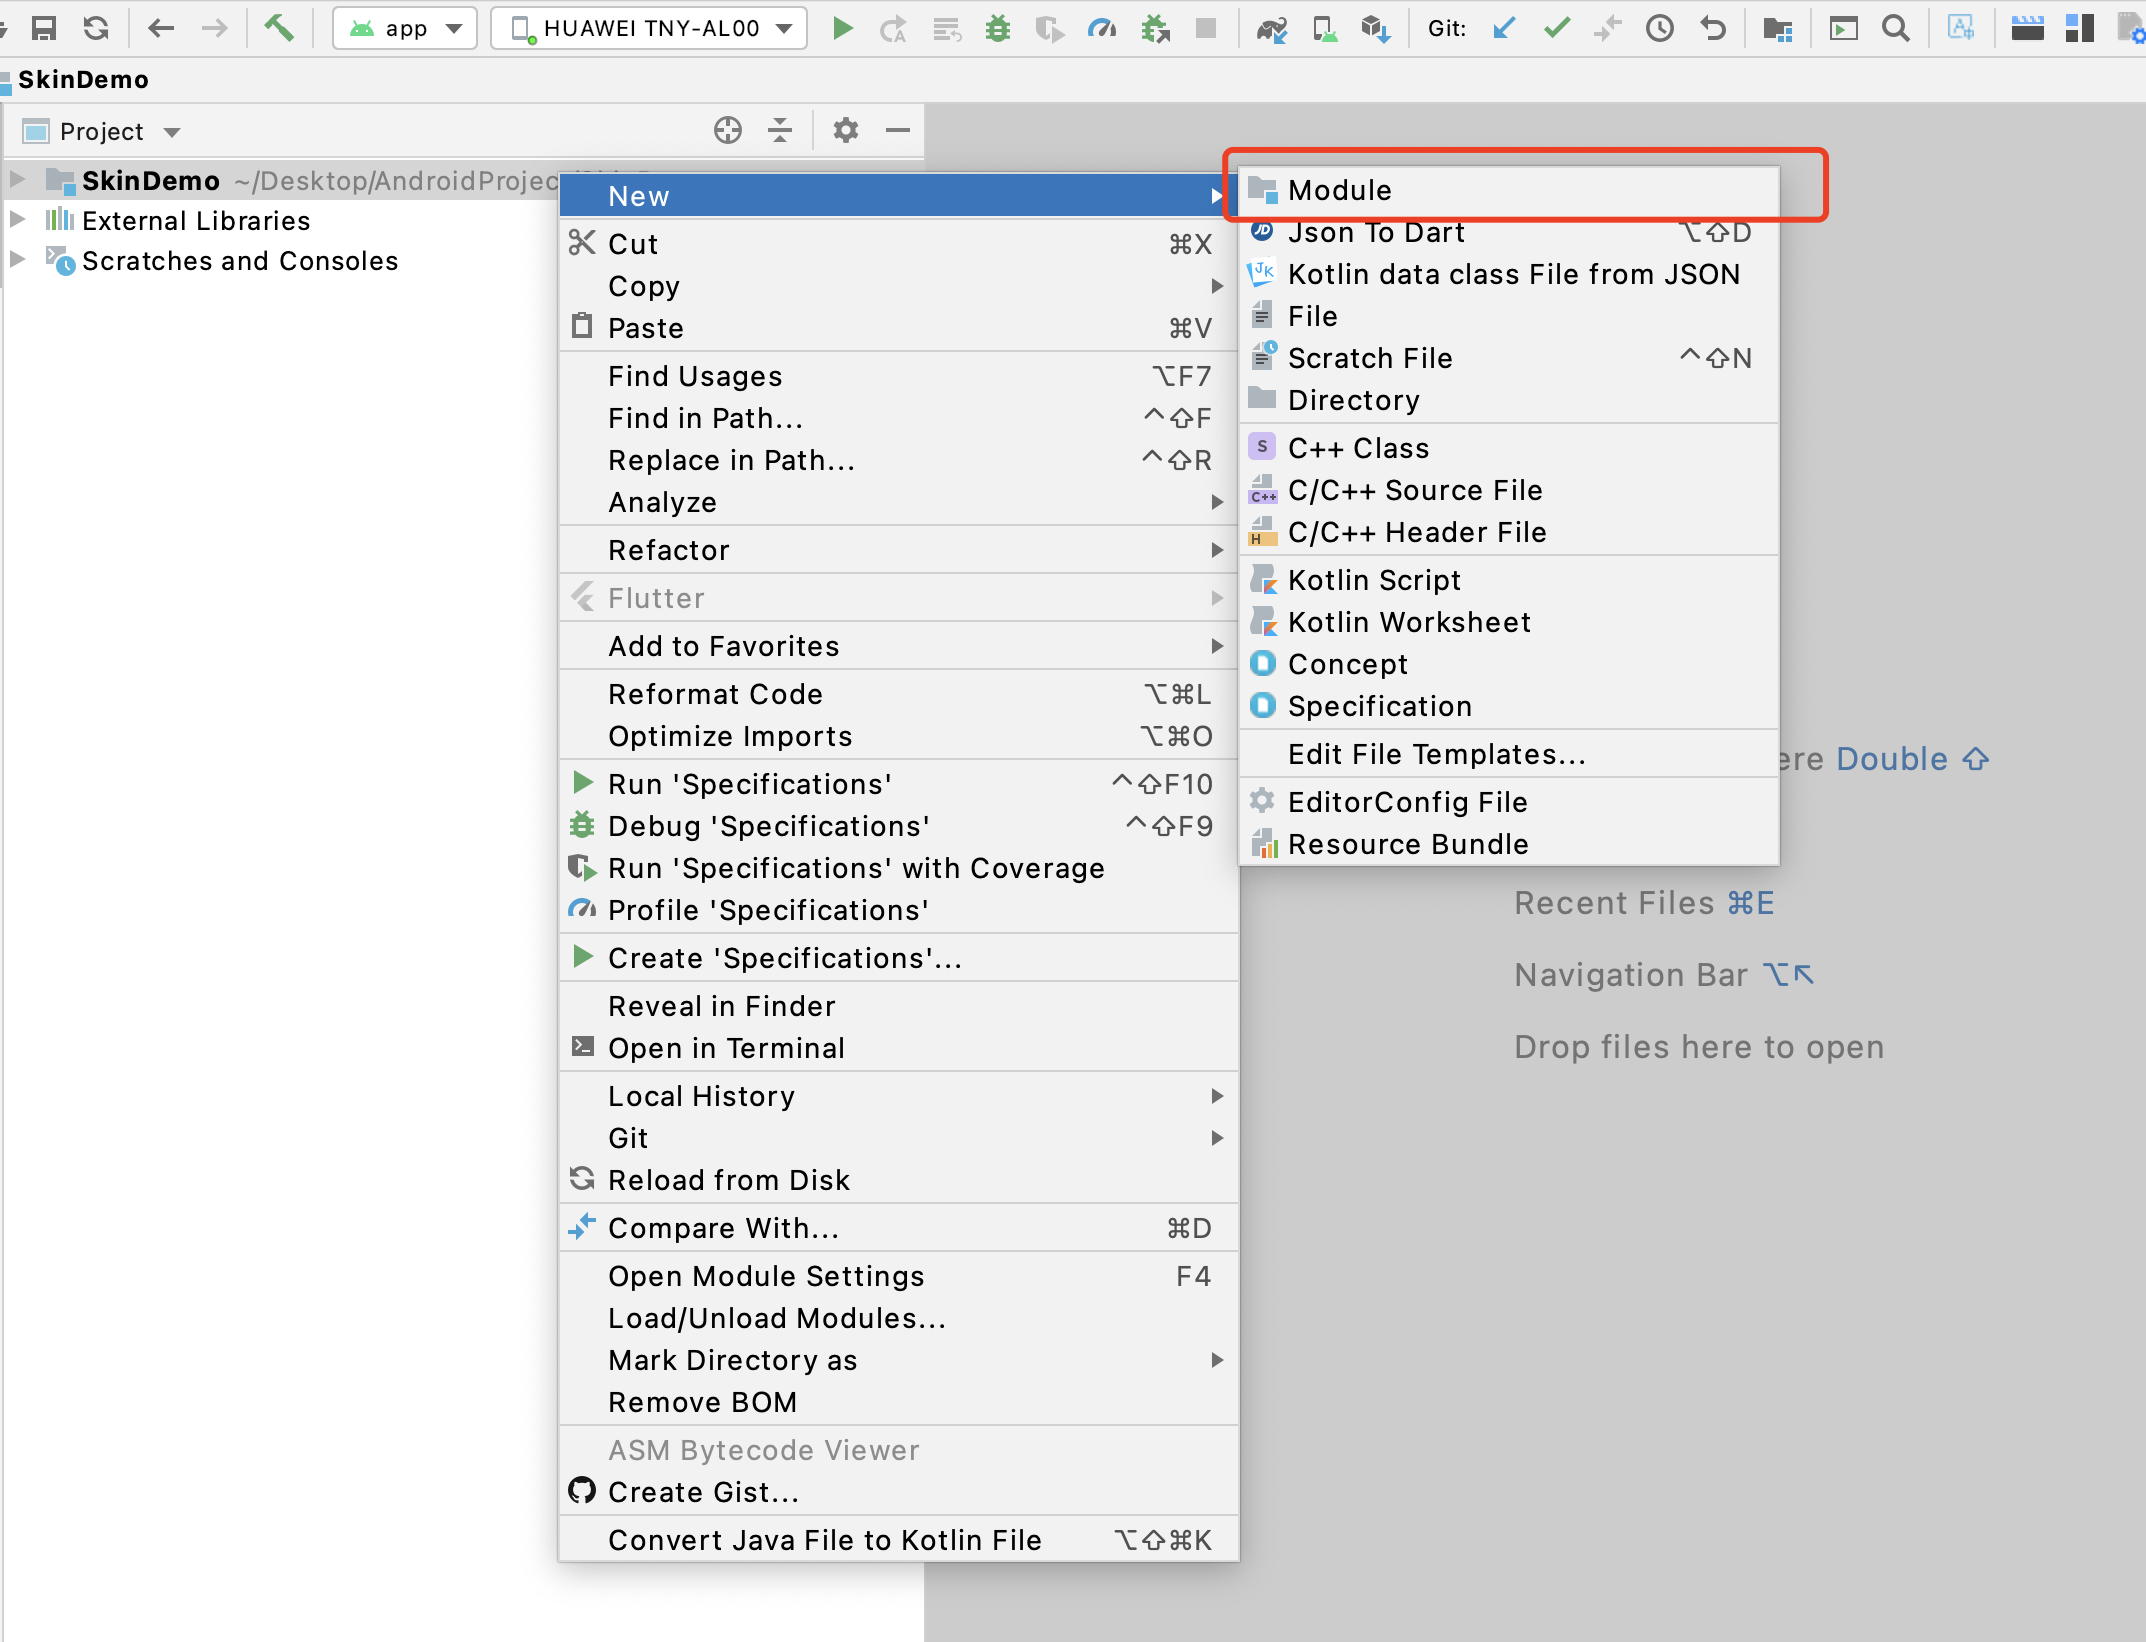
- 直接创建module
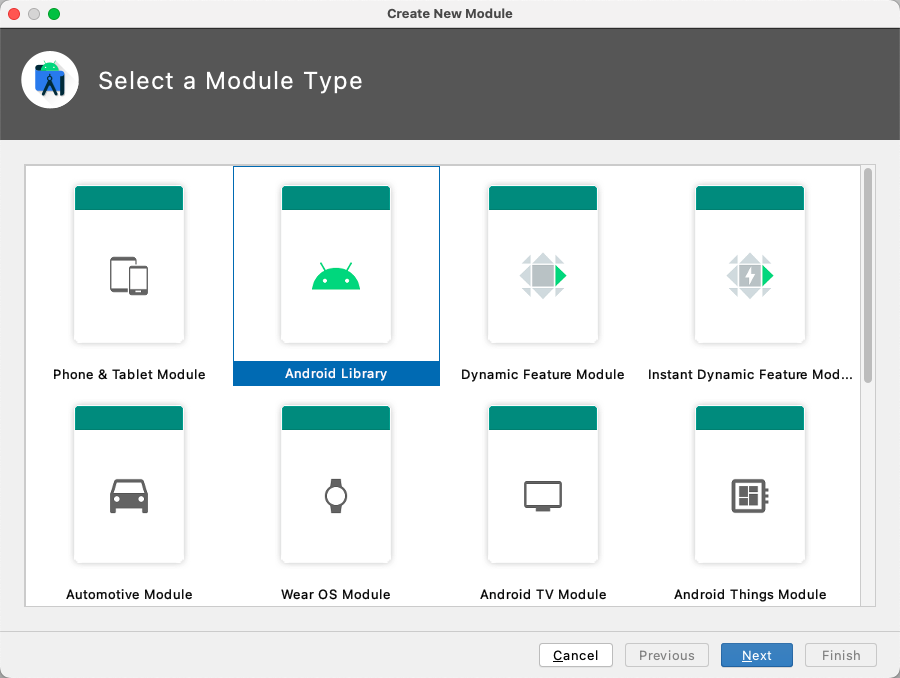
- 创建lib
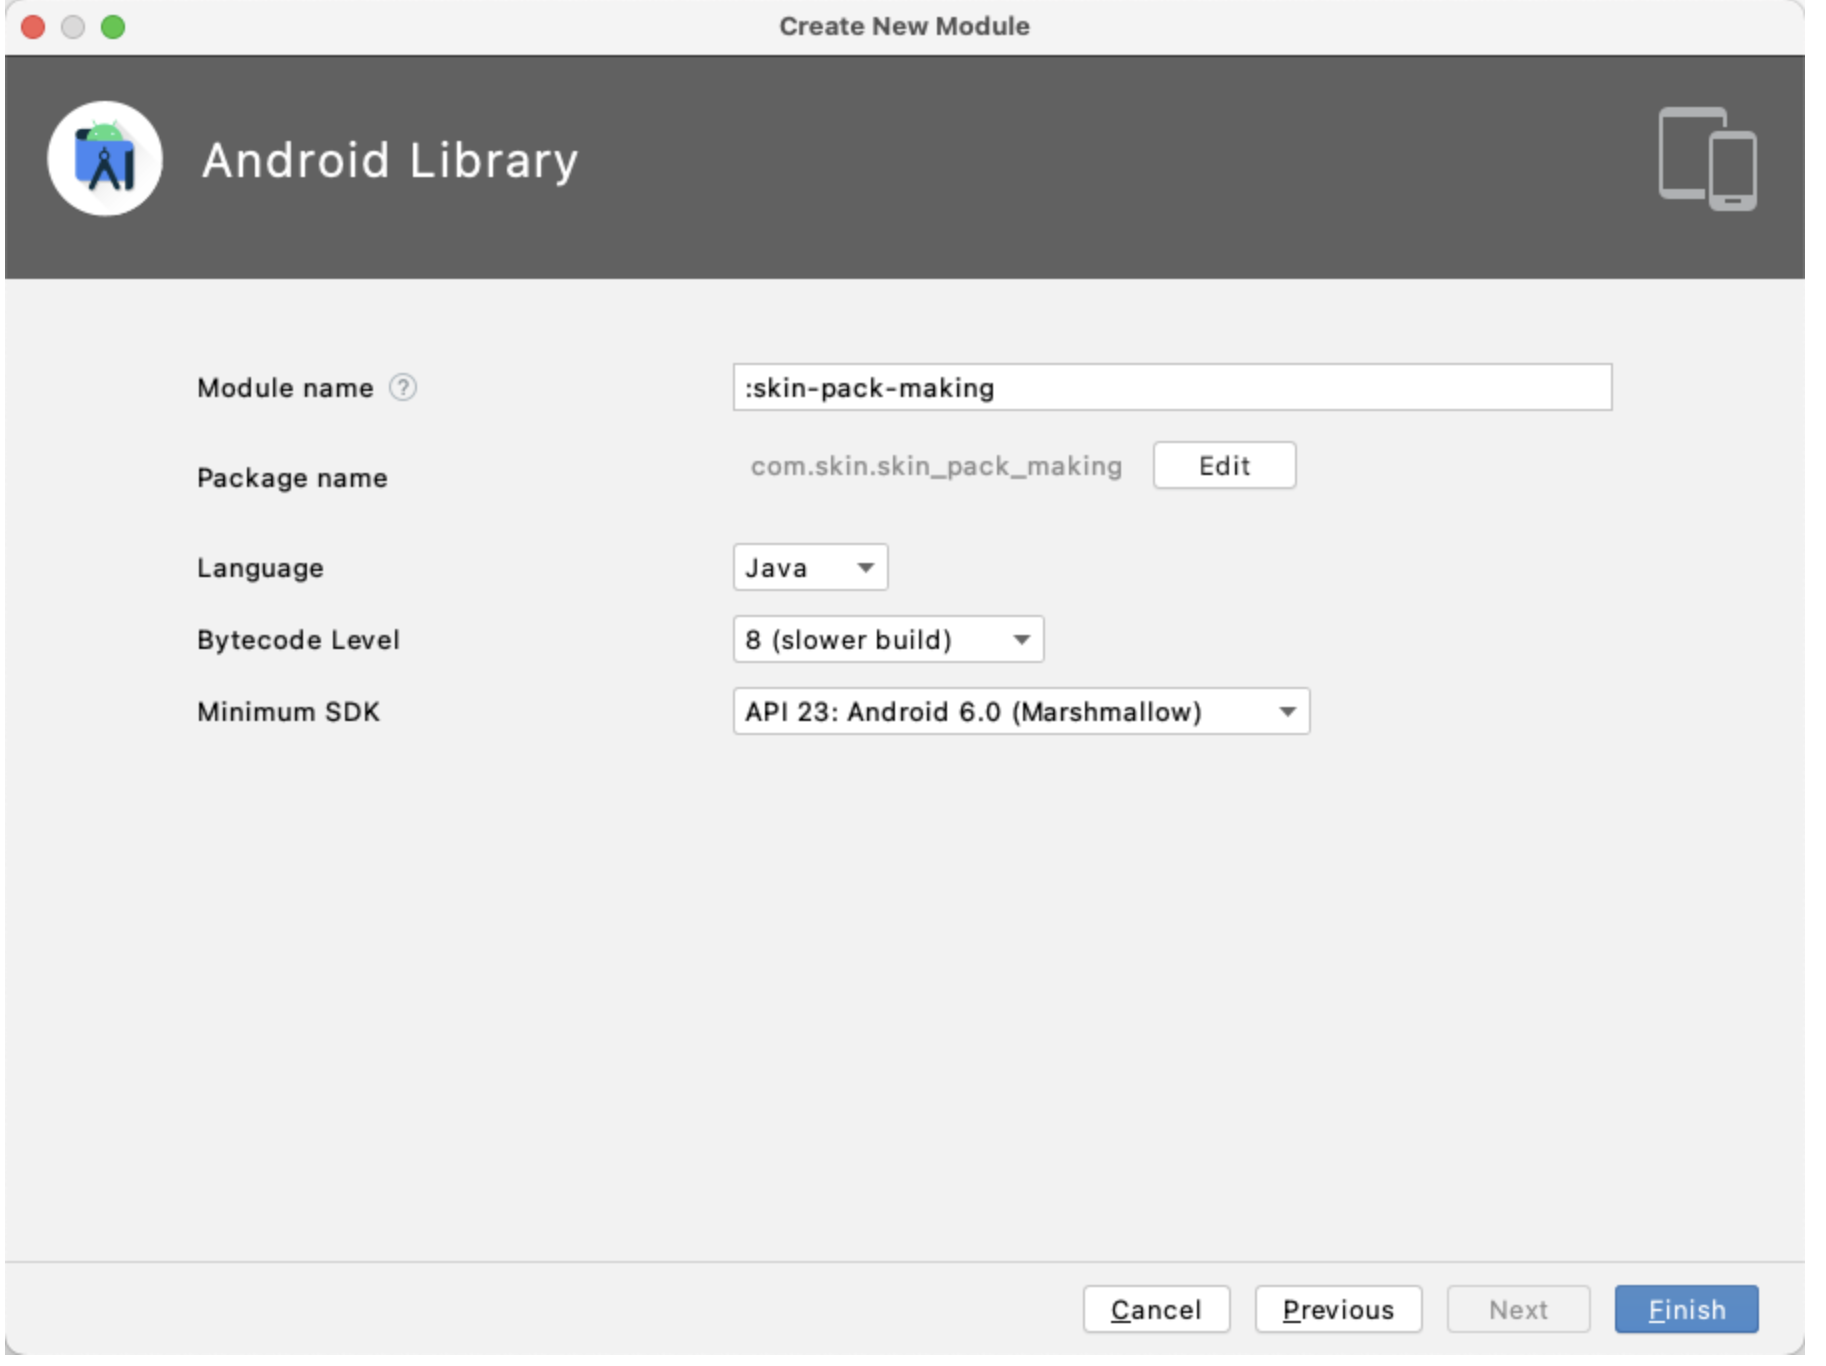
- 直接输入名字创建即可
- 将lib修改为application,并添加applicationId, 并且添加同名资源(制作皮肤包)
- 生成“皮肤包”(skin-pack-making-debug.apk)
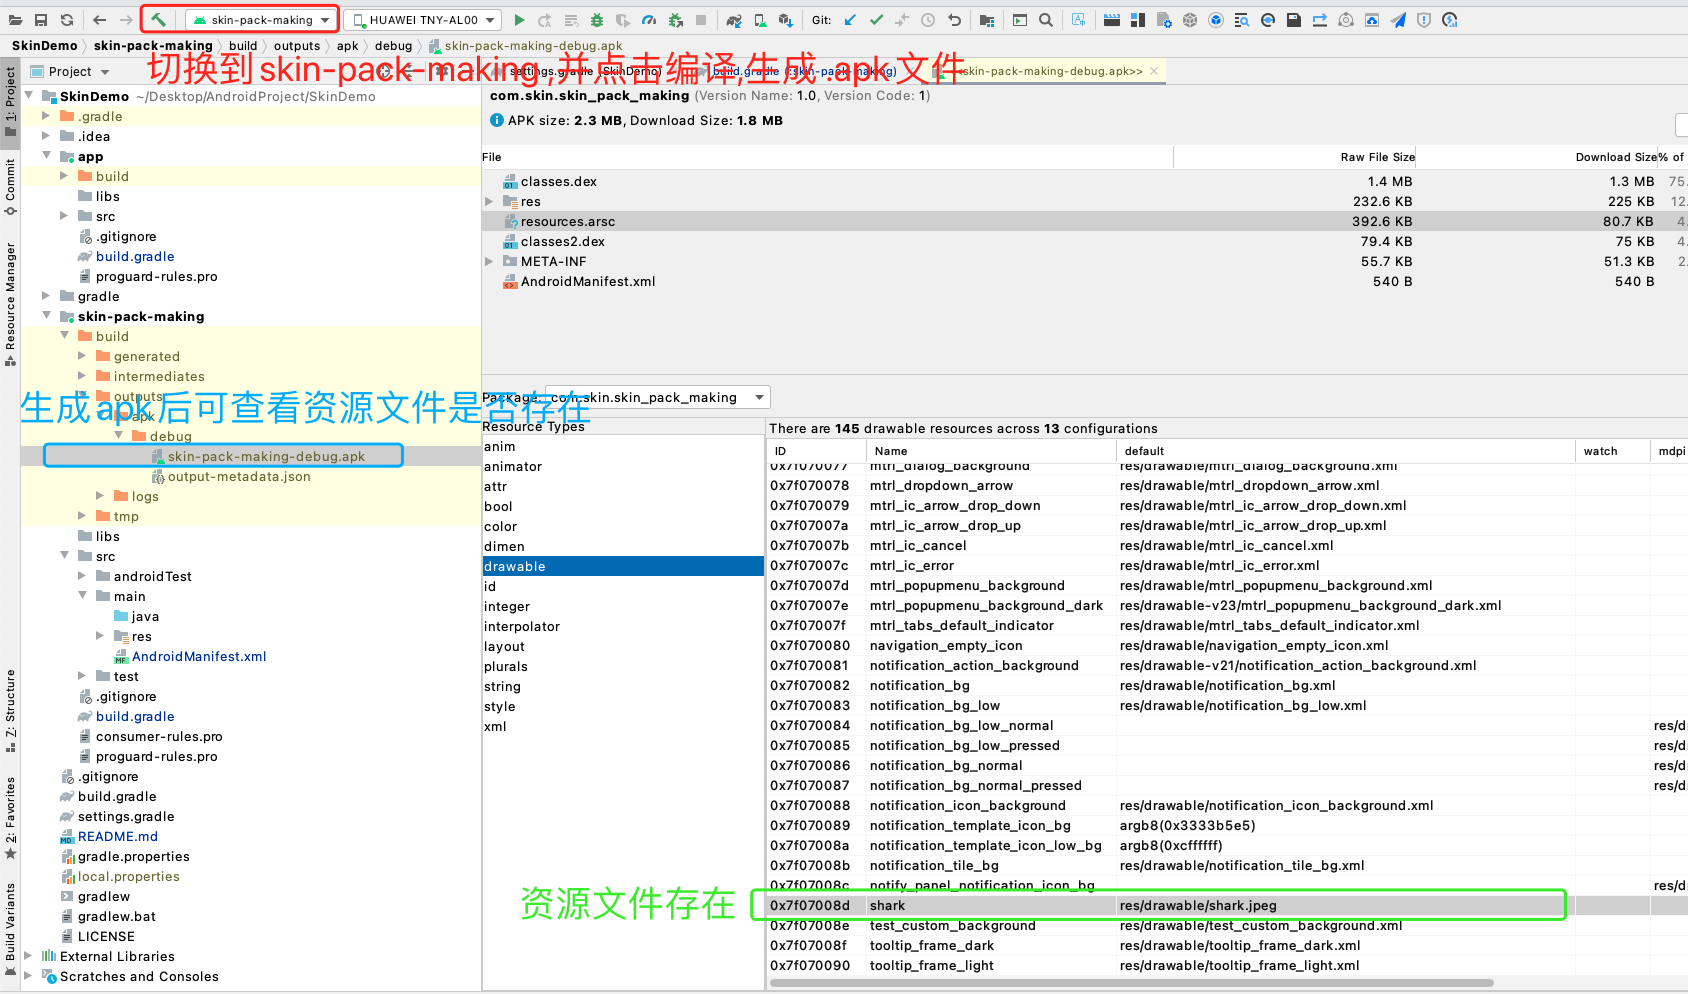
此时,皮肤包我们就制作好了,skin-pack-making-debug.apk,我们将它放入到手机内存中尝试加载一下
使用皮肤包
为了测试方便,我们直接将“皮肤包”放入到根目录即可
adb push apk路径 根目录
adb shell
ls sdcard
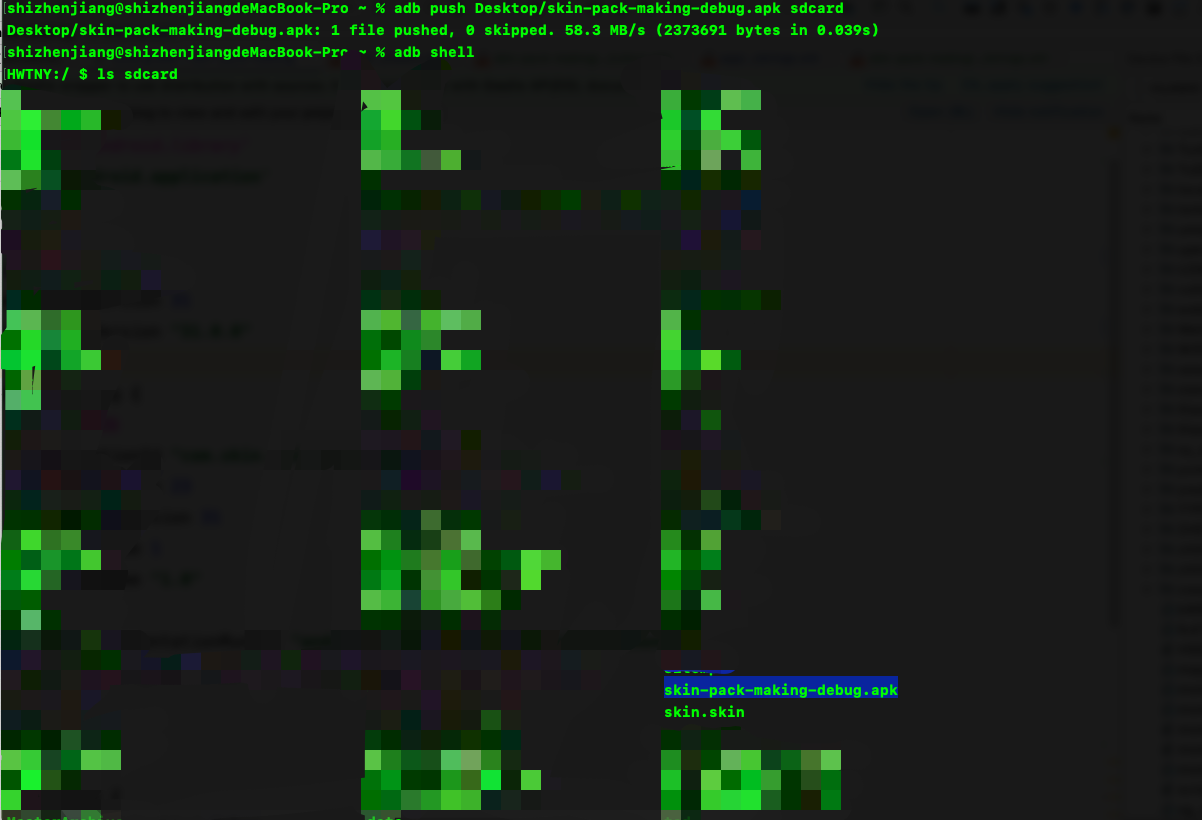
加载皮肤包中的apk
public static final String PATH = Environment.getExternalStorageDirectory().getAbsolutePath() + File.separator + "skin-pack-making-debug.apk";
try {
AssetManager assetManager = AssetManager.class.newInstance();
@SuppressLint("DiscouragedPrivateApi")
Method method = AssetManager.class.getDeclaredMethod("addAssetPath", String.class);
method.setAccessible(true);
/// 反射执行方法
method.invoke(assetManager, PATH);
// 创建自己的Resources
Resources resources = new Resources(assetManager, createDisplayMetrics(), createConfiguration());
/*
* getIdentifier 根据名字拿id
* name: 资源名
* defType: 资源类型
* defPackage: 所在包名
* return:如果返回0则表示没有找到
*/
/// 加载drawable
int drawableId = resources.getIdentifier("shark", "drawable", "com.skin.skin_pack_making");
// 加载string
int stringId = resources.getIdentifier("hello_skin", "string", "com.skin.skin_pack_making");
// 加载color
int colorId = resources.getIdentifier("global_background", "color", "com.skin.skin_pack_making");
mImageView.setImageDrawable(resources.getDrawable(drawableId, null));
mTextView.setText(resources.getString(stringId));
mTextView.setBackgroundColor(resources.getColor(colorId, null));
} catch (Exception e) {
e.printStackTrace();
showDialog("出错了" + e.getMessage());
}
需要注意的是,这里得通过名字来获取id
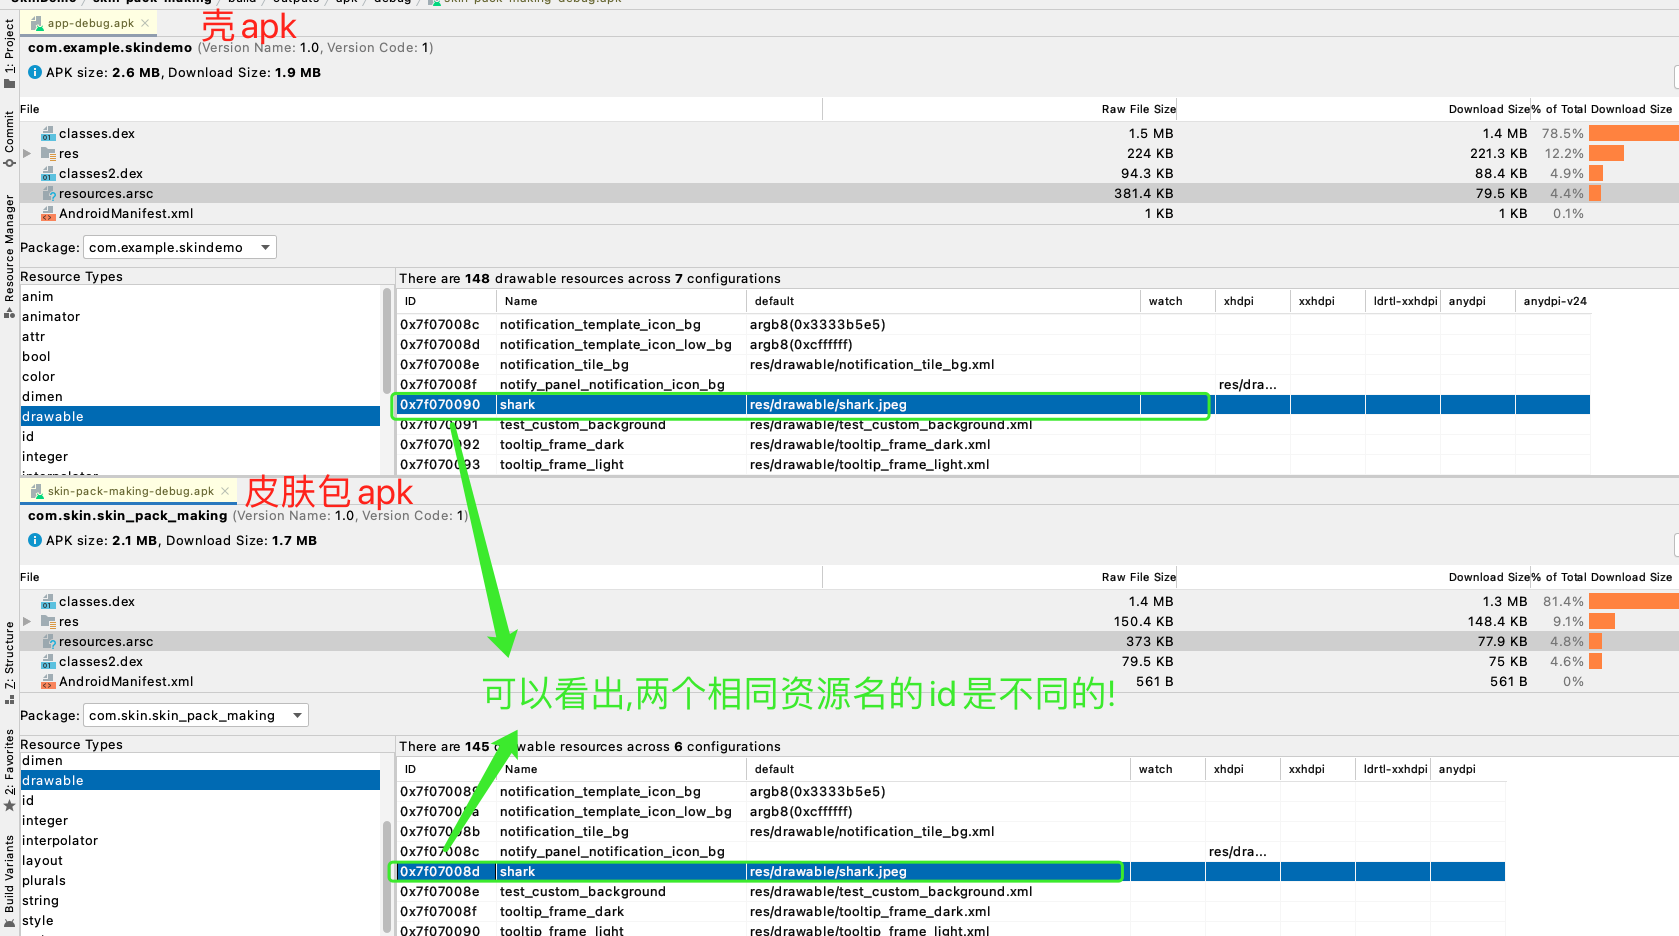
当我们加载一个drawable,id,color或者string的时候,在加载的时候都会替换成id
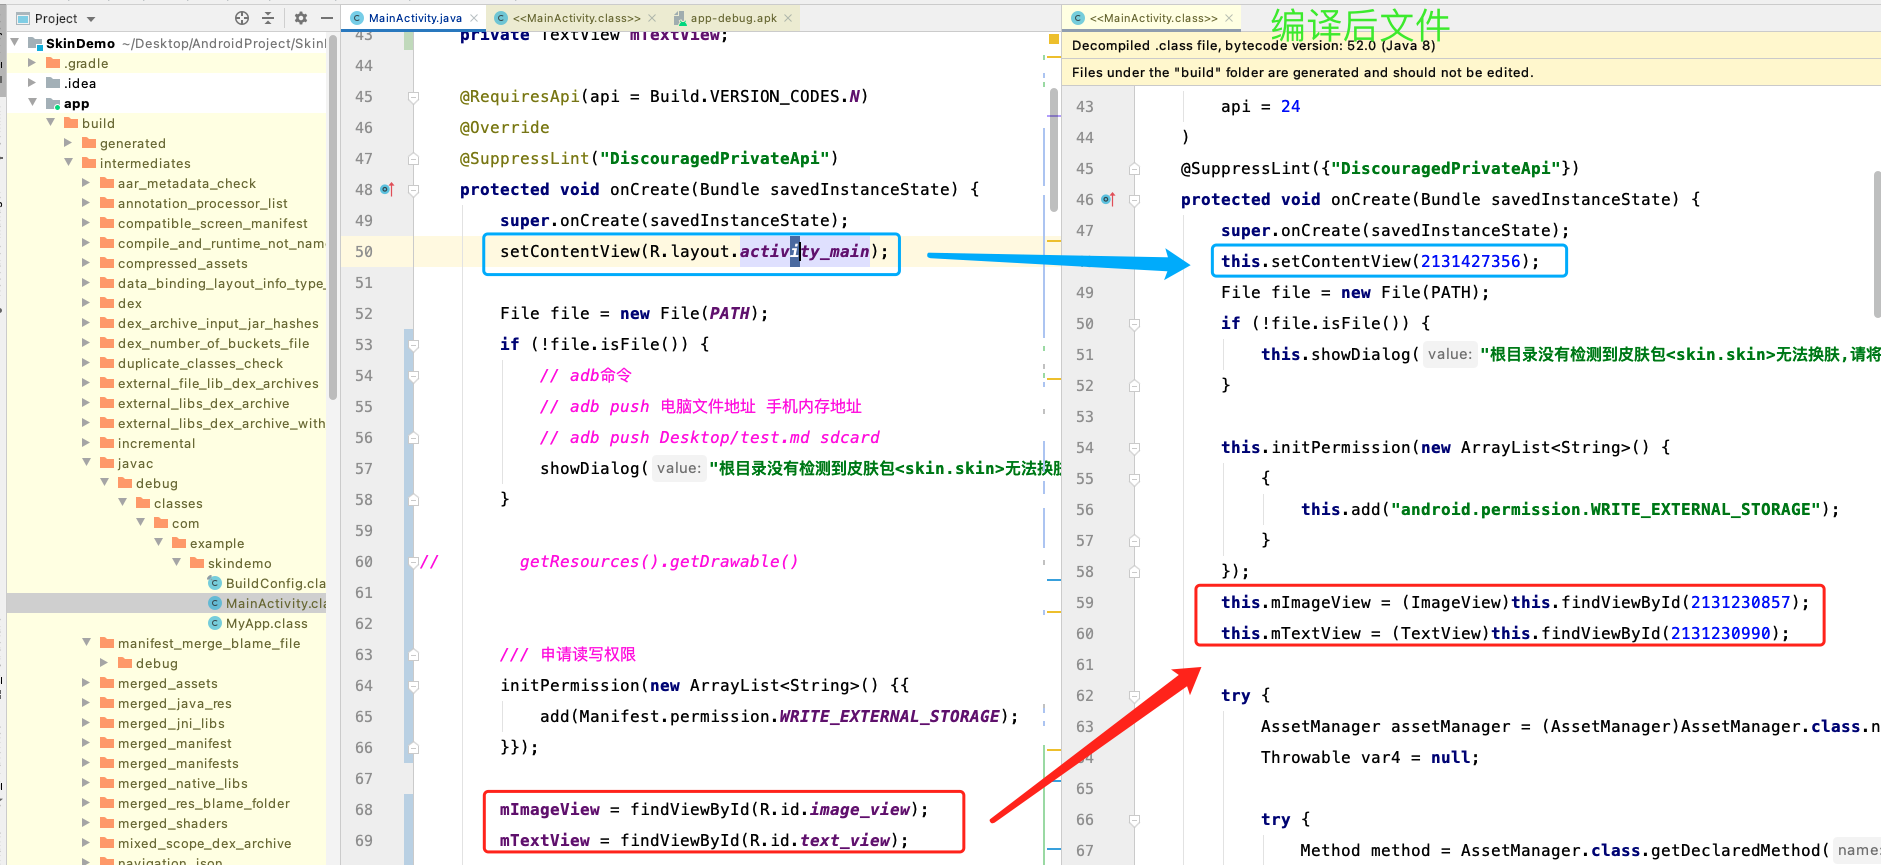
各个apk生成的id肯定是各不相同的,所以我们找的是皮肤包中的资源id,
最后再来看看今天完成的效果:
请下载level-simple分支:完整代码
git clone -b level-simple https://gitee.com/lanyangyangzzz/skin-demo.git
原创不易,您的点赞就是对我最大的支持!
下一篇:android setContentView() / LayoutInflater 源码解析
热门文章:
- android MD 进阶[五] CoordinatorLayout 从源码到实战…
- android View生命周期
- android MD进阶[四] NestedScrollView 从源码到实战…
- android 浅析RecyclerView回收复用机制及实战(仿探探效果)
- Android进阶 -事件冲突与解决方案大揭秘
