在这篇博客中,我们将了解如何将顶点颜色烘焙到纹理中。 其用例是某些照片扫描资产,其中颜色数据保存到顶点颜色中。 我们将了解如何使用 remesher 和聚合器管道来完成此操作。 我们还将介绍如何为顶点颜色材质创建着色网络以及如何从模型后处理中删除顶点颜色。
这个博客或多或少与我们的将纹理烘焙为顶点颜色博客相反,在那篇博客中我们采取了相反的方式; 纹理到顶点颜色。
此示例将使用 Blender 中的 Simplygon 集成,但相同的概念可以应用于 Simplygon API 的所有其他集成。
NSDT在线工具推荐: Three.js AI纹理开发包 - YOLO合成数据生成器 - GLTF/GLB在线编辑 - 3D模型格式在线转换 - 可编程3D场景编辑器
1、需要解决的问题
我们要优化的资源是没有 UV 的照片扫描资源,其中颜色数据保存为顶点颜色。 我们想要的输出是一个模型,其中颜色数据保存在纹理中。 输入资源非常密集,因此我们希望使其更加轻量级。

2、使用remesh解决方案
由于我们的原始模型具有非常密集的几何形状,因此我们可能也希望减少其多边形数量。 我们的remesh管道非常适合这项任务。
2.1 Blender导出
第一步是从 Blender 导出到 Simplygon。 为此,我们将场景导出为 glTF,然后使用场景导入器将其导入 Simplygon。
def export_selection(sg, file_path):
    """Export the current selected objects into Simplygon."""
    bpy.ops.export_scene.gltf(filepath = file_path, use_selection=True)
    sceneImporter = sg.CreateSceneImporter()
    sceneImporter.SetImportFilePath(file_path)
    sceneImporter.Run()
    scene = sceneImporter.GetScene()
    return scene
2.2 设置顶点颜色着色网络
如果我们通过 UI 对资源执行颜色投射,我们将不会得到任何颜色输出。 原因是颜色存储在顶点颜色中而不是纹理中。 为了让颜色投射器理解我们想要使用顶点颜色作为输入,我们需要创建一个自定义着色网络。
首先,我们需要为基色添加材质通道。 在 Blender 中,这被称为 Basecolor。 然后我们可以创建一个顶点颜色节点并指定要使用的 VertexColorIndex。 在我们的例子中,我们只有一种顶点颜色,因此索引为 0。然后,我们将顶点颜色节点指定为材质颜色通道的着色网络。
def setup_vertex_color_material(sg, material, channel):
    """Set material to use vertex color as color."""

    material.AddMaterialChannel(channel)
    shading_node = sg.CreateShadingVertexColorNode()
    shading_node.SetVertexColorIndex(vertex_color_index)
    material.SetShadingNetwork(channel, shading_node)
一旦我们有了创建顶点颜色材质的函数,我们就可以迭代场景材质表中的每种材质,并将其设置为使用我们的自定义顶点颜色着色网络。
def setup_vertex_color_materials(sg, scene):
    """Set all materials in scene to vertex colored."""

    material_table = scene.GetMaterialTable()
    for i in range(0, material_table.GetMaterialsCount()):
        material = material_table.GetMaterial(i)
        setup_vertex_color_material(sg, material, color_channel)
2.3 创建remeshing管线
我们的remesh管道做了两件事; 创建一个水密的低多边形网格并将原始资源中的材料烘焙到其中。 这使得它非常适合我们的用例。 我们首先创建一个重新网格化管道,然后根据我们所需的模型输出质量设置 OnScreenSize。 值得一提的是,屏幕尺寸太大会导致缩放效果很差,在这种情况下,请查看我们的博客使用镶嵌属性加速重新网格化,了解如何加快速度。
映射图像负责将表面从原始模型转换为我们重新划分的模型。 我们需要创建一个来传输材质,因此需要将GenerateMappingImage 设置为True。 我们还可以使用TextureHeight和TextureWidth指定大小。
def create_pipline(sg):
    """Create remesing pipeline and color caster."""
    pipeline = sg.CreateRemeshingPipeline()
    settings = pipeline.GetRemeshingSettings()

    settings.SetOnScreenSize(resolution)

    mapping_image_settings = pipeline.GetMappingImageSettings()
    material_output_settings = mapping_image_settings.GetOutputMaterialSettings(0)
    material_output_settings.SetTextureHeight(texture_size)
    material_output_settings.SetTextureWidth(texture_size)
    mapping_image_settings.SetGenerateMappingImage(True)
    mapping_image_settings.SetTexCoordName("MaterialLOD")
为了能够烘焙颜色,我们在remesh管道中添加了一个调色器。 当我们运行管道时它会自动被转换。 我们需要指定的是要烘焙的 MaterialChannel,这应该与我们的顶点颜色材质输出 - 基色相同。
    caster = sg.CreateColorCaster()
    caster_settings = caster.GetColorCasterSettings()
    caster_settings.SetMaterialChannel( color_channel )
    pipeline.AddMaterialCaster( caster, 0 )
    return pipeline
2.4 导入Blender
为了将结果返回到 Blender,我们将使用场景导出器将优化后的场景导出为 gltf 文件。 然后我们可以导入到 Blender 中。
def import_results(sg, scene, file_path):
    """Import the Simplygon scene into Blender."""
    scene_exporter = sg.CreateSceneExporter()
    scene_exporter.SetExportFilePath(file_path)
    scene_exporter.SetScene(scene)
    scene_exporter.Run()
    bpy.ops.import_scene.gltf(filepath=file_path)
2.5 整合在一起
一旦创建了所有辅助函数,我们就可以将它们放在一起。 首先,我们将从 Blender 中导出选定的网格,然后设置我们的自定义顶点颜色材质。 之后,我们创建一个remesh管道并运行它。 最后我们将结果导入到 Blender 中。
def process_selection(sg):
    """Process selected mesh in Blender"""

    # Export scene from Blender and import it
    file_path = temp_path + file
    scene = export_selection(sg, file_path)

    # Setup vertex color shader
    setup_vertex_color_materials(sg, scene)

    # Process scene
    pipeline = create_pipline(sg)
    pipeline.RunScene(scene, Simplygon.EPipelineRunMode_RunInThisProcess)

    # Import result into Blender
    import_results(sg, scene, file_path)
2.6 remesh结果
最终结果是一个低多边形模型,其中顶点颜色被烘焙到纹理中。 非常适合用于运行时可视化。
| 资产 | 三角形 |
|---|---|
| 原始资产 | 673152 |
| 优化资产 | 988 |
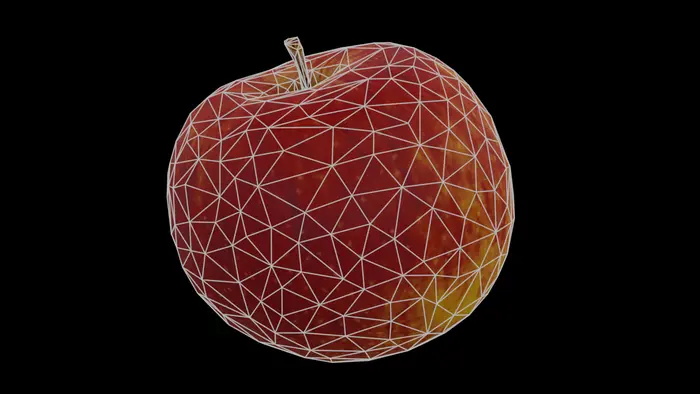
所有顶点颜色现在都被烘焙到纹理中:
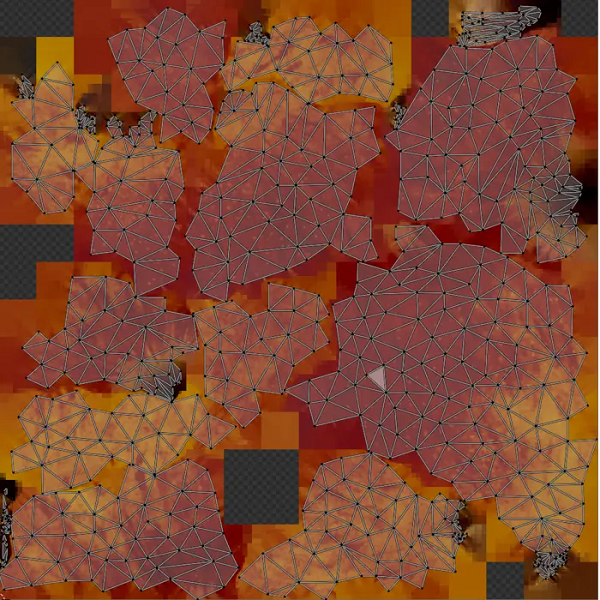
进一步改善我们的结果的一件事是添加一个法线脚轮,它可以将任何微小的几何细节转移到法线贴图中。
3、聚合解决方案
如果我们想保持几何体完整但只是烘焙 UV 贴图,我们可以使用聚合管道而不是重新划分网格。 代码的许多部分是相同的,因此我们将只讨论新的部分。
3.1 删除顶点颜色
由于我们的颜色数据现在驻留在纹理中,我们可以从场景中删除顶点颜色字段。 为此,我们首先通过创建包含所有 SceneMesh 节点的选择集来查找场景中的所有网格。 之后我们一一迭代它们。
def remove_vertex_weights(sg, scene, vertex_color_index):
    """Remove all vertex colors of index from scene."""

    scene_meshes_selection_set_id = scene.SelectNodes("SceneMesh")
    scene_meshes_selection_set = scene.GetSelectionSetTable().GetSelectionSet(scene_meshes_selection_set_id)
    # Loop through all meshes in the scene
    for node_id in range(scene_meshes_selection_set.GetItemCount()):
将节点安全投射到 SceneMesh 后,我们可以从中获取几何数据。 在这里我们可以操纵它,在我们的例子中,我们将通过调用RemoveColors来删除顶点颜色字段。 在我们的 Blender 资源中,这是顶点颜色索引 0。
        scene_mesh = Simplygon.spSceneMesh.SafeCast(scene.GetNodeByGUID( scene_meshes_selection_set.GetItem(node_id)))
        # Get geometry for mesh
        geometry = scene_mesh.GetGeometry()
        if not geometry:
            continue
        geometry.RemoveColors(vertex_color_index)
如果你的顶点颜色仅用于指导 Simplygon 使用顶点权重,则上述函数对于清理优化后的资源非常有用。 优化后可以调用该函数。
3.2 创建聚合管道
由于我们希望保持网格完整,因此我们使用聚合管道来处理网格。 如上所述,我们需要创建一个映射图像,用于从顶点颜色传输到纹理。 将 TexCoordGeneratorType 设置为 ETexcoordGeneratorType_Parameterizer 后,我们使用 Simplygon 中的参数化器为我们的资源创建新的 UV 贴图。
def create_aggregaton_pipline(sg):
    """Create aggregation pipeline with color material caster"""

    aggregation_pipeline = sg.CreateAggregationPipeline()
    aggregator_settings = aggregation_pipeline.GetAggregationSettings()
    mapping_image_settings = aggregation_pipeline.GetMappingImageSettings()
    mapping_image_settings.SetGenerateMappingImage(True)
    material_settings = mapping_image_settings.GetOutputMaterialSettings(0)
    material_settings.SetTextureWidth(texture_size)
    material_settings.SetTextureHeight(texture_size)

    mapping_image_settings.SetTexCoordGeneratorType( Simplygon.ETexcoordGeneratorType_Parameterizer )
然后,我们以与重新网格化管道完全相同的方式添加色彩投射器。
    caster = sg.CreateColorCaster()
    caster_settings = caster.GetColorCasterSettings()
    caster_settings.SetMaterialChannel( color_channel )
    aggregation_pipeline.AddMaterialCaster( caster, 0 )
    return aggregation_pipeline
3.3 整合在一起
与remesh解决方案的唯一区别是我们在运行管道后调用 remove_vertex_weights。
def process_selection(sg):
    """Remove and bake decals on selected meshes."""

    # Export scene from Blender and import it
    file_path = temp_path + file
    scene = export_selection(sg, file_path)

    # Setup vertex color shader
    setup_vertex_color_materials(sg, scene)

    # Aggregate optimized scene
    pipeline = create_aggregaton_pipline(sg)
    pipeline.RunScene(scene, Simplygon.EPipelineRunMode_RunInThisProcess)

    # Clean up vertex colors
    remove_vertex_weights(sg, scene, vertex_color_index)

    # Import result into Blender
    import_results(sg, scene, file_path)
3.4 聚合结果
运行聚合脚本后的结果是网格保持完整的模型。
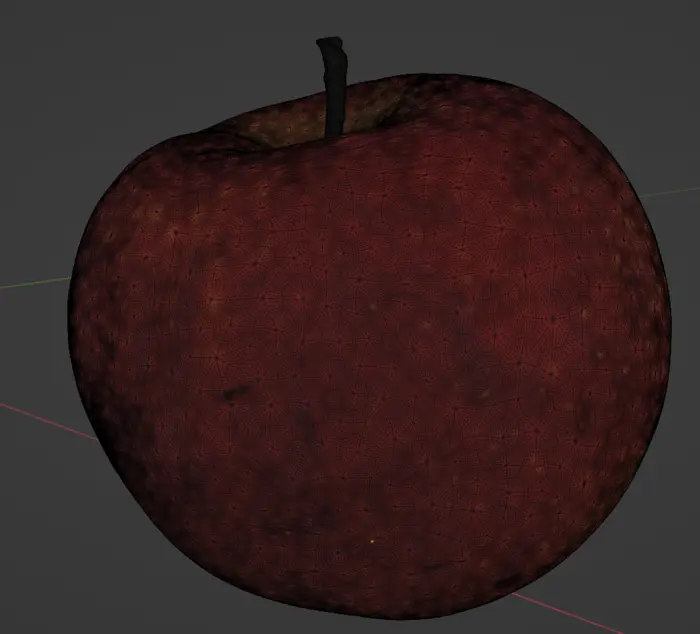
我们已经从中删除了顶点颜色字段,并将颜色保存在纹理中,并使用新烘焙的 UV 贴图来访问它。 图像的黑色部分是非常密集的 UV 图。
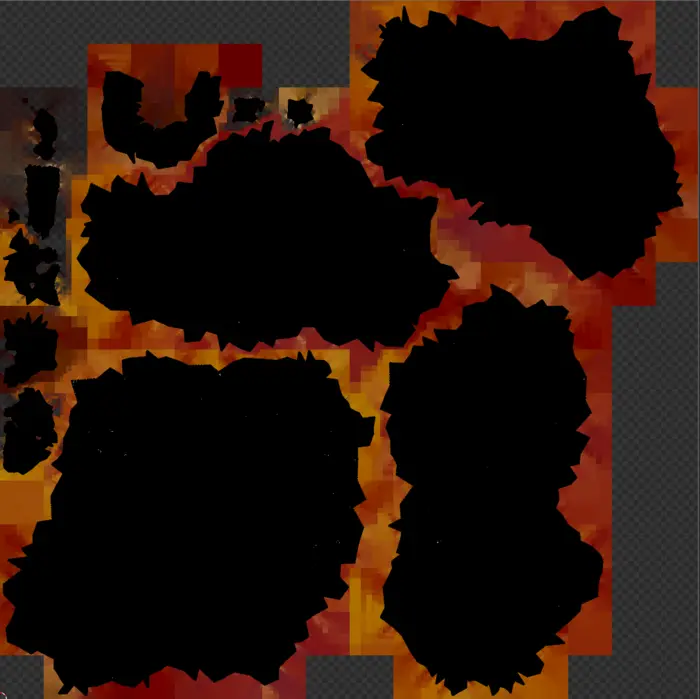
其用例可能相当狭窄,但我们希望将其包括在内,因为它还介绍了如何从网格优化后删除顶点颜色,这是一个可能有用的代码片段。
4、完整的代码
remesh方案:
# Copyright (c) Microsoft Corporation.
# Licensed under the MIT license.

import os
import bpy
import gc

from simplygon10 import simplygon_loader
from simplygon10 import Simplygon

file = "scene.glb"
temp_path = "c:/tmp/"

# Change parameters for quality
texture_size = 4096
resolution = 300

# Blender specific settings
color_channel = "Basecolor"
vertex_color_index = 0

def export_selection(sg, file_path):
    """Export the current selected objects into Simplygon."""
    bpy.ops.export_scene.gltf(filepath = file_path, use_selection=True)
    sceneImporter = sg.CreateSceneImporter()
    sceneImporter.SetImportFilePath(file_path)
    sceneImporter.Run()
    scene = sceneImporter.GetScene()
    return scene


def import_results(sg, scene, file_path):
    """Import the Simplygon scene into Blender."""
    scene_exporter = sg.CreateSceneExporter()
    scene_exporter.SetExportFilePath(file_path)
    scene_exporter.SetScene(scene)
    scene_exporter.Run()
    bpy.ops.import_scene.gltf(filepath=file_path)


def create_pipline(sg):
    """Create remesing pipeline and color caster."""
    pipeline = sg.CreateRemeshingPipeline()
    settings = pipeline.GetRemeshingSettings()

    settings.SetOnScreenSize(resolution)

    mapping_image_settings = pipeline.GetMappingImageSettings()
    material_output_settings = mapping_image_settings.GetOutputMaterialSettings(0)
    material_output_settings.SetTextureHeight(texture_size)
    material_output_settings.SetTextureWidth(texture_size)
    mapping_image_settings.SetGenerateMappingImage(True)
    mapping_image_settings.SetTexCoordName("MaterialLOD")

    caster = sg.CreateColorCaster()
    caster_settings = caster.GetColorCasterSettings()
    caster_settings.SetMaterialChannel( color_channel )
    pipeline.AddMaterialCaster( caster, 0 )
    return pipeline


def setup_vertex_color_materials(sg, scene):
    """Set all materials in scene to vertex colored."""

    material_table = scene.GetMaterialTable()
    for i in range(0, material_table.GetMaterialsCount()):
        material = material_table.GetMaterial(i)
        setup_vertex_color_material(sg, material, color_channel)


def setup_vertex_color_material(sg, material, channel):
    """Set material to use vertex color as color."""

    material.AddMaterialChannel(channel)
    shading_node = sg.CreateShadingVertexColorNode()
    shading_node.SetVertexColorIndex(vertex_color_index)
    material.SetShadingNetwork(channel, shading_node)

def process_selection(sg):
    """Process selected mesh in Blender"""

    # Export scene from Blender and import it
    file_path = temp_path + file
    scene = export_selection(sg, file_path)

    # Setup vertex color shader
    setup_vertex_color_materials(sg, scene)

    # Process scene
    pipeline = create_pipline(sg)
    pipeline.RunScene(scene, Simplygon.EPipelineRunMode_RunInThisProcess)

    # Import result into Blender
    import_results(sg, scene, file_path)


def main():
    sg = simplygon_loader.init_simplygon()

    process_selection(sg)
    sg = None
    gc.collect()


if __name__== "__main__":
    main()
聚合方案:
# Copyright (c) Microsoft Corporation.
# Licensed under the MIT license.

import os
import bpy
import gc

from simplygon10 import simplygon_loader
from simplygon10 import Simplygon

file = "scene.glb"
temp_path = "c:/tmp/"


# Change parameters for quality
texture_size = 4096


# Blender specific settings
color_channel = "Basecolor"
vertex_color_index = 0


def export_selection(sg, file_path):
    """Export the current selected objects into Simplygon."""
    bpy.ops.export_scene.gltf(filepath = file_path, use_selection=True)
    sceneImporter = sg.CreateSceneImporter()
    sceneImporter.SetImportFilePath(file_path)
    sceneImporter.Run()
    scene = sceneImporter.GetScene()
    return scene


def import_results(sg, scene, file_path):
    """Import the Simplygon scene into Blender."""
    scene_exporter = sg.CreateSceneExporter()
    scene_exporter.SetExportFilePath(file_path)
    scene_exporter.SetScene(scene)
    scene_exporter.Run()
    bpy.ops.import_scene.gltf(filepath=file_path)


def create_aggregaton_pipline(sg):
    """Create aggregation pipeline with color material caster"""

    aggregation_pipeline = sg.CreateAggregationPipeline()
    aggregator_settings = aggregation_pipeline.GetAggregationSettings()
    mapping_image_settings = aggregation_pipeline.GetMappingImageSettings()
    mapping_image_settings.SetGenerateMappingImage(True)
    material_settings = mapping_image_settings.GetOutputMaterialSettings(0)
    material_settings.SetTextureWidth(texture_size)
    material_settings.SetTextureHeight(texture_size)

    mapping_image_settings.SetTexCoordGeneratorType( Simplygon.ETexcoordGeneratorType_Parameterizer )

    caster = sg.CreateColorCaster()
    caster_settings = caster.GetColorCasterSettings()
    caster_settings.SetMaterialChannel( color_channel )
    aggregation_pipeline.AddMaterialCaster( caster, 0 )
    return aggregation_pipeline


def setup_vertex_color_materials(sg, scene):
    """Set all materials in scene to vertex colored."""

    material_table = scene.GetMaterialTable()
    for i in range(0, material_table.GetMaterialsCount()):
        material = material_table.GetMaterial(i)
        setup_vertex_color_material(sg, material, color_channel)

def setup_vertex_color_material(sg, material, channel):
    """Set material to use vertex color as color."""

    material.AddMaterialChannel(channel)
    shading_node = sg.CreateShadingVertexColorNode()
    shading_node.SetVertexColorIndex(vertex_color_index)
    material.SetShadingNetwork(channel, shading_node)

def remove_vertex_weights(sg, scene, vertex_color_index):
    """Remove all vertex colors of index from scene."""

    scene_meshes_selection_set_id = scene.SelectNodes("SceneMesh")
    scene_meshes_selection_set = scene.GetSelectionSetTable().GetSelectionSet(scene_meshes_selection_set_id)
    # Loop through all meshes in the scene
    for node_id in range(scene_meshes_selection_set.GetItemCount()):
        scene_mesh = Simplygon.spSceneMesh.SafeCast(scene.GetNodeByGUID( scene_meshes_selection_set.GetItem(node_id)))
        # Get geometry for mesh
        geometry = scene_mesh.GetGeometry()
        if not geometry:
            continue
        geometry.RemoveColors(vertex_color_index)


def process_selection(sg):
    """Remove and bake decals on selected meshes."""

    # Export scene from Blender and import it
    file_path = temp_path + file
    scene = export_selection(sg, file_path)

    # Setup vertex color shader
    setup_vertex_color_materials(sg, scene)

    # Aggregate optimized scene
    pipeline = create_aggregaton_pipline(sg)
    pipeline.RunScene(scene, Simplygon.EPipelineRunMode_RunInThisProcess)

    # Clean up vertex colors
    remove_vertex_weights(sg, scene, vertex_color_index)

    # Import result into Blender
    import_results(sg, scene, file_path)


def main():
    sg = simplygon_loader.init_simplygon()

    process_selection(sg)
    sg = None
    gc.collect()


if __name__== "__main__":
    main()
原文链接:顶点颜色转纹理 - BimAnt
