在这个教程中,我们将使用可微渲染学习给定参考图像的相机的 [x, y, z] 位置。
我们将首先使用相机的起始位置初始化渲染器。 然后,我们将使用它来生成图像,使用参考图像计算损失,最后通过整个管道进行反向传播以更新相机的位置。
NSDT在线工具推荐: Three.js AI纹理开发包 - YOLO合成数据生成器 - GLTF/GLB在线编辑 - 3D模型格式在线转换 - 可编程3D场景编辑器
本教程展示如何:
- 从 .obj 文件加载网格
- 初始化相机、着色器和渲染器,
- 渲染网格
- 使用损失函数和优化器设置优化循环
首先确保已安装torch和torchvision,并使用以下代码安装pytorch3d:
import os
import sys
import torch
need_pytorch3d=False
try:
    import pytorch3d
except ModuleNotFoundError:
    need_pytorch3d=True
if need_pytorch3d:
    if torch.__version__.startswith("2.1.") and sys.platform.startswith("linux"):
        # We try to install PyTorch3D via a released wheel.
        pyt_version_str=torch.__version__.split("+")[0].replace(".", "")
        version_str="".join([
            f"py3{sys.version_info.minor}_cu",
            torch.version.cuda.replace(".",""),
            f"_pyt{pyt_version_str}"
        ])
        !pip install fvcore iopath
        !pip install --no-index --no-cache-dir pytorch3d -f https://dl.fbaipublicfiles.com/pytorch3d/packaging/wheels/{version_str}/download.html
    else:
        # We try to install PyTorch3D from source.
        !pip install 'git+https://github.com/facebookresearch/pytorch3d.git@stable'
导入模块:
import os
import torch
import numpy as np
from tqdm.notebook import tqdm
import imageio
import torch.nn as nn
import torch.nn.functional as F
import matplotlib.pyplot as plt
from skimage import img_as_ubyte

# io utils
from pytorch3d.io import load_obj

# datastructures
from pytorch3d.structures import Meshes

# 3D transformations functions
from pytorch3d.transforms import Rotate, Translate

# rendering components
from pytorch3d.renderer import (
    FoVPerspectiveCameras, look_at_view_transform, look_at_rotation,
    RasterizationSettings, MeshRenderer, MeshRasterizer, BlendParams,
    SoftSilhouetteShader, HardPhongShader, PointLights, TexturesVertex,
)
1、加载obj模型
我们将加载一个 obj 文件并创建一个 Meshes 对象。 网格是 PyTorch3D 中提供的独特数据结构,用于处理批量不同大小的网格。 它有几个在渲染管道中使用的有用的类方法:
# Set the cuda device
if torch.cuda.is_available():
    device = torch.device("cuda:0")
    torch.cuda.set_device(device)
else:
    device = torch.device("cpu")

# Load the obj and ignore the textures and materials.
verts, faces_idx, _ = load_obj("./data/teapot.obj")
faces = faces_idx.verts_idx

# Initialize each vertex to be white in color.
verts_rgb = torch.ones_like(verts)[None]  # (1, V, 3)
textures = TexturesVertex(verts_features=verts_rgb.to(device))

# Create a Meshes object for the teapot. Here we have only one mesh in the batch.
teapot_mesh = Meshes(
    verts=[verts.to(device)],
    faces=[faces.to(device)],
    textures=textures
)
如果在克隆 PyTorch3D 存储库后在本地运行此笔记本,则网格将已经可用。 如果使用 Google Colab,请获取网格并将其保存在路径 data/ 中:
!mkdir -p data
!wget -P data https://dl.fbaipublicfiles.com/pytorch3d/data/teapot/teapot.obj
2、优化设置
PyTorch3D 中的渲染器由光栅器和着色器组成,每个组件都有许多子组件,例如相机(正交/透视)。 在这里,我们初始化其中一些组件,并对其余组件使用默认值。
2.1 创建渲染器
为了优化相机位置,我们将使用渲染器,它仅生成对象的轮廓,而不应用任何照明或阴影。 我们还将初始化另一个应用完整 Phong 着色的渲染器,并使用它来可视化输出。
# Initialize a perspective camera.
cameras = FoVPerspectiveCameras(device=device)

# To blend the 100 faces we set a few parameters which control the opacity and the sharpness of
# edges. Refer to blending.py for more details.
blend_params = BlendParams(sigma=1e-4, gamma=1e-4)

# Define the settings for rasterization and shading. Here we set the output image to be of size
# 256x256. To form the blended image we use 100 faces for each pixel. We also set bin_size and max_faces_per_bin to None which ensure that
# the faster coarse-to-fine rasterization method is used. Refer to rasterize_meshes.py for
# explanations of these parameters. Refer to docs/notes/renderer.md for an explanation of
# the difference between naive and coarse-to-fine rasterization.
raster_settings = RasterizationSettings(
    image_size=256,
    blur_radius=np.log(1. / 1e-4 - 1.) * blend_params.sigma,
    faces_per_pixel=100,
)

# Create a silhouette mesh renderer by composing a rasterizer and a shader.
silhouette_renderer = MeshRenderer(
    rasterizer=MeshRasterizer(
        cameras=cameras,
        raster_settings=raster_settings
    ),
    shader=SoftSilhouetteShader(blend_params=blend_params)
)


# We will also create a Phong renderer. This is simpler and only needs to render one face per pixel.
raster_settings = RasterizationSettings(
    image_size=256,
    blur_radius=0.0,
    faces_per_pixel=1,
)
# We can add a point light in front of the object.
lights = PointLights(device=device, location=((2.0, 2.0, -2.0),))
phong_renderer = MeshRenderer(
    rasterizer=MeshRasterizer(
        cameras=cameras,
        raster_settings=raster_settings
    ),
    shader=HardPhongShader(device=device, cameras=cameras, lights=lights)
)
2.2 创建参考图像
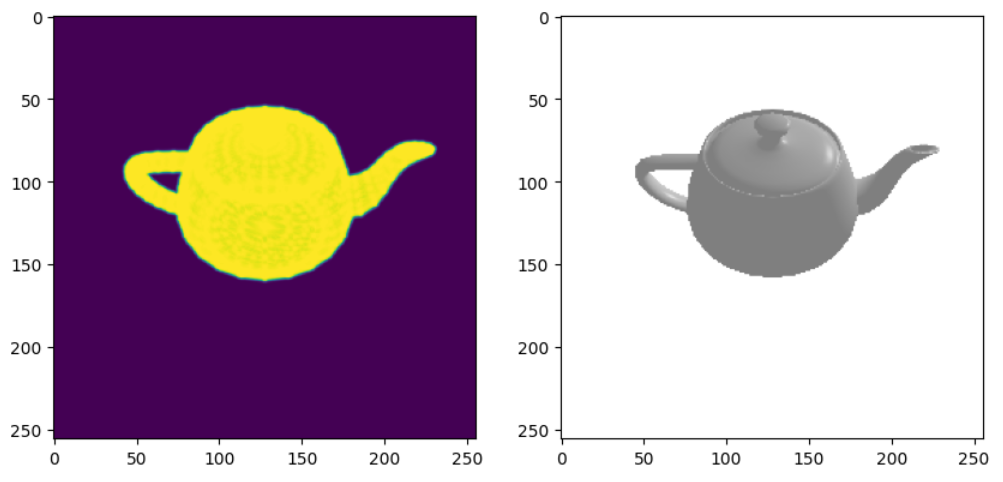
我们将首先定位茶壶并生成图像。 我们使用辅助函数将茶壶旋转到所需的视角。 然后我们可以使用渲染器来生成图像。 在这里,我们将使用两个渲染器并可视化轮廓和全着色图像。
世界坐标系定义为+Y向上、+X向左和+Z向内。世界坐标中的茶壶的壶嘴指向左侧。
我们定义了一个位于 z 轴正方向上的相机,因此可以看到右侧的喷口。
# Select the viewpoint using spherical angles
distance = 3   # distance from camera to the object
elevation = 50.0   # angle of elevation in degrees
azimuth = 0.0  # No rotation so the camera is positioned on the +Z axis.

# Get the position of the camera based on the spherical angles
R, T = look_at_view_transform(distance, elevation, azimuth, device=device)

# Render the teapot providing the values of R and T.
silhouette = silhouette_renderer(meshes_world=teapot_mesh, R=R, T=T)
image_ref = phong_renderer(meshes_world=teapot_mesh, R=R, T=T)

silhouette = silhouette.cpu().numpy()
image_ref = image_ref.cpu().numpy()

plt.figure(figsize=(10, 10))
plt.subplot(1, 2, 1)
plt.imshow(silhouette.squeeze()[..., 3])  # only plot the alpha channel of the RGBA image
plt.grid(False)
plt.subplot(1, 2, 2)
plt.imshow(image_ref.squeeze())
plt.grid(False)
输出如下:
2.3 创建基础模型
这里我们创建一个简单的模型类并初始化相机位置的参数。
class Model(nn.Module):
    def __init__(self, meshes, renderer, image_ref):
        super().__init__()
        self.meshes = meshes
        self.device = meshes.device
        self.renderer = renderer

        # Get the silhouette of the reference RGB image by finding all non-white pixel values.
        image_ref = torch.from_numpy((image_ref[..., :3].max(-1) != 1).astype(np.float32))
        self.register_buffer('image_ref', image_ref)

        # Create an optimizable parameter for the x, y, z position of the camera.
        self.camera_position = nn.Parameter(
            torch.from_numpy(np.array([3.0,  6.9, +2.5], dtype=np.float32)).to(meshes.device))

    def forward(self):

        # Render the image using the updated camera position. Based on the new position of the
        # camera we calculate the rotation and translation matrices
        R = look_at_rotation(self.camera_position[None, :], device=self.device)  # (1, 3, 3)
        T = -torch.bmm(R.transpose(1, 2), self.camera_position[None, :, None])[:, :, 0]   # (1, 3)

        image = self.renderer(meshes_world=self.meshes.clone(), R=R, T=T)

        # Calculate the silhouette loss
        loss = torch.sum((image[..., 3] - self.image_ref) ** 2)
        return loss, image
3、初始化模型和优化器
现在我们可以创建上述模型的实例并为相机位置参数设置优化器。
# We will save images periodically and compose them into a GIF.
filename_output = "./teapot_optimization_demo.gif"
writer = imageio.get_writer(filename_output, mode='I', duration=0.3)
# Initialize a model using the renderer, mesh and reference image
model = Model(meshes=teapot_mesh, renderer=silhouette_renderer, image_ref=image_ref).to(device)
# Create an optimizer. Here we are using Adam and we pass in the parameters of the model
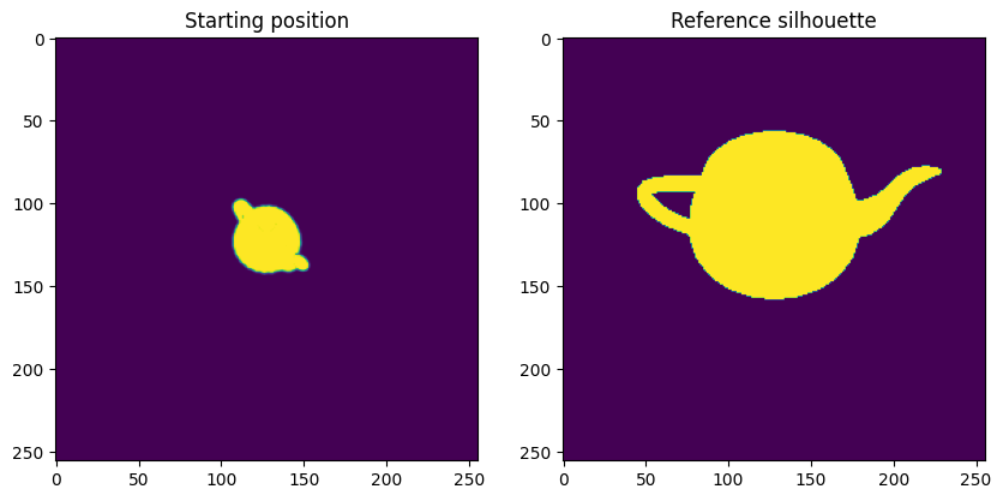
optimizer = torch.optim.Adam(model.parameters(), lr=0.05)可视化起始位置和参考位置:
plt.figure(figsize=(10, 10))

_, image_init = model()
plt.subplot(1, 2, 1)
plt.imshow(image_init.detach().squeeze().cpu().numpy()[..., 3])
plt.grid(False)
plt.title("Starting position")

plt.subplot(1, 2, 2)
plt.imshow(model.image_ref.cpu().numpy().squeeze())
plt.grid(False)
plt.title("Reference silhouette");
输出如下:
4、运行优化
我们运行前向和后向传递的多次迭代,并每 10 次迭代保存输出。
loop = tqdm(range(200))
for i in loop:
    optimizer.zero_grad()
    loss, _ = model()
    loss.backward()
    optimizer.step()

    loop.set_description('Optimizing (loss %.4f)' % loss.data)

    if loss.item() < 200:
        break

    # Save outputs to create a GIF.
    if i % 10 == 0:
        R = look_at_rotation(model.camera_position[None, :], device=model.device)
        T = -torch.bmm(R.transpose(1, 2), model.camera_position[None, :, None])[:, :, 0]   # (1, 3)
        image = phong_renderer(meshes_world=model.meshes.clone(), R=R, T=T)
        image = image[0, ..., :3].detach().squeeze().cpu().numpy()
        image = img_as_ubyte(image)
        writer.append_data(image)

        plt.figure()
        plt.imshow(image[..., :3])
        plt.title("iter: %d, loss: %0.2f" % (i, loss.data))
        plt.axis("off")

writer.close()
迭代期间输出如下:
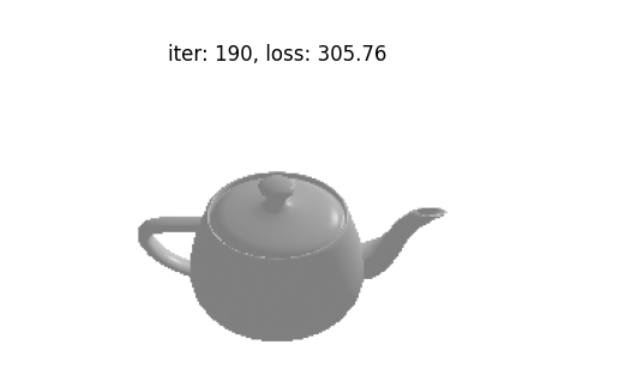
完成后可以查看 ./teapot_optimization_demo.gif,优化过程的炫酷 gif:
5、结束语
在本教程中,我们学习了如何从 obj 文件加载网格,初始化名为 Meshes 的 PyTorch3D 数据结构,设置由光栅化器和着色器组成的渲染器,设置包括模型和损失函数的优化循环,并运行优化。
原文链接:用可微渲染优化相机位置 - BimAnt