0 前沿
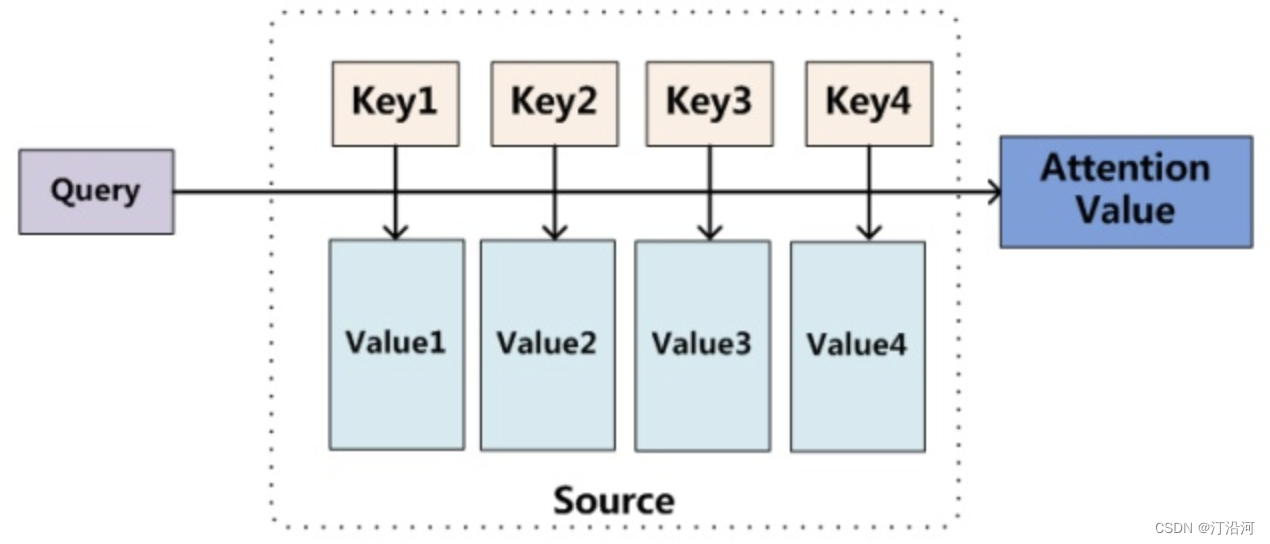
注意力机制其本质是一种通过网络自主学习出的一组权重系数,并以“动态加权”的方式来强调我们所感兴趣的区域同时抑制不相关背景区域的机制。核心目标也是从众多信息中选择出对当前任务目标更关键的信息。
Multi-Head Attention(MHA):MHA是一种多头注意力模型,将注意力机制扩展到多个头,从而增强模型对于不同特征的关注度。
MHA 的输入包括三个向量:查询向量(query)、键向量(key)和值向量(value)。对于一个给定的查询向量,MHA 会对键向量进行加权求和,权重由查询向量和键向量之间的相似度计算得到,然后将得到的加权和乘以值向量进行输出。在计算相似度时,常用的方法是使用点积(dot product)或者是双线性(bilinear)计算。
MHA 的多头机制可以有效提高模型的表达能力,同时也可以使模型学习到更加多样化和复杂的特征。在多头机制下,输入的序列数据会被分成多个头,每个头进行独立的计算,得到不同的输出。这些输出最后被拼接在一起,形成最终的输出。
MHA 的流程可以总结为以下几步:
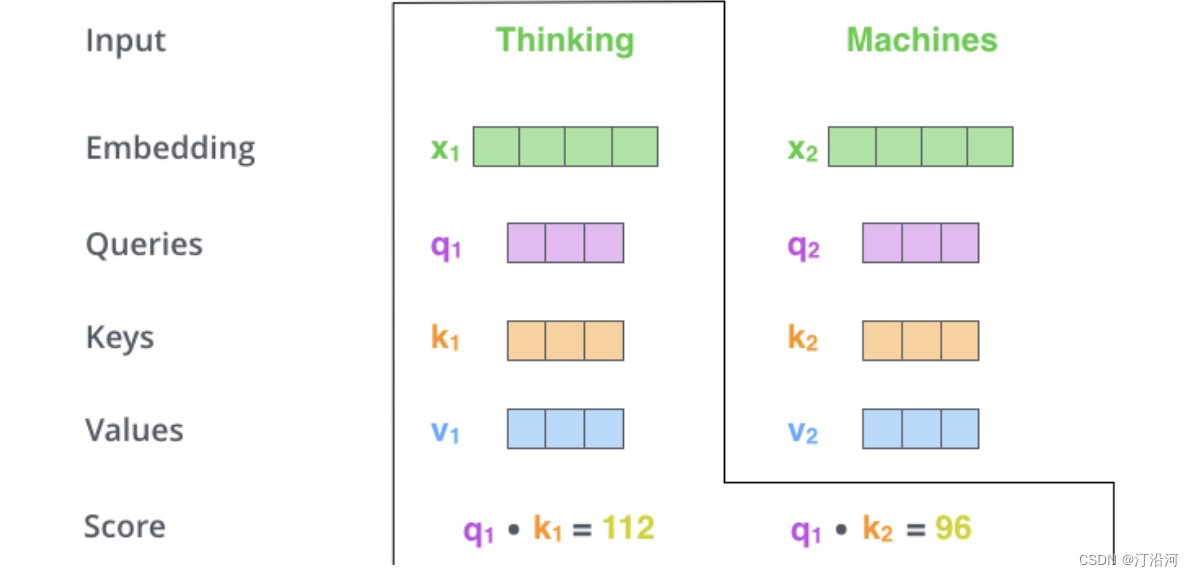
- 对每个词向量,生成query-vec, key-vec, value-vec(生成方法为分别乘以三个矩阵,这些矩阵在训练过程中需要学习。);
- 计算attention就是计算一个score. 对“Thinking Matchines”这句话,对“Thinking”(pos#1)计算attention score。我们需要计算每个词与“Thinking”的score,这个score决定着编码“Thinking”时(某个固定位置时),每个输入词需要集中多少关注度。这个score,通过“Thing”对应query-vector与所有词的key-vec依次做点积得到。所以当我们处理位置#1时,第一个score是q1和k1的点积,第二个score是q1和k2的点积。
- 然后加上softmax操作,归一化score使得全为正数且加和为1;
- 将softmax值与value-vec按位相乘。保留关注词的value值,削弱非相关词的value值。
- 将所有加权向量加和,产生该位置的self-attention的输出结果;
nn.MultiheadAttention(embed_dim=hidden_size, num_heads=num_heads, batch_first=True, dropout=0.8)
embed_dim: 所有的头总的输入维度
num_heads: 单注意力头的总共个数
每个头的维度是 embed_dim // num_heads
attention_output, attn_out_put_weijghts = MultiheadAttention(output,output,output)
output = (batch_szie, timestamp, hidden_size)
attention_output = (batch_szie, timestamp, hidden_size)
attn_out_put_weijghts: 输出的是注意力层的权重
import numpy as np
import pandas as pd
import torch
import torch.nn as nn
from torch.nn.utils import weight_norm
#import tushare as ts
from sklearn.preprocessing import StandardScaler, MinMaxScaler
from torch.utils.data import TensorDataset
from tqdm import tqdm
from sklearn.model_selection import train_test_split

import matplotlib.pyplot as plt
import sys
import os
import gc
import argparse
import warnings

warnings.filterwarnings('ignore')


class Config():
    data_path = '../data/data1/train/power.csv'
    timestep = 18  # 时间步长,就是利用多少时间窗口
    batch_size = 32  # 批次大小
    feature_size = 1  # 每个步长对应的特征数量,这里只使用1维,
    hidden_size = 64
    num_heads = 2
    output_size = 1  # 由于是单卷机和输出任务,最终输出层大小为1
    num_layers = 2  # lstm的层数
    epochs = 10 # 迭代轮数
    best_loss = 0 # 记录损失
    learning_rate = 0.003 # 学习率
    model_name = 'tcn' # 模型名称
    save_path = './{}.pth'.format(model_name) # 最优模型保存路径

config = Config()
# 读取数据
train_power_forecast_history = pd.read_csv('../data/data1/train/power_forecast_history.csv')
train_power = pd.read_csv('../data/data1/train/power.csv')
train_stub_info = pd.read_csv('../data/data1/train/stub_info.csv')

test_power_forecast_history = pd.read_csv('../data/data1/test/power_forecast_history.csv')
test_stub_info = pd.read_csv('../data/data1/test/stub_info.csv')

# 聚合数据
train_df = train_power_forecast_history.groupby(['id_encode','ds']).head(1)
del train_df['hour']

test_df = test_power_forecast_history.groupby(['id_encode','ds']).head(1)
del test_df['hour']

tmp_df = train_power.groupby(['id_encode','ds'])['power'].sum()
tmp_df.columns = ['id_encode','ds','power']

# 合并充电量数据
train_df = train_df.merge(tmp_df, on=['id_encode','ds'], how='left')

### 合并数据
train_df = train_df.merge(train_stub_info, on='id_encode', how='left')
test_df = test_df.merge(test_stub_info, on='id_encode', how='left')

h3_code = pd.read_csv("../data/h3_lon_lat.csv")
train_df = train_df.merge(h3_code,on='h3')
test_df = test_df.merge(h3_code,on='h3')

# 卡尔曼平滑
def kalman_filter(data, q=0.0001, r=0.01):
    # 后验初始值
    x0 = data[0]                              # 令第一个估计值,为当前值
    p0 = 1.0
    # 存结果的列表
    x = [x0]
    for z in data[1:]:                        # kalman 滤波实时计算,只要知道当前值z就能计算出估计值(后验值)x0
        # 先验值
        x1_minus = x0                         # X(k|k-1) = AX(k-1|k-1) + BU(k) + W(k), A=1,BU(k) = 0
        p1_minus = p0 + q                     # P(k|k-1) = AP(k-1|k-1)A' + Q(k), A=1
        # 更新K和后验值
        k1 = p1_minus / (p1_minus + r)        # Kg(k)=P(k|k-1)H'/[HP(k|k-1)H' + R], H=1
        x0 = x1_minus + k1 * (z - x1_minus)   # X(k|k) = X(k|k-1) + Kg(k)[Z(k) - HX(k|k-1)], H=1
        p0 = (1 - k1) * p1_minus              # P(k|k) = (1 - Kg(k)H)P(k|k-1), H=1
        x.append(x0)                          # 由输入的当前值z 得到估计值x0存入列表中,并开始循环到下一个值
    return x


#kalman_filter()
train_df['new_label'] = 0
for i in range(500):
    #print(i)
    label = i
    #train_df[train_df['id_encode']==labe]['power'].values
    train_df.loc[train_df['id_encode']==label, 'new_label'] = kalman_filter(data=train_df[train_df['id_encode']==label]['power'].values)

### 数据预处理
train_df['flag'] = train_df['flag'].map({'A':0,'B':1})
test_df['flag'] = test_df['flag'].map({'A':0,'B':1})

def get_time_feature(df, col):

    df_copy = df.copy()
    prefix = col + "_"
    df_copy['new_'+col] = df_copy[col].astype(str)

    col = 'new_'+col
    df_copy[col] = pd.to_datetime(df_copy[col], format='%Y%m%d')
    #df_copy[prefix + 'year'] = df_copy[col].dt.year
    df_copy[prefix + 'month'] = df_copy[col].dt.month
    df_copy[prefix + 'day'] = df_copy[col].dt.day
    # df_copy[prefix + 'weekofyear'] = df_copy[col].dt.weekofyear
    df_copy[prefix + 'dayofweek'] = df_copy[col].dt.dayofweek
    # df_copy[prefix + 'is_wknd'] = df_copy[col].dt.dayofweek // 6
    df_copy[prefix + 'quarter'] = df_copy[col].dt.quarter
    # df_copy[prefix + 'is_month_start'] = df_copy[col].dt.is_month_start.astype(int)
    # df_copy[prefix + 'is_month_end'] = df_copy[col].dt.is_month_end.astype(int)
    del df_copy[col]

    return df_copy

train_df = get_time_feature(train_df, 'ds')
test_df = get_time_feature(test_df, 'ds')

train_df = train_df.fillna(999)
test_df = test_df.fillna(999)

cols = [f for f in train_df.columns if f not in ['ds','power','h3','new_label']]


scaler = MinMaxScaler(feature_range=(0,1))
scalar_falg = False
if scalar_falg == True:
    df_for_training_scaled = scaler.fit_transform(train_df[cols+['new_label']])
    df_for_testing_scaled= scaler.transform(test_df[cols])
else:
    df_for_training_scaled = train_df[cols+['new_label']]
    df_for_testing_scaled = test_df[cols]
#df_for_training_scaled
# scaler_label = MinMaxScaler(feature_range=(0,1))
# label_for_training_scaled = scaler_label.fit_transform(train_df['new_label']..values)
# label_for_testing_scaled= scaler_label.transform(train_df['new_label'].values)
# #df_for_training_scaled

#x_train, x_test, y_train, y_test = train_test_split(df_for_training_scaled.values, train_df['new_label'].values,shuffle=False, test_size=0.2)
x_train_list = []
y_train_list = []
x_test_list = []
y_test_list = []

for i in range(500):
    temp_df = df_for_training_scaled[df_for_training_scaled.id_encode==i]
    x_train, x_test, y_train, y_test = train_test_split(temp_df[cols].values, temp_df['new_label'].values,shuffle=False, test_size=0.2)
    x_train_list.append(x_train)
    y_train_list.append(y_train)

    x_test_list.append(x_test)
    y_test_list.append(y_test)

x_train = np.concatenate(x_train_list)
y_train = np.concatenate(y_train_list)

x_test = np.concatenate(x_test_list)
y_test = np.concatenate(y_test_list)

# 将数据转为tensor
x_train_tensor = torch.from_numpy(x_train.reshape(-1,config.timestep,1)).to(torch.float32)
y_train_tensor = torch.from_numpy(y_train.reshape(-1,1)).to(torch.float32)
x_test_tensor = torch.from_numpy(x_test.reshape(-1,config.timestep,1)).to(torch.float32)
y_test_tensor = torch.from_numpy(y_test.reshape(-1,1)).to(torch.float32)

# 5.形成训练数据集
train_data = TensorDataset(x_train_tensor, y_train_tensor)
test_data = TensorDataset(x_test_tensor, y_test_tensor)

# 6.将数据加载成迭代器
train_loader = torch.utils.data.DataLoader(train_data,
                                           config.batch_size,
                                           True)

test_loader = torch.utils.data.DataLoader(test_data,
                                          config.batch_size,
                                          True)

# 7.定义LSTM + Attention网络
# 7.定义LSTM + Attention网络
class LSTM_Attention(nn.Module):
    def __init__(self, feature_size, timestep, hidden_size, num_layers, num_heads, output_size):
        super(LSTM_Attention, self).__init__()
        self.hidden_size = hidden_size
        self.num_layers = num_layers

        # LSTM层
        self.lstm = nn.LSTM(feature_size, hidden_size, num_layers, batch_first=True)

        # 注意力层
        self.attention = nn.MultiheadAttention(embed_dim=hidden_size, num_heads=num_heads, batch_first=True, dropout=0.8)

        # 输出层
        self.fc1 = nn.Linear(hidden_size * timestep, 256)
        self.fc2 = nn.Linear(256, output_size)

        # 激活函数
        self.relu = nn.ReLU()

    def forward(self, x, hidden=None):
        batch_size = x.shape[0] # 获取批次大小

        # 初始化隐层状态
        if hidden is None:
            h_0 = x.data.new(self.num_layers, batch_size, self.hidden_size).fill_(0).float()
            c_0 = x.data.new(self.num_layers, batch_size, self.hidden_size).fill_(0).float()
        else:
            h_0, c_0 = hidden

        # LSTM运算
        output, (h_0, c_0) = self.lstm(x, (h_0, c_0)) # output[32, 18, 64] batch_size, timestamp, hiddensize
        #print(output.shape)

        # 注意力计算
        attention_output, attn_output_weights = self.attention(output, output, output)
        #print(attention_output.shape) # [32, 18, 64]
#         print(attn_output_weights.shape) # [20, 18, 32]

        # 展开
        output = attention_output.flatten(start_dim=1) # [32, 1280]

        # 全连接层
        output = self.fc1(output) # [32, 256]
        output = self.relu(output)

        output = self.fc2(output) # [32, output_size]

        return output
model = LSTM_Attention(config.feature_size, config.timestep, config.hidden_size, config.num_layers,
                       config.num_heads, config.output_size)  # 定义LSTM + Attention网络

loss_function = nn.MSELoss()  # 定义损失函数
optimizer = torch.optim.AdamW(model.parameters(), lr=config.learning_rate)  # 定义优化器
# 8.模型训练
for epoch in range(config.epochs):
    model.train()
    running_loss = 0
    train_bar = tqdm(train_loader)  # 形成进度条
    for data in train_bar:
        x_train, y_train = data  # 解包迭代器中的X和Y
        optimizer.zero_grad()
        y_train_pred = model(x_train)
        loss = loss_function(y_train_pred, y_train.reshape(-1, 1))
        loss.backward()
        optimizer.step()

        running_loss += loss.item()
        train_bar.desc = "train epoch[{}/{}] loss:{:.3f}".format(epoch + 1,
                                                                 config.epochs,
                                                                 loss)

    # 模型验证
    model.eval()
    test_loss = 0
    with torch.no_grad():
        test_bar = tqdm(test_loader)
        for data in test_bar:
            x_test, y_test = data
            y_test_pred = model(x_test)
            test_loss = loss_function(y_test_pred, y_test.reshape(-1, 1))

    if test_loss < config.best_loss:
        config.best_loss = test_loss
        torch.save(model.state_dict(), save_path)

print('Finished Training')
train epoch[1/10] loss:355662.344: 100%|███████████████████████████████████████████████████████████████████████████████████████████████████████████████████████████████| 3725/3725 [00:36<00:00, 102.96it/s] 100%|████████████████████████████████████████████████████████████████████████████████████████████████████████████████████████████████████████████████████████████████████| 934/934 [00:02<00:00, 321.67it/s] train epoch[2/10] loss:1219.896: 100%|█████████████████████████████████████████████████████████████████████████████████████████████████████████████████████████████████| 3725/3725 [00:37<00:00, 100.11it/s] 100%|████████████████████████████████████████████████████████████████████████████████████████████████████████████████████████████████████████████████████████████████████| 934/934 [00:02<00:00, 333.49it/s] train epoch[3/10] loss:444266.594: 100%|███████████████████████████████████████████████████████████████████████████████████████████████████████████████████████████████| 3725/3725 [00:35<00:00, 105.06it/s] 100%|████████████████████████████████████████████████████████████████████████████████████████████████████████████████████████████████████████████████████████████████████| 934/934 [00:02<00:00, 342.23it/s] train epoch[4/10] loss:2522337.500: 100%|██████████████████████████████████████████████████████████████████████████████████████████████████████████████████████████████| 3725/3725 [00:35<00:00, 105.29it/s] 100%|████████████████████████████████████████████████████████████████████████████████████████████████████████████████████████████████████████████████████████████████████| 934/934 [00:02<00:00, 340.12it/s] train epoch[5/10] loss:2511534.750: 100%|██████████████████████████████████████████████████████████████████████████████████████████████████████████████████████████████| 3725/3725 [00:35<00:00, 105.03it/s] 100%|████████████████████████████████████████████████████████████████████████████████████████████████████████████████████████████████████████████████████████████████████| 934/934 [00:02<00:00, 332.68it/s] train epoch[6/10] loss:1475551.125: 100%|██████████████████████████████████████████████████████████████████████████████████████████████████████████████████████████████| 3725/3725 [00:35<00:00, 106.35it/s] 100%|████████████████████████████████████████████████████████████████████████████████████████████████████████████████████████████████████████████████████████████████████| 934/934 [00:03<00:00, 300.62it/s] train epoch[7/10] loss:272458.906: 100%|███████████████████████████████████████████████████████████████████████████████████████████████████████████████████████████████| 3725/3725 [00:35<00:00, 104.16it/s] 100%|████████████████████████████████████████████████████████████████████████████████████████████████████████████████████████████████████████████████████████████████████| 934/934 [00:02<00:00, 326.25it/s] train epoch[8/10] loss:1289131.000: 100%|██████████████████████████████████████████████████████████████████████████████████████████████████████████████████████████████| 3725/3725 [00:35<00:00, 105.09it/s] 100%|████████████████████████████████████████████████████████████████████████████████████████████████████████████████████████████████████████████████████████████████████| 934/934 [00:03<00:00, 308.32it/s] train epoch[9/10] loss:2472.249: 100%|█████████████████████████████████████████████████████████████████████████████████████████████████████████████████████████████████| 3725/3725 [00:36<00:00, 102.99it/s] 100%|████████████████████████████████████████████████████████████████████████████████████████████████████████████████████████████████████████████████████████████████████| 934/934 [00:02<00:00, 315.44it/s] train epoch[10/10] loss:805158.875: 100%|██████████████████████████████████████████████████████████████████████████████████████████████████████████████████████████████| 3725/3725 [00:36<00:00, 100.76it/s] 100%|████████████████████████████████████████████████████████████████████████████████████████████████████████████████████████████████████████████████████████████████████| 934/934 [00:03<00:00, 310.95it/s]
Finished Training
ref:
Attention机制的基本思想与实现原理 - 张浩在路上
注意力机制详解_章鱼杰的博客-CSDN博客
