在chromium通信系统-mojo系统(一)-ipcz系统基本概念一文中我们介绍了ipcz的基本概念。 本章我们来通过代码分析它的实现。
handle系统
为了不对上层api暴露太多细节,实现解耦,也方便于传输,ipcz系统使用handle表示一个对象,handle类似于文件描述符,用IpczHandle类型表示ipcz系统内的一个对象。一个可以用IpczHandle 句柄表示的对象必须是APIObject子类。APIObject数据结构如下
class APIObject : public RefCounted {
 public:
 enum ObjectType {
    kNode,
    kPortal,
    kBox,
    kTransport,
    kParcel,
  };
  static APIObject* FromHandle(IpczHandle handle) {
    return reinterpret_cast<APIObject*>(static_cast<uintptr_t>(handle));
  }

  // Takes ownership of an APIObject from an existing `handle`.
  static Ref<APIObject> TakeFromHandle(IpczHandle handle) {
    return AdoptRef(
        reinterpret_cast<APIObject*>(static_cast<uintptr_t>(handle)));
  }

  // Returns an IpczHandle which can be used to reference this object. The
  // reference is not owned by the caller.
  IpczHandle handle() const { return reinterpret_cast<uintptr_t>(this); }

  // Releases ownership of a Ref<APIObject> to produce a new IpczHandle which
  // implicilty owns the released reference.
  static IpczHandle ReleaseAsHandle(Ref<APIObject> object) {
    return static_cast<IpczHandle>(
        reinterpret_cast<uintptr_t>(object.release()));
  }
......
}
APIObject 提供四个方法,FromHandle() 和 TakeFromHandle() 方法用于将IpczHandle() 转化为具体对象。handle() 和 ReleaseAsHandle() 方法用于将对象转成IpczHandle句柄。这里我们还可以看到系统里有5中类型的APIObject,分别是:
- kNode 代表IPCZ Node(节点)对象
- kPortal 代表ipcz Portal(端口)对象
- kBox 用于其他可传输的ipcz对象
- kTransport 代表ipcz Transport(传输点)对象
- kParcel 代表ipcz Parcel(消息)对象
同Node通讯
我们先以最简单的本地通讯为例子,分析代码实现。进程启动后一般会创建一个全局Node节点。
IpczResult CreateNode(const IpczDriver* driver,
                      IpczCreateNodeFlags flags,
                      const IpczCreateNodeOptions* options,
                      IpczHandle* node) {
 ......
  auto node_ptr = ipcz::MakeRefCounted<ipcz::Node>(
      (flags & IPCZ_CREATE_NODE_AS_BROKER) != 0 ? ipcz::Node::Type::kBroker
                                                : ipcz::Node::Type::kNormal,
      *driver, options);
  *node = ipcz::Node::ReleaseAsHandle(std::move(node_ptr));
  return IPCZ_RESULT_OK;
  ......
}

Node::Node(Type type,
           const IpczDriver& driver,
           const IpczCreateNodeOptions* options)
    : type_(type), driver_(driver), options_(CopyOrUseDefaultOptions(options)) {
  if (type_ == Type::kBroker) {
    // Only brokers assign their own names.
    // broker 节点是有名字的
    assigned_name_ = GenerateRandomName();

  } else {
    DVLOG(4) << "Created new non-broker node " << this;
  }
}
创建Node
Node 对象的创建很简单, 直接实例化了Node对象,如果该Node对象是broker node, 要为其分配名字。
我们分析不跨进程通信。所以是单个Node内通信,不需要使用Transport,也不涉及NodeLink, 所以我们直接分析两个端点Portal的创建。
创建Port
third_party/ipcz/src/api.cc
IpczResult OpenPortals(IpczHandle node_handle,
                       uint32_t flags,
                       const void* options,
                       IpczHandle* portal0,
                       IpczHandle* portal1) {
  ipcz::Node* node = ipcz::Node::FromHandle(node_handle);
......
  ipcz::Portal::Pair portals = ipcz::Portal::CreatePair(WrapRefCounted(node));
  *portal0 = ipcz::Portal::ReleaseAsHandle(std::move(portals.first));
  *portal1 = ipcz::Portal::ReleaseAsHandle(std::move(portals.second));
  return IPCZ_RESULT_OK;
}
OpenPortals 调用ipcz::Portal::CreatePair()创建一对通信端口
// static
Portal::Pair Portal::CreatePair(Ref<Node> node) {
  Router::Pair routers{MakeRefCounted<Router>(), MakeRefCounted<Router>()};
......

  const OperationContext context{OperationContext::kAPICall};
  auto links = LocalRouterLink::CreatePair(LinkType::kCentral, routers,
                                           LocalRouterLink::kStable);
  routers.first->SetOutwardLink(context, std::move(links.first));
  routers.second->SetOutwardLink(context, std::move(links.second));
  return {MakeRefCounted<Portal>(node, std::move(routers.first)),
          MakeRefCounted<Portal>(node, std::move(routers.second))};
}
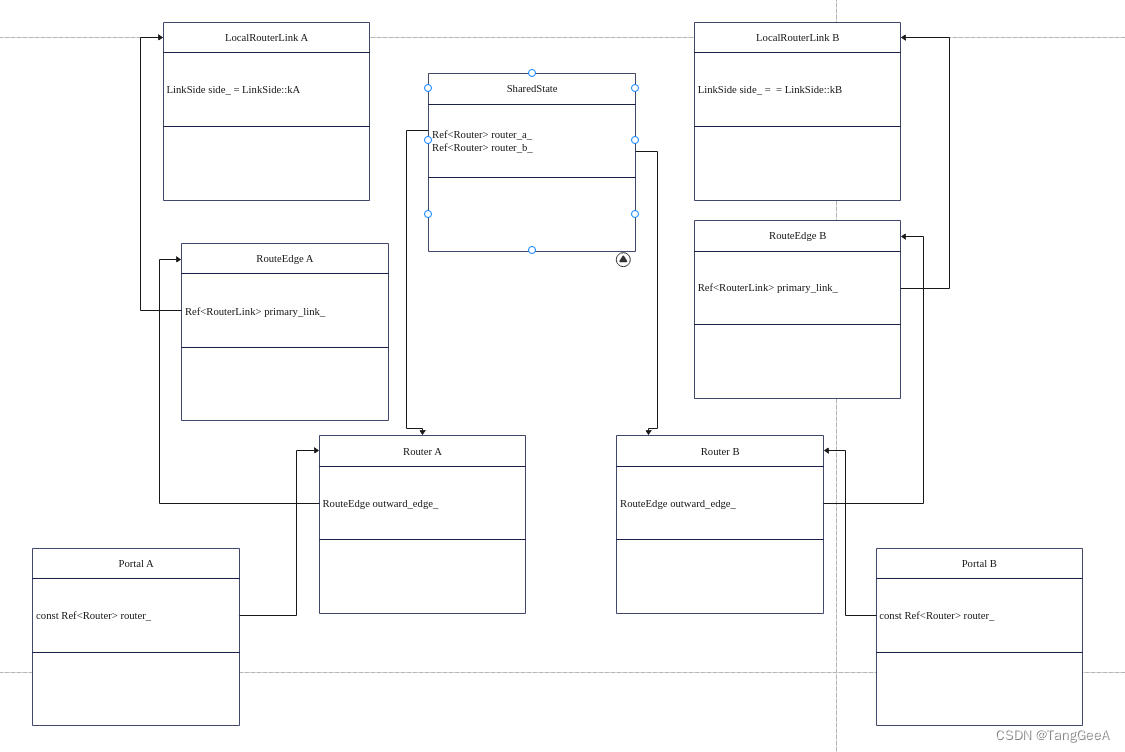
CreatePair首先实例化了两个Router。 然后创建两个LocalRouterLink, 由于这两个端口在同一个进程内,不能跨进程通信,所以创建了两个LocalRouterLink, 这里local代表本地。 LocalRouter维护两个Router之间的对等关系。 到这里总体数据关系如下。
发送消息
有了一对Portal之后我们就可以通过一个Portal给另一个Portal发送消息。发送消息使用Put方法。
third_party/ipcz/src/api.cc
IpczResult Put(IpczHandle portal_handle,
               const void* data,
               size_t num_bytes,
               const IpczHandle* handles,
               size_t num_handles,
               uint32_t flags,
               const void* options) {
  ipcz::Portal* portal = ipcz::Portal::FromHandle(portal_handle);
  if (!portal) {
    return IPCZ_RESULT_INVALID_ARGUMENT;
  }
  return portal->Put(
      absl::MakeSpan(static_cast<const uint8_t*>(data), num_bytes),
      absl::MakeSpan(handles, num_handles));
}
函数有7个参数:
- portal_handle 表示目标Portal
- data 表示要发送的数据
- num_bytes 发送的数据大小
- handles 要发送的ipcz handle对象
- num_handles 要发送的ipcz handle对象个数
- flags 标志位
- options 控制选项
函数直接获取Portal对象,然后调用Portal的put方法进行数据写出。
IpczResult Portal::Put(absl::Span<const uint8_t> data,
                       absl::Span<const IpczHandle> handles) {
  // 1、将要发送的IpczHandle 对象转成APIObject
  std::vector<Ref<APIObject>> objects;
  if (!ValidateAndAcquireObjectsForTransitFrom(*this, handles, objects)) {
    return IPCZ_RESULT_INVALID_ARGUMENT;
  }
  ......
  // 2、分配一个parcel对象作为消息对象(可序列化和反序列化)
  Parcel parcel;
  const IpczResult allocate_result = router_->AllocateOutboundParcel(
      data.size(), /*allow_partial=*/false, parcel);
 ......
  // 3、将要发送的数据拷贝到parcel对应的数据内存中
  if (!data.empty()) {
    memcpy(parcel.data_view().data(), data.data(), data.size());
  }
  parcel.CommitData(data.size());
  // 4、将要发送的IPCZHandle 对象放到parcel中
  parcel.SetObjects(std::move(objects));

  // 5、发送消息
  const IpczResult result = router_->SendOutboundParcel(parcel);
......
  }

  return result;
}
Portal::Put 函数首先将要发送的Ipcz handle对象转成APIObject对象。 然后分配要发送的消息parcel对象, 将要发送的数据和ipcz handle对象都放到parcel中。 最后将消息传递给partal 对应的router对象。
先来看看parcel 对象的分配
IpczResult Router::AllocateOutboundParcel(size_t num_bytes,
                                          bool allow_partial,
                                          Parcel& parcel) {
  Ref<RouterLink> outward_link;
  {
    absl::MutexLock lock(&mutex_);
    outward_link = outward_edge_.primary_link();
  }

  if (outward_link) {
    outward_link->AllocateParcelData(num_bytes, allow_partial, parcel);
  } else {
    parcel.AllocateData(num_bytes, allow_partial, nullptr);
  }
  return IPCZ_RESULT_OK;
}
如果对应的outward_link 存在,则使用outward_link分配parcel对应的内存(跨进程通信的时候需要在共享内存中分配)。 如果outward_link不存在则直接使用Parcel->AllocateData()分配本地内存。这里我们会看使用routerlink分配消息内存的场景。在同Node内通信的情况,使用的是LocalRouterLink。
void LocalRouterLink::AllocateParcelData(size_t num_bytes,
                                         bool allow_partial,
                                         Parcel& parcel) {
  parcel.AllocateData(num_bytes, allow_partial, /*memory=*/nullptr);
}
LocalRouterLink的消息内存分配其实也是调用Parcel.AllocateData() 方法分配本地内存。
接下来我们再来看看Router是如何将消息发送出去的。
介绍发送消息之前我们先来介绍一下Router的数据结构。
  // The edge connecting this router outward to another, toward the portal on
  // the other side of the route.
  RouteEdge outward_edge_ ABSL_GUARDED_BY(mutex_);

  // The edge connecting this router inward to another, closer to the portal on
  // our own side of the route. Only present for proxying routers: terminal
  // routers by definition can have no inward edge.
  absl::optional<RouteEdge> inward_edge_ ABSL_GUARDED_BY(mutex_);

  // A special inward edge which when present bridges this route with another
  // route. This is used only to implement route merging.
  std::unique_ptr<RouteEdge> bridge_ ABSL_GUARDED_BY(mutex_);

  // Parcels received from the other end of the route. If this is a terminal
  // router, these may be retrieved by the application via a controlling portal;
  // otherwise they will be forwarded along `inward_edge_` as soon as possible.
  ParcelQueue inbound_parcels_ ABSL_GUARDED_BY(mutex_);

  // Parcels transmitted directly from this router (if sent by a controlling
  // portal) or received from an inward peer which sent them outward toward this
  // Router. These parcels generally only accumulate if there is no outward link
  // present when attempting to transmit them, and they are forwarded along
  // `outward_edge_` as soon as possible.
  ParcelQueue outbound_parcels_ ABSL_GUARDED_BY(mutex_);
Router类有几个比较关键的成员变量
outward_edge_: 输出边,用于链接输出方向的router。
inward_edge_: 输入边,用于链接输入方向的router, 只有作为代理路由器使用的时候才需要inward_edge_
bridge_:桥接边,路由合并的过程中会用到。
inbound_parcels_: 接收消息队列。
outbound_parcels_: 发送消息队列。
关于 inward_edge_ 和 bridge_ 我们在分析路由代理和合并过程中再具体说明。这里为了后面分析我们展开看一下ParcelQueue是如何管理消息的。 ipcz消息系统中,为了解决消息同步问题,使消息不会被乱序处理,会为每个消息分配一个序号,所有消息的序号是连续递增的,处理消息的时候要按照消息顺序去处理,发送和接收都是如此, 所以ipcz中的消息队列要具备有序处理消息的能力。
class ParcelQueue : public SequencedQueue<Parcel, ParcelQueueTraits> {
 public:
  bool Consume(size_t num_bytes_consumed, absl::Span<IpczHandle> handles);
};
ipcz系统使用ParcelQueue描述消息队列, ParcelQueue 继承自SequencedQueue, SequencedQueue 具备维护消息顺序的能力。
class SequencedQueue {
......
  using EntryStorage = absl::InlinedVector<absl::optional<Entry>, 4>;
  using EntryView = absl::Span<absl::optional<Entry>>;

  // This is a sparse vector of queued elements indexed by a relative sequence
  // number.
  //
  // It's sparse because the queue may push elements out of sequence order (e.g.
  // elements 42 and 47 may be pushed before elements 43-46.)
  EntryStorage storage_;

  // A view into `storage_` whose first element corresponds to the entry with
  // sequence number `base_sequence_number_`. As elements are popped, the view
  // moves forward in `storage_`. When convenient, we may reallocate `storage_`
  // and realign this view.
  EntryView entries_{storage_.data(), 0};

  // The sequence number which corresponds to `entries_` index 0 when `entries_`
  // is non-empty.
  SequenceNumber base_sequence_number_{0};
}
SequencedQueue的核心数据是storage_ 和 entries_, storage_的类型是absl::InlinedVector<absl::optional, 4>, 是一个类似Vectory的结构,也就是维护了一个消息数组。 entries_数据结构为 absl::Span<absl::optional> 类型,是storage_中连续的一部分。 base_sequence_number_则代表未消费的消息的最小的序号。 为了方便直观的说明,我们用途描述一个存在乱序消息的某个场景。
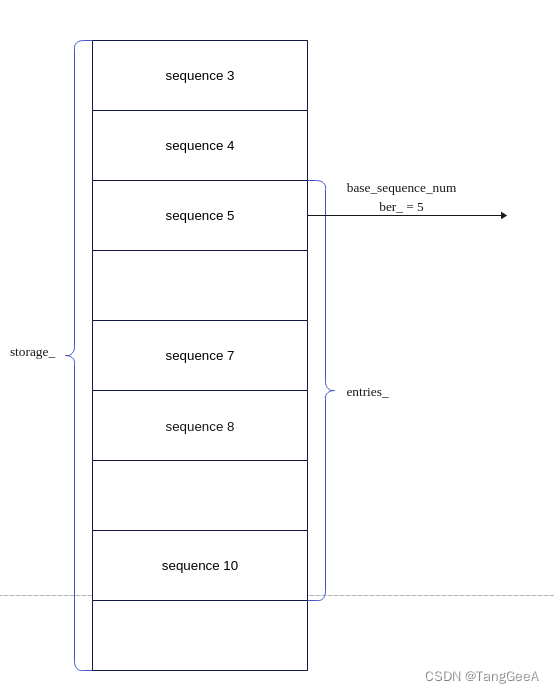
如图所示, storage_表示全部存储,entries_表示storage_的一部分连续的存储,这部分存储代表已经存放了待处理消息的部分。这里sequence 3 和 sequence 4 以及之前的消息已经被处理掉了。 base_sequence_num表示最小的应该被消费的sequence 序号。 中间sequence 6 和 sequence 9 还没有进到队列(因为存在乱序)。 使得entries_是一个稀疏队列。 entries_的开头只想base_sequence_num应该放入的消息地址, entry_的结尾指向当前队列里最大序号的消息。
我们看一下SequencedQueue的两个关键函数
  SequenceNumber current_sequence_number() const {
    return base_sequence_number_;
  }


  size_t GetNumAvailableElements() const {
    if (entries_.empty() || !entries_[0].has_value()) {
      return 0;
    }

    return entries_[0]->num_entries_in_span;
  }


  SequenceNumber GetCurrentSequenceLength() const {
    return SequenceNumber{current_sequence_number().value() +
                          GetNumAvailableElements()};
  }
current_sequence_number() 返回下一个未被处理sequence number。
GetNumAvailableElements() 返回从base_sequence_number_ 开始连续的如队列的消息个数,这些消息是可以被处理的。(如果base_sequence_number_消息还没有入队列,后面的消息也不能处理。)
GetCurrentSequenceLength 表示现在可处理的最大消息序号的下一个序号(也就是从base_sequence_number_开始向后第一个未入队列的消息序号)。
了解了ParcelQueue之后我们继续分析Router的消息发送过程
IpczResult Router::SendOutboundParcel(Parcel& parcel) {
  Ref<RouterLink> link;
  {
 ......
    const SequenceNumber sequence_number =
        outbound_parcels_.GetCurrentSequenceLength();
    // 发送消息,不存在乱序,所以下一个消息的sequence_number就是outbound_parcels_.GetCurrentSequenceLength()
    parcel.set_sequence_number(sequence_number);
    if (outward_edge_.primary_link() &&
        outbound_parcels_.SkipElement(sequence_number,
                                      parcel.data_view().size())) {
        // SkipElement 为真表示该消息就是下一个要消费的消息,没必要入队列, 直接设置通过link 进行发送
      link = outward_edge_.primary_link();
    } else {
      // 前面有积压的消息待发送, 消息直接放到outbound_parcels_队列
      const bool push_ok =
          outbound_parcels_.Push(sequence_number, std::move(parcel));
      ABSL_ASSERT(push_ok);
    }
  }

  const OperationContext context{OperationContext::kAPICall};
  if (link) {
    // 如果选定了RouterLink, 顺着RouterLink发送消息
    link->AcceptParcel(context, parcel);
  } else {
    // 消息已经入队列了,调用flush刷新队列
    Flush(context);
  }
  return IPCZ_RESULT_OK;
}
SendOutboundParcel消息分两种情况,一种是没有积压消息的情况, 直接通过RouterLink发送消息。 另外一种情况是已经积压了消息,要先将消息放入队列, 然后调用Flush 刷出消息。
先来看直接通过routerlink 刷出消息的情况
void LocalRouterLink::AcceptParcel(const OperationContext& context,
                                   Parcel& parcel) {
  if (Ref<Router> receiver = state_->GetRouter(side_.opposite())) {
    if (state_->type() == LinkType::kCentral) {
      receiver->AcceptInboundParcel(context, parcel);
    } else {
      ABSL_ASSERT(state_->type() == LinkType::kBridge);
      receiver->AcceptOutboundParcel(context, parcel);
    }
  }
}
通Node内通信的场景下RouterLink 是LocalRouterLink。 LocalRouterLink::AcceptParcel 函数找到接收router,这里根据链接的类型判断调用哪个函数处理, 如果这个链接是一个中心链接,则消息是发给接收router处理的,调用Router->AcceptInboundParcel() 函数接收,如果链接是一个桥接链接,则消息需要转发给接收router的输出端,调用receiver->AcceptOutboundParcel(context, parcel) 进行转发。
LinkSide opposite() const { return is_side_a() ? Value::kB : Value::kA; }

  Ref<Router> GetRouter(LinkSide side) {
    absl::MutexLock lock(&mutex_);
    switch (side.value()) {
      case LinkSide::kA:
        return router_a_;

      case LinkSide::kB:
        return router_b_;
    }
  }
找到接收路由是通过LinkSide的GetRouter 方法实现的, 这里传递的参数是通过LinkSide opposite() 函数获取的,如果当前路由是a路由,获取到的LinkSide是Value::kB, GetRouter 获取的Router 就是 router_b_(参考图创建Portal 对之后的实例关系),也就是找到对端的路由。 好了我们来分析对端路由接收到消息如何处理。
bool Router::AcceptInboundParcel(const OperationContext& context,
                                 Parcel& parcel) {
  TrapEventDispatcher dispatcher;
  {
    absl::MutexLock lock(&mutex_);
    const SequenceNumber sequence_number = parcel.sequence_number();
    // 1、将消息放到router的接收队列中,如果失败直接返回
    if (!inbound_parcels_.Push(sequence_number, std::move(parcel))) {
      return true;
    }

    if (!inward_edge_) {
    // 如果存在inward_edge_(不在代理绕过过程中)
      status_.num_local_parcels = inbound_parcels_.GetNumAvailableElements();
      status_.num_local_bytes = inbound_parcels_.GetTotalAvailableElementSize();
      if (sequence_number < inbound_parcels_.GetCurrentSequenceLength()) {
        // 有新的可处理消息(前面没有消息待接收)通知注册的监听者新的本地可用消息可以处理
        traps_.UpdatePortalStatus(context, status_,
                                  TrapSet::UpdateReason::kNewLocalParcel,
                                  dispatcher);
      }
    }
  }
  // 调用Flush 刷新消息队列。 在桥接和代理绕过时候我们再分析。
  Flush(context);
  return true;
}
Router::AcceptInboundParcel 函数主要把消息放到router的接收消息队列(inbound_parcels_)中,当消息进入队列后,如果有新的可处理的消息(不可处理的消息表示前面还有消息没有收到),则通知注册的traps_该事件。 一般traps_收到消息后会调用Portal.Get 获取消息(当然在端口合并和代理过程中有特殊处理)。
到这里消息发送我们就分析完了, 发送端把消息放到接收端router的接收队列里面。 我们再来分析下接收端如何获取消息。
IpczResult Portal::Get(IpczGetFlags flags,
                       void* data,
                       size_t* num_data_bytes,
                       IpczHandle* handles,
                       size_t* num_handles,
                       IpczHandle* parcel) {
  return router_->GetNextInboundParcel(flags, data, num_data_bytes, handles,
                                       num_handles, parcel);
}


IpczResult Router::GetNextInboundParcel(IpczGetFlags flags,
                                        void* data,
                                        size_t* num_bytes,
                                        IpczHandle* handles,
                                        size_t* num_handles,
                                        IpczHandle* parcel) {
  const OperationContext context{OperationContext::kAPICall};
  TrapEventDispatcher dispatcher;
  Parcel consumed_parcel;
  {
 ......
    // 1 获取一条消息
    Parcel& p = inbound_parcels_.NextElement();
    // 2 对传出参数做一些校验,比如内存大小和存放ipcz handle 容器大小。
      const bool allow_partial = (flags & IPCZ_GET_PARTIAL) != 0;
    const size_t data_capacity = num_bytes ? *num_bytes : 0;
    const size_t handles_capacity = num_handles ? *num_handles : 0;
  ......
    if (!pending_gets_.empty() && is_pending_get_exclusive_) {
      return IPCZ_RESULT_ALREADY_EXISTS;
    }

    const size_t data_size =
        allow_partial ? std::min(p.data_size(), data_capacity) : p.data_size();
    const size_t handles_size =
        allow_partial ? std::min(p.num_objects(), handles_capacity)
                      : p.num_objects();
    if (num_bytes) {
      *num_bytes = data_size;
    }
    if (num_handles) {
      *num_handles = handles_size;
    }

    const bool consuming_whole_parcel =
        (data_capacity >= data_size && handles_capacity >= handles_size);
    if (!consuming_whole_parcel && !allow_partial) {
      return IPCZ_RESULT_RESOURCE_EXHAUSTED;
    }
    // 3、拷贝数据和handle 到传输参数
    if (data_size > 0) {
      memcpy(data, p.data_view().data(), data_size);
    }

    const bool ok = inbound_parcels_.Pop(consumed_parcel);
    ABSL_ASSERT(ok);
    consumed_parcel.Consume(0, absl::MakeSpan(handles, handles_size));

    status_.num_local_parcels = inbound_parcels_.GetNumAvailableElements();
    status_.num_local_bytes = inbound_parcels_.GetTotalAvailableElementSize();
    if (inbound_parcels_.IsSequenceFullyConsumed()) {
      status_.flags |= IPCZ_PORTAL_STATUS_PEER_CLOSED | IPCZ_PORTAL_STATUS_DEAD;
    }
    // 4 通知traps
    traps_.UpdatePortalStatus(context, status_,
                              TrapSet::UpdateReason::kLocalParcelConsumed,
                              dispatcher);
  }
  // 传出parcel
  if (parcel) {
    *parcel = ParcelWrapper::ReleaseAsHandle(
        MakeRefCounted<ParcelWrapper>(std::move(consumed_parcel)));
  }

  return IPCZ_RESULT_OK;
}
GetNextInboundParcel函数主要分为5步骤
- 1、从inbound_parcels_获取一条消息
- 2、验证传出参数容量和消息是否匹配
- 3、拷贝数据和ipcz handle 到传输参数
- 4、 触发traps ,通知监听者消息队列变化
- 5、设置传出参数parcel
到这里ipcz同Node通信我们就分析完了。
端口合并和桥接代理消除
分析完同Node下portal通信,我们以同node通信来分析一下端口合并和桥接代理消除。
首先端口合并是一个比较特殊的场景,只有新建立的端口才可以合并,一旦端口使用过(传输过数据),就不能再进行合并。一般在chromium中,两个Node之间建立链接后会建立几对跨进程链接的端口(Portcal), 然后业务需要使用这些端口的时候只需要和初始化好的端口合并,就能直接建立和另一个Node 端口通信的能力
以下面一段代理为例
  auto [a, b] = OpenPortals(node);
  auto [c, d] = OpenPortals(node);

  EXPECT_EQ(IPCZ_RESULT_OK, Put(a, "!"));
  EXPECT_EQ(IPCZ_RESULT_OK, ipcz().MergePortals(b, c, IPCZ_NO_FLAGS, nullptr));

 EXPECT_EQ(IPCZ_RESULT_OK, Get(d, &message));
上面是单元测试里面的一段代码。代码先打开了两对端口,然后向a端口写入"!“, 再将b和c端口合并,则可以从d端口独处写入a端口的”!"。
OpenPortals 和Put方法我们前边已经分析过了, 下面来看一下MergePortals的实现,以及ipcz如何合并端口。
IpczResult MergePortals(IpczHandle portal0,
                        IpczHandle portal1,
                        uint32_t flags,
                        const void* options) {
  ipcz::Portal* first = ipcz::Portal::FromHandle(portal0);
  ipcz::Portal* second = ipcz::Portal::FromHandle(portal1);
  if (!first || !second) {
    return IPCZ_RESULT_INVALID_ARGUMENT;
  }

  ipcz::Ref<ipcz::Portal> one(ipcz::RefCounted::kAdoptExistingRef, first);
  ipcz::Ref<ipcz::Portal> two(ipcz::RefCounted::kAdoptExistingRef, second);
  IpczResult result = one->Merge(*two);
  if (result != IPCZ_RESULT_OK) {
    one.release();
    two.release();
    return result;
  }

  return IPCZ_RESULT_OK;
}
函数调用Portal->Merge() 方法来合并端口。
IpczResult Router::MergeRoute(const Ref<Router>& other) {
  ......
  {
    MultiMutexLock lock(&mutex_, &other->mutex_);
   // 如果Router传递过消息,则不允许merge
   if (inbound_parcels_.current_sequence_number() > SequenceNumber(0) ||
        outbound_parcels_.GetCurrentSequenceLength() > SequenceNumber(0) ||
        other->inbound_parcels_.current_sequence_number() > SequenceNumber(0) ||
        other->outbound_parcels_.GetCurrentSequenceLength() >
            SequenceNumber(0)) {
      // It's not legal to call this on a router which has transmitted outbound
      // parcels to its peer or retrieved inbound parcels from its queue.
      return IPCZ_RESULT_FAILED_PRECONDITION;
    }

    ......
    bridge_ = std::make_unique<RouteEdge>();
    other->bridge_ = std::make_unique<RouteEdge>();

    RouterLink::Pair links = LocalRouterLink::CreatePair(
        LinkType::kBridge, Router::Pair(WrapRefCounted(this), other));
    bridge_->SetPrimaryLink(std::move(links.first));
    other->bridge_->SetPrimaryLink(std::move(links.second));
  }

  const OperationContext context{OperationContext::kAPICall};
  Flush(context);
  return IPCZ_RESULT_OK;
}
函数创建了一对LocalRouterLink, 这对LocalRouterLink描述的是b和c之间的链接,也就是在b和c router之间建立了链接。 并且将b router的bridge_的PrimaryLink 指向b->c的LocalRouterLink。 将c的bridge_的PrimaryLink 指向c->b的LocalRouterLink, 注意这里面LocalRouterLink的类型为LinkType::kBridge, 这区别与前面创建一对链接时候的LinkType::kCentral。 到这时候整体的数据结构图如下:
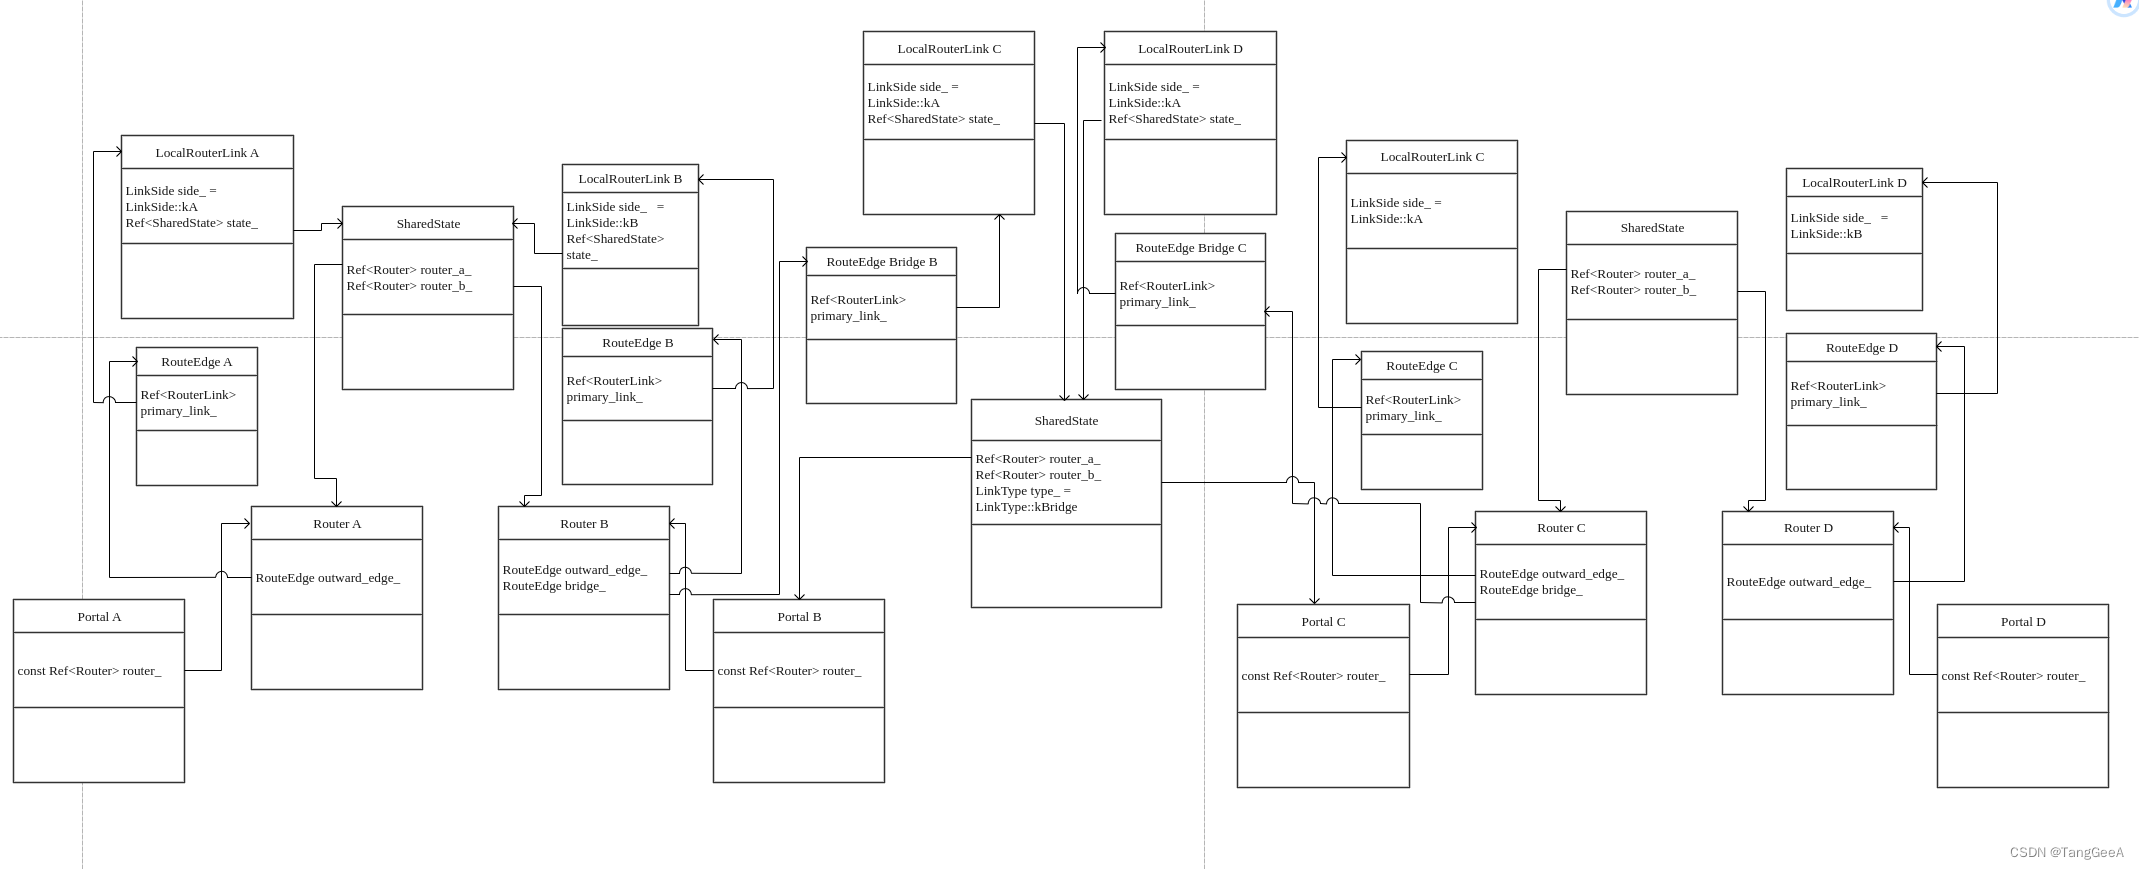
这里router b 和 router c 之间有一条LocalRouterLink, 并且通过bridge_这条边指向这条链接。 router b 还使用outward_edge_ 指向和router a的链接, 同样router c 使用outward_edge_ 指向和d之间的链接。链接建立好之后会调用router b的Flush() 函数,来将之前router b收到的消息通过router c刷到router d中。 接下来具体看Flush函数。
void Router::Flush(const OperationContext& context, FlushBehavior behavior) {
  TrapEventDispatcher dispatcher;
  {
    absl::MutexLock lock(&mutex_);

    // Acquire stack references to all links we might want to use, so it's safe
    // to acquire additional (unmanaged) references per ParcelToFlush.
    // 1 如果router的bridge_边存在,那么bridge_link 就是这个桥接边上的链接。
    if (bridge_) {
      // Bridges have either a primary link or decaying link, but never both.
      bridge_link = bridge_->primary_link() ? bridge_->primary_link()
                                            : bridge_->decaying_link();
    }

    // Collect any parcels which are safe to transmit now. Note that we do not
    // transmit anything or generally call into any RouterLinks while `mutex_`
    // is held, because such calls may ultimately re-enter this Router
    // (e.g. if a link is a LocalRouterLink, or even a RemoteRouterLink with a
    // fully synchronous driver.) Instead we accumulate work within this block,
    // and then perform any transmissions or link deactivations after the mutex
    // is released further below.

    CollectParcelsToFlush(outbound_parcels_, outward_edge_, parcels_to_flush);
    const SequenceNumber outbound_sequence_length_sent =
        outbound_parcels_.current_sequence_number();
    const SequenceNumber inbound_sequence_length_received =
        inbound_parcels_.GetCurrentSequenceLength();
    if (outward_edge_.MaybeFinishDecay(outbound_sequence_length_sent,
                                       inbound_sequence_length_received)) {
      DVLOG(4) << "Outward " << decaying_outward_link->Describe()
               << " fully decayed at " << outbound_sequence_length_sent
               << " sent and " << inbound_sequence_length_received
               << " recived";
      outward_link_decayed = true;
    }

    if (inward_edge_) {
        ......
    } else if (bridge_link) {
      // 2、从inbound_parcels_ 里面读取消息,设置消息由bridge_边的链接发送
      CollectParcelsToFlush(inbound_parcels_, *bridge_, parcels_to_flush);
    }
   ......

  for (ParcelToFlush& parcel : parcels_to_flush) {
    // 3、将前面读取到的消息沿着前边选定的链接发送
    parcel.link->AcceptParcel(context, parcel.parcel);
  }

 ......
}
Flush 代码很长。我们先删掉不涉及桥接的部分,主要关注消息是如何从a发到d的。 我们当前分析的Flush 是b router的行为。此时它的inbound_parcels_里面有a发给它的一条消息,内容是"!" 。
- 如果router的bridge_边存在,那么bridge_link 就是这个桥接边上的链接。 bridge_->primary_link()为桥接链接, 路由被合并后,这个链接就不在需要了,慢慢衰减直到释放,后面我们会分析这个衰减逻辑。
- 从inbound_parcels_ 里面读取消息,设置消息由bridge_边的链接发送
- 将前面读取到的消息沿着前边选定的链接发送
我们先看从步骤2, 从inbound_parcels_ 里面读取消息,设置消息由bridge_边的链接发送的代码
void CollectParcelsToFlush(ParcelQueue& queue,
                           const RouteEdge& edge,
                           ParcelsToFlush& parcels) {
  RouterLink* decaying_link = edge.decaying_link().get();
  RouterLink* primary_link = edge.primary_link().get();
  while (queue.HasNextElement()) {
    const SequenceNumber n = queue.current_sequence_number();
    RouterLink* link = nullptr;
    if (decaying_link && edge.ShouldTransmitOnDecayingLink(n)) {
      link = decaying_link;
    } else if (primary_link && !edge.ShouldTransmitOnDecayingLink(n)) {
      link = primary_link;
    } else {
      return;
    }

    ParcelToFlush& parcel = parcels.emplace_back(ParcelToFlush{.link = link});
    const bool popped = queue.Pop(parcel.parcel);
    ABSL_ASSERT(popped);
  }
}
CollectParcelsToFlush 函数读取队列里面的消息, 然后调用RouterEdge->edge.ShouldTransmitOnDecayingLink() 方法判定是由primary_link 还是 decaying_link 处理。 最终将消息对象(parcel)和 选定的link关联上。关于decaying_link(衰减链接)我们后面分析。
再看 parcel.link->AcceptParcel(context, parcel.parcel) 这段代码的实现, 将步骤2 中选择好的消息按照选择好的RouterLink 发出去。 我们知道b router的bridge_是primary_link 是 和 b和c的RouterLinker, 类型为LocalRouterLink。
void LocalRouterLink::AcceptParcel(const OperationContext& context,
                                   Parcel& parcel) {
  if (Ref<Router> receiver = state_->GetRouter(side_.opposite())) {
    if (state_->type() == LinkType::kCentral) {
      receiver->AcceptInboundParcel(context, parcel);
    } else {
      ABSL_ASSERT(state_->type() == LinkType::kBridge);
      receiver->AcceptOutboundParcel(context, parcel);
    }
  }
}
获取接收router(receiver)的代码我们已经分析过了。 这里的receiver 为 router c。需要注意的是state_->type() == LinkType::kBridge。 所以这里实际上调用的 router c的 AcceptOutboundParcel() 方法。
bool Router::AcceptOutboundParcel(const OperationContext& context,
                                  Parcel& parcel) {
  {
    absl::MutexLock lock(&mutex_);

   ......
    const SequenceNumber sequence_number = parcel.sequence_number();
    if (!outbound_parcels_.Push(sequence_number, std::move(parcel))) {
      // Unexpected route disconnection can cut off outbound sequences, so don't
      // treat an out-of-bounds parcel as a validation failure.
      return true;
    }
  }

  Flush(context);
  return true;
}
AcceptOutboundParcel函数将消息放到了router c的outbound_parcels_ 里面。 然后调用Flush 把消息发送的d router的 inbound_parcels_。 我们来具体分析一下c router的Flush的过程。
void Router::Flush(const OperationContext& context, FlushBehavior behavior) {
 ......
  {
    absl::MutexLock lock(&mutex_);
......
    CollectParcelsToFlush(outbound_parcels_, outward_edge_, parcels_to_flush);
......
  for (ParcelToFlush& parcel : parcels_to_flush) {
    parcel.link->AcceptParcel(context, parcel.parcel);
  }
......
}
同样是从发送队列outbound_parcels_读取消息,设置发送链接, 这里对应c router 和 d router的链接,然后调用LocalRouterLink->AcceptParcel() 发送给d router 。 这个过程的代码我们已经分析过了。 就不再继续分析。 最终消息会被放到d的inbound_parcels_ 中。 通过 d protcal 读取消息的时候就能读到"!"消息。
还要补充一个关键点, 4个路由使用了相同的sequence num, 是因为在merge port前进行了检查, 必须是两条新链接,没有处理过任何消息的两个路由才可以合并。
接下来我们看下两个桥接的路由合并, 也就是a->b->c->d 合并为a->d。
从头捋一下流程router a 给router b发送消息走的正常消息发送流程,将消息放到router b的inbound_parcels_队列中。然后merge router的过程中调用了router b的Flush方法。
Flush 函数比较复杂,我们先们删除部分代码,只看绕过bridge_边的情形
void Router::Flush(const OperationContext& context, FlushBehavior behavior) {
 ......
  Ref<RouterLink> bridge_link;
 .......
  {
    absl::MutexLock lock(&mutex_);

    // Acquire stack references to all links we might want to use, so it's safe
    // to acquire additional (unmanaged) references per ParcelToFlush.
    outward_link = outward_edge_.primary_link(); // 输出边主链接

  // If we have an outward link, and we have no decaying outward link (or our
  // decaying outward link has just finished decaying above), we consider the
  // the outward link to be stable.
  // 没有输出边方向衰减链接,或者已经完成衰减,表示outward_link边为稳定状态
  const bool has_stable_outward_link =
      outward_link && (!decaying_outward_link || outward_link_decayed);

  // If we have no primary inward link, and we have no decaying inward link
  // (or our decaying inward link has just finished decaying above), this
  // router has no inward-facing links.
  // 没有输入边链接。并且输入边方向没有衰减链接或者完成衰减,则已经完全没有输入边了
  const bool has_no_inward_links =
      !inward_link && (!decaying_inward_link || inward_link_decayed);

  // Bridge bypass is only possible with no inward links and a stable outward
  // link.
  if (bridge_link && has_stable_outward_link && has_no_inward_links) {
    // 没有输入边,并且 输出边稳定,可以尝试绕过Bridge
    MaybeStartBridgeBypass(context);
  }
......
  if (dead_bridge_link) {
    if (final_inward_sequence_length) {
      // 设置为不活跃状态
      dead_bridge_link->AcceptRouteClosure(context,
                                           *final_inward_sequence_length);
    }
  }

......
}
我们前面可以看到,有输入边的时候(router 作为代理的时候), router根本不会处理bridge_边,所以我们不考虑输入边。在 bridge_边生效的情况下(没有输入边), 并且输出边稳定的情况下可以尝试绕过bridge_进行端口合并, 代码为MaybeStartBridgeBypass(context), 这可能先发生在路由b 也可能先发生在路由c。 在我们分析MaybeStartBridgeBypass代码前我们先来介绍一下衰减链接。先来看下RouteEdge的数据结构
class RouteEdge {

......
 // The primary link over which this edge transmits and accepts parcels and
  // other messages. If a decaying link is also present, then the decaying link
  // is preferred for transmission of all parcels with a SequenceNumber up to
  // (but not including) `length_to_decaying_link_`. If that value is not set,
  // the decaying link is always preferred when set.
  Ref<RouterLink> primary_link_;

  // If true, this edge was marked to decay its primary link before it actually
  // acquired a primary link. In that case the next primary link adopted by
  // this edge will be demoted immediately to a decaying link.
  bool is_decay_deferred_ = false;

  // If non-null, this is a link which used to be the edge's primary link but
  // which is being phased out. The decaying link may continue to receive
  // parcels, but once `length_from_decaying_link_` is set, it will only expect
  // to receive parcels with a SequenceNumber up to (but not including) that
  // value. Similarly, the decaying link will be preferred for message
  // transmission as long as `length_to_decaying_link_` remains unknown, but as
  // soon as that value is set, only parcels with a SequenceNumber up to
  // (but not including) that value will be transmitted over this link. Once
  // both sequence lengths are known and surpassed, the edge will drop this
  // link.
  Ref<RouterLink> decaying_link_;

  // If present, the length of the parcel sequence after which this edge must
  // stop using `decaying_link_` to transmit parcels. If this is 5, then the
  // decaying link must be used to transmit any new parcels with a
  // SequenceNumber in the range [0, 4] inclusive. Beyond that point the primary
  // link must be used.
  absl::optional<SequenceNumber> length_to_decaying_link_;

  // If present, the length of the parcel sequence after which this edge can
  // stop expecting to receive parcels over `decaying_link_`. If this is 7, then
  // the Router using this edge should still expect to receive parcels from the
  // decaying link as long as it is missing any parcel in the range [0, 6]
  // inclusive. Beyond that point parcels should only be expected from the
  // primary link.
  absl::optional<SequenceNumber> length_from_decaying_link_;
};
RouterEdge 里面可以同时持有primary_link_和decaying_link_, 两条链接, 在我们桥接模式下,比如上面的场景a->b 和 c->d本来是两对独立互相通信的端点, 在merge port的过程中, a 通过c->d 之间的交接链接和d通信, 场景如下

在有桥接的过程中,a发送给b的消息都会经过b到c的桥接边发给c,在由c发给d。反之,d 发给c的消息会经过b发给a。
这时候b和c显然只是转发消息的作用,代理消除的过程就是让a的out edge 直接指向d, 让d的out edge直接指向a, 这样就可以删除掉b 和c,提高通信效率。代理消除的过程如下:

代理消除的过程中,在a和d之间直接建立链接, 并且将a out edge 的primary_link 指向d, d out edge 的primary_link 指向a。 然后其他链接都变为衰减链接,后面a和d的通信通过a out edge primary_link, d和a的通信通过d out edge primary_link。如上图,这时候我们可以发现a out edge 同时持有两条链接, a->d的链接为primary_link, 表示后面主要通过这个链接和d通信,但是有一部分消息还是要通过a->b 链接发送给d的,这个链接为decaying_link(衰减链接)。当衰减链接完成衰减后将可以被释放。 这里有两个问题:
- 哪些消息通过primary link发送,哪些消息通过deacying_link发送。
- 什么时候decaying_link可以释放。
我们可以推断,从设置衰减链接时刻开始,更大序号的消息都可以不再通过衰减链接发送。但是由于更小的消息可能存在乱序,b 和c中也可能有消息未送到d,所以需要所有乱序消息都到达链接两端(a,d), 就可以释放衰减链接了。具体来说,就是d的接收序号到达开始衰减时刻的a发送的序号, a的接收序号达到d的发送序号。 RouterEdge 有两个成员变量:
- length_to_decaying_link_ 开始衰减时的序号, 大于该序号的消息由out edge primary_link发送
- length_from_decaying_link_ 开始衰减时对端已经的发送的序号,当收到的消息的序列号大于该值表示后续消息不再由衰减链接发送, 此时衰减链接就可以释放了。
有了上述知识我们来具体分析下MaybeStartBridgeBypass的代码,已b路由执行MaybeStartBridgeBypass的情景分析,如果感兴趣读者可以自行代入c路由先执行MaybeStartBridgeBypass的情景(其实是完全一样的)。好了,具体看代码(我们忽略跨node通信的场景)。
1643 void Router::MaybeStartBridgeBypass(const OperationContext& context) {
       // b路由
1644   Ref<Router> first_bridge = WrapRefCounted(this);
       // c 路由
1645   Ref<Router> second_bridge;
1646   {
1647     absl::MutexLock lock(&mutex_);
1648     if (!bridge_ || !bridge_->is_stable()) {
           // 不存在或不稳定状态,不向下执行
1649       return;
1650     }
1651
1652     second_bridge = bridge_->GetLocalPeer();
1653     if (!second_bridge) {
1654       return;
1655     }
1656   }
1657   // a路由
1658   Ref<Router> first_local_peer;
       //d的路由
1659   Ref<Router> second_local_peer;
       // 如果是远端链接,b->a 的链接
1660   Ref<RemoteRouterLink> first_remote_link;
       // 如果是远端链接,c->d 的链接
1661   Ref<RemoteRouterLink> second_remote_link;
1662   {
1663     MultiMutexLock lock(&mutex_, &second_bridge->mutex_);
         // b->a 链接
1664     const Ref<RouterLink>& link_to_first_peer = outward_edge_.primary_link();
         // c->d 链接
1665     const Ref<RouterLink>& link_to_second_peer =
1666         second_bridge->outward_edge_.primary_link();
1667     if (!link_to_first_peer || !link_to_second_peer) {
1668       return;
1669     }
1670
1671     NodeName first_peer_node_name;

1672     first_local_peer = link_to_first_peer->GetLocalPeer();
1673     first_remote_link =
1674         WrapRefCounted(link_to_first_peer->AsRemoteRouterLink());
1675     if (first_remote_link) {
1676       first_peer_node_name = first_remote_link->node_link()->remote_node_name();
1677     }
1678     // d node 的名字
1679     NodeName second_peer_node_name;
1680     second_local_peer = link_to_second_peer->GetLocalPeer();
1681     second_remote_link =
1682         WrapRefCounted(link_to_second_peer->AsRemoteRouterLink());
1683     if (second_remote_link) {
1684       second_peer_node_name =
1685           second_remote_link->node_link()->remote_node_name();
1686     }
1687
         // 锁定b->a 链接,链接锁定后不能对链接做其他管理操作
1688     if (!link_to_first_peer->TryLockForBypass(second_peer_node_name)) {
1689       return;
1690     }
         // 锁定c->d链接,链接锁定后不能对链接做其他管理操作
1691     if (!link_to_second_peer->TryLockForBypass(first_peer_node_name)) {
1692       // Cancel the decay on this bridge's side, because we couldn't decay the
1693       // other side of the bridge yet.
1694       link_to_first_peer->Unlock();
1695       return;
1696     }
1697   }
1698
        ......

1739   // Case 3: Both bridge routers' outward peers are local to this node. This is
1740   // a unique bypass case, as it's the only scenario where all involved routers
1741   // are local to the same node and bypass can be orchestrated synchronously in
1742   // a single step.
1743   {
1744     MultiMutexLock lock(&mutex_, &second_bridge->mutex_,
1745                         &first_local_peer->mutex_, &second_local_peer->mutex_);
         // a 路由的输出序号
1746     const SequenceNumber length_from_first_peer =
1747         first_local_peer->outbound_parcels_.current_sequence_number();
         // d 路由的输出序号
1748     const SequenceNumber length_from_second_peer =
1749         second_local_peer->outbound_parcels_.current_sequence_number();
1750
1751     RouteEdge& first_peer_edge = first_local_peer->outward_edge_;
          // a->b 输出边链接进入衰减状态(a->b链接衰减)
1752     first_peer_edge.BeginPrimaryLinkDecay();
         // 在这个场景下,a和d通过桥接进行通信,那么a收到的消息都来源于d,d收到的消息都来源于c,由于存在乱序关系,所以需要保证a发送的消息都被d收到,d发送的消息都被a收到。 同时还要保证从衰减此刻起,a输出边队列里面所有消息都不再通过桥接路由发送给d。
1753     first_peer_edge.set_length_to_decaying_link(length_from_first_peer);
1754     first_peer_edge.set_length_from_decaying_link(length_from_second_peer);
1755
         // d->c输出边链接进入衰减状态。
1756     RouteEdge& second_peer_edge = second_local_peer->outward_edge_;
1757     second_peer_edge.BeginPrimaryLinkDecay();
1758     second_peer_edge.set_length_to_decaying_link(length_from_second_peer);
1759     second_peer_edge.set_length_from_decaying_link(length_from_first_peer);
1760
         // b->a 输出边链接开始衰减
1761     outward_edge_.BeginPrimaryLinkDecay();
1762     outward_edge_.set_length_to_decaying_link(length_from_second_peer);
1763     outward_edge_.set_length_from_decaying_link(length_from_first_peer);
1764
         // c->d 输出边链接开始衰减
1765     RouteEdge& peer_bridge_outward_edge = second_bridge->outward_edge_;
1766     peer_bridge_outward_edge.BeginPrimaryLinkDecay();
1767     peer_bridge_outward_edge.set_length_to_decaying_link(
1768         length_from_first_peer);
1769     peer_bridge_outward_edge.set_length_from_decaying_link(
1770         length_from_second_peer);
1771     // b->c桥接边链接开始衰减
1772     bridge_->BeginPrimaryLinkDecay();
1773     bridge_->set_length_to_decaying_link(length_from_first_peer);
1774     bridge_->set_length_from_decaying_link(length_from_second_peer);
1775
         // c->b 桥接边链接开始衰减
1776     RouteEdge& peer_bridge = *second_bridge->bridge_;
1777     peer_bridge.BeginPrimaryLinkDecay();
1778     peer_bridge.set_length_to_decaying_link(length_from_second_peer);
1779     peer_bridge.set_length_from_decaying_link(length_from_first_peer);
1780
         // 在a->c 之间创建链接。 并且将设置为二者输出边
1781     RouterLink::Pair links = LocalRouterLink::CreatePair(
1782         LinkType::kCentral, Router::Pair(first_local_peer, second_local_peer));
1783     first_local_peer->outward_edge_.SetPrimaryLink(std::move(links.first));
1784     second_local_peer->outward_edge_.SetPrimaryLink(std::move(links.second));
1785   }
1786   // 刷新涉及到的四个路由
1787   first_bridge->Flush(context);
1788   second_bridge->Flush(context);
1789   first_local_peer->Flush(context);
1790   second_local_peer->Flush(context);
1791 }
1792
1644-1686 行找到通信涉及到的四个路由和6个链接。
1687-1698 行代码锁定b-a 和 c-d 4条链接. 防止对端再对路由进行其他管理操作。
1744-1799行代码设置a->b, b->a, c->d, d->c, b->c, c->d 6条链接开始衰减。
1781-1785行代码建立a和d的链接对。
1797->1790 分别对b、c、a、d路由进行flush,使该衰减的链接衰减。
bool RouteEdge::BeginPrimaryLinkDecay() {
  if (decaying_link_ || is_decay_deferred_) {
    return false;
  }

  decaying_link_ = std::move(primary_link_);
  is_decay_deferred_ = !decaying_link_;
  return true;
}
RouteEdge开始衰减会将primary_link 设置到decaying_link_, 将primary_link_设置为空(std::move)。
我们再来分析Flush 函数,这次我们重点关注链接衰减的过程。请对照 桥接代理消除中间状态 这张图进行分析。
void Router::Flush(const OperationContext& context, FlushBehavior behavior) {
    ......

    // 选择输出边消息通过primary link 还是 decaying_link发送。
    CollectParcelsToFlush(outbound_parcels_, outward_edge_, parcels_to_flush);
    const SequenceNumber outbound_sequence_length_sent =
        outbound_parcels_.current_sequence_number();
    const SequenceNumber inbound_sequence_length_received =
        inbound_parcels_.GetCurrentSequenceLength();
    if (outward_edge_.MaybeFinishDecay(outbound_sequence_length_sent,
                                       inbound_sequence_length_received)) {
      DVLOG(4) << "Outward " << decaying_outward_link->Describe()
               << " fully decayed at " << outbound_sequence_length_sent
               << " sent and " << inbound_sequence_length_received
               << " recived";
      // 输出边方向该通过衰减链接发送的消息都发送完成,设置衰减完成。
      outward_link_decayed = true;
    }

    if (inward_edge_) {
       ......
    } else if (bridge_link) {
        // 桥接变方向该通过衰减链接发送的消息都发送完成,设置衰减完成。
      CollectParcelsToFlush(inbound_parcels_, *bridge_, parcels_to_flush);
    }

    if (bridge_ && bridge_->MaybeFinishDecay(
                       inbound_parcels_.current_sequence_number(),
                       outbound_parcels_.current_sequence_number())) {
      // bridge_边完成衰减, 清空bridge_指针,注意这里不会释放衰减链接边,因为站变量bridge_link还持有实例
      bridge_.reset();
    }

  ......

  for (ParcelToFlush& parcel : parcels_to_flush) {
    parcel.link->AcceptParcel(context, parcel.parcel);
  }

  if (outward_link_decayed) {
    // 衰减完成,释放衰减链接
    decaying_outward_link->Deactivate();
  }

  if (inward_link_decayed) {
    // 衰减完成,释放衰减链接
    decaying_inward_link->Deactivate();
  }

......
}
分析上面的代码我们可以看到,CollectParcelsToFlush会选择使用primary link发送数据还是使用 decaying_link进行发送。
bool RouteEdge::ShouldTransmitOnDecayingLink(SequenceNumber n) const {
  return (decaying_link_ || is_decay_deferred_) &&
         (!length_to_decaying_link_ || n < *length_to_decaying_link_);
}


void CollectParcelsToFlush(ParcelQueue& queue,
                           const RouteEdge& edge,
                           ParcelsToFlush& parcels) {
  RouterLink* decaying_link = edge.decaying_link().get();
  RouterLink* primary_link = edge.primary_link().get();
  while (queue.HasNextElement()) {
    const SequenceNumber n = queue.current_sequence_number();
    RouterLink* link = nullptr;
    if (decaying_link && edge.ShouldTransmitOnDecayingLink(n)) {
      link = decaying_link;
    } else if (primary_link && !edge.ShouldTransmitOnDecayingLink(n)) {
      link = primary_link;
    } else {
      return;
    }

    ParcelToFlush& parcel = parcels.emplace_back(ParcelToFlush{.link = link});
    const bool popped = queue.Pop(parcel.parcel);
    ABSL_ASSERT(popped);
  }
}
主要依据就是RouterEdge的length_to_decaying_link_值。
判断衰减链接是否可以释放的函数为MaybeFinishDecay
bool RouteEdge::MaybeFinishDecay(SequenceNumber length_sent,
                                 SequenceNumber length_received) {
  if (!decaying_link_) {
    return false;
  }

  if (!length_to_decaying_link_) {
    DVLOG(4) << "Cannot decay yet with no known sequence length to "
             << decaying_link_->Describe();
    return false;
  }

  if (!length_from_decaying_link_) {
    DVLOG(4) << "Cannot decay yet with no known sequence length to "
             << decaying_link_->Describe();
    return false;
  }

  if (length_sent < *length_to_decaying_link_) {
    DVLOG(4) << "Cannot decay yet without sending full sequence up to "
             << *length_to_decaying_link_ << " on "
             << decaying_link_->Describe();
    return false;
  }

  if (length_received < *length_from_decaying_link_) {
    DVLOG(4) << "Cannot decay yet without receiving full sequence up to "
             << *length_from_decaying_link_ << " on "
             << decaying_link_->Describe();
    return false;
  }

  ABSL_ASSERT(!is_decay_deferred_);
  decaying_link_.reset();
  length_to_decaying_link_.reset();
  length_from_decaying_link_.reset();
  return true;
}
MaybeFinishDecay 函数判断衰减是否完成,我们前面已经说了判断的依据,这里可以衰减后执行decaying_link_.reset()函数,清除了对衰减链接的引用,Flush函数执行完成后,完成衰减的链接就不再有引用,这时候智能指针就会对链接对象进行析构。
到这里b 和c router 是不会被释放的,因为portcal 还持有router对象。只有在关闭protcal的时候才会真正释放router对象。到这里对portcal的merge过程我们已经分析完毕。
Portcal资源清理
最后我们再来分析一下portcal关闭的过程。
IpczResult Close(IpczHandle handle, uint32_t flags, const void* options) {
  const ipcz::Ref<ipcz::APIObject> doomed_object =
      ipcz::APIObject::TakeFromHandle(handle);
  if (!doomed_object) {
    return IPCZ_RESULT_INVALID_ARGUMENT;
  }

  return doomed_object->Close();
}

IpczResult Portal::Close() {
  router_->CloseRoute();
  return IPCZ_RESULT_OK;
}

void Router::CloseRoute() {
  const OperationContext context{OperationContext::kAPICall};
  TrapEventDispatcher dispatcher;
  Ref<RouterLink> link;
  {
    absl::MutexLock lock(&mutex_);
    outbound_parcels_.SetFinalSequenceLength(
        outbound_parcels_.GetCurrentSequenceLength());
    traps_.RemoveAll(context, dispatcher);
  }
  Flush(context);
}

  bool SequencedQueue::SetFinalSequenceLength(SequenceNumber length) {
    if (final_sequence_length_) {
      return false;
    }

    const SequenceNumber lower_bound(base_sequence_number_.value() +
                                     entries_.size());
    if (length < lower_bound) { // 这个条件可能导致端口关闭失败,但是并没有处理返回值, 有bug
      return false;
    }

    if (length.value() - base_sequence_number_.value() > GetMaxSequenceGap()) {
      return false;
    }

    final_sequence_length_ = length;
    return Reallocate(length);
  }
Portcal关闭先调用Router->CloseRoute() 关闭路由。 CloseRoute()方法调用ParcelQueue.SetFinalSequenceLength方法设置输出边的的终止的最终要发送的序号,也就是SequencedQueue成员变量final_sequence_length_的值,这里的需要是输出队列里面最后一条连续消息的序列号。然后删除所有traps,不再通知任何时间, 最后调用Flush 函数。
  bool SequencedQueue::IsSequenceFullyConsumed() const {
    return !HasNextElement() && !ExpectsMoreElements();
  }
  // Indicates whether the next element (in sequence order) is available to pop.
  bool SequencedQueue::HasNextElement() const {
    return !entries_.empty() && entries_[0].has_value();
  }

  bool SequencedQueue::ExpectsMoreElements() const {
    if (!final_sequence_length_) {
      return true;
    }

    if (base_sequence_number_ >= *final_sequence_length_) {
      return false;
    }

    const size_t num_entries_remaining =
        final_sequence_length_->value() - base_sequence_number_.value();
    return num_entries_ < num_entries_remaining;
  }
判断一个对象所有sequence是否全部被消费有两个条件。
- !HasNextElement() 条件表示不存在下一个待处理的消息。(未必 queue里面没有消息,有可能乱序导致无法处理下一个消息)
- !ExpectsMoreElements() 条件表示已经不需要处理更多消息了。 如果没有请求关闭,肯定需要更多消息的。
我们再次分析Flush函数,这次重点关注router的关闭。
1286 void Router::Flush(const OperationContext& context, FlushBehavior behavior) {

       ......

1303   {
1304     absl::MutexLock lock(&mutex_);

         ......

1386     if (on_central_link && either_link_decayed && both_edges_stable) {
1387       DVLOG(4) << "Router with fully decayed links may be eligible for bypass "
1388                << " with outward " << outward_link->Describe();
1389       outward_link->MarkSideStable();
1390       dropped_last_decaying_link = true;
1391     }
1392
1393     if (on_central_link && outbound_parcels_.IsSequenceFullyConsumed() &&
1394         outward_link->TryLockForClosure()) {
1395       // Notify the other end of the route that this end is closed. See the
1396       // AcceptRouteClosure() invocation further below.
           // 有值表示主动请求关闭(中心链接才能主动关闭输出边链接)
1397       final_outward_sequence_length =
1398           *outbound_parcels_.final_sequence_length();
1399
1400       // We also have no more use for either outward or inward links: trivially
1401       // there are no more outbound parcels to send outward, and there no longer
1402       // exists an ultimate destination for any forwarded inbound parcels. So we
1403       // drop both links now.
           // 要释放的输出边链接
1404       dead_outward_link = outward_edge_.ReleasePrimaryLink();
1405     } else if (!inbound_parcels_.ExpectsMoreElements()) {
1406       // If the other end of the route is gone and we've received all its
1407       // parcels, we can simply drop the outward link in that case.
           // 不会再收到新的消息, 说明另一端关闭,也可以释放输出链接
1408       dead_outward_link = outward_edge_.ReleasePrimaryLink();
1409     }
1410
1411     if (inbound_parcels_.IsSequenceFullyConsumed()) {
1412       // We won't be receiving anything new from our peer, and if we're a proxy
1413       // then we've also forwarded everything already. We can propagate closure
1414       // inward and drop the inward link, if applicable.
            // 有值表示主动请求关闭
1415       final_inward_sequence_length = inbound_parcels_.final_sequence_length();
1416       if (inward_edge_) {
1417         dead_inward_link = inward_edge_->ReleasePrimaryLink();
1418       } else {
1419         dead_bridge_link = std::move(bridge_link);
1420         bridge_.reset();
1421       }
1422     }
1423   }
1424
1425   for (ParcelToFlush& parcel : parcels_to_flush) {
1426     parcel.link->AcceptParcel(context, parcel.parcel);
1427   }
1428
       ......

1455   if (dead_outward_link) {
1456     if (final_outward_sequence_length) {
           // 主动请求关闭, 调用AcceptRouteClosure 表示接收关闭请求
1457       dead_outward_link->AcceptRouteClosure(context,
1458                                             *final_outward_sequence_length);
1459     }
         // 释放router
1460     dead_outward_link->Deactivate();
1461   }
1462
1463   if (dead_inward_link) {
1464     if (final_inward_sequence_length) {
            // 主动请求关闭, 调用AcceptRouteClosure 表示接收关闭请求
1465       dead_inward_link->AcceptRouteClosure(context,
1466                                            *final_inward_sequence_length);
1467     }
          // 释放router
1468     dead_inward_link->Deactivate();
1469   }
1470
1471   if (dead_bridge_link) {
1472     if (final_inward_sequence_length) {
           // 主动请求关闭, 调用AcceptRouteClosure 表示接收关闭请求
1473       dead_bridge_link->AcceptRouteClosure(context,
1474                                            *final_inward_sequence_length);
1475     }
           // 不需要释放router的原因是bridge_不是router真正属主
1476   }
1477

      ......

1495 }
Flush 主要处理主动关闭和被动关闭两种情况,主动关闭是指当前router端发起的关闭,被动关闭则是只对端router发起的关闭。 主动关闭主要考虑输出边是否需要继续向外发送消息,如果不再发送消息,就可以关闭了。 被动关闭则考虑是否还会收到更多消息,也就是对端是否关闭。如果对端关闭则本端可以关闭释放了。另外只有中心链接可以主动关闭,这里感觉整个系统设计的不太优雅,很多情况都无法处理,主要是系统设计的复杂,这样设计只是简化了对一些复杂情况的处理。
对于主动关闭的链接,要调用AcceptRouteClosure 函数通知对端。
void LocalRouterLink::AcceptRouteClosure(const OperationContext& context,
                                         SequenceNumber sequence_length) {
  if (Ref<Router> receiver = state_->GetRouter(side_.opposite())) {
    receiver->AcceptRouteClosureFrom(context, state_->type(), sequence_length);
  }
}
AcceptRouteClosure主要调用对端router的AcceptRouteClosureFrom方法,这里主要的参数是sequence_length,告诉对端自己最后发送的消息序列号。 另一个参数是只链接的类型。我们先来看一下链接有哪些类型
struct LinkType {
  enum class Value {
    // The link along a route which connects one side of the route to the other.
    // This is the only link which is treated by both sides as an outward link,
    // and it's the only link along a route at which decay can be initiated by a
    // router.
    kCentral,

    // Any link along a route which is established to extend the route on one
    // side is a peripheral link. Peripheral links forward parcels and other
    // messages along the same direction in which they were received (e.g.
    // messages from an inward peer via a peripheral link are forwarded
    // outward).
    //
    // Peripheral links can only decay as part of a decaying process initiated
    // on a central link by a mutually adjacent router.
    //
    // Every peripheral link has a side facing inward and a side facing outward.
    // An inward peripheral link goes further toward the terminal endpoint of
    // the router's own side of the route, while an outward peripheral link goes
    // toward the terminal endpoint of the side opposite the router.
    kPeripheralInward,
    kPeripheralOutward,

    // Bridge links are special links formed only when merging two routes
    // together. A bridge link links two terminal routers from two different
    // routes, and it can only decay once both routers are adjacent to decayable
    // central links along their own respective routes; at which point both
    // routes atomically initiate decay of those links to replace them (and the
    // bridge link itself) with a single new central link.
    kBridge,
  };
链接主要有4中类型
- kCentral 中心链接
- kPeripheralInward边缘内向链接
- kPeripheralOutward 边缘外向链接
- kBridge 桥接链接(主要用于merge端口)
具体概念可以参考chromium通信系统-mojo系统(一)-ipcz系统基本概念 这篇文章。
  bool is_outward() const { return is_central() || is_peripheral_outward(); }
    bool is_central() const { return value_ == Value::kCentral; }
  bool is_peripheral_inward() const {
    return value_ == Value::kPeripheralInward;
  }
  bool is_peripheral_outward() const {
    return value_ == Value::kPeripheralOutward;
  }
  bool is_bridge() const { return value_ == Value::kBridge; }


bool Router::AcceptRouteClosureFrom(const OperationContext& context,
                                    LinkType link_type,
                                    SequenceNumber sequence_length) {
  TrapEventDispatcher dispatcher;
  {
    absl::MutexLock lock(&mutex_);
    if (link_type.is_outward()) {
      if (!inbound_parcels_.SetFinalSequenceLength(sequence_length)) { // 设置inbound_parcels_的final_sequence_length_ 表示被动关闭链接
        // Ignore if and only if the sequence was terminated early.
        DVLOG(4) << "Discarding inbound route closure notification";
        return inbound_parcels_.final_sequence_length().has_value() &&
               *inbound_parcels_.final_sequence_length() <= sequence_length;
      }

      if (!inward_edge_ && !bridge_) {
        // 不是代理路由, 设置is_peer_closed_ 表示对端已经关闭
        is_peer_closed_ = true;
        if (inbound_parcels_.IsSequenceFullyConsumed()) {
          status_.flags |=
              IPCZ_PORTAL_STATUS_PEER_CLOSED | IPCZ_PORTAL_STATUS_DEAD;
        }
        // 通知traps_
        traps_.UpdatePortalStatus(
            context, status_, TrapSet::UpdateReason::kPeerClosed, dispatcher);
      }
    } else if (link_type.is_peripheral_inward()) { // 边缘内向链接,只有向外方向,设置outbound_parcels_,设置关闭
      if (!outbound_parcels_.SetFinalSequenceLength(sequence_length)) {
        // Ignore if and only if the sequence was terminated early.
        DVLOG(4) << "Discarding outbound route closure notification";
        return outbound_parcels_.final_sequence_length().has_value() &&
               *outbound_parcels_.final_sequence_length() <= sequence_length;
      }
    } else if (link_type.is_bridge()) { // 桥接路由,只有输出方向。
      if (!outbound_parcels_.SetFinalSequenceLength(sequence_length)) {
        return false;
      }
      bridge_.reset();
    }
  }

  Flush(context);
  return true;
}
AcceptRouteClosureFrom函数主要根据对端的link_type 去设置队列的FinalSequenceLength, 最后执行Flush,也就是被动关闭的过程。
结尾
由于ipcz这个系统太复杂了,导致太多情况无法处理,估计bug也会少。
