栈
栈的基本概念
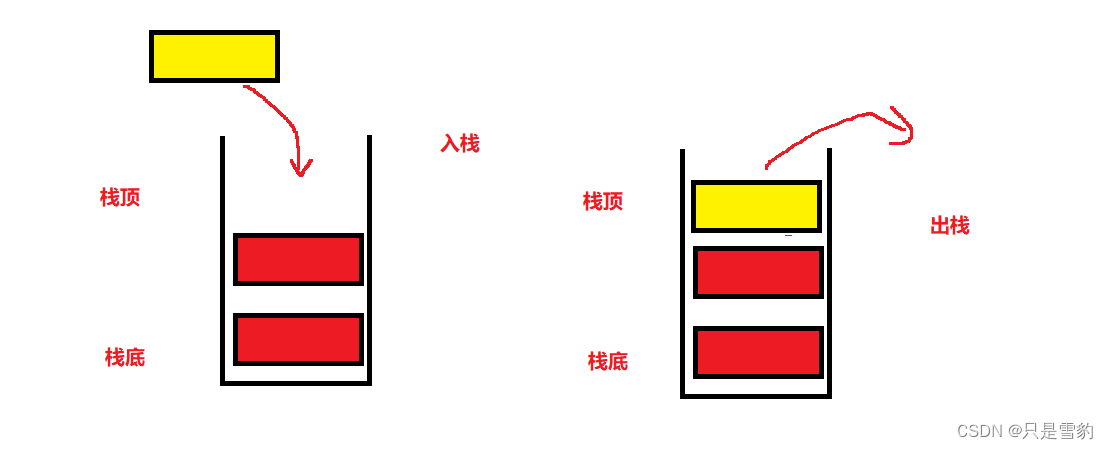
栈是一种特殊的线性表,其只允许在固定的一端进行插入和删除元素操作。进行数据插入和删除操作的一称为栈顶,另一端称为栈底。栈中的数据元素遵守后进先出LIFO(Last In First Out)的原则。
压栈:栈的插入操作叫做进栈/压栈/入栈,入数据在栈顶。
出栈:栈的删除操作叫做出栈。出数据也在栈顶。
出栈和入栈的操作如下:
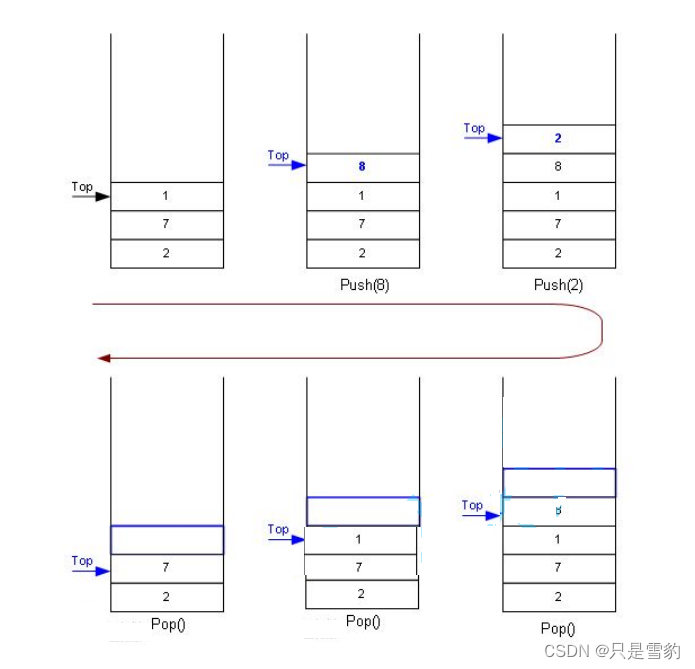
他们都只能从栈顶进行出栈和进栈操作,所以栈要遵守先进后出的原则
栈的先进先出原则如下:
栈的实现
栈的实现一般可以使用数组或者链表实现,相对而言数组的结构实现更优一些。因为数组在尾上插入数据的代价比较小。所以我们在这里选择用数组来实现栈。
数组栈的结构图:

下面我们就用数组来是具体实现栈的增删查改等操作
头文件如下:
#include<stdio.h>
#include<assert.h>
#include<ctype.h>
#include<stdlib.h>
typedef int STDataType;
typedef struct Stack
{
	STDataType* a;
	int top;		// 栈顶
	int capacity;  // 容量
}Stack;
// 初始化栈
void StackInit(Stack* ps);
// 入栈
void StackPush(Stack* ps, STDataType data);
// 出栈
void StackPop(Stack* ps);
// 获取栈顶元素
STDataType StackTop(Stack* ps);
// 获取栈中有效元素个数
int StackSize(Stack* ps);
// 检测栈是否为空,如果为空返回非零结果,如果不为空返回0
int StackEmpty(Stack* ps);
// 销毁栈
void StackDestroy(Stack* ps);
创建栈
首先我们在这里将int作为本次栈的数据类型
我们还要定义一个结构体里面有数组,栈顶元素的下标的+1和栈的容量(栈里面的最多元素个数)
typedef int STDataType;
typedef struct Stack
{
	STDataType* a;
	int top;		//
	int capacity;  //
}Stack;
栈的初始化
栈的初始化就比较简单了,直接将top和容量置为0,并且把数组置为空
void StackInit(Stack* ps)
{
	assert(ps);
	ps->top = 0;
	ps->capacity = 0;
	ps->a = NULL;
}
栈的销毁
栈的销毁同样很简单,将数组free掉,防止出现野指针,同时置空,然后容量和栈顶元素下标置为0
void StackDestroy(Stack* ps)
{
	assert(ps);
	free(ps->a);
	ps->a = NULL;
	ps->capacity = 0;
	ps->top = 0;
}
判断栈是否为空
在后面的增删查改等操作我们需要断言,为了增加代码的可读性,我们直接写一个函数 ,更加容易理解,如果栈顶元素下标为0,那么这个栈就为空 ,所以直接return top等于 0这个表达式的值,为空则返回 1,不为空则返回0
int StackEmpty(Stack* ps)
{
	assert(ps);
	return ps->top == 0;
}
数据进栈
数据进栈是从栈顶入,我们首先要判断这个 栈是否已满,如果满了的话那么栈顶的下标就和容量相等,对于top和capacity的不理解的可以看这个图,top的意思如下图:
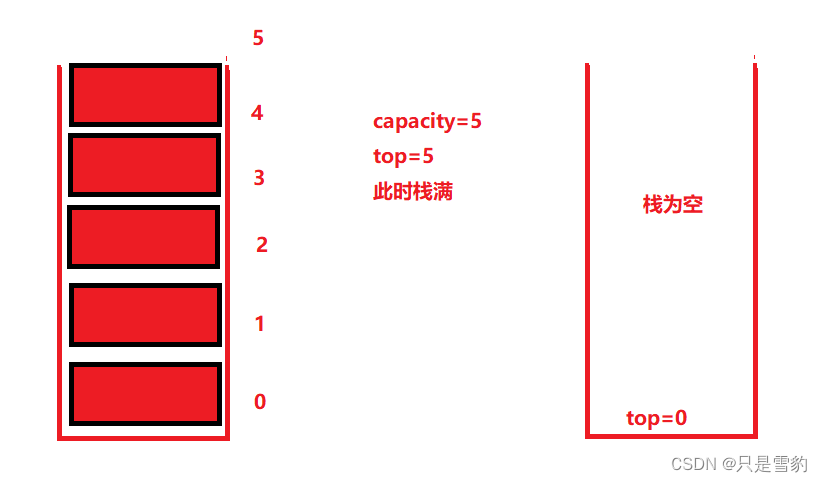
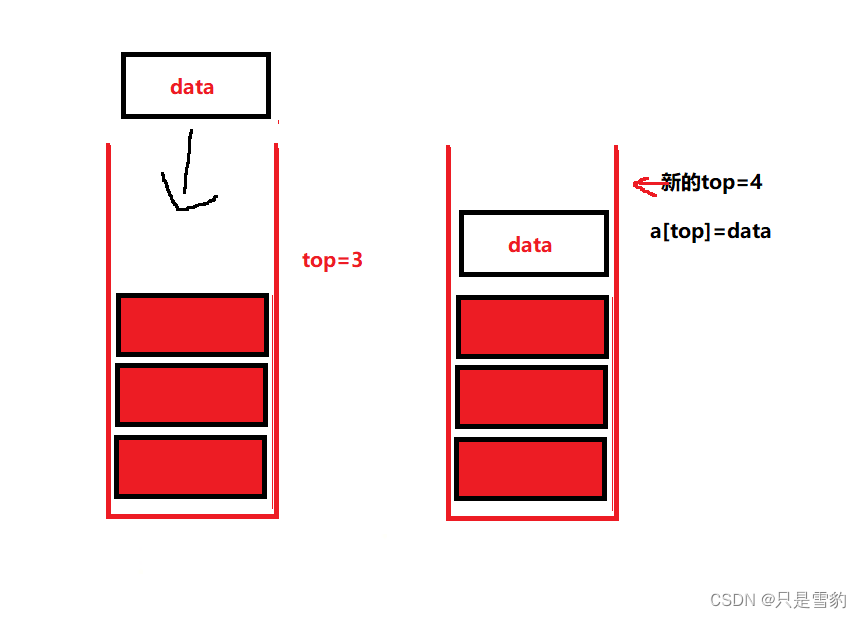
当capacity和top相等时其实是有两种情况的,一种时为空,另一种是栈满,,我们在这里就用一个三目操作符,如果为0,就将capacity初始化为4,否则将capacity的原来的值乘2,然后动态开辟realloc一块新的空间,大小就是newcapacity,这样我们就完成了扩容
然后我们将新空间temp给数组a
最后直接把插入的数据data给a[top],同时top++
void StackPush(Stack* ps, STDataType data)
{
	if (ps->top == ps->capacity)
	{
		int newcapacity = ps->capacity == 0 ? 4 : ps->capacity * 2;
		STDataType* temp = (STDataType*)realloc(ps->a, newcapacity * sizeof(STDataType));
		if (temp == NULL)
		{
			perror("realloc");
			return;
		}
		ps->capacity = newcapacity;
		ps->a = temp;
	}
	ps->a[ps->top] = data;
	ps->top++;
}
数据出栈
出栈及其简单,直接先判断栈是否为空,然后将top–即可
void StackPop(Stack* ps)
{
	assert(ps);
	assert(!StackEmpty(ps));
	ps->top--;
}
获取栈顶元素
栈顶元素的下标其实就是top-1,所以直接返回a[top-1]
STDataType StackTop(Stack* ps)
{
	assert(ps);
	assert(!StackEmpty(ps));
	return ps->a[ps->top - 1];
}
获取栈内的元素个数
栈内元素个数就是top的值,栈为空top为0
int StackSize(Stack* ps)
{
	assert(ps);
	return ps->top;
}
栈的实现就完成了,完整代码如下:
typedef int STDataType;
typedef struct Stack
{
	STDataType* a;
	int top;		// ջ
	int capacity;  //
}Stack;

void StackInit(Stack* ps)
{
	assert(ps);
	ps->top = 0;
	ps->capacity = 0;
	ps->a = NULL;
}

void StackDestroy(Stack* ps)
{
	assert(ps);
	free(ps->a);
	ps->a = NULL;
	ps->capacity = 0;
	ps->top = 0;
}

int StackEmpty(Stack* ps)
{
	assert(ps);
	return ps->top == 0;
}

void StackPush(Stack* ps, STDataType data)
{
	if (ps->top == ps->capacity)
	{
		int newcapacity = ps->capacity == 0 ? 4 : ps->capacity * 2;
		STDataType* temp = (STDataType*)realloc(ps->a, newcapacity * sizeof(STDataType));
		if (temp == NULL)
		{
			perror("realloc");
			return;
		}
		ps->capacity = newcapacity;
		ps->a = temp;
	}
	ps->a[ps->top] = data;
	ps->top++;
}

void StackPop(Stack* ps)
{
	assert(ps);
	assert(!StackEmpty(ps));
	ps->top--;
}

STDataType StackTop(Stack* ps)
{
	assert(ps);
	assert(!StackEmpty(ps));
	return ps->a[ps->top - 1];
}

int StackSize(Stack* ps)
{
	assert(ps);
	return ps->top;
}
队列
栈的基本概念
队列:只允许在一端进行插入数据操作,在另一端进行删除数据操作的特殊线性表,队列具有先进先出FIFO(First In First Out)
入队列:进行插入操作的一端称为队尾
出队列:进行删除操作的一端称为队头

队列的实现
队列也可以数组和链表的结构实现,使用链表的结构实现更优一些,因为如果使用数组的结构,出队列在数组头上出数据,效率会比较低。
这里我们就用列表的结构来实现队列
头文件如下:
注意,这里我们定义了两个结构体,,第一个结构体其实只是链表的结构,里面有一个next一个data,第二个则是队列的结构,一个队头(出数据)指针,一个队尾指针(进数据),还有一个队列的大小
#include<stdio.h>
#include<stdlib.h>
#include<assert.h>
#include<ctype.h>

// 链式结构:表示队列
typedef int QDataType;

typedef struct QListNode
{
	struct QListNode* next;
	QDataType data;
}QNode;

// 队列的结构
typedef struct Queue
{
	QDataType size;
	QNode* front;
	QNode* rear;
}Queue;

// 初始化队列
void QueueInit(Queue* q);
// 队尾入队列
void QueuePush(Queue* q, QDataType data);
// 队头出队列
void QueuePop(Queue* q);
// 获取队列头部元素
QDataType QueueFront(Queue* q);
// 获取队列队尾元素
QDataType QueueBack(Queue* q);
// 获取队列中有效元素个数
int QueueSize(Queue* q);
// 检测队列是否为空,如果为空返回非零结果,如果非空返回0
int QueueEmpty(Queue* q);
// 销毁队列
void QueueDestroy(Queue* q);
队列的初始化
初始目前以及是熟能生巧了,很简单,size置为0,头尾指针置为空即可
void QueueInit(Queue* q)
{
	assert(q);
	q->size = 0;
	q->front = q->rear = NULL;
}
队列的销毁
队列的销毁我们需要花点功夫理解一下:
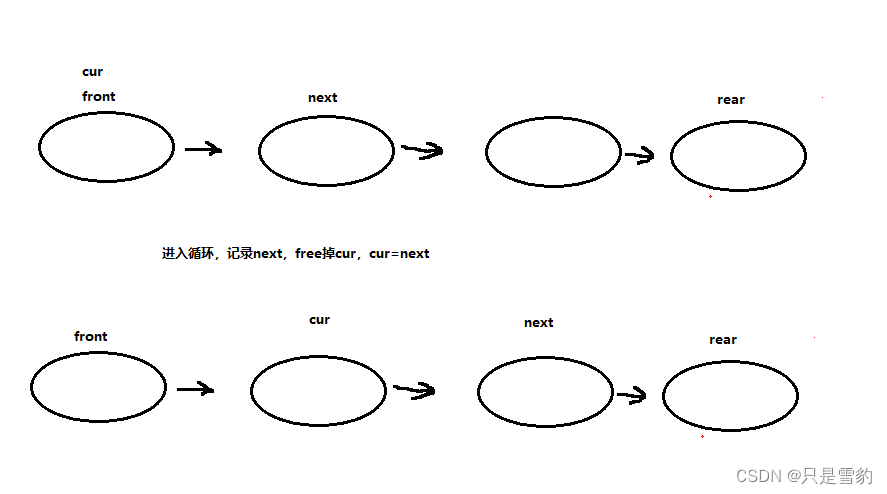
因为队列有多个节点,全部都要free掉 ,不然就可能会出现野指针的问题,所以我们在这里用一个while循环,将cur置为头指针,将next置为cur的next,这样当前cur的next就不会丢失。首先我们把cur给free掉,然后将cur置为next继续操作,直到cur为空,然后将front和rear置为空,size置为0即可。
void QueueDestroy(Queue* q)
{
	assert(q);
	QNode* cur = q->front;
	while (cur)
	{
		QNode* next = cur->next;
		free(cur);
		cur = next;
	}
	q->front = q->rear = NULL;
	q->size = 0;
}
判断队列是否为空
和栈一样,提高代码的可读性,如果size=0,其实队列就为空,但是头尾指针都为空时也可以,为空时返回1,不为空时返回0
int QueueEmpty(Queue* q)
{
	assert(q);
	return q->front == NULL && q->rear == NULL;
	/*return q->size == 0;*/
}
队列数据插入
要插入一个数据我们首先要做的就是开辟有一个新的链表节点,然后将他的next置为空,data置为你要插入的数据
插入数据分为两种情况,链表为空和不为空
链表为空时直接将front和rear置为新节点newnode同时size++
链表不为空时就将front的next置为newnode,rear置为newnode同时size++
void QueuePush(Queue* q, QDataType data)
{
	assert(q);
	QNode* newnode = (QNode*)malloc(sizeof(QNode));
	if (newnode == NULL)
	{
		perror("malloc");
		return;
	}
	newnode->data = data;
	newnode->next = NULL;
	if (q->rear == NULL)
	{
		assert(q->front == NULL);
		q->front = q->rear = newnode;
	}
	else
	{
		q->rear->next = newnode;
		q->rear = newnode;
	}
	q->size++;
}
队列数据删除
队列的删除我们就要判断队列是否为空,为空就不能删除了
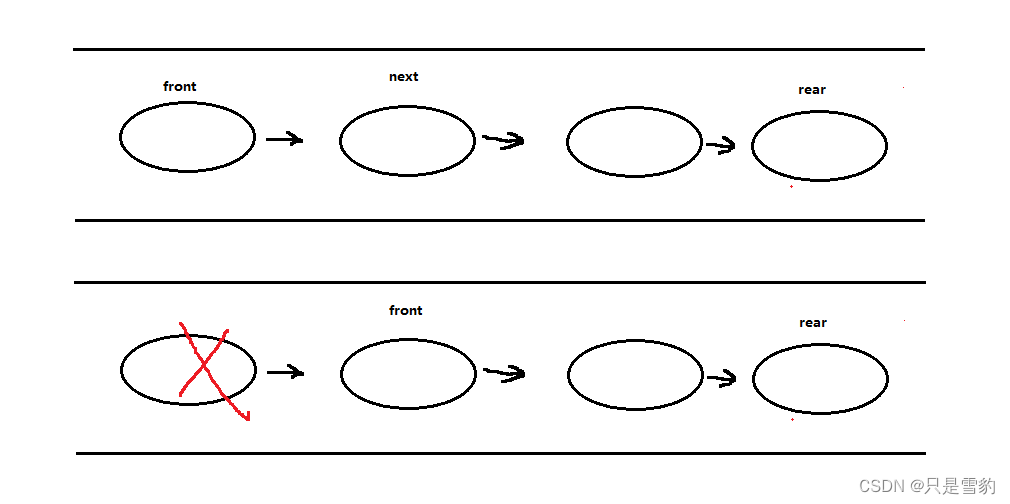
同样的有两种情况:
链表只有一个节点时直接将头尾指针都置为空即可,size–
链表有多个节点时就将front的next置为front,size–
void QueuePop(Queue* q)
{
	assert(q);
	assert(!QueueEmpty(q));
	if (q->rear == q->front)
	{
		free(q->front);
		q->front = q->rear = NULL;
	}
	else
	{
		QNode* next = q->front->next;
		free(q->front);
		q->front = next;
	}
	q->size--;
}
获取队头数据
获取队头的元素 ,直接返回头指针的data即可
QDataType QueueFront(Queue* q)
{
	assert(q);
	assert(!QueueEmpty(q));
	return q->front->data;
}
获取队尾数据
获取队尾元素 同样简单,直接返回rear的data即可
QDataType QueueBack(Queue* q)
{
	assert(q);
	return q->rear->data;
}
求队列元素个数
直接返回size的值即可
int QueueSize(Queue* q)
{
	assert(q);
	return q->size;
}
队列的实现就完成了
完整代码如下:
void QueueInit(Queue* q)
{
	assert(q);
	q->size = 0;
	q->front = q->rear = NULL;
}

void QueueDestroy(Queue* q)
{
	assert(q);
	QNode* cur = q->front;
	while (cur)
	{
		QNode* next = cur->next;
		free(cur);
		cur = next;
	}
	q->front = q->rear = NULL;
	q->size = 0;
}

int QueueEmpty(Queue* q)
{
	assert(q);
	return q->front == NULL && q->rear == NULL;
	/*return q->size == 0;*/
}

void QueuePush(Queue* q, QDataType data)
{
	assert(q);
	QNode* newnode = (QNode*)malloc(sizeof(QNode));
	if (newnode == NULL)
	{
		perror("malloc");
		return;
	}
	newnode->data = data;
	newnode->next = NULL;
	if (q->rear == NULL)
	{
		assert(q->front == NULL);
		q->front = q->rear = newnode;
	}
	else
	{
		q->rear->next = newnode;
		q->rear = newnode;
	}
	q->size++;
}

void QueuePop(Queue* q)
{
	assert(q);
	assert(!QueueEmpty(q));
	//һڵʱ
	if (q->rear == q->front)
	{
		free(q->front);
		q->front = q->rear = NULL;
	}
	//ڵ
	else
	{
		QNode* next = q->front->next;
		free(q->front);
		q->front = next;
	}
	q->size--;
}

QDataType QueueFront(Queue* q)
{
	assert(q);
	assert(!QueueEmpty(q));
	return q->front->data;
}

QDataType QueueBack(Queue* q)
{
	assert(q);
	return q->rear->data;
}

int QueueSize(Queue* q)
{
	assert(q);
	return q->size;
}
好了,今天的分享到这里就结束了,谢谢大家的支持!
