基于WIN10的64位系统演示
一、写在前面
本期开始,我们继续学习深度学习图像目标检测系列,FCOS(Fully Convolutional One-Stage Object Detection)模型。
二、FCOS简介
FCOS(Fully Convolutional One-Stage Object Detection)是一种无锚框的目标检测方法,由 Tian et al. 在 2019 年提出。与传统的基于锚框的目标检测方法(如 Faster R-CNN 和 SSD)不同,FCOS 完全摒弃了锚框的概念,使得模型结构更为简洁和高效。
以下是 FCOS 模型的主要特点:
(1)无锚框设计:
FCOS 不使用预定义的锚框来生成候选框。相反,它直接在特征图上的每个位置进行预测。这消除了与锚框大小和形状相关的超参数,简化了模型设计。
(2)位置编码:
对于特征图上的每个位置,FCOS 不仅预测类别分数,还预测与真实边界框的四个边的距离。这四个距离值为:左、右、上、下,与目标中心的相对距离。
(3)训练时的位置限制:
为了使每个位置只对特定大小的目标负责,FCOS 在训练时为特征图的每个层级引入了一个目标大小的范围。这确保了大的物体由底层的特征图来检测,小的物体由高层的特征图来检测。
(4)中心性偏置:
由于物体的中心位置通常包含更明确的语义信息,FCOS 引入了一个中心性分支来预测每个位置是否接近物体的中心。这有助于减少检测的假阳性。
(5)简洁与高效:
由于其无锚框的设计,FCOS 的结构相对简单,计算量较小,但在多个标准数据集上的性能与其他一流的目标检测方法相当或更好。
三、数据源
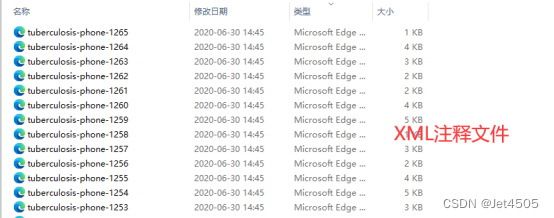
来源于公共数据,文件设置如下:


大概的任务就是:用一个框框标记出MTB的位置。
四、FCOS实战
直接上代码:
import os
import random
import torch
import torchvision
from torchvision.models.detection import fcos_resnet50_fpn
from torchvision.models.detection.fcos import FCOS_ResNet50_FPN_Weights
from torchvision.transforms import functional as F
from PIL import Image
from torch.utils.data import DataLoader
import xml.etree.ElementTree as ET
import matplotlib.pyplot as plt
from torchvision import transforms
import albumentations as A
from albumentations.pytorch import ToTensorV2
import numpy as np

# Function to parse XML annotations
def parse_xml(xml_path):
    tree = ET.parse(xml_path)
    root = tree.getroot()

    boxes = []
    for obj in root.findall("object"):
        bndbox = obj.find("bndbox")
        xmin = int(bndbox.find("xmin").text)
        ymin = int(bndbox.find("ymin").text)
        xmax = int(bndbox.find("xmax").text)
        ymax = int(bndbox.find("ymax").text)

        # Check if the bounding box is valid
        if xmin < xmax and ymin < ymax:
            boxes.append((xmin, ymin, xmax, ymax))
        else:
            print(f"Warning: Ignored invalid box in {xml_path} - ({xmin}, {ymin}, {xmax}, {ymax})")

    return boxes

# Function to split data into training and validation sets
def split_data(image_dir, split_ratio=0.8):
    all_images = [f for f in os.listdir(image_dir) if f.endswith(".jpg")]
    random.shuffle(all_images)
    split_idx = int(len(all_images) * split_ratio)
    train_images = all_images[:split_idx]
    val_images = all_images[split_idx:]

    return train_images, val_images


# Dataset class for the Tuberculosis dataset
class TuberculosisDataset(torch.utils.data.Dataset):
    def __init__(self, image_dir, annotation_dir, image_list, transform=None):
        self.image_dir = image_dir
        self.annotation_dir = annotation_dir
        self.image_list = image_list
        self.transform = transform

    def __len__(self):
        return len(self.image_list)

    def __getitem__(self, idx):
        image_path = os.path.join(self.image_dir, self.image_list[idx])
        image = Image.open(image_path).convert("RGB")

        xml_path = os.path.join(self.annotation_dir, self.image_list[idx].replace(".jpg", ".xml"))
        boxes = parse_xml(xml_path)

        # Check for empty bounding boxes and return None
        if len(boxes) == 0:
            return None

        boxes = torch.as_tensor(boxes, dtype=torch.float32)
        labels = torch.ones((len(boxes),), dtype=torch.int64)
        iscrowd = torch.zeros((len(boxes),), dtype=torch.int64)

        target = {}
        target["boxes"] = boxes
        target["labels"] = labels
        target["image_id"] = torch.tensor([idx])
        target["iscrowd"] = iscrowd

        # Apply transformations
        if self.transform:
            image = self.transform(image)

        return image, target

# Define the transformations using torchvision
data_transform = torchvision.transforms.Compose([
    torchvision.transforms.ToTensor(),  # Convert PIL image to tensor
    torchvision.transforms.Normalize(mean=[0.485, 0.456, 0.406], std=[0.229, 0.224, 0.225])  # Normalize the images
])


# Adjusting the DataLoader collate function to handle None values
def collate_fn(batch):
    batch = list(filter(lambda x: x is not None, batch))
    return tuple(zip(*batch))


def get_fcos_model_for_finetuning(num_classes):
    # Load an FCOS model with a ResNet-50-FPN backbone without pre-trained weights
    model = fcos_resnet50_fpn(weights=None, num_classes=num_classes)

    return model


# Function to save the model
def save_model(model, path="fcos_mtb.pth", save_full_model=False):
    if save_full_model:
        torch.save(model, path)
    else:
        torch.save(model.state_dict(), path)
    print(f"Model saved to {path}")

# Function to compute Intersection over Union
def compute_iou(boxA, boxB):
    xA = max(boxA[0], boxB[0])
    yA = max(boxA[1], boxB[1])
    xB = min(boxA[2], boxB[2])
    yB = min(boxA[3], boxB[3])

    interArea = max(0, xB - xA + 1) * max(0, yB - yA + 1)
    boxAArea = (boxA[2] - boxA[0] + 1) * (boxA[3] - boxA[1] + 1)
    boxBArea = (boxB[2] - boxB[0] + 1) * (boxB[3] - boxB[1] + 1)

    iou = interArea / float(boxAArea + boxBArea - interArea)
    return iou

# Adjusting the DataLoader collate function to handle None values and entirely empty batches
def collate_fn(batch):
    batch = list(filter(lambda x: x is not None, batch))
    if len(batch) == 0:
        # Return placeholder batch if entirely empty
        return [torch.zeros(1, 3, 224, 224)], [{}]
    return tuple(zip(*batch))

#Training function with modifications for collecting IoU and loss
def train_model(model, train_loader, optimizer, device, num_epochs=10):
    model.train()
    model.to(device)
    loss_values = []
    iou_values = []
    for epoch in range(num_epochs):
        epoch_loss = 0.0
        total_ious = 0
        num_boxes = 0
        for images, targets in train_loader:
            # Skip batches with placeholder data
            if len(targets) == 1 and not targets[0]:
                continue
            # Skip batches with empty targets
            if any(len(target["boxes"]) == 0 for target in targets):
                continue
            images = [image.to(device) for image in images]
            targets = [{k: v.to(device) for k, v in t.items()} for t in targets]

            loss_dict = model(images, targets)
            losses = sum(loss for loss in loss_dict.values())

            optimizer.zero_grad()
            losses.backward()
            optimizer.step()

            epoch_loss += losses.item()

            # Compute IoU for evaluation
            with torch.no_grad():
                model.eval()
                predictions = model(images)
                for i, prediction in enumerate(predictions):
                    pred_boxes = prediction["boxes"].cpu().numpy()
                    true_boxes = targets[i]["boxes"].cpu().numpy()
                    for pred_box in pred_boxes:
                        for true_box in true_boxes:
                            iou = compute_iou(pred_box, true_box)
                            total_ious += iou
                            num_boxes += 1
                model.train()

        avg_loss = epoch_loss / len(train_loader)
        avg_iou = total_ious / num_boxes if num_boxes != 0 else 0
        loss_values.append(avg_loss)
        iou_values.append(avg_iou)
        print(f"Epoch {epoch+1}/{num_epochs} Loss: {avg_loss} Avg IoU: {avg_iou}")

    # Plotting loss and IoU values
    plt.figure(figsize=(12, 5))
    plt.subplot(1, 2, 1)
    plt.plot(loss_values, label="Training Loss")
    plt.title("Training Loss across Epochs")
    plt.xlabel("Epochs")
    plt.ylabel("Loss")

    plt.subplot(1, 2, 2)
    plt.plot(iou_values, label="IoU")
    plt.title("IoU across Epochs")
    plt.xlabel("Epochs")
    plt.ylabel("IoU")
    plt.show()

    # Save model after training
    save_model(model)

# Validation function
def validate_model(model, val_loader, device):
    model.eval()
    model.to(device)

    with torch.no_grad():
        for images, targets in val_loader:
            images = [image.to(device) for image in images]
            targets = [{k: v.to(device) for k, v in t.items()} for t in targets]
            model(images)

# Paths to your data
image_dir = "tuberculosis-phonecamera"
annotation_dir = "tuberculosis-phonecamera"

# Split data
train_images, val_images = split_data(image_dir)

# Create datasets and dataloaders
train_dataset = TuberculosisDataset(image_dir, annotation_dir, train_images, transform=data_transform)
val_dataset = TuberculosisDataset(image_dir, annotation_dir, val_images, transform=data_transform)

# Updated DataLoader with new collate function
train_loader = DataLoader(train_dataset, batch_size=4, shuffle=True, collate_fn=collate_fn)
val_loader = DataLoader(val_dataset, batch_size=4, shuffle=False, collate_fn=collate_fn)

# Model and optimizer
model = get_fcos_model_for_finetuning(2)
optimizer = torch.optim.Adam(model.parameters(), lr=0.001)


# Train and validate
train_model(model, train_loader, optimizer, device="cuda", num_epochs=100)
validate_model(model, val_loader, device="cuda")


#######################################Print Metrics######################################
def calculate_metrics(predictions, ground_truths, iou_threshold=0.5):
    TP = 0  # True Positives
    FP = 0  # False Positives
    FN = 0  # False Negatives
    total_iou = 0  # to calculate mean IoU

    for pred, gt in zip(predictions, ground_truths):
        pred_boxes = pred["boxes"].cpu().numpy()
        gt_boxes = gt["boxes"].cpu().numpy()

        # Match predicted boxes to ground truth boxes
        for pred_box in pred_boxes:
            max_iou = 0
            matched = False
            for gt_box in gt_boxes:
                iou = compute_iou(pred_box, gt_box)
                if iou > max_iou:
                    max_iou = iou
                    if iou > iou_threshold:
                        matched = True

            total_iou += max_iou
            if matched:
                TP += 1
            else:
                FP += 1

        FN += len(gt_boxes) - TP

    precision = TP / (TP + FP) if (TP + FP) != 0 else 0
    recall = TP / (TP + FN) if (TP + FN) != 0 else 0
    f1_score = (2 * precision * recall) / (precision + recall) if (precision + recall) != 0 else 0
    mean_iou = total_iou / (TP + FP)

    return precision, recall, f1_score, mean_iou

def evaluate_model(model, dataloader, device):
    model.eval()
    model.to(device)
    all_predictions = []
    all_ground_truths = []

    with torch.no_grad():
        for images, targets in dataloader:
            images = [image.to(device) for image in images]
            predictions = model(images)

            all_predictions.extend(predictions)
            all_ground_truths.extend(targets)

    precision, recall, f1_score, mean_iou = calculate_metrics(all_predictions, all_ground_truths)
    return precision, recall, f1_score, mean_iou


train_precision, train_recall, train_f1, train_iou = evaluate_model(model, train_loader, "cuda")
val_precision, val_recall, val_f1, val_iou = evaluate_model(model, val_loader, "cuda")

print("Training Set Metrics:")
print(f"Precision: {train_precision:.4f}, Recall: {train_recall:.4f}, F1 Score: {train_f1:.4f}, Mean IoU: {train_iou:.4f}")

print("\nValidation Set Metrics:")
print(f"Precision: {val_precision:.4f}, Recall: {val_recall:.4f}, F1 Score: {val_f1:.4f}, Mean IoU: {val_iou:.4f}")

#sheet
header = "| Metric    | Training Set | Validation Set |"
divider = "+----------+--------------+----------------+"

train_metrics = f"| Precision | {train_precision:.4f}      | {val_precision:.4f}          |"
recall_metrics = f"| Recall    | {train_recall:.4f}      | {val_recall:.4f}          |"
f1_metrics = f"| F1 Score  | {train_f1:.4f}      | {val_f1:.4f}          |"
iou_metrics = f"| Mean IoU  | {train_iou:.4f}      | {val_iou:.4f}          |"

print(header)
print(divider)
print(train_metrics)
print(recall_metrics)
print(f1_metrics)
print(iou_metrics)
print(divider)

#######################################Train Set######################################
import numpy as np
import matplotlib.pyplot as plt

def plot_predictions_on_image(model, dataset, device, title):
    # Select a random image from the dataset
    idx = np.random.randint(5, len(dataset))
    image, target = dataset[idx]
    img_tensor = image.clone().detach().to(device).unsqueeze(0)

    # Use the model to make predictions
    model.eval()
    with torch.no_grad():
        prediction = model(img_tensor)

    # Inverse normalization for visualization
    inv_normalize = transforms.Normalize(
        mean=[-0.485/0.229, -0.456/0.224, -0.406/0.225],
        std=[1/0.229, 1/0.224, 1/0.225]
    )
    image = inv_normalize(image)
    image = torch.clamp(image, 0, 1)
    image = F.to_pil_image(image)

    # Plot the image with ground truth boxes
    plt.figure(figsize=(10, 6))
    plt.title(title + " with Ground Truth Boxes")
    plt.imshow(image)
    ax = plt.gca()

    # Draw the ground truth boxes in blue
    for box in target["boxes"]:
        rect = plt.Rectangle(
            (box[0], box[1]), box[2]-box[0], box[3]-box[1],
            fill=False, color='blue', linewidth=2
        )
        ax.add_patch(rect)
    plt.show()

    # Plot the image with predicted boxes
    plt.figure(figsize=(10, 6))
    plt.title(title + " with Predicted Boxes")
    plt.imshow(image)
    ax = plt.gca()

    # Draw the predicted boxes in red
    for box in prediction[0]["boxes"].cpu():
        rect = plt.Rectangle(
            (box[0], box[1]), box[2]-box[0], box[3]-box[1],
            fill=False, color='red', linewidth=2
        )
        ax.add_patch(rect)
    plt.show()

# Call the function for a random image from the train dataset
plot_predictions_on_image(model, train_dataset, "cuda", "Selected from Training Set")


#######################################Val Set######################################

# Call the function for a random image from the validation dataset
plot_predictions_on_image(model, val_dataset, "cuda", "Selected from Validation Set")
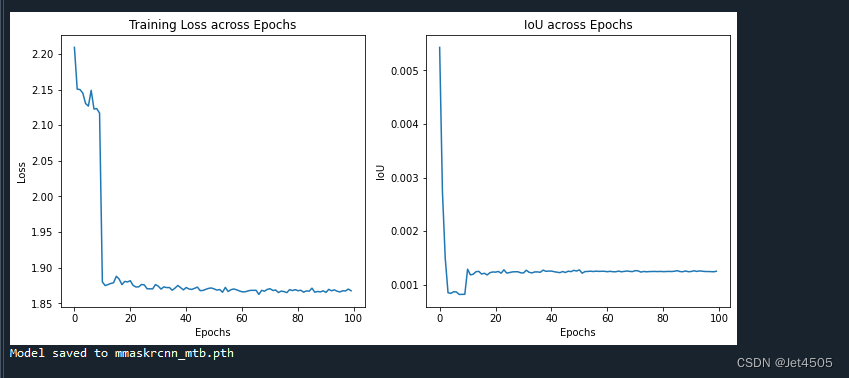
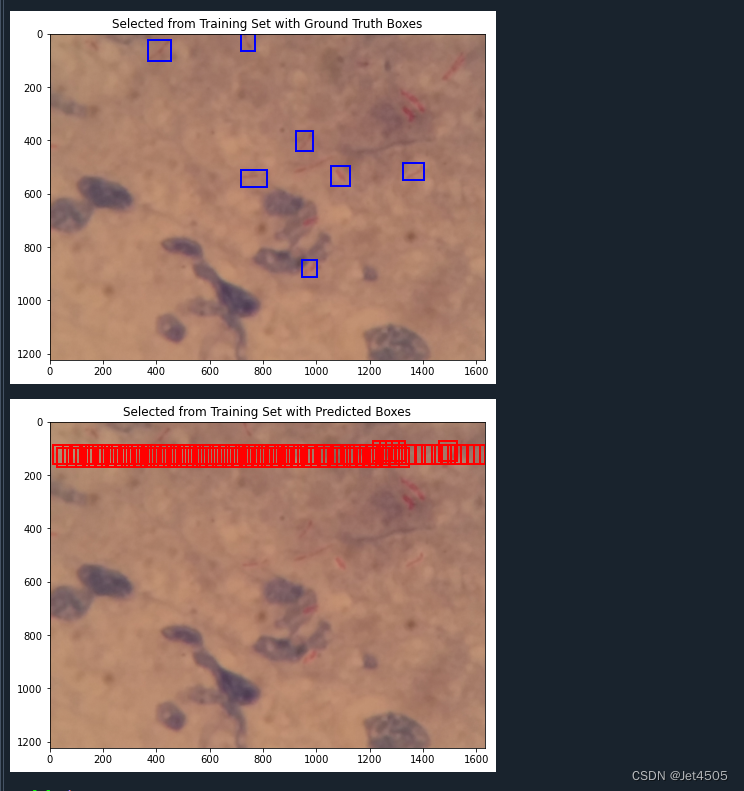
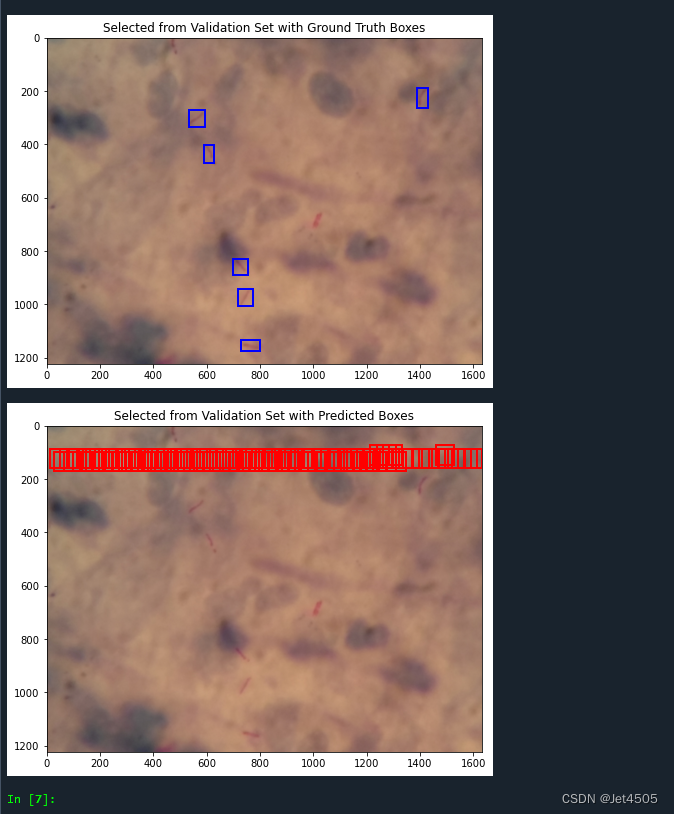
这回是从头训练的,因此结果不理想:
(1)loss曲线图:
(2)性能指标:

(3)训练的图片测试结果:
(4)验证集的图片测试结果:
五、写在后面
这回没有使用预训练模型,因为在运行过程中有个问题还没解决,因此只能从头训练,但默认参数也没达到很好的效果。哪位大佬解决了告诉我一声~
