1、先构建基本的netty框架
再下面的代码中我构建了一个最基本的netty实现websocket的框架,其他个性化部分再自行添加。
@Slf4j
public class TeacherServer {

    public void teacherStart(int port) throws InterruptedException {
        NioEventLoopGroup boss = new NioEventLoopGroup();
        NioEventLoopGroup worker = new NioEventLoopGroup(2);
    try{
        ServerBootstrap serverBootstrap = new ServerBootstrap()
                .group(boss, worker)
                .channel(NioServerSocketChannel.class)
                .childHandler(new ChannelInitializer<NioSocketChannel>() {
                    @Override
                    protected void initChannel(NioSocketChannel nsc) throws Exception {
                        //http的编解码器
                        nsc.pipeline().addLast(new HttpServerCodec());
                        //将多个快组成一个完整的http请求
                        nsc.pipeline().addLast(new HttpObjectAggregator(65536));
                        nsc.pipeline().addLast(new WebSocketServerProtocolHandler("/teacher", null, true, 65536 * 10,false,true));
                    }
                });
        ChannelFuture cf = serverBootstrap.bind(port).sync();
        log.info("教师服务已开启");
        cf.channel().closeFuture().sync();
    } finally {
        boss.shutdownGracefully().sync(); // 释放线程池资源
        worker.shutdownGracefully().sync();
    }
    }

    //初始化
    public void init(int port){
    //异步启动
        new Thread(() -> {
            try {
                teacherStart(port);
            } catch (InterruptedException e) {
                e.printStackTrace();
            }
        }).start();
    }
}
要实现websocket并且实现url传参,我们需要关注WebSocketServerProtocolHandler处理的一个参数:checkStartsWith

这个参数我们需要把他设置成ture,为什么呢,让我们来看一下源码isWebSockerPath(),这方法是判断具体的url是否和我设置的路径相匹配:
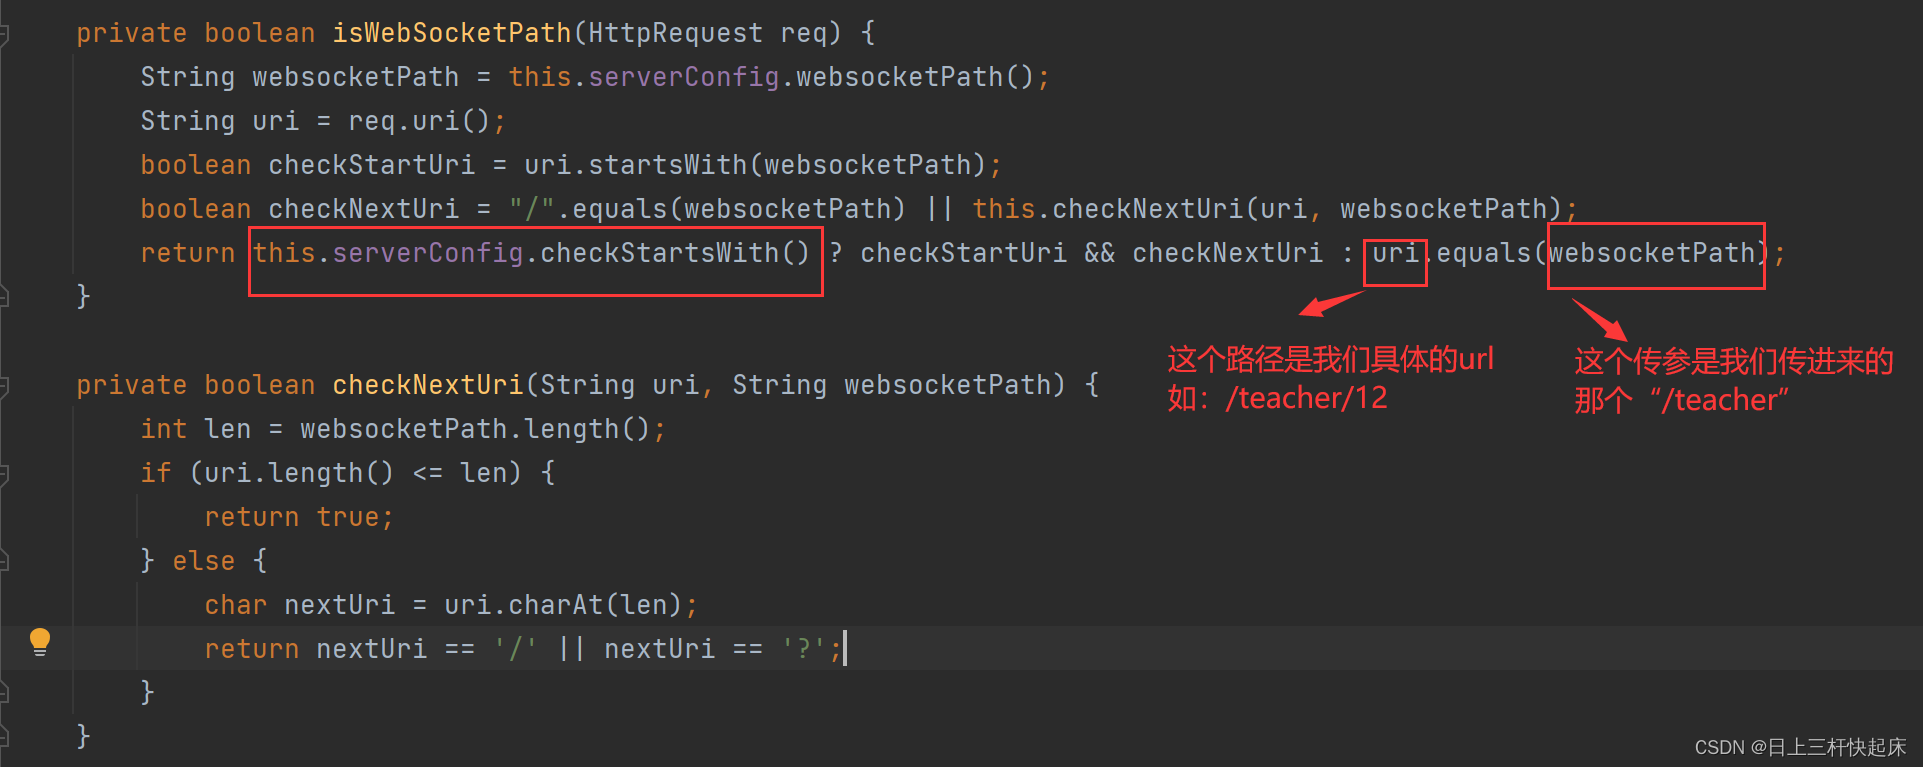
可以看出如果checkStartWith设为false的话,则必须url和websocketPath相等,否则会返回false。如果设置为true的话则只需要websocketPath是具体的url的前缀就行。当最后返回false时,连接就无法建立。
我们看源码这是一个处理类WebSocketServerProtocolHandshakeHandler,这是WebSocketServerProtocolHandler这个处理类再创建的时候给加pipelien()里的的,放在其之前,专门用来处理握手的处理器。可以看到如果返回false,则不会接下来进行握手操作,而是直接将消息返回给下一个处理器。如果这样的话我们可以认为连接已经失败。

所以我们如果要通过url传参的话再构建WebSocketServerProtocolHandler对象时要将chaekStartWith设为true。
2、获取url中的传参
2.1 再没建立连接前获取url
因为websocket发起建立连接用的时http协议并携带升级协议的请求,后面服务端进行升级,将其升为websocket,那么我们可以再还未升级前,也就是再WebSocketServerProtocolHandler处理器前再新增一个处理器,读取第一次发起的http请求。再其中获取url,等获取到初始化完后将这个处理器从pipelien中移除。
FullRequest是一个Java类,它表示一个完整的HTTP请求,包含请求方法、路径、头部和内容。它是Netty框架中的一个组件,用于处理网络通信。
public class TeacherContineHandler extends ChannelInboundHandlerAdapter {


    @Override
    public void channelRead(ChannelHandlerContext channelHandlerContext, Object msg) throws Exception {
        if (msg instanceof FullHttpRequest){
            FullHttpRequest request = (FullHttpRequest) msg;
            String uri = request.uri();
           /*
            *再这里编写自己的操作
            */
            // 在本channel上移除这个handler消息处理,即只处理一次,鉴权通过与否
            channelHandlerContext.pipeline().remove(TeacherContineHandler.class);
        }
        super.channelRead(channelHandlerContext, msg);
    }
}
ps:主要放置顺序:

2.2 建立后通过自定义事件HandshakeComplete获取url
其实netty已经为我们想好了,我也是看源码才发现的,再连接建立完成后WebSocketServerProtocolHandshakeHandler会响应一个事件,再这个事件里我们可以获取到我们想要的请求路径和请求头,我们通过这个方法不光可以再url上传参,还能通过请求头传参。

其中我们通过一个 那个futre对象,就是握手方法返回的,该对象是一个异步的操作结果,可以在完成时触发回调函数。当其完成时我们通过这个对象判断是否成功握手。如果握手成功,那么就调用localHandshakePromise的trySuccess方法,表示握手成功,并调用ctx.fireUserEventTriggered方法,触发两个用户自定义的事件,分别是:
- ServerHandshakeStateEvent.HANDSHAKE_COMPLETE,表示握手完成的状态事件。
- HandshakeComplete,表示握手完成的具体信息,包括req.uri()、req.headers()和handshaker.selectedSubprotocol(),分别表示WebSocket的URI地址、HttpRequest的头信息和选择的子协议。
那我们就可以通过监听这个用户自定义事件来获取请求体了。具体做法就是我们需要实现userEventTriggered()方法这个方法就是用来再有用户自定义事件发生时被调用的,
具体实现如下:
public class TeacherWebSocketHandler extends ChannelInboundHandlerAdapter {
    @Override
    public void userEventTriggered(ChannelHandlerContext ctx, Object evt) throws Exception {
        if (evt instanceof WebSocketServerProtocolHandler.HandshakeComplete){
            WebSocketServerProtocolHandler.HandshakeComplete handshakeComplete = (WebSocketServerProtocolHandler.HandshakeComplete) evt;
            String s = handshakeComplete.requestUri();
            HttpHeaders entries = handshakeComplete.requestHeaders();
            /**
             * 实现自己的初始化操作
             */
        }
        super.userEventTriggered(ctx, evt);
    }
}
3、项目启动
我们的启动代码就写在main方法当中,再这个方法进行初始化,记得传入你想监听的端口,如果你想监听多个端口,可以安这样的步骤之间重复再写一遍就行,因为是异步启动的。


