文章目录
- 前言
- setSurface
- start
- 从哪个pool中申请buffer
- 解码后框架的处理流程
- renderOutbuffer 输出显示
前言
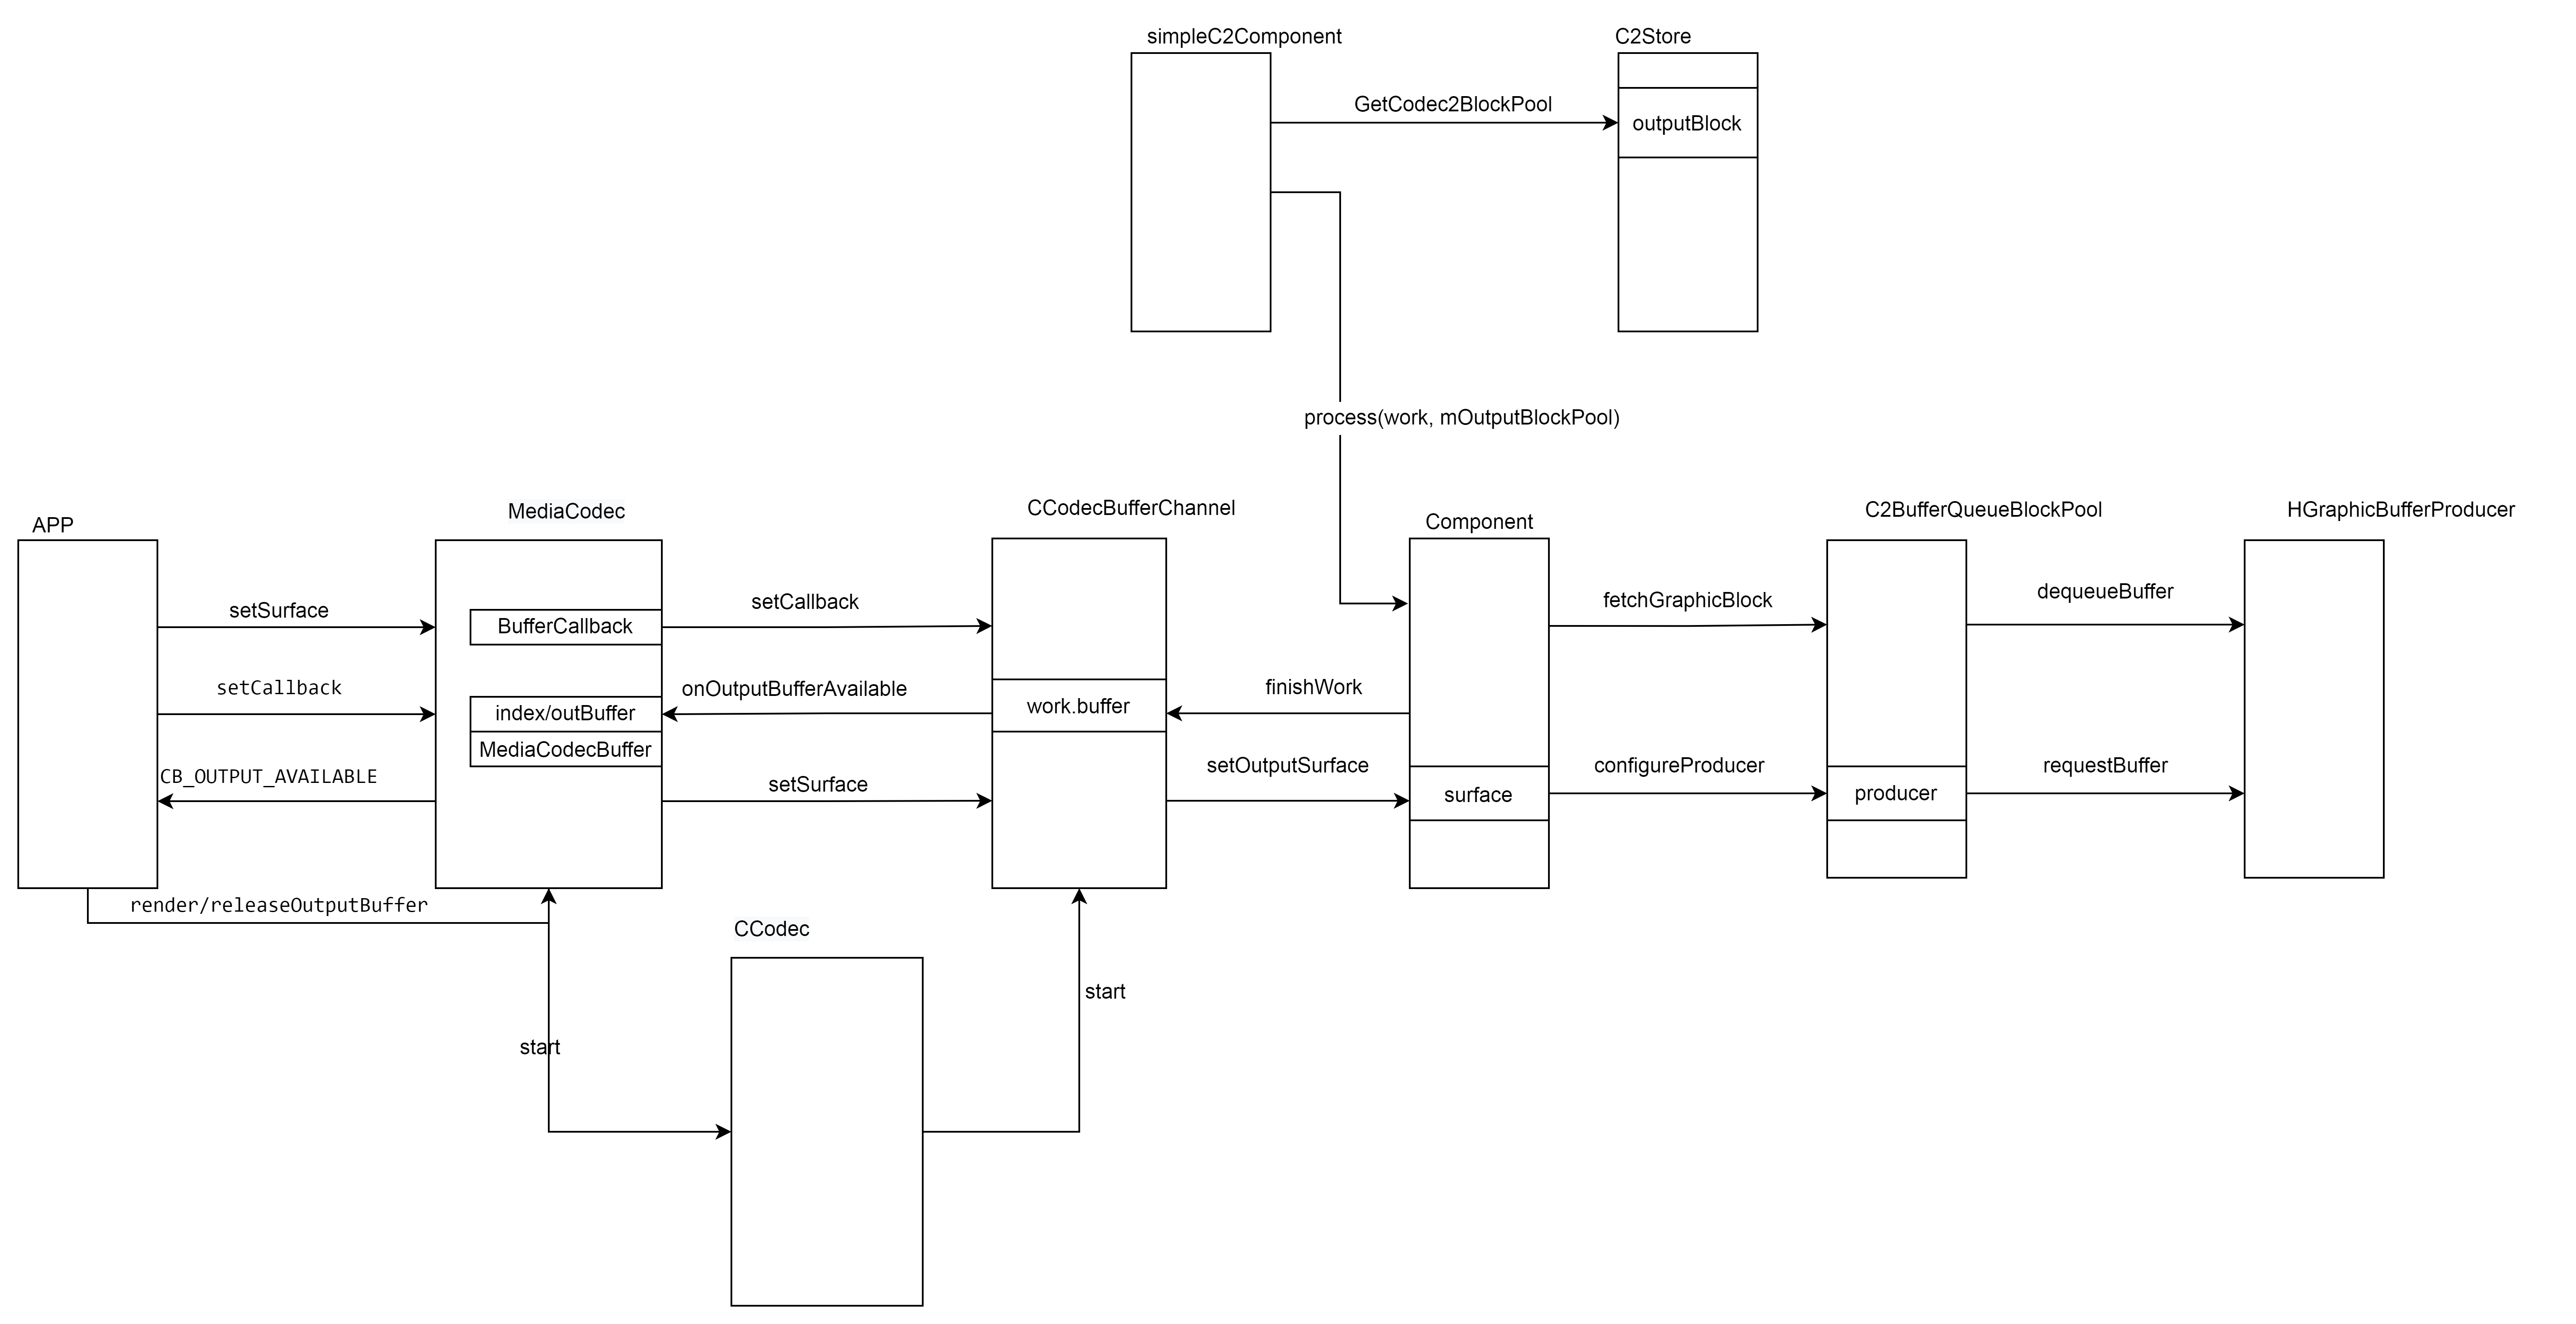
输出buffer整体的管理流程主要可以分为三个部分:
- MediaCodc 和 应用之间的交互 包括设置Surface、解码输出回调到MediaCodec。将输出buffer render或者releas到surface。
- MediaCodec到CCodecBufferChannel,主要是传递控制命令
- CCodecbufferChannel到componet buffer的封装 传递 控制等等。
- componet到bufferqueuepool buffer的申请
外部设置Surface进来,然后把输入buffer 输入,等待输出buffer 的回调,回调回来后 根据音视频同步的策略。在合适的时机renderOutput 送到MediaCodec。
需要了解的几个方面
- setSurface内部做了什么处理。
- 什么时候有输出的buffer可用?
- 输出buffer render到MediaCodec.内部做了什么处理。
setSurface
外部的setSurface调用到 MediaCodec的kWhatSetSurface
- MediaCodec::setSurface
调用下面的connetToSurface 对surface进行连接
nativeWindowConnect(surface.get(), "connectToSurface(reconnect)");
- CCodecBufferChannel::setSurface
根据bufferChanned的信息配置surface,比如配置deuque buffer 的超时时间、
dequeue最大的buffer数,当然这些值在后续可能还会改变,后续在解码器中解码出来的delay改变的话 回重新设置这个delay,
然后在handlework 重新设置最大的可dequeue的buffer 数。赋值mOutputSurface的相关变量。
        Mutexed<OutputSurface>::Locked output(mOutputSurface);
        output->surface = newSurface;
        output->generation = generation;
- 设置surface到 C2BufferQueueBlockPool 用于后续的解码buffer的申请
在ccodecbufferchannel的start中调用configureProducer设置外部surface的GraphicBufferProducer到
bufferQueueBlockpopl中。
          outputSurface = output->surface ?
                    output->surface->getIGraphicBufferProducer() : nullptr;


        if (outputSurface) {
            mComponent->setOutputSurface(
                    outputPoolId_,
                    outputSurface,
                    outputGeneration,
                    maxDequeueCount);
        }

Return<Status> Component::setOutputSurface(
        uint64_t blockPoolId,
        const sp<HGraphicBufferProducer2>& surface) {
    std::shared_ptr<C2BlockPool> pool;
    GetCodec2BlockPool(blockPoolId, mComponent, &pool);
    if (pool && pool->getAllocatorId() == C2PlatformAllocatorStore::BUFFERQUEUE) {
        if (bqPool) {
            bqPool->setRenderCallback(cb);
            bqPool->configureProducer(surface);
        }
    }
    return Status::OK;
}

void configureProducer(const sp<HGraphicBufferProducer> &producer,
                       native_handle_t *syncHandle,
                       uint64_t producerId,
                       uint32_t generation,
                       uint64_t usage,
                       bool bqInformation) {
          if (producer) {
                mProducer = producer;
                mProducerId = producerId;
                mGeneration = bqInformation ? generation : 0;
         }

}
start
start 中跟输出buffer 相关的主要是两个方面
- 可以从surface最大能够dequeue出的buffer 数。由4个值组成 其中
kSmoothnessFactor为4 kRenderingDepth为3。outputDelay由各个解码组件进行设置
比如h264的默认设置为8, 同时会在解码过程handlework进行重新设置。
具体来说:
- 在解码组件中解析到相关的reorder系数变化时 将系统放到输出的work中携带出去。
在外部的ccodebufferchannel 中取出系统设置到surface中。 - 实现动态的控制surface最大可以dequeue的buffer 数量。 外部通过dequeue申请的最大的buffer数是通过surface的setMaxDequeuedBufferCount
设置到bufferqueueproducter 中,后续调用dequeue的时候会进行判断。 - 比如解码器会重新设置为i4_reorder_depth。i4_reorder_depth 是什么? 怎么赋值的?(显示次序在某帧图像之后,解码次序在某帧图像之前的图像数量的最大值。因为编码器中的B帧不仅有前向参考,还有后向参考。 后向参考要求当前图像编码前,参考的后向图像已经编码完成,所以会导致图像的编码顺序和显示顺序不一样。)hevc 是存储在sps的sps_max_num_reorder_pics语言当中。
hevc'解码为例
ps_dec_op->i4_reorder_depth =
ps_sps->ai1_sps_max_num_reorder_pics[ps_sps->i1_sps_max_sub_layers - 1];

mOutputDelay = ps_decode_op->i4_reorder_depth;
ALOGV("New Output delay %d ", mOutputDelay);
C2PortActualDelayTuning::output outputDelay(mOutputDelay);
std::vector<std::unique_ptr<C2SettingResult>> failures;
c2_status_t err =
    mIntf->config({&outputDelay}, C2_MAY_BLOCK, &failures);
if (err == OK) {
    work->worklets.front()->output.configUpdate.push_back(
        C2Param::Copy(outputDelay));
 }


bool CCodecBufferChannel::handleWork(
        std::unique_ptr<C2Work> work,
        const sp<AMessage> &outputFormat,
        const C2StreamInitDataInfo::output *initData) {

while (!worklet->output.configUpdate.empty()) {
        std::unique_ptr<C2Param> param;
        worklet->output.configUpdate.back().swap(param);
        worklet->output.configUpdate.pop_back();

                if (param->forOutput()) {
                    C2PortActualDelayTuning::output outputDelay;
                    if (outputDelay.updateFrom(*param)) {
                        ALOGE("[%s] onWorkDone: updating output delay %u",
                              mName, outputDelay.value);
                        (void)mPipelineWatcher.lock()->outputDelay(outputDelay.value);
                        newOutputDelay = outputDelay.value;
                        needMaxDequeueBufferCountUpdate = true;
                    }
                }
                break;

    if (needMaxDequeueBufferCountUpdate) {
        int maxDequeueCount = 0;
        {
            Mutexed<OutputSurface>::Locked output(mOutputSurface);
            maxDequeueCount = output->maxDequeueBuffers =
                    numOutputSlots + reorderDepth + kRenderingDepth;
            if (output->surface) {
                output->surface->setMaxDequeuedBufferCount(output->maxDequeueBuffers);
            }
        }
        if (maxDequeueCount > 0) {
            mComponent->setOutputSurfaceMaxDequeueCount(maxDequeueCount);
        }
    }


}
constexpr size_t kSmoothnessFactor = 4;
constexpr size_t kRenderingDepth = 3;

    C2PortActualDelayTuning::output outputDelay(0);
    c2_status_t err = mComponent->query(
            {
                &iStreamFormat,
                &oStreamFormat,
                &kind,
                &reorderDepth,
                &reorderKey,
                &inputDelay,
                &pipelineDelay,
                &outputDelay,
                &secureMode,
            },
            {},
            C2_DONT_BLOCK,
            nullptr);
        size_t numOutputSlots = outputDelayValue + kSmoothnessFactor

        sp<IGraphicBufferProducer> outputSurface;
        uint32_t outputGeneration;
        int maxDequeueCount = 0;
        {
            Mutexed<OutputSurface>::Locked output(mOutputSurface);
            maxDequeueCount = output->maxDequeueBuffers = numOutputSlots +
                    reorderDepth.value + kRenderingDepth;
            outputSurface = output->surface ?
                    output->surface->getIGraphicBufferProducer() : nullptr;
            if (outputSurface) {
                output->surface->setMaxDequeuedBufferCount(output->maxDequeueBuffers);
            }
            outputGeneration = output->generation;

constexpr uint32_t kDefaultOutputDelay = 8;

        addParameter(
                DefineParam(mActualOutputDelay, C2_PARAMKEY_OUTPUT_DELAY)
                .withDefault(new C2PortActualDelayTuning::output(kDefaultOutputDelay))
                .withFields({C2F(mActualOutputDelay, value).inRange(0, kMaxOutputDelay)})
                .withSetter(Setter<decltype(*mActualOutputDelay)>::StrictValueWithNoDeps)
                .build());


   if (ps_decode_op->i4_reorder_depth >= 0 && mOutputDelay != ps_decode_op->i4_reorder_depth) {
            mOutputDelay = ps_decode_op->i4_reorder_depth;
            ALOGV("New Output delay %d ", mOutputDelay);
            C2PortActualDelayTuning::output outputDelay(mOutputDelay);
            std::vector<std::unique_ptr<C2SettingResult>> failures;
            c2_status_t err =
                mIntf->config({&outputDelay}, C2_MAY_BLOCK, &failures);
            if (err == OK) {
                work->worklets.front()->output.configUpdate.push_back(
                    C2Param::Copy(outputDelay));
            } else {
                ALOGE("Cannot set output delay");
                mSignalledError = true;
                work->workletsProcessed = 1u;
                work->result = C2_CORRUPTED;
                return;
            }
        }
从哪个pool中申请buffer
在CCodecBufferChannel::start的时候决定,在下面代码中将pools的allocatedID转为
C2BufferQueueBlockPool。 在这之后调用mComponent->createBlockPool。Codec2Client::Component::createBlockPool调用c2store的c2_status_t createBlockPool()然后调用_createBlockPool,在之前设置了是BUFFERQUEUE,这边就保存了创建好的C2BufferQueueBlockPool。 在后面解码的流程中fetchGrallocBlock,使用的是这个类型的
C2BufferQueueBlockPool。
poolmask的默认值:
int GetCodec2PoolMask() {
    return property_get_int32(
            "debug.stagefright.c2-poolmask",
            1 << C2PlatformAllocatorStore::ION |
            1 << C2PlatformAllocatorStore::BUFFERQUEUE);
}

int poolMask = GetCodec2PoolMask();
申请的buffer的类型函数是bufferqueue
if (pools->outputAllocatorId == C2PlatformAllocatorStore::GRALLOC
&& err != C2_OK
&& ((poolMask >> C2PlatformAllocatorStore::BUFFERQUEUE) & 1)) {
pools->outputAllocatorId = C2PlatformAllocatorStore::BUFFERQUEUE;
}
}
bufferqueue的申请调用的是C2PlatformAllocatorStoreImpl的fetchAllocator
case C2PlatformAllocatorStore::BUFFERQUEUE:
res = allocatorStore->fetchAllocator(
C2PlatformAllocatorStore::BUFFERQUEUE, &allocator);
if (res == C2_OK) {
std::shared_ptr<C2BlockPool> ptr(
new C2BufferQueueBlockPool(allocator, poolId), deleter);
*pool = ptr;
mBlockPools[poolId] = ptr;
mComponents[poolId].insert(
mComponents[poolId].end(),
components.begin(), components.end());
}
break;
fetchAllocator返回gralloc的allocator。
std::shared_ptr<C2Allocator> C2PlatformAllocatorStoreImpl::fetchBufferQueueAllocator() {
    static std::mutex mutex;
    static std::weak_ptr<C2Allocator> grallocAllocator;
    std::lock_guard<std::mutex> lock(mutex);
    std::shared_ptr<C2Allocator> allocator = grallocAllocator.lock();
    if (allocator == nullptr) {
        allocator = std::make_shared<C2AllocatorGralloc>(
                C2PlatformAllocatorStore::BUFFERQUEUE, true);
        grallocAllocator = allocator;
    }
    return allocator;
}
### fetchGraphicBlock 流程
- fetchGraphicBlock
fetch经过一系列判断和处理 最终调用mProducer的dequeueBuffer
    c2_status_t fetchGraphicBlock(
            uint32_t width,
            uint32_t height,
            uint32_t format,
            C2MemoryUsage usage,
            std::shared_ptr<C2GraphicBlock> *block /* nonnull */,
            C2Fence *fence) {

c2_status_t status = fetchFromIgbp_l(width, height, format, usage, block, fence);
             c2Status = dequeueBuffer(width, height, format, usage,
                              &slot, &bufferNeedsReallocation, &fence);
        if (fence) {
            static constexpr int kFenceWaitTimeMs = 10;
            status_t status = fence->wait(kFenceWaitTimeMs);
     }

    其中 dequeueBuffer

        Return<void> transResult = mProducer->dequeueBuffer(
                Input{
                    width,
                    height,
                    format,
                    androidUsage.asGrallocUsage()},
                [&status, slot, needsRealloc,
                 fence](HStatus hStatus,
                         int32_t hSlot,
                         Output const& hOutput) {
                    *slot = static_cast<int>(hSlot);
                    if (!h2b(hStatus, &status) ||
                            !h2b(hOutput.fence, fence)) {
                        status = ::android::BAD_VALUE;
                    } else {
                        *needsRealloc =
                                hOutput.bufferNeedsReallocation;
                    }
                });
- dequebuffer中的fence 有什么作用
Fence是一种同步机制,用于GraphicBuffer的同步。用来处理跨硬件平台不同的情况(CPU和GPU),尤其是CPU、GPU和HWC之间的同步。另外,也可用于多个时间点之间的同步,当Graphics Buffer的生产者或消费者在对buffer处理完之后,通过fence发出信号,这样系统可以异步queue当前不需要但有可能接下来会使用读写的buffer。
简言之,在合适的时间发一种信号,将先到的buffer拦住,等后来的到达,两者步调一致再一起走。也就是dequeuebuffer 之后并不能直接用这块buffer,需要等待buffer的fence发送上来之后 才可以使用这块buffer。
- 完整一个获取fetch buffer的流程
dequeueBuffer ---->(获取到slot或fence) fence->wait -----> mProducer->requestBuffer(通过slot 获取到buffer)
将从gralloc 获取到的buffer (native_handle_t)通过调用android::WrapNativeCodec2GrallocHandle转化为C2Handle
这个C2Handle 会生成C2AllocationGralloc,这个alloc最后会new 封装成C2GraphicBlock。这个block就是返回给外部解码申请的地方。
经过上面的这个流程 解码要的共享的buffer 就从gralloc这边申请出来了,然后这个buffer就可以给到后面的解码器使用了,如果是软解就map出虚拟地址,然后将软解后的数据拷贝到里面。但一般厂商不会用软解,正常的实现是这块buffer给到硬件,硬解数据直接写到这块buffer。
解码的buffer准备好之后,会把grallocblock的buffer 转换为c2buffer 然后会放到c2work中output buffers里面。
std::shared_ptr<C2Buffer> buffer
= createGraphicBuffer(std::move(entry->outblock),
C2Rect(mWidth, mHeight).at(left, top));
解码后框架的处理流程
解码后的哪些信息是携带在work里面的, 解码的buffer,
work->worklets.front()->output.flags = (C2FrameData::flags_t)0;
work->worklets.front()->output.buffers.clear();
work->worklets.front()->output.buffers.push_back(buffer);
work->worklets.front()->output.ordinal = work->input.ordinal;
work->workletsProcessed = 1u;
- 从应用开始, 应用调用的是dequeueOutputBuffer返回的是index 时间戳等等信息,这个调用到mediacodec, mediacodec 从 mAvailPortBuffers 取出可用的buffer。
- mAvailPortBuffers是通过解码那边 BufferCallback onOutputBufferAvailable来把解码buffer push 到mAvailPortBuffers。这个回调是simpleC2Componet 的finish的listener->onWorkDone_nb调用到CCodec的onWorkDone。
- onWorkDone调用到mChannel->onWorkDone。 在mChannel的workDone 中 调用handleWork。
- handlework 里面将解码器传递在work 中outputbuffer 转换为mediacodec的用的index 和 mediaCodecbuffer。同时返回到MediaCodec之前设置的callback。这个最后会返回应用设置callback的地方。
mCallback->onOutputBufferAvailable(index, outBuffer);
这个callback 是从何而来的。 在mediacodec的init的时候会新建一个codec 并将codec设置到codec2里面。mCodec->setCallback(
std::unique_ptrCodecBase::CodecCallback(
new CodecCallback(new AMessage(kWhatCodecNotify, this))));
- 各个buffer 直接的转换
首先从解码这边出来的是C2GraphicBlock,会在codecbufferchannel中转为index 传递出去给mediacodec 转换过程是 内部有一个
mBuffers数组,在handlework先pushToStash到这里面。然后从这里面取出来。popFromStashAndRegister是这个里面去转换为mediacodec的buffer 和index 的。转换的MediaCodecBuffer, 就是把c2buffer的一个结构体赋值到Codec2Buffer中。c2Buffer->copy(buffer)。
renderOutbuffer 输出显示
- render的时候传递的是index,同样也是mAvailPortBuffers 取出可用的buffer。
- 这个buffer 通过status_t err = mBufferChannel->renderOutputBuffer(buffer, renderTimeNs)。将MediaCodecBuffer转换为C2buffer。
- 从这个C2buffer 中取出C2ConstGraphicBlock, block 在转换为bqslot。 这个slot最后queue到surface那边。
getBufferQueueAssignment(block, &generation, &bqId, &bqSlot)
status = outputIgbp->queueBuffer(static_cast<int>(bqSlot),
input, output);