1.做这件事的目的
语言只是工具,使用python训练图片数据,最终会得到.pth的训练文件,java有使用这个文件进行图片识别的工具,顺便整合,我觉得Neo4J正确率太低了,草莓都能识别成为苹果,而且速度慢,不能持续识别视频帧
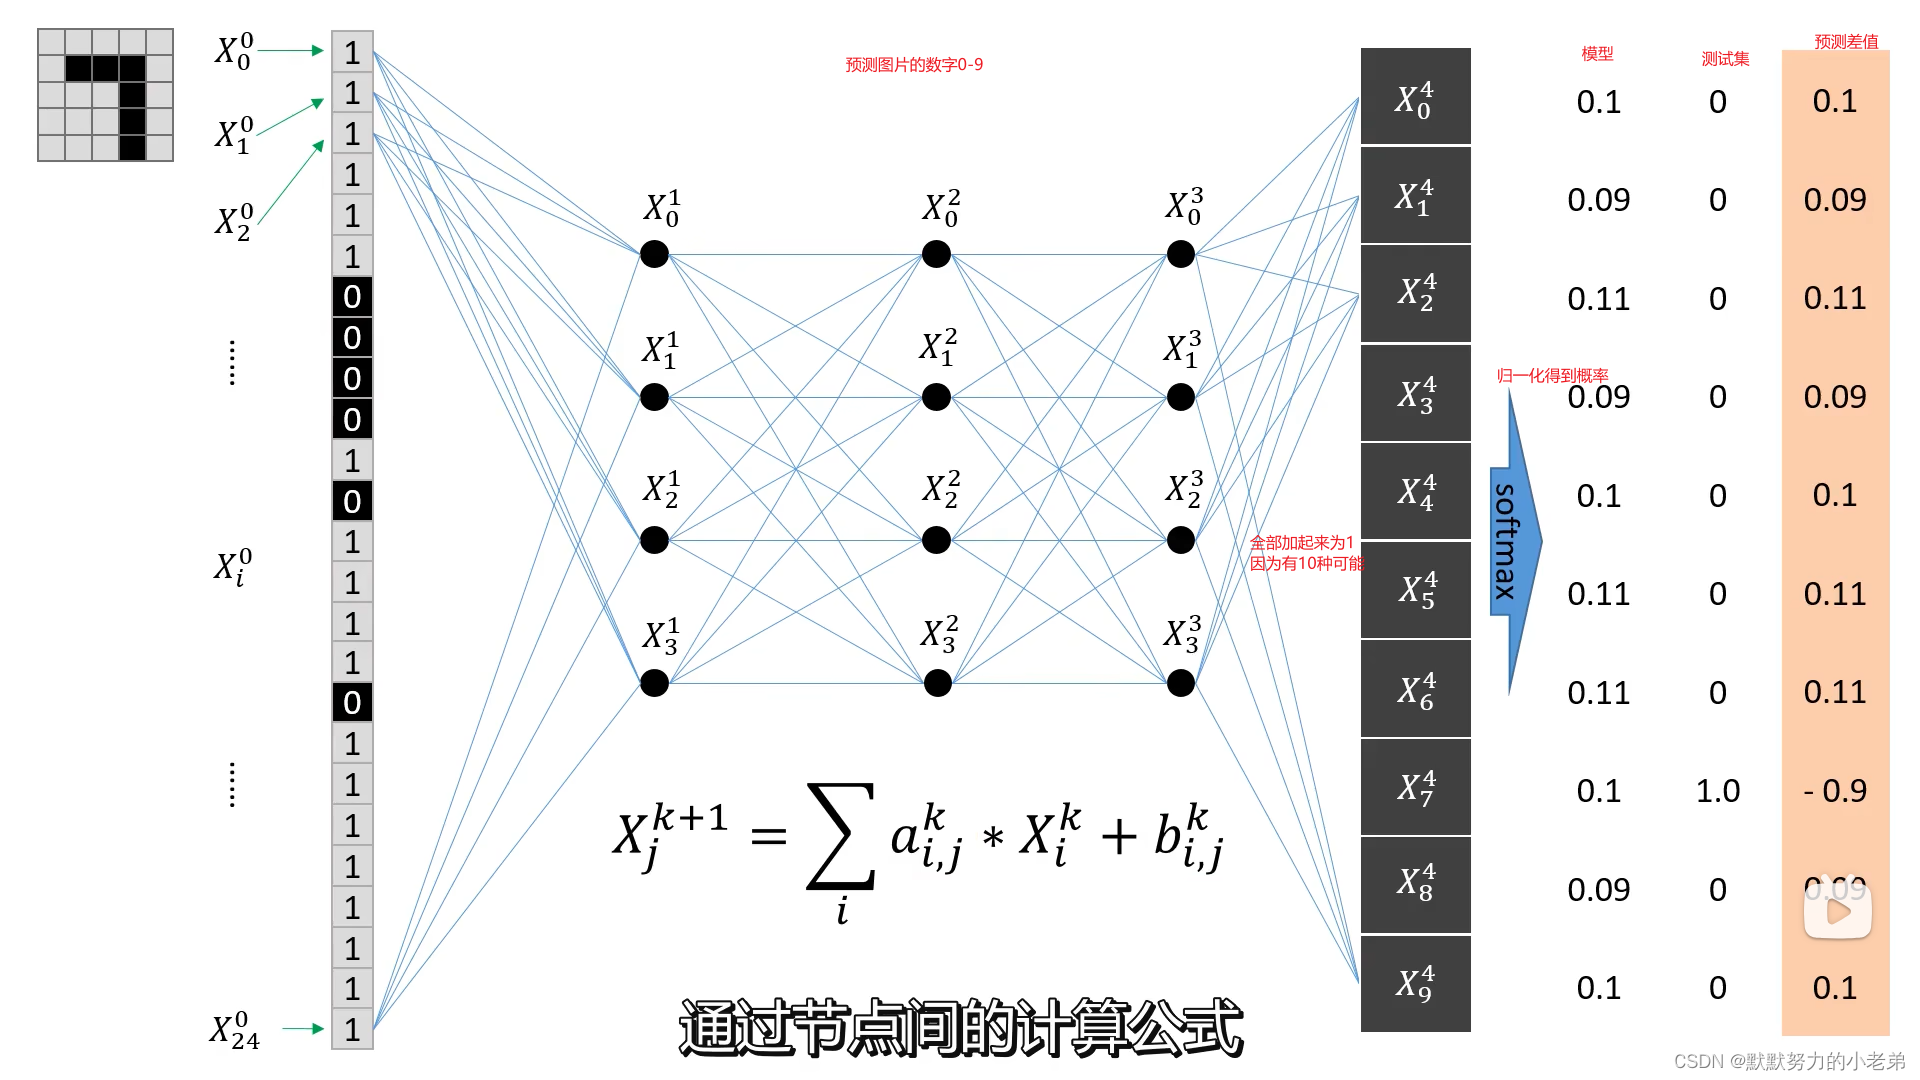
2.什么是神经网络?(其实就是数学的排列组合最终得到统计结果的概率)
1.先把二维数组转为一维
2.通过公式得到节点个数和值
3…同2
4.通过节点得到概率(softmax归一化公式)
5.对比模型的和 差值=原始概率-目标结果概率
6.不断优化原来模型的概率
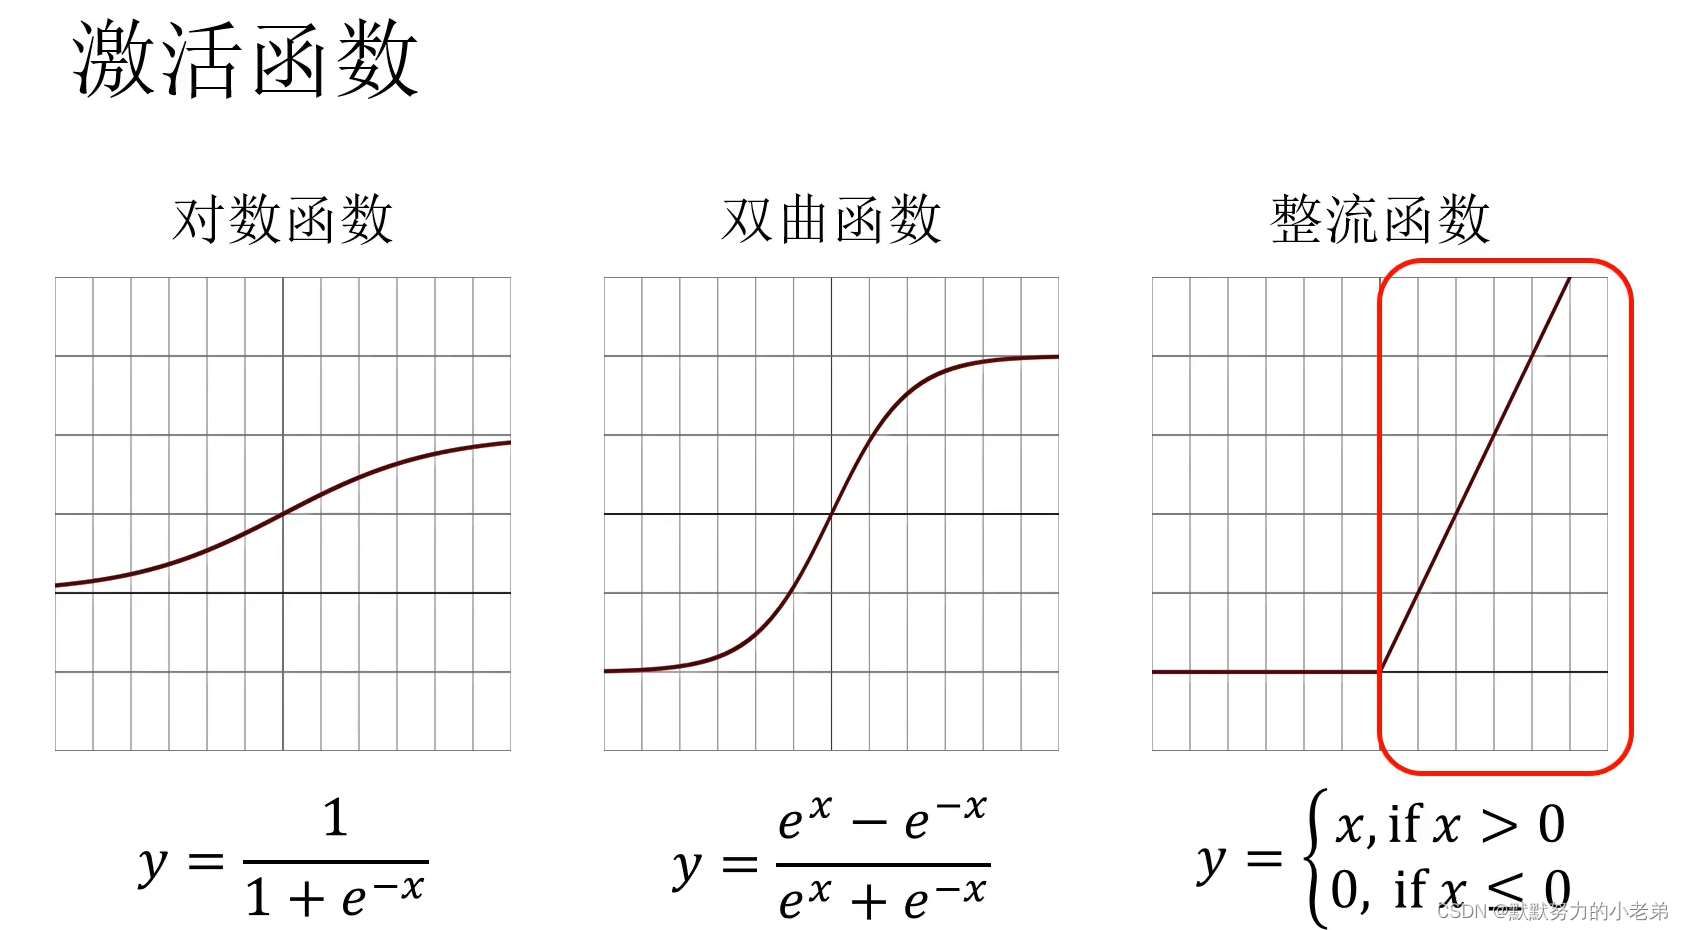
5.激活函数,激活某个节点的函数,可以引入非线性的(因为所有问题不可能是线性的比如 很少图片识别一定可以识别出绝对的正方形,他可能中间有一定弯曲或者线在中心短开了)
3.训练的代码
//环境python3.8 最好使用conda进行版本管理,不然每个版本都可能不兼容,到处碰壁
 #安装依赖
 pip install numpy torch torchvision matplotlib
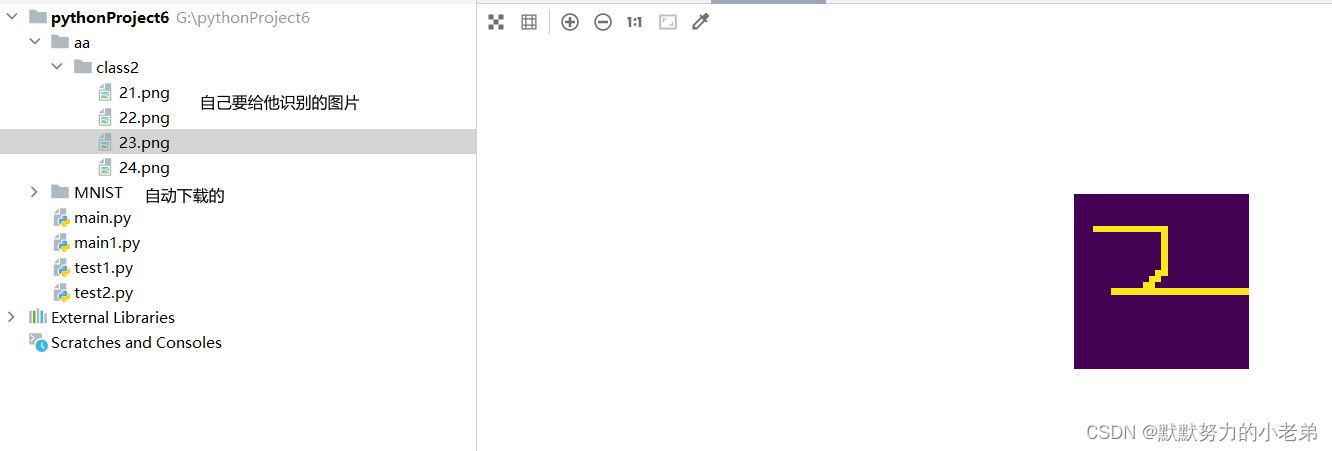
#文件夹结构,图片一定要是28x28的
import torch
from torch.utils.data import DataLoader
from torchvision import transforms
from torchvision.datasets import MNIST
import matplotlib.pyplot as plt
from torchvision.datasets.folder import ImageFolder

class Net(torch.nn.Module):

    def __init__(self):
        super().__init__()
        self.fc1 = torch.nn.Linear(28 * 28, 64)
        self.fc2 = torch.nn.Linear(64, 64)
        self.fc3 = torch.nn.Linear(64, 64)
        self.fc4 = torch.nn.Linear(64, 10)

    def forward(self, x):
        x = torch.nn.functional.relu(self.fc1(x))
        x = torch.nn.functional.relu(self.fc2(x))
        x = torch.nn.functional.relu(self.fc3(x))
        x = torch.nn.functional.log_softmax(self.fc4(x), dim=1)
        return x

#导入数据
def get_data_loader(is_train):
     #张量,多维数组
    to_tensor = transforms.Compose([transforms.ToTensor()])
     # 下载数据集 下载目录
    data_set = MNIST("", is_train, transform=to_tensor, download=True)
     #一个批次15张,顺序打乱
    return DataLoader(data_set, batch_size=15, shuffle=True)

def get_image_loader(folder_path):
    to_tensor = transforms.Compose([transforms.ToTensor()])
    data_set = ImageFolder(folder_path, transform=to_tensor)
    return DataLoader(data_set, batch_size=1)

#评估准确率
def evaluate(test_data, net):
    n_correct = 0
    n_total = 0
    with torch.no_grad():
        #按批次取数据
        for (x, y) in test_data:
            #计算神经网络预测值
            outputs = net.forward(x.view(-1, 28 * 28))

            for i, output in enumerate(outputs):
                #比较预测结果和测试集结果
                if torch.argmax(output) == y[i]:
                    #统计正确预测结果数
                    n_correct += 1
                #统计全部预测结果
                n_total += 1
        #返回准确率=正确/全部的
    return n_correct / n_total


def main():
    #加载训练集
    train_data = get_data_loader(is_train=True)
    #加载测试集
    test_data = get_data_loader(is_train=False)
    #初始化神经网络
    net = Net()
    #打印测试网络的准确率 0.1
    print("initial accuracy:", evaluate(test_data, net))
    #训练神经网络
    optimizer = torch.optim.Adam(net.parameters(), lr=0.001)
    #重复利用数据集 2次
    for epoch in range(100):
        for (x, y) in train_data:
            #初始化 固定写法
            net.zero_grad()
            #正向传播
            output = net.forward(x.view(-1, 28 * 28))
            #计算差值
            loss = torch.nn.functional.nll_loss(output, y)
            #反向误差传播
            loss.backward()
            #优化网络参数
            optimizer.step()
        print("epoch", epoch, "accuracy:", evaluate(test_data, net))
    # #使用3张图片进行预测
    # for (n, (x, _)) in enumerate(test_data):
    #     if n > 3:
    #         break
    #     predict = torch.argmax(net.forward(x[0].view(-1, 28 * 28)))
    #     plt.figure(n)
    #     plt.imshow(x[0].view(28, 28))
    #     plt.title("prediction: " + str(int(predict)))
    # plt.show()
    image_loader = get_image_loader("aa")

    for (n, (x, _)) in enumerate(image_loader):
        if n > 2:
            break
        predict = torch.argmax(net.forward(x.view(-1, 28 * 28)))
        plt.figure(n)
        plt.imshow(x[0].permute(1, 2, 0))
        plt.title("prediction: " + str(int(predict)))
    plt.show()


if __name__ == "__main__":
    main()
#运行结果 弹框出现图片和识别结果
4.测试电脑的cuda是否安装成功,不成功不能运行下面的代码
import torch

device = torch.device('cuda' if torch.cuda.is_available() else 'cpu')
print('Using device:', device)
print('CUDA version:', torch.version.cuda)
print('PyTorch version:', torch.__version__)
5.在gpu上运行,需要去官网下载cuda安装
https://developer.nvidia.com/cuda-toolkit-archive
#并且需要安装和torch对应的版本,我的电脑是1660ti的所以安装了10.2的cuda
#安装torchgpu版本
pip install torch==1.9.0+cu102 -f
https://download.pytorch.org/whl/cu102/torch_stable.html
import torch
from torch.utils.data import DataLoader
from torchvision import transforms
from torchvision.datasets import MNIST
import matplotlib.pyplot as plt
from torchvision.datasets.folder import ImageFolder

device = torch.device("cuda" if torch.cuda.is_available() else "cpu")

class Net(torch.nn.Module):

    def __init__(self):
        super().__init__()
        self.fc1 = torch.nn.Linear(28 * 28, 64)
        self.fc2 = torch.nn.Linear(64, 64)
        self.fc3 = torch.nn.Linear(64, 64)
        self.fc4 = torch.nn.Linear(64, 10)

    def forward(self, x):
        x = torch.nn.functional.relu(self.fc1(x))
        x = torch.nn.functional.relu(self.fc2(x))
        x = torch.nn.functional.relu(self.fc3(x))
        x = torch.nn.functional.log_softmax(self.fc4(x), dim=1)
        return x

def get_data_loader(is_train):
    to_tensor = transforms.Compose([transforms.ToTensor()])
    data_set = MNIST("", is_train, transform=to_tensor, download=True)
    return DataLoader(data_set, batch_size=15, shuffle=True)

def get_image_loader(folder_path):
    to_tensor = transforms.Compose([transforms.ToTensor()])
    data_set = ImageFolder(folder_path, transform=to_tensor)
    return DataLoader(data_set, batch_size=1)

def evaluate(test_data, net):
    n_correct = 0
    n_total = 0
    with torch.no_grad():
        for (x, y) in test_data:
            x, y = x.to(device), y.to(device)
            outputs = net.forward(x.view(-1, 28 * 28))
            for i, output in enumerate(outputs):
                if torch.argmax(output.cpu()) == y[i].cpu():
                    n_correct += 1
                n_total += 1
    return n_correct / n_total

def main():
    train_data = get_data_loader(is_train=True)
    test_data = get_data_loader(is_train=False)
    net = Net().to(device)
    print("initial accuracy:", evaluate(test_data, net))
    optimizer = torch.optim.Adam(net.parameters(), lr=0.001)
    for epoch in range(100):
        for (x, y) in train_data:
            x, y = x.to(device), y.to(device)
            net.zero_grad()
            output = net.forward(x.view(-1, 28 * 28))
            loss = torch.nn.functional.nll_loss(output, y)
            loss.backward()
            optimizer.step()
        print("epoch", epoch, "accuracy:", evaluate(test_data, net))
    image_loader = get_image_loader("aa")

    for (n, (x, _)) in enumerate(image_loader):
        if n > 2:
            break
        x = x.to(device)
        predict = torch.argmax(net.forward(x.view(-1, 28 * 28)).cpu())
        plt.figure(n)
        plt.imshow(x[0].permute(1, 2, 0).cpu())
        plt.title("prediction: " + str(int(predict)))
    plt.show()

if __name__ == "__main__":
    main()


![[Docker]八.Docker 容器跨主机通讯](https://img-blog.csdnimg.cn/c0b6d670e6c3491a85cecad1b3a3f593.png)