1、什么是SNAPSHOT
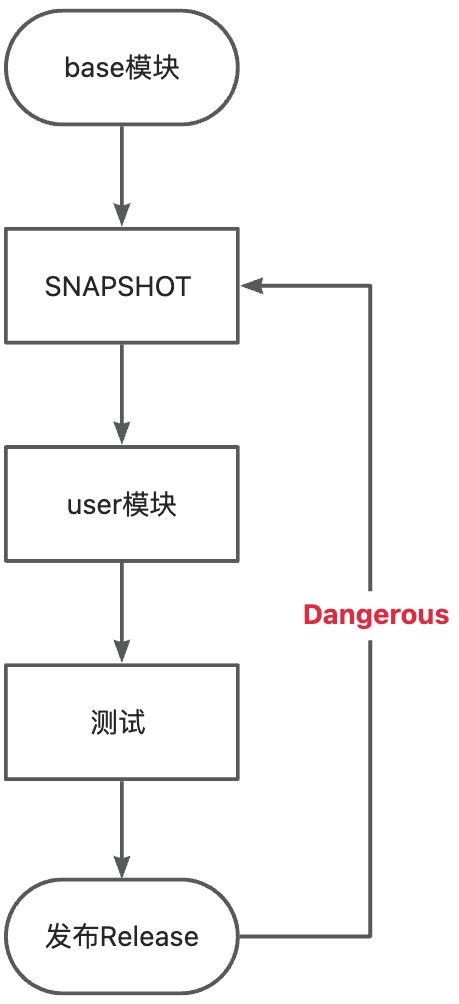
SNAPSHOT版本是指尚未发布的版本,是一个「动态版本」,它始终指向最新的发布工件(gav),也就是说同一个SNAPSHOT版本可以反复用来发布。
这种情况在大型app多团队的开发中比较常见,比如user模块依赖base模块,因为是在开发阶段,base模块可能会不断的修bug或者提供新能力,这时候就可以不断的发布SNAPSHOT版本提供给user模块使用,而不用发正式版本,也达不到正式版本的要求,而user模块也不用频繁的去改版本就能拉到最新的base代码了。
2、为什么要检测
这种开发效率的提升也带来一定的风险,因为SNAPSHOT版本是开发阶段的动态版本,反复发布具有覆盖的特性,如果在打release包的时候拉到最新的SNAPSHOT版本中有未验证的代码,轻则编译错误,万一带到线上去可是非常危险的。
3、检测思路
SNAPSHOT版本通常用版本号后缀表示:
gradle:
    classpath('com.github.yechaoa.GradleX:plugin:1.3-SNAPSHOT')

maven:
    <version>1.3-SNAPSHOT</version>
- 获取项目中参与编译的所有依赖项;
- 校验依赖项的版本号;
- 有SNAPSHOT依赖,打印出来,并打断构建流程(可选);
- 无 则继续;
听起来并不复杂,实际上也很简单,下面来实战一下。
4、实战
4.1、获取所有依赖
- 先获取AppExtension。
AppExtension androidExtension = project.getExtensions().getByType(AppExtension.class);
- 简单理解它对应的是build.gradle,而build.gradle里面有
dependencies{ };
- 通过Variants获取Configuration。
androidExtension.getApplicationVariants().all(applicationVariant -> {
    // debug/release也可以加配置
    System.out.println(TAG + "applicationVariant.getName() = " + applicationVariant.getName());
    Configuration configuration = project.getConfigurations().getByName(applicationVariant.getName() + "CompileClasspath");
    // ...
});
- 不同的build type它的依赖是有区别的,比如implementation和debugImplementation;
- 获取Configuration对象是因为依赖项是在配置阶段解析的;
4.2、遍历依赖项
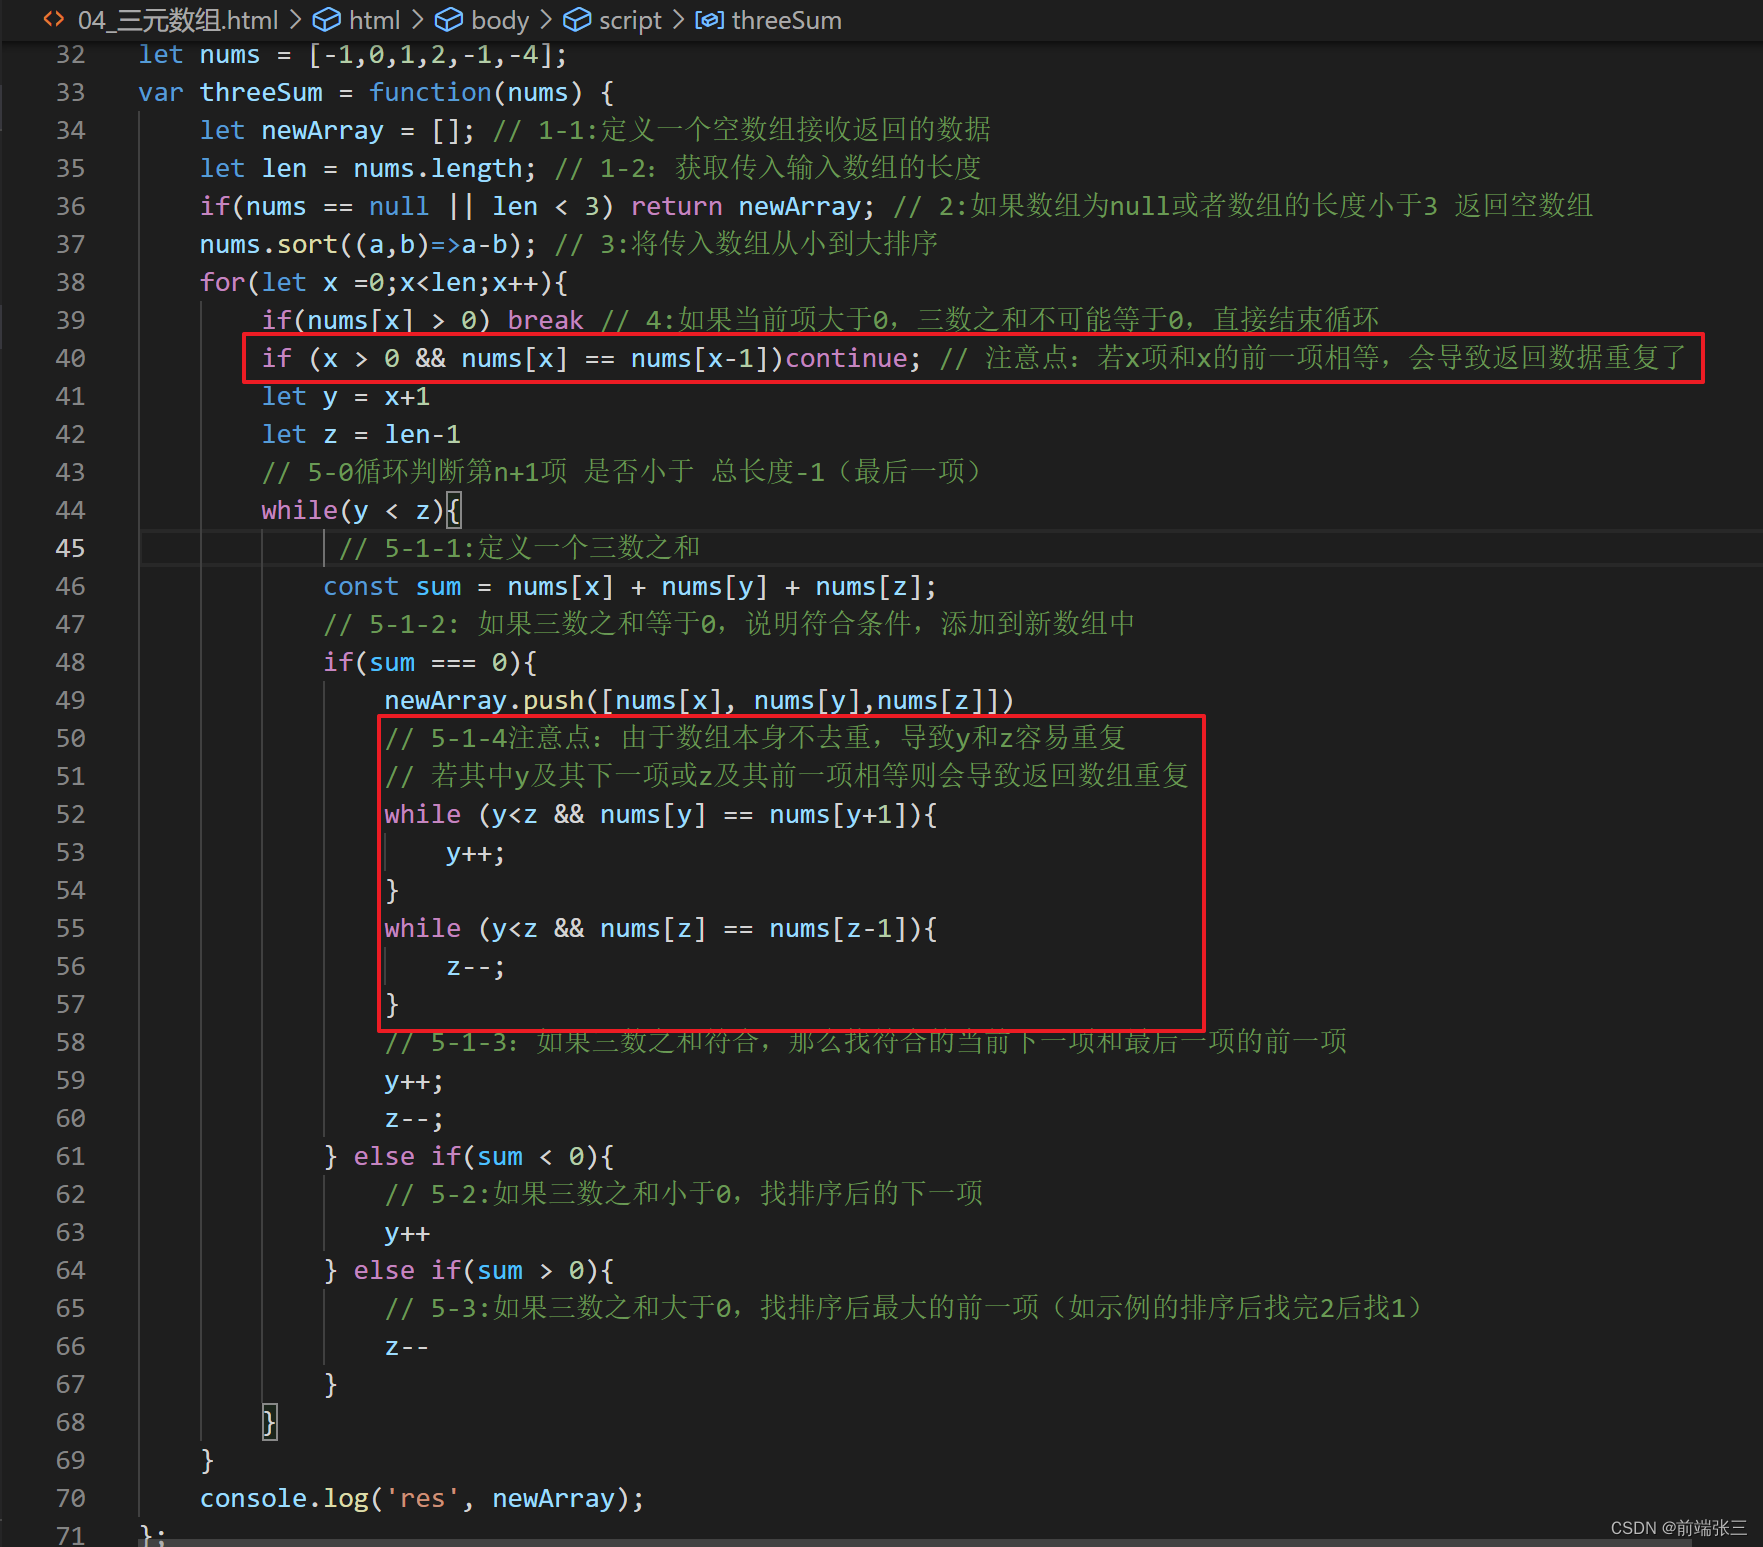
configuration.getResolvedConfiguration().getLenientConfiguration().getAllModuleDependencies().forEach(resolvedDependency -> {
    ModuleVersionIdentifier identifier = resolvedDependency.getModule().getId();
    if (isSnapshot(identifier.getVersion())) {
        snapshotList.add(identifier.getGroup() + ":" + identifier.getName() + ":" + identifier.getVersion());
    }
});
- 这里我们要用getResolvedConfiguration()来获取版本决议后的依赖项;
- 然后通过getLenientConfiguration().getAllModuleDependencies()获取所有依赖,包括依赖中的子依赖;
- 在遍历中,我们还要获取ModuleVersionIdentifier对象,通过它获取依赖项的坐标GAV;
4.3、Snapshot校验
    private boolean isSnapshot(String version) {
        String checkRules = "SNAPSHOT";
        return version.endsWith(checkRules) || version.contains(checkRules);
    }
- 校验规则比较简单,就是判断是否包含
SNAPSHOT字符串; - 符合规则的就添加到集合中,然后打印出来;
4.4、打断编译
    private void blockBuilding() {
        String errorMassage = "检测到有SNAPSHOT版本依赖";
        throw new GradleException(errorMassage, new Exception(errorMassage));
    }
打断编译也比较简单,直接抛个异常就好了。
4.4.1、异常类型
GradleException:一般用于在Gradle构建过程中抛出异常,比如自定义Plugin中的逻辑错误等;GradleScriptException:一般表示构建脚本(build script)执行异常,比如语法错误、解析错误等;StopActionException:一般用在Task里面,表示当前Action执行异常,但是还可以继续执行下一个;InvalidUserDataException:这个也是经常遇到和经常用的,一般表示无效的参数或者选项;
更多的可以去翻下源码,一般编译过程中的异常都是继承自RuntimeException。
4.5、完整代码
    private void checkSnapshot(Project project, boolean blockSnapshot) {
        AppExtension androidExtension = project.getExtensions().getByType(AppExtension.class);
        androidExtension.getApplicationVariants().all(applicationVariant -> {
            // debug/release也可以加配置
            System.out.println(TAG + "applicationVariant.getName() = " + applicationVariant.getName());
            Configuration configuration = project.getConfigurations().getByName(applicationVariant.getName() + "CompileClasspath");

            List<String> snapshotList = new ArrayList<>();

            // 所有的依赖,包括依赖中的依赖
            configuration.getResolvedConfiguration().getLenientConfiguration().getAllModuleDependencies().forEach(resolvedDependency -> {
                ModuleVersionIdentifier identifier = resolvedDependency.getModule().getId();
                if (isSnapshot(identifier.getVersion())) {
                    snapshotList.add(identifier.getGroup() + ":" + identifier.getName() + ":" + identifier.getVersion());
                }
            });

            if (snapshotList.size() > 0) {
                snapshotList.forEach(System.out::println);
                if (blockSnapshot) {
                    blockBuilding();
                }
            } else {
                System.out.println(TAG + "无SNAPSHOT版本依赖");
            }
        });
    }

    private void blockBuilding() {
        String errorMassage = "检测到有SNAPSHOT版本依赖";
        throw new GradleException(errorMassage, new Exception(errorMassage));
    }

    private boolean isSnapshot(String version) {
        String checkRules = "SNAPSHOT";
        return version.endsWith(checkRules) || version.contains(checkRules);
    }
4.6、验证
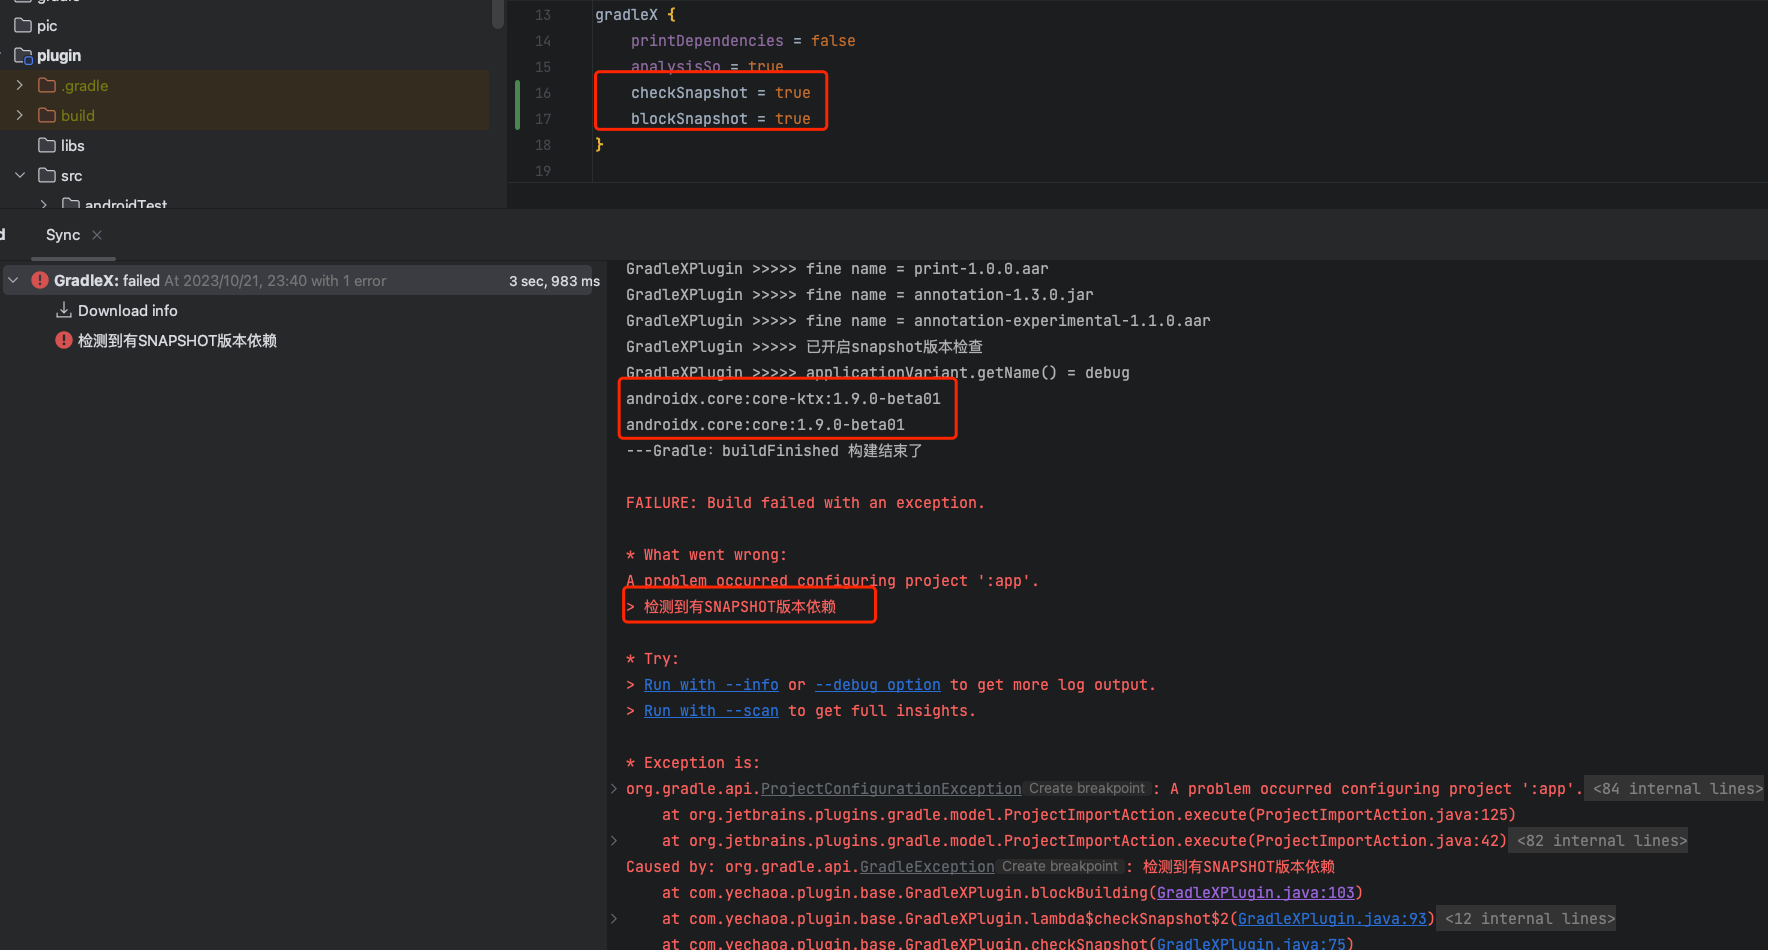
测试找了一个androidx.core的beta版本,然后把检测规则改成beta来验证。
implementation 'androidx.core:core:1.9.0-beta01'
然后在插件配置中加上Snapshot检查和编译打断(默认关)。
gradleX {
    checkSnapshot = true
    blockSnapshot = true
}
最终效果:
是不是还挺简单的~
在实际开发中,如果有CI/CD流程可以添加一个后置执行卡口,再补一个白名单和审批流,如果没有,也可以整个构建报告。
5、最后
如果你不想自己写,这个插件我也发布远端了,按照下面三步走,即可使用。
Step 1. Add the JitPack repository to your build file
repositories {
	...
	maven { url 'https://jitpack.io' }
}
Step 2. Add the dependency
dependencies {
    classpath('com.github.yechaoa.GradleX:plugin:1.5')
}
Step 3. Add the Plugin Id to your build file and configure the gradleX{ } dsl
plugins {
    id 'com.yechaoa.plugin.gradleX'
}

gradleX {
    printDependencies = false
    analysisSo = true
    checkSnapshot = true
    blockSnapshot = false
}
ok,以上即是本文介绍内容,学废了吗,快来三连~
6、GitHub
https://github.com/yechaoa/GradleX
7、相关文档
- 【Gradle-8】Gradle插件开发指南
- GradleException

![[AI]ChatGPT4 与 ChatGPT3.5 区别有多大](https://img-blog.csdnimg.cn/fa98ee2c1eef427a88412f9bc6483e55.png)

