一、Nacos Config入门
1. 搭建nacos环境【使用现有的nacos环境即可】
使用之前的即可
2. 在微服务中引入nacos的依赖

          <!--    nacos配置依赖    -->
        <dependency>
            <groupId>com.alibaba.cloud</groupId>
            <artifactId>spring-cloud-starter-alibaba-nacos-config</artifactId>
        </dependency>

        <dependency>
            <groupId>org.springframework.cloud</groupId>
            <artifactId>spring-cloud-starter-bootstrap</artifactId>
        </dependency>
3. 在微服务中添加nacos config的配置

spring:
  cloud:
    nacos:
      config:
        server-addr: localhost:8848
        shared-configs:
          - data-id: Test.properties
4. 在nacos中添加配置

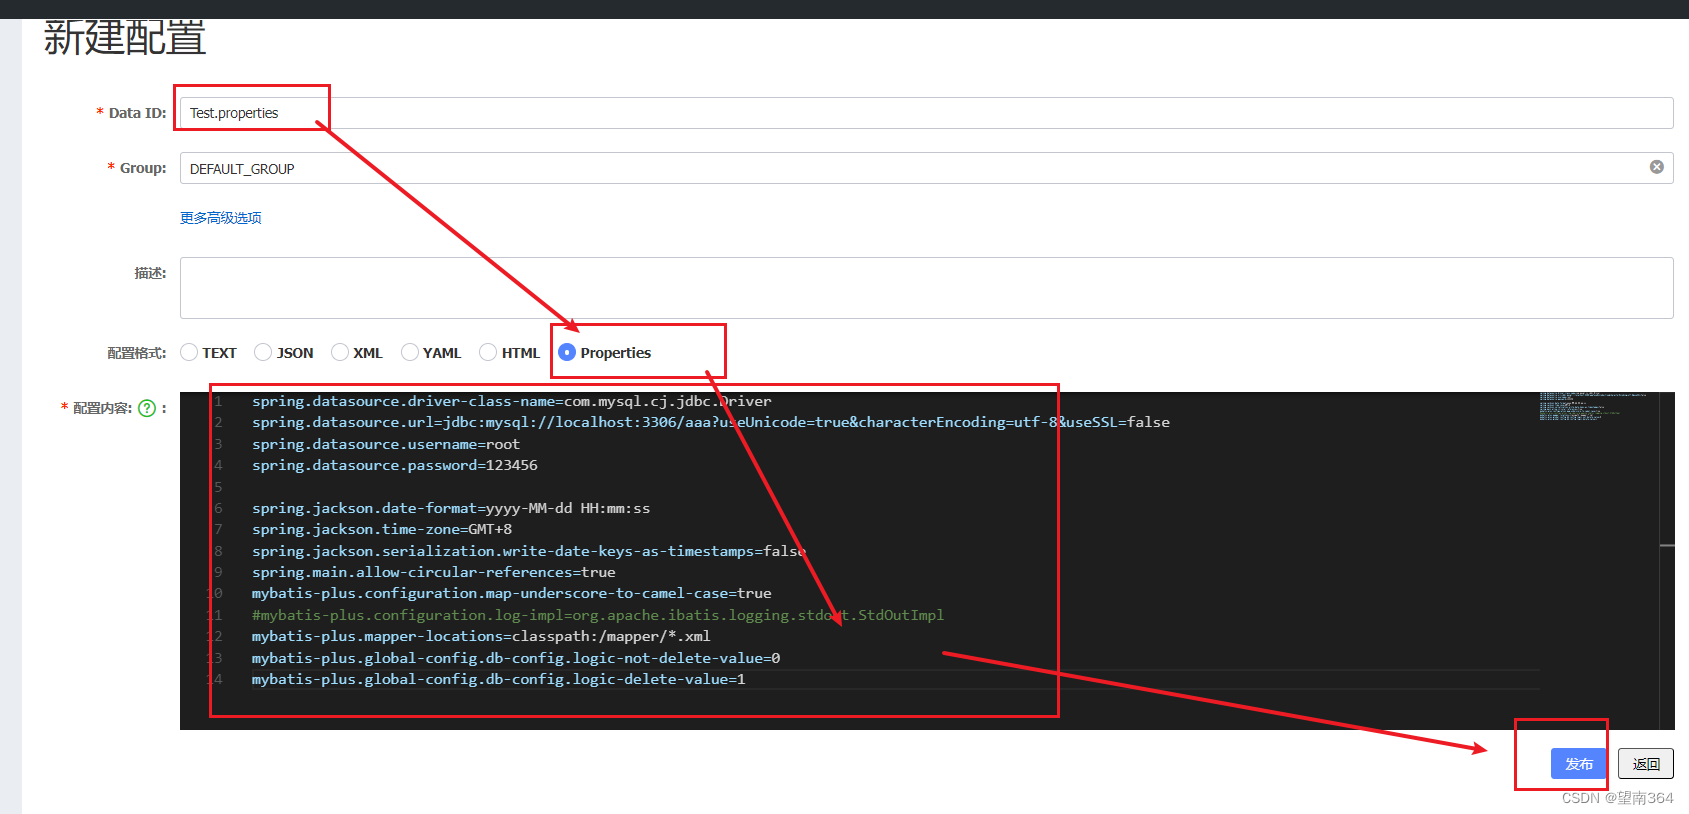
5. 启动测试
加入MySQL依赖测试
<!--   mysql  -->
<dependency>
    <groupId>mysql</groupId>
    <artifactId>mysql-connector-java</artifactId>
    <version>8.0.26</version>
</dependency>
成功

如果出现url类的错误就是配置nacos config 时出错了
二、Nacos Config深入
1. 配置动态刷新
设置bootstrap.yml文件

修改启动类

import com.fasterxml.jackson.databind.ObjectMapper;
import org.example.config.LoadBalancerConfig;
import org.springframework.boot.SpringApplication;
import org.springframework.boot.autoconfigure.SpringBootApplication;
import org.springframework.cloud.client.discovery.EnableDiscoveryClient;
import org.springframework.cloud.client.loadbalancer.LoadBalanced;
import org.springframework.cloud.loadbalancer.annotation.LoadBalancerClient;
import org.springframework.cloud.openfeign.EnableFeignClients;
import org.springframework.context.ConfigurableApplicationContext;
import org.springframework.context.annotation.Bean;
import org.springframework.http.codec.ServerCodecConfigurer;
import org.springframework.web.client.RestTemplate;

import java.util.concurrent.TimeUnit;

/**
 * Hello world!
 *
 */
@SpringBootApplication
@EnableDiscoveryClient //  当前的微服务是可以被nacos发现的
@EnableFeignClients//使用openFeign
//@LoadBalancerClient(value = "product",configuration = LoadBalancerConfig.class)
public class orders {
    public static void main( String[] args ){
        ConfigurableApplicationContext run = SpringApplication.run(orders.class);
        while (true){
            String userName = run.getEnvironment().getProperty("user.name");
            System.out.println(userName);
            try {
                TimeUnit.SECONDS.sleep(2);
            } catch (InterruptedException e) {
                throw new RuntimeException(e);
            }
        }

    }
    @Bean
    //@LoadBalanced
    public RestTemplate getRestTemplate(){
        return new RestTemplate();
    }
    @Bean
    public ObjectMapper getObjectMapper(){
        return new ObjectMapper();
    }

}
修改nacos config
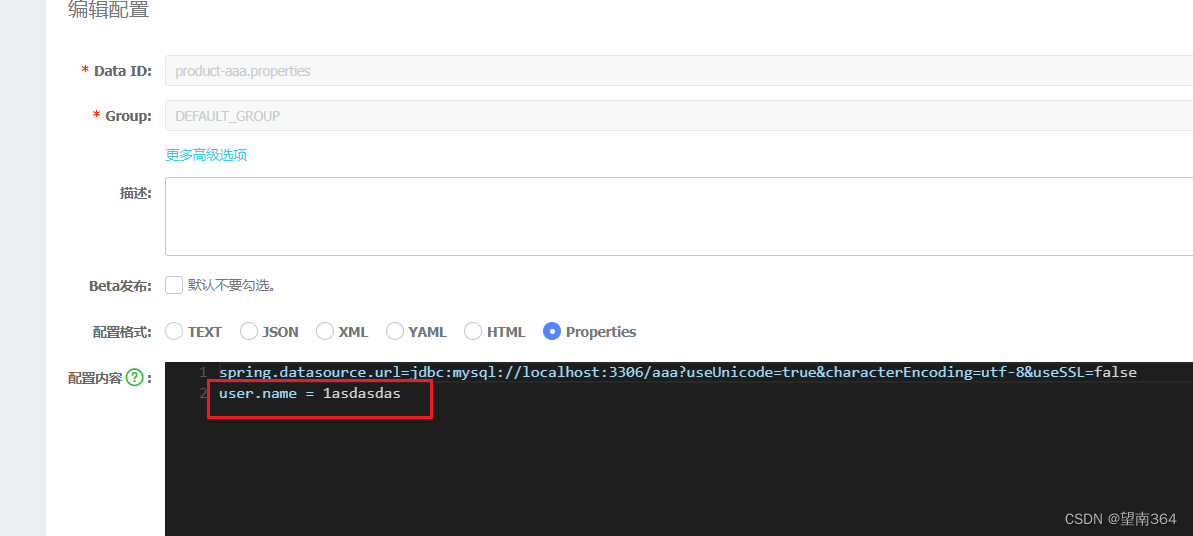
结果:

2. 配置共享
当配置越来越多的时候,我们就发现有很多配置是重复的,这时候就考虑可不可以将公共配置文件 提取出来,然后实现共享呢?当然是可以的。接下来我们就来探讨如何实现这一功能
把刚才在nacos里面配置的Test.properties的连接数据库的url删除
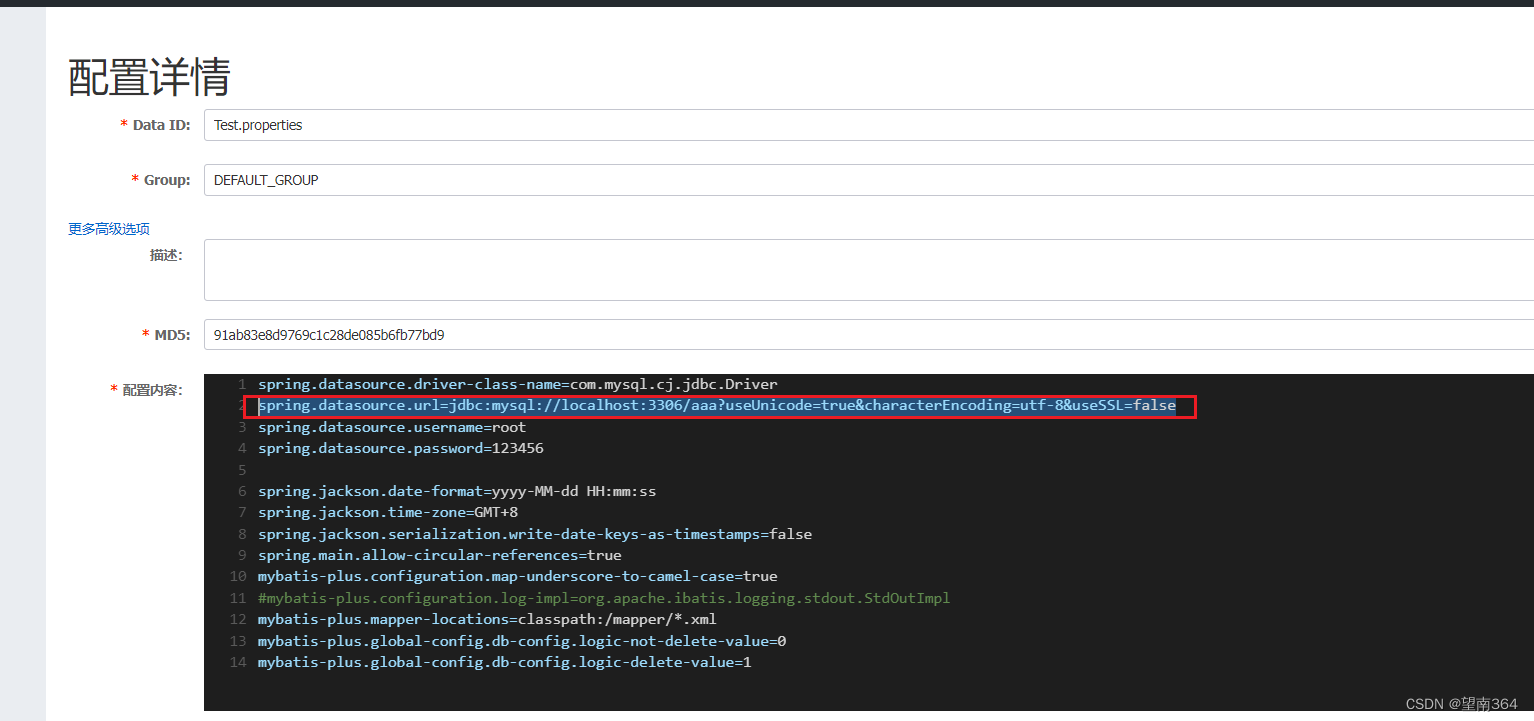
在添加一个

在添加一个连接数据库test的

修改bootstrap.yml文件

只能修改属于product的
三、链路追踪介绍
四、Sleuth
在大型系统的微服务化构建中,一个系统被拆分成了许多模块。这些模块负责不同的功能,组合成 系统,最终可以提供丰富的功能。在这种架构中,一次请求往往需要涉及到多个服务。互联网应用构建 在不同的软件模块集上,这些软件模块,有可能是由不同的团队开发、可能使用不同的编程语言来实现、有可能布在了几千台服务器,横跨多个不同的数据中心,也就意味着这种架构形式也会存在一些问题
如何快速发现问题?
如何判断故障影响范围?
如何梳理服务依赖以及依赖的合理性?
如何分析链路性能问题以及实时容量规划?

分布式链路追踪(Distributed Tracing),就是将一次分布式请求还原成调用链路,进行日志记 录,性能监控并将一次分布式请求的调用情况集中展示。比如各个服务节点上的耗时、请求具体到达哪 台机器上、每个服务节点的请求状态等等。
常见的链路追踪技术有下面这些:
cat 由大众点评开源,基于Java开发的实时应用监控平台,包括实时应用监控,业务监控 。 集成 方案是通过代码埋点的方式来实现监控,比如: 拦截器,过滤器等。 对代码的侵入性很大,集成 成本较高。风险较大。
zipkin 由Twitter公司开源,开放源代码分布式的跟踪系统,用于收集服务的定时数据,以解决微 服务架构中的延迟问题,包括:数据的收集、存储、查找和展现。该产品结合spring-cloud-sleuth 使用较为简单, 集成很方便, 但是功能较简单。
pinpoint Pinpoint是韩国人开源的基于字节码注入的调用链分析,以及应用监控分析工具。特点 是支持多种插件,UI功能强大,接入端无代码侵入。
skywalking SkyWalking是本土开源的基于字节码注入的调用链分析,以及应用监控分析工具。特点是支持多 种插件,UI功能较强,接入端无代码侵入。目前已加入Apache孵化器。 Sleuth SpringCloud 提供的分布式系统中链路追踪解决方案。
注意:SpringCloud alibaba技术栈中并没有提供自己的链路追踪技术的,我们可以采用Sleuth + Zinkin(客户端)来做链路追踪解决方案
1. Sleuth入门
(1)Sleuth介绍
SpringCloud Sleuth主要功能就是在分布式系统中提供追踪解决方案。它大量借用了Google Dapper的设计, 先来了解一下Sleuth中的术语和相关概念。
(2)Trace
服务追踪的追踪单元是从客户发起请求(request)抵达被追踪系统的边界开始,到被追踪系统
向客户返回响应(response)为⽌的过程叫做链路追踪
由一组Trace Id相同的Span串联形成一个树状结构。为了实现请求跟踪,当请求到达分布式系统的 入口端点时,只需要服务跟踪框架为该请求创建一个唯一的标识(即TraceId),同时在分布式系 统内部流转的时候,框架始终保持传递该唯一值,直到整个请求的返回。那么我们就可以使用该唯 一标识将所有的请求串联起来,形成一条完整的请求链路。
(3)Span
代表了一组基本的工作单元。为了统计各处理单元的延迟,当请求到达各个服务组件的时 候,也通过一个唯一标识(SpanId)来标记它的开始、具体过程和结束。通过SpanId的开始和结 束时间戳,就能统计该span的调用时间,除此之外,我们还可以获取如事件的名称。请求信息等 元数据。
(4)Annotation
用它记录一段时间内的事件,内部使用的重要注释:
cs(Client Send)客户端发出请求,开始一个请求的生命
sr(Server Received)服务端接受到请求开始进行处理, sr-cs = 网络延迟(服务调用的时间)
ss(Server Send)服务端处理完毕准备发送到客户端,ss - sr = 服务器上的请求处理时间
cr(Client Reveived)客户端接受到服务端的响应,请求结束。 cr - sr = 请求的总时间

2. Sleuth使用
修改父工程引入Sleuth依赖
    <dependency>
        <groupId>org.springframework.cloud</groupId>
        <artifactId>spring-cloud-starter-sleuth</artifactId>
    </dependency>
追踪的时候必须开启日志的记录:(不开启就没有办法查看)

logging:
  level:
    org.springframework.web.servlet.DispatcherServlet: debug
    org.springframework.cloud.sleuth: debug

六、Zipkin的集成
1. ZipKin介绍
Zipkin 是 Twitter 的一个开源项目,它基于Google Dapper实现,它致力于收集服务的定时数据, 以解决微服务架构中的延迟问题,包括数据的收集、存储、查找和展现。
我们可以使用它来收集各个服务器上请求链路的跟踪数据,并通过它提供的REST API接口来辅助我 们查询跟踪数据以实现对分布式系统的监控程序,从而及时地发现系统中出现的延迟升高问题并找出系 统性能瓶颈的根源。
除了面向开发的 API 接口之外,它也提供了方便的UI组件来帮助我们直观的搜索跟踪信息和分析请 求链路明细,比如:可以查询某段时间内各用户请求的处理时间等。
Zipkin 提供了可插拔数据存储方式:In-Memory、MySql、Cassandra 以及 Elasticsearch。
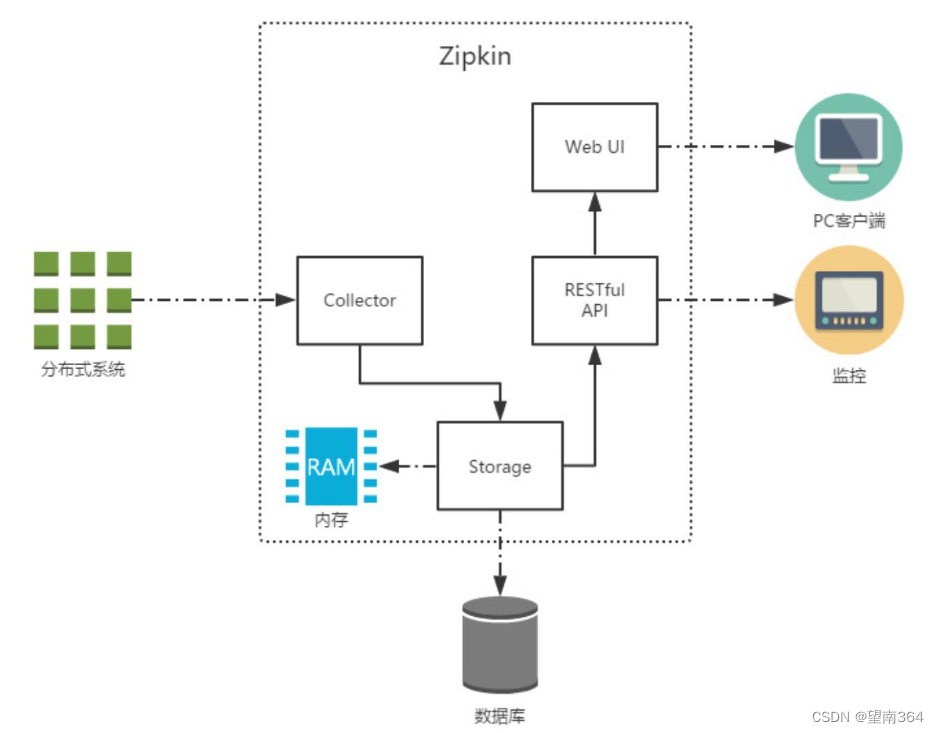
Collector:收集器组件,它主要用于处理从外部系统发送过来的跟踪信息,将这些信息转换为 Zipkin内部处理的 Span 格式,以支持后续的存储、分析、展示等功能。
Storage:存储组件,它主要对处理收集器接收到的跟踪信息,默认会将这些信息存储在内存中, 我们也可以修改此存储策略,通过使用其他存储组件将跟踪信息存储到数据库中。 RESTful API:API 组件,它主要用来提供外部访问接口。比如给客户端展示跟踪信息,或是外接 系统访问以实现监控等。
Web UI:UI 组件, 基于API组件实现的上层应用。通过UI组件用户可以方便而有直观地查询和分 析跟踪信息。
Zipkin分为两端,一个是 Zipkin服务端,一个是 Zipkin客户端,客户端也就是微服务的应用。 客户端会 配置服务端的 URL 地址,一旦发生服务间的调用的时候,会被配置在微服务里面的 Sleuth 的监听器监 听,并生成相应的 Trace 和 Span 信息发送给服务端。
2. ZipKin服务端安装
(1)下载ZipKin的jar包
https://search.maven.org/remote_content?g=io.zipkin.java&a=zipkin-server&v=LATEST&c=exec
(2) 启动ZipKin Server
j ava -jar zipkin的包.jar
(3) 访问
http://localhost:9411访问

3. Zipkin客户端集成
(1) 在每个微服务中添加依赖
         <dependency>
            <groupId>org.springframework.cloud</groupId>
            <artifactId>spring-cloud-starter-zipkin</artifactId>
            <version>2.2.8.RELEASE</version>
        </dependency>
(2) 修改bootstrap.yml文件

spring:
  cloud:
    nacos:
      config:
        server-addr: localhost:8848
        shared-configs:
          - data-id: Test.properties
          - data-id: product-aaa.properties
           # refresh: true
  zipkin:
    base-url: http://127.0.0.1:9411/
    discoveryClientEnabled: false #让nacos把它当成一个URL,而不要当成一个服务
  sleuth:
    sampler:
       probability: 1.0 #采样的百分比
logging:
  level:
    org.springframework.web.servlet.DispatcherServlet: debug
    org.springframework.cloud.sleuth: debug
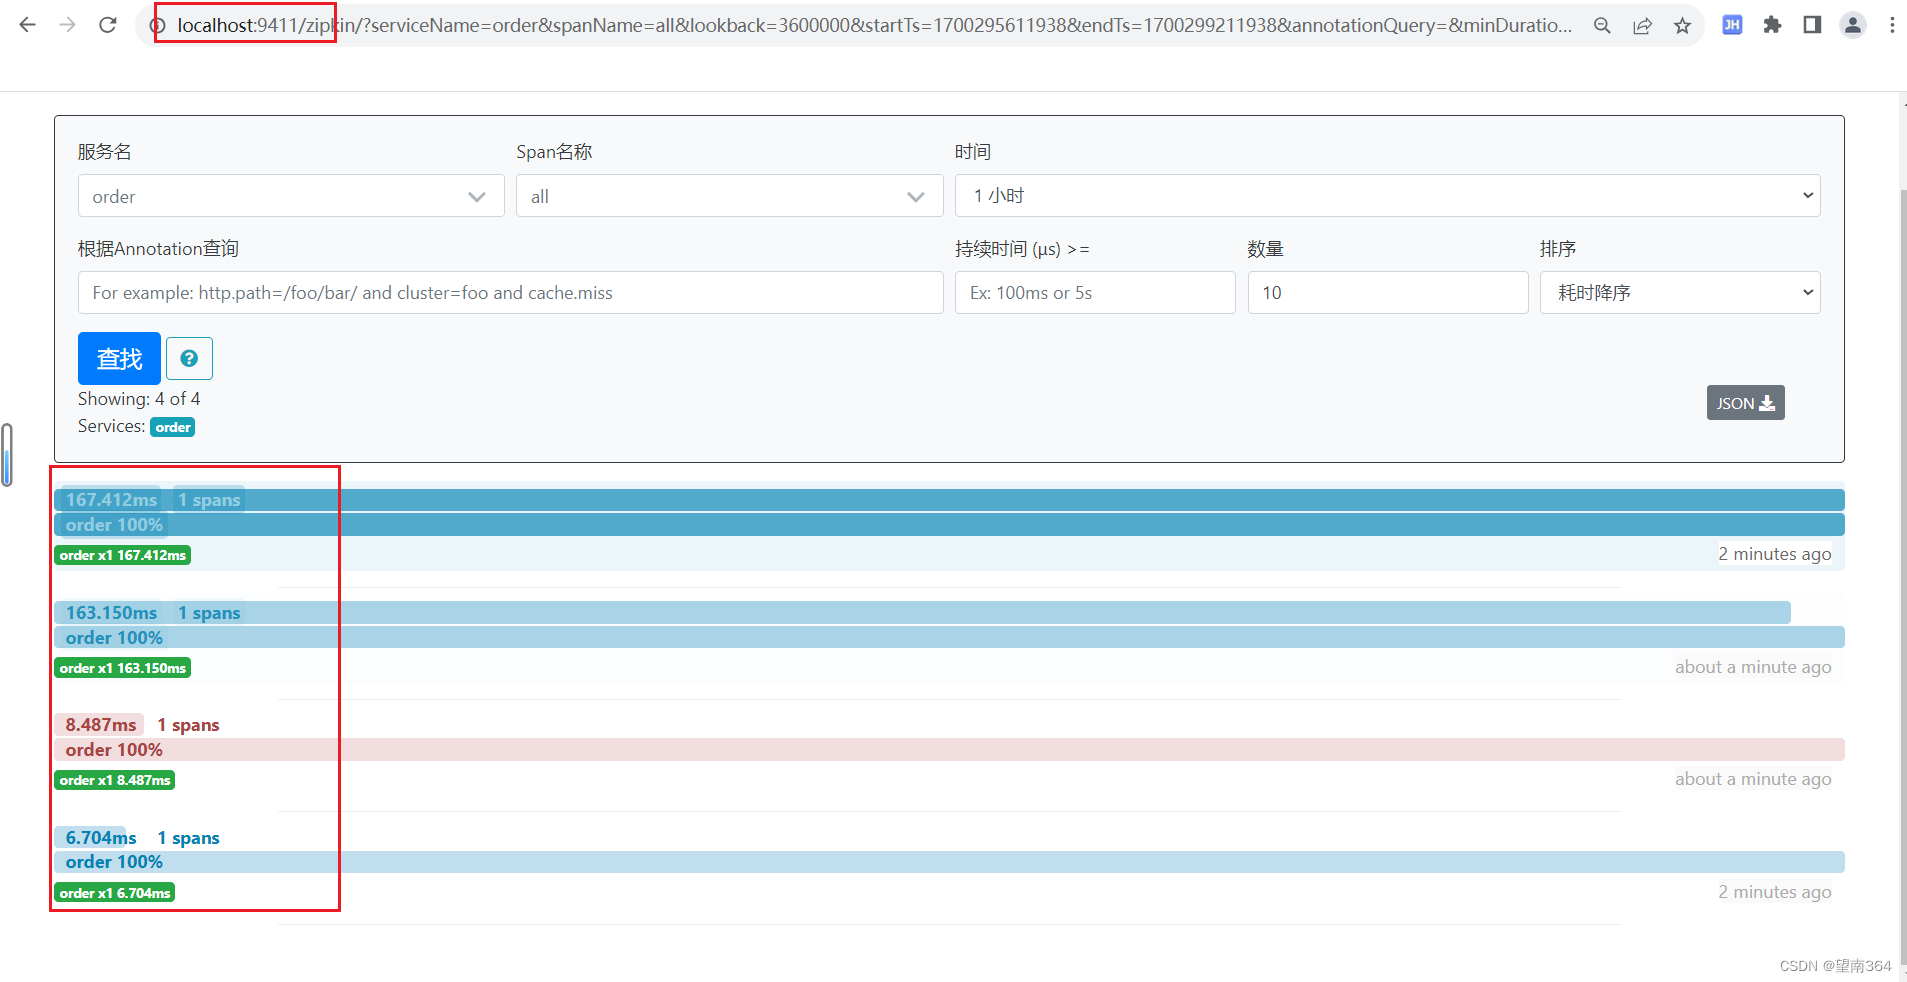
(3) 测试
访问
http://localhost:9411/zipkin
4. ZipKin数据持久化
(1) SQL语句
CREATE TABLE IF NOT EXISTS zipkin_spans (
`trace_id_high` BIGINT NOT NULL DEFAULT 0 COMMENT 'If non zero, this
means the trace uses 128 bit traceIds instead of 64 bit',
`trace_id` BIGINT NOT NULL,
`id` BIGINT NOT NULL,
`name` VARCHAR(255) NOT NULL,
`parent_id` BIGINT,
`debug` BIT(1),
`start_ts` BIGINT COMMENT 'Span.timestamp(): epoch micros used for endTs
query and to implement TTL',
`duration` BIGINT COMMENT 'Span.duration(): micros used for minDuration
and maxDuration query'
) ENGINE=InnoDB ROW_FORMAT=COMPRESSED CHARACTER SET=utf8 COLLATE
utf8_general_ci;
ALTER TABLE zipkin_spans ADD UNIQUE KEY(`trace_id_high`, `trace_id`, `id`)
COMMENT 'ignore insert on duplicate';
ALTER TABLE zipkin_spans ADD INDEX(`trace_id_high`, `trace_id`, `id`) COMMENT 'for joining with zipkin_annotations';
ALTER TABLE zipkin_spans ADD INDEX(`trace_id_high`, `trace_id`) COMMENT 'for
getTracesByIds';
ALTER TABLE zipkin_spans ADD INDEX(`name`) COMMENT 'for getTraces and
getSpanNames';
ALTER TABLE zipkin_spans ADD INDEX(`start_ts`) COMMENT 'for getTraces
ordering and range';
CREATE TABLE IF NOT EXISTS zipkin_annotations (
`trace_id_high` BIGINT NOT NULL DEFAULT 0 COMMENT 'If non zero, this
means the trace uses 128 bit traceIds instead of 64 bit',
`trace_id` BIGINT NOT NULL COMMENT 'coincides with
zipkin_spans.trace_id',
`span_id` BIGINT NOT NULL COMMENT 'coincides with zipkin_spans.id',
`a_key` VARCHAR(255) NOT NULL COMMENT 'BinaryAnnotation.key or
Annotation.value if type == -1',
`a_value` BLOB COMMENT 'BinaryAnnotation.value(), which must be smaller
than 64KB',
`a_type` INT NOT NULL COMMENT 'BinaryAnnotation.type() or -1 if
Annotation',
`a_timestamp` BIGINT COMMENT 'Used to implement TTL;
Annotation.timestamp or zipkin_spans.timestamp',
`endpoint_ipv4` INT COMMENT 'Null when Binary/Annotation.endpoint is
null',
`endpoint_ipv6` BINARY(16) COMMENT 'Null when Binary/Annotation.endpoint
is null, or no IPv6 address',
`endpoint_port` SMALLINT COMMENT 'Null when Binary/Annotation.endpoint
is null',
`endpoint_service_name` VARCHAR(255) COMMENT 'Null when
Binary/Annotation.endpoint is null'
) ENGINE=InnoDB ROW_FORMAT=COMPRESSED CHARACTER SET=utf8 COLLATE
utf8_general_ci;
ALTER TABLE zipkin_annotations ADD UNIQUE KEY(`trace_id_high`, `trace_id`, `span_id`, `a_key`, `a_timestamp`) COMMENT 'Ignore insert on duplicate';
ALTER TABLE zipkin_annotations ADD INDEX(`trace_id_high`, `trace_id`,
`span_id`) COMMENT 'for joining with zipkin_spans';
ALTER TABLE zipkin_annotations ADD INDEX(`trace_id_high`, `trace_id`)
COMMENT 'for getTraces/ByIds';
ALTER TABLE zipkin_annotations ADD INDEX(`endpoint_service_name`) COMMENT 'for getTraces and getServiceNames';
ALTER TABLE zipkin_annotations ADD INDEX(`a_type`) COMMENT 'for getTraces';
ALTER TABLE zipkin_annotations ADD INDEX(`a_key`) COMMENT 'for getTraces';
ALTER TABLE zipkin_annotations ADD INDEX(`trace_id`, `span_id`, `a_key`)
COMMENT 'for dependencies job';
CREATE TABLE IF NOT EXISTS zipkin_dependencies (
`day` DATE NOT NULL,
`parent` VARCHAR(255) NOT NULL,
`child` VARCHAR(255) NOT NULL,
`call_count` BIGINT
) ENGINE=InnoDB ROW_FORMAT=COMPRESSED CHARACTER SET=utf8 COLLATE
utf8_general_ci;
ALTER TABLE zipkin_dependencies ADD UNIQUE KEY(`day`, `parent`, `child`);
(2) 重新启动zipkin
运行命令
java -jar zipkin-server-2.12.9-exec.jar --STORAGE_TYPE=mysql --MYSQL_HOST=127.0.0.1 --MYSQL_TCP_PORT=3306 --MYSQL_DB=zipkin --MYSQL_USER=root --MYSQL_PASS=123456
七、网关添加swagger
每个微服务中添加swagger的方式完全一致
把所有的微服务的swagger整合到一起放到网关中
1. jar
添加依赖
        <dependency>
            <groupId>io.springfox</groupId>
            <artifactId>springfox-boot-starter</artifactId>
            <version>3.0.0</version>
        </dependency>

        <dependency>
            <groupId>com.github.xiaoymin</groupId>
            <artifactId>swagger-bootstrap-ui</artifactId>
            <version>1.9.6</version>
        </dependency>
说明:
将swagger升级到3.0.0可用支持webflux,同时有以下这些变化:
1、自动化注解变更:由之前的 @EnableSwagger2 更改为 @EnableOpenApi,当然@EnableOpenApi可以放在配置类,也可以放在启动类上
2、页面访问变更:
项目访问地址从2.x的 http://localhost:端口号/swagger-ui.html 到 3.x的 http://localhost:端口号/swagger-ui/index.html 或 http://localhost:8080/swagger-ui/
注:@EnableSwagger2在springfox3版本依然可以继续使用
3、DocumentationType变更
Docket构造函数中的DocumentationType指向更改:由之前的DocumentationType.SWAGGER_2 更改为 DocumentationType.OAS_30
注:DocumentationType.SWAGGER_2在springfox3版本依然可以继续使用
核心思想:以前能用的现在依然可以使用
2. swagger启动类
import org.springframework.context.annotation.Bean;
import org.springframework.context.annotation.Configuration;
import springfox.documentation.builders.ApiInfoBuilder;
import springfox.documentation.builders.PathSelectors;
import springfox.documentation.builders.RequestHandlerSelectors;
import springfox.documentation.service.ApiInfo;
import springfox.documentation.service.Contact;
import springfox.documentation.spi.DocumentationType;
import springfox.documentation.spring.web.plugins.Docket;
import springfox.documentation.swagger2.annotations.EnableSwagger2;

@Configuration
@EnableSwagger2
public class Swagger2 {


        @Bean
        public Docket createRestApi() {
            return new Docket(DocumentationType.SWAGGER_2)
                    .apiInfo(apiInfo())
                    .select()
                    .apis(RequestHandlerSelectors.basePackage("org.example.controller"))
                    .paths(PathSelectors.any())
                    .build();
        }


        private ApiInfo apiInfo() {
            return new ApiInfoBuilder()
                    .title("服务:发布为daocke镜像,权限管理,用户管理,页面管理,日志 后台 APIs")
                    .description("服务:发布为daocke镜像,权限管理,用户管理,页面管理,日志 后台")
                    .termsOfServiceUrl("http://xxx.xxx.com") //代码的路径
                    .contact(new Contact("作者","https://www.xxx.com/","6666.@qq.com"))
                    .version("1.0")
                    .build();
        }


    }
3. 聚合swagger
import org.springframework.beans.factory.annotation.Autowired;
import org.springframework.beans.factory.annotation.Value;
import org.springframework.cloud.gateway.config.GatewayProperties;
import org.springframework.cloud.gateway.route.RouteLocator;
import org.springframework.context.annotation.Primary;
import org.springframework.stereotype.Component;
import springfox.documentation.swagger.web.SwaggerResource;
import springfox.documentation.swagger.web.SwaggerResourcesProvider;

import java.util.*;

@Component
@Primary
public class DocumentConfig implements SwaggerResourcesProvider {


    @Value("${spring.application.name}")
    private String self;
   //整合每个微服务的swagger

    @Autowired
    private RouteLocator routeLocator;
    @Autowired
    private GatewayProperties gatewayProperties;
    //自动检测
    @Override
    public List<SwaggerResource> get() {
        List<SwaggerResource> resources = new ArrayList<>();
        List<String> routeHosts = new ArrayList<>();
        routeLocator.getRoutes()
                //.filter(route -> route.getUri().getHost() != null)
                .filter(route -> route.getUri().getHost() != null)
                .filter(route -> Objects.equals(route.getUri().getScheme(), "lb"))
                //过滤掉网关自身的服务 uri中的host就是服务id
                .filter(route -> !self.equalsIgnoreCase(route.getUri().getHost()))
                .subscribe(route -> routeHosts.add(route.getUri().getHost()));
        // 记录已经添加过的server,存在同一个应用注册了多个服务在注册中心上
        Set<String> dealed = new HashSet<>();
        routeHosts.forEach(instance -> {
            // 拼接url ,请求swagger的url
            //String url = "/"+ instance.toLowerCase() + "/v2/api-docs";
            String url = "/v2/api-docs";
            System.out.println("------------------------------");
            System.out.println(url);
            if (!dealed.contains(url)) {
                dealed.add(url);
                SwaggerResource swaggerResource = new SwaggerResource();
                swaggerResource.setUrl(url);
                swaggerResource.setName(instance);
                swaggerResource.setSwaggerVersion("2.0");
                resources.add(swaggerResource);
            }
        });
        return resources;
    }

//直接写固定的代码,如果有很多模块的话写起来不方便,不建议写
/*    public List<SwaggerResource> get() {
        List<SwaggerResource> resources = new ArrayList<>();
        SwaggerResource swaggerResource = new SwaggerResource();
        swaggerResource.setName("product");
        swaggerResource.setLocation("/v2/api-docs");// pro
        swaggerResource.setSwaggerVersion("2.0");
        resources.add(swaggerResource);


        SwaggerResource swaggerResource1 = new SwaggerResource();
        swaggerResource1.setName("order");
        swaggerResource1.setLocation("/v2/api-docs");// pro
        swaggerResource1.setSwaggerVersion("2.0");
        resources.add(swaggerResource1);
        return resources;

    }


    private SwaggerResource swaggerResource(String name, String location, String version) {

        SwaggerResource swaggerResource = new SwaggerResource();
        swaggerResource.setName(name);
        swaggerResource.setLocation(location);
        swaggerResource.setSwaggerVersion(version);
        return swaggerResource;

    }*/

}
![【算法每日一练]-图论(保姆级教程 篇5(LCA,最短路,分层图)) #LCA #最短路计数 #社交网络 #飞行路线 # 第二短路](https://img-blog.csdnimg.cn/32f59826c94946f38589cb1f80528ae5.png)

