跑通代码之后可以深入看代码了,整体代码很多,可先从配置文件开始看。
1. VINS-MONO配置文件理解
参考启动文件launch与参数配置文件yaml介绍
启动文件launch:euroc.launch
参数配置文件yaml:euroc_config.yaml:包括通用参数,相机内参,IMU噪声参数,Tbc相机外参,需要的topic,前端feature tracker的参数,后端loop的参数,优化的参数,以及时间戳补偿的参数。
2. 基本数据结构
从ROS源码看一下数据结构,基本上都是一些stl的数据结构的封装
- sensor_msgs::ImageConstPtr
typedef  ::std_msgs::Header_<ContainerAllocator>  header;
uint32_t height;
uint32_t width;
std::basic_string encoding;
uint8_t is_bigendian; #大端big endian(从低地址到高地址的顺序存放数据的高位字节到低位字节)和小端little endian
uint32_t step;
vector<uint8_t> data;
typedef ::sensor_msgs::Image_<std::allocator<void> > Image;
typedef boost::shared_ptr< ::sensor_msgs::Image > ImagePtr;
- sensor_msgs::PointCloudPtr feature_points
from file:sensor_msgs/PointCloud.msg
//头信息
std_msgs::Header_ header
	feature_points->header = img_msg->header;
	feature_points->header.frame_id = "world";
//3D landmark(如下是在归一化camera系下)
std::vector< ::geometry_msgs::Point32_> points;
    geometry_msgs::Point32 p;
    p.x = un_pts[j].x;
    p.y = un_pts[j].y;
    p.z = 1;
    feature_points->points.push_back(p);//3D点
//channels
std::vector< ::sensor_msgs::ChannelFloat32_> channels;
sensor_msgs::PointCloudPtr feature_points(new sensor_msgs::PointCloud);
    feature_points->channels.push_back(id_of_point);//这里每个channel都是一个独立的ChannelFloat32_,就使用了多个channel
    feature_points->channels.push_back(u_of_point);
    feature_points->channels.push_back(v_of_point);
    feature_points->channels.push_back(velocity_x_of_point);
    feature_points->channels.push_back(velocity_y_of_point);
//对于ChannelFloat32_
	std::basic_string<char> name;//名称
	std::vector<float> values;//值
	typedef ::sensor_msgs::ChannelFloat32_<std::allocator<void> > ChannelFloat32;
	typedef boost::shared_ptr< ::sensor_msgs::ChannelFloat32 > ChannelFloat32Ptr;
- sensor_msgs::PointCloud msg_match_points
上面的feature_points是类成员指针,这个直接是msg类成员
//头信息
std_msgs::Header_ header
	msg_match_points.header.stamp = ros::Time(time_stamp);
//3D landmark(如下是在归一化camera系下)
std::vector< ::geometry_msgs::Point32_> points;
	geometry_msgs::Point32 p;
	p.x = matched_2d_old_norm[i].x;
	p.y = matched_2d_old_norm[i].y;
	p.z = matched_id[i];
	msg_match_points.points.push_back(p);
//channels
std::vector< ::sensor_msgs::ChannelFloat32_> channels;
	Eigen::Vector3d T = old_kf->T_w_i;
	Eigen::Matrix3d R = old_kf->R_w_i;
	Quaterniond Q(R);
	sensor_msgs::ChannelFloat32 t_q_index;//一个channel是一个通道,这里代表的是一个量就是两帧间的T
	t_q_index.values.push_back(T.x());
	t_q_index.values.push_back(T.y());
	t_q_index.values.push_back(T.z());
	t_q_index.values.push_back(Q.w());
	t_q_index.values.push_back(Q.x());
	t_q_index.values.push_back(Q.y());
	t_q_index.values.push_back(Q.z());
	t_q_index.values.push_back(index);
	msg_match_points.channels.push_back(t_q_index);
- sensor_msgs::ImuConstPtr
底层const指针,指向的IMU数据不可变,即只读
from file:sensor_msgs/Imu.msg
{
std_msgs::Header_ header; //头
geometry_msgs::Quaternion_ orientation; //pose rotation
boost::array<double, 9> orientation_covariance;//rotation 协方差
geometry_msgs::Vector3_<> angular_velocity;//角速度
boost::array<double, 9> angular_velocity_covariance;//角速度cov
geometry_msgs::Vector3_<> linear_acceleration;//加速度
boost::array<double, 9> linear_acceleration_covariance;//加速度cov
} //Imu_
typedef ::sensor_msgs::Imu_<std::allocator<void> > Imu;
typedef boost::shared_ptr< ::sensor_msgs::Imu > ImuPtr;
typedef boost::shared_ptr< ::sensor_msgs::Imu const> ImuConstPtr;
挖坑:对ROS数据结构中的理解。
rosrun rqt_graph rqt_graph看图更好理解topic:

3. 组合数据结构
本节参考自博客:https://blog.csdn.net/qq_41839222/article/details/86030962
- measurements
std::vector<std::pair<std::vector<sensor_msgs::ImuConstPtr>, sensor_msgs::PointCloudConstPtr>> measurements;
estimator_node.cpp中getMeasurements()函数将对imu和图像数据进行初步对齐得到的数据结构,确保图像关联着对应时间戳内的所有IMU数据
sensor_msgs::PointCloudConstPtr 表示某一帧图像的feature_points
std::vector<sensor_msgs::ImuConstPtr> 表示当前帧和上一帧时间间隔中的所有IMU数据
将两者组合成一个数据结构,并构建元素为这种结构的vector进行存储
- image
map<int, vector<pair<int, Eigen::Matrix<double, 7, 1>>>> image;
在estimator.cpp中的process()中被建立,在Estimator::processImage()中被调用
作用是建立每个特征点(camera_id,[x,y,z,u,v,vx,vy])构成的map,索引为feature_id。
由于是单目,所以pair内的camera_id都为0
for (unsigned int i = 0; i < img_msg->points.size(); i++){
    int v = img_msg->channels[0].values[i] + 0.5;
    int feature_id = v / NUM_OF_CAM;
    int camera_id = v % NUM_OF_CAM;
    double x = img_msg->points[i].x;
    double y = img_msg->points[i].y;
    double z = img_msg->points[i].z;
    double p_u = img_msg->channels[1].values[i];
    double p_v = img_msg->channels[2].values[i];
    double velocity_x = img_msg->channels[3].values[i];
    double velocity_y = img_msg->channels[4].values[i];
    ROS_ASSERT(z == 1);
    Eigen::Matrix<double, 7, 1> xyz_uv_velocity;
    xyz_uv_velocity << x, y, z, p_u, p_v, velocity_x, velocity_y;
    image[feature_id].emplace_back(camera_id,  xyz_uv_velocity);
}
- all_image_frame
map<double, ImageFrame> all_image_frame
在estimator.h中作为class Estimator的属性:键是图像帧的时间戳,值是图像帧类。
图像帧类可由图像帧的特征点与时间戳构造,此外还保存了位姿Rt,预积分对象pre_integration,是否是关键帧。
class ImageFrame
{
    public:
        ImageFrame(){};
        ImageFrame(const map<int, vector<pair<int, Eigen::Matrix<double, 7, 1>>>>& _points, double _t):t{_t},is_key_frame{false}
        {
            points = _points;
        };
        map<int, vector<pair<int, Eigen::Matrix<double, 7, 1>> > > points;
        double t;
        Matrix3d R;
        Vector3d T;
        IntegrationBase *pre_integration;
        bool is_key_frame;
};
数据结构暂时总结到这里,下面开始前端部分。
4. 前端:视觉跟踪 feature_trackers
feature_trackers整体pipeline:

这里的Recursive distortion model还不太懂,需要补一下。
readIamge() 是关键
- 1. 直方图均衡
- 2. KLT(用status筛一遍)
- 3. rejectWithF:选择部分KLT match上的点计算F矩阵:过程中用RANSAC筛一遍(RANSAC需要学习一下,Recursive distortion model不是很懂)
- liftProjective 用内参将uv从像素平面转换到归一化平面上(x,y,1)(这里根据camera 类型的不同pinhole或者fisheye有不同的方法和重载函数)
- 使用inverse distortion model(proposed by Heikkila)或者Recursive distortion model去畸变
- 计算F矩阵并使用FM_RANSAC方法剔除outlier features
inPinholeCamera.cc
void
PinholeCamera::liftProjective(const Eigen::Vector2d& p, Eigen::Vector3d& P) const
{
    double mx_d, my_d,mx2_d, mxy_d, my2_d, mx_u, my_u;
    double rho2_d, rho4_d, radDist_d, Dx_d, Dy_d, inv_denom_d;
    //double lambda;

    // Lift points to normalised plane 将内参的逆变化转化为4个算子invKxx,从uv变为归一化平面内的xy1
    mx_d = m_inv_K11 * p(0) + m_inv_K13;
    my_d = m_inv_K22 * p(1) + m_inv_K23;

    if (m_noDistortion)
    {
        mx_u = mx_d;
        my_u = my_d;
    }
    else
    {
        if (0)
        {
            double k1 = mParameters.k1();
            double k2 = mParameters.k2();
            double p1 = mParameters.p1();
            double p2 = mParameters.p2();

            // Apply inverse distortion model
            // proposed by Heikkila
            mx2_d = mx_d*mx_d;
            my2_d = my_d*my_d;
            mxy_d = mx_d*my_d;
            rho2_d = mx2_d+my2_d;
            rho4_d = rho2_d*rho2_d;
            radDist_d = k1*rho2_d+k2*rho4_d;
            Dx_d = mx_d*radDist_d + p2*(rho2_d+2*mx2_d) + 2*p1*mxy_d;
            Dy_d = my_d*radDist_d + p1*(rho2_d+2*my2_d) + 2*p2*mxy_d;
            inv_denom_d = 1/(1+4*k1*rho2_d+6*k2*rho4_d+8*p1*my_d+8*p2*mx_d);

            mx_u = mx_d - inv_denom_d*Dx_d;
            my_u = my_d - inv_denom_d*Dy_d;
        }
        else
        {
            // Recursive distortion model(这个递归distortion到底是什么意思?)
            int n = 8;
            Eigen::Vector2d d_u;
            distortion(Eigen::Vector2d(mx_d, my_d), d_u);
            // Approximate value
            mx_u = mx_d - d_u(0);
            my_u = my_d - d_u(1);

            for (int i = 1; i < n; ++i)
            {
                distortion(Eigen::Vector2d(mx_u, my_u), d_u);
                mx_u = mx_d - d_u(0);
                my_u = my_d - d_u(1);
            }
        }
    }

    // Obtain a projective ray
    P << mx_u, my_u, 1.0;
}
- 4. setMask():使feature分布更均匀。
- 对所有track上的feature按照track cnt进行排序
- 遍历排序后的features,以feature坐标为圆心,MIN_DIST(程序里取30)为圆心画圆,圆内mask值均设置为0,后续遇到mask值不为255的点直接pass掉,相当于扔掉较为接近的feature,留下的都是track次数较多的,分布较为均匀的feature。
- 5. 判断是否需要在forw_img上提取新的feature:经过rejectWithF()和setMask()的剔除后,inlier可能不够,如果小于阈值MAX_CNT,则调用 goodFeaturesToTrack() 和当前mask提取新的features(当前mask可能长这样
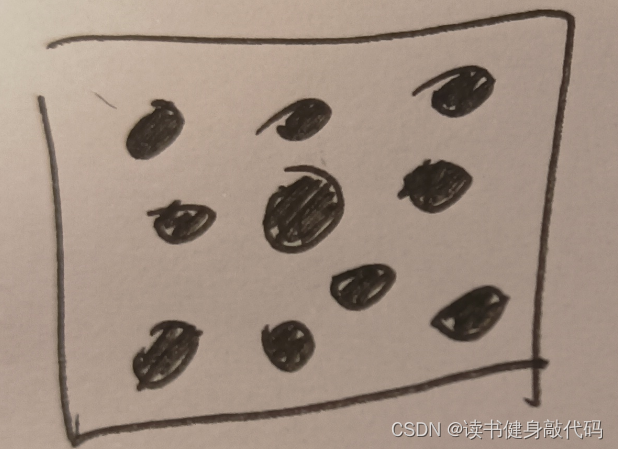
被设为0的区域是黑的,手画的所以没保证半径相同-_- ),在白色区域进行提点,保证了features的均匀分布。
- 6. addPoints():将新提取的点添加到forw_pts中,ids设为-1(前端处理完,在pub之前会updateID,遍历到-1的就会赋值给当前的feature总数+1),track_cnt设为1
- 7. prev_,cur_变量更新
- 8. 去畸变:
- 遍历cur_pts,调用liftProjective()去畸变,与rejectWithF中相同,构建cur_un_pts(当前features的归一化坐标vector),cur_un_pts_map(用id来查询features的map)。
- 补充:cur_un_pts当前共有3类点:1.新点(ids==-1),2.在prev_pts中跟到的点(find!=end),3.没跟到的点(find==end)
只有在prev中跟到的点才能计算速度,其他均将速度设为0(在Ch7作业中这里的速度没有用到,所以当时直接全部设为了0)
至此,readImage完毕。
如果需要pub则将所有cur_相关的量都打包成feature_points,并pub
打包:
        pub_count++;
        sensor_msgs::PointCloudPtr feature_points(new sensor_msgs::PointCloud);
        sensor_msgs::ChannelFloat32 id_of_point;
        sensor_msgs::ChannelFloat32 u_of_point;
        sensor_msgs::ChannelFloat32 v_of_point;
        sensor_msgs::ChannelFloat32 velocity_x_of_point;
        sensor_msgs::ChannelFloat32 velocity_y_of_point;

        feature_points->header = img_msg->header;
        feature_points->header.frame_id = "world";

        vector<set<int>> hash_ids(NUM_OF_CAM);
        for (int i = 0; i < NUM_OF_CAM; i++)
        {
            auto &un_pts = trackerData[i].cur_un_pts;
            auto &cur_pts = trackerData[i].cur_pts;
            auto &ids = trackerData[i].ids;
            auto &pts_velocity = trackerData[i].pts_velocity;
            for (unsigned int j = 0; j < ids.size(); j++)
            {
                if (trackerData[i].track_cnt[j] > 1)
                {
                    int p_id = ids[j];
                    hash_ids[i].insert(p_id);
                    geometry_msgs::Point32 p;
                    p.x = un_pts[j].x;
                    p.y = un_pts[j].y;
                    p.z = 1;

                    feature_points->points.push_back(p);//3D点
                    id_of_point.values.push_back(p_id * NUM_OF_CAM + i);//track到的特征点都是成对出现的,左目的i=0,就是自身,右目相应的特征点的id就是多加了1,效果是左右目的tracked points的id只相差1
                    u_of_point.values.push_back(cur_pts[j].x);
                    v_of_point.values.push_back(cur_pts[j].y);
                    velocity_x_of_point.values.push_back(pts_velocity[j].x);//光流速度作为该点的速度
                    velocity_y_of_point.values.push_back(pts_velocity[j].y);
                }
            }
        }
        feature_points->channels.push_back(id_of_point);//这里每个channel都是一个独立的量,就使用了多个channel
        feature_points->channels.push_back(u_of_point);
        feature_points->channels.push_back(v_of_point);
        feature_points->channels.push_back(velocity_x_of_point);
        feature_points->channels.push_back(velocity_y_of_point);
发布:pub_img.publish(feature_points);//发布一幅图像中的特征点信息
得到了最新一帧的,归一化平面上的(目前好像没看到rpj to unit sphere的操作),去了畸变的features。
下一节是状态估计器vins_estimator,是VINS的重点。




![[云原生2.] Kurbernetes资源管理 ---- (陈述式资源管理方式)](https://img-blog.csdnimg.cn/598038617e5c42e9ad263920e52ceebc.png)


![[nlp] 损失缩放(Loss Scaling)loss sacle](https://img-blog.csdnimg.cn/7a1a6f1924374a3eb4c0b1ce649bab0b.png)
