前言:
有时候我们受限于硬件设备和网络的的问题,无法将内网的大容量、高性能存储设备或计算设备对外访问。这个时候就会变的特别苦恼,上云呢成本太大,不用云呢公网又无法直接访问,这个时候怎么办呢,NPS它来了!!!!
nps是一款轻量级、高性能、功能强大的内网穿透代理服务器。目前支持tcp、udp流量转发,可支持任何tcp、udp上层协议(访问内网网站、本地支付接口调试、ssh访问、远程桌面,内网dns解析等等……),此外还支持内网http代理、内网socks5代理、p2p等,并带有功能强大的web管理端。
GitHub地址:https://github.com/ehang-io/nps
下载地址:https://github.com/ehang-io/nps/releases/tag/v0.26.10
详细介绍参考文档:https://gitee.com/penry/nps?skip_mobile=true#nps
一、环境准备
1、带公网的服务器一台(以下均使用ECS代替),配置不用特别高
2、内网的Linux服务器或者Windows服务器
二、源码包下载
1、先在ECS上下载NPS的服务端包进行安装配置
wget https://github.com/ehang-io/nps/releases/download/v0.26.10/freebsd_amd64_server.tar.gz

tar -zxf linux_amd64_server.tar.gz

[root@qingtong nps]# ls
conf  linux_amd64_server.tar.gz  nps  web
2、默认配置文件在conf目录下,也可以先启动在配置文件,启动后的配置文件在/etc/nps/conf/nps.conf 修改这个配置文件也是可以的
请参照下面的基础配置文件修改适配自己的配置
如需更高级的配置请参考:https://gitee.com/penry/nps?skip_mobile=true#nps
#应用程序的名称,此处为"NPS"。
appname = nps
#Boot mode(dev|pro)
#启动模式,可以是开发模式(dev)或生产模式(pro)。
runmode = dev

#HTTP(S) proxy port, no startup if empty
#HTTP和 HTTPS代理的配置,包括代理服务器的IP和端口,以及是否只使用HTTPS代理。
http_proxy_ip=0.0.0.0
http_proxy_port=22000
https_proxy_port=22001
https_just_proxy=true

#default https certificate setting
默认的HTTPS证书和私钥文件路径。
https_default_cert_file=conf/server.pem
https_default_key_file=conf/server.key

##bridge
#桥接(bridge)配置,定义桥接的类型、端口和IP。
bridge_type=tcp
bridge_port=22002
bridge_ip=0.0.0.0

# Public password, which clients can use to connect to the server
# After the connection, the server will be able to open relevant ports and parse related domain names according to its own configuration file.
#公共密码,客户端使用该密码连接到服务器。
public_vkey=123

#Traffic data persistence interval(minute)
#Ignorance means no persistence
#流量数据持久化间隔,以分钟为单位。
#flow_store_interval=1

# log level LevelEmergency->0  LevelAlert->1 LevelCritical->2 LevelError->3 LevelWarning->4 LevelNotice->5 LevelInformational->6 LevelDebug->7
#日志级别,数值从0到7,表示从紧急(LevelEmergency)到调试(LevelDebug)。
log_level=7
#log_path=nps.log

#Whether to restrict IP access, true or false or ignore
#是否限制IP访问。
#ip_limit=true

#P2P配置,定义P2P的IP和端口。
#p2p
#p2p_ip=127.0.0.1
#p2p_port=6000

#web
#Web管理界面的配置,包括主机名、用户名、密码、端口和IP。
web_host=a.o.com
web_username=admin
web_password=^hjkl/-321,
web_port = 22003
web_ip=0.0.0.0
#Web管理界面的基本URL路径。
web_base_url=
#Web管理界面是否启用SSL以及SSL证书和私钥文件的路径。
web_open_ssl=false
web_cert_file=conf/server.pem
web_key_file=conf/server.key
# if web under proxy use sub path. like http://host/nps need this.
#web_base_url=/nps

#Web API unauthenticated IP address(the len of auth_crypt_key must be 16)
#Remove comments if needed
#auth_key=test
#Web API无需身份验证时允许访问的IP地址,以及用于加密的密钥。
auth_crypt_key =1234567812345678

#allow_ports=9001-9009,10001,11000-12000
#允许连接的端口范围。TCP协议相关配置,包括模式、服务器端口和目标端口范围。
[tcp]
mode=tcp
server_port=22000-23000
target_port=22000-23000


#Web management multi-user login
#允许用户登录、注册和更改用户名的配置。
allow_user_login=true
allow_user_register=true
allow_user_change_username=true


#extension
#不同功能的开关,控制流量限制、速率限制、隧道数量限制、本地代理、连接数量限制、多IP支持以及系统信息显示等。
allow_flow_limit=false
allow_rate_limit=false
allow_tunnel_num_limit=false
allow_local_proxy=false
allow_connection_num_limit=false
allow_multi_ip=false
system_info_display=false

#cache
#HTTP缓存的配置,包括是否启用和缓存长度。
http_cache=false
http_cache_length=100

#get origin ip
#是否在HTTP请求中添加原始IP头。
http_add_origin_header=false

#pprof debug options
#pprof_ip=0.0.0.0
#pprof_port=9999

#client disconnect timeout
#客户端断开连接的超时时间,单位为秒。
disconnect_timeout=60
安装成功后,对于linux,darwin,将会把配置文件和静态文件放置于/etc/nps/,并将可执行文件nps复制到/usr/bin/nps或者/usr/local/bin/nps,安装成功后可在任何位置执行
nps test|start|stop|restart|status
3、安装配置完成后打开web页面控制端输入配置文件里的账号密码登录
1)在左侧的导航栏点击客户端,然后根据提示新增客户端
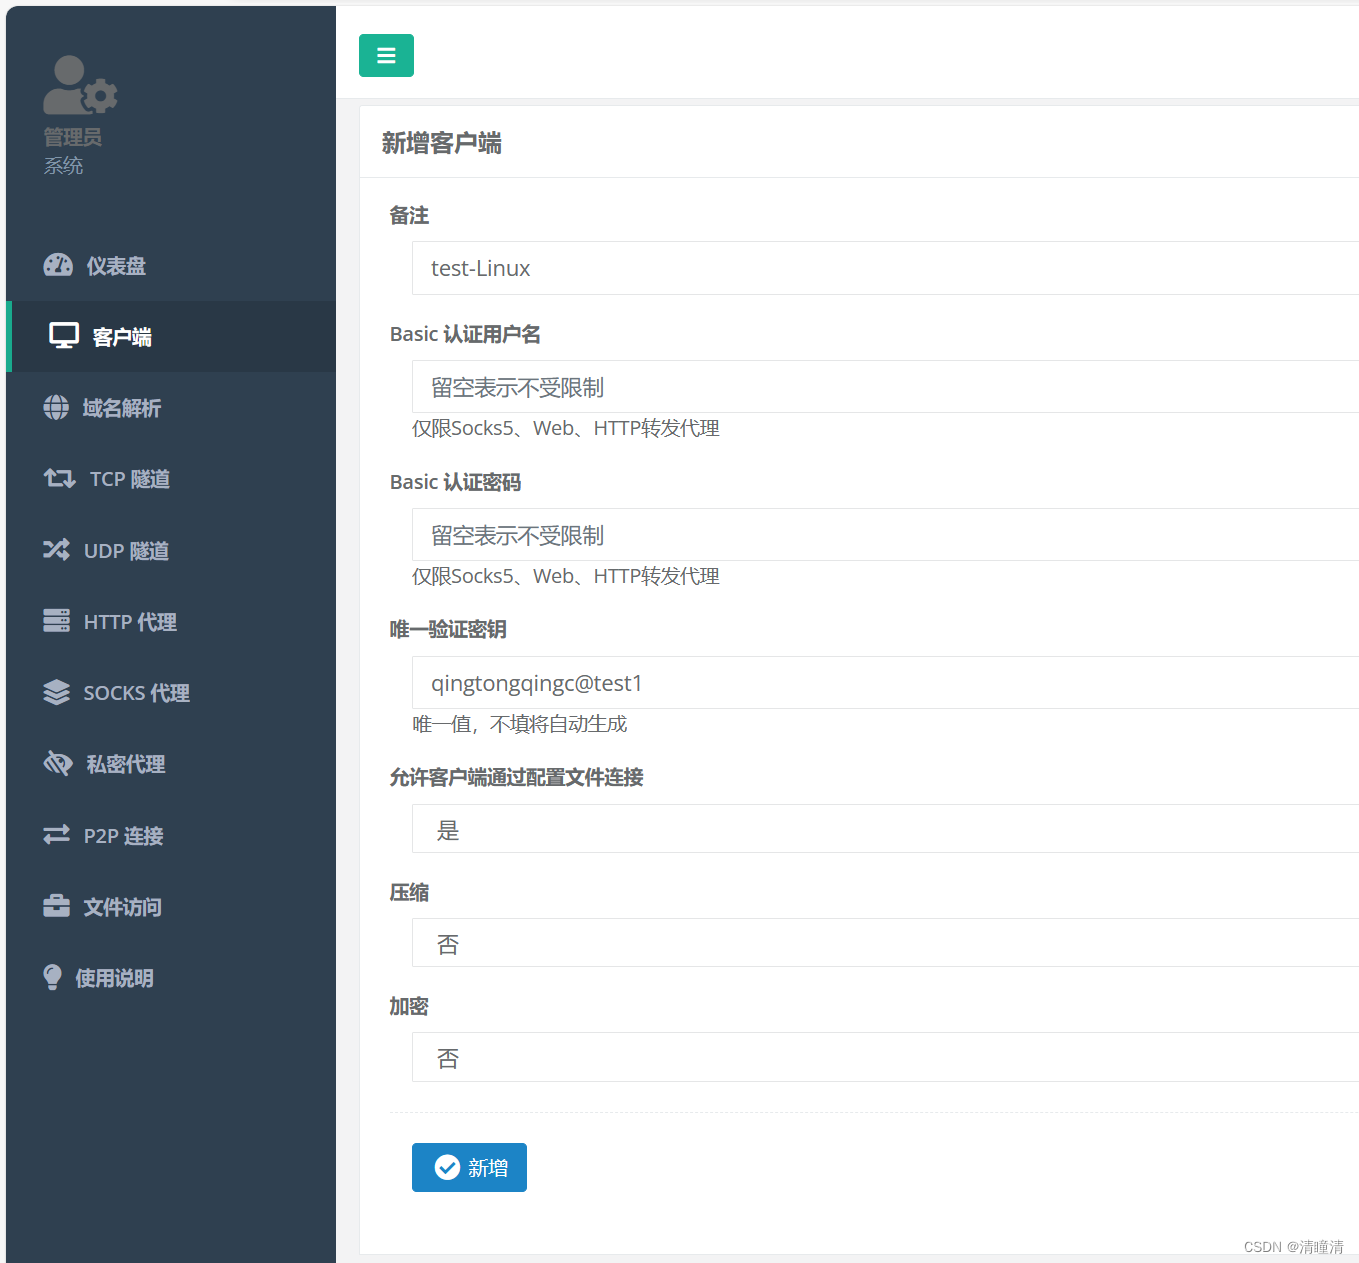
2)新增客户端口新增TCP隧道与刚才新增客户端就行绑定(客户端ID与前边创建的客户端进行对应),服务端口的配置范围是配置文件里限制的,请依照配置文件来
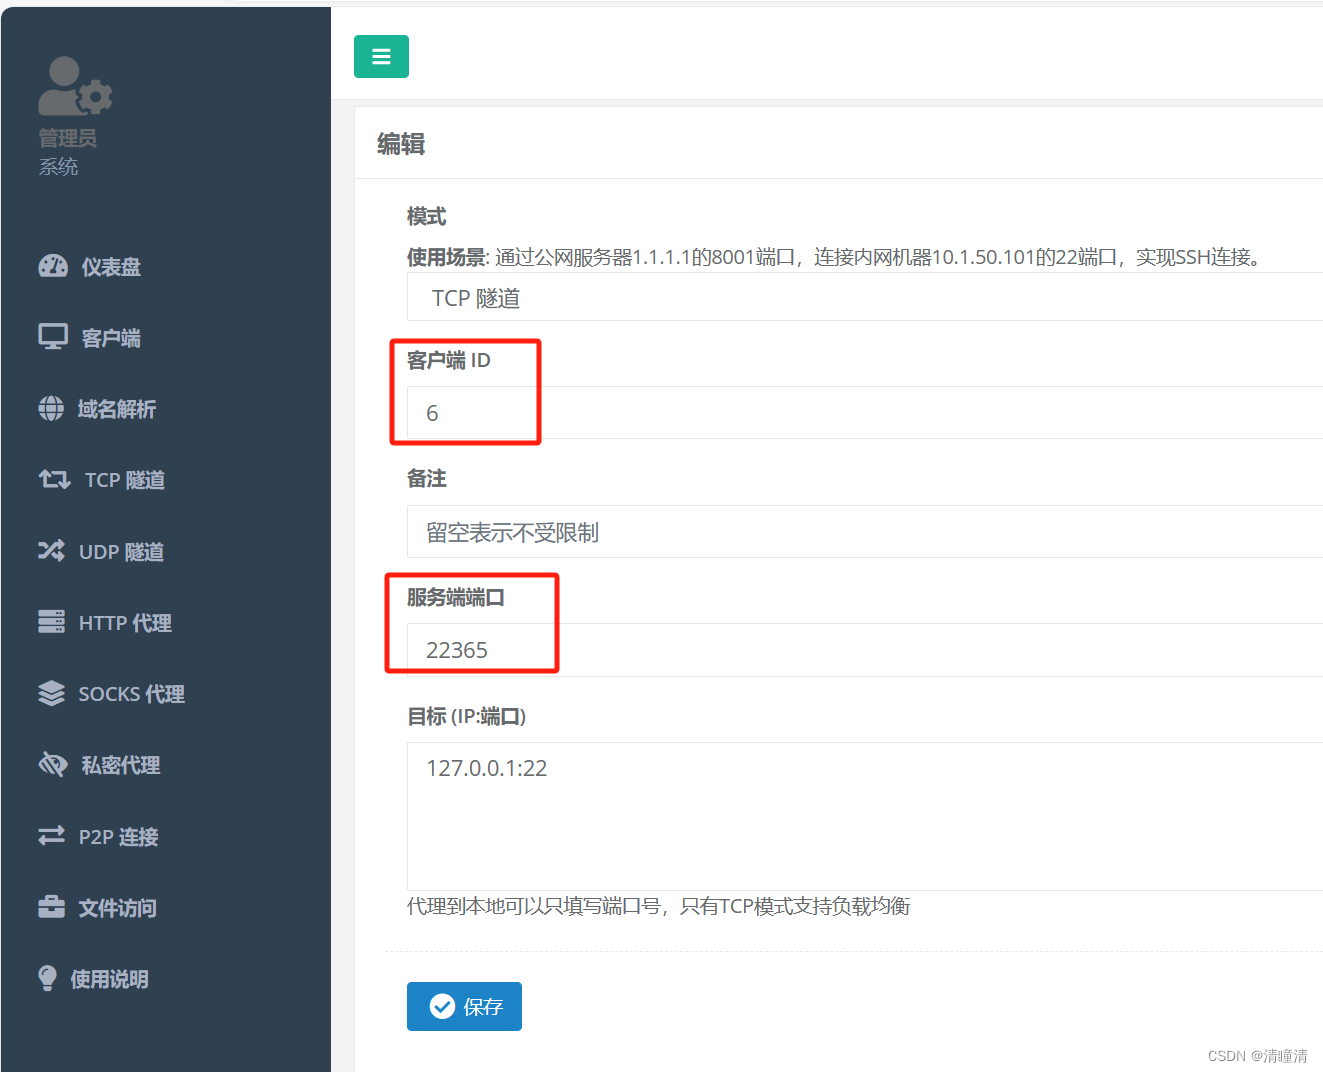
4、在内网的Linux主机上安装NPC客户端进行内网穿透
wget https://github.com/ehang-io/nps/releases/download/v0.26.10/linux_amd64_client.tar.gz
#解压
tar -zxf linux_amd64_client.tar.gz
NPC客户端是不需要任何配置文件的,所以只需要程序就可以
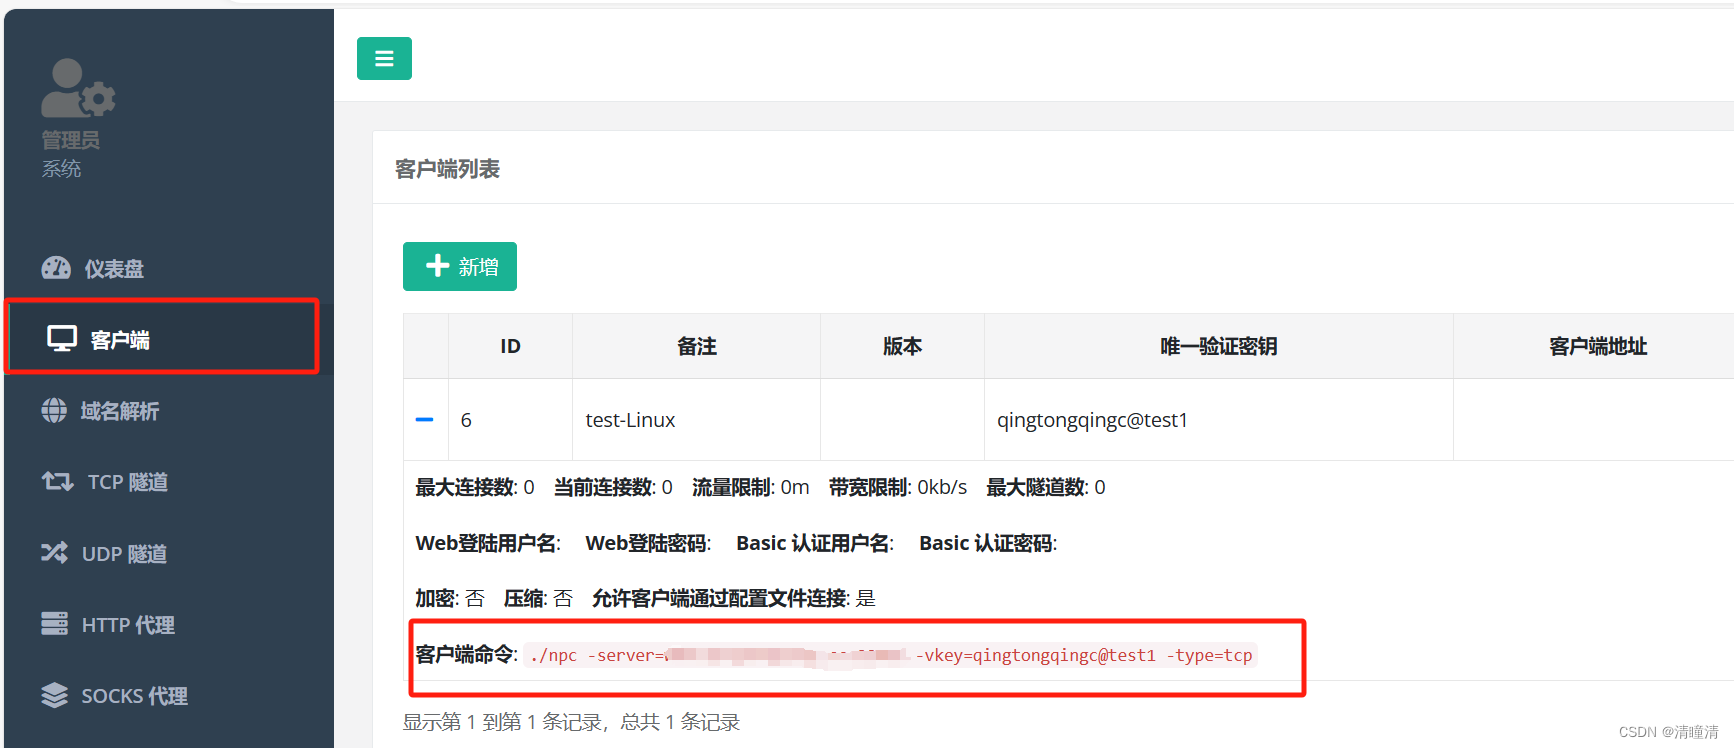
复制此处的命令到内网的主机上执行
扩展知识:推荐大家使用第一种方法,至于区别请看下列对比
要将 NPC 客户端的输出重定向到后台或文件,你可以使用 shell 中的重定向功能。有两种常见的方法可以做到这一点:

1、后台运行并保存输出到文件

npc -server=xxx.xxxxxxx.xxx:22002 -vkey=qingtongqingc@test1 -type=tcp &> /var/log/npc.log &

# 这将把 NPC 客户端的标准输出和标准错误输出都重定向到名为 npc.log 的文件,并且客户端在后台运行(使用 & 符号)。

2、后台运行并将输出保存到文件但仅记录标准错误输出

npc -server=xxx.xxxxxxx.xxx:22002 -vkey=qingtongqingc@test1 -type=tcp 2> /var/log/npc_error.log &

# 这将把标准错误输出重定向到名为 npc_error.log 的文件,而标准输出仍然会显示在终端上。

5、确认没问题后进行验证

访问成功后就可以在任何地方去访问这台内网的机器
windows主机的添加方法类似,后续有时间会在更新,请大家持续关注~~~~~~~~


