文章目录
- 前言
- 一、springBoot 集成mybatis-plus
- 1.1 maven 引入依赖:
- 1.2 配置数据源::
- 二、使用:
- 2.1 mysql 打印执行的sql 设置:
- 2.2 分页查询:
- 2.3 条件构造器:
- 2.3.1 QueryWrapper 查询:
- 2.3.2 UpdateWrapper 更新:
- 2.3.3 LambdaQueryWrapper查询:
- 2.3. LambdaUpdateWrapper 更新:
- 三、插件的使用:
- 3.1 自定义id 生成:
- 3.2 逻辑删除:
- 3.3 自动填充:
- 3.4 执行sql打印:
- 3.4.1 依赖:
- 3.4.2 驱动修改:
- 3.4.3 定义 py.properties 配置:
- 3.4.4 可选项 idea 对sql 美化插件 :
- 3.5 数据库安全保护:
- 3.6 数据库乐观锁:
- 3.7 代码生成器:
- 3.7.1 springboot web 项目中 jar:
- 3.7.2 定义业务类生成:
- 3.7.3 运行业务类生成:
- 总结:
- 参考:
前言
Spring-boot 项目中引入了Mybatis-plus 后 应该怎样进行数据源的配置,怎样通过Mybatis-plus 的接口快速的实现CRUD。
一、springBoot 集成mybatis-plus
1.1 maven 引入依赖:
<dependency>
    <groupId>com.baomidou</groupId>
    <artifactId>mybatis-plus-boot-starter</artifactId>
    <version>3.5.2</version>
</dependency>
<!-- https://mvnrepository.com/artifact/mysql/mysql-connector-java -->
<dependency>
    <groupId>com.mysql</groupId>
    <artifactId>mysql-connector-j</artifactId>
</dependency>
1.2 配置数据源::
@Configuration
public class MyConfig {


    @Bean
    public DataSource dataSource() {
        DriverManagerDataSource dataSource = new DriverManagerDataSource();
        dataSource.setUrl("jdbc:mysql://localhost:3406/mybatis?useUnicode=true&characterEncoding=UTF-8&allowMultiQueries=true&useAffectedRows=true&useSSL=false&zeroDateTimeBehavior=convertToNull&serverTimezone=GMT%2B8");
        dataSource.setUsername("root");
        dataSource.setPassword("ddsoft");
        return dataSource;
    }

    @Bean
    public JdbcTemplate jdbcTemplate(DataSource dataSource) {
        return new JdbcTemplate(dataSource);
    }


    @Bean
    public DataSourceTransactionManager transactionManager(DataSource dataSource) {
        return new DataSourceTransactionManager(dataSource);
    }

    @Bean
    public JdbcTemplate jdbcTemplate() {
        return new JdbcTemplate(dataSource());
    }
    @Bean
    public DataSourceTransactionManager transactionManager() {
        return new DataSourceTransactionManager(dataSource());
    }

}
二、使用:
2.1 mysql 打印执行的sql 设置:
# mysql 日志
logging.level.root= info
logging.level.com.example.springdabaihua=debug
tip: Dao 层 使用Mapper 的crud 通常与sql 的crud 名字开头;service 使用通查我们不会直接引用Mapper 层,会使用service 层:service 通查有业务命名的开头 如 listXxx ,getXxx ;这些api 这里不在进行展开,可以通过官网CRUD接口了解;
2.2 分页查询:
定义分页的插件进行sql 的拦截:
/**
 * 添加分页插件
 */
@Bean
public MybatisPlusInterceptor mybatisPlusInterceptor() {
    MybatisPlusInterceptor interceptor = new MybatisPlusInterceptor();
    interceptor.addInnerInterceptor(new PaginationInnerInterceptor(DbType.MYSQL));//如果配置多个插件,切记分页最后添加
    //interceptor.addInnerInterceptor(new PaginationInnerInterceptor()); 如果有多数据源可以不配具体类型 否则都建议配上具体的DbType
    return interceptor;
})
业务层的分页:
@Test
public void testPage1() {
    IPage<TbUser> ipage = new Page<TbUser>(1, 2);
    IPage<TbUser> page = userService.page(ipage);
    System.out.println(page.getRecords());
    System.out.println(page.getPages());
    System.out.println(page.getTotal());
}
mapper 层的分页:
@Test
public void testPage2() {
    IPage<TbUser> ipage = new Page<TbUser>(1, 2);
    IPage<TbUser> page = userMapper.getPage(ipage);;
    System.out.println(page.getRecords());
    System.out.println(page.getPages());
    System.out.println(page.getTotal());
}

public interface TbUserMapper extends BaseMapper<TbUser> {

    IPage<TbUser> getPage(IPage<?>page );
}
<?xml version="1.0" encoding="UTF-8"?>
<!DOCTYPE mapper PUBLIC "-//mybatis.org//DTD Mapper 3.0//EN" "http://mybatis.org/dtd/mybatis-3-mapper.dtd">
<mapper namespace="com.example.springdabaihua.mapper.TbUserMapper">


    <select id="getPage" resultType="com.example.springdabaihua.entity.TbUser">
        select * from  tb_user
    </select>
</mapper>
2.3 条件构造器:
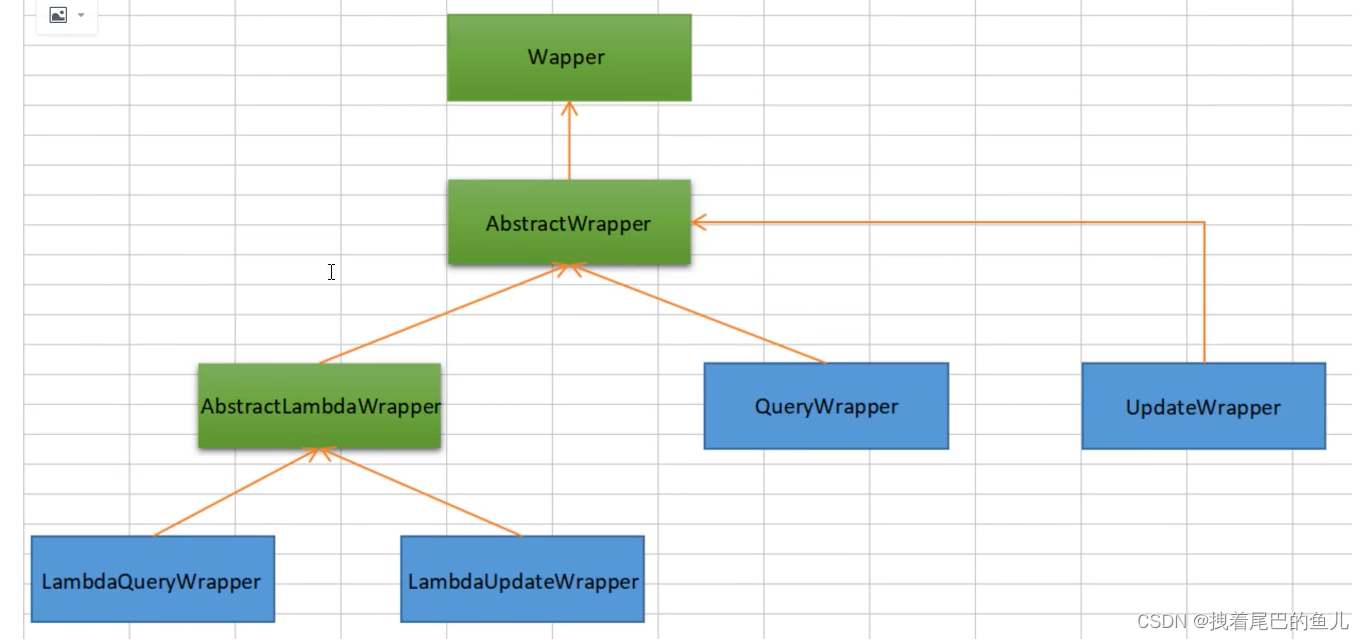
2.3.1 QueryWrapper 查询:
@Test
public  void testWraaper1(){
    QueryWrapper<TbUser> wrapper = new QueryWrapper<>();
// select 可以限制列名
    wrapper.select("id","name").like("name","张");
    List<TbUser> list = userService.list(wrapper);
    list.stream().forEach(e->{
        System.out.println(e);
    });
}
2.3.2 UpdateWrapper 更新:
@Test
public void testWraaper2() {
    UpdateWrapper<TbUser> wrapper = new UpdateWrapper<>();
    wrapper.like("name", "1");
    wrapper.set("name", "赵六");
    userService.update(wrapper);

}
2.3.3 LambdaQueryWrapper查询:
增加使用 Lambda 表达式,这样就不用收到传入列名
@Test
public void testWraaper3() {
    LambdaQueryWrapper<TbUser> wrapper = new LambdaQueryWrapper<>();
    wrapper.select(TbUser::getId,TbUser::getName).like(TbUser::getName, "张");
    List<TbUser> list = userService.list(wrapper);
    list.stream().forEach(e -> {
        System.out.println(e);
    });
}
2.3. LambdaUpdateWrapper 更新:
增加使用 Lambda 表达式,这样就不用收到传入列名
@Test
public void testWraaper4() {
    LambdaUpdateWrapper<TbUser> wrapper = new LambdaUpdateWrapper<>();
    wrapper.like(TbUser::getName, "赵");
    wrapper.set(TbUser::getName,"小李飞刀");
    userService.update(wrapper);

}
三、插件的使用:
3.1 自定义id 生成:
定义id 生成:(分布式全局唯一id 的设置可以参考我博客中的其他文章 搜索关键字"分布式全局唯一id" 查看)
@Component
public class CustomIdGenerator implements IdentifierGenerator {
    @Override
    public Long nextId(Object entity) {
      	//可以将当前传入的class全类名来作为bizKey,或者提取参数来生成bizKey进行分布式Id调用生成.
      	String bizKey = entity.getClass().getName();
        //根据bizKey调用分布式ID生成
        long id = ....;
      	//返回生成的id值即可.
        return id;
    }
}
实体类中定义使用自定义id:
  @TableId(value = "id", type = IdType.ASSIGN_ID)
    private Integer id;
3.2 逻辑删除:
mysql 表中增加逻辑删除的字段

tip :支持所有数据类型(推荐使用 Integer,Boolean,LocalDateTime),如果数据库字段使用datetime,逻辑未删除值和已删除值支持配置为字符串null,另一个值支持配置为函数来获取值如now();
可以对单表字段进行设置:
 @TableLogic(value = "1",delval = "0")
 private Integer isDelete;
也可以进行全局配置:
mybatis-plus:
  global-config:
    db-config:
      logic-delete-field: flag # 全局逻辑删除的实体字段名(since 3.3.0,配置后可以忽略不配置步骤2)
      logic-delete-value: 1 # 逻辑已删除值(默认为 1)
      logic-not-delete-value: 0 # 逻辑未删除值(默认为 0)
tip :只对自动注入的 sql 起效( 对mybatis-plus 提供的api 结果,自己xml 写的不支持):
- 插入: 不作限制
- 查找: 追加 where 条件过滤掉已删除数据,如果使用 wrapper.entity 生成的 where 条件也会自动追加该字段
- 更新: 追加 where 条件防止更新到已删除数据,如果使用 wrapper.entity 生成的 where 条件也会自动追加该字段
- 删除: 转变为 更新
3.3 自动填充:
填充创建,更新 人和时间:注解填充字段 @TableField(… fill = FieldFill.INSERT) 生成器策略部分也可以配置
自定义填充:
@Slf4j
@Component
public class MyMetaObjectHandler implements MetaObjectHandler {

    @Override
    public void insertFill(MetaObject metaObject) {
        log.info("start insert fill ....");
        this.strictInsertFill(metaObject, "createTime", LocalDateTime.class, LocalDateTime.now()); // 起始版本 3.3.0(推荐使用)
        // 或者
        this.strictInsertFill(metaObject, "createTime", () -> LocalDateTime.now(), LocalDateTime.class); // 起始版本 3.3.3(推荐)
        // 或者
        this.fillStrategy(metaObject, "createTime", LocalDateTime.now()); // 也可以使用(3.3.0 该方法有bug)
    }

    @Override
    public void updateFill(MetaObject metaObject) {
        log.info("start update fill ....");
        this.strictUpdateFill(metaObject, "updateTime", LocalDateTime.class, LocalDateTime.now()); // 起始版本 3.3.0(推荐)
        // 或者
        this.strictUpdateFill(metaObject, "updateTime", () -> LocalDateTime.now(), LocalDateTime.class); // 起始版本 3.3.3(推荐)
        // 或者
        this.fillStrategy(metaObject, "updateTime", LocalDateTime.now()); // 也可以使用(3.3.0 该方法有bug)
    }
}
填充时机:
public enum FieldFill {
    /**
     * 默认不处理
     */
    DEFAULT,
    /**
     * 插入填充字段
     */
    INSERT,
    /**
     * 更新填充字段
     */
    UPDATE,
    /**
     * 插入和更新填充字段
     */
    INSERT_UPDATE
}
3.4 执行sql打印:
3.4.1 依赖:
  <dependency>
    <groupId>p6spy</groupId>
     <artifactId>p6spy</artifactId>
     <version>3.9.1</version>
 </dependency>
3.4.2 驱动修改:
  datasource:
    driver-class-name: com.p6spy.engine.spy.P6SpyDriver
    url: jdbc:p6spy:h2:mem:test
tip : driver-class-name 和 url 都增加了 p6spy
3.4.3 定义 py.properties 配置:
#3.2.1以上使用
modulelist=com.baomidou.mybatisplus.extension.p6spy.MybatisPlusLogFactory,com.p6spy.engine.outage.P6OutageFactory
#3.2.1以下使用或者不配置
#modulelist=com.p6spy.engine.logging.P6LogFactory,com.p6spy.engine.outage.P6OutageFactory
# 自定义日志打印
logMessageFormat=com.baomidou.mybatisplus.extension.p6spy.P6SpyLogger
#日志输出到控制台
appender=com.baomidou.mybatisplus.extension.p6spy.StdoutLogger
# 使用日志系统记录 sql
#appender=com.p6spy.engine.spy.appender.Slf4JLogger
# 设置 p6spy driver 代理
deregisterdrivers=true
# 取消JDBC URL前缀
useprefix=true
# 配置记录 Log 例外,可去掉的结果集有error,info,batch,debug,statement,commit,rollback,result,resultset.
excludecategories=info,debug,result,commit,resultset
# 日期格式
dateformat=yyyy-MM-dd HH:mm:ss
# 实际驱动可多个
#driverlist=org.h2.Driver
# 是否开启慢SQL记录
outagedetection=true
# 慢SQL记录标准 2 秒
outagedetectioninterval=2
效果:

3.4.4 可选项 idea 对sql 美化插件 :
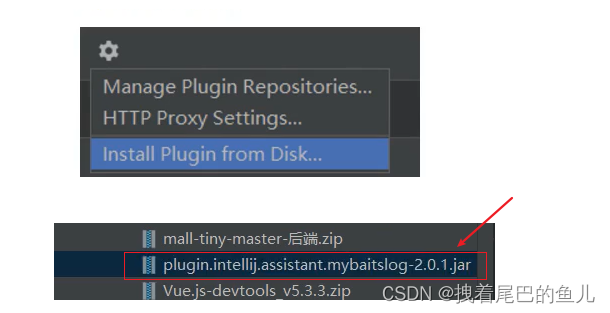
美化后 打印出来的sql 会进行格式化显示,而不是只在一行显示;
注意!
- driver-class-name 为 p6spy 提供的驱动类
- url 前缀为 jdbc:p6spy 跟着冒号为对应数据库连接地址
- 打印出 sql 为 null,在 excludecategories 增加 commit
- 批量操作不打印 sql,去除 excludecategories 中的 batch
- 批量操作打印重复的问题请使用 MybatisPlusLogFactory (3.2.1 新增)
- 该插件有性能损耗,不建议生产环境使用。
3.5 数据库安全保护:
对敏感的数据进行加密,如mysql 的连接,用户名,密码等:
public static void main(String[] args) {
    // 生成 16 位随机 AES 密钥
    String randomKey = AES.generateRandomKey();
    System.out.println("randomKey = " + randomKey);
    // 随机密钥加密
    String result = AES.encrypt("root", randomKey);
    System.out.println(result);
}
获得的randomKey 为加密的秘钥,通过改秘钥可以实现对敏感数据加密;
效果:

项目启动时完成对自定义的密文内容进行解密:
定义要解密的属性值注解:DecryptedValue
import java.lang.annotation.ElementType;
import java.lang.annotation.Retention;
import java.lang.annotation.RetentionPolicy;
import java.lang.annotation.Target;

@Retention(RetentionPolicy.RUNTIME)
@Target(ElementType.FIELD)
public @interface DecryptedValue {
    String value() default "";
}
在要加密的字段增加 DecryptedValue 注解:
@Value("${spring.datasource.username}")
@DecryptedValue("spring.datasource.username")
private String userName;

@Value("${spring.datasource.password}")
@DecryptedValue("spring.datasource.password")
private String passWord;
定义解密类:DataSourceDecryptionProcessor
import com.baomidou.mybatisplus.core.toolkit.AES;
import org.springframework.beans.BeansException;
import org.springframework.beans.factory.annotation.Value;
import org.springframework.beans.factory.config.BeanPostProcessor;
import org.springframework.core.annotation.AnnotationUtils;
import org.springframework.core.env.Environment;
import org.springframework.stereotype.Component;
import org.springframework.util.StringUtils;

import java.lang.reflect.Field;

@Component
public class DataSourceDecryptionProcessor implements BeanPostProcessor {
    @Value("${spring.datasource.key:xxxx}")
    private String dataSourceKey;

    private final Environment environment;

    public DataSourceDecryptionProcessor(Environment environment) {
        this.environment = environment;
    }

    @Override
    public Object postProcessBeforeInitialization(Object bean, String beanName) throws BeansException {
        Class<?> clazz = bean.getClass();
        do {
            for (Field field : clazz.getDeclaredFields()) {
                DecryptedValue decryptedValueAnnotation = AnnotationUtils.findAnnotation(field, DecryptedValue.class);
                if (decryptedValueAnnotation != null) {
                    String propertyValue = environment.getProperty(decryptedValueAnnotation.value());
                    if (!StringUtils.isEmpty(propertyValue)) {
                        field.setAccessible(true);
                        try {
                        	// 对加密的值进行解密处理
                            String value = AES.decrypt(propertyValue, dataSourceKey);
                            field.set(bean, value);
                        } catch (IllegalAccessException e) {
                            e.printStackTrace();
                        }
                    }
                }
            }
            clazz = clazz.getSuperclass();
        } while (clazz != null);
        return bean;
    }
}
3.6 数据库乐观锁:
添加插件:
@Bean
public MybatisPlusInterceptor mybatisPlusInterceptor() {
    MybatisPlusInterceptor interceptor = new MybatisPlusInterceptor();
    interceptor.addInnerInterceptor(new OptimisticLockerInnerInterceptor());
    return interceptor;
}
在实体类的字段上加上@Version注解:
@Version
private Integer version;
表中增加 version int 类型字段 ;
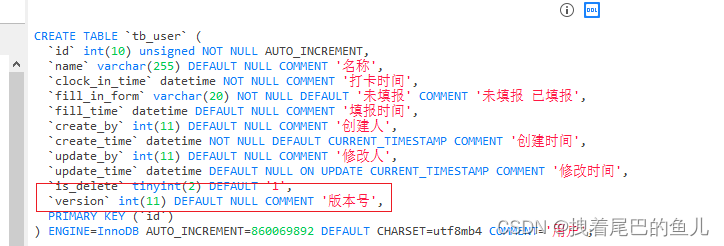
测试1 :
@Test
public void testLock() throws InterruptedException {
    CountDownLatch countDownLatch =new CountDownLatch(2);
    for (int i = 0; i < 2; i++) {
        int finalI = i;
        new Thread(()->{
            TbUser byId = userService.getById(860069891);
            byId.setName("lisi"+ finalI);
            try {
                Thread.sleep(2000);
            } catch (InterruptedException e) {
                countDownLatch.countDown();
                throw new RuntimeException(e);

            }
            userService.updateById(byId);
            countDownLatch.countDown();

        },"thread"+i).start();
    }

    countDownLatch.await();


}

测试2 :
@Test
public void testLock1() throws InterruptedException {
    TbUser byId1 = userService.getById(860069891);
    TbUser byId2 = userService.getById(860069891);
    byId1.setName("张飞1");
    System.out.println("userService.updateById(byId1) = " + userService.updateById(byId1));
    byId2.setName("赵云1");
    System.out.println("userService.updateById(byId2) = " + userService.updateById(byId2));


}

3.7 代码生成器:
用于快速生成 实体,service ,mapper 和controller ,方便业务开发;
3.7.1 springboot web 项目中 jar:
  <dependencies>
<dependency>
        <groupId>org.springframework.boot</groupId>
        <artifactId>spring-boot-starter</artifactId>
    </dependency>

    <dependency>
        <groupId>org.projectlombok</groupId>
        <artifactId>lombok</artifactId>
        <optional>true</optional>
    </dependency>
    <dependency>
        <groupId>org.springframework.boot</groupId>
        <artifactId>spring-boot-starter-test</artifactId>
        <scope>test</scope>
    </dependency>
    <dependency>
        <groupId>mysql</groupId>
        <artifactId>mysql-connector-java</artifactId>
        <version>8.0.18</version>
    </dependency>
    <dependency>
        <groupId>com.baomidou</groupId>
        <artifactId>mybatis-plus-boot-starter</artifactId>
        <version>3.1.1</version>
    </dependency>
    <!--代码生成器-->
    <dependency>
        <groupId>com.baomidou</groupId>
        <artifactId>mybatis-plus-generator</artifactId>
        <version>3.1.1</version>
    </dependency>
    <dependency>
        <groupId>org.freemarker</groupId>
        <artifactId>freemarker</artifactId>
        <version>2.3.28</version>
    </dependency>
    <!--代码生成器-->
</dependencies>
3.7.2 定义业务类生成:
package com.example.mybatiscodegenerage;

import com.baomidou.mybatisplus.core.exceptions.MybatisPlusException;
import com.baomidou.mybatisplus.core.toolkit.StringPool;
import com.baomidou.mybatisplus.generator.AutoGenerator;
import com.baomidou.mybatisplus.generator.InjectionConfig;
import com.baomidou.mybatisplus.generator.config.*;
import com.baomidou.mybatisplus.generator.config.po.TableInfo;
import com.baomidou.mybatisplus.generator.config.rules.DateType;
import com.baomidou.mybatisplus.generator.config.rules.NamingStrategy;
import com.baomidou.mybatisplus.generator.engine.FreemarkerTemplateEngine;
import org.springframework.util.StringUtils;

import java.util.ArrayList;
import java.util.List;
import java.util.Scanner;

public class GenerateCode {
    /**
     * <p>
     * 读取控制台内容
     * </p>
     */
    public static String scanner(String tip) {
        Scanner scanner = new Scanner(System.in);
        StringBuilder help = new StringBuilder();
        help.append("请输入" + tip + ":");
        System.out.println(help.toString());
        if (scanner.hasNext()) {
            String ipt = scanner.next();
            if (StringUtils.hasText(ipt)) {
                return ipt;
            }
        }
        throw new MybatisPlusException("请输入正确的" + tip + "!");
    }

    public static void main(String[] args) {
        // 代码生成器
        AutoGenerator mpg = new AutoGenerator();

        // 全局配置
        GlobalConfig gc = new GlobalConfig();
        // 当前项目路径获取
        String projectPath = System.getProperty("user.dir");
        // 输出目录
        gc.setOutputDir(projectPath + "/spring-batch/src/main/java");
        // 设置作者
        gc.setAuthor("jobob");
        // 代码生成后是不是需要打开所在文件夹
        gc.setOpen(false);
        // 是否生成 Swagger2 注解
        // gc.setSwagger2(true); 实体属性 Swagger2 注解
        // 是否在xml 中生成映射所有字段的BaseResultMap
        //gc.setBaseResultMap(true);
        // 相同文件生成覆盖
        gc.setFileOverride(true);
        // 生成代码的时间格式
        gc.setDateType(DateType.ONLY_DATE);
        // https://baomidou.com/pages/061573/#datetype
        // 用表的名字直接生成实体,%s 表名 不加Entity 后缀
       // gc.setEntityName("%s");
        // Mapper 接口名 %sMapper 表名+Mapper
       //  gc.setMapperName("%sMapper");
        // Mapper.xml 生成文件名,表名+Mapper.xml
        // gc.setXmlName("%sMapper");
        //Service 接口名称 表名+ Service
        // gc.setServiceName("%sService")
        //Service 接口实现类名称 表名+ ImplService
        // gc.setServiceImplName("%sImplService");
        // 设置到全局配置中
        mpg.setGlobalConfig(gc);

        // 数据源配置
        DataSourceConfig dsc = new DataSourceConfig();
        dsc.setUrl("jdbc:mysql://localhost:3406/mybatis?useUnicode=true&characterEncoding=UTF-8&allowMultiQueries=true&useAffectedRows=true&useSSL=false&zeroDateTimeBehavior=convertToNull&serverTimezone=GMT%2B8");
        // dsc.setSchemaName("public");
//        dsc.setDriverName("com.mysql.jdbc.Driver");
        dsc.setDriverName("com.mysql.cj.jdbc.Driver");
        dsc.setUsername("root");
        dsc.setPassword("ddsoft");
        mpg.setDataSource(dsc);

        // 包配置
        PackageConfig pc = new PackageConfig();
        // 如 com.xxx.xxx.user ,com.xxx.xxx 为包名, user 为模块名称
        // 设置模块名称
        pc.setModuleName(scanner("模块名"));
        // 设置包名字
        pc.setParent("com.baomidou.ant");
        mpg.setPackageInfo(pc);

        // 自定义配置 自定义属性
        InjectionConfig cfg = new InjectionConfig() {
            @Override
            public void initMap() {
                // to do nothing
            }
        };

        // 如果模板引擎是 freemarker
        String templatePath = "/templates/mapper.xml.ftl";
        // 如果模板引擎是 velocity
        // String templatePath = "/templates/mapper.xml.vm";

        // 自定义输出配置
        List<FileOutConfig> focList = new ArrayList<>();
        // 自定义配置会被优先输出 mapper.xml 文件位置设置
        focList.add(new FileOutConfig(templatePath) {
            @Override
            public String outputFile(TableInfo tableInfo) {
                // 自定义输出文件名 , 如果你 Entity 设置了前后缀、此处注意 xml 的名称会跟着发生变化!!
                return projectPath + "/spring-batch/src/main/resources/mapper/" + pc.getModuleName()
                        + "/" + tableInfo.getEntityName() + "Mapper" + StringPool.DOT_XML;
            }
        });
        /*
        cfg.setFileCreate(new IFileCreate() {
            @Override
            public boolean isCreate(ConfigBuilder configBuilder, FileType fileType, String filePath) {
                // 判断自定义文件夹是否需要创建
                checkDir("调用默认方法创建的目录,自定义目录用");
                if (fileType == FileType.MAPPER) {
                    // 已经生成 mapper 文件判断存在,不想重新生成返回 false
                    return !new File(filePath).exists();
                }
                // 允许生成模板文件
                return true;
            }
        });
        */
        // 设置自定义配置
        cfg.setFileOutConfigList(focList);
        mpg.setCfg(cfg);

        // 配置模板
        TemplateConfig templateConfig = new TemplateConfig();

        // 配置自定义输出模板
        //指定自定义模板路径,注意不要带上.ftl/.vm, 会根据使用的模板引擎自动识别
        // templateConfig.setEntity("templates/entity2.java");
        // templateConfig.setService();
        // templateConfig.setController();
        // 把 已有的生成在代码层面的xml 配置失效
        templateConfig.setXml(null);
        mpg.setTemplate(templateConfig);

        // 策略配置,数据库表配置
        StrategyConfig strategy = new StrategyConfig();
        //数据库表映射到实体的命名策略 下划线转驼峰
        strategy.setNaming(NamingStrategy.underline_to_camel);
        //数据库表字段映射到实体类的命名策略
        strategy.setColumnNaming(NamingStrategy.underline_to_camel);
        //自定义继承entity类,添加这一个会在生成实体类的时候继承entity
        //strategy.setSuperEntityClass("com.wy.testCodeGenerator.entity");
        //实体是否为lombok模型
        strategy.setEntityLombokModel(true);
        //生成@RestController控制器
        strategy.setRestControllerStyle(true);
        // 公共父类  Controller 是否有父类
        // strategy.setSuperControllerClass("你自己的父类控制器,没有就不用设置!");
        // 写于父类中的公共字段
        // strategy.setSuperEntityColumns("id");
        // 如果想按照前缀生成 setTablePrefix("pms_")
//        strategy.setTablePrefix("pms_");
        strategy.setInclude(scanner("表名,多个英文逗号分割").split(","));
        // 驼峰转连字符串  RestController 中的mapper 路径设置 设置了则生成 表名的路径如 pmp_user
        strategy.setControllerMappingHyphenStyle(true);
        // 表前缀 如 pms_xxx 生成的类就不带pms
//        strategy.setTablePrefix( "pms");
        strategy.setTablePrefix(pc.getModuleName() + "_");
        mpg.setStrategy(strategy);
        mpg.setTemplateEngine(new FreemarkerTemplateEngine());
        mpg.execute();
    }
}
3.7.3 运行业务类生成:

总结:
本文对Spring-boot Mybatis-plus 常用的CRUD api 及常用的插件进行整理。
参考:
Mybatis-plus 官网;

![详解[ZJCTF 2019]NiZhuanSiWei 1(PHP两种伪协议、PHP反序列化漏洞、PHP强比较)还有那道题有这么经典?](https://img-blog.csdnimg.cn/img_convert/e5c484fa787d24258de113ac9b6db7a5.png)
