硬件平台:
1、firefly安装Ubuntu系统的RK3588;
2、安装Windows系统的电脑一台,其上安装Ubuntu18.04系统虚拟机。
参考手册:《00-Rockchip_RKNPU_User_Guide_RKNN_API_V1.3.0_CN》
《RKNN Toolkit Lite2 用户使用指南》
1、文字检测
项目地址:
GitHub - WenmuZhou/PytorchOCR: 基于Pytorch的OCR工具库,支持常用的文字检测和识别算法
DBNet(Dynamic-Link Bi-directional Network)是一种用于文本检测的深度学习模型。该模型于2019年由Minghui Liao等人提出,并在文本检测领域取得了显著的成果。DBNet的设计目标是在保持高精度的同时,提高文本检测的效率。传统的文本检测模型通常使用单向的横向连接或纵向连接来处理文本实例。然而,这种单向连接可能导致信息的不完整传递或信息冗余,影响了检测性能和速度。
为了解决这些问题,DBNet引入了双向动态连接机制,允许横向和纵向两个方向上的信息流动。具体来说,DBNet由两个关键组成部分构成:
(1) Bi-directional FFM(Feature Fusion Module):这是DBNet的核心组件之一。它包括横向和纵向两个方向的子模块。在横向子模块中,DBNet通过可变形卷积(deformable convolution)从不同尺度的特征图中提取并融合文本实例的特征。而在纵向子模块中,DBNet使用自适应的特征选择机制,动态选择最具有代表性的特征。这些子模块的组合使得文本实例的特征能够全面而高效地进行建模。
(2) Aggregation Decoder:这是DBNet的另一个重要组件,用于从特征图中生成文本实例的边界框和对应的文本分数。该解码器结合了横向和纵向的特征,通过逐步聚合来预测文本的位置和形状。由于使用了双向动态连接,解码器能够更准确地还原文本实例的形态。
DBNet的训练过程包括前向传播和反向传播。在前向传播中,DBNet将图像输入网络,经过一系列卷积、特征融合和解码操作,得到文本检测的结果。然后,通过计算预测结果和真实标签之间的损失函数,使用反向传播算法来更新网络参数,从而不断优化模型的性能。
DBNet在文本检测任务中取得了非常好的效果。其双向动态连接机制允许更好地利用横向和纵向的信息,提高了文本检测的准确性和鲁棒性。此外,相比传统的文本检测模型,DBNet在保持高精度的情况下,大幅提升了检测速度,使得它在实际应用中更具可用性和实用性。因此,DBNet在文字检测、自动化办公、图像识别等领域都具有广泛的应用前景。论文地址:https://arxiv.org/abs/1911.08947
 图1. DBNet网络结构
2、文字识别
项目地址:
GitHub - WenmuZhou/PytorchOCR: 基于Pytorch的OCR工具库,支持常用的文字检测和识别算法
CRNN(Convolutional Recurrent Neural Network)是一种深度学习模型,结合了卷积神经网络(CNN)和循环神经网络(RNN)的优势,广泛应用于图像文本识别(OCR)任务。CRNN模型于2015年由Baoguang Shi等人首次提出,并在OCR领域取得了显著的突破。
CRNN的设计思想是将卷积神经网络用于图像的特征提取,并利用循环神经网络来对序列建模,从而使得CRNN能够直接从图像级别到序列级别进行端到端的学习。
CRNN模型通常由以下几个部分组成:
(1) 卷积层(Convolutional Layers):CRNN利用多个卷积层来提取图像中的局部特征。这些卷积层可以学习不同层次的图像表示,从低级特征(如边缘和纹理)到高级特征(如形状和模式)。
(2) RNN层(Recurrent Layers):在卷积层后面,CRNN采用RNN层来处理序列数据。RNN能够捕捉序列的上下文信息,因此对于OCR任务而言,它可以有效地处理不同长度的文本序列。
(3) 转录层(Transcription Layer):在RNN层之后,CRNN使用转录层来将RNN输出映射到字符类别。这通常是一个全连接层,将RNN输出映射到预定义的字符集合,从而实现对文本的识别。
CRNN的训练过程包括两个主要步骤:前向传播和反向传播。在前向传播中,CRNN将图像输入模型,经过卷积和循环层,最终得到文本序列的预测。然后,通过计算预测结果和真实标签之间的损失函数,使用反向传播算法来更新网络参数,从而使得模型的预测结果逐渐接近真实标签。
CRNN在OCR领域的应用广泛,能够识别不同尺寸、字体、颜色和背景的文本。它在识别长文本序列方面表现优秀,并且由于端到端的设计,避免了传统OCR系统中复杂的流水线处理。因此,CRNN在很多实际场景中都取得了很好的效果,如车牌识别、文字检测和手写体识别等。
总结来说,CRNN是一种将CNN和RNN结合起来的深度学习模型,用于图像文本识别任务。其端到端的设计、优秀的序列建模能力和在OCR领域的广泛应用,使得CRNN成为了一种重要的OCR模型,为自动化文本处理和识别带来了巨大的便利。论文地址:https://arxiv.org/abs/1507.05717
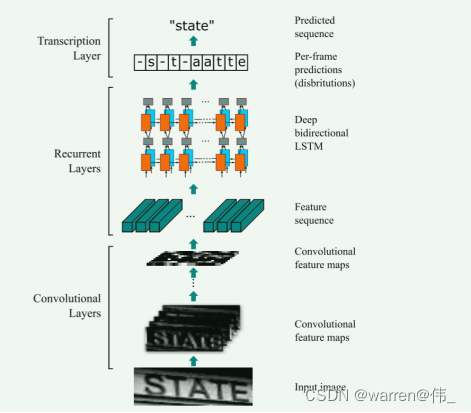
图2. CRNN结构
环境搭建
rknn-toolkit以及rknpu_sdk环境搭建
(手把手)rknn-toolkit以及rknpu_sdk环境搭建--以rk3588为例_warren@伟_的博客-CSDN博客
模型的导出与验证
文字检测
导出onnx模型
'''

Author: warren

Date: 2023-06-07 14:52:27

LastEditors: warren

LastEditTime: 2023-06-12 15:20:28

FilePath: /warren/VanillaNet1/export_onnx.py

Description: export onnx model


Copyright (c) 2023 by ${git_name_email}, All Rights Reserved.

'''

#!/usr/bin/env python3

import torch

from torchocr.networks import build_model

MODEL_PATH='./model/det_db_mbv3_new.pth'

DEVICE='cuda:0' if torch.cuda.is_available() else 'cpu'

print("-----------------------devices",DEVICE)


class DetInfer:

    def __init__(self, model_path):

        ckpt = torch.load(model_path, map_location=DEVICE)

        cfg = ckpt['cfg']

        self.model = build_model(cfg['model'])

        state_dict = {}

        for k, v in ckpt['state_dict'].items():

            state_dict[k.replace('module.', '')] = v

        self.model.load_state_dict(state_dict)

        self.device = torch.device(DEVICE)

        self.model.to(self.device)

        self.model.eval()


        checkpoint = torch.load(MODEL_PATH, map_location=DEVICE)


        # Prepare input tensor

        input = torch.randn(1, 3, 640, 640, requires_grad=False).float().to(torch.device(DEVICE))


        # Export the torch model as onnx

        print("-------------------export")

        torch.onnx.export(self.model,

            input,

            'detect_model_small.onnx', # name of the exported onnx model

            export_params=True,

            opset_version=12,

            do_constant_folding=False)


# Load the pretrained model and export it as onnx

model = DetInfer(MODEL_PATH)
验证
import numpy as np

import cv2

import torch

from torchvision import transforms

# from label_convert import CTCLabelConverter

import cv2

import numpy as np

import pyclipper

from shapely.geometry import Polygon

import onnxruntime


class DBPostProcess():

    def __init__(self, thresh=0.3, box_thresh=0.7, max_candidates=1000, unclip_ratio=2):

        self.min_size = 3

        self.thresh = thresh

        self.box_thresh = box_thresh

        self.max_candidates = max_candidates

        self.unclip_ratio = unclip_ratio


    def __call__(self, pred, h_w_list, is_output_polygon=False):

        '''

        batch: (image, polygons, ignore_tags

        h_w_list: 包含[h,w]的数组

        pred:

            binary: text region segmentation map, with shape (N, 1,H, W)

        '''

        pred = pred[:, 0, :, :]

        segmentation = self.binarize(pred)

        boxes_batch = []

        scores_batch = []

        for batch_index in range(pred.shape[0]):

            height, width = h_w_list[batch_index]

            boxes, scores = self.post_p(pred[batch_index], segmentation[batch_index], width, height,

                                        is_output_polygon=is_output_polygon)

            boxes_batch.append(boxes)

            scores_batch.append(scores)

        return boxes_batch, scores_batch


    def binarize(self, pred):

        return pred > self.thresh


    def post_p(self, pred, bitmap, dest_width, dest_height, is_output_polygon=False):

        '''

        _bitmap: single map with shape (H, W),

            whose values are binarized as {0, 1}

        '''

        height, width = pred.shape

        boxes = []

        new_scores = []

        # bitmap = bitmap.cpu().numpy()

        if cv2.__version__.startswith('3'):

            _, contours, _ = cv2.findContours((bitmap * 255).astype(np.uint8), cv2.RETR_LIST, cv2.CHAIN_APPROX_SIMPLE)

        if cv2.__version__.startswith('4'):

            contours, _ = cv2.findContours((bitmap * 255).astype(np.uint8), cv2.RETR_LIST, cv2.CHAIN_APPROX_SIMPLE)

        for contour in contours[:self.max_candidates]:

            epsilon = 0.005 * cv2.arcLength(contour, True)

            approx = cv2.approxPolyDP(contour, epsilon, True)

            points = approx.reshape((-1, 2))

            if points.shape[0] < 4:

                continue

            score = self.box_score_fast(pred, contour.squeeze(1))

            if self.box_thresh > score:

                continue

            if points.shape[0] > 2:

                box = self.unclip(points, unclip_ratio=self.unclip_ratio)

                if len(box) > 1:

                    continue

            else:

                continue

            four_point_box, sside = self.get_mini_boxes(box.reshape((-1, 1, 2)))

            if sside < self.min_size + 2:

                continue

            if not isinstance(dest_width, int):

                dest_width = dest_width.item()

                dest_height = dest_height.item()

            if not is_output_polygon:

                box = np.array(four_point_box)

            else:

                box = box.reshape(-1, 2)

            box[:, 0] = np.clip(np.round(box[:, 0] / width * dest_width), 0, dest_width)

            box[:, 1] = np.clip(np.round(box[:, 1] / height * dest_height), 0, dest_height)

            boxes.append(box)

            new_scores.append(score)

        return boxes, new_scores


    def unclip(self, box, unclip_ratio=1.5):

        poly = Polygon(box)

        distance = poly.area * unclip_ratio / poly.length

        offset = pyclipper.PyclipperOffset()

        offset.AddPath(box, pyclipper.JT_ROUND, pyclipper.ET_CLOSEDPOLYGON)

        expanded = np.array(offset.Execute(distance))

        return expanded


    def get_mini_boxes(self, contour):

        bounding_box = cv2.minAreaRect(contour)

        points = sorted(list(cv2.boxPoints(bounding_box)), key=lambda x: x[0])


        index_1, index_2, index_3, index_4 = 0, 1, 2, 3

        if points[1][1] > points[0][1]:

            index_1 = 0

            index_4 = 1

        else:

            index_1 = 1

            index_4 = 0

        if points[3][1] > points[2][1]:

            index_2 = 2

            index_3 = 3

        else:

            index_2 = 3

            index_3 = 2


        box = [points[index_1], points[index_2], points[index_3], points[index_4]]

        return box, min(bounding_box[1])


    def box_score_fast(self, bitmap, _box):

        # bitmap = bitmap.detach().cpu().numpy()

        h, w = bitmap.shape[:2]

        box = _box.copy()

        xmin = np.clip(np.floor(box[:, 0].min()).astype(np.int), 0, w - 1)

        xmax = np.clip(np.ceil(box[:, 0].max()).astype(np.int), 0, w - 1)

        ymin = np.clip(np.floor(box[:, 1].min()).astype(np.int), 0, h - 1)

        ymax = np.clip(np.ceil(box[:, 1].max()).astype(np.int), 0, h - 1)


        mask = np.zeros((ymax - ymin + 1, xmax - xmin + 1), dtype=np.uint8)

        box[:, 0] = box[:, 0] - xmin

        box[:, 1] = box[:, 1] - ymin

        cv2.fillPoly(mask, box.reshape(1, -1, 2).astype(np.int32), 1)

        return cv2.mean(bitmap[ymin:ymax + 1, xmin:xmax + 1], mask)[0]

def narrow_224_32(image, expected_size=(224,32)):

    ih, iw = image.shape[0:2]

    ew, eh = expected_size

    # scale = eh / ih

    scale = min((eh/ih),(ew/iw))

    # scale = eh / max(iw,ih)

    nh = int(ih * scale)

    nw = int(iw * scale)

    image = cv2.resize(image, (nw, nh), interpolation=cv2.INTER_CUBIC)


    top = 0

    bottom = eh - nh

    left = 0

    right = ew - nw


    new_img = cv2.copyMakeBorder(image, top, bottom, left, right, cv2.BORDER_CONSTANT, value=(114, 114, 114))

    return image,new_img

def draw_bbox(img_path, result, color=(0, 0, 255), thickness=2):

    import cv2

    if isinstance(img_path, str):

        img_path = cv2.imread(img_path)

        # img_path = cv2.cvtColor(img_path, cv2.COLOR_BGR2RGB)

    img_path = img_path.copy()

    for point in result:

        point = point.astype(int)

        cv2.polylines(img_path, [point], True, color, thickness)

    return img_path


if __name__ == '__main__':

    onnx_model = onnxruntime.InferenceSession("detect_model_small.onnx")

    input_name = onnx_model.get_inputs()[0].name

    # Set inputs

    img = cv2.imread('./pic/6.jpg')

    img0 , image= narrow_224_32(img,expected_size=(640,640))


    transform_totensor = transforms.ToTensor()

    tensor=transform_totensor(image)

    tensor_nor=transforms.Normalize(mean=[0.485, 0.456, 0.406], std=[0.229, 0.224, 0.225])

    tensor=tensor_nor(tensor)

    tensor = np.array(tensor,dtype=np.float32).reshape(1,3,640,640)


    post_proess = DBPostProcess()

    is_output_polygon = False

    #run

    outputs = onnx_model.run(None, {input_name:tensor})

    #post process

    feat_2 = torch.from_numpy(outputs[0])

    print(feat_2.size())

    box_list, score_list = post_proess(outputs[0], [image.shape[:2]], is_output_polygon=is_output_polygon)

    box_list, score_list = box_list[0], score_list[0]

    if len(box_list) > 0:

        idx = [x.sum() > 0 for x in box_list]

        box_list = [box_list[i] for i, v in enumerate(idx) if v]

        score_list = [score_list[i] for i, v in enumerate(idx) if v]

    else:

        box_list, score_list = [], []

    print("-----------------box list",box_list)

    img = draw_bbox(image, box_list)

    img = img[0:img0.shape[0],0:img0.shape[1]]

    print("============save pic")

    img1=np.array(img,dtype=np.uint8).reshape(640,640,3)

    cv2.imwrite("img.jpg",img1)

    cv2.waitKey()

文字识别
onnx模型导出
#!/usr/bin/env python3

import os

import sys

import pathlib

# 将 torchocr路径加到python路径里

__dir__ = pathlib.Path(os.path.abspath(__file__))

import numpy as np

sys.path.append(str(__dir__))

sys.path.append(str(__dir__.parent.parent))

import torch

from torchocr.networks import build_model


MODEL_PATH='./model/ch_rec_moblie_crnn_mbv3.pth'

DEVICE='cuda:0' if torch.cuda.is_available() else 'cpu'

print("-----------------------devices",DEVICE)


class RecInfer:

    def __init__(self, model_path, batch_size=1):

        ckpt = torch.load(model_path, map_location=DEVICE)

        cfg = ckpt['cfg']

        self.model = build_model(cfg['model'])

        state_dict = {}

        for k, v in ckpt['state_dict'].items():

            state_dict[k.replace('module.', '')] = v

        self.model.load_state_dict(state_dict)

        self.batch_size = batch_size

        self.device = torch.device(DEVICE)

        self.model.to(self.device)

        self.model.eval()

# Prepare input tensor

        input = torch.randn(1, 3, 32, 224, requires_grad=False).float().to(torch.device(DEVICE))

# Export the torch model as onnx

        print("-------------------export")

        torch.onnx.export(self.model,

            input,

            'rego_model_small.onnx',

            export_params=True,

            opset_version=12,

            do_constant_folding=False)


# Load the pretrained model and export it as onnx

model = RecInfer(MODEL_PATH)
验证
import onnxruntime

import numpy as np

import cv2

import torch

DEVICE='cuda:0' if torch.cuda.is_available() else 'cpu'

IMG_WIDTH=448

ONNX_MODEL='./onnx_model/repvgg_s.onnx'

LABEL_FILE='/root/autodl-tmp/warren/PytorchOCR_OLD/torchocr/datasets/alphabets/dict_text.txt'

#ONNX_MODEL='./onnx_model/rego_model_small.onnx'

#LABEL_FILE='/root/autodl-tmp/warren/PytorchOCR_OLD/torchocr/datasets/alphabets/ppocr_keys_v1.txt'

PIC='./pic/img.jpg'


class CTCLabelConverter(object):

    """ Convert between text-label and text-index """


    def __init__(self, character):

        # character (str): set of the possible characters.

        dict_character = []

        with open(character, "rb") as fin:

            lines = fin.readlines()

            for line in lines:

                line = line.decode('utf-8').strip("\n").strip("\r\n")

                dict_character += list(line)

        self.dict = {}

        for i, char in enumerate(dict_character):

            # NOTE: 0 is reserved for 'blank' token required by CTCLoss

            self.dict[char] = i + 1

        #TODO replace ‘ ’ with special symbol

        self.character = ['[blank]'] + dict_character+[' ']  # dummy '[blank]' token for CTCLoss (index 0)


    def decode(self, preds, raw=False):

        """ convert text-index into text-label. """

        preds_idx = preds.argmax(axis=2)

        preds_prob = preds.max(axis=2)

        result_list = []

        for word, prob in zip(preds_idx, preds_prob):

            if raw:

                result_list.append((''.join([self.character[int(i)] for i in word]), prob))

            else:

                result = []

                conf = []

                for i, index in enumerate(word):

                    if word[i] != 0 and (not (i > 0 and word[i - 1] == word[i])):

                        result.append(self.character[int(index)])

                        conf.append(prob[i])

                result_list.append((''.join(result), conf))

        return result_list


def decode(preds, raw=False):

    """ convert text-index into text-label. """

    dict_character = []

    dict = {}

    character=LABEL_FILE

    with open(character, "rb") as fin:

        lines = fin.readlines()

        for line in lines:

            line = line.decode('utf-8').strip("\n").strip("\r\n")

            dict_character += list(line)

    for i, char in enumerate(dict_character):

        # NOTE: 0 is reserved for 'blank' token required by CTCLoss

        dict[char] = i + 1

        #TODO replace ‘ ’ with special symbol

        character = ['[blank]'] + dict_character+[' ']  # dummy '[blank]' token for CTCLoss (index 0)

    preds_idx = preds.argmax(axis=2)

    preds_prob = preds.max(axis=2)

    result_list = []

    for word, prob in zip(preds_idx, preds_prob):

        if raw:

            result_list.append((''.join([character[int(i)] for i in word]), prob))

        else:

            result = []

            conf = []

            for i, index in enumerate(word):

                if word[i] != 0 and (not (i > 0 and word[i - 1] == word[i])):

                    result.append(character[int(index)])

                    conf.append(prob[i])

            result_list.append((''.join(result), conf))

    return result_list


def width_pad_img(_img, _target_width, _pad_value=0):

        _height, _width, _channels = _img.shape

        to_return_img = np.ones([_height, _target_width, _channels], dtype=_img.dtype) * _pad_value

        to_return_img[:_height, :_width, :] = _img

        return to_return_img

def resize_with_specific_height(_img):

        resize_ratio = 32 / _img.shape[0]

        return cv2.resize(_img, (0, 0), fx=resize_ratio, fy=resize_ratio, interpolation=cv2.INTER_LINEAR)

def normalize_img(_img):

        return (_img.astype(np.float32) / 255 - 0.5) / 0.5


if __name__ == '__main__':

    onnx_model = onnxruntime.InferenceSession(ONNX_MODEL)

    input_name = onnx_model.get_inputs()[0].name

    # Set inputs

    imgs = cv2.imread(PIC)

    if not isinstance(imgs,list):

        imgs = [imgs]

    imgs = [normalize_img(resize_with_specific_height(img)) for img in imgs]

    widths = np.array([img.shape[1] for img in imgs])

    idxs = np.argsort(widths)

    txts = []

    label_convert=CTCLabelConverter(LABEL_FILE)

    for idx in range(len(imgs)):

        batch_idxs = idxs[idx:min(len(imgs), idx+1)]

        batch_imgs = [width_pad_img(imgs[idx],IMG_WIDTH) for idx in batch_idxs]

        batch_imgs = np.stack(batch_imgs)

        print(batch_imgs.shape)

        tensor =batch_imgs.transpose([0,3, 1, 2]).astype(np.float32)

        out = onnx_model.run(None, {input_name:tensor})

        tensor_out = torch.tensor(out)

        tensor_out = torch.squeeze(tensor_out,dim=1)

        softmax_output = tensor_out.softmax(dim=2)

        print("---------------out shape is",softmax_output.shape)

        txts.extend([label_convert.decode(np.expand_dims(txt, 0)) for txt in softmax_output])

    idxs = np.argsort(idxs)

    out_txts = [txts[idx] for idx in idxs]

    import sys

    import codecs


    sys.stdout = codecs.getwriter("utf-8")(sys.stdout.detach())

print(out_txts)![]()
至此 导出验证成功
rk3588板端部署
转化为rknn模型
from rknn.api import RKNN

ONNX_MODEL = 'xxx.onnx'
RKNN_MODEL = 'xxxx.rknn'
DATASET = './dataset.txt'

if __name__ == '__main__':

    # Create RKNN object
    rknn = RKNN(verbose=True)

    # pre-process config
    print('--> Config model')
    ret=rknn.config(mean_values=[[0, 0, 0]], std_values=[[0, 0, 0]],target_platform='rk3588')  #wzw
    if ret != 0:
        print('config model failed!')
        exit(ret)
    print('done')

    # Load ONNX model
    print('--> Loading model')
    ret = rknn.load_onnx(model=ONNX_MODEL, outputs=['output', '345', '346'])
    if ret != 0:
        print('Load model failed!')
        exit(ret)
    print('done')

    # Build model
    print('--> Building model')
    ret = rknn.build(do_quantization=True, dataset=DATASET)
    #ret = rknn.build(do_quantization=False)
    if ret != 0:
        print('Build model failed!')
        exit(ret)
    print('done')

    # Export RKNN model
    print('--> Export rknn model')
    ret = rknn.export_rknn(RKNN_MODEL)
    if ret != 0:
        print('Export rknn model failed!')
        exit(ret)
    print('done')
    #release rknn
    rknn.release()
使用pyqt进行开发
5.4 PyQt软件设计
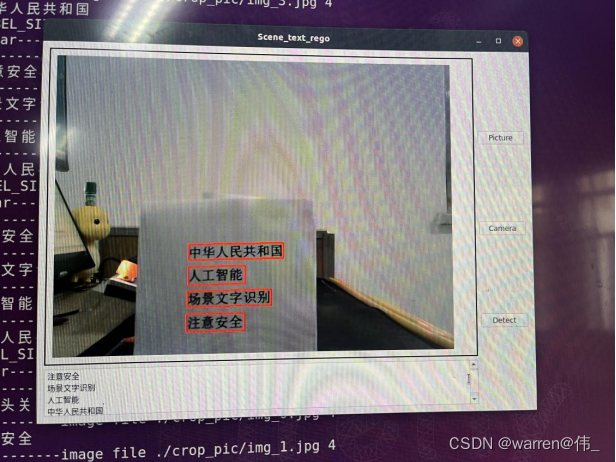
使用pyqt进行开发,ui界面如图所示

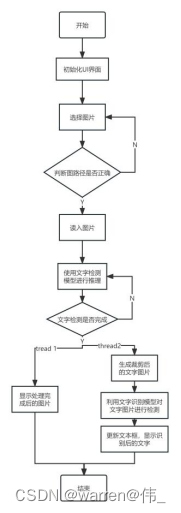
该界面包含了三个功能按钮,其中包裹一个选择静态图片,一个使用相机,一个检测按钮,TextEdit用于显示识别结果,label用于显示处理完成后的图片。
软件流程图如下:
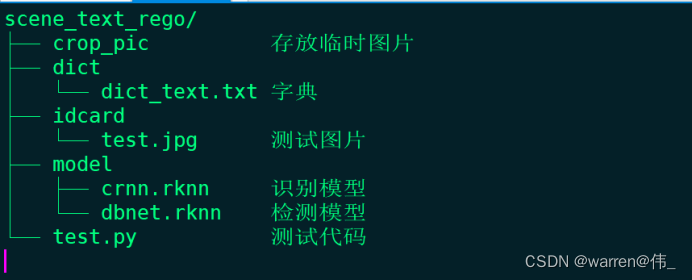
总体目录参照
下面依次介绍图片检测的相关代码:
import platform

import sys

import cv2

import numpy as np

import torch

import pyclipper

from shapely.geometry import Polygon

from torchvision import transforms

import time

import os

import glob

import threading

from PyQt5.QtGui import *

from PyQt5.QtWidgets import *

from PyQt5.QtCore import *

import platform

from rknnlite.api import RKNNLite

import os

os.environ.pop("QT_QPA_PLATFORM_PLUGIN_PATH")

DETECT_MODEL = './model/model_small.rknn'

REGO_MODEL='./model/repvgg_s.rknn'

LABEL_FILE='./dict/dict_text.txt'

LABEL_SIZE_PRIVIOUS=0

LABEL_SIZE_LATTER=0

# 文件夹路径

folder_path = './crop_pic'

# 使用 glob 来获取所有图片文件的路径

image_files = glob.glob(os.path.join(folder_path, '*.png')) + glob.glob(os.path.join(folder_path, '*.jpg'))


def  resize_img_self(image,reszie_size=(0,0)):

    ih,iw=image.shape[0:2]

    ew,eh=reszie_size

    scale=eh/ih

    width=int(iw*scale)

    height=int(ih*scale)

    if height!=eh:

        height=eh

    image=cv2.resize(image,(width,height),interpolation=cv2.INTER_LINEAR)

    top = 0

    bottom = 0

    left = 0

    right = ew-width

    new_img = cv2.copyMakeBorder(image, top, bottom, left, right, cv2.BORDER_CONSTANT, value=(114, 114, 114))

    #print("new image shape",new_img.shape)

    return new_img

def narrow_224_32(image, expected_size=(224,32)):

    ih, iw = image.shape[0:2]

    ew, eh = expected_size

    # scale = eh / ih

    scale = min((eh/ih),(ew/iw))

    # scale = eh / max(iw,ih)

    nh = int(ih * scale)

    nw = int(iw * scale)

    image = cv2.resize(image, (nw, nh), interpolation=cv2.INTER_CUBIC)


    top = 0

    bottom = eh - nh

    left = 0

    right = ew - nw


    new_img = cv2.copyMakeBorder(image, top, bottom, left, right, cv2.BORDER_CONSTANT, value=(114, 114, 114))

    return image,new_img

def draw_bbox(img_path, result, color=(0, 0, 255), thickness=2):

    import cv2

    if isinstance(img_path, str):

        img_path = cv2.imread(img_path)

        # img_path = cv2.cvtColor(img_path, cv2.COLOR_BGR2RGB)

    img_path = img_path.copy()

    for point in result:

        point = point.astype(int)

        cv2.polylines(img_path, [point], True, color, thickness)

    return img_path

def delay_milliseconds(milliseconds):

    seconds = milliseconds / 1000.0

    time.sleep(seconds)


""" Convert between text-label and text-index """

class CTCLabelConverter(object):

    def __init__(self, character):

        # character (str): set of the possible characters.

        dict_character = []

        with open(character, "rb") as fin:

            lines = fin.readlines()

            for line in lines:

                line = line.decode('utf-8').strip("\n").strip("\r\n")

                dict_character += list(line)

        self.dict = {}

        for i, char in enumerate(dict_character):

            # NOTE: 0 is reserved for 'blank' token required by CTCLoss

            self.dict[char] = i + 1

        #TODO replace ‘ ’ with special symbol

        self.character = ['[blank]'] + dict_character+[' ']  # dummy '[blank]' token for CTCLoss (index 0)


    def decode(self, preds, raw=False):

        """ convert text-index into text-label. """

        preds_idx = preds.argmax(axis=2)

        preds_prob = preds.max(axis=2)

        result_list = []

        for word, prob in zip(preds_idx, preds_prob):

            if raw:

                result_list.append((''.join([self.character[int(i)] for i in word]), prob))

            else:

                result = []

                conf = []

                for i, index in enumerate(word):

                    if word[i] != 0 and (not (i > 0 and word[i - 1] == word[i])):

                        result.append(self.character[int(index)])

                        #conf.append(prob[i])

                #result_list.append((''.join(result), conf))

                result_list.append((''.join(result)))

        return result_list

class DBPostProcess():

    def __init__(self, thresh=0.3, box_thresh=0.7, max_candidates=1000, unclip_ratio=2):

        self.min_size = 3

        self.thresh = thresh

        self.box_thresh = box_thresh

        self.max_candidates = max_candidates

        self.unclip_ratio = unclip_ratio


    def __call__(self, pred, h_w_list, is_output_polygon=False):

        pred = pred[:, 0, :, :]

        segmentation = self.binarize(pred)

        boxes_batch = []

        scores_batch = []

        for batch_index in range(pred.shape[0]):

            height, width = h_w_list[batch_index]

            boxes, scores = self.post_p(pred[batch_index], segmentation[batch_index], width, height,

                                        is_output_polygon=is_output_polygon)

            boxes_batch.append(boxes)

            scores_batch.append(scores)

        return boxes_batch, scores_batch


    def binarize(self, pred):

        return pred > self.thresh


    def post_p(self, pred, bitmap, dest_width, dest_height, is_output_polygon=False):

        '''

        _bitmap: single map with shape (H, W),

            whose values are binarized as {0, 1}

        '''

        height, width = pred.shape

        boxes = []

        new_scores = []

        # bitmap = bitmap.cpu().numpy()

        if cv2.__version__.startswith('3'):

            _, contours, _ = cv2.findContours((bitmap * 255).astype(np.uint8), cv2.RETR_LIST, cv2.CHAIN_APPROX_SIMPLE)

        if cv2.__version__.startswith('4'):

            contours, _ = cv2.findContours((bitmap * 255).astype(np.uint8), cv2.RETR_LIST, cv2.CHAIN_APPROX_SIMPLE)

        for contour in contours[:self.max_candidates]:

            epsilon = 0.005 * cv2.arcLength(contour, True)

            approx = cv2.approxPolyDP(contour, epsilon, True)

            points = approx.reshape((-1, 2))

            if points.shape[0] < 4:

                continue

            score = self.box_score_fast(pred, contour.squeeze(1))

            if self.box_thresh > score:

                continue

            if points.shape[0] > 2:

                box = self.unclip(points, unclip_ratio=self.unclip_ratio)

                if len(box) > 1:

                    continue

            else:

                continue

            four_point_box, sside = self.get_mini_boxes(box.reshape((-1, 1, 2)))

            if sside < self.min_size + 2:

                continue

            if not isinstance(dest_width, int):

                dest_width = dest_width.item()

                dest_height = dest_height.item()

            if not is_output_polygon:

                box = np.array(four_point_box)

            else:

                box = box.reshape(-1, 2)

            box[:, 0] = np.clip(np.round(box[:, 0] / width * dest_width), 0, dest_width)

            box[:, 1] = np.clip(np.round(box[:, 1] / height * dest_height), 0, dest_height)

            boxes.append(box)

            new_scores.append(score)

        return boxes, new_scores


    def unclip(self, box, unclip_ratio=1.5):

        poly = Polygon(box)

        distance = poly.area * unclip_ratio / poly.length

        offset = pyclipper.PyclipperOffset()

        offset.AddPath(box, pyclipper.JT_ROUND, pyclipper.ET_CLOSEDPOLYGON)

        expanded = np.array(offset.Execute(distance))

        return expanded


    def get_mini_boxes(self, contour):

        bounding_box = cv2.minAreaRect(contour)

        points = sorted(list(cv2.boxPoints(bounding_box)), key=lambda x: x[0])


        index_1, index_2, index_3, index_4 = 0, 1, 2, 3

        if points[1][1] > points[0][1]:

            index_1 = 0

            index_4 = 1

        else:

            index_1 = 1

            index_4 = 0

        if points[3][1] > points[2][1]:

            index_2 = 2

            index_3 = 3

        else:

            index_2 = 3

            index_3 = 2


        box = [points[index_1], points[index_2], points[index_3], points[index_4]]

        return box, min(bounding_box[1])


    def box_score_fast(self, bitmap, _box):

        # bitmap = bitmap.detach().cpu().numpy()

        h, w = bitmap.shape[:2]

        box = _box.copy()

        xmin = np.clip(np.floor(box[:, 0].min()).astype(np.int), 0, w - 1)

        xmax = np.clip(np.ceil(box[:, 0].max()).astype(np.int), 0, w - 1)

        ymin = np.clip(np.floor(box[:, 1].min()).astype(np.int), 0, h - 1)

        ymax = np.clip(np.ceil(box[:, 1].max()).astype(np.int), 0, h - 1)


        mask = np.zeros((ymax - ymin + 1, xmax - xmin + 1), dtype=np.uint8)

        box[:, 0] = box[:, 0] - xmin

        box[:, 1] = box[:, 1] - ymin

        cv2.fillPoly(mask, box.reshape(1, -1, 2).astype(np.int32), 1)

        return cv2.mean(bitmap[ymin:ymax + 1, xmin:xmax + 1], mask)[0]

class Process_Class(QWidget):

    detect_end = pyqtSignal(str)

    clear_text = pyqtSignal()

    def __init__(self):

        super().__init__()

        self.image = None

        self.img=None

        self.camera_status=False

        self.result_string=None

        self.cap = cv2.VideoCapture()

        #detect

        rknn_model_detect = DETECT_MODEL

        self.rknn_lite_detect = RKNNLite()

        self.rknn_lite_detect.load_rknn(rknn_model_detect)# load RKNN model

        self.rknn_lite_detect.init_runtime(core_mask=RKNNLite.NPU_CORE_2)# init runtime environment

        #rego

        rknn_model_rego = REGO_MODEL

        self.rknn_lite_rego = RKNNLite()

        self.rknn_lite_rego.load_rknn(rknn_model_rego)# load RKNN model

        self.rknn_lite_rego.init_runtime(core_mask=RKNNLite.NPU_CORE_0_1)# init runtime environment

        self.detect_end.connect(self.update_text_box)

        self.clear_text.connect(self.clear_text_box)

    def cv2_to_qpixmap(self, cv_image):

        height, width, channel = cv_image.shape

        bytes_per_line = 3 * width

        q_image = QImage(cv_image.data, width, height, bytes_per_line, QImage.Format_RGB888).rgbSwapped()

        return QPixmap.fromImage(q_image)

    def show_pic(self, cv_image):

        pixmap = self.cv2_to_qpixmap(cv_image)

        if MainWindow.pic_label is not None:

            MainWindow.pic_label.setPixmap(pixmap)

            QApplication.processEvents()

        else:

            print("wrong!!!!!!!")

    def camera_open(self):

        self.camera_status = not self.camera_status

        print("------------camera status is",self.camera_status)

        if  self.camera_status:

            self.cap.open(12)

            if  self.cap.isOpened():

                print("run camera")

                while(True):

                    frame = self.cap.read()

                    if not frame[0]:

                        print("read frame failed!!!!")

                        exit()

                    self.image=frame[1]

                    self.detect_pic()

                    if not self.camera_status:

                        break

            else:

                print("Cannot open camera")

                exit()

        else:

            self.release_camera()

    def release_camera(self):

        if self.cap.isOpened():

            self.cap.release()

            self.camera_status = False

            print("摄像头关闭")

    def open_file(self):

        # 获取图像的路径

        img_path, _ = QFileDialog.getOpenFileName()

        if img_path != '':

            self.image = cv2.imread(img_path)

        self.show_pic(self.image)

    def crop_and_save_image(self,image, box_points):

        global LABEL_SIZE_PRIVIOUS

        global LABEL_SIZE_LATTER

        i=-1

        # 将box_points转换为NumPy数组,并取整数值

        box_points = np.array(box_points, dtype=np.int32)

        mask = np.zeros_like(image)  # 创建与图像相同大小的全黑图像

        print("LABEL_SIZE_PRIVIOUS ",LABEL_SIZE_PRIVIOUS,"LABEL_SIZE_LATTER ",LABEL_SIZE_LATTER)

        if LABEL_SIZE_PRIVIOUS==LABEL_SIZE_LATTER:

            LABEL_SIZE_PRIVIOUS=len(box_points)

            for box_point in box_points:

                i=i+1

                cropped_image = image.copy()

                # 使用OpenCV的函数裁剪图像

                x, y, w, h = cv2.boundingRect(box_point)

                cropped_image = image[y:y+h, x:x+w]

                # 创建与图像大小相同的全黑掩码

                mask = np.zeros_like(cropped_image)

                # 在掩码上绘制多边形

                cv2.fillPoly(mask, [box_point - (x, y)], (255, 255, 255))

                # 使用 bitwise_and 进行图像裁剪

                masked_cropped_image = cv2.bitwise_and(cropped_image, mask)

                # 保存裁剪后的图像

                output_path = f"{'./crop_pic/'}img_{i}.jpg"

                cv2.imwrite(output_path, masked_cropped_image)

        else:

            #self.clear_text.emit()

            LABEL_SIZE_LATTER=LABEL_SIZE_PRIVIOUS

            current_directory = os.getcwd()+'/crop_pic'  # Get the current directory

            for filename in os.listdir(current_directory):

                if filename.endswith(".jpg"):

                    file_path = os.path.join(current_directory, filename)

                    os.remove(file_path)

                    print(f"Deleted: {file_path}")

    def detect_thread(self):

        #detect inference

        img0 , image= narrow_224_32(self.image,expected_size=(640,640))

        outputs =self.rknn_lite_detect.inference(inputs=[image])

        post_proess = DBPostProcess()

        is_output_polygon = False

        box_list, score_list = post_proess(outputs[0], [image.shape[:2]], is_output_polygon=is_output_polygon)

        box_list, score_list = box_list[0], score_list[0]

        if len(box_list) > 0:

            idx = [x.sum() > 0 for x in box_list]

            box_list = [box_list[i] for i, v in enumerate(idx) if v]

            score_list = [score_list[i] for i, v in enumerate(idx) if v]

        else:

            box_list, score_list = [], []

        self.image = draw_bbox(image, box_list)

        self.crop_and_save_image(image,box_list)

        self.image = self.image[0:img0.shape[0],0:img0.shape[1]]

        self.show_pic(self.image)

    def rego_thread(self):

        label_convert=CTCLabelConverter(LABEL_FILE)

        self.clear_text.emit()

        for image_file in image_files:

            if os.path.exists(image_file):

                print('-----------image file',image_file,len(image_files))

                self.img = cv2.imread(image_file)

                image = resize_img_self(self.img,reszie_size=(448,32))

                # Inference

                outputs = self.rknn_lite_rego.inference(inputs=[image])

                #post process

                feat_2 = torch.tensor(outputs[0],dtype=torch.float32)

                txt = label_convert.decode(feat_2.detach().numpy())

                self.result_string = ' '.join(txt)

                print(self.result_string)

                self.detect_end.emit(self.result_string)

            else:

                print("-----------no crop image!!!")

    def detect_pic(self):

        self.detect_thread()

        my_thread = threading.Thread(target=self.rego_thread)

        # 启动线程

        my_thread.start()

        # 等待线程结束

        my_thread.join()

    def update_text_box(self, text):

        # 在主线程中更新文本框的内容

        MainWindow.text_box.append(text)

    def clear_text_box(self):

        print("clear--------------------------------")

        # 在主线程中更新文本框的内容

        MainWindow.text_box.clear()


class MainWindow(QMainWindow):

    #pic_label = None

    def __init__(self):

        pic_label = None

        text_box  = None

        super().__init__()

        self.process_functions = Process_Class()

        self.window = QWidget()

        # 创建小部件

        self.pic_label = QLabel('Show Window!', parent=self.window)

        self.pic_label.setMinimumHeight(500)  # 设置最小高度

        self.pic_label.setMaximumHeight(500)  # 设置最大高度

        self.pic_button = QPushButton('Picture', parent=self.window)

        self.pic_button.clicked.connect(self.process_functions.open_file)

        self.camera_button = QPushButton('Camera', parent=self.window)

        self.camera_button.clicked.connect(self.process_functions.camera_open)

        self.detect_button = QPushButton('Detect', parent=self.window)

        self.detect_button.clicked.connect(self.process_functions.detect_pic)

        self.text_box = QTextEdit()

        # 创建垂直布局管理器并将小部件添加到布局中

        self.left_layout = QVBoxLayout()

        self.right_layout = QVBoxLayout()

        self.layout = QHBoxLayout()

        self.create_ui()

        self.window.closeEvent = self.closeEvent


    def create_ui(self):

        self.window.setWindowTitle('Scene_text_rego')

        self.window.setGeometry(0, 0, 800, 600)  # 设置窗口位置和大小

        # 设置主窗口的布局

        self.pic_label.setStyleSheet('border: 2px solid black; padding: 10px;')

        self.left_layout.addWidget(self.pic_label)

        self.left_layout.addWidget(self.text_box)

        self.right_layout.addWidget(self.pic_button)

        self.right_layout.addWidget(self.camera_button)

        self.right_layout.addWidget(self.detect_button)

        self.layout.addLayout(self.left_layout)

        self.layout.addLayout(self.right_layout)

        self.window.setLayout(self.layout)

        self.window.show()

    def closeEvent(self, event):

        # 释放摄像头资源

        self.process_functions.release_camera()

        event.accept()


def main():

    # 创建应用程序对象

    app = QApplication(sys.argv)

    win = MainWindow()

    MainWindow.pic_label = win.pic_label  # 设置类变量pic_label为MainWindow对象的pic_label

    MainWindow.text_box = win.text_box  # 设置类变量pic_label为MainWindow对象的pic_label

    # 运行应用程序

    sys.exit(app.exec_())

    rknn_lite_detect.release()


if __name__ == '__main__':

    main()
运行结果
参考资料
博文:
【工程部署】手把手教你在RKNN上部署OCR服务(上)_rknn ocr_三叔家的猫的博客-CSDN博客
