概述
- @EnableAutoConfiguration源码解析
- SpringBoot常用条件注解源码解析
- SpringBoot之Mybatis自动配置源码解析
- SpringBoot之AOP自动配置源码解析
- SpringBoot Jar包启动过程源码解析
DeferredImportSelector接口
DeferredImportSelector和ImportSelector的区别在于:
- 在解析ImportSelector时,所导入的配置类会被直接解析,而DeferredImportSelector导入的配置类会延迟解析(延迟在其他配置类都解析完之后)
- DeferredImportSelector支持分组,可以实现getImportGroup方法以及定义Group对象,就相当于指定了DeferredImportSelector所导入进来的配置类所属的组,比如SpringBoot就把所有自动配置类单独做了分组AutoConfigurationGroup
常用条件注解
SpringBoot中的常用条件注解有:
- ConditionalOnBean:是否存在某个类或某个名字的Bean
- ConditionalOnMissingBean:是否缺失某个类或某个名字的Bean
- ConditionalOnSingleCandidate:是否符合指定类型的Bean只有一个
- ConditionalOnClass:是否存在某个类
- ConditionalOnMissingClass:是否缺失某个类
- ConditionalOnExpression:指定的表达式返回的是true还是false
- ConditionalOnJava:判断Java版本
- ConditionalOnWebApplication:当前应用是不是一个Web应用
- ConditionalOnNotWebApplication:当前应用不是一个Web应用
- ConditionalOnProperty:Environment中是否存在某个属性
也可以利用@Conditional来自定义条件注解。
条件注解是可以写在类上和方法上的,如果某个条件注解写在了自动配置类上,那该自动配置类会不会生效就要看当前条件能不能符合,或者条件注解写在某个@Bean修饰的方法上,那这个Bean生不生效就看当前条件符不符合。
具体原理是:
- Spring在解析某个自动配置类时,会先检查该自动配置类上是否有条件注解,如果有,则进一步判断该条件注解所指定的条件当前能不能满足,如果满足了则继续解析该配置类,如果不满足则不进行解析了,也就是配置类所定义的Bean都得不到解析,也就是相当于没有这些Bean了。
- 同理,Spring在解析某个@Bean的方法时,也会先判断方法上是否有条件注解,然后进行解析,如果不满足条件,则该Bean不会生效
可以发现,SpringBoot的自动配置,实际上就是SpringBoot的源码中预先写好了一些配置类,预先定义好了一些Bean,在用SpringBoot时,这些配置类就已经在项目的依赖中了,而这些自动配置类或自动配置Bean到底生不生效,就看具体所指定的条件了。
自定义条件注解
SpringBoot中众多的条件注解,都是基于Spring中的@Conditional来实现的。
@Conditional注解的定义:
@Target({ElementType.TYPE, ElementType.METHOD})
@Retention(RetentionPolicy.RUNTIME)
@Documented
public @interface Conditional {

    /**
    * All {@link Condition} classes that must {@linkplain Condition#matches match}
    * in order for the component to be registered.
    */
    Class<? extends Condition>[] value();

}
根据定义在用@Conditional注解时,需要指定一个或多个Condition的实现类,所以先来提供一个实现类:
public class FireCondition implements Condition {

    @Override
    public boolean matches(ConditionContext context, AnnotatedTypeMetadata metadata) {
        return false;
    }

}
很明显,可以在matches方法中来定义条件逻辑:
- ConditionContext:表示条件上下文,可以通过ConditionContext获取到当前的类加载器、BeanFactory、Environment环境变量对象
- AnnotatedTypeMetadata:表示当前正在进行条件判断的Bean所对应的类信息,或方法信息(比如@Bean定义的一个Bean),可以通过AnnotatedTypeMetadata获取到当前类或方法相关的信息,从而就可以拿到条件注解的信息,当然如果一个Bean上使用了多个条件注解,那么在解析过程中都可以获取到,同时也能获取Bean上定义的其他注解信息
@ConditionalOnClass底层工作原理
示例:
@Configuration
@ConditionalOnClass(name = "com.firechou.Jetty")
@ConditionalOnMissingClass(value = "com.firechou.Tomcat")
public class FireConfiguration {

}
在FireConfiguration这个类上使用了两个条件注解:
- @ConditionalOnClass(name = “com.firechou.Jetty”):条件是项目依赖中存在"com.firechou.Jetty"这个类,则表示符合条件
- @ConditionalOnMissingClass(value = “com.firechou.Tomcat”):条件是项目依赖中不存在"com.firechou.Tomcat"这个类,则表示符合条件
这两个注解对应的都是@Conditional(OnClassCondition.class),那在OnClassCondition类中是如何对这两个注解进行区分的呢?
Spring在解析到FireConfiguration这个配置时,发现该类上用到了条件注解就会进行条件解析,相关源码如下:
// 这是Spring中的源码,不是SpringBoot中的
for (Condition condition : conditions) {
    ConfigurationPhase requiredPhase = null;
    if (condition instanceof ConfigurationCondition) {
        requiredPhase = ((ConfigurationCondition) condition).getConfigurationPhase();
    }

    // 重点在这
    if ((requiredPhase == null || requiredPhase == phase) && !condition.matches(this.context, metadata)) {
        return true;
    }
}
conditions中保存了两个OnClassCondition对象,这段代码会依次调用OnClassCondition对象的matches方法进行条件匹配,一旦某一个条件不匹配就不会进行下一个条件的判断了,这里return的是true,但是这段代码所在的方法叫做shouldSkip,所以true表示忽略。
继续看OnClassCondition的matches()方法的实现。
OnClassCondition类继承了FilteringSpringBootCondition,FilteringSpringBootCondition类又继承了SpringBootCondition,而SpringBootCondition实现了Condition接口,matches()方法也是在SpringBootCondition这个类中实现的:
@Override
public final boolean matches(ConditionContext context, AnnotatedTypeMetadata metadata) {
    // 获取当前解析的类名或方法名
    String classOrMethodName = getClassOrMethodName(metadata);
    try {
        // 进行具体的条件匹配,ConditionOutcome表示匹配结果
        ConditionOutcome outcome = getMatchOutcome(context, metadata);

        // 日志记录匹配结果
        logOutcome(classOrMethodName, outcome);
        recordEvaluation(context, classOrMethodName, outcome);

        // 返回true或false
        return outcome.isMatch();
    }
    catch (NoClassDefFoundError ex) {
        // ...
    }
    catch (RuntimeException ex) {
        // ...
    }
}
所以具体的条件匹配逻辑在getMatchOutcome方法中,而SpringBootCondition类中的getMatchOutcome方法是一个抽象方法,具体的实现逻辑就在子类OnClassCondition中:
@Override
public ConditionOutcome getMatchOutcome(ConditionContext context, AnnotatedTypeMetadata metadata) {
    ClassLoader classLoader = context.getClassLoader();
    ConditionMessage matchMessage = ConditionMessage.empty();

    // 拿到ConditionalOnClass注解中的value值,也就是要判断是否存在的类名
    List<String> onClasses = getCandidates(metadata, ConditionalOnClass.class);
    if (onClasses != null) {
        // 判断onClasses中不存在的类
        List<String> missing = filter(onClasses, ClassNameFilter.MISSING, classLoader);
        // 如果有缺失的类,那就表示不匹配
        if (!missing.isEmpty()) {
            return ConditionOutcome.noMatch(ConditionMessage.forCondition(ConditionalOnClass.class)
                                            .didNotFind("required class", "required classes").items(Style.QUOTE, missing));
        }
        // 否则就表示匹配
        matchMessage = matchMessage.andCondition(ConditionalOnClass.class)
            .found("required class", "required classes")
            .items(Style.QUOTE, filter(onClasses, ClassNameFilter.PRESENT, classLoader));
    }

    // 和上面类似,只不过是判断onMissingClasses是不是全部缺失,如果是则表示匹配
    List<String> onMissingClasses = getCandidates(metadata, ConditionalOnMissingClass.class);
    if (onMissingClasses != null) {
        List<String> present = filter(onMissingClasses, ClassNameFilter.PRESENT, classLoader);
        if (!present.isEmpty()) {
            return ConditionOutcome.noMatch(ConditionMessage.forCondition(ConditionalOnMissingClass.class)
                                            .found("unwanted class", "unwanted classes").items(Style.QUOTE, present));
        }
        matchMessage = matchMessage.andCondition(ConditionalOnMissingClass.class)
            .didNotFind("unwanted class", "unwanted classes")
            .items(Style.QUOTE, filter(onMissingClasses, ClassNameFilter.MISSING, classLoader));
    }
    return ConditionOutcome.match(matchMessage);
}
在getMatchOutcome方法中的逻辑为:
- 如果类或方法上有@ConditionalOnClass注解,则获取@ConditionalOnClass注解中的value属性,也就是要判断是否存在的类名
- 利用ClassNameFilter.MISSING来判断这些类是否缺失,把缺失的类的类名存入missing集合
- 如果missing不为空,则表示有类缺失,则表示不匹配,并利用ConditionMessage记录哪些类是缺失的,直接return,表示条件不匹配
- 否则,则表示条件匹配,继续执行代码
- 如果类或方法上有ConditionalOnMissingClass注解,则获取ConditionalOnMissingClass注解中的value属性,也就是要判断是否缺失的类名
- 利用ClassNameFilter.PRESENT来判断这些类是否存在,把存在的类的类名存入present集合
- 如果present不为空,则表示有类存在,则表示不匹配,并利用ConditionMessage记录哪些类是存在的,直接return,表示条件不匹配
- 否则,则表示条件匹配,继续执行代码
- return,表示条件匹配
因为ConditionalOnClass注解和ConditionalOnMissingClass注解的逻辑是比较类似的,所以在源码中都是在OnClassCondition这个类中实现的,假如一个类上即有@ConditionalOnClass,也有@ConditionalOnMissingClass,比如以下代码:
@Configuration
@ConditionalOnClass(Tomcat.class)
@ConditionalOnMissingClass(value = "com.firechou.Tomcat")
public class FireConfiguration {

}
- 如果@ConditionalOnClass条件匹配、@ConditionalOnMissingClass条件也匹配,那么getMatchOutcome方法会执行两次
- 如果@ConditionalOnClass条件不匹配,那么getMatchOutcome方法会执行一次
- 如果@ConditionalOnClass条件匹配、@ConditionalOnMissingClass条件不匹配,那么getMatchOutcome方法也只会执行一次,因为在getMatchOutcome方法处理了这种情况
上面提到的ClassNameFilter.MISSING和ClassNameFilter.PRESENT也比较简单,代码如下:
protected enum ClassNameFilter {

        PRESENT {

            @Override
            public boolean matches(String className, ClassLoader classLoader) {
                return isPresent(className, classLoader);
            }

        },

        MISSING {

            @Override
            public boolean matches(String className, ClassLoader classLoader) {
                return !isPresent(className, classLoader);
            }

        };

        abstract boolean matches(String className, ClassLoader classLoader);

        static boolean isPresent(String className, ClassLoader classLoader) {
            if (classLoader == null) {
                classLoader = ClassUtils.getDefaultClassLoader();
            }
            try {
                resolve(className, classLoader);
                return true;
            }
            catch (Throwable ex) {
                return false;
            }
        }

    }
protected static Class<?> resolve(String className, ClassLoader classLoader) throws ClassNotFoundException {
    if (classLoader != null) {
        return Class.forName(className, false, classLoader);
    }
    return Class.forName(className);
}
主要就是用类加载器,来判断类是否存在。
@ConditionalOnBean底层工作原理
@ConditionalOnBean和@ConditionalOnClass的底层实现应该是差不多的,一个是判断Bean存不存在,一个是判断类存不存在,事实上也确实差不多。
首先@ConditionalOnBean和@ConditionalOnMissingBean对应的都是OnBeanCondition类,OnBeanCondition类也是继承了SpringBootCondition,所以SpringBootCondition类中的getMatchOutcome方法才是匹配逻辑:
@Override
public ConditionOutcome getMatchOutcome(ConditionContext context, AnnotatedTypeMetadata metadata) {
    ConditionMessage matchMessage = ConditionMessage.empty();
    MergedAnnotations annotations = metadata.getAnnotations();

    // 如果存在ConditionalOnBean注解
    if (annotations.isPresent(ConditionalOnBean.class)) {
        Spec<ConditionalOnBean> spec = new Spec<>(context, metadata, annotations, ConditionalOnBean.class);
        MatchResult matchResult = getMatchingBeans(context, spec);

        // 如果某个Bean不存在
        if (!matchResult.isAllMatched()) {
            String reason = createOnBeanNoMatchReason(matchResult);
            return ConditionOutcome.noMatch(spec.message().because(reason));
        }

        // 所有Bean都存在
        matchMessage = spec.message(matchMessage).found("bean", "beans").items(Style.QUOTE,
                                                                               matchResult.getNamesOfAllMatches());
    }

    // 如果存在ConditionalOnSingleCandidate注解
    if (metadata.isAnnotated(ConditionalOnSingleCandidate.class.getName())) {
        Spec<ConditionalOnSingleCandidate> spec = new SingleCandidateSpec(context, metadata, annotations);
        MatchResult matchResult = getMatchingBeans(context, spec);

        // Bean不存在
        if (!matchResult.isAllMatched()) {
            return ConditionOutcome.noMatch(spec.message().didNotFind("any beans").atAll());
        }

        // Bean存在
        Set<String> allBeans = matchResult.getNamesOfAllMatches();

        // 如果只有一个
        if (allBeans.size() == 1) {
            matchMessage = spec.message(matchMessage).found("a single bean").items(Style.QUOTE, allBeans);
        }
        else {
            // 如果有多个
            List<String> primaryBeans = getPrimaryBeans(context.getBeanFactory(), allBeans,
                                                        spec.getStrategy() == SearchStrategy.ALL);

            // 没有主Bean,那就不匹配
            if (primaryBeans.isEmpty()) {
                return ConditionOutcome.noMatch(
                    spec.message().didNotFind("a primary bean from beans").items(Style.QUOTE, allBeans));
            }
            // 有多个主Bean,那就不匹配
            if (primaryBeans.size() > 1) {
                return ConditionOutcome
                    .noMatch(spec.message().found("multiple primary beans").items(Style.QUOTE, primaryBeans));
            }

            // 只有一个主Bean
            matchMessage = spec.message(matchMessage)
                .found("a single primary bean '" + primaryBeans.get(0) + "' from beans")
                .items(Style.QUOTE, allBeans);
        }
    }

    // 存在ConditionalOnMissingBean注解
    if (metadata.isAnnotated(ConditionalOnMissingBean.class.getName())) {
        Spec<ConditionalOnMissingBean> spec = new Spec<>(context, metadata, annotations,
                                                         ConditionalOnMissingBean.class);
        MatchResult matchResult = getMatchingBeans(context, spec);

        // 有任意一个Bean存在,那就条件不匹配
        if (matchResult.isAnyMatched()) {
            String reason = createOnMissingBeanNoMatchReason(matchResult);
            return ConditionOutcome.noMatch(spec.message().because(reason));
        }

        // 都不存在在,则匹配
        matchMessage = spec.message(matchMessage).didNotFind("any beans").atAll();
    }
    return ConditionOutcome.match(matchMessage);
}
逻辑流程为:
- 当前在解析的类或方法上,是否有@ConditionalOnBean注解,如果有则生成对应的Spec对象,该对象中包含了用户指定的,要判断的是否存在的Bean的类型
- 调用getMatchingBeans方法进行条件判断,MatchResult为条件判断结果
- 只要判断出来某一个Bean不存在,则return,表示条件不匹配
- 只要所有Bean都存在,则继续执行下面代码
- 当前在解析的类或方法上,是否有@ConditionalOnSingleCandidate注解,如果有则生成对应的SingleCandidateSpec对象,该对象中包含了用户指定的,要判断的是否存在的Bean的类型(只能指定一个类型),并且该类型的Bean只能有一个
- 调用getMatchingBeans方法进行条件判断,MatchResult为条件判断结果
- 指定类型的Bean如果不存在,则return,表示条件不匹配
- 如果指定类型的Bean存在,但是存在多个,那就看是否存在主Bean(加了@Primary注解的Bean),并且只能有一个主Bean,如果没有,则return,表示条件不匹配
- 如果只有一个主Bean,则表示条件匹配,继续执行下面代码
- 当前在解析的类或方法上,是否有@ConditionalOnMissingBean注解,如果有则生成对应的Spec对象,该对象中包含了用户指定的,要判断的是否缺失的Bean的类型
- 调用getMatchingBeans方法进行条件判断,MatchResult为条件判断结果
- 只要有任意一个Bean存在,则return,表示条件不匹配
- 都存在,则表示条件匹配
- 结束
getMatchingBeans方法中会利用BeanFactory去获取指定类型的Bean,如果没有指定类型的Bean,则会将该类型记录在MatchResult对象的unmatchedTypes集合中,如果有该类型的Bean,则会把该Bean的beanName记录在MatchResult对象的matchedNames集合中,所以MatchResult对象中记录了,哪些类没有对应的Bean,哪些类有对应的Bean。
@ConditionalOnClass和@ConditionalOnBean,总结以下流程就是:
- Spring在解析某个配置类,或某个Bean定义时
- 如果发现它们上面用到了条件注解,就会取出所有的条件的条件注解,并生成对应的条件对象,比如OnBeanCondition对象、OnClassCondition对象
- 从而依次调用条件对象的matches方法,进行条件匹配,看是否符合条件
- 而条件匹配逻辑中,会拿到@ConditionalOnClass和@ConditionalOnBean等条件注解的信息,比如要判断哪些类存在、哪些Bean存在
- 然后利用ClassLaoder、BeanFactory来进行判断
- 最后只有所有条件注解的条件都匹配,那么当前配置类或Bean定义才算符合条件
Starter机制
SpringBoot中的Starter和自动配置又有什么关系呢?
其实首先要明白一个Starter,就是一个Maven依赖,当在项目的pom.xml文件中添加某个Starter依赖时,其实就是简单的添加了很多其他的依赖,比如:
- spring-boot-starter-web:引入了spring-boot-starter、spring-boot-starter-json、spring-boot-starter-tomcat等和Web开发相关的依赖包
- spring-boot-starter-tomcat:引入了tomcat-embed-core、tomcat-embed-el、tomcat-embed-websocket等和Tomcat相关的依赖包
如果硬要把Starter机制和自动配置联系起来,那就是通过@ConditionalOnClass这个条件注解,因为这个条件注解的作用就是用来判断当前应用的依赖中是否存在某个类或某些类,比如:
@Configuration(proxyBeanMethods = false)
@ConditionalOnClass({ Servlet.class, Tomcat.class, UpgradeProtocol.class })
@ConditionalOnMissingBean(value = ServletWebServerFactory.class, search = SearchStrategy.CURRENT)
static class EmbeddedTomcat {

    @Bean
    TomcatServletWebServerFactory tomcatServletWebServerFactory(
        ObjectProvider<TomcatConnectorCustomizer> connectorCustomizers,
        ObjectProvider<TomcatContextCustomizer> contextCustomizers,
        ObjectProvider<TomcatProtocolHandlerCustomizer<?>> protocolHandlerCustomizers) {
        TomcatServletWebServerFactory factory = new TomcatServletWebServerFactory();

        // orderedStream()调用时会去Spring容器中找到TomcatConnectorCustomizer类型的Bean,默认是没有的,程序员可以自己定义
        factory.getTomcatConnectorCustomizers()
            .addAll(connectorCustomizers.orderedStream().collect(Collectors.toList()));
        factory.getTomcatContextCustomizers()
            .addAll(contextCustomizers.orderedStream().collect(Collectors.toList()));
        factory.getTomcatProtocolHandlerCustomizers()
            .addAll(protocolHandlerCustomizers.orderedStream().collect(Collectors.toList()));
        return factory;
    }

}
上面代码中就用到了@ConditionalOnClass,用来判断项目中是否存在Servlet.class、Tomcat.class、UpgradeProtocol.class这三个类,如果存在就满足当前条件,如果项目中引入了spring-boot-starter-tomcat,那就有这三个类,如果没有spring-boot-starter-tomcat那就可能没有这三个类(除非你自己单独引入了Tomcat相关的依赖)。
所以这就做到了,如果在项目中要用Tomcat,那就依赖spring-boot-starter-web就够了,因为它默认依赖了spring-boot-starter-tomcat,从而依赖了Tomcat,从而Tomcat相关的Bean能生效。
而如果不想用Tomcat,就得这么写:
<dependency>
    <groupId>org.springframework.boot</groupId>
    <artifactId>spring-boot-starter-web</artifactId>
    <exclusions>
        <exclusion>
            <groupId>org.springframework.boot</groupId>
      <artifactId>spring-boot-starter-tomcat</artifactId>
      </exclusion>
    </exclusions>
</dependency>

<dependency>
    <groupId>org.springframework.boot</groupId>
    <artifactId>spring-boot-starter-jetty</artifactId>
</dependency>
把spring-boot-starter-tomcat给排除掉,再添加上spring-boot-starter-jetty的依赖,这样Tomcat的Bean就不会生效,Jetty的Bean就能生效,从而项目中用的就是Jetty。
Spring Boot Tomcat自动配置
通过前面对SpringBoot的自动配置机制、Starter机制、启动过程的底层分析,接着分析下SpringBoot和Tomcat的整合。
只要项目添加的starter为:spring-boot-starter-web,那么启动项目时,SpringBoot就会自动启动一个Tomcat。
这是怎么做到的呢?
首先可以发现,在spring-boot-starter-web这个starter中,其实简介的引入了spring-boot-starter-tomcat这个starter,这个spring-boot-starter-tomcat又引入了tomcat-embed-core依赖,所以只要项目中依赖了spring-boot-starter-web就相当于依赖了Tomcat。
然后在SpringBoot众多的自动配置类中,有一个自动配置类叫做ServletWebServerFactoryAutoConfiguration,定义为:
@Configuration(proxyBeanMethods = false)
@AutoConfigureOrder(Ordered.HIGHEST_PRECEDENCE)
@ConditionalOnClass(ServletRequest.class)
@ConditionalOnWebApplication(type = Type.SERVLET)
@EnableConfigurationProperties(ServerProperties.class)
@Import({ ServletWebServerFactoryAutoConfiguration.BeanPostProcessorsRegistrar.class,
        ServletWebServerFactoryConfiguration.EmbeddedTomcat.class,
        ServletWebServerFactoryConfiguration.EmbeddedJetty.class,
        ServletWebServerFactoryConfiguration.EmbeddedUndertow.class })
public class ServletWebServerFactoryAutoConfiguration {
    // ...
}
首先看这个自动配置类所需要的条件:
- @ConditionalOnClass(ServletRequest.class):表示项目依赖中要有ServletRequest类(server api)
- @ConditionalOnWebApplication(type = Type.SERVLET):表示项目应用类型得是SpringMVC(讲启动过程的时候就知道如何判断一个SpringBoot应用的类型了)
在上面提到的spring-boot-starter-web中,其实还间接的引入了spring-web、spring-webmvc等依赖,这就使得第二个条件满足,而对于第一个条件的ServletRequest类,虽然它是Servlet规范中的类,但是在所依赖的tomcat-embed-core这个jar包中是存在这个类的,这是因为Tomcat在自己的源码中把Servlet规范中的一些代码也包含进去了,比如: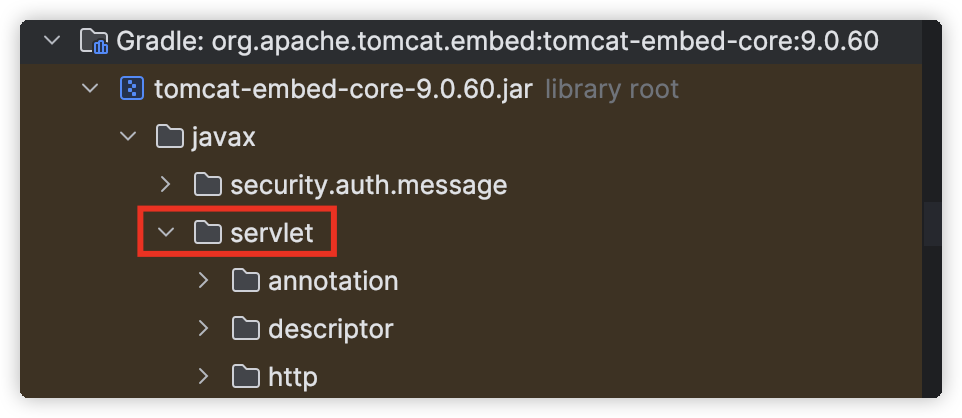
javax.servlet.ServletRequest
这就使得ServletWebServerFactoryAutoConfiguration这个自动配置的两个条件都符合,那么Spring就能去解析它,一解析它就发现这个自动配置类Import进来了三个类:
- ServletWebServerFactoryConfiguration.EmbeddedTomcat.class
- ServletWebServerFactoryConfiguration.EmbeddedJetty.class
- ServletWebServerFactoryConfiguration.EmbeddedUndertow.class
很明显,Import进来的这三个类应该是差不多,再看EmbeddedTomcat这个类:
@Configuration(proxyBeanMethods = false)
@ConditionalOnClass({ Servlet.class, Tomcat.class, UpgradeProtocol.class })
@ConditionalOnMissingBean(value = ServletWebServerFactory.class, search = SearchStrategy.CURRENT)
static class EmbeddedTomcat {

    @Bean
    TomcatServletWebServerFactory tomcatServletWebServerFactory(
        ObjectProvider<TomcatConnectorCustomizer> connectorCustomizers,
        ObjectProvider<TomcatContextCustomizer> contextCustomizers,
        ObjectProvider<TomcatProtocolHandlerCustomizer<?>> protocolHandlerCustomizers) {
        TomcatServletWebServerFactory factory = new TomcatServletWebServerFactory();

        // orderedStream()调用时会去Spring容器中找到TomcatConnectorCustomizer类型的Bean,默认是没有的,程序员可以自己定义
        factory.getTomcatConnectorCustomizers()
            .addAll(connectorCustomizers.orderedStream().collect(Collectors.toList()));
        factory.getTomcatContextCustomizers()
            .addAll(contextCustomizers.orderedStream().collect(Collectors.toList()));
        factory.getTomcatProtocolHandlerCustomizers()
            .addAll(protocolHandlerCustomizers.orderedStream().collect(Collectors.toList()));
        return factory;
    }

}
要构造这个Bean,Spring会从Spring容器中获取到TomcatConnectorCustomizer、TomcatContextCustomizer、TomcatProtocolHandlerCustomizer这三个类型的Bean,然后把它们添加到TomcatServletWebServerFactory对象中去,很明显这三种Bean是用来配置Tomcat的,比如:
- TomcatConnectorCustomizer:是用来配置Tomcat中的Connector组件的
- TomcatContextCustomizer:是用来配置Tomcat中的Context组件的
- TomcatProtocolHandlerCustomizer:是用来配置Tomcat中的ProtocolHandler组件的
也就是可以通过定义TomcatConnectorCustomizer类型的Bean,来对Tomcat进行配置,比如:
@SpringBootApplication
public class MyApplication {

    @Bean
    public TomcatConnectorCustomizer tomcatConnectorCustomizer(){
        return new TomcatConnectorCustomizer() {
            @Override
            public void customize(Connector connector) {
                connector.setPort(8888);
            }
        };
    }

    public static void main(String[] args) {
        SpringApplication.run(MyApplication.class);
    }

}
这样Tomcat就会绑定8888这个端口。
有了TomcatServletWebServerFactory这个Bean之后,在SpringBoot的启动过程中,会执行ServletWebServerApplicationContext的onRefresh()方法,而这个方法会调用createWebServer()方法,而这个方法中最为重要的两行代码为:
ServletWebServerFactory factory = getWebServerFactory();
this.webServer = factory.getWebServer(getSelfInitializer());
很明显,getWebServerFactory()负责获取具体的ServletWebServerFactory对象,要么是TomcatServletWebServerFactory对象,要么是JettyServletWebServerFactory对象,要么是UndertowServletWebServerFactory对象,注意只能获取到一个,然后调用该对象的getWebServer方法,启动对应的Tomcat、或者Jetty、或者Undertow。
getWebServerFactory方法中的逻辑比较简单,获取Spring容器中的ServletWebServerFactory类型的Bean对象,如果没有获取到则抛异常,如果找到多个也抛异常,也就是在Spring容器中只能有一个ServletWebServerFactory类型的Bean对象。
拿到TomcatServletWebServerFactory对象后,就调用它的getWebServer方法,而在这个方法中就会生成一个Tomcat对象,并且利用前面的TomcatConnectorCustomizer等等会Tomcat对象进行配置,最后启动Tomcat。
这样在启动应用时就完成了Tomcat的启动,到此通过这个案例也看到了具体的Starter机制、自动配置的具体使用。
自动配置类ServletWebServerFactoryAutoConfiguration中,还会定义一个ServletWebServerFactoryCustomizer类型的Bean,定义为:
@Bean
public ServletWebServerFactoryCustomizer servletWebServerFactoryCustomizer(ServerProperties serverProperties,
                                                                           ObjectProvider<WebListenerRegistrar> webListenerRegistrars,
                                                                           ObjectProvider<CookieSameSiteSupplier> cookieSameSiteSuppliers) {
    return new ServletWebServerFactoryCustomizer(serverProperties,
                                                 webListenerRegistrars.orderedStream().collect(Collectors.toList()),
                                                 cookieSameSiteSuppliers.orderedStream().collect(Collectors.toList()));
}
这个Bean会接收一个ServerProperties的Bean,ServerProperties的Bean对应的就是properties文件中前缀为server的配置,可以利用ServerProperties对象的getPort方法获取到我们所配置的server.port的值。
而ServletWebServerFactoryCustomizer是针对一个ServletWebServerFactory的自定义器,也就是用来配置TomcatServletWebServerFactory这个Bean的,到时候ServletWebServerFactoryCustomizer就会利用ServerProperties对象来对TomcatServletWebServerFactory对象进行设置。
在ServletWebServerFactoryAutoConfiguration这个自动配置上,除开Import了EmbeddedTomcat、EmbeddedJetty、EmbeddedUndertow这三个配置类,还Import了一个ServletWebServerFactoryAutoConfiguration.BeanPostProcessorsRegistrar.class,这个BeanPostProcessorsRegistrar会向Spring容器中注册一个WebServerFactoryCustomizerBeanPostProcessor类型的Bean。
WebServerFactoryCustomizerBeanPostProcessor是一个BeanPosrtProcessor,它专门用来处理类型为WebServerFactory的Bean对象,而我们的TomcatServletWebServerFactory、JettyServletWebServerFactory、UndertowServletWebServerFactory也都实现了这个接口,所以不管当前项目依赖的情况,只要Spring在创建比如TomcatServletWebServerFactory这个Bean时,WebServerFactoryCustomizerBeanPostProcessor就会对它进行处理,处理的逻辑为:
- 从Spring容器中拿到WebServerFactoryCustomizer类型的Bean,也就是前面说的ServletWebServerFactoryCustomizer对象
- 然后调用ServletWebServerFactoryCustomizer对象的customize方法,把TomcatServletWebServerFactory对象传入进去
- customize方法中就会从ServerProperties对象获取各种配置,然后设置给TomcatServletWebServerFactory对象
比如: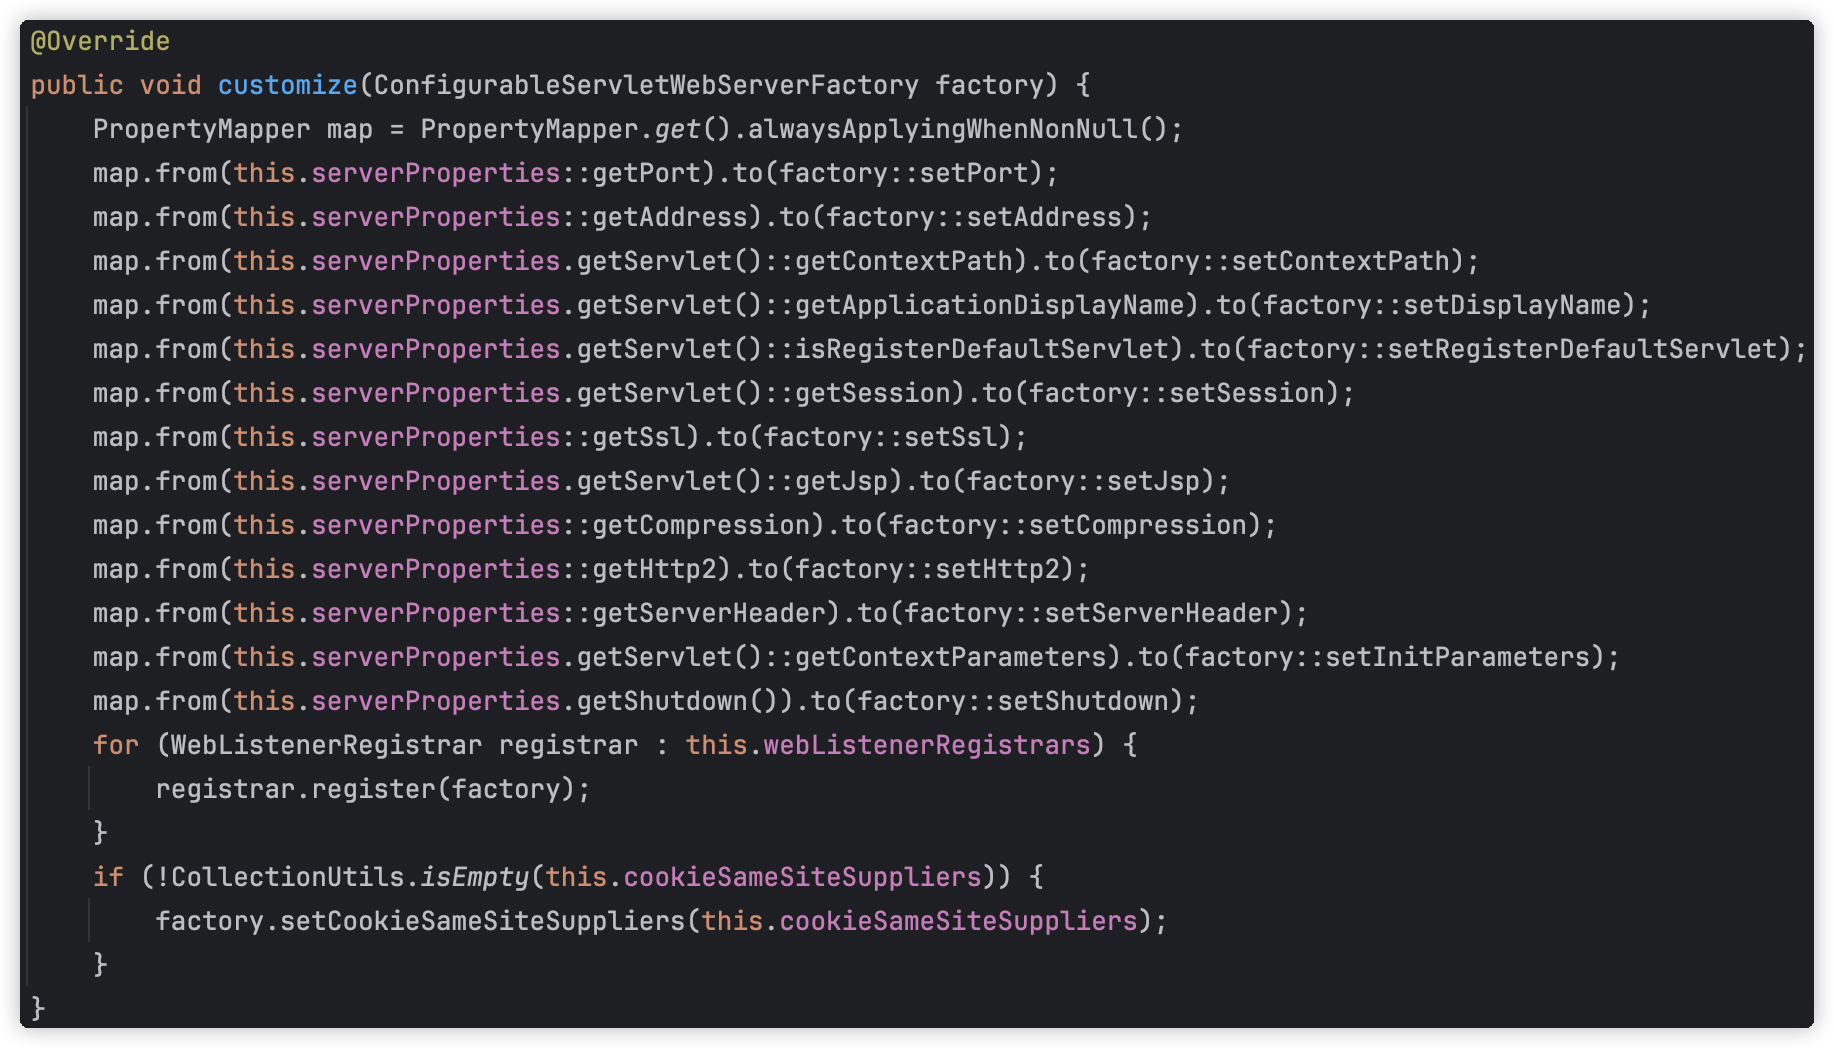
org.springframework.boot.autoconfigure.web.servlet.ServletWebServerFactoryCustomizer#customize
这样当TomcatServletWebServerFactory这个Bean对象创建完成后,它里面的很多属性,比如port,就已经是程序员所配置的值了,后续执行getWebServer方法时,就直接获取自己的属性,比如port属性,设置给Tomcat,然后再利用TomcatConnectorCustomizer等进行处理,最后启动Tomcat。
到此,SpringBoot整合Tomcat的核心原理就分析完了,主要涉及的东西有:
- spring-boot-starter-web:会自动引入Tomcat、SpringMVC的依赖
- ServletWebServerFactoryAutoConfiguration:自动配置类
- ServletWebServerFactoryAutoConfiguration.BeanPostProcessorsRegistrar:用来注册WebServerFactoryCustomizerBeanPostProcessor
- ServletWebServerFactoryConfiguration.EmbeddedTomcat:配置TomcatServletWebServerFactory
- ServletWebServerFactoryConfiguration.EmbeddedJetty:配置JettyServletWebServerFactory
- ServletWebServerFactoryConfiguration.EmbeddedUndertow:配置UndertowServletWebServerFactory
- ServletWebServerFactoryCustomizer:用来配置ServletWebServerFactory
- WebServerFactoryCustomizerBeanPostProcessor:是一个BeanPostProcessor,利用ServletWebServerFactoryCustomizer来配置ServletWebServerFactory
- ServletWebServerApplicationContext中的onRefresh()方法:负责启动Tomcat
Spring Boot AOP自动配置
@Configuration(proxyBeanMethods = false)

// spring.aop.auto=true时开启AOP,或者没有配置spring.aop.auto时默认也是开启
@ConditionalOnProperty(prefix = "spring.aop", name = "auto", havingValue = "true", matchIfMissing = true)
public class AopAutoConfiguration {

    @Configuration(proxyBeanMethods = false)
    @ConditionalOnClass(Advice.class)
    static class AspectJAutoProxyingConfiguration {

        @Configuration(proxyBeanMethods = false)
        // 开启AOP的注解,使用JDK动态代理
        @EnableAspectJAutoProxy(proxyTargetClass = false)
        // spring.aop.proxy-target-class=false时才生效
        @ConditionalOnProperty(prefix = "spring.aop", name = "proxy-target-class", havingValue = "false")
        static class JdkDynamicAutoProxyConfiguration {

        }


        @Configuration(proxyBeanMethods = false)
        // 开启AOP的注解,使用CGLIB动态代理
        @EnableAspectJAutoProxy(proxyTargetClass = true)
        // spring.aop.proxy-target-class=true时生效,或者没有配置spring.aop.proxy-target-class时默认也生效
        @ConditionalOnProperty(prefix = "spring.aop", name = "proxy-target-class", havingValue = "true",
                matchIfMissing = true)
        static class CglibAutoProxyConfiguration {

        }

    }

    @Configuration(proxyBeanMethods = false)
    // 没有aspectj的依赖,但是又要使用cglib动态代理
    @ConditionalOnMissingClass("org.aspectj.weaver.Advice")
    @ConditionalOnProperty(prefix = "spring.aop", name = "proxy-target-class", havingValue = "true",
            matchIfMissing = true)
    static class ClassProxyingConfiguration {

        @Bean
        static BeanFactoryPostProcessor forceAutoProxyCreatorToUseClassProxying() {
            return (beanFactory) -> {
                if (beanFactory instanceof BeanDefinitionRegistry) {
                    BeanDefinitionRegistry registry = (BeanDefinitionRegistry) beanFactory;
                    // 注册InfrastructureAdvisorAutoProxyCreator从而开启Spring AOP
                    // @EnableAspectJAutoProxy会注册AnnotationAwareAspectJAutoProxyCreator,也会开启Spring AOP但是同时有用解析AspectJ注解的功能
                    AopConfigUtils.registerAutoProxyCreatorIfNecessary(registry);
                    AopConfigUtils.forceAutoProxyCreatorToUseClassProxying(registry);
                }
            };
        }

    }

}
Spring Boot Mybatis自动配置
Mybatis的自动配置类为MybatisAutoConfiguration,该类中配置了一个SqlSessionFactory和AutoConfiguredMapperScannerRegistrar。
SqlSessionFactory这个Bean是Mybatis需要配置的,AutoConfiguredMapperScannerRegistrar会注册并配置一个MapperScannerConfigurer。
public static class AutoConfiguredMapperScannerRegistrar
      implements BeanFactoryAware, EnvironmentAware, ImportBeanDefinitionRegistrar {

    private BeanFactory beanFactory;
    private Environment environment;

    @Override
    public void registerBeanDefinitions(AnnotationMetadata importingClassMetadata, BeanDefinitionRegistry registry) {

      if (!AutoConfigurationPackages.has(this.beanFactory)) {
        logger.debug("Could not determine auto-configuration package, automatic mapper scanning disabled.");
        return;
      }

      logger.debug("Searching for mappers annotated with @Mapper");

      // 获取AutoConfigurationPackages Bean从而获取SpringBoot的扫描路径
      List<String> packages = AutoConfigurationPackages.get(this.beanFactory);
      if (logger.isDebugEnabled()) {
        packages.forEach(pkg -> logger.debug("Using auto-configuration base package '{}'", pkg));
      }

      BeanDefinitionBuilder builder = BeanDefinitionBuilder.genericBeanDefinition(MapperScannerConfigurer.class);
      builder.addPropertyValue("processPropertyPlaceHolders", true);

      // 限制了接口上得加Mapper注解
      builder.addPropertyValue("annotationClass", Mapper.class);
      builder.addPropertyValue("basePackage", StringUtils.collectionToCommaDelimitedString(packages));
      BeanWrapper beanWrapper = new BeanWrapperImpl(MapperScannerConfigurer.class);
      Set<String> propertyNames = Stream.of(beanWrapper.getPropertyDescriptors()).map(PropertyDescriptor::getName)
          .collect(Collectors.toSet());
      if (propertyNames.contains("lazyInitialization")) {
        // Need to mybatis-spring 2.0.2+
        builder.addPropertyValue("lazyInitialization", "${mybatis.lazy-initialization:false}");
      }
      if (propertyNames.contains("defaultScope")) {
        // Need to mybatis-spring 2.0.6+
        builder.addPropertyValue("defaultScope", "${mybatis.mapper-default-scope:}");
      }

      // for spring-native
      boolean injectSqlSession = environment.getProperty("mybatis.inject-sql-session-on-mapper-scan", Boolean.class,
          Boolean.TRUE);
      if (injectSqlSession && this.beanFactory instanceof ListableBeanFactory) {
        ListableBeanFactory listableBeanFactory = (ListableBeanFactory) this.beanFactory;
        Optional<String> sqlSessionTemplateBeanName = Optional
            .ofNullable(getBeanNameForType(SqlSessionTemplate.class, listableBeanFactory));
        Optional<String> sqlSessionFactoryBeanName = Optional
            .ofNullable(getBeanNameForType(SqlSessionFactory.class, listableBeanFactory));
        if (sqlSessionTemplateBeanName.isPresent() || !sqlSessionFactoryBeanName.isPresent()) {
          builder.addPropertyValue("sqlSessionTemplateBeanName",
              sqlSessionTemplateBeanName.orElse("sqlSessionTemplate"));
        } else {
          builder.addPropertyValue("sqlSessionFactoryBeanName", sqlSessionFactoryBeanName.get());
        }
      }
      builder.setRole(BeanDefinition.ROLE_INFRASTRUCTURE);

      registry.registerBeanDefinition(MapperScannerConfigurer.class.getName(), builder.getBeanDefinition());
    }

    @Override
    public void setBeanFactory(BeanFactory beanFactory) {
      this.beanFactory = beanFactory;
    }

    @Override
    public void setEnvironment(Environment environment) {
      this.environment = environment;
    }

    private String getBeanNameForType(Class<?> type, ListableBeanFactory factory) {
      String[] beanNames = factory.getBeanNamesForType(type);
      return beanNames.length > 0 ? beanNames[0] : null;
    }

  }

