前后端分离
一般来说,我们用SpringSecurity默认的话是前后端整在一起的,比如thymeleaf或者Freemarker,SpringSecurity还自带login登录页,还让你配置登出页,错误页。
但是现在前后端分离才是正道,前后端分离的话,那就需要将返回的页面换成Json格式交给前端处理了
SpringSecurity默认的是采用Session来判断请求的用户是否登录的,但是不方便分布式的扩展,虽然SpringSecurity也支持采用SpringSession来管理分布式下的用户状态,不过现在分布式的还是无状态的Jwt比较主流。 所以怎么让SpringSecurity变成前后端分离,可以采用Jwt来做认证
什么是jwt
Json web token (JWT),是为了在网络应用环境间传递声明而执行的一种基于JSON的开放标准((RFC7519).该token被设计为紧凑且==安全==的,特别适用于==分布式站点的单点登录(SSO)场景==。JWT的声明一般被用来在身份提供者和服务提供者间传递被认证的用户身份信息,以便于从资源服务器获取资源,也可以增加一些额外的其它业务逻辑所必须的声明信息,该token也可直接被用于认证,也可被加密。
官网: JSON Web Token Introduction - jwt.io
jwt的结构
以 . 分割 三部分


Header
Header 部分是一个JSON对象,描述JWT的元数据,通常是下面的样子。
{

"alg": "HS256",

"typ": "JWT"

}
上面代码中,alg属性表示签名的算法(algorithm),默认是 HMAC SHA256 (写成 HS256) ;typ属性表示这个令牌(token)的类型(type), JWT令牌统一写为JWT。
最后,将上面的JSON对象使用Base64URL算法转成字符串。
Payload(载荷)
Payload 部分也是一个JSON对象,==用来存放实际需要传递的数据==。JWT规定了7个官方字段,供选用。
iss (issuer):签发人
exp (expiration time):过期时间
sub (subject):主题
aud (audience):受众
nbf (Not Before):生效时间
iat (lssued At):签发时间
jti (JWT ID):编号
除了官方字段,==你还可以在这个部分定义私有字段==,下面就是一个例子。
{

"sub": "1234567890",

"name" : "John Doe",

“userid”:2

"admin": true

}
注意,JWT 默认是不加密的,任何人都可以读到,所以不要把==秘密信息==放在这个部分。这个JSON 对象也要使用Base64URL 算法转成字符串。
Signature
Signature部分是对前两部分的签名,防止数据篡改。
首先,需要指定一个==密钥(secret)==。这个密钥只有==服务器才知道==,不能泄露给用户。然后,使用Header里面指定的==签名算法(默认是 HMAC SHA256)==,按照下面的公式产生签名。
HMACSHA256(

base64UrlEncode(header) + ".”"+base64UrlEncode(payload),

secret)
算出签名以后,把 Header、Payload、Signature 三个部分拼成一个字符串,每个部分之间用"点"(.)分隔,就可以返回给用户。
1.项目添加hutool依赖
        <dependency>
            <groupId>cn.hutool</groupId>
            <artifactId>hutool-all</artifactId>
            <version>5.8.18</version>
</dependency>http://t.csdnimg.cn/TA0Xx基于文章中连接数据库的实例基础上进行的前后端分离设计
2.搭建好一个vue项目
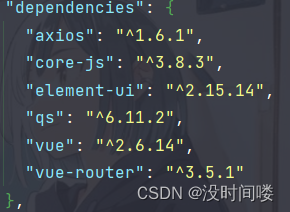
所需的导入包
3.修改配置文件 main.js
全局导入引入
import Vue from 'vue'
import App from './App.vue'
import router from './router'

Vue.config.productionTip = false


import ElementUI from 'element-ui';
import 'element-ui/lib/theme-chalk/index.css';


Vue.use(ElementUI);
import axios from 'axios'
// 后端项目的时候  http://localhost:8080
// axios设置一个默认的路径
// 创建实例时配置默认值
const instance = axios.create({
  // 访问路径的时候假的一个基础的路径
  baseURL: 'http://localhost:8080/',
  // withCredentials: true
});
请求拦截器与响应拦截器
// 请求拦截器
//
instance.interceptors.request.use( config=> {
  // config 前端  访问后端的时候  参数
  // 如果sessionStorage里面于token   携带着token  过去
  if(sessionStorage.getItem("token")){
    // token的值  放到请求头里面
    let token = sessionStorage.getItem("token");
    config.headers['token']=token;
  }
  // config.headers['Authorization']="yyl"

  return config;
}, error=> {
  // 超出 2xx 范围的状态码都会触发该函数。
  // 对响应错误做点什么
  return Promise.reject(error);
});


// 添加响应拦截器
instance.interceptors.response.use( response=> {
  console.log(response)
  // 状态码  500
  if(response.data.code!=200){
    alert("chucuole")
    console.log(response.data);

    router.push({path:"/login"});

    return;
  }
  return response;
}, error=> {
  // 超出 2xx 范围的状态码都会触发该函数。
  // 对响应错误做点什么
  return Promise.reject(error);
});

Vue.prototype.$axios = instance;
// 引入组件
挂载点
new Vue({
  router,
  render: h => h(App)
}).$mount('#app')
4.搭建一个.vue页面,并在 router 目录下的 index.js 文件配置好路由
<template>
  <div class="login-container">
    <el-form :model="ruleForm" status-icon :rules="rules" ref="ruleForm" label-width="100px" class="login-form">
      <el-form-item label="用户名" prop="username">
        <el-input type="text" v-model="ruleForm.username" autocomplete="off"></el-input>
      </el-form-item>
      <el-form-item label="确认密码" prop="password">
        <el-input type="password" v-model="ruleForm.password" autocomplete="off"></el-input>
      </el-form-item>


      <el-form-item>
        <el-button type="primary" @click="submitForm('ruleForm')">提交</el-button>
        <el-button @click="resetForm('ruleForm')">重置</el-button>
      </el-form-item>
    </el-form>
  </div>
</template>
搭建的页面包含基本的登录表单,在新建一个页面用于成功的页面展示,如 图中跳转的main.vue
 methods: {
    submitForm(formName) {
      this.$refs[formName].validate((valid) => {
        if (valid) {
          alert('submit!');
          // 请求  userlogin   userlogin
          //post i请求  json 数据  后端接受的时候  @RequestBody
          this.$axios.post("userlogin",qs.stringify(this.ruleForm)).then(r=>{
            // 获取token的值
            console.log(r.data.t);
            // 存起来
            sessionStorage.setItem("token",r.data.t)
            // 成功之后    跳转 /main
            this.$router.push("/main");

            //console.log(r.data);
          })


        } else {
          console.log('error submit!!');
          return false;
        }
      });
    },
  }
import Vue from 'vue'
import VueRouter from 'vue-router'
import HomeView from '../views/HomeView.vue'
Vue.use(VueRouter)
const routes = [
{
path: '/',
name: 'home',
component: HomeView
},
{
path: '/login',
name: 'login',
component: () => import(/* webpackChunkName: "about" */ '../views/login.vue')
},
{
path: '/about',
name: 'about',
// route level code-splitting
// this generates a separate chunk (about.[hash].js) for this route
// which is lazy-loaded when the route is visited.
component: () => import(/* webpackChunkName: "about" */ '../views/AboutView.vue')
},
{
path: '/main',
name: 'main',
component: () => import(/* webpackChunkName: "about" */ '../views/main.vue')
},
]
// 针对ElementUI导航栏中重复导航报错问题
const originalPush = VueRouter.prototype.push
VueRouter.prototype.push = function push(location) {
return originalPush.call(this, location).catch(err => err)
}这里配置了导航重复导航的问题,我们在响应拦截器配置了code非200的跳转登录的情况,为了避免登录失败导致跳转登录页面,重复导航的问题
5.后端加入跨域的配置文件
import org.springframework.context.annotation.Bean;
import org.springframework.context.annotation.Configuration;
import org.springframework.web.cors.CorsConfiguration;
import org.springframework.web.cors.UrlBasedCorsConfigurationSource;
import org.springframework.web.filter.CorsFilter;

@Configuration
public class CrossConfig {
    @Bean
    public CorsFilter corsFilter() {
        final UrlBasedCorsConfigurationSource source = new UrlBasedCorsConfigurationSource();
        final CorsConfiguration corsConfiguration = new CorsConfiguration();
        //corsConfiguration.setAllowCredentials(true);  // 允许 携带cookie 的信息
        corsConfiguration.addAllowedHeader("*"); // 允许所有的头
        corsConfiguration.addAllowedOrigin("*");// 允许所有的请求源
        corsConfiguration.addAllowedMethod("*");  // 所欲的方法   get post delete put
        source.registerCorsConfiguration("/**", corsConfiguration); // 所有的路径都允许跨域
        return new CorsFilter(source);
    }

}
6.统一返回数据实体
@Data
@AllArgsConstructor //
@NoArgsConstructor //
public class Result<T> {
    /**
     * code编码
     */
    private Integer code = 200;
    /**
     * 消息
     */
    private String msg = "操作成功";
    /**
     * 具体的数据
     */
    private T t;

    /**
     * 成功的静态方法
     */
    public static <T> Result  success(T t){
        return new Result<>(200,"操作成功",t);
    }

    public static <T>  Result  <T>  fail(){
        return new Result<>(500,"操作失败",null);
    }

    public static <T>  Result  <T>  forbidden(){
        return new Result<>(403,"权限不允许",null);
    }
}
7.对实现了UserDetailsService接口的service层进行了修改
@Service
public class MyUserDetailService implements UserDetailsService {
    @Resource
    private TabUserMapper userMapper;
    @Resource
    private TabUserRoleMapper userRoleMapper;
    @Resource
    private TabRoleMapper roleMapper;
    @Resource
    private TabMenuMapper menuMapper;

//    根据用户的名字 加载用户的信息
    @Override
    public UserDetails loadUserByUsername(String username) throws UsernameNotFoundException {
//        username 代表前端传递过来的名字
//        根据名字去数据库查询一下有没有这个用户的信息
        QueryWrapper queryWrapper = new QueryWrapper();
        queryWrapper.eq("username",username);
        TabUser tabUser = userMapper.selectOne(queryWrapper);
        if(tabUser != null) {
//            有值 查询用户对应的角色的id
            QueryWrapper queryWrapper1 = new QueryWrapper();
            queryWrapper1.eq("uid",tabUser.getId());
            List<TabUserRole> tabUserRoles = userRoleMapper.selectList(queryWrapper1);
            List<Integer> rids = tabUserRoles.stream().map(tabUserRole -> tabUserRole.getRid()).collect(Collectors.toList());
//            根据角色的id 查询rcode
            List<TabRole> tabRoles = roleMapper.selectBatchIds(rids);
//            角色的修信息 角色管理 修改角色的名字
            List<SimpleGrantedAuthority> collect = tabRoles.stream().map(tabRole -> new SimpleGrantedAuthority("ROLE_" + tabRole.getRcode())).collect(Collectors.toList());
//            根据角色的id 查询菜单的mcode
            List<TabMenu> menus = menuMapper.selectCodeByRids(rids);
            List<SimpleGrantedAuthority> resources = menus.stream().map(tabMenu -> new SimpleGrantedAuthority(tabMenu.getMcode())).collect(Collectors.toList());
//            将角色的所有信息,和资源信息合并在一起
            List<SimpleGrantedAuthority> allresource = Stream.concat(collect.stream(), resources.stream()).collect(Collectors.toList());
            return new User(username, tabUser.getPassword(), allresource);
        }
        return null;
    }
}
8.数据链路层,对前后端的认证进行判断与返回的JSON数据
@Component
public class JwtFilter extends OncePerRequestFilter {
    @Override
    protected void doFilterInternal(HttpServletRequest request, HttpServletResponse response, FilterChain filterChain) throws ServletException, IOException {
        /*解析token
        1.获取token -> 存在 -> 解析
          不存在返回 null 没有认证
        2.效验token真的还是假的 真-> 过 -> 用户的信息存放到安全框架的上下文路径里面
          假-> 返回一个Json 数据 没有认证
        * */
        String[] whitename = {"/userlogin"};
        String token = request.getHeader("token");
//        token存在
        if(StringUtils.isNotBlank(token)) {
//            存在 解析
            boolean verify = JWTUtil.verify(token, "hp".getBytes());
            if(verify) {
//                效验合格
//                获取用户的名字 和密码的信息
                JWT jwt = JWTUtil.parseToken(token);
                String username = (String) jwt.getPayload("username");
                List<String> resources = (List<String>) jwt.getPayload("resources");
//                资源的信息
                List<SimpleGrantedAuthority> collect = resources.stream().map(s -> new SimpleGrantedAuthority(s)).collect(Collectors.toList());
//                保存用户的信息
                UsernamePasswordAuthenticationToken usertoken = new UsernamePasswordAuthenticationToken(username, null, collect);
//                存起来用户的信息
                SecurityContextHolder.getContext().setAuthentication(usertoken);
//                放行
                filterChain.doFilter(request,response);
            }else  {
                Result result = new Result(401, "没有登录", null);
                printJsonData(response,result);
            }
        }else {
//              查看是否在白名单 如果在 就放行
            String requestURL = request.getRequestURI();
            if(ArrayUtils.contains(whitename,requestURL)) {
                filterChain.doFilter(request,response);
            }else {
                Result result = new Result(401, "没有登录", null);
                printJsonData(response,result);
            }
        }
    }
    public void printJsonData(HttpServletResponse response, Result result) {
        try {
            response.setContentType("application/json;charset=utf8"); //json格式 编码是中文
            ObjectMapper objectMapper = new ObjectMapper();
            String s = objectMapper.writeValueAsString(result);// 使用objectMapper将result转化为json字符串
            PrintWriter writer = response.getWriter();
            writer.print(s);
            writer.flush();
            writer.close();
        }catch (Exception e) {
            e.printStackTrace();
        }
    }
}
9.对config文件进行修改(前后端分离情况)
@Configuration
public class SecurityConfig extends WebSecurityConfigurerAdapter {
    @Resource
    private JwtFilter jwtFilter;

    @Override
    protected void configure(HttpSecurity http) throws Exception {
        //    配置 登录form 表单
//    路劲前面必须加 /
        http.formLogin()
                .loginProcessingUrl("/userlogin")
                .successHandler((request, response, authentication) -> {
                    System.out.println("authentication"+authentication);
//                    资源的信息
                    Collection<? extends GrantedAuthority> authorities = authentication.getAuthorities();
                    List<String> allresources = authorities.stream().map(s -> s.getAuthority()).collect(Collectors.toList());
                    System.out.println("allresources"+allresources);
//                    认证成功
//                    生成token
                    Map map =new HashMap<>();
                    map.put("username",authentication.getName());  // 认证成功之后 用户的名字
                    map.put("resources",allresources);
//                    资源的信息
                    设置签发时间
//                    Calendar instance = Calendar.getInstance(); //获取当前的时间
//                    Date time = instance.getTime();
                    过期的时间设置为2小时之后
//                    instance.add(Calendar.HOUR,2); //两个小时之后
//                    Date time1 = instance.getTime();
//                    map.put(JWTPayload.EXPIRES_AT,time1);
//                    map.put(JWTPayload.ISSUED_AT,time);
//                    map.put(JWTPayload.NOT_BEFORE,time);
                    String token = JWTUtil.createToken(map, "hp".getBytes());
                    System.out.println(token);
                    Result result = new Result(200,"登录成功",token);
                    printJsonData(response,result);
                }) //前后端分离的时候 认证成功 走的方法
                .failureHandler((request, response, exception) -> {
                    Result result = new Result(500, "失败", null);
                    printJsonData(response,result);
                }); //认证失败 走的方法
        http.authorizeRequests().antMatchers("/userlogin").permitAll(); //代表放行 "/userlogin"
        http.authorizeRequests().anyRequest().authenticated();
//        权限不允许的时候
        http.exceptionHandling().accessDeniedHandler((request, response, accessDeniedException) -> {
            Result result = new Result(403, "权限不允许", null);
            printJsonData(response,result);
        });
        http.addFilterBefore(jwtFilter, UsernamePasswordAuthenticationFilter.class);
//         csrf 方便html文件 能够通过
        http.csrf().disable();
        http.cors();   // 可以跨域

    }
    @Resource
    private UserDetailsService userDetailsService;

    @Bean
    public PasswordEncoder getPassword() {
        return new BCryptPasswordEncoder();
    }

    //    自定义用户的信息
    @Override
    protected void configure(AuthenticationManagerBuilder auth) throws Exception {
        auth.userDetailsService(userDetailsService).passwordEncoder(getPassword());
    }
    public void printJsonData(HttpServletResponse response, Result result) {
        try {
            response.setContentType("application/json;charset=utf8");
            ObjectMapper objectMapper = new ObjectMapper();
            String s = objectMapper.writeValueAsString(result);
            PrintWriter writer = response.getWriter();
            writer.print(s);
            writer.flush();
            writer.close();
        }catch (Exception e) {
            e.printStackTrace();
        }
    }
}
