目录
- 前言
- 一、YOLOv8-Pose推理(Python)
- 1. YOLOv8-Pose预测
- 2. YOLOv8-Pose预处理
- 3. YOLOv8-Pose后处理
- 4. YOLOv8-Pose推理
- 二、YOLOv8-Pose推理(C++)
- 1. ONNX导出
- 2. YOLOv8-Pose预处理
- 3. YOLOv8-Pose后处理
- 4. YOLOv8-Pose推理
- 三、YOLOv8-Pose部署
- 1. 源码下载
- 2. 环境配置
- 2.1 配置CMakeLists.txt
- 2.2 配置Makefile
- 3. ONNX导出
- 4. 源码修改
- 5. 运行
- 结语
- 下载链接
- 参考
前言
梳理下 YOLOv8-Pose 的预处理和后处理流程,顺便让 tensorRT_Pro 支持 YOLOv8-Pose
参考:https://github.com/shouxieai/tensorRT_Pro
实现:https://github.com/Melody-Zhou/tensorRT_Pro-YOLOv8
一、YOLOv8-Pose推理(Python)
1. YOLOv8-Pose预测
我们先尝试利用官方预训练权重来推理一张图片并保存,看能否成功
在 YOLOv8 主目录下新建 predict-pose.py 预测文件,其内容如下:
import cv2
import numpy as np
from ultralytics import YOLO

def hsv2bgr(h, s, v):
    h_i = int(h * 6)
    f = h * 6 - h_i
    p = v * (1 - s)
    q = v * (1 - f * s)
    t = v * (1 - (1 - f) * s)

    r, g, b = 0, 0, 0

    if h_i == 0:
        r, g, b = v, t, p
    elif h_i == 1:
        r, g, b = q, v, p
    elif h_i == 2:
        r, g, b = p, v, t
    elif h_i == 3:
        r, g, b = p, q, v
    elif h_i == 4:
        r, g, b = t, p, v
    elif h_i == 5:
        r, g, b = v, p, q

    return int(b * 255), int(g * 255), int(r * 255)

def random_color(id):
    h_plane = (((id << 2) ^ 0x937151) % 100) / 100.0
    s_plane = (((id << 3) ^ 0x315793) % 100) / 100.0
    return hsv2bgr(h_plane, s_plane, 1)

skeleton = [[16, 14], [14, 12], [17, 15], [15, 13], [12, 13], [6, 12], [7, 13], [6, 7], [6, 8],
            [7, 9], [8, 10], [9, 11], [2, 3], [1, 2], [1, 3], [2, 4], [3, 5], [4, 6], [5, 7]]
pose_palette = np.array([[255, 128, 0], [255, 153, 51], [255, 178, 102], [230, 230, 0], [255, 153, 255],
                         [153, 204, 255], [255, 102, 255], [255, 51, 255], [102, 178, 255], [51, 153, 255],
                         [255, 153, 153], [255, 102, 102], [255, 51, 51], [153, 255, 153], [102, 255, 102],
                         [51, 255, 51], [0, 255, 0], [0, 0, 255], [255, 0, 0], [255, 255, 255]],dtype=np.uint8)
kpt_color  = pose_palette[[16, 16, 16, 16, 16, 0, 0, 0, 0, 0, 0, 9, 9, 9, 9, 9, 9]]
limb_color = pose_palette[[9, 9, 9, 9, 7, 7, 7, 0, 0, 0, 0, 0, 16, 16, 16, 16, 16, 16, 16]]

if __name__ == "__main__":

    model = YOLO("yolov8s-pose.pt")

    img = cv2.imread("ultralytics/assets/bus.jpg")
    results = model(img)[0]
    names   = results.names
    boxes   = results.boxes.data.tolist()

    # keypoints.data.shape -> n,17,3
    keypoints = results.keypoints.cpu().numpy()

    # keypoint -> 每个人的关键点
    for keypoint in keypoints.data:
        for i, (x, y, conf) in enumerate(keypoint):
            color_k = [int(x) for x in kpt_color[i]]
            if conf < 0.5:
                continue
            if x != 0 and y != 0:
                cv2.circle(img, (int(x), int(y)), 5, color_k , -1, lineType=cv2.LINE_AA)
        for i, sk in enumerate(skeleton):
            pos1 = (int(keypoint[(sk[0] - 1), 0]), int(keypoint[(sk[0] - 1), 1]))
            pos2 = (int(keypoint[(sk[1] - 1), 0]), int(keypoint[(sk[1] - 1), 1]))

            conf1 = keypoint[(sk[0] - 1), 2]
            conf2 = keypoint[(sk[1] - 1), 2]
            if conf1 < 0.5 or conf2 < 0.5:
                continue
            if pos1[0] == 0 or pos1[1] == 0 or pos2[0] == 0 or pos2[1] == 0:
                continue
            cv2.line(img, pos1, pos2, [int(x) for x in limb_color[i]], thickness=2, lineType=cv2.LINE_AA)

    for obj in boxes:
        left, top, right, bottom = int(obj[0]), int(obj[1]), int(obj[2]), int(obj[3])
        confidence = obj[4]
        label = int(obj[5])
        color = random_color(label)
        cv2.rectangle(img, (left, top), (right, bottom), color = color ,thickness=2, lineType=cv2.LINE_AA)
        caption = f"{names[label]} {confidence:.2f}"
        w, h = cv2.getTextSize(caption, 0, 1, 2)[0]
        cv2.rectangle(img, (left - 3, top - 33), (left + w + 10, top), color, -1)
        cv2.putText(img, caption, (left, top - 5), 0, 1, (0, 0, 0), 2, 16)

    cv2.imwrite("predict-pose.jpg", img)
    print("save done")
在上述代码中我们通过 opencv 读取了一张图像,并送入模型中推理得到输出 results,results 中保存着不同任务的结果,我们这里是姿态点估计任务,因此只需要拿到对应的 boxes 和 keypoints 即可。
拿到 boxes 后我们就可以将对应的框和置信度绘制在图像上,拿到 keypoints 后我们就可以将对应的人体 17 个关键点绘制在图像上并保存。
关于 boxes 可视化的代码实现参考自 tensorRT_Pro 中的实现,可以参考:app_yolo.cpp#L95
关于 keypoints 可视化的代码实现参考自 ultralytics/utils/plotting.py 中的实现,可以参考:plotting.py#L171
关于随机颜色的代码实现参考自 tensorRT_Pro 中的实现,可以参考:ilogger.cpp#L90
模型推理保存的结果图像如下所示:

2. YOLOv8-Pose预处理
模型预测成功后我们就需要自己动手来写下 YOLOv8-Pose 的预处理和后处理,方便后续在 C++ 上的实现,我们先来看看预处理的实现
经过我们的调试分析可知 YOLOv8-Pose 的预处理过程在 ultralytics/engine/predictor.py 文件中,可以参考:predictor.py#L111
代码如下:
def preprocess(self, im):
    """
    Prepares input image before inference.

    Args:
        im (torch.Tensor | List(np.ndarray)): BCHW for tensor, [(HWC) x B] for list.
    """
    not_tensor = not isinstance(im, torch.Tensor)
    if not_tensor:
        im = np.stack(self.pre_transform(im))
        im = im[..., ::-1].transpose((0, 3, 1, 2))  # BGR to RGB, BHWC to BCHW, (n, 3, h, w)
        im = np.ascontiguousarray(im)  # contiguous
        im = torch.from_numpy(im)

    im = im.to(self.device)
    im = im.half() if self.model.fp16 else im.float()  # uint8 to fp16/32
    if not_tensor:
        im /= 255  # 0 - 255 to 0.0 - 1.0
    return im
它包含以下步骤:
- self.pre_transform:即 letterbox 添加灰条
- im[…,::-1]:BGR → RGB
- transpose((0, 3, 1, 2)):添加 batch 维度,HWC → CHW
- torch.from_numpy:to Tensor
- im /= 255:除以 255,归一化
大家如果对 YOLOv5 的预处理熟悉的话,会发现 YOLOv8-Pose 的预处理和 YOLOv5 的预处理一模一样,因此我们不难写出对应的预处理代码,如下所示:
def preprocess_warpAffine(image, dst_width=640, dst_height=640):
    scale = min((dst_width / image.shape[1], dst_height / image.shape[0]))
    ox = (dst_width  - scale * image.shape[1]) / 2
    oy = (dst_height - scale * image.shape[0]) / 2
    M = np.array([
        [scale, 0, ox],
        [0, scale, oy]
    ], dtype=np.float32)

    img_pre = cv2.warpAffine(image, M, (dst_width, dst_height), flags=cv2.INTER_LINEAR,
                             borderMode=cv2.BORDER_CONSTANT, borderValue=(114, 114, 114))
    IM = cv2.invertAffineTransform(M)

    img_pre = (img_pre[...,::-1] / 255.0).astype(np.float32)
    img_pre = img_pre.transpose(2, 0, 1)[None]
    img_pre = torch.from_numpy(img_pre)
    return img_pre, IM
其中的 letterbox 添加灰条步骤我们可以通过仿射变换 warpAffine 实现,warpAffine 非常适合在 CUDA 上加速,关于 warpAffine 仿射变换的细节大家可以参考 YOLOv5推理详解及预处理高性能实现,这边不再赘述。其它步骤倒是和官方的没有区别。
值得注意得是,letterbox 的操作是先将长边缩放到 640,再将短边按比例缩放,同时确保缩放后的短边能整除 32,如果不能则向上取整多余部分填充。warpAffine 的操作则是将图像分辨率固定在 640x640,多余部分添加灰条,博主对一张 1080x810 分辨率的图像经过两种不同预处理后的结果进行了对比,如下图所示:


可以看到二者明显的差别,letterbox 中没有灰条,因为长边缩放到 640 后短边刚好缩放到 480,能整除 32。而 warpAffine 则是固定分辨率 640x640,因此短边多余部分将用灰条填充。
warpAffine 预处理方法将图像分辨率固定在 640x640,主要有以下几点考虑:(from chatGPT)
- 简化处理逻辑:所有预处理后的图像分辨率相同,可以简化 CUDA 中并行处理的逻辑,使得代码更易于编写和维护。
- 优化内存访问:在 GPU 上,连续的内存访问模式通常比非连续的访问更高效。如果所有图像具有相同的大小和布局,这可以帮助优化内存访问,提高处理速度。
- 避免动态内存分配:动态内存分配和释放是昂贵的操作,特别是在 GPU 上。固定分辨率意味着可以预先分配足够的内存,而不需要根据每个图像的大小动态调整内存大小。
这两种不同的预处理方法生成的图片输入到神经网络时的维度不同,letterbox 的输入是 torch.Size([1, 3, 640, 480]),warpAffine 的输入是 torch.Size([1, 3, 640, 640])。由于输入维度不同将导致模型输出维度的差异,leetrbox 的输出是 torch.Size([1, 56, 6300]) 只有 6300 个框,而 warpAffine 的输出是 torch.Size([1, 56, 8400]) 有 8400 个框,这点大家需要清楚。
3. YOLOv8-Pose后处理
我们再来看看后处理的实现
经过我们的调试分析可知 YOLOv8-Pose 的后处理过程在 ultralytics/models/yolo/pose/predict.py 文件中,可以参考:pose/predict.py#L31
class PosePredictor(DetectionPredictor):
    """
    A class extending the DetectionPredictor class for prediction based on a pose model.

    Example:
        ```python
        from ultralytics.utils import ASSETS
        from ultralytics.models.yolo.pose import PosePredictor

        args = dict(model='yolov8n-pose.pt', source=ASSETS)
        predictor = PosePredictor(overrides=args)
        predictor.predict_cli()

    """

    def __init__(self, cfg=DEFAULT_CFG, overrides=None, _callbacks=None):
        """Initializes PosePredictor, sets task to 'pose' and logs a warning for using 'mps' as device."""
        super().__init__(cfg, overrides, _callbacks)
        self.args.task = 'pose'
        if isinstance(self.args.device, str) and self.args.device.lower() == 'mps':
            LOGGER.warning("WARNING ⚠️ Apple MPS known Pose bug. Recommend 'device=cpu' for Pose models. "
                           'See https://github.com/ultralytics/ultralytics/issues/4031.')

    def postprocess(self, preds, img, orig_imgs):
        """Return detection results for a given input image or list of images."""
        preds = ops.non_max_suppression(preds,
                                        self.args.conf,
                                        self.args.iou,
                                        agnostic=self.args.agnostic_nms,
                                        max_det=self.args.max_det,
                                        classes=self.args.classes,
                                        nc=len(self.model.names))

        if not isinstance(orig_imgs, list):  # input images are a torch.Tensor, not a list
            orig_imgs = ops.convert_torch2numpy_batch(orig_imgs)

        results = []
        for i, pred in enumerate(preds):
            orig_img = orig_imgs[i]
            pred[:, :4] = ops.scale_boxes(img.shape[2:], pred[:, :4], orig_img.shape).round()
            pred_kpts = pred[:, 6:].view(len(pred), *self.model.kpt_shape) if len(pred) else pred[:, 6:]
            pred_kpts = ops.scale_coords(img.shape[2:], pred_kpts, orig_img.shape)
            img_path = self.batch[0][i]
            results.append(
                Results(orig_img, path=img_path, names=self.model.names, boxes=pred[:, :6], keypoints=pred_kpts))
        return results
它包含以下步骤:
- ops.non_max_suppression:非极大值抑制,即 NMS
- ops.scale_boxes:框的解码,即 decode boxes
- ops.scale_coords:关键点的解码,即 decode keypoints
大家如果对 YOLOv5 的后处理熟悉的话,会发现 YOLOv8-Pose 的后处理中检测框的处理和 YOLOv5 中的基本一样,只是需要大家额外处理下关键点,因此我们不难写出对应的后处理代码,如下所示:
def iou(box1, box2):

    def area_box(box):
        return (box[2] - box[0]) * (box[3] - box[1])

    left, top = max(box1[:2], box2[:2])
    right, bottom = min(box1[2:4], box2[2:4])
    union = max((right - left), 0) * max((bottom - top), 0)
    cross = area_box(box1) + area_box(box2) - union
    if cross == 0 or union == 0:
        return 0
    return union / cross

def NMS(boxes, iou_thres):

    remove_flags = [False] * len(boxes)

    keep_boxes = []
    for i, ibox in enumerate(boxes):
        if remove_flags[i]:
            continue

        keep_boxes.append(ibox)
        for j in range(i + 1, len(boxes)):
            if remove_flags[j]:
                continue

            jbox = boxes[j]
            if iou(ibox, jbox) > iou_thres:
                remove_flags[j] = True
    return keep_boxes

def postprocess(pred, IM=[], conf_thres=0.25, iou_thres=0.45):

    # 输入是模型推理的结果,即8400个预测框
    # 1,8400,56 [cx,cy,w,h,conf,17*3]
    boxes = []
    for img_id, box_id in zip(*np.where(pred[...,4] > conf_thres)):
        item = pred[img_id, box_id]
        cx, cy, w, h, conf = item[:5]
        left    = cx - w * 0.5
        top     = cy - h * 0.5
        right   = cx + w * 0.5
        bottom  = cy + h * 0.5
        keypoints = item[5:].reshape(-1, 3)
        keypoints[:, 0] = keypoints[:, 0] * IM[0][0] + IM[0][2]
        keypoints[:, 1] = keypoints[:, 1] * IM[1][1] + IM[1][2]
        boxes.append([left, top, right, bottom, conf, *keypoints.reshape(-1).tolist()])

    boxes = np.array(boxes)
    lr = boxes[:,[0, 2]]
    tb = boxes[:,[1, 3]]
    boxes[:,[0,2]] = IM[0][0] * lr + IM[0][2]
    boxes[:,[1,3]] = IM[1][1] * tb + IM[1][2]
    boxes = sorted(boxes.tolist(), key=lambda x:x[4], reverse=True)

    return NMS(boxes, iou_thres)
其中预测框的解码我们是通过仿射变换逆矩阵 IM 实现的,关于 IM 的细节大家可以参考 YOLOv5推理详解及预处理高性能实现,这边不再赘述。关于 NMS 的代码参考自 tensorRT_Pro 中的实现:yolo.cpp#L119
关键点的解码我们同样可以通过 IM 将其映射回原图上,因此 YOLOv8-Pose 的后处理和 YOLOv5 的基本上没什么区别,只是需要大家清楚模型预测的结果中每个维度所代表的含义即可
对于一张 640x640 的图片来说,YOLOv8-Pose 预测框的总数量是 8400,每个预测框的维度是 56(针对 COCO 数据集的人体 17 个关键点而言)
8400
×
56
=
80
×
80
×
56
+
40
×
40
×
56
+
20
×
20
×
56
=
80
×
80
×
(
5
+
51
)
+
40
×
40
×
(
5
+
51
)
+
20
×
20
×
(
5
+
51
)
=
80
×
80
×
(
5
+
17
×
3
)
+
40
×
40
×
(
5
+
17
×
3
)
+
20
×
20
×
(
5
+
17
×
3
)
\begin{aligned} 8400\times56&=80\times80\times56+40\times40\times56+20\times20\times56\\ &=80\times80\times(5+51)+40\times40\times(5+51)+20\times20\times(5+51)\\ &=80\times80\times(5+17\times3)+40\times40\times(5+17\times3)+20\times20\times(5+17\times3)\\ \end{aligned}
8400×56=80×80×56+40×40×56+20×20×56=80×80×(5+51)+40×40×(5+51)+20×20×(5+51)=80×80×(5+17×3)+40×40×(5+17×3)+20×20×(5+17×3)
其中的 5 对应的是 cx, cy, w, h, conf,分别代表的含义是边界框中心点坐标、宽高以及置信度;17 对应的是 COCO 数据集中的人体 17 个关键点,3 代表每个关键点的信息,包括 x, y, visibility,分别代表的含义是关键点的 x 和 y 坐标以及可见性或者说置信度,在对关键点进行可视化时我们只会可视化那些 visibility 大于 0.5 的关键点,因为低于 0.5 的关键点我们认为它被遮挡或者不在图像上。
目前主流的姿态点估计算法分为两种,一种是 top-down 自顶向下,先检测出图像中所有的人体检测框,再根据每个检测框识别姿态;另一种是 bottom-up 自低向上,先检测出图像中所有的骨骼点,再通过拼接得到多个人的骨架。两种方法各有优缺点,其中自顶向上的方法,姿态检测的准确度非常依赖目标检测框的质量;而自低向上的方法,如果两人离得非常近,容易出现模棱两可的情况,而且由于是依赖两个骨骼点之间的关系,所以失去了对全局的信息获取。
像 AlphaPose 和 YOLOv8-Pose 模型都是采用的自顶向下的方法,即先检测出所有的人体框再对每个人体做姿态估计。
4. YOLOv8-Pose推理
通过上面对 YOLOv8-Pose 的预处理和后处理分析之后,整个推理过程就显而易见了。YOLOv8-Pose 的推理包括图像预处理、模型推理、预测结果后处理三部分,其中预处理主要包括 warpAffine 仿射变换,后处理主要包括 boxes、keypoints 的 decode 解码和 NMS 两部分。
完整的推理代码如下:
import cv2
import torch
import numpy as np
from ultralytics.data.augment import LetterBox
from ultralytics.nn.autobackend import AutoBackend

def preprocess_letterbox(image):
    letterbox = LetterBox(new_shape=640, stride=32, auto=True)
    image = letterbox(image=image)
    image = (image[..., ::-1] / 255.0).astype(np.float32) # BGR to RGB, 0 - 255 to 0.0 - 1.0
    image = image.transpose(2, 0, 1)[None]  # BHWC to BCHW (n, 3, h, w)
    image = torch.from_numpy(image)
    return image

def preprocess_warpAffine(image, dst_width=640, dst_height=640):
    scale = min((dst_width / image.shape[1], dst_height / image.shape[0]))
    ox = (dst_width  - scale * image.shape[1]) / 2
    oy = (dst_height - scale * image.shape[0]) / 2
    M = np.array([
        [scale, 0, ox],
        [0, scale, oy]
    ], dtype=np.float32)

    img_pre = cv2.warpAffine(image, M, (dst_width, dst_height), flags=cv2.INTER_LINEAR,
                             borderMode=cv2.BORDER_CONSTANT, borderValue=(114, 114, 114))
    IM = cv2.invertAffineTransform(M)

    img_pre = (img_pre[...,::-1] / 255.0).astype(np.float32)
    img_pre = img_pre.transpose(2, 0, 1)[None]
    img_pre = torch.from_numpy(img_pre)
    return img_pre, IM

def iou(box1, box2):

    def area_box(box):
        return (box[2] - box[0]) * (box[3] - box[1])

    left, top = max(box1[:2], box2[:2])
    right, bottom = min(box1[2:4], box2[2:4])
    union = max((right-left), 0) * max((bottom-top), 0)
    cross = area_box(box1) + area_box(box2) - union
    if cross == 0 or union == 0:
        return 0
    return union / cross

def NMS(boxes, iou_thres):

    remove_flags = [False] * len(boxes)

    keep_boxes = []
    for i, ibox in enumerate(boxes):
        if remove_flags[i]:
            continue

        keep_boxes.append(ibox)
        for j in range(i + 1, len(boxes)):
            if remove_flags[j]:
                continue

            jbox = boxes[j]
            if iou(ibox, jbox) > iou_thres:
                remove_flags[j] = True
    return keep_boxes

def postprocess(pred, IM=[], conf_thres=0.25, iou_thres=0.45):

    # 输入是模型推理的结果,即8400个预测框
    # 1,8400,56 [cx,cy,w,h,conf,17*3]
    boxes = []
    for img_id, box_id in zip(*np.where(pred[...,4] > conf_thres)):
        item = pred[img_id, box_id]
        cx, cy, w, h, conf = item[:5]
        left    = cx - w * 0.5
        top     = cy - h * 0.5
        right   = cx + w * 0.5
        bottom  = cy + h * 0.5
        keypoints = item[5:].reshape(-1, 3)
        keypoints[:, 0] = keypoints[:, 0] * IM[0][0] + IM[0][2]
        keypoints[:, 1] = keypoints[:, 1] * IM[1][1] + IM[1][2]
        boxes.append([left, top, right, bottom, conf, *keypoints.reshape(-1).tolist()])

    boxes = np.array(boxes)
    lr = boxes[:,[0, 2]]
    tb = boxes[:,[1, 3]]
    boxes[:,[0,2]] = IM[0][0] * lr + IM[0][2]
    boxes[:,[1,3]] = IM[1][1] * tb + IM[1][2]
    boxes = sorted(boxes.tolist(), key=lambda x:x[4], reverse=True)

    return NMS(boxes, iou_thres)

def hsv2bgr(h, s, v):
    h_i = int(h * 6)
    f = h * 6 - h_i
    p = v * (1 - s)
    q = v * (1 - f * s)
    t = v * (1 - (1 - f) * s)

    r, g, b = 0, 0, 0

    if h_i == 0:
        r, g, b = v, t, p
    elif h_i == 1:
        r, g, b = q, v, p
    elif h_i == 2:
        r, g, b = p, v, t
    elif h_i == 3:
        r, g, b = p, q, v
    elif h_i == 4:
        r, g, b = t, p, v
    elif h_i == 5:
        r, g, b = v, p, q

    return int(b * 255), int(g * 255), int(r * 255)

def random_color(id):
    h_plane = (((id << 2) ^ 0x937151) % 100) / 100.0
    s_plane = (((id << 3) ^ 0x315793) % 100) / 100.0
    return hsv2bgr(h_plane, s_plane, 1)

skeleton = [[16, 14], [14, 12], [17, 15], [15, 13], [12, 13], [6, 12], [7, 13], [6, 7], [6, 8],
            [7, 9], [8, 10], [9, 11], [2, 3], [1, 2], [1, 3], [2, 4], [3, 5], [4, 6], [5, 7]]
pose_palette = np.array([[255, 128, 0], [255, 153, 51], [255, 178, 102], [230, 230, 0], [255, 153, 255],
                         [153, 204, 255], [255, 102, 255], [255, 51, 255], [102, 178, 255], [51, 153, 255],
                         [255, 153, 153], [255, 102, 102], [255, 51, 51], [153, 255, 153], [102, 255, 102],
                         [51, 255, 51], [0, 255, 0], [0, 0, 255], [255, 0, 0], [255, 255, 255]],dtype=np.uint8)
kpt_color  = pose_palette[[16, 16, 16, 16, 16, 0, 0, 0, 0, 0, 0, 9, 9, 9, 9, 9, 9]]
limb_color = pose_palette[[9, 9, 9, 9, 7, 7, 7, 0, 0, 0, 0, 0, 16, 16, 16, 16, 16, 16, 16]]

if __name__ == "__main__":

    img = cv2.imread("ultralytics/assets/bus.jpg")

    # img = preprocess_letterbox(img)
    img_pre, IM = preprocess_warpAffine(img)

    model  = AutoBackend(weights="yolov8s-pose.pt")
    names  = model.names
    result = model(img_pre)[0].transpose(-1, -2)  # 1,8400,56

    boxes = postprocess(result, IM)

    for box in boxes:
        left, top, right, bottom = int(box[0]), int(box[1]), int(box[2]), int(box[3])
        confidence = box[4]
        label = 0
        color = random_color(label)
        cv2.rectangle(img, (left, top), (right, bottom), color, 2, cv2.LINE_AA)
        caption = f"{names[label]} {confidence:.2f}"
        w, h = cv2.getTextSize(caption, 0, 1, 2)[0]
        cv2.rectangle(img, (left - 3, top - 33), (left + w + 10, top), color, -1)
        cv2.putText(img, caption, (left, top - 5), 0, 1, (0, 0, 0), 2, 16)

        keypoints = box[5:]
        keypoints = np.array(keypoints).reshape(-1, 3)
        for i, keypoint in enumerate(keypoints):
            x, y, conf = keypoint
            color_k = [int(x) for x in kpt_color[i]]
            if conf < 0.5:
                continue
            if x != 0 and y != 0:
                cv2.circle(img, (int(x), int(y)), 5, color_k, -1, lineType=cv2.LINE_AA)

        for i, sk in enumerate(skeleton):
            pos1 = (int(keypoints[(sk[0] - 1), 0]), int(keypoints[(sk[0] - 1), 1]))
            pos2 = (int(keypoints[(sk[1] - 1), 0]), int(keypoints[(sk[1] - 1), 1]))

            conf1 = keypoints[(sk[0] - 1), 2]
            conf2 = keypoints[(sk[1] - 1), 2]
            if conf1 < 0.5 or conf2 < 0.5:
                continue
            if pos1[0] == 0 or pos1[1] == 0 or pos2[0] == 0 or pos2[1] == 0:
                continue
            cv2.line(img, pos1, pos2, [int(x) for x in limb_color[i]], thickness=2, lineType=cv2.LINE_AA)

    cv2.imwrite("infer-pose.jpg", img)
    print("save done")
推理效果如下图所示:

至此,我们在 Python 上面完成了 YOLOv8-Pose 的整个推理过程,下面我们去 C++ 上实现。
二、YOLOv8-Pose推理(C++)
C++ 上的实现我们使用的 repo 依旧是 tensorRT_Pro,现在我们就基于 tensorRT_Pro 完成 YOLOv8-Pose 在 C++ 上的推理。
1. ONNX导出
首先我们需要将 YOLOv8-Pose 模型导出为 ONNX,为了适配 tensorRT_Pro 我们需要做一些修改,主要有以下几点:
- 修改输出节点名为 output,输入输出只让 batch 维度动态,宽高不动态
- 增加 transpose 节点交换输出的 2、3 维度
具体修改如下:
1. 在 ultralytics/engine/exporter.py 文件中改动一处
- 323 行:输出节点名修改为 output
- 326 行:输入只让 batch 维度动态,宽高不动态
- 327 行:输出只让 batch 维度动态,宽高不动态
# ========== exporter.py ==========

# ultralytics/engine/exporter.py第323行
# output_names = ['output0', 'output1'] if isinstance(self.model, SegmentationModel) else ['output0']
# dynamic = self.args.dynamic
# if dynamic:
#     dynamic = {'images': {0: 'batch', 2: 'height', 3: 'width'}}  # shape(1,3,640,640)
#     if isinstance(self.model, SegmentationModel):
#         dynamic['output0'] = {0: 'batch', 2: 'anchors'}  # shape(1, 116, 8400)
#         dynamic['output1'] = {0: 'batch', 2: 'mask_height', 3: 'mask_width'}  # shape(1,32,160,160)
#     elif isinstance(self.model, DetectionModel):
#         dynamic['output0'] = {0: 'batch', 2: 'anchors'}  # shape(1, 84, 8400)
# 修改为:

output_names = ['output0', 'output1'] if isinstance(self.model, SegmentationModel) else ['output']
dynamic = self.args.dynamic
if dynamic:
    dynamic = {'images': {0: 'batch'}}  # shape(1,3,640,640)
    dynamic['output'] = {0: 'batch'}
    if isinstance(self.model, SegmentationModel):
        dynamic['output0'] = {0: 'batch', 2: 'anchors'}  # shape(1, 116, 8400)
        dynamic['output1'] = {0: 'batch', 2: 'mask_height', 3: 'mask_width'}  # shape(1,32,160,160)
    elif isinstance(self.model, DetectionModel):
        dynamic['output0'] = {0: 'batch', 2: 'anchors'}  # shape(1, 84, 8400)
2. 在 ultralytics/nn/modules/head.py 文件中改动一处
- 130 行:添加 transpose 节点交换第 2 和第 3 维度
# ========== head.py ==========

# ultralytics/nn/modules/head.py第130行,forward函数
# return torch.cat([x, pred_kpt], 1) if self.export else (torch.cat([x[0], pred_kpt], 1), (x[1], kpt))
# 修改为:

return torch.cat([x, pred_kpt], 1).permute(0, 2, 1) if self.export else (torch.cat([x[0], pred_kpt], 1), (x[1], kpt))
以上就是为了适配 tensorRT_Pro 而做出的代码修改,修改好以后,将预训练权重 yolov8s-pose.pt 放在 ultralytics-main 主目录下,新建导出文件 export.py,内容如下:
from ultralytics import YOLO

model = YOLO("yolov8s-pose.pt")

success = model.export(format="onnx", dynamic=True, simplify=True)
在终端执行如下指令即可完成 onnx 导出:
python export.py
导出过程如下图所示:

可以看到导出的 pytorch 模型的输入 shape 是 1x3x640x640,输出 shape 是 1x8400x56,符合我们的预期。
导出成功后会在当前目录下生成 yolov8s-pose.onnx 模型,我们可以使用 Netron 可视化工具查看,如下图所示:

可以看到输入节点名是 images, 维度是 batchx3x640x640,保证只有 batch 维度动态,输出节点名是 output,维度是 batchxTransposeoutput_dim_1xTransposeoutput_dim_2,保证只有 batch 维度动态,符合 tensorRT_Pro 的格式。
大家不要看到 Transposeoutput_dim_1 和 Transposeoutput_dim_2 就认为这也是动态的,其实输出节点的维度是根据输入节点的维度和模型的结构生成的,而额外的维度 Transposeoutput_dim_1 和 Transposeoutput_dim_2 可能是由模型结构中某些操作决定的,如通道数变换(Transpose)操作的输出维度,而不是由动态维度决定的。因此,通常情况下,这些维度是静态的,不会在推理时改变。
2. YOLOv8-Pose预处理
之前有提到过 YOLOv8-Pose 的预处理部分和 YOLOv5 实现一模一样,因此我们在 tensorRT_Pro 中 YOLOv8-Pose 模型的预处理可以直接使用 YOLOv5 的预处理。
tensorRT_Pro 中预处理的代码如下:
__global__ void warp_affine_bilinear_and_normalize_plane_kernel(uint8_t* src, int src_line_size, int src_width, int src_height, float* dst, int dst_width, int dst_height,
	uint8_t const_value_st, float* warp_affine_matrix_2_3, Norm norm, int edge){

	int position = blockDim.x * blockIdx.x + threadIdx.x;
	if (position >= edge) return;

	float m_x1 = warp_affine_matrix_2_3[0];
	float m_y1 = warp_affine_matrix_2_3[1];
	float m_z1 = warp_affine_matrix_2_3[2];
	float m_x2 = warp_affine_matrix_2_3[3];
	float m_y2 = warp_affine_matrix_2_3[4];
	float m_z2 = warp_affine_matrix_2_3[5];

	int dx      = position % dst_width;
	int dy      = position / dst_width;
	float src_x = m_x1 * dx + m_y1 * dy + m_z1;
	float src_y = m_x2 * dx + m_y2 * dy + m_z2;
	float c0, c1, c2;

	if(src_x <= -1 || src_x >= src_width || src_y <= -1 || src_y >= src_height){
		// out of range
		c0 = const_value_st;
		c1 = const_value_st;
		c2 = const_value_st;
	}else{
		int y_low = floorf(src_y);
		int x_low = floorf(src_x);
		int y_high = y_low + 1;
		int x_high = x_low + 1;

		uint8_t const_value[] = {const_value_st, const_value_st, const_value_st};
		float ly    = src_y - y_low;
		float lx    = src_x - x_low;
		float hy    = 1 - ly;
		float hx    = 1 - lx;
		float w1    = hy * hx, w2 = hy * lx, w3 = ly * hx, w4 = ly * lx;
		uint8_t* v1 = const_value;
		uint8_t* v2 = const_value;
		uint8_t* v3 = const_value;
		uint8_t* v4 = const_value;
		if(y_low >= 0){
			if (x_low >= 0)
				v1 = src + y_low * src_line_size + x_low * 3;

			if (x_high < src_width)
				v2 = src + y_low * src_line_size + x_high * 3;
		}

		if(y_high < src_height){
			if (x_low >= 0)
				v3 = src + y_high * src_line_size + x_low * 3;

			if (x_high < src_width)
				v4 = src + y_high * src_line_size + x_high * 3;
		}

		// same to opencv
		c0 = floorf(w1 * v1[0] + w2 * v2[0] + w3 * v3[0] + w4 * v4[0] + 0.5f);
		c1 = floorf(w1 * v1[1] + w2 * v2[1] + w3 * v3[1] + w4 * v4[1] + 0.5f);
		c2 = floorf(w1 * v1[2] + w2 * v2[2] + w3 * v3[2] + w4 * v4[2] + 0.5f);
	}

	if(norm.channel_type == ChannelType::Invert){
		float t = c2;
		c2 = c0;  c0 = t;
	}

	if(norm.type == NormType::MeanStd){
		c0 = (c0 * norm.alpha - norm.mean[0]) / norm.std[0];
		c1 = (c1 * norm.alpha - norm.mean[1]) / norm.std[1];
		c2 = (c2 * norm.alpha - norm.mean[2]) / norm.std[2];
	}else if(norm.type == NormType::AlphaBeta){
		c0 = c0 * norm.alpha + norm.beta;
		c1 = c1 * norm.alpha + norm.beta;
		c2 = c2 * norm.alpha + norm.beta;
	}

	int area = dst_width * dst_height;
	float* pdst_c0 = dst + dy * dst_width + dx;
	float* pdst_c1 = pdst_c0 + area;
	float* pdst_c2 = pdst_c1 + area;
	*pdst_c0 = c0;
	*pdst_c1 = c1;
	*pdst_c2 = c2;
}
关于预处理部分其实就是调用了上述 CUDA 核函数来实现 warpAffine,由于在 CUDA 中我们是对每个像素进行操作,因此非常容易实现 BGR → RGB,/255.0 等操作。关于代码的具体分析可以参考 YOLOv5推理详解及预处理高性能实现,这边不再赘述。
3. YOLOv8-Pose后处理
之前有提到过 YOLOv8-Pose 的检测框后处理部分和 YOLOv5 相同,只是需要添加关键点的解码即可,因此我们可以借鉴 YOLOv5 中 decode 解码部分的实现,添加关键点部分的解码即可,代码可参考:yolo_decode.cu#L13
因此我们不难写出 YOLOv8-Pose 的 decode 解码部分的实现代码,如下所示:
static __global__ void decode_kernel_v8_Pose(float *predict, int num_bboxes, float confidence_threshold, float* invert_affine_matrix, float* parray, int MAX_IMAGE_BOXES){

    int position = blockDim.x * blockIdx.x + threadIdx.x;
    if(position >= num_bboxes) return;

    float* pitem = predict + (5 + 3 * NUM_KEYPOINTS) * position;

    float cx         = *pitem++;
    float cy         = *pitem++;
    float width      = *pitem++;
    float height     = *pitem++;
    float confidence = *pitem++;

    if(confidence < confidence_threshold)
        return;

    int index = atomicAdd(parray, 1);
    if(index >= MAX_IMAGE_BOXES)
        return;

    float left   = cx - width  * 0.5f;
    float top    = cy - height * 0.5f;
    float right  = cx + width  * 0.5f;
    float bottom = cy + height * 0.5f;
    affine_project(invert_affine_matrix, left,  top,    &left,  &top);
    affine_project(invert_affine_matrix, right, bottom, &right, &bottom);

    float* pout_item = parray + 1 + index * NUM_BOX_ELEMENT;
    *pout_item++ = left;
    *pout_item++ = top;
    *pout_item++ = right;
    *pout_item++ = bottom;
    *pout_item++ = confidence;
    *pout_item++ = 1; // 1 = keep, 0 = ignore

    for(int i = 0; i < NUM_KEYPOINTS; ++i){
        float keypoint_x          = *pitem++;
        float keypoint_y          = *pitem++;
        float keypoint_confidence = *pitem++;

        affine_project(invert_affine_matrix, keypoint_x, keypoint_y, &keypoint_x, &keypoint_y);

        *pout_item++ = keypoint_x;
        *pout_item++ = keypoint_y;
        *pout_item++ = keypoint_confidence;
    }
}
关于 decode 的具体实现其实就是启动多个线程,每个线程处理一个框的解码,包括框坐标和关键点坐标的解码,我们会通过仿射变换逆矩阵 IM 将坐标映射回原图上的,关于 decode 代码的详细分析可参考 infer源码阅读之yolo.cu,这边不再赘述。
另外关于 NMS 部分,由于在 YOLOv8-Pose 模型中没有 label 类别标签维度,因此也需要适当调整,调整后的 NMS 代码如下:
static __global__ void nms_kernel_v8_Pose(float* bboxes, int max_objects, float threshold){

    int position = (blockDim.x * blockIdx.x + threadIdx.x);
    int count = min((int)*bboxes, max_objects);
    if (position >= count)
        return;

    // left, top, right, bottom, confidence, keepflag, (keypoint_x, keypoint_y, keypoint_confidence) * 17
    float* pcurrent = bboxes + 1 + position * NUM_BOX_ELEMENT;
    for(int i = 0; i < count; ++i){
        float* pitem = bboxes + 1 + i * NUM_BOX_ELEMENT;
        if(i == position) continue;

        if(pitem[4] >= pcurrent[4]){
            if(pitem[4] == pcurrent[4] && i < position)
                continue;

            float iou = box_iou(
                pcurrent[0], pcurrent[1], pcurrent[2], pcurrent[3],
                pitem[0],    pitem[1],    pitem[2],    pitem[3]
            );

            if(iou > threshold){
                pcurrent[5] = 0;  // 1=keep, 0=ignore
                return;
            }
        }
    }
}
关于 NMS 的具体实现也是启动多个线程,每个线程处理一个框,如果剩余框中的置信度大于当前线程中处理的框,则计算两个框的 IoU,通过 IoU 值判断是否保留该框。相比于 CPU 版的 NMS 应该是少套了一层循环,另外一层循环是通过 CUDA 上线程的并行操作处理的,代码参考自:yolo_decode.cu#L81
4. YOLOv8-Pose推理
通过上面对 YOLOv8-Pose 的预处理和后处理分析之后,整个推理过程就显而易见了。C++ 上 YOLOv8-Pose 的预处理部分可直接沿用 YOLOv5 的预处理,后处理中的 decode 解码和 NMS 部分需要简单修改。
我们在终端执行如下指令即可完成推理(注意!完整流程博主会在后续内容介绍,这边只是简单演示)
make yolo_pose
编译图解如下所示:

推理结果如下图所示:

至此,我们在 C++ 上面完成了 YOLOv8-Pose 的整个推理过程,下面我们将完整的走一遍流程。
三、YOLOv8-Pose部署
博主新建了一个仓库 tensorRT_Pro-YOLOv8,该仓库基于 shouxieai/tensorRT_Pro,并进行了调整以支持 YOLOv8 的各项任务,目前已支持分类、检测、分割、姿态点估计任务。
下面我们就来具体看看如何利用 tensorRT_Pro-YOLOv8 这个 repo 完成 YOLOv8-Pose 的推理。
1. 源码下载
tensorRT_Pro-YOLOv8 的代码可以直接从 GitHub 官网上下载,源码下载地址是 https://github.com/Melody-Zhou/tensorRT_Pro-YOLOv8,Linux 下代码克隆指令如下:
git clone https://github.com/Melody-Zhou/tensorRT_Pro-YOLOv8.git
也可手动点击下载,点击右上角的 Code 按键,将代码下载下来。至此整个项目就已经准备好了。也可以点击 here 下载博主准备好的源代码(注意代码下载于 2023/11/7 日,若有改动请参考最新)
2. 环境配置
需要使用的软件环境有 TensorRT、CUDA、cuDNN、OpenCV、Protobuf,所有软件环境的安装可以参考 Ubuntu20.04软件安装大全,这里不再赘述,需要各位看官自行配置好相关环境😄,外网访问较慢,这里提供下博主安装过程中的软件安装包下载链接 Baidu Drive【pwd:yolo】🚀🚀🚀
tensorRT_Pro-YOLOv8 提供 CMakeLists.txt 和 Makefile 两种方式编译,二者选一即可
2.1 配置CMakeLists.txt
主要修改五处
1. 修改第 13 行,修改 OpenCV 路径
set(OpenCV_DIR "/usr/local/include/opencv4")
2. 修改第 15 行,修改 CUDA 路径
set(CUDA_TOOLKIT_ROOT_DIR "/usr/local/cuda-11.6")
3. 修改第 16 行,修改 cuDNN 路径
set(CUDNN_DIR "/usr/local/cudnn8.4.0.27-cuda11.6")
4. 修改第 17 行,修改 tensorRT 路径
set(TENSORRT_DIR "/opt/TensorRT-8.4.1.5")
5. 修改第 20 行,修改 protobuf 路径
set(PROTOBUF_DIR "/home/jarvis/protobuf")
2.2 配置Makefile
主要修改五处
1. 修改第 4 行,修改 protobuf 路径
lean_protobuf := /home/jarvis/protobuf
2. 修改第 5 行,修改 tensorRT 路径
lean_tensor_rt := /opt/TensorRT-8.4.1.5
3. 修改第 6 行,修改 cuDNN 路径
lean_cudnn := /usr/local/cudnn8.4.0.27-cuda11.6
4. 修改第 7 行,修改 OpenCV 路径
lean_opencv := /usr/local
5. 修改第 8 行,修改 CUDA 路径
lean_cuda := /usr/local/cuda-11.6
3. ONNX导出
导出细节可以查看之前的内容,这边不再赘述。记得将导出的 ONNX 模型放在 tensorRT_Pro-YOLOv8/workspace 文件夹下。
4. 源码修改
如果你想推理自己训练的模型还需要修改下源代码,YOLOv8-Pose 模型的推理代码主要在 app_yolo_pose.cpp 文件中,我们就只需要修改这一个文件中的内容即可,源码修改较简单主要有以下几点:
- 1. app_yolo_pose.cpp 292行,“yolov8s-pose” 修改为你导出的 ONNX 模型名
具体修改示例如下:
test(TRT::Mode::FP32, "best") // 修改1 292行"yolov8s-pose"改成"best"
5. 运行
OK!源码修改好了,Makefile 编译文件也搞定了,ONNX 模型也准备好了,现在可以编译运行了,直接在终端执行如下指令即可:
make yolo_pose
编译过程如下所示:

编译运行成功后在 workspace 文件夹下会生成 engine 文件 yolov8s-pose.FP32.trtmodel 用于模型推理,同时它还会生成 yolov8s-pose_YoloV8-Pose_FP32_result 文件夹,该文件夹下保存了推理的图片。
模型推理效果如下图所示:
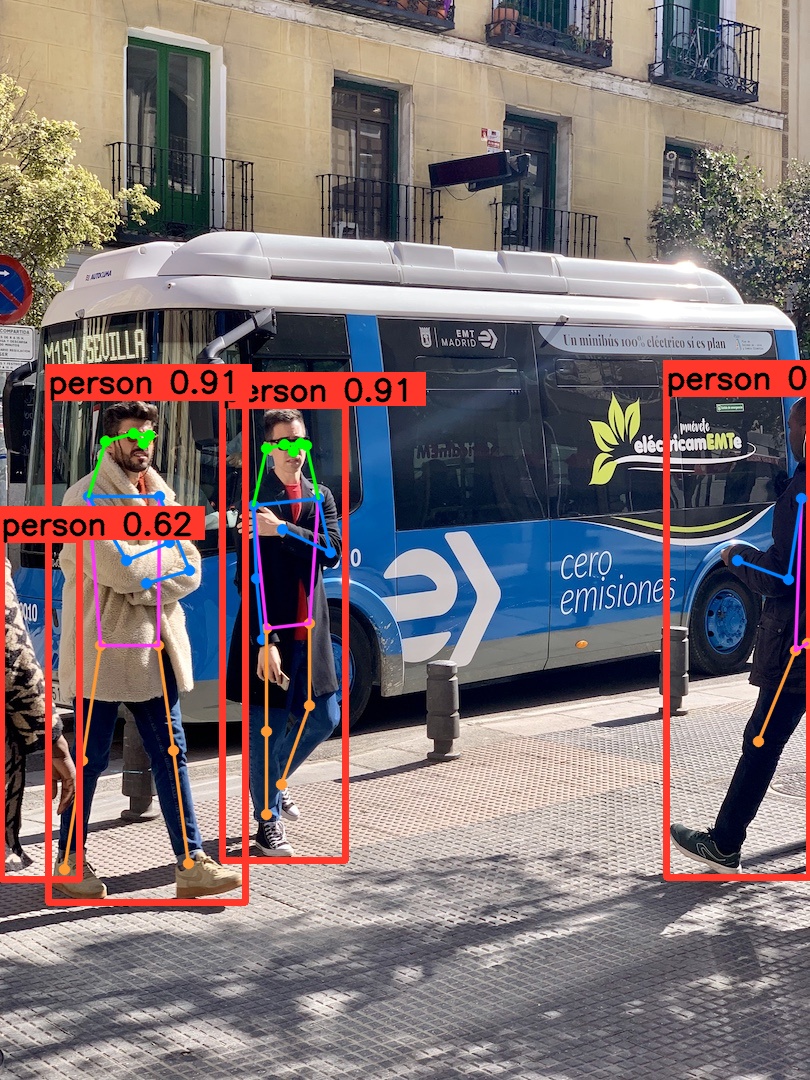
OK!以上就是使用 tensorRT_Pro-YOLOv8 推理 YOLOv8-Pose 的大致流程,若有问题,欢迎各位看官批评指正。
结语
博主在这里针对 YOLOv8-Pose 的预处理和后处理做了简单分析,同时与大家分享了 C++ 上的实现流程,目的是帮大家理清思路,更好的完成后续的部署工作😄。感谢各位看到最后,创作不易,读后有收获的看官请帮忙点个👍⭐️
最后大家如果觉得 tensorRT_Pro-YOLOv8 这个 repo 对你有帮助的话,不妨点个 ⭐️ 支持一波,这对博主来说非常重要,感谢各位🙏。
下载链接
- 软件安装包下载链接【提取码:yolo】🚀🚀🚀
- 源代码、权重下载链接【提取码:yolo】
参考
- https://github.com/shouxieai/infer
- https://github.com/ultralytics/ultralytics
- https://github.com/shouxieai/tensorRT_Pro
- https://github.com/Melody-Zhou/tensorRT_Pro-YOLOv8
- YOLOv5推理详解及预处理高性能实现
