项目搭建
1. 使用express提供的框架构建(不需要)
2. 从零开始(推荐)
安装
初始化项目
npm init -y
安装express
npm install express
1.express的基本使用
创建js文件
const express = require('express')
// 1,创建服务器,express本质是一个函数
const app = express()
// login的post请求,home的get请求
app.post('/login',(req,res)=>{
    res.end("hello login")
})
app.get('/home',()=>{
    res.end("hello home")
})
// 2,开启监听
app.listen(9000,()=>{
    console.log("服务启动成功~");
})
node启动文件
此时我们可以使用postman或者浏览器测试接口 http://localhost:9000/home
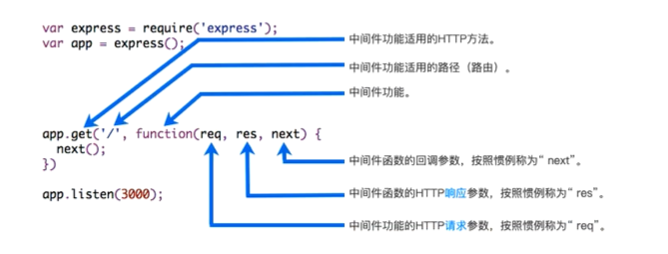
2.认识中间件
const express = require('express')
const app = express()
// 什么是中间件?在下面的get请求的回调函数就是一个中间件
app.get('/home',(req,res,next)=>{
    res.end("hello home")
    // 1,我们可以在中间件执行任何代码
    // 2,我们可以修改 req,res对象
    req.aaa = 'aaa'
    // 3,可以结束响应,或挂起响应(当没有res.end或者res.json时)
    // 4,调取下一个中间件
    next()
})
// 普通的中间件
app.use(()=>{
    console.log('second middle exec');
})
app.listen(9000,()=>{
    console.log("服务启动成功~");
})
3.普通中间件
const express = require('express')
const app = express()

// 普通的中间件
// 无论什么请求都会匹配上use注册普通中间件
// 当存在多个中间件时,只会执行第一个,后面的会不会执行取决于第一个有没有调用next()
app.use((req,res,next)=>{
    console.log('middle exec 01');
    // res.end('请求结束')
    // next()
})
app.use((req,res,next)=>{
    console.log('middle exec 02');
})
app.listen(9000,()=>{
    console.log("服务启动成功~");
})
4.路径限制中间件
const express = require('express')
const app = express()

// 匹配路径的中间件
// 只有home路径才能匹配,但是不区分请求方法,任何方法都能匹配上
app.use('/home',(req,res,next)=>{
    console.log('home middle exec ');
    res.end('----')
})

app.listen(9000,()=>{
    console.log("服务启动成功~");
})
5.路径及方法限制中间件
const express = require('express')
const app = express()

// 对methods,path都有限制
// app.methods(path,()=>{})
app.get('/home',(req,res,next)=>{
    console.log('home middle exec ');
    res.end('----')
})

app.listen(9000,()=>{
    console.log("服务启动成功~");
})
6.注册多个中间件
const express = require('express')
const app = express()
// 应用场景:当这个请求特别复杂时,我们可以把业务拆分到不同中间件
// app.methods(path,中间件1,中间件2,中间件3,中间件...)
app.get('/home',(req,res,next)=>{
    console.log('01 ');
    // 调取下一个中间件需要next()
    next()
},(req,res,next)=>{
    console.log('02 ');
},(req,res,next)=>{
    console.log('03 ');
},(req,res,next)=>{
    console.log('04 ');
})

app.listen(9000,()=>{
    console.log("服务启动成功~");
})
7.中间件匹配规则
当你书写了很多中间件,你发送一个请求,他会按照代码书写顺序依次匹配(普通中间件与路径及方法中间件一视同仁),先执行代码最上面的中间件,后续匹配上的中间件有没有执行取决于上一个匹配中间件有没有调next()
8.应用中间件-处理请求参数(express内置)
const express = require('express')
const app = express()
// 应用中间件
// 处理json数据
app.use(express.json())
// 处理urlencode数据
// 默认使用是querystring模块有过期提示,配置extended: true使用qs模块
app.use(express.urlencoded({extended: true}))
app.post('/home',(req,res,next) => {
    // 直接在req.body获取处理好的数据
    console.log(req.body);
})
app.listen(9000,()=>{
    console.log("服务启动成功");
})
9.应用中间件-打印日志
const fs = require('fs')
const express = require('express')
// 安装导入morgan
const morgan = require('morgan')
const app = express()
const writeStream = fs.createWriteStream('./log/access.log')
// 应用中间件
app.use(morgan('combined',{stream:writeStream}))
app.post('/home',(req,res,next) => {

    res.end('请求成功')
})
app.listen(9000,()=>{
    console.log("服务启动成功");
})
10.应用中间件-文件上传
const express = require('express')
// 安装导入multer
const multer = require('multer')
const app = express()

// 应用中间件
const upload = multer({
    storage: multer.diskStorage({
        // 存储位置
        destination(req,file,callback) {
            callback(null, './uploads')
        },
        // 存储名称
        filename(req,file,callback) {
            callback(null,file.originalname)
        }
    })
})

app.post('/home',upload.array('home') ,(req,res,next) => {
    console.log(req.files);
    res.end('请求成功')
})
app.listen(9000,()=>{
    console.log("服务启动成功");
})
11.响应数据
const express = require('express')
const app = express()


app.post('/home',(req,res,next) => {
    //方式一:使用最少
    // res.end('请求成功')
    //方式二:推荐使用
    // res.json({
    //     message: 'ok',
    //     statusCode: 0,
    //     data: [
    //         {
    //             name:'zhao'
    //         }
    //     ]
    // })
    // status方法,用于设置状态码
    res.status(201)
    res.end('请求成功')
})
app.listen(9000,()=>{
    console.log("服务启动成功");
})
12.express中路由的使用
我们在开发中,业务逻辑是非常大的,不能全部写在app中
- router/userRouter.js
const express = require('express')
// 创建路由对象
const userRouter = express.Router()

// 定义路由对象中的映射接口
userRouter.get('/',(req,res,next)=>{
    res.json('获取数据成功')
})
userRouter.delete('/:id',(req,res,next)=>{
    res.json('删除某个数据成功'+req.params.id)
})
// 导出
module.exports = userRouter
- app
const express = require('express')
const userRouter = require('./router/userRouter')
const app = express()

// 应用路由对象
app.use('/user',userRouter)
app.listen(9000,()=>{
    console.log("服务启动成功");
})
13.express部署静态资源服务器
对于一些图片啥的,用户不能直接在浏览器查看,使用express内置中间件,可以域名加文件名查看
const express = require('express')
const app = express()
// 内置的中间件,直接将一个文件夹作为静态资源
app.use(express.static('./uploads'))

app.listen(9000,()=>{
    console.log("服务启动成功");
})
http://localhost:9000/avatar2.png 访问图片
也可以部署我们之前做过的项目,把打包好的dist文件夹放到express.static()中,可以直接访问
14.express错误处理
在常规的服务器开发中,后端处理错误信息主要是两种方式
- 修改res.status,比如没有权限把status修改完401
- 还有一种是不修改status,依旧返回200.在返回体中加一个code进行判断,比如正确是code = 0 其他错误code = -1001
在express中我们也要处理错误
const express = require('express')
const app = express()

app.use(express.json())
app.post('/login',(req,res,next)=>{
    const {username, password} = req.body
    if (!username || !password) {
    // 错误处理代码写在这里太臃肿了
        next(-1001)
    } else if(username !== 'zhao' || password !== '123456') {
        next(-1002)
    } else {
        res.json({
            code: 0,
            message: '登录成功'
        })
    }
})
// 处理错误,四个参数
app.use((err,req,res,next)=>{
    const code = err
    let message = '未知错误'
    switch (code) {
        case -1001:
            message = '请输入账号密码'
            break;
        case -1002:
            message = '账号密码错误'
            break;
        default:
            break;
    }
    res.json({code,message})
})
app.listen(9000,()=>{
    console.log("服务启动成功");
})
