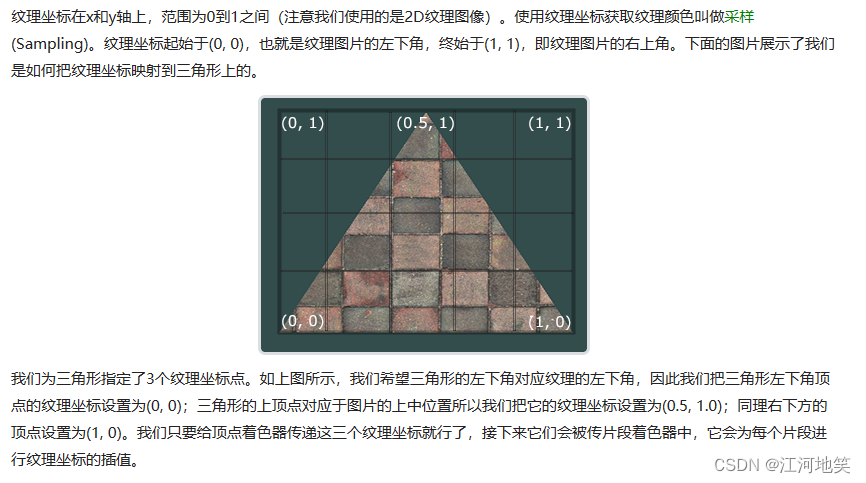
1. 纹理贴图
wall.jpg (512×512) (learnopengl-cn.github.io)
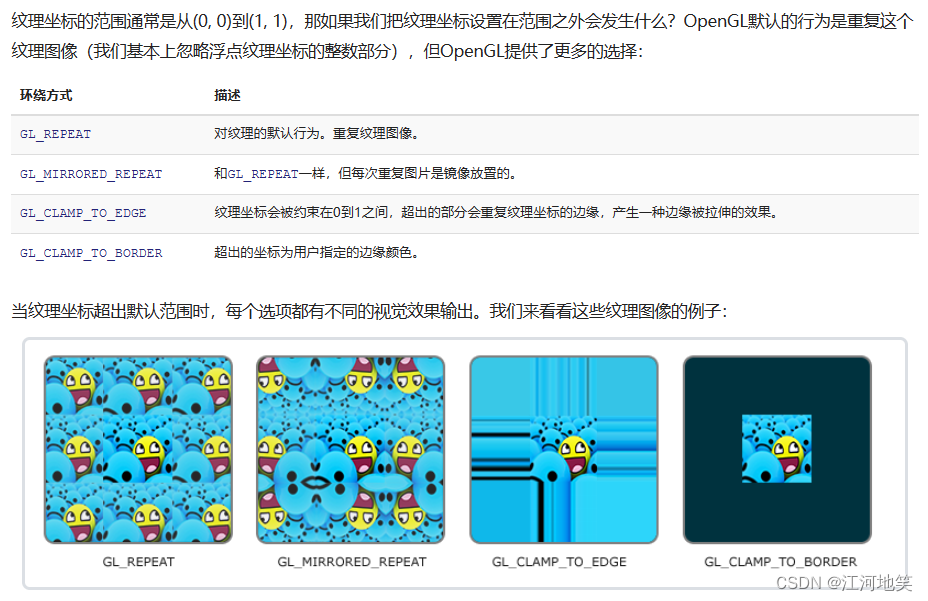
纹理过滤分为:邻近和线性,这跟opencv图像处理一样。
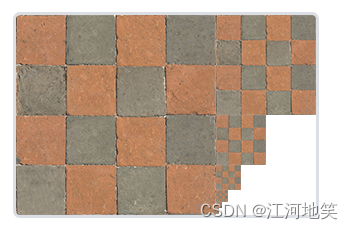
多级渐远纹理
四种采样方式:
代码实现:
std_image.h
https://github.com/nothings/stb/blob/master/stb_image.h
图片
https://learnopengl-cn.github.io/img/01/06/container.jpg
main.cpp
如果load image报错等,记得增加宏:STB_IMAGE_IMPLEMENTATION
#include <glad/glad.h>
#include <GLFW/glfw3.h>

#include <iostream>
#include "stb_image.h"
#include <cmath>
#include "shader.h"
void framebuffer_size_callback(GLFWwindow* window, int width, int height);
void processInput(GLFWwindow* window);

// settings
const unsigned int SCR_WIDTH = 800;
const unsigned int SCR_HEIGHT = 600;

int main() {

	//1.初始化配置
	glfwInit();
	glfwWindowHint(GLFW_CONTEXT_VERSION_MAJOR, 3);
	glfwWindowHint(GLFW_CONTEXT_VERSION_MINOR, 3);
	glfwWindowHint(GLFW_OPENGL_PROFILE, GLFW_OPENGL_CORE_PROFILE);

#ifdef __APPLE__
	glfwWindowHint(GLFW_OPENGL_FORWARD_COMPAT, GLFW_TRUE);
#endif // __APPLE__

	//2.gltf 窗口创建
	GLFWwindow* window = glfwCreateWindow(SCR_WIDTH, SCR_HEIGHT, "LeranOpenGL", NULL, NULL);
	if (window == NULL) {
		std::cout << "Failed to create GLFW window" << std::endl;
		glfwTerminate();
		return -1;
	}

	glfwMakeContextCurrent(window);
	glfwSetFramebufferSizeCallback(window, framebuffer_size_callback);

	//3. 加载所有GL函数指针
	if (!gladLoadGLLoader((GLADloadproc)glfwGetProcAddress)) {
		std::cout << "Failed to initialize GLAD" << std::endl;
		return -1;
	}

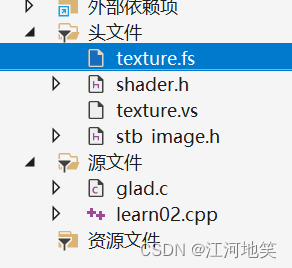
	Shader ourShader("./texture.vs", "./texture.fs");

	//4. 设置顶点数据
	float vertices[] = {
		// positions          // colors           // texture coords
		 0.5f,  0.5f, 0.0f,   1.0f, 0.0f, 0.0f,   1.0f, 1.0f, // top right
		 0.5f, -0.5f, 0.0f,   0.0f, 1.0f, 0.0f,   1.0f, 0.0f, // bottom right
		-0.5f, -0.5f, 0.0f,   0.0f, 0.0f, 1.0f,   0.0f, 0.0f, // bottom left
		-0.5f,  0.5f, 0.0f,   1.0f, 1.0f, 0.0f,   0.0f, 1.0f  // top left
	};

	unsigned int indices[] = {
	0, 1, 3, // first triangle
	1, 2, 3  // second triangle
	};

	unsigned int VBO, VAO, EBO;
	glGenVertexArrays(1, &VAO);
	glGenBuffers(1, &VBO);
	glGenBuffers(1,&EBO);//元素缓冲对象:Element Buffer Object,EBO

	glBindVertexArray(VAO);

	//复制顶点数组到缓冲区中供opengl使用
	glBindBuffer(GL_ARRAY_BUFFER, VBO);
	glBufferData(GL_ARRAY_BUFFER, sizeof(vertices), vertices, GL_STATIC_DRAW);

	glBindBuffer(GL_ELEMENT_ARRAY_BUFFER, EBO);
	glBufferData(GL_ELEMENT_ARRAY_BUFFER, sizeof(indices), indices, GL_STATIC_DRAW);


	//设置顶点属性指针
	glVertexAttribPointer(0, 3, GL_FLOAT, GL_FALSE, 8 * sizeof(float), (void*)0);
	glEnableVertexAttribArray(0);
	//设置颜色属性指针
	glVertexAttribPointer(1, 3, GL_FLOAT, GL_FALSE, 8 * sizeof(float), (void*)(3 * sizeof(float)));
	glEnableVertexAttribArray(1);
	//设置纹理属性指针
	glVertexAttribPointer(2, 2, GL_FLOAT, GL_FALSE, 8 * sizeof(float), (void*)(6 * sizeof(float)));
	glEnableVertexAttribArray(2);

	//加载和创建纹理
	unsigned int texture;
	glGenTextures(1, &texture);
	glBindTexture(GL_TEXTURE_2D, texture);
	//设置纹理环绕参数
	glTexParameteri(GL_TEXTURE_2D, GL_TEXTURE_WRAP_S, GL_REPEAT);
	glTexParameteri(GL_TEXTURE_2D, GL_TEXTURE_WRAP_T, GL_REPEAT);
	//设置纹理过滤参数
	glTexParameteri(GL_TEXTURE_2D, GL_TEXTURE_MIN_FILTER, GL_LINEAR_MIPMAP_LINEAR);
	glTexParameteri(GL_TEXTURE_2D, GL_TEXTURE_MAG_FILTER, GL_LINEAR);

	//加载图像和生成mipmaps
	int width, height, nrChannels;
	std::string filePath = R"(D:\CPlusProject\LearnOpenGL\DataSet\container.jpg)";
	unsigned char* data = stbi_load(filePath.c_str(), &width, &height, &nrChannels, 0);

	if (data) {
		glTexImage2D(GL_TEXTURE_2D, 0, GL_RGB, width, height, 0, GL_RGB, GL_UNSIGNED_BYTE, data);
		glGenerateMipmap(GL_TEXTURE_2D);
	}
	else {
		std::cout << "Failed to load texture" << std::endl;
	}

	stbi_image_free(data);

	//5. 循环渲染
	while (!glfwWindowShouldClose(window)) {
		processInput(window);

		// render
		glClearColor(0.2f, 0.3f, 0.3f, 1.0f);
		glClear(GL_COLOR_BUFFER_BIT);
		//绑定纹理
		glBindTexture(GL_TEXTURE_2D, texture);

		ourShader.use();
		glBindVertexArray(VAO);
		glDrawElements(GL_TRIANGLES,6,GL_UNSIGNED_INT,0);

		glfwSwapBuffers(window);
		glfwPollEvents();

	}

	glDeleteVertexArrays(1, &VAO);
	glDeleteBuffers(1, &VBO);
	glDeleteBuffers(1, &EBO);

	glfwTerminate();
	return 0;

}

// process all input: query GLFW whether relevant keys are pressed/released this frame and react accordingly
// ---------------------------------------------------------------------------------------------------------
void processInput(GLFWwindow* window)
{
	if (glfwGetKey(window, GLFW_KEY_ESCAPE) == GLFW_PRESS)
		glfwSetWindowShouldClose(window, true);
}

// glfw: whenever the window size changed (by OS or user resize) this callback function executes
// ---------------------------------------------------------------------------------------------
void framebuffer_size_callback(GLFWwindow* window, int width, int height)
{
	// make sure the viewport matches the new window dimensions; note that width and
	// height will be significantly larger than specified on retina displays.
	glViewport(0, 0, width, height);
}
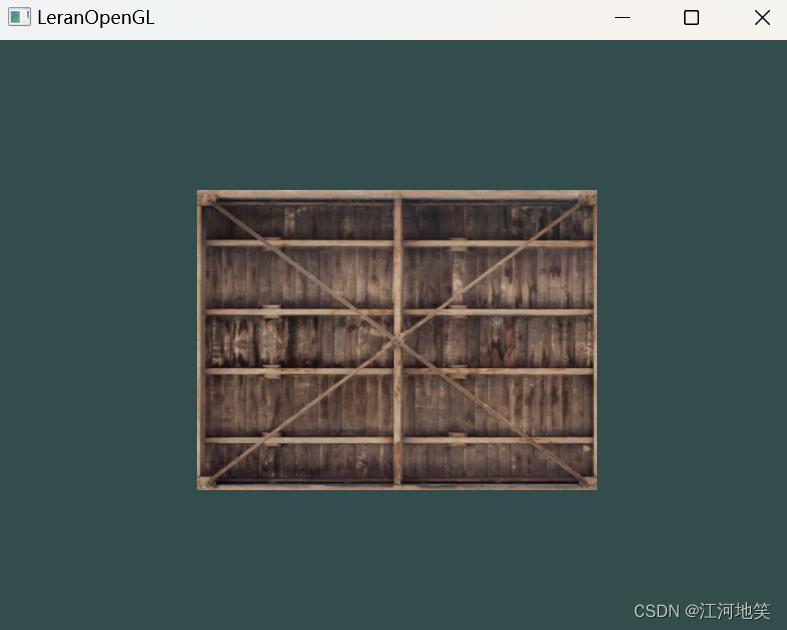
2. 混合纹理
第二张图
awesomeface.png (512×512) (learnopengl-cn.github.io)
texture.vs
#version 330 core
layout (location = 0) in vec3 aPos;
layout (location = 1) in vec3 aColor;
layout (location = 2) in vec2 aTexCorrd;

out vec3 ourColor;
out vec2 TexCoord;

void main()
{
    gl_Position = vec4(aPos, 1.0);
    ourColor = aColor;
    TexCoord=vec2(aTexCorrd.x,aTexCorrd.y);
}
texture.fs
#version 330 core
out vec4 FragColor;

in vec3 ourColor;
in vec2 TexCoord;

//texture sampler
uniform sampler2D textureone;
uniform sampler2D texturetwo;

void main()
{
    FragColor = mix(texture(textureone,TexCoord),texture(texturetwo,TexCoord),0.5);
}
main.cpp
#include <glad/glad.h>
#include <GLFW/glfw3.h>

#include <iostream>
#include "stb_image.h"
#include <cmath>
#include "shader.h"
void framebuffer_size_callback(GLFWwindow* window, int width, int height);
void processInput(GLFWwindow* window);

// settings
const unsigned int SCR_WIDTH = 800;
const unsigned int SCR_HEIGHT = 600;

int main() {

	//1.初始化配置
	glfwInit();
	glfwWindowHint(GLFW_CONTEXT_VERSION_MAJOR, 3);
	glfwWindowHint(GLFW_CONTEXT_VERSION_MINOR, 3);
	glfwWindowHint(GLFW_OPENGL_PROFILE, GLFW_OPENGL_CORE_PROFILE);

#ifdef __APPLE__
	glfwWindowHint(GLFW_OPENGL_FORWARD_COMPAT, GLFW_TRUE);
#endif // __APPLE__

	//2.gltf 窗口创建
	GLFWwindow* window = glfwCreateWindow(SCR_WIDTH, SCR_HEIGHT, "LeranOpenGL", NULL, NULL);
	if (window == NULL) {
		std::cout << "Failed to create GLFW window" << std::endl;
		glfwTerminate();
		return -1;
	}

	glfwMakeContextCurrent(window);
	glfwSetFramebufferSizeCallback(window, framebuffer_size_callback);

	//3. 加载所有GL函数指针
	if (!gladLoadGLLoader((GLADloadproc)glfwGetProcAddress)) {
		std::cout << "Failed to initialize GLAD" << std::endl;
		return -1;
	}

	Shader ourShader("./texture.vs", "./texture.fs");

	//4. 设置顶点数据
	float vertices[] = {
		// positions          // colors           // texture coords
		 0.5f,  0.5f, 0.0f,   1.0f, 0.0f, 0.0f,   1.0f, 1.0f, // top right
		 0.5f, -0.5f, 0.0f,   0.0f, 1.0f, 0.0f,   1.0f, 0.0f, // bottom right
		-0.5f, -0.5f, 0.0f,   0.0f, 0.0f, 1.0f,   0.0f, 0.0f, // bottom left
		-0.5f,  0.5f, 0.0f,   1.0f, 1.0f, 0.0f,   0.0f, 1.0f  // top left
	};

	unsigned int indices[] = {
	0, 1, 3, // first triangle
	1, 2, 3  // second triangle
	};

	unsigned int VBO, VAO, EBO;
	glGenVertexArrays(1, &VAO);
	glGenBuffers(1, &VBO);
	glGenBuffers(1,&EBO);//元素缓冲对象:Element Buffer Object,EBO

	glBindVertexArray(VAO);

	//复制顶点数组到缓冲区中供opengl使用
	glBindBuffer(GL_ARRAY_BUFFER, VBO);
	glBufferData(GL_ARRAY_BUFFER, sizeof(vertices), vertices, GL_STATIC_DRAW);

	glBindBuffer(GL_ELEMENT_ARRAY_BUFFER, EBO);
	glBufferData(GL_ELEMENT_ARRAY_BUFFER, sizeof(indices), indices, GL_STATIC_DRAW);


	//设置顶点属性指针
	glVertexAttribPointer(0, 3, GL_FLOAT, GL_FALSE, 8 * sizeof(float), (void*)0);
	glEnableVertexAttribArray(0);
	//设置颜色属性指针
	glVertexAttribPointer(1, 3, GL_FLOAT, GL_FALSE, 8 * sizeof(float), (void*)(3 * sizeof(float)));
	glEnableVertexAttribArray(1);
	//设置纹理属性指针
	glVertexAttribPointer(2, 2, GL_FLOAT, GL_FALSE, 8 * sizeof(float), (void*)(6 * sizeof(float)));
	glEnableVertexAttribArray(2);

	//加载和创建纹理
	unsigned int textureone,texturetwo;
	glGenTextures(1, &textureone);
	glBindTexture(GL_TEXTURE_2D, textureone);
	//设置纹理环绕参数
	glTexParameteri(GL_TEXTURE_2D, GL_TEXTURE_WRAP_S, GL_REPEAT);
	glTexParameteri(GL_TEXTURE_2D, GL_TEXTURE_WRAP_T, GL_REPEAT);
	//设置纹理过滤参数
	glTexParameteri(GL_TEXTURE_2D, GL_TEXTURE_MIN_FILTER, GL_LINEAR_MIPMAP_LINEAR);
	glTexParameteri(GL_TEXTURE_2D, GL_TEXTURE_MAG_FILTER, GL_LINEAR);

	//加载图像和生成mipmaps
	int width, height, nrChannels;
	stbi_set_flip_vertically_on_load(true);
	std::string filePath = R"(D:\CPlusProject\LearnOpenGL\DataSet\container.jpg)";
	unsigned char* data = stbi_load(filePath.c_str(), &width, &height, &nrChannels, 0);

	if (data) {
		glTexImage2D(GL_TEXTURE_2D, 0, GL_RGB, width, height, 0, GL_RGB, GL_UNSIGNED_BYTE, data);
		glGenerateMipmap(GL_TEXTURE_2D);
	}
	else {
		std::cout << "Failed to load texture" << std::endl;
	}

	stbi_image_free(data);


	glGenTextures(1, &texturetwo);
	glBindTexture(GL_TEXTURE_2D, texturetwo);
	//设置纹理环绕参数
	glTexParameteri(GL_TEXTURE_2D, GL_TEXTURE_WRAP_S, GL_REPEAT);
	glTexParameteri(GL_TEXTURE_2D, GL_TEXTURE_WRAP_T, GL_REPEAT);
	//设置纹理过滤参数
	glTexParameteri(GL_TEXTURE_2D, GL_TEXTURE_MIN_FILTER, GL_LINEAR_MIPMAP_LINEAR);
	glTexParameteri(GL_TEXTURE_2D, GL_TEXTURE_MAG_FILTER, GL_LINEAR);

	//加载图像和生成mipmaps
	filePath = R"(D:\CPlusProject\LearnOpenGL\DataSet\awesomeface.png)";
	unsigned char* data2 = stbi_load(filePath.c_str(), &width, &height, &nrChannels, 0);

	if (data2) {
		glTexImage2D(GL_TEXTURE_2D, 0, GL_RGB, width, height, 0, GL_RGBA, GL_UNSIGNED_BYTE, data2);
		glGenerateMipmap(GL_TEXTURE_2D);
	}
	else {
		std::cout << "Failed to load texture" << std::endl;
	}

	stbi_image_free(data2);


	ourShader.use();
	glUniform1i(glGetUniformLocation(ourShader.ID, "textureone"), 0);//二选一
	ourShader.setInt("texturetwo", 1);//二选一

	//5. 循环渲染
	while (!glfwWindowShouldClose(window)) {
		processInput(window);

		// render
		glClearColor(0.2f, 0.3f, 0.3f, 1.0f);
		glClear(GL_COLOR_BUFFER_BIT);
		//绑定纹理
		glActiveTexture(GL_TEXTURE0);
		glBindTexture(GL_TEXTURE_2D, textureone);
		glActiveTexture(GL_TEXTURE1);
		glBindTexture(GL_TEXTURE_2D, texturetwo);


		ourShader.use();
		glBindVertexArray(VAO);
		glDrawElements(GL_TRIANGLES,6,GL_UNSIGNED_INT,0);

		glfwSwapBuffers(window);
		glfwPollEvents();

	}

	glDeleteVertexArrays(1, &VAO);
	glDeleteBuffers(1, &VBO);
	glDeleteBuffers(1, &EBO);

	glfwTerminate();
	return 0;

}

// process all input: query GLFW whether relevant keys are pressed/released this frame and react accordingly
// ---------------------------------------------------------------------------------------------------------
void processInput(GLFWwindow* window)
{
	if (glfwGetKey(window, GLFW_KEY_ESCAPE) == GLFW_PRESS)
		glfwSetWindowShouldClose(window, true);
}

// glfw: whenever the window size changed (by OS or user resize) this callback function executes
// ---------------------------------------------------------------------------------------------
void framebuffer_size_callback(GLFWwindow* window, int width, int height)
{
	// make sure the viewport matches the new window dimensions; note that width and
	// height will be significantly larger than specified on retina displays.
	glViewport(0, 0, width, height);
} 