Breakpad在Windows,Linux双平台编译、集成以及dump文件的分析
1、Windows平台
Windows平台上非常好的参考文档:
https://r12f.com/posts/google-breakpad-1-introduction-with-windows/
https://r12f.com/posts/google-breakpad-2-implementations-on-windows/
1.1、源码下载及编译
平台:Win10 + Intel
IDE:Visual Studio 2017
1.1.1、源码下载
github上的main分支一致编译不通过也没有gyp用于生成VS的sln。
当前我们使用github上breakpad的master分支即可
1.1.2、源码编译依赖
源码编译需要GYP生成VS打开的sln文件,GYP又依赖于python2.7.x版本
依赖关系:python2.7.x -> GYP -> Visual Studio;可顺序安装
详细请见:https://blog.csdn.net/zyhse/article/details/112577340博客
1.1.3、编译
breakpad只需要生成client中的项目,目录:breakpad-master\src\client\windows
该目录下可以看到breakpad_client.gyp文件(2023年后github main分支上已经没有该文件了)
使用安装好的GYP生成SLN(若gyp执行失败,大概率是python版本不对)
gyp --no-circular-check "./breakpad_client.gyp" -Dwin_release_RuntimeLibrary=2 -Dwin_debug_RuntimeLibrary=3
使用vs2017打开调整为Release|x64编译

生成如上静态库
1.2、集成到现有代码中
breakpad集成到现有VS c++代码中非常的容易
1.2.1、包含头文件以及lib库
头文件:项目属性 -> C/C++ -> 附加包含目录 添加文件文件路径
lib库: 项目属性 -> 链接器 -> 常规 -> 附加库目录 添加库目录
项目属性 -> 链接器 -> 输入 -> 附加依赖项 添加 common.lib crash_generation_client.lib crash_generation_server.lib exception_handler.lib 或使用代码方式添加
#pragma comment(lib, "common.lib")
#pragma comment(lib, "crash_generation_client.lib")
#pragma comment(lib, "crash_generation_server.lib")
#pragma comment(lib, "exception_handler.lib")
1.2.2、使用breakpad C/S模式增加下面代码段至项目中就好
// 头文件
#include "client/windows/handler/exception_handler.h"
#include "client/windows/crash_generation/crash_generation_server.h"
#include "client/windows/crash_generation/client_info.h"

// lib库
#pragma comment(lib, "common.lib")
#pragma comment(lib, "crash_generation_client.lib")
#pragma comment(lib, "crash_generation_server.lib")
#pragma comment(lib, "exception_handler.lib")

// server回调函数
void onClientConnected(void* context,
	const google_breakpad::ClientInfo* client_info)
{
}

void onClientDumpRequest(void* context,
	const google_breakpad::ClientInfo* client_info,
	const std::wstring* file_path)
{
}

void onClientExited(void* context,
	const google_breakpad::ClientInfo* client_info) {
}

// client端回调函数,写完minidump后的回调函数
bool onMinidumpDumped(const wchar_t* dump_path, const wchar_t* id,
	void* context, EXCEPTION_POINTERS* exinfo,
	MDRawAssertionInfo* assertion,
	bool succeeded) {
	return succeeded;
}

bool InitBreakpad()
{
	if (_wmkdir(s_strCrashDir.c_str()) && (errno != EEXIST)) {
		return false;
	}

	google_breakpad::CrashGenerationServer *pCrashServer =
		new google_breakpad::CrashGenerationServer(s_pPipeName,
			NULL,
			onClientConnected,
			NULL,
			onClientDumpRequest,
			NULL,
			onClientExited,
			NULL,
			NULL,
			NULL,
			true,
			&s_strCrashDir);

	if (pCrashServer == NULL) {
		return false;
	}

	// 如果已经服务端已经启动了,此处启动会失败
	if (!pCrashServer->Start()) {
		delete pCrashServer;
		pCrashServer = NULL;
	}

	google_breakpad::ExceptionHandler *pCrashHandler =
		new google_breakpad::ExceptionHandler(s_strCrashDir,
			nullptr,
			onMinidumpDumped,
			NULL,
			google_breakpad::ExceptionHandler::HANDLER_ALL,
			MiniDumpNormal,
			(pCrashServer == NULL) ? s_pPipeName : NULL, // 如果是服务端,则直接使用进程内dump
			NULL);

	if (pCrashHandler == NULL) {
		return false;
	}
	return true;
}

int main(...)
{
    // ....
    bool ret = InitBreakpad();
    // ... 项目当前的代码 ...
}
1.3、dump文件分析
Windows上dump文件分析非常的简单,要么Visual Studio,要么Windbg。
下面我们使用windbg进行分析dump文件;
注意:项目生成exe文件必须要有pdb文件,该文件主要存储symbols的,如果没有请修改项目属性;
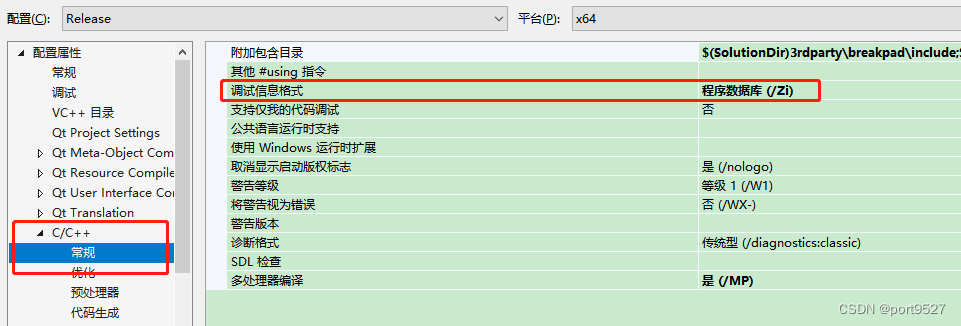
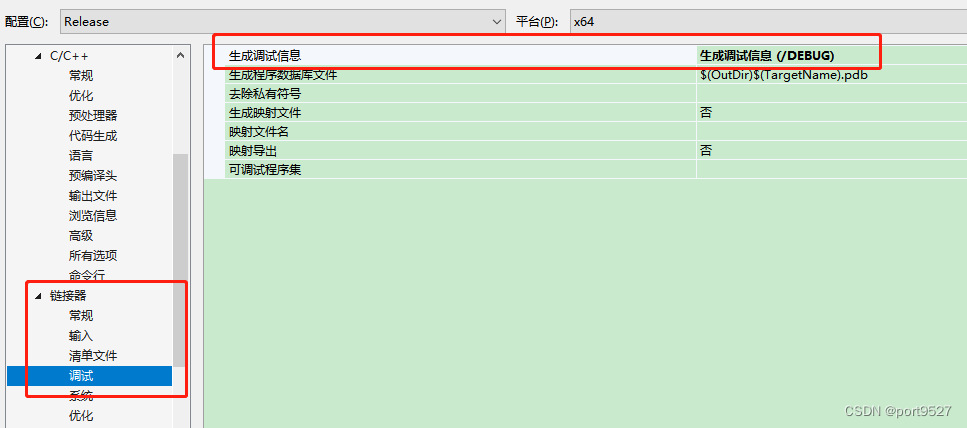
打开这两个属性就可以生成pdb文件了。
使用windbg打开dmp文件,配置好Symbol file path路径(就是该dump的exe对应的pdb文件路径)以及Source file path路径(该dump的exe的源码路径)
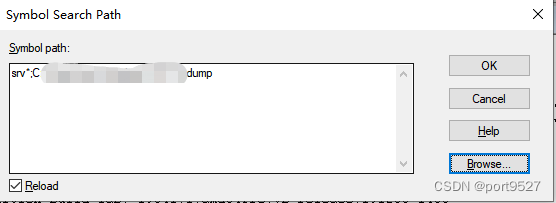
点击!analyze -v就行

非常容易的看到保存的代码行

2、Linux平台
linux平台与windows平台有些许不同。
首先是依赖项;
其次是分析dump文件的工具(breakpad自带的);
2.1、依赖项
需要去google上下载lss依赖包放在/breakpad-master/src/third_party/lss目录下,里面主要就是linux_syscall_support.h文件在代码中依赖了
2.2、分析工具
在linux上编译的breakpad会生成自带的分析工具minidump_stackwalk以及symbol生成工具dump_syms
- minidump_stackwalk:./breakpad-master/src/processor目录下
- dump_syms: ./breakpad-master/src/tools/linux/dump_syms目录下
2.3、具体使用
#include <unistd.h>
#include <thread>
#include <iostream>
#include "client/linux/handler/exception_handler.h"

static bool dumpCallback(const google_breakpad::MinidumpDescriptor& descriptor,
void* context, bool succeeded) {
  printf("Dump path: %s\n", descriptor.path());
  return succeeded;
}

void crash() { volatile int* a = (int*)(NULL); *a = 1; }

void task1(string msg)
{
    std::cout << "task1 says: " << msg << std::endl;
    crash();
}

int main(int argc, char* argv[]) {
  google_breakpad::MinidumpDescriptor descriptor("/tmp/hzh");
  google_breakpad::ExceptionHandler eh(descriptor, NULL, dumpCallback, NULL, true, -1);
  std::thread t1(task1, "Hello");
  t1.detach();
  sleep(2);
  return 0;
}
$ g++ -g a.cpp -I/home/hzh/soft/softy/breakpad/include/breakpad -L/home/hzh/soft/softy/breakpad/lib -lbreakpad -lbreakpad_client -pthread -o test
1,运行test,会崩溃并产生 179cac63-2e41-4de0-09e8b58c-56069f80.dmp 文件。
2,从可执行程序生成符号表:
$ /home/xxx/soft/softy/breakpad/bin/dump_syms test >> test.sym
3,建立一个目录结构,目录名必须为“可执行程序的名字”,然后再该目录里面建立一个目录,名字为 test.sym 的第一行的某个数据,具体如下:
$ head -n1 test.sym
得到: MODULE Linux x86_64 A35260606902350047A2A3559926FE410 test ,我们就要 A35260606902350047A2A3559926FE410 作为目录名。
$ mkdir -p ./symbols/test/A35260606902350047A2A3559926FE410
4,将 test.sym 移动到目录里:
$ mv test.sym symbols/test/A35260606902350047A2A3559926FE410/
5,开始分析:
$ /home/xxx/soft/softy/breakpad/bin/minidump_stackwalk 179cac63-2e41-4de0-09e8b58c-56069f80.dmp ./symbols

