文章目录
- @[TOC](文章目录)
- 一、mybatis是什么?
- 1. Mybatis的特点以及优缺点
- 二、mybatis架构
- 1.基本架构
- 2.重要组件
- 三、原理
- 1. SQL解析
- 2. Mapper接口
- 3. 动态代理
- 4. SQL执行
- 4.1 Executor
- 4.2 StatementHandler
- 4.3 ParameterHandler
- 4.4 ResultHandler
文章目录
- @[TOC](文章目录)
- 一、mybatis是什么?
- 1. Mybatis的特点以及优缺点
- 二、mybatis架构
- 1.基本架构
- 2.重要组件
- 三、原理
- 1. SQL解析
- 2. Mapper接口
- 3. 动态代理
- 4. SQL执行
- 4.1 Executor
- 4.2 StatementHandler
- 4.3 ParameterHandler
- 4.4 ResultHandler
文章内容有点长,小伙伴们选择自己想看的,抱拳、抱拳
一、mybatis是什么?
mybatis本是apache的一个开源项目ibatis, 2010年由Apache Software Foundation迁移到了Google Code, 并且改名为Mybatis, 也就是从3.0版本开始iBatis更名为Mybatis。于2013年11月迁移到github,中文文档地址参考https://mybatis.net.cn/,mybatis是一个基于java的持久层框架,包括sql maps和data access objects。
Mybatis是一款优秀的持久层框架,支持自定义的sql、存储过程以及高级映射。免除了几乎所有的jdbc代码以及设置参数和获取结果集的繁琐的工作,mybatis可以通过简单的xml或者注解来配置和映射原始类型、接口和java pojo为数据库中的记录。
现在都有各种的ORM框架,很少再有人用传统的jdbc代码来操作数据库了, 但凡用过的都知道,开发人员除了要写sql外,还必须操作Connection、Statment、ResultSet等,为了访问不同的表,不同字段的数据,还需要书写很多模板化的代码,这些代码写起来往往是重复的,又繁琐又枯燥,ORM框架的诞生就是为了解决开发者的痛点,优秀的ORM框架比如mybatis、hibernate、JPA等等。
1. Mybatis的特点以及优缺点
特点:
- 支持定制化SQL、存储过程以及高级映射的优秀的持久层框架
- 封装了底层JDBC API的调用细节,自动将结果集转换成java Bean对象,大大简化了java数据库编程的重复工作
- 避免了几乎所有的JDBC代码和手动设置参数以及获取结果集
- 可以使用简单的xml或者注解用于配置和原始映射,将接口和java的实体映射成数据库中的记录
- 把sql语句从java源程序中独立出来,放在单独的xml文件中编写,给程序的维护带来了很大的便利
- 需要程序员自己去编写sql语句,程序员可以结合数据库自身的特点灵活控制,因此能够实现比hibernate等全自动ORM框架更高的查询效率,能够完成复杂查询。
优点:
- 简单易学,Mybatis本身很小且简单,整个源代码大概5MB。并且没有任何第三方依赖,简单实用只要几个jar包和配置几个sql映射文件,而且有官方中文文档,可以通过官方文档轻松学习。
- 使用灵活易于上手和掌握,相比于jdbc需要编写的代码更少,减少50%以上的代码量。
- 提供xml标签,支持编写动态sql,满足不同的业务需求。
- sql’写在xml里,便于统一管理和优化,同时也解除了sql与程序代码的耦合。使系统的设计更清晰,更容易维护,更容易单元测试。sql和代码的分离,提高了可维护性。
- 提供映射标签,支持对象和数据库的ORM字段关系映射。
- 提供对象关系映射标签,支持对象关系组维护。
缺点:
- sql语句的编写工作量比较大,尤其在表或者字段比较多的情况下,对开发人员编写sql的能力有一定的要求。
- sql语句依赖于数据库,导致数据库不具有好的移植性,不可以随便更换数据库
二、mybatis架构
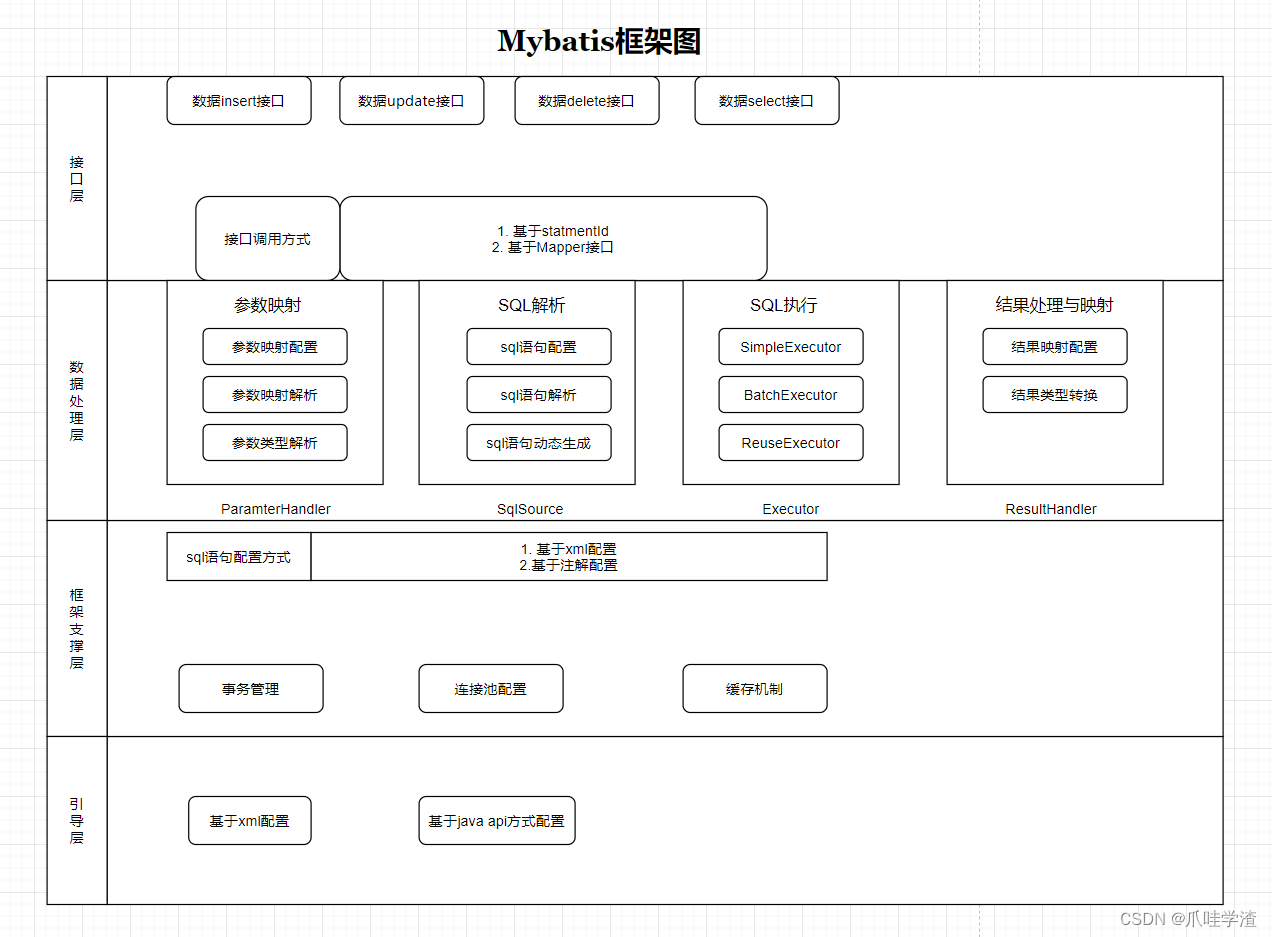
1.基本架构
2.重要组件
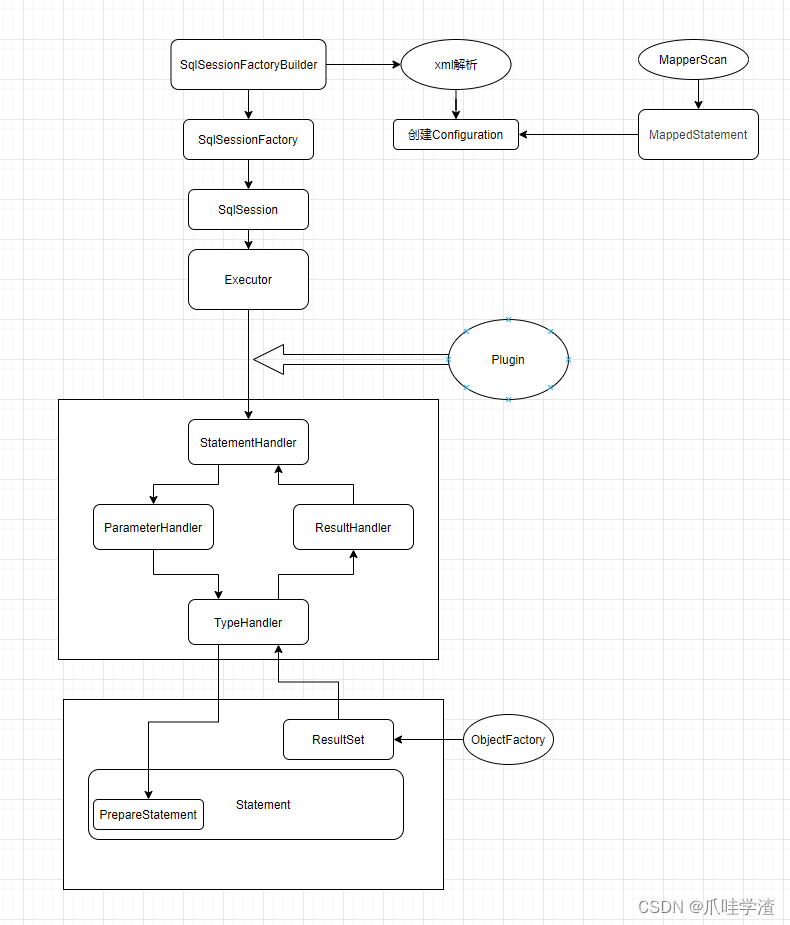
Mybatis流程中使用到的核心组件大概也就是上述相关内容。
下面我们更详细的介绍一下MyBatis核心组件的作用和使用方法:
SqlSessionFactoryBuilder:用于构建SqlSessionFactory对象。使用它的build()方法来创建SqlSessionFactory对象。
使用示例:
InputStream inputStream = Resources.getResourceAsStream("mybatis-config.xml");
SqlSessionFactory sqlSessionFactory = new SqlSessionFactoryBuilder().build(inputStream);
SqlSessionFactory:用于创建SqlSession对象。通过调用openSession()方法来创建SqlSession对象。
使用示例:
SqlSession sqlSession = sqlSessionFactory.openSession();
SqlSession:与数据库交互的主要对象。使用它的selectOne()、selectList()、insert()、update()、delete()等方法来执行数据库操作。
使用示例:
User user = sqlSession.selectOne("com.example.mapper.UserMapper.selectUserById", 1);
Configuration:MyBatis的核心配置类。通过读取配置文件或编程方式来创建Configuration对象。
使用示例:
InputStream inputStream = Resources.getResourceAsStream("mybatis-config.xml");
Configuration configuration = new Configuration();
configuration.setXXX(...);
MappedStatement:封装了SQL语句和映射配置信息。在映射文件中定义SQL语句和映射关系,通过Configuration对象获取MappedStatement对象。
使用示例:
MappedStatement mappedStatement = configuration.getMappedStatement("com.example.mapper.UserMapper.selectUserById");
Executor:执行SQL语句的对象。通过SqlSession对象的selectOne()、selectList()、insert()、update()、delete()等方法来执行SQL语句。
使用示例:
Executor executor = sqlSession.getExecutor();
ParameterHandler:处理SQL语句中的参数。MyBatis会根据SQL语句的参数类型,使用不同的ParameterHandler来处理参数。
使用示例:
ParameterHandler parameterHandler = mappedStatement.getBoundSql(parameterObject).getParameterHandler();
ResultSetHandler:处理SQL查询结果集。MyBatis会根据查询结果集的类型,使用不同的ResultSetHandler来处理结果集。
使用示例:
ResultSetHandler resultSetHandler = mappedStatement.getResultSetHandler();
StatementHandler:处理SQL语句的对象。MyBatis会根据SQL语句的类型,使用不同的StatementHandler来处理SQL语句。
使用示例:
StatementHandler statementHandler = executor.createStatementHandler(mappedStatement, parameterObject, RowBounds.DEFAULT, null, null);
TypeHandler:处理Java类型与数据库类型的转换。MyBatis提供了一些默认的TypeHandler,也可以自定义TypeHandler来处理特定类型的转换。
使用示例:
public class MyTypeHandler extends BaseTypeHandler<MyType> {
    @Override
    public void setNonNullParameter(PreparedStatement ps, int i, MyType parameter, JdbcType jdbcType) throws SQLException {
        ps.setString(i, parameter.toString());
    }
    @Override
    public MyType getNullableResult(ResultSet rs, String columnName) throws SQLException {
        String value = rs.getString(columnName);
        return MyType.valueOf(value);
    }
    // ...
}
Transaction:事务管理。通过配置文件或编程方式来管理事务。
使用示例:
TransactionFactory transactionFactory = new JdbcTransactionFactory();
Environment environment = new Environment("development", transactionFactory, dataSource);
Configuration configuration = new Configuration(environment);
configuration.addMapper(UserMapper.class);
SqlSessionFactory sqlSessionFactory = new SqlSessionFactoryBuilder().build(configuration);
SqlSession sqlSession = sqlSessionFactory.openSession();
Transaction transaction = sqlSession.getTransaction();
DataSource:数据库连接池。配置数据源的相关信息,MyBatis支持各种类型的数据源。
使用示例:
DataSource dataSource = new PooledDataSource(driver, url, username, password);
ObjectFactory:创建结果对象实例。MyBatis使用ObjectFactory来创建结果对象实例。
使用示例:
ObjectFactory objectFactory = configuration.getObjectFactory();
User user = objectFactory.create(User.class);
Plugin:插件。可以通过自定义插件来扩展MyBatis的功能。
使用示例:
@Intercepts({
    @Signature(type = Executor.class, method = "update", args = {MappedStatement.class, Object.class})
})
public class MyPlugin implements Interceptor {
    @Override
    public Object intercept(Invocation invocation) throws Throwable {
        // ...
    }
    // ...
}
Environment:环境配置。配置数据库连接信息、事务管理器等。
使用示例:
TransactionFactory transactionFactory = new JdbcTransactionFactory();
Environment environment = new Environment("development", transactionFactory, dataSource);
Interceptor:拦截器。可以通过自定义拦截器来拦截SQL语句的执行。
使用示例:
public class MyInterceptor implements Interceptor {
    @Override
    public Object intercept(Invocation invocation) throws Throwable {
        // ...
    }
    // ...
}
LanguageDriver:SQL语言驱动。MyBatis提供了多种语言驱动,如XML、注解等。
使用示例:
@Select("SELECT * FROM user WHERE id = #{id}")
User selectUserById(@Param("id") int id);
Cache:缓存。MyBatis提供了一级缓存和二级缓存。
使用示例:
<cache eviction="LRU" flushInterval="60000" size="512" readOnly="true"/>
Scripting:动态SQL语句处理。MyBatis支持动态SQL语句的构建和执行。
使用示例:
<select id="selectUsers" resultType="User">
  SELECT * FROM user
  <where>
    <if test="id != null">
      AND id = #{id}
    </if>
    <if test="name != null">
      AND name = #{name}
    </if>
  </where>
</select>
- Binding:绑定Mapper接口和映射配置文件。通过Mapper接口和映射配置文件的绑定,实现SQL语句的执行。
使用示例:
public interface UserMapper {
    @Select("SELECT * FROM user WHERE id = #{id}")
    User selectUserById(@Param("id") int id);
}
三、原理
这里所有的原理分析都是基于springboot的架构解析的,请各位朋友不要看错了。
依赖包如下:
        <dependency>
            <groupId>org.springframework.boot</groupId>
            <artifactId>spring-boot-starter-jdbc</artifactId>
        </dependency>

        <dependency>
            <groupId>org.mybatis.spring.boot</groupId>
            <artifactId>mybatis-spring-boot-starter</artifactId>
            <version>2.1.3</version>
        </dependency>

        <dependency>
            <groupId>mysql</groupId>
            <artifactId>mysql-connector-java</artifactId>
            <version>8.0.21</version>
        </dependency>
1. SQL解析
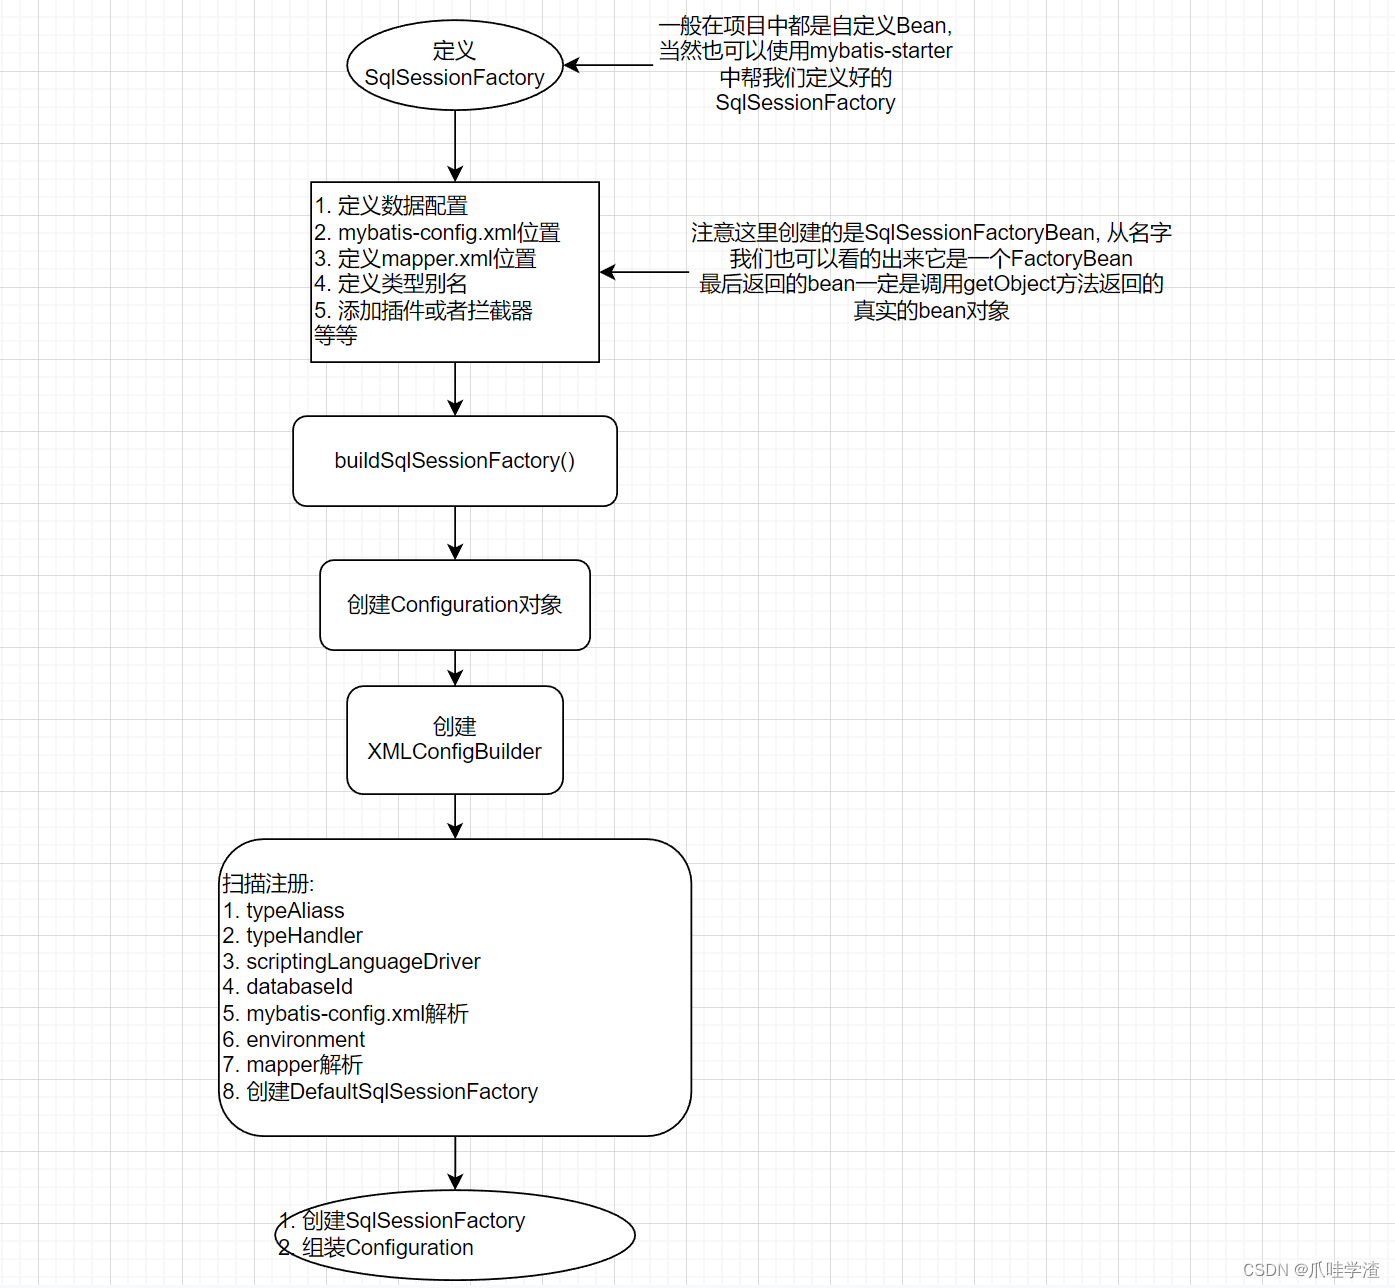
上图就是SqlSessionFactory创建、Configuration创建、Mapper解析等相关的操作流程,下面我们对照代码进行它的详细业务逻辑流程。
	@Bean
    public SqlSessionFactory sqlSessionFactory(HikariDataSource dataSource) throws Exception {
        SqlSessionFactoryBean sqlSessionFactoryBean = new SqlSessionFactoryBean();
        //设置数据源配置, 配套的就是我们配置的DataSource实例
        sqlSessionFactoryBean.setDataSource(dataSource);
        PathMatchingResourcePatternResolver resolver = new PathMatchingResourcePatternResolver();
        //配置mybatis-config路径
        sqlSessionFactoryBean.setConfigLocation(resolver.getResources(myBatisConfigPath)[0]);
        //配置mapper路径
        sqlSessionFactoryBean.setMapperLocations(resolver.getResources(mapperXmlConfigPath));
        //配置typealias路径
        sqlSessionFactoryBean.setTypeAliasesPackage(mapperPackagePath);

        return sqlSessionFactoryBean.getObject();
    }
流程的开始就需要从我们代码中的config中配置的这个bean开始说起,使用的就是大家熟悉的注解@Bean,在spring加载的过程中帮我们创建SqlSessionFactory的实例,通过SqlSessionFactoryBean类实例构造SqlSessionFactory的实例。
主要的业务逻辑都在SqlSessionFactoryBean.getObject()流程里,代码比较多,我们拆开分析。
1. 创建XMLConfigBuilder
	XMLConfigBuilder xmlConfigBuilder = null;
    if (this.configuration != null) {
      targetConfiguration = this.configuration;
      if (targetConfiguration.getVariables() == null) {
        targetConfiguration.setVariables(this.configurationProperties);
      } else if (this.configurationProperties != null) {
        targetConfiguration.getVariables().putAll(this.configurationProperties);
      }
    } else if (this.configLocation != null) {
      //主要看这里
      xmlConfigBuilder = new XMLConfigBuilder(this.configLocation.getInputStream(), null, this.configurationProperties);
      targetConfiguration = xmlConfigBuilder.getConfiguration();
    }
    //省略.......
通过我们配置的mybatis-config和一些属性配置作为参数,创建XMLConfigBuilder实例。
public XMLConfigBuilder(InputStream inputStream, String environment, Properties props) {
    this(new XPathParser(inputStream, true, props, new XMLMapperEntityResolver()), environment, props);
  }
XPathParser就是用来解析xml文件的,通过解析xml文件生成Document文档对象,用于解析xml中不同节点node的数据,封装到Configuration中。
  private XMLConfigBuilder(XPathParser parser, String environment, Properties props) {
  	//创建Configuration
    super(new Configuration());
    //省略....
  }

public Configuration() {
    typeAliasRegistry.registerAlias("JDBC", JdbcTransactionFactory.class);
    typeAliasRegistry.registerAlias("MANAGED", ManagedTransactionFactory.class);

    typeAliasRegistry.registerAlias("JNDI", JndiDataSourceFactory.class);
    typeAliasRegistry.registerAlias("POOLED", PooledDataSourceFactory.class);
    typeAliasRegistry.registerAlias("UNPOOLED", UnpooledDataSourceFactory.class);
    //省略....
    //创建Configuration的时候, 注册一些内置的别名定义, 太多了, 代码太长
  }
2. 注册typeAlias
//扫描指定包下的带有@Alias注解的类
if (hasLength(this.typeAliasesPackage)) {
      scanClasses(this.typeAliasesPackage, this.typeAliasesSuperType).stream()
          .filter(clazz -> !clazz.isAnonymousClass()).filter(clazz -> !clazz.isInterface())
          .filter(clazz -> !clazz.isMemberClass()).forEach(targetConfiguration.getTypeAliasRegistry()::registerAlias);
    }
	//添加我们配置的typeAlias
    if (!isEmpty(this.typeAliases)) {
      Stream.of(this.typeAliases).forEach(typeAlias -> {
        targetConfiguration.getTypeAliasRegistry().registerAlias(typeAlias);
        LOGGER.debug(() -> "Registered type alias: '" + typeAlias + "'");
      });
    }
注册typeAlias,注册到Configuration中的typeAliasRegistry中。
protected final TypeAliasRegistry typeAliasRegistry = new TypeAliasRegistry();
我们可以看下这个类TypeAliasRegistry有什么?
public class TypeAliasRegistry {
  private final Map<String, Class<?>> typeAliases = new HashMap<>();
类里面只有个map变量,保存了别名和类的映射关系。
3. plugin
//注解配置的拦截器
if (!isEmpty(this.plugins)) {
      Stream.of(this.plugins).forEach(plugin -> {
        targetConfiguration.addInterceptor(plugin);
        LOGGER.debug(() -> "Registered plugin: '" + plugin + "'");
      });
    }
protected final InterceptorChain interceptorChain = new InterceptorChain();

public void addInterceptor(Interceptor interceptor) {
    interceptorChain.addInterceptor(interceptor);
  }

 //InterceptorChain 类变量
  private final List<Interceptor> interceptors = new ArrayList<>();
我们自定义的Interceptor注册到Configuration中的interceptorChain中, 而这个类下只有一个变量interceptors, 当开始执行sql的时候就会调用到InterceptorChain类中的pluginAll方法, 获取所有的拦截器.
4. typeHandler
//扫描指定路径下的TypeHandler类, 注册到TypeHandlerRegistry
if (hasLength(this.typeHandlersPackage)) {
      scanClasses(this.typeHandlersPackage, TypeHandler.class).stream().filter(clazz -> !clazz.isAnonymousClass())
          .filter(clazz -> !clazz.isInterface()).filter(clazz -> !Modifier.isAbstract(clazz.getModifiers()))
          .forEach(targetConfiguration.getTypeHandlerRegistry()::register);
    }
	//注册方式同上,这个typeHandlers就是我们在配置SqlSessionFactoryBean的时候设值的TypeHandler
    if (!isEmpty(this.typeHandlers)) {
      Stream.of(this.typeHandlers).forEach(typeHandler -> {
        targetConfiguration.getTypeHandlerRegistry().register(typeHandler);
        LOGGER.debug(() -> "Registered type handler: '" + typeHandler + "'");
      });
    }
public void register(Class<?> typeHandlerClass) {
    boolean mappedTypeFound = false;
    //判断类上是否有MappedTypes注解, MappedTypes注解中的value是java的返回类型
    MappedTypes mappedTypes = typeHandlerClass.getAnnotation(MappedTypes.class);
    if (mappedTypes != null) {
      for (Class<?> javaTypeClass : mappedTypes.value()) {
        register(javaTypeClass, typeHandlerClass);
        mappedTypeFound = true;
      }
    }
    //没有MappedTypes注解的类
    if (!mappedTypeFound) {
      register(getInstance(null, typeHandlerClass));
    }
  }

private <T> void register(Type javaType, TypeHandler<? extends T> typeHandler) {
	//判断自定义的TypeHandler类上是否有MappedJdbcTypes注解, 这个是返回jdbc类型的
    MappedJdbcTypes mappedJdbcTypes = typeHandler.getClass().getAnnotation(MappedJdbcTypes.class);
    if (mappedJdbcTypes != null) {
      for (JdbcType handledJdbcType : mappedJdbcTypes.value()) {
        register(javaType, handledJdbcType, typeHandler);
      }
      if (mappedJdbcTypes.includeNullJdbcType()) {
        register(javaType, null, typeHandler);
      }
    } else {
      register(javaType, null, typeHandler);
    }
  }

 private void register(Type javaType, JdbcType jdbcType, TypeHandler<?> handler) {
    if (javaType != null) {
      Map<JdbcType, TypeHandler<?>> map = typeHandlerMap.get(javaType);
      if (map == null || map == NULL_TYPE_HANDLER_MAP) {
        map = new HashMap<>();
      }
      //map赋值的是jdbc类型 -> typehandler
      //注意这里的jdbctype可能是null
      map.put(jdbcType, handler);
      //typeHandlerMap是java类型 -> map。
      typeHandlerMap.put(javaType, map);
    }
    //allType存放是typeHandler的Class -> typeHandler
    allTypeHandlersMap.put(handler.getClass(), handler);
  }
正常情况下,mybatis内置的TypeHandler已经足够使用了,在开发的时候一般用不到自己定义handler。
5. languageDriver
//判断是否配置了语言驱动, 如果配置了, 注册到LanguageDriverRegistry.LANGUAGE_DRIVER_MAP(Map<Class<? extends LanguageDriver>, LanguageDriver>)
if (!isEmpty(this.scriptingLanguageDrivers)) {
      Stream.of(this.scriptingLanguageDrivers).forEach(languageDriver -> {
        targetConfiguration.getLanguageRegistry().register(languageDriver);
        LOGGER.debug(() -> "Registered scripting language driver: '" + languageDriver + "'");
      });
    }

    Optional.ofNullable(this.defaultScriptingLanguageDriver)
        .ifPresent(targetConfiguration::setDefaultScriptingLanguage);
LanguageDriver主要用来解析sql的,同时利用解析后的参数提供ParameterHandler实例对象。
mybatis提供了2种实现,第一个是XMLLanguageDriver, 同时它也是默认的LanguageDriver, 第二个是RawLanguageDriver。
6. databaseId
if (this.databaseIdProvider != null) {// fix #64 set databaseId before parse mapper xmls
      try {
        targetConfiguration.setDatabaseId(this.databaseIdProvider.getDatabaseId(this.dataSource));
      } catch (SQLException e) {
        throw new NestedIOException("Failed getting a databaseId", e);
      }
    }
mybatis提供了databaseIdProvider的概念,用于支持不同的数据库,因为不同的数据库有些sql的语法或者函数上有差异,如果需要同时支持多种不同的数据库,就需要用到dabaseIdProvider的概念。
例如:
定义bean
public DatabaseIdProvider databaseIdProvider() {
DatabaseIdProvider databaseIdProvider = new VendorDatabaseIdProvider();
Properties p = new Properties();
p.setProperty(“Oracle”, “oracle”);
p.setProperty(“MySQL”, “mysql”);
databaseIdProvider.setProperties§;
return databaseIdProvider;
}
同时支持mysql和oracle
select
account
dep_code
from SYS_USER
where ID = #{id,jdbcType=CHAR}
或者
select
account
from SYS_USER
where ID = #{id,jdbcType=CHAR}
7. mybatis-config解析
if (xmlConfigBuilder != null) {
      try {
        xmlConfigBuilder.parse();
        LOGGER.debug(() -> "Parsed configuration file: '" + this.configLocation + "'");
      }
      //省略....
    }
 //调用XMLConfigBuilder开始解析mybatis的xml文件
public Configuration parse() {
    //省略  解析状态的处理
    //xml配置的根节点是configuration
    parseConfiguration(parser.evalNode("/configuration"));
    return configuration;
  }

private void parseConfiguration(XNode root) {
    try {
      // issue #117 read properties first
      propertiesElement(root.evalNode("properties"));
      Properties settings = settingsAsProperties(root.evalNode("settings"));
      loadCustomVfs(settings);
      loadCustomLogImpl(settings);
      typeAliasesElement(root.evalNode("typeAliases"));
      pluginElement(root.evalNode("plugins"));
      objectFactoryElement(root.evalNode("objectFactory"));
      objectWrapperFactoryElement(root.evalNode("objectWrapperFactory"));
      reflectorFactoryElement(root.evalNode("reflectorFactory"));
      settingsElement(settings);
      // read it after objectFactory and objectWrapperFactory issue #631
      environmentsElement(root.evalNode("environments"));
      databaseIdProviderElement(root.evalNode("databaseIdProvider"));
      typeHandlerElement(root.evalNode("typeHandlers"));
      mapperElement(root.evalNode("mappers"));
    } catch (Exception e) {
      throw new BuilderException("Error parsing SQL Mapper Configuration. Cause: " + e, e);
    }
  }
比如下图的这个mybatis-config.xml的配置

private void parseConfiguration(XNode root) {
    try {
      // issue #117 read properties first
      propertiesElement(root.evalNode("properties"));
      Properties settings = settingsAsProperties(root.evalNode("settings"));
      loadCustomVfs(settings);
      loadCustomLogImpl(settings);
      typeAliasesElement(root.evalNode("typeAliases"));
      pluginElement(root.evalNode("plugins"));
      objectFactoryElement(root.evalNode("objectFactory"));
      objectWrapperFactoryElement(root.evalNode("objectWrapperFactory"));
      reflectorFactoryElement(root.evalNode("reflectorFactory"));
      settingsElement(settings);
      // read it after objectFactory and objectWrapperFactory issue #631
      environmentsElement(root.evalNode("environments"));
      databaseIdProviderElement(root.evalNode("databaseIdProvider"));
      typeHandlerElement(root.evalNode("typeHandlers"));
      mapperElement(root.evalNode("mappers"));
    } catch (Exception e) {
      throw new BuilderException("Error parsing SQL Mapper Configuration. Cause: " + e, e);
    }
  }
这里主要是解析配置中相关的属性配置,更详细的解释大家可以去官网去看,解释的很详细。
并且有些注册流程在上面的代码中也介绍到了,大家自行看吧。mapper的解析我们放在下面详细分析。
常使用的几种配置方式:
<mappers>
        <mapper resource="mapper/TestMapper.xml"/>
        <mapper class="com.z.mapper.TestMapper"/>
        <package name="com.z.mapper"/>
    </mappers>
7. mapper解析
if (this.mapperLocations != null) {
      //省略....
      {
      	//这里的resource在配置SqlSessionFactoryBean的时候,已经获取到mapper.xml的resource资源了
        for (Resource mapperLocation : this.mapperLocations) {
        //省略...
          try {
            XMLMapperBuilder xmlMapperBuilder = new XMLMapperBuilder(mapperLocation.getInputStream(),
                targetConfiguration, mapperLocation.toString(), targetConfiguration.getSqlFragments());
             //解析mapper.xml
            xmlMapperBuilder.parse();
          } catch (Exception e) {
            throw new NestedIOException("Failed to parse mapping resource: '" + mapperLocation + "'", e);
          } finally {
            ErrorContext.instance().reset();
          }
        }
      }
    }
接下来我们看下parse方法
public void parse() {
    if (!configuration.isResourceLoaded(resource)) {
    //解析mapper根节点下的所有节点标签
      configurationElement(parser.evalNode("/mapper"));
      configuration.addLoadedResource(resource);
      bindMapperForNamespace();
    }

    parsePendingResultMaps();
    parsePendingCacheRefs();
    parsePendingStatements();
  }
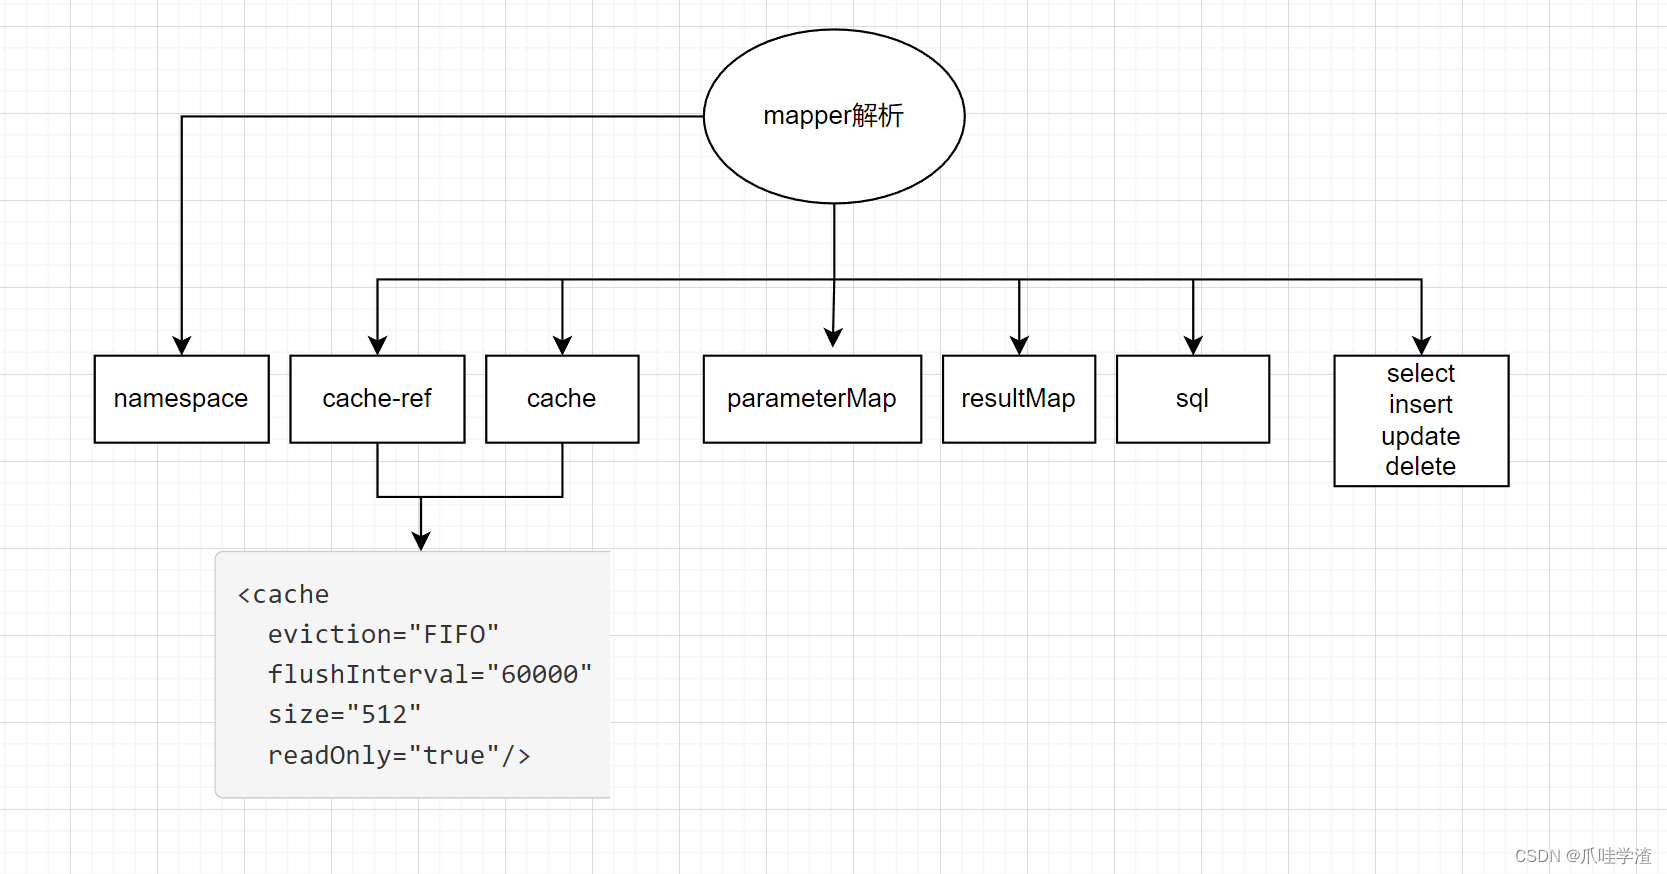
mapper中的所有标签解析和注册都在configurationElement方法中实现.
private void configurationElement(XNode context) {
    try {
      String namespace = context.getStringAttribute("namespace");
      if (namespace == null || namespace.isEmpty()) {
        throw new BuilderException("Mapper's namespace cannot be empty");
      }
      builderAssistant.setCurrentNamespace(namespace);
      cacheRefElement(context.evalNode("cache-ref"));
      cacheElement(context.evalNode("cache"));
      parameterMapElement(context.evalNodes("/mapper/parameterMap"));
      resultMapElements(context.evalNodes("/mapper/resultMap"));
      sqlElement(context.evalNodes("/mapper/sql"));
      buildStatementFromContext(context.evalNodes("select|insert|update|delete"));
    } catch (Exception e) {
      throw new BuilderException("Error parsing Mapper XML. The XML location is '" + resource + "'. Cause: " + e, e);
    }
  }
mapper中的标签说明请参考官方文档说明, 这里我们不做含义的一一解释, 官方的解释已经很清楚了。
- 命名空间,赋值到mapperxml解析的辅助类MapperBuilderAssistant
- cache-ref, 在configuratin中的cahcheRefMap保存当前命名空间和cache引用的命名空间的映射关系,同时在builderAssistant中保存应用的cache对象
- cache,创建Cache对象,保存在configuration中的caches的map对象中,key就是当前mapper的命名空间
- parameterMap,首先构建ParameterMapping对象,保存javaType、jdbcType、typeHandler等等,如果有多个参数,那就有多个ParameterMapping, 然后构建parameterMap对象,id就是parameterMap的id,保存在configuration中的parameterMaps。
- resultMap,创建ResultMapping对象,包含column、javaType、jdbcType、typeHandler等等,保存在configuration中的resultMaps中,注意constructor和discriminator的特殊处理部分,一个是类的构造器,一个是不同数据集映射不同resultmap的。
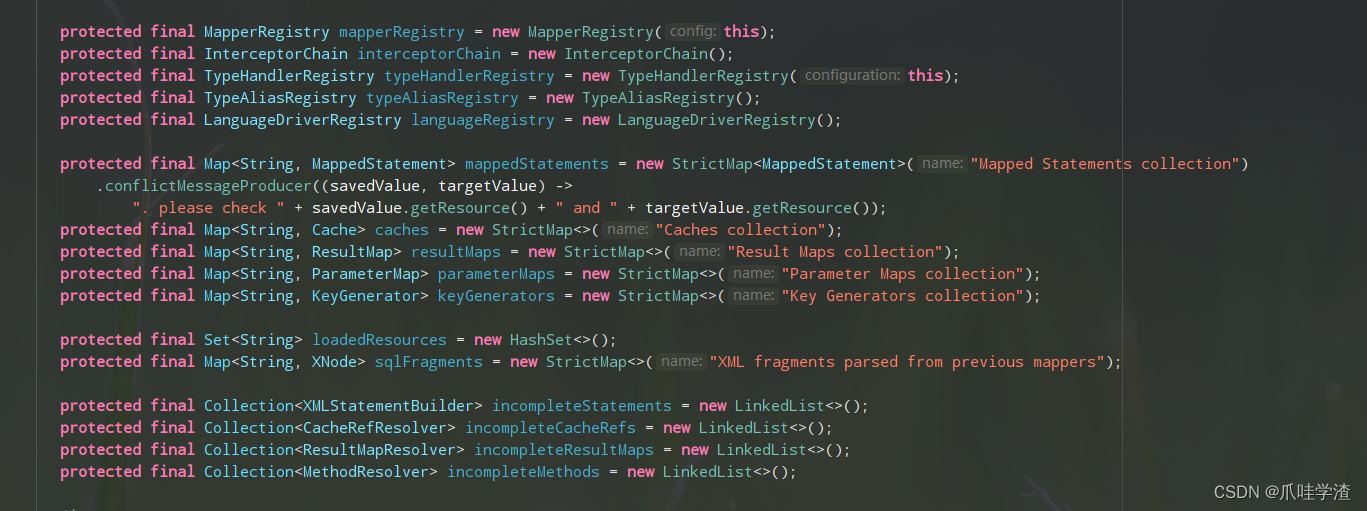
- sql,解析sql片段,sql片段就是为了复用代码,解析后放置在XMLMapperBuilder的sqlFragments中,但是这个对象是Configuration.StrictMap,所以sql片段的解析最后还是放置在configuration中的sqlFragments中。
- sql语句,包含insert、update、delete、select,封装sqlSource,sqlSource中只提供了getBoundSql方法,返回了BoundSql,BoundSql中包含了我们的sql、参数映射、参数值等等,最后封装成MappedStatement对象,最后放置在configuration中的mappedStatements变量(map),同时也包含resultMap。
这里主要都是xml文件的解析,然后把解析后的数据封装到指定的功能对象中,便于后续取值使用。
8. 注解mapper解析
public void parse() {
    if (!configuration.isResourceLoaded(resource)) {
      ///省略....
      //1.
      configuration.addLoadedResource(resource);
      //2.
      bindMapperForNamespace();
    }
  }
- 在configuration的loadedResources变量添加xml资源路径
- 第一个:添加命名空间的资源路径到loadedResources;第二个在configuration的konwMappers添加mapper的映射关系,key就是mapper接口的class,value是MapperProxyFactory代理工厂。
public <T> void addMapper(Class<T> type) {
    if (type.isInterface()) {
      //省略....
      boolean loadCompleted = false;
      try {
        knownMappers.put(type, new MapperProxyFactory<>(type));
        MapperAnnotationBuilder parser = new MapperAnnotationBuilder(config, type);
        parser.parse();
        loadCompleted = true;
      } finally {
        if (!loadCompleted) {
          knownMappers.remove(type);
        }
      }
    }
  }
- configuration中的knownMappers变量保存了mapper的class和mapper代理工厂的映射关系,这个后续获取mapper的代理对象的时候会使用到。
- 创建MapperAnnotationBuilder对象, 解析mapper接口对应方法上添加的mybatis的相关注解。
public void parse() {
    String resource = type.toString();
    //1
    if (!configuration.isResourceLoaded(resource)) {
    //2
      loadXmlResource();
      //3
      configuration.addLoadedResource(resource);
      assistant.setCurrentNamespace(type.getName());
      //4
      parseCache();
      //5
      parseCacheRef();
      //6
      for (Method method : type.getMethods()) {
        if (!canHaveStatement(method)) {
          continue;
        }
        //7
        if (getAnnotationWrapper(method, false, Select.class, SelectProvider.class).isPresent()
            && method.getAnnotation(ResultMap.class) == null) {
          parseResultMap(method);
        }
        try {
        //8
          parseStatement(method);
        } catch (IncompleteElementException e) {
          configuration.addIncompleteMethod(new MethodResolver(this, method));
        }
      }
    }
    parsePendingMethods();
  }
- 1、判断资源包(比如com.xx.xxMapper)是否已经解析过了,防止重复解析数据
- 2、解析xml数据,官方给的注释是防止spring在初始化的时候没有加载xml,才有此举,这个和上面的解析流程是一样的
- 3、添加资源包路径
- 4、判断是否添加@CacheNameSpace注解,这个就是开启二级缓存用的,等同于xml中的标签,如果有封装成Cache对象,然后放置到configuration的cache变量中
- 5、CacheRef也是同样的,引用了不同命名空间的缓存,把引用的cache放置到自己命名空间中
- 6、遍历mapper中的所有方法,判断是否添加select或者selectProvider注解,并且没有添加resultMap注解的情况下,添加对应方法返回值的类型,添加到configuration中的resultMap变量中
- 7、解析具体的sql语句,这个就和xml解析的流程一样了,无非是不同注解赋值不同的属性上
9. 清理解析失败的相关结果
//清理处理失败的保存的resultmap
parsePendingResultMaps();
//清理处理失败的保存的cacheref
parsePendingCacheRefs();
//清理处理失败的保存的XMLStatementBuilder
parsePendingStatements();
到这里所有的xml和注解的sql都解析完毕了。
10. 生成SqlSessionFactory
public SqlSessionFactory build(Configuration config) {
    return new DefaultSqlSessionFactory(config);
  }
生成SqlSessionFactory实例对象,这是使用的mybatis默认的工厂对象DefaultSqlSessionFactory。
最后我们再看下Configuration的变量,从这里我们就可以看到基本上所有解析的数据机构都在configuration对象中。
2. Mapper接口
我们写好的mapper接口什么时候创建实例对象的呢? 写好的mapper.xml文件怎么解析的呢?
从上面的mybatis-config.xml解析的流程中,可以知道mapper的xml文件当然也可以配置在mybatis-config.xml文件中,在mappers的xml节点下配置即可。
在我们开发的过程中,对于某个业务的dao调用,我们都定义了一个对应的mapper接口,那么它作为一个接口,是如果注入和被调用呢?这里我们要看下@MapperScan(“com.xx.xx”)注解的业务逻辑了。
如图所示:

1. @MapperScan
先看下这个注解的定义
@Retention(RetentionPolicy.RUNTIME)
@Target(ElementType.TYPE)
@Documented
@Import(MapperScannerRegistrar.class)
@Repeatable(MapperScans.class)
public @interface MapperScan {
从这个注解里面我们看到了Import的一个类,就是MapperScannerRegistrar,相关的逻辑就在这里处理。
public class MapperScannerRegistrar implements ImportBeanDefinitionRegistrar, ResourceLoaderAware
从类实现上我们看到了, 它实现了ImportBeanDefinitionRegistrar, 这个就是一个bean注册的逻辑, 在spring启动的过程中, 注册我们自定义的bean, 看下它的主要代码部分.
BeanDefinitionBuilder builder = BeanDefinitionBuilder.genericBeanDefinition(MapperScannerConfigurer.class);
    builder.addPropertyValue("processPropertyPlaceHolders", true);
从这里我们可以看到它是为了注册MapperScannerConfigurer这个bean, 那么我们到这个类里面具体看下它主要实现了什么.
2. MapperScannerConfigurer
public class MapperScannerConfigurer
    implements BeanDefinitionRegistryPostProcessor, InitializingBean, ApplicationContextAware, BeanNameAware
它实现了BeanDefinitionRegistryPostProcessor, 从名字我们就可知道它是为了创建并注册BeanDefinition的, 主要看下它的postProcessBeanDefinitionRegistry实现方法.
public void postProcessBeanDefinitionRegistry(BeanDefinitionRegistry registry) {
    if (this.processPropertyPlaceHolders) {
      processPropertyPlaceHolders();
    }

    ClassPathMapperScanner scanner = new ClassPathMapperScanner(registry);
    scanner.setAddToConfig(this.addToConfig);
    scanner.setAnnotationClass(this.annotationClass);
    scanner.setMarkerInterface(this.markerInterface);
    scanner.setSqlSessionFactory(this.sqlSessionFactory);
    scanner.setSqlSessionTemplate(this.sqlSessionTemplate);
    scanner.setSqlSessionFactoryBeanName(this.sqlSessionFactoryBeanName);
    scanner.setSqlSessionTemplateBeanName(this.sqlSessionTemplateBeanName);
    scanner.setResourceLoader(this.applicationContext);
    scanner.setBeanNameGenerator(this.nameGenerator);
    scanner.setMapperFactoryBeanClass(this.mapperFactoryBeanClass);
    if (StringUtils.hasText(lazyInitialization)) {
      scanner.setLazyInitialization(Boolean.valueOf(lazyInitialization));
    }
    scanner.registerFilters();
    scanner.scan(
        StringUtils.tokenizeToStringArray(this.basePackage, ConfigurableApplicationContext.CONFIG_LOCATION_DELIMITERS));
  }
创建ClassPathMapperScanner, 其中设置的一些参数, 比如sqlsessionFactory、sqlsessionTemplate,这个在spring调用refresh方法后,基本都是null,我们主要关注scan方法的实现逻辑。
scan方法是在继承类ClassPathBeanDefinitionScanner中实现的.
protected Set<BeanDefinitionHolder> doScan(String... basePackages) {
		Assert.notEmpty(basePackages, "At least one base package must be specified");
		Set<BeanDefinitionHolder> beanDefinitions = new LinkedHashSet<>();
		for (String basePackage : basePackages) {
			//根据定义好的mapper的路径,查找所有的mapper接口资源
			Set<BeanDefinition> candidates = findCandidateComponents(basePackage);
			for (BeanDefinition candidate : candidates) {
				//省略...
				if (checkCandidate(beanName, candidate)) {
					BeanDefinitionHolder definitionHolder = new BeanDefinitionHolder(candidate, beanName);
					definitionHolder =
							AnnotationConfigUtils.applyScopedProxyMode(scopeMetadata, definitionHolder, this.registry);
					beanDefinitions.add(definitionHolder);
					registerBeanDefinition(definitionHolder, this.registry);
				}
			}
		}
		return beanDefinitions;
	}
对注册的mapper的bean添加一些其他属性数据。
public Set<BeanDefinitionHolder> doScan(String... basePackages) {
	//获取所有的mapper接口的bean定义信息列表
    Set<BeanDefinitionHolder> beanDefinitions = super.doScan(basePackages);

    if (beanDefinitions.isEmpty()) {
      //省略...
    } else {
      //赋值一些属性, 比如beanClass, 属性值sqlSessionFactory sqlSessionTemplate等等
      processBeanDefinitions(beanDefinitions);
    }

    return beanDefinitions;
  }
在processBeanDefinitions(beanDefinitions)方法中,我们看下这个BeanClass属性的设置, 赋值为definition.setBeanClass(this.mapperFactoryBeanClass); 这个mapperFactoryBeanClass就是class org.mybatis.spring.mapper.MapperFactoryBean,这个就涉及到bean初始化的时候,包括后面我们调用mapper的时候它的实例对象是什么。
3. MapperFactoryBean
MapperFactoryBean它是一个FactoryBean,对于它来说我们知道要获取它的真实的实例对象,必定是调用getObject()方法,下面我们主要看下这个方法的业务逻辑。
public T getObject() throws Exception {
    return getSqlSession().getMapper(this.mapperInterface);
  }

它有3个不同的实现,这里使用的是SqlSessionTemplate。
public <T> T getMapper(Class<T> type) {
    return getConfiguration().getMapper(type, this);
  }
这里是通过Configuration.getMapper()方法获取mapper的实例对象的。
最后就来到了MapperRegistry类中,正是通过它的getMapper()方法返回了mapper的实例对象,并且它是一代理对象,使用了jdk的动态代理方式。
3. 动态代理
从@MapperScan的流程中我们可以得知,最后返回的mapper对象正是一个jdk的动态代理对象,这就是为什么我们定义的是mapper接口,仍然可以注入,仍然可以正常调用的原因了,下面我们看下代理的生成流程。
从MapperFactoryBean的名字上我们就知道它是一个FactoryBean,那么我们主要看下它的getObject方法获取mapper实例对象的业务逻辑。
public T getObject() throws Exception {
	//这里的getSqlSession是sqlSessionTemplate对象
    return getSqlSession().getMapper(this.mapperInterface);
  }

public <T> T getMapper(Class<T> type) {
	//通过configuration获取mapper对象
    return getConfiguration().getMapper(type, this);
  }
最后获取对象的地方是在MapperRegistry中处理的。
public <T> T getMapper(Class<T> type, SqlSession sqlSession) {
    final MapperProxyFactory<T> mapperProxyFactory = (MapperProxyFactory<T>) knownMappers.get(type);
    if (mapperProxyFactory == null) {
      throw new BindingException("Type " + type + " is not known to the MapperRegistry.");
    }
    try {
      return mapperProxyFactory.newInstance(sqlSession);
    } catch (Exception e) {
      throw new BindingException("Error getting mapper instance. Cause: " + e, e);
    }
  }
这里knownMappers保存了mapper的class和proxyFactory的映射关系。
通过mapperProxyFactory创建mapper的代理实例对象。
 protected T newInstance(MapperProxy<T> mapperProxy) {
    return (T) Proxy.newProxyInstance(mapperInterface.getClassLoader(), new Class[] { mapperInterface }, mapperProxy);
  }

  public T newInstance(SqlSession sqlSession) {
    final MapperProxy<T> mapperProxy = new MapperProxy<>(sqlSession, mapperInterface, methodCache);
    return newInstance(mapperProxy);
  }
这代码看着是不是太熟悉了,对的, 这就是jdk的动态代理,代理类是MapperProxy,后续sql的执行逻辑就是要从这个代理类执行。
4. SQL执行
从上面我们已经知道了要执行sql,就一定会执行mapper的代理类的invoke方法,下面我们就看下它的实现流程。
1. invoker
public Object invoke(Object proxy, Method method, Object[] args) throws Throwable {
    try {
      if (Object.class.equals(method.getDeclaringClass())) {
        return method.invoke(this, args);
      } else {
        return cachedInvoker(method).invoke(proxy, method, args, sqlSession);
      }
    } catch (Throwable t) {
      throw ExceptionUtil.unwrapThrowable(t);
    }
  }
- 首先判断它的类是不是Object, 如果是, 直接执行目标对象的method.
- 获取MapperMethodInvoker对象,调用了cachedInvoker方法,从名字上我们就可以看的出来,它做了一层本地缓存,下次同样的method过来请求的话,直接从缓存中获取即可,省去了很多逻辑的判断,这里返回的invoker对象是PlainMethodInvoker。
2. MapperMethod
我们继续跟踪代码查看,就到了MapperMethod类中了。
private final SqlCommand command;
  private final MethodSignature method;
MapperMethod中包含了2个成语变量,从invoker调用之前,对这2个成员变量做了数据的封装,sqlCommand封装了调用命令类型,比如是select还是update等等,还有就是id,这个id就是mapper的报名加上方法名,比如com.xxx.mapper.get;MethodSignature变量主要保证了方法的返回值类型、是不是返回的void、是不是游标处理等等,当然其中也包含了参数名的处理ParamNameResolver,这里面就包含了方法对应的参数。
Method(@Param(“M”) int a, @Param(“N”) int b) -> {{0, “M”}, {1, “N”}}
Method(int a, int b) -> {{0, “0”}, {1, “1”}}
Method(int a, RowBounds rb, int b) -> {{0, “0”}, {2, “1”}}
public ParamNameResolver(Configuration config, Method method) {
    this.useActualParamName = config.isUseActualParamName();
    final Class<?>[] paramTypes = method.getParameterTypes();
    final Annotation[][] paramAnnotations = method.getParameterAnnotations();
    final SortedMap<Integer, String> map = new TreeMap<>();
    int paramCount = paramAnnotations.length;
    // get names from @Param annotations
    for (int paramIndex = 0; paramIndex < paramCount; paramIndex++) {
      if (isSpecialParameter(paramTypes[paramIndex])) {
        // skip special parameters
        continue;
      }
      String name = null;
      for (Annotation annotation : paramAnnotations[paramIndex]) {
        if (annotation instanceof Param) {
          hasParamAnnotation = true;
          name = ((Param) annotation).value();
          break;
        }
      }
      if (name == null) {
        // @Param was not specified.
        if (useActualParamName) {
          name = getActualParamName(method, paramIndex);
        }
        if (name == null) {
          // use the parameter index as the name ("0", "1", ...)
          // gcode issue #71
          name = String.valueOf(map.size());
        }
      }
      map.put(paramIndex, name);
    }
    names = Collections.unmodifiableSortedMap(map);
  }
从参数的处理逻辑上,我们就可以知道,既可以添加@Param注解,也可以不加,个人建议还是添加上比较好一点。
再来看下根据不同的CommandType处理的流程。
  public Object execute(SqlSession sqlSession, Object[] args) {
    Object result;
    switch (command.getType()) {
      case INSERT: {
      	//参数处理,转换成map,key就是index, value就是对应参数的值
        Object param = method.convertArgsToSqlCommandParam(args);
        //执行insert操作,处理结果
        result = rowCountResult(sqlSession.insert(command.getName(), param));
        break;
      }
      case UPDATE: {
        //参数处理,转换成map,key就是index, value就是对应参数的值
        Object param = method.convertArgsToSqlCommandParam(args);
        //执行update操作,处理结果
        result = rowCountResult(sqlSession.update(command.getName(), param));
        break;
      }
      case DELETE: {
        //参数处理,转换成map,key就是index, value就是对应参数的值
        Object param = method.convertArgsToSqlCommandParam(args);
        //执行delete操作,处理结果
        result = rowCountResult(sqlSession.delete(command.getName(), param));
        break;
      }
      case SELECT:
      	//无结果返回
        if (method.returnsVoid() && method.hasResultHandler()) {
          executeWithResultHandler(sqlSession, args);
          result = null;
          //返回集合
        } else if (method.returnsMany()) {
          result = executeForMany(sqlSession, args);
          //返回map
        } else if (method.returnsMap()) {
          result = executeForMap(sqlSession, args);
          //返回游标
        } else if (method.returnsCursor()) {
          result = executeForCursor(sqlSession, args);
        } else {
        //返回单对象
        //参数处理,转换成map,key就是index, value就是对应参数的值
          Object param = method.convertArgsToSqlCommandParam(args);
          result = sqlSession.selectOne(command.getName(), param);
          if (method.returnsOptional()
              && (result == null || !method.getReturnType().equals(result.getClass()))) {
            result = Optional.ofNullable(result);
          }
        }
        break;
        //刷新
      case FLUSH:
        result = sqlSession.flushStatements();
        break;
      default:
        throw new BindingException("Unknown execution method for: " + command.getName());
    }
    return result;
  }
这里看着是不是就熟悉多了,根据不同sql执行类型做不同的业务处理,这里的分支比较多,我们就以select中的selectOne作为demo进行后续的原理分析。
3. DefaultSqlSession调用
  public <T> T selectOne(String statement, Object parameter) {
    // Popular vote was to return null on 0 results and throw exception on too many.
    List<T> list = this.selectList(statement, parameter);
    if (list.size() == 1) {
      return list.get(0);
    } else if (list.size() > 1) {
      throw new TooManyResultsException("Expected one result (or null) to be returned by selectOne(), but found: " + list.size());
    } else {
      return null;
    }
  }
就算我们调用的selectOne方法,内部实现的还是调用的selectList方法,只是帮我们取了list的第一个元素而已。
public <E> List<E> selectList(String statement, Object parameter, RowBounds rowBounds) {
    try {
     //根据id获取封装好的MappedStatement对象,它里面包含了sql要执行的相关的sqlsource,returntype等很多属性值
      MappedStatement ms = configuration.getMappedStatement(statement);
      return executor.query(ms, wrapCollection(parameter), rowBounds, Executor.NO_RESULT_HANDLER);
    } catch (Exception e) {
      throw ExceptionFactory.wrapException("Error querying database.  Cause: " + e, e);
    } finally {
      ErrorContext.instance().reset();
    }
  }
到这里所有的sql数据都准备好了,接开始真正执行sql调用了。
4.1 Executor
在我们不设置的情况下,默认的executorType就是simle,对应的executor也就是SimpleExecutor,执行器调度的逻辑就在这里面,它继承了BaseExecutor。
public <E> List<E> query(MappedStatement ms, Object parameter, RowBounds rowBounds, ResultHandler resultHandler) throws SQLException {
	//获取boundsql
    BoundSql boundSql = ms.getBoundSql(parameter);
    //创建缓存key,如果关闭了缓存,则不处理
    //缓存key包含了很多参数,比如id, sql, limit, offset, 参数值, 参数, 环境id等等
    CacheKey key = createCacheKey(ms, parameter, rowBounds, boundSql);
    //调用query方法
    return query(ms, parameter, rowBounds, resultHandler, key, boundSql);
  }
//如果resultHandler为空,判断缓存是否有值,有则不再调用db,否则执行db查询
//从selectone过来的查询resultHandler=null
list = resultHandler == null ? (List<E>) localCache.getObject(key) : null;
      if (list != null) {
        handleLocallyCachedOutputParameters(ms, key, parameter, boundSql);
      } else {
        list = queryFromDatabase(ms, parameter, rowBounds, resultHandler, key, boundSql);
      }
private <E> List<E> queryFromDatabase(MappedStatement ms, Object parameter, RowBounds rowBounds, ResultHandler resultHandler, CacheKey key, BoundSql boundSql) throws SQLException {
    List<E> list;
    localCache.putObject(key, EXECUTION_PLACEHOLDER);
    try {
    	//调用SimpleExecuor中的doQuery方法
      list = doQuery(ms, parameter, rowBounds, resultHandler, boundSql);
    } finally {
      localCache.removeObject(key);
    }
    //缓存处理
    localCache.putObject(key, list);
    if (ms.getStatementType() == StatementType.CALLABLE) {
      localOutputParameterCache.putObject(key, parameter);
    }
    return list;
  }
调用simpleExecutor的doQuery方法
public <E> List<E> doQuery(MappedStatement ms, Object parameter, RowBounds rowBounds, ResultHandler resultHandler, BoundSql boundSql) throws SQLException {
    Statement stmt = null;
    try {
      //获取configuration对象
      Configuration configuration = ms.getConfiguration();
      //获取StatementHandler对象
      StatementHandler handler = configuration.newStatementHandler(wrapper, ms, parameter, rowBounds, resultHandler, boundSql);
      //参数预预处理
      stmt = prepareStatement(handler, ms.getStatementLog());
      //调用query
      return handler.query(stmt, resultHandler);
    } finally {
      closeStatement(stmt);
    }
  }
4.2 StatementHandler
它就是为了处理sql语句的,也包含参数的预处理
1. StatementHandler
StatementHandler handler = configuration.newStatementHandler(wrapper, ms, parameter, rowBounds, resultHandler, boundSql);
stmt = prepareStatement(handler, ms.getStatementLog());
通过configuration获取statementhandler对象, 根据的sql语句类型, 获取到不同的handler实现。
public RoutingStatementHandler(Executor executor, MappedStatement ms, Object parameter, RowBounds rowBounds, ResultHandler resultHandler, BoundSql boundSql) {

    switch (ms.getStatementType()) {
      case STATEMENT:
        delegate = new SimpleStatementHandler(executor, ms, parameter, rowBounds, resultHandler, boundSql);
        break;
      case PREPARED:
        delegate = new PreparedStatementHandler(executor, ms, parameter, rowBounds, resultHandler, boundSql);
        break;
      case CALLABLE:
        delegate = new CallableStatementHandler(executor, ms, parameter, rowBounds, resultHandler, boundSql);
        break;
      default:
        throw new ExecutorException("Unknown statement type: " + ms.getStatementType());
    }

  }
handler根据不同的类型有3种不同的实现。
- 不需要预编译的, 使用SimpleStatementHandler
- 需要预编译的, 使用PreparedStatementHandler
- 调用存储过程的, 使用CallableStatementHandler
我们正常编写的sql,为了防止sql注入,现在都使用预编译的方式。
2. plugin
statementHandler = (StatementHandler) interceptorChain.pluginAll(statementHandler);

public Object pluginAll(Object target) {
    for (Interceptor interceptor : interceptors) {
      target = interceptor.plugin(target);
    }
    return target;
  }
这里的插件包含mybatis内置的,同时也包含我们自定义的一些插件,interceptors变量中保存了所有的插件实现,调用interceptor的plugin方法,就是为了获取interceptor拦截器对应实现的代理类,循环遍历所有的plugin,第一次进来的target是真是的statmentHander对象,第一次调用plugin方法后,就已经是一个plugin的代理对象了,以此类推,以后每次的target都是上一个plugin返回的代理对象,所以当执行interceptor的intercept方法时,它是按照plugin添加的倒序依次执行所有的plugin的。
我们先来看下插件的接口,也就是Interceptor。
public interface Interceptor {
  //执行拦截方法
  Object intercept(Invocation invocation) throws Throwable;

  //获取interceptor对应的代理对象
  default Object plugin(Object target) {
    return Plugin.wrap(target, this);
  }

  default void setProperties(Properties properties) {
  }

}
- intercept方法直接覆盖你所拦截对象原有的方法,参数是Invocation, 通过反射我们可以获取到真实的target对象
- plugin方法就是对拦截对象target生成一个代理对象
- setProperties方法允许plugin元素中配置所需参数
问题来了,既然要拦截,它可以拦截哪些对象呢?其实就是mybatis的四大核心组件
- Executor:它是执行sql的全过程的,包括参数组装,结果返回,sql执行等,范围较广,一般用的比较少
- StatementHandler:这个是sql的执行过程,我们可以重写执行sql的过程,这个用的比较多
- ParameterHandler:这个是sql组装参数的,可以重写参数组装规则
- ResultHander:这个是结果组装的,可以重写组装规则
既然现在我们知道了要拦截的对象有哪些,那么我们就要知道怎么去使用它。
首先我们需要自定义一个Interceptor的实现类,添加如下注解:
@Intercepts({@Signature(type = StatementHandler.class, method = "query", args = {Statement.class, ResultHandler.class}),
        @Signature(type = StatementHandler.class, method = "batch", args = {Statement.class})})
主要看下@Signature,type代表的就是你要拦截的对象,method就是对象对应的方法,args就是方法上的参数。
我们也看一个demo,下图是一个mybatiplus的分页实现:

是不是很简单,下面简单罗列一下使用plugin频繁用到的一些api。
- 获取真实的拦截对象
StatementHandler statementHandler = PluginUtils.realTarget(invocation.getTarget());
- MetaObject对象
MetaObject可以有效的读取或者修改一些重要对象的属性, 但是mybatis对于四大核心对象提供的public方法很少,满足不了我们的需求,MetaObject这个工具类就可以帮助我们通过其他的技术手段读取或者修改这些对象的属性.
MetaObject metaObject = SystemMetaObject.forObject(statementHandler);
- 获取MappedStatement
(MappedStatement) metaObject.getValue(“delegate.mappedStatement”)
- 获取BoundSql
BoundSql boundSql = (BoundSql) metaObject.getValue(“delegate.boundSql”);
Object paramObj = boundSql.getParameterObject();
- 获取sql
metaObject.get(“delegate.boundSql.sql”);
- 获取绑定的sql参数对象
metaObject.get(“delegate.boundSql.parameterObject”);
3. prepareStatement
private Statement prepareStatement(StatementHandler handler, Log statementLog) throws SQLException {
    Statement stmt;
    Connection connection = getConnection(statementLog);
    stmt = handler.prepare(connection, transaction.getTimeout());
    handler.parameterize(stmt);
    return stmt;
  }
调用prepare方法实现sql的预编译,就是为了防止sql的注入,同时也为了sql的执行提高查询的效率。调用prepare预编译方法后返回的实例对象是PreparedStatement。

在调用instantiatestatement方法的时候,发现它有3种不同的handler。
- callableStatementHandler为了处理存储过程调用的
- preparedStatementHandler可进行编译,可携带参数,编译后会放到缓冲区,下次再次调用的时候就不需要编译了
- simpleStatementHandler每次都需要编译和解析,直接操作sql。
正常使用的场景大部分都是使用preparedStatementHandler。
但是预编译命令也不一定比未预编译的执行效率高,首先要开启预编译的命令,db服务端也要开启预编译,然后应用的驱动url地址上也要配置响应参数,useServerPrepStmts=true&cachePrepStmts=true。否则prepare只是一个方法,不执行预编译操作。
4.3 ParameterHandler
paramterHandler就是为了对参数值进行处理的,根据解析的入参的javaType转换成jdbcType。
private Statement prepareStatement(StatementHandler handler, Log statementLog) throws SQLException {
    handler.parameterize(stmt);
    return stmt;
  }
对sql进行预编译后,就要调用parameterize方法实现到jdbcType参数的转换和对应参数的赋值。
public void setParameters(PreparedStatement ps) {
   //所有参数映射
    List<ParameterMapping> parameterMappings = boundSql.getParameterMappings();
    if (parameterMappings != null) {
      for (int i = 0; i < parameterMappings.size(); i++) {
        ParameterMapping parameterMapping = parameterMappings.get(i);
        if (parameterMapping.getMode() != ParameterMode.OUT) {
          Object value;
          //属性名
          String propertyName = parameterMapping.getProperty();
          if (boundSql.hasAdditionalParameter(propertyName)) { // issue #448 ask first for additional params
            value = boundSql.getAdditionalParameter(propertyName);
            //参数值为空
          } else if (parameterObject == null) {
            value = null;
            //指定typeHandler
          } else if (typeHandlerRegistry.hasTypeHandler(parameterObject.getClass())) {
            value = parameterObject;
          } else {
          //使用MetaObject 获取参数值
            MetaObject metaObject = configuration.newMetaObject(parameterObject);
            value = metaObject.getValue(propertyName);
          }
          TypeHandler typeHandler = parameterMapping.getTypeHandler();
          JdbcType jdbcType = parameterMapping.getJdbcType();
          if (value == null && jdbcType == null) {
            jdbcType = configuration.getJdbcTypeForNull();
          }
          try {
            //调用不同的typeHandler实现,进行赋值操作
            typeHandler.setParameter(ps, i + 1, value, jdbcType);
          } catch (TypeException | SQLException e) {
            throw new TypeException("Could not set parameters for mapping: " + parameterMapping + ". Cause: " + e, e);
          }
        }
      }
    }
  }
通过这个操作以后,不同index上的参数对应值已经设置好了,后续就是执行sql了。
TypeHandler正常情况下,mybatis内置的已经够用了,如果有特殊的,我们就需要自定义TypeHandler,只需要实现TypeHandler接口,实现它的set和get方法,在使用的时候就需要我们显示的定义TypeHandler。
4.4 ResultHandler
参数都处理完以后,就要真正的执行sql了,
public <E> Cursor<E> queryCursor(Statement statement) throws SQLException {
    PreparedStatement ps = (PreparedStatement) statement;
    ps.execute();
    return resultSetHandler.handleCursorResultSets(ps);
  }
调用execute方法,通过connection调用db服务执行sql,下面就是调用mysql封装好的jdbc的相关操作了。
执行的结果是封装到statement的ResultSetInternalMethods变量内,获取的时候当然也是获取的ResultSetInternalMethods。
public List<Object> handleResultSets(Statement stmt) throws SQLException {
    final List<Object> multipleResults = new ArrayList<>();

    int resultSetCount = 0;
    ResultSetWrapper rsw = getFirstResultSet(stmt);

	//结果封装的逻辑主要看这里
    List<ResultMap> resultMaps = mappedStatement.getResultMaps();
    int resultMapCount = resultMaps.size();
    validateResultMapsCount(rsw, resultMapCount);
    while (rsw != null && resultMapCount > resultSetCount) {
      ResultMap resultMap = resultMaps.get(resultSetCount);
      handleResultSet(rsw, resultMap, multipleResults, null);
      rsw = getNextResultSet(stmt);
      cleanUpAfterHandlingResultSet();
      resultSetCount++;
    }

    //多结果集的调用
    //一般情况下, 基本上不会用到这种情况
    String[] resultSets = mappedStatement.getResultSets();
    if (resultSets != null) {
      while (rsw != null && resultSetCount < resultSets.length) {
        ResultMapping parentMapping = nextResultMaps.get(resultSets[resultSetCount]);
        if (parentMapping != null) {
          String nestedResultMapId = parentMapping.getNestedResultMapId();
          ResultMap resultMap = configuration.getResultMap(nestedResultMapId);
          handleResultSet(rsw, resultMap, null, parentMapping);
        }
        rsw = getNextResultSet(stmt);
        cleanUpAfterHandlingResultSet();
        resultSetCount++;
      }
    }

    return collapseSingleResultList(multipleResults);
  }```
我们跟踪下代码看看它到底是如何封装到javabean(也许你猜到了, 它就是反射)对象的.

```java
private void handleRowValuesForSimpleResultMap(ResultSetWrapper rsw, ResultMap resultMap, ResultHandler<?> resultHandler, RowBounds rowBounds, ResultMapping parentMapping)
      throws SQLException {
    DefaultResultContext<Object> resultContext = new DefaultResultContext<>();
    ResultSet resultSet = rsw.getResultSet();
    skipRows(resultSet, rowBounds);
    while (shouldProcessMoreRows(resultContext, rowBounds) && !resultSet.isClosed() && resultSet.next()) {
      ResultMap discriminatedResultMap = resolveDiscriminatedResultMap(resultSet, resultMap, null);
      //生成javabean对象,并且赋值
      Object rowValue = getRowValue(rsw, discriminatedResultMap, null);
      storeObject(resultHandler, resultContext, rowValue, parentMapping, resultSet);
    }
  }
private Object getRowValue(ResultSetWrapper rsw, ResultMap resultMap, String columnPrefix) throws SQLException {
    final ResultLoaderMap lazyLoader = new ResultLoaderMap();
    //创建返回值的
    Object rowValue = createResultObject(rsw, resultMap, lazyLoader, columnPrefix);
    if (rowValue != null && !hasTypeHandlerForResultObject(rsw, resultMap.getType())) {
      final MetaObject metaObject = configuration.newMetaObject(rowValue);
      boolean foundValues = this.useConstructorMappings;
      if (shouldApplyAutomaticMappings(resultMap, false)) {
        foundValues = applyAutomaticMappings(rsw, resultMap, metaObject, columnPrefix) || foundValues;
      }
      foundValues = applyPropertyMappings(rsw, resultMap, metaObject, lazyLoader, columnPrefix) || foundValues;
      foundValues = lazyLoader.size() > 0 || foundValues;
      rowValue = foundValues || configuration.isReturnInstanceForEmptyRow() ? rowValue : null;
    }
    return rowValue;
  }
createResultObject创建目标对象
private Object createResultObject(ResultSetWrapper rsw, ResultMap resultMap, List<Class<?>> constructorArgTypes, List<Object> constructorArgs, String columnPrefix)
      throws SQLException {
      //返回的结果对象类型
    final Class<?> resultType = resultMap.getType();
    final MetaClass metaType = MetaClass.forClass(resultType, reflectorFactory);
    final List<ResultMapping> constructorMappings = resultMap.getConstructorResultMappings();
    //怕短是否有结果typeHandler
    if (hasTypeHandlerForResultObject(rsw, resultType)) {
      return createPrimitiveResultObject(rsw, resultMap, columnPrefix);
      //判断是不是有构造函数参数映射
    } else if (!constructorMappings.isEmpty()) {
      return createParameterizedResultObject(rsw, resultType, constructorMappings, constructorArgTypes, constructorArgs, columnPrefix);
      //判断结果类型是不是接口 或者是不是包含默认构造器
    } else if (resultType.isInterface() || metaType.hasDefaultConstructor()) {
      return objectFactory.create(resultType);
      //判断是不是设置了自动映射, 默认是true
    } else if (shouldApplyAutomaticMappings(resultMap, false)) {
      return createByConstructorSignature(rsw, resultType, constructorArgTypes, constructorArgs);
    }
    throw new ExecutorException("Do not know how to create an instance of " + resultType);
  }
当返回的实例对象创建好以后, 接下来的事情就是赋值操作了.
//包装成MetaObject对象,便于对属性值的读写操作
final MetaObject metaObject = configuration.newMetaObject(rowValue);
boolean foundValues = this.useConstructorMappings;
//是否设置了自动映射
if (shouldApplyAutomaticMappings(resultMap, false)) {
   foundValues = applyAutomaticMappings(rsw, resultMap, metaObject, columnPrefix) || foundValues;
}
foundValues = applyPropertyMappings(rsw, resultMap, metaObject, lazyLoader, columnPrefix) || foundValues;
foundValues = lazyLoader.size() > 0 || foundValues;
rowValue = foundValues || configuration.isReturnInstanceForEmptyRow() ? rowValue : null;
看下自动匹配的路基
private boolean applyAutomaticMappings(ResultSetWrapper rsw, ResultMap resultMap, MetaObject metaObject, String columnPrefix) throws SQLException {
    //获取自动映射的column和javaType
    List<UnMappedColumnAutoMapping> autoMapping = createAutomaticMappings(rsw, resultMap, metaObject, columnPrefix);
    boolean foundValues = false;
    if (!autoMapping.isEmpty()) {
      for (UnMappedColumnAutoMapping mapping : autoMapping) {
      //根据不同的property类型,选择不同的typeHandler,然后从resultset中取值和转换成javaType
        final Object value = mapping.typeHandler.getResult(rsw.getResultSet(), mapping.column);
        if (value != null) {
          foundValues = true;
        }
        if (value != null || (configuration.isCallSettersOnNulls() && !mapping.primitive)) {
          // 赋值
          metaObject.setValue(mapping.property, value);
        }
      }
    }
    return foundValues;
  }
自动映射的字段处理完毕后,接下来就是未自动映射的, 根据property和column做处理的流程.
foundValues = applyPropertyMappings(rsw, resultMap, metaObject, lazyLoader, columnPrefix) || foundValues;
到此呢,从db获取到数据也就封装到了我们预设的javabean中,供后续的我们业务的使用了。
到这里, mybatis的原理分析就结束了,非常感谢小伙伴的阅读, 感谢! 有错误的地方, 还希望小伙伴帮忙纠正, 多谢!

![【蓝桥每日一题]-二分精确(保姆级教程 篇4) #kotori的设备 #银行贷款 #一元三次方程求解](https://img-blog.csdnimg.cn/6392744afbf14007a3545eaff1474d6e.png)

