文章目录
- 官方配置
- 新建一套新配置
- 新建板级pro-liefyuan-rv1126.mk配置文件
- 新建一个Buildroot的defconfigs文件
- 吐槽:RP-RV1126 的SDK奇怪的地方
- make ARCH=arm xxx_defconfig 生成的.config文件位置不一样
- savedefconfig命令直接替换原配置文件
- 坑爹的地方
- Buildroot上增加WiFi和BT
- 增加BT需要确定连接的串口号
- WiFi/BT模块的模块和固件位置
- BT使用过程:
- 进入BT交互模式
- 测试WiFi速度(AP6256)
官方配置
buildroot官方配置完整编译需要30分钟。我想搞一个简单的配置,可以快速编译,快速测试一些简单的功能。
| 命令 | 对应的文件 | 描述 |
|---|---|---|
./build.sh lunch | pro-liefyuan-rv1126.mk | 选择全局配置文件 |
source envset.sh | rockchip_rv1126_rv1109_liefyuan_defconfig | 选择Buildroot配置文件 |
新建一套新配置
新建板级pro-liefyuan-rv1126.mk配置文件
定义一个自己的pro-liefyuan-rv1126.mk文件:
基于原来的文件:./device/rockchip/rv1126_rv1109/pro-rv1126.mk
改为:./device/rockchip/rv1126_rv1109/pro-liefyuan-rv1126.mk
拷贝目录sdk/device/rockchip/rv1126_rv1109/下的pro-rv1126.mk改成自己的名字:pro-liefyuan-rv1126.mk
目前的打算,只修改Buildroot文件系统的配置,Uboot和Kernel的配置不变。
# Buildroot config
export RK_CFG_BUILDROOT=rockchip_rv1126_rv1109_facial_gate
改为:
# Buildroot config
export RK_CFG_BUILDROOT=rockchip_rv1126_rv1109_liefyuan
pro-liefyuan-rv1126.mk 的全部内容:
#!/bin/bash

# Target arch
export RK_ARCH=arm
# Uboot defconfig
export RK_UBOOT_DEFCONFIG=rv1126
# Uboot image format type: fit(flattened image tree)
export RK_UBOOT_FORMAT_TYPE=fit
# Kernel defconfig
export RK_KERNEL_DEFCONFIG=rv1126_defconfig
# Kernel defconfig fragment
export RK_KERNEL_DEFCONFIG_FRAGMENT=rv1126-facial-gate.config
# Kernel dts
#export RK_KERNEL_DTS=rv1109-evb-ddr3-v13-facial-gate
export RK_KERNEL_DTS=pro-rv1126
# boot image type
export RK_BOOT_IMG=zboot.img
# kernel image path
export RK_KERNEL_IMG=kernel/arch/arm/boot/zImage
# kernel image format type: fit(flattened image tree)
export RK_KERNEL_FIT_ITS=boot.its
# parameter for GPT table
export RK_PARAMETER=parameter-facial-gate.txt
# Buildroot config
export RK_CFG_BUILDROOT=rockchip_rv1126_rv1109_liefyuan
# Recovery config
export RK_CFG_RECOVERY=rockchip_rv1126_rv1109_recovery
# Recovery image format type: fit(flattened image tree)
export RK_RECOVERY_FIT_ITS=boot4recovery.its
# ramboot config
export RK_CFG_RAMBOOT=
# Pcba config
export RK_CFG_PCBA=
# Build jobs
export RK_JOBS=12
# target chip
export RK_TARGET_PRODUCT=rv1126_rv1109
# Set rootfs type, including ext2 ext4 squashfs
export RK_ROOTFS_TYPE=ext4
# rootfs image path
export RK_ROOTFS_IMG=rockdev/rootfs.${RK_ROOTFS_TYPE}
# rootfs system
export RK_ROOTFS_SYSTEM=buildroot
# Set ramboot image type
export RK_RAMBOOT_TYPE=
# Set oem partition type, including ext2 squashfs
export RK_OEM_FS_TYPE=ext2
# Set userdata partition type, including ext2, fat
export RK_USERDATA_FS_TYPE=ext2
#OEM config
export RK_OEM_DIR=oem_facial_gate
# OEM build on buildroot
export RK_OEM_BUILDIN_BUILDROOT=NO
#userdata config, if not define this, system will format by RK_USERDATA_FS_TYPE
export RK_USERDATA_DIR=userdata_normal
#misc image
export RK_MISC=wipe_all-misc.img
#choose enable distro module
export RK_DISTRO_MODULE=
# Define pre-build script for this board
export RK_BOARD_PRE_BUILD_SCRIPT=app-build.sh
# Define package-file for update.img
export RK_PACKAGE_FILE=rv1126_rv1109-package-file
新建一个Buildroot的defconfigs文件
定义一个自己的Buildroot的configs文件:
基于原来的文件:./buildroot/configs/rockchip_rv1126_rv1109_facial_gate_defconfig
改为:./buildroot/configs/rockchip_rv1126_rv1109_liefyuan_defconfig
$ cp ./buildroot/configs/rockchip_rv1126_rv1109_facial_gate_defconfig ./buildroot/configs/rockchip_rv1126_rv1109_liefyuan_defconfig
原来的Buildroot配置太复杂了我精简到如下:
buildroot/configs/rockchip_rv1126_rv1109_liefyuan_defconfig 文件的全部内容:
#include "base.config"
#include "base_extra.config"
#include "debug.config"
#include "audio.config"
#include "wifi.config"
#include "network.config"
#include "rv1126_rv1109_arm.config"
#include "updateEngine.config"
BR2_PACKAGE_RKWIFIBT_AP6256=y
BR2_PACKAGE_RKWIFIBT_BTUART="ttyS0"
BR2_PACKAGE_DRM_DISPLAY_OUTPUT=y
BR2_PACKAGE_LIBERATION=y
BR2_PACKAGE_SOURCE_HAN_SANS_CN=y
BR2_PACKAGE_QT5BASE_WIDGETS=y
BR2_PACKAGE_QT5BASE_FONTCONFIG=y
BR2_PACKAGE_QT5BASE_GIF=y
BR2_PACKAGE_QT5BASE_JPEG=y
BR2_PACKAGE_QT5BASE_PNG=y
BR2_PACKAGE_QT5BASE_USE_RGA=y
BR2_PACKAGE_QT5BASE_LINUXFB_ARGB32=y
BR2_PACKAGE_QT5MULTIMEDIA=y
BR2_PACKAGE_QT5QUICKCONTROLS=y
BR2_PACKAGE_QT5SERIALPORT=y
BR2_PACKAGE_BLUEZ_TOOLS=y
BR2_PACKAGE_BLUEZ5_UTILS=y
BR2_PACKAGE_BLUEZ5_UTILS_OBEX=y
BR2_PACKAGE_BLUEZ5_UTILS_CLIENT=y
BR2_PACKAGE_BLUEZ5_UTILS_GATTTOOL=y
BR2_PACKAGE_DHCP=y
这里其实就设置了WiFi蓝牙相关和Qt相关的配置,整个编译下来不到8分钟。
吐槽:RP-RV1126 的SDK奇怪的地方
make ARCH=arm xxx_defconfig 生成的.config文件位置不一样
- 一般来说(主线Buildroot),我在Buildroot根目录下运行命令:
make ARCH=arm xxxx_defconfig,会在当前目录下产生一个.config文件,但是Rockchip的不一样,运行了上述命令后,它是会在这里产生该文件:./output/xxxx/.config
savedefconfig命令直接替换原配置文件
liefyuan@ubuntu:~/rv1126/rp_rv1126_sdk/buildroot$ make ARCH=arm savedefconfig
  GEN     /home/liefyuan/rv1126/rp_rv1126_sdk/buildroot/output/rockchip_rv1126_rv1109_liefyuan/Makefile
grep "#include" /home/liefyuan/rv1126/rp_rv1126_sdk/buildroot/configs/rockchip_rv1126_rv1109_liefyuan_defconfig > /home/liefyuan/rv1126/rp_rv1126_sdk/buildroot/configs/rockchip_rv1126_rv1109_liefyuan_defconfig.split || true
cat /home/liefyuan/rv1126/rp_rv1126_sdk/buildroot/configs/rockchip_rv1126_rv1109_liefyuan_defconfig >> /home/liefyuan/rv1126/rp_rv1126_sdk/buildroot/configs/rockchip_rv1126_rv1109_liefyuan_defconfig.split
/home/liefyuan/rv1126/rp_rv1126_sdk/buildroot/build/defconfig_hook.py -s /home/liefyuan/rv1126/rp_rv1126_sdk/buildroot/configs/rockchip_rv1126_rv1109_liefyuan_defconfig.split /home/liefyuan/rv1126/rp_rv1126_sdk/buildroot/configs/rockchip_rv1126_rv1109_liefyuan_defconfig
rm /home/liefyuan/rv1126/rp_rv1126_sdk/buildroot/configs/rockchip_rv1126_rv1109_liefyuan_defconfig.split
/home/liefyuan/rv1126/rp_rv1126_sdk/buildroot/build/defconfig_hook.py -s /home/liefyuan/rv1126/rp_rv1126_sdk/buildroot/configs/rockchip_rv1126_rv1109_liefyuan_defconfig.split /home/liefyuan/rv1126/rp_rv1126_sdk/buildroot/configs/rockchip_rv1126_rv1109_liefyuan_defconfig这句话把我震惊了,我运行命令make ARCH=arm savedefconfig之后它直接保存到原文件了。。。。
坑爹的地方
- 清除
buildroot的编译内容,需要进入sdk/buildroot/目录进行make clean才可以清除。 ./build.sh cleanall并不能清除所有生成文件- 重新编译的顺序:
- 全部清除:
./build.sh cleanall - 删除固件等:
cd ./rockdev然后rm ./* - 重新编译:
./build.sh all - 构建一次完整固件:
./build.sh updateimg
- 全部清除:
Buildroot上增加WiFi和BT
增加BT需要确定连接的串口号
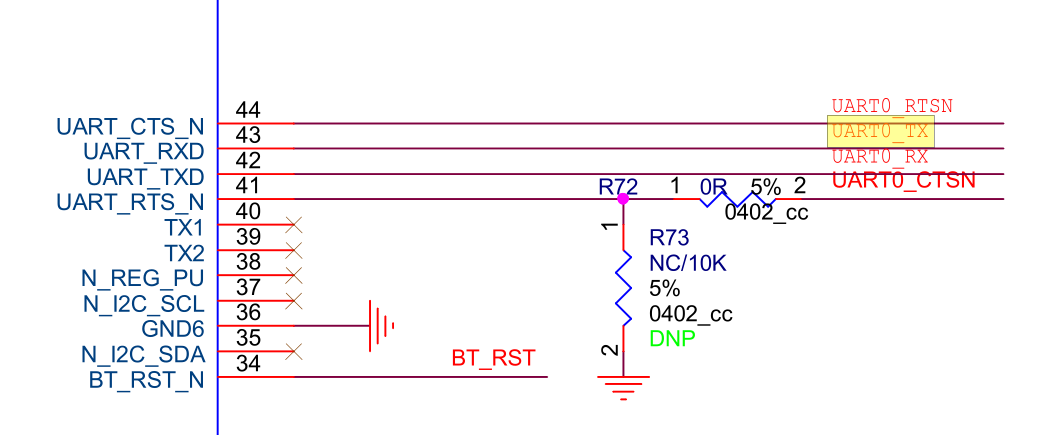

根据以上信息,确认BT串口连接的是UART0,也就是ttyS0。
因此Buildroot里面配置相应的串口号。

WiFi/BT模块的模块和固件位置
开发板上的位置
/system/lib/modules/bcmdhd.ko #驱动ko(如果是ko编译的话)
/system/etc/firmware/fw_bcm43455c0_ag.bin #驱动firmware文件存放位置
/system/etc/firmware/nvram_ap6255.txt #驱动nvram文件存放位置
/system/etc/firmware/BCM4345C0.hcd #蓝牙firmware文件(如果有蓝牙功能)
BT使用过程:
killall brcm_patchram_plus1

echo 0 > /sys/class/rfkill/rfkill0/state # 下电
echo 1 > /sys/class/rfkill/rfkill0/state # 上电

brcm_patchram_plus1 --bd_addr_rand --enable_hci --no2byt
es --use_baudrate_for_download --tosleep 200000 --baudrate 1500000 --patchram /s
ystem/etc/firmware/bcm43438a1.hcd /dev/ttyS0 &

hciconfig -a
hciconfig hci0 up

hcitool lescan
hcitool scan
进入BT交互模式
cd /usr/libexec/bluetooth/
./bluetoothd -n -d &

bluetoothctl
在bluetoothctl中,我们可以进行手动配对操作。配对时,我们需要提供设备的MAC地址,并且将设备设置为可被发现模式。
$ bluetoothctl
[bluetooth]# power on
[bluetooth]# discoverable on
[bluetooth]# scan on
[bluetooth]# devices
Device 20:13:03:22:66:19 Bose SoundSport Wireless
[bluetooth]# pair 20:13:03:22:66:19
[bluetooth]# trust 20:13:03:22:66:19
[bluetooth]# connect 20:13:03:22:66:19
[bluetooth]# exit
测试WiFi速度(AP6256)
ubuntu端服务器
liefyuan@ubuntu:~/rv1126/rp_rv1126_sdk/buildroot$ iperf -s
------------------------------------------------------------
Server listening on TCP port 5001
TCP window size:  128 KByte (default)
------------------------------------------------------------
[  4] local 192.168.1.105 port 5001 connected with 192.168.1.111 port 49918
[ ID] Interval       Transfer     Bandwidth
[  4]  0.0-10.4 sec  37.6 MBytes  30.3 Mbits/sec
RV1126开发板端:
[root@RV1126_RV1109:/etc]# iperf -c 192.168.1.105 -i 1
------------------------------------------------------------
Client connecting to 192.168.1.105, TCP port 5001
TCP window size: 43.8 KByte (default)
------------------------------------------------------------
[  3] local 192.168.1.111 port 49918 connected with 192.168.1.105 port 5001
[ ID] Interval       Transfer     Bandwidth
[  3]  0.0- 1.0 sec  3.25 MBytes  27.3 Mbits/sec
[  3]  1.0- 2.0 sec  3.62 MBytes  30.4 Mbits/sec
[  3]  2.0- 3.0 sec  3.75 MBytes  31.5 Mbits/sec
[  3]  3.0- 4.0 sec  4.00 MBytes  33.6 Mbits/sec
[  3]  4.0- 5.0 sec  4.38 MBytes  36.7 Mbits/sec
[  3]  5.0- 6.0 sec  3.62 MBytes  30.4 Mbits/sec
[  3]  6.0- 7.0 sec  3.12 MBytes  26.2 Mbits/sec
[  3]  7.0- 8.0 sec  4.00 MBytes  33.6 Mbits/sec
[  3]  8.0- 9.0 sec  3.88 MBytes  32.5 Mbits/sec
[  3]  9.0-10.0 sec  4.00 MBytes  33.6 Mbits/sec
[  3]  0.0-10.1 sec  37.6 MBytes  31.1 Mbits/sec
测试速度约37.6MByte


