Bean的生命周期流程-上
- 引言
- getBean
- getSingleton
- createBean
- 后置处理器类型区分
- doCreateBean
- createBeanInstance 是如何创建bean的实例的
引言
Spring拥有一套完善的Bean生命周期体系,而使得这套生命周期体系具有高扩展性的关键在于Bean生命周期回调接口,通过这些接口我们可以动态的插入Bean生命周期初始化的各个阶段,然后进行一系列动态代理,自动注入,属性校验的工作。
今天,我们来一起看看Bean的生命周期流程,即getBean流程是怎样实现的。
getBean
AbstractBeanFactory的getBean方法会调用doGetBean方法:
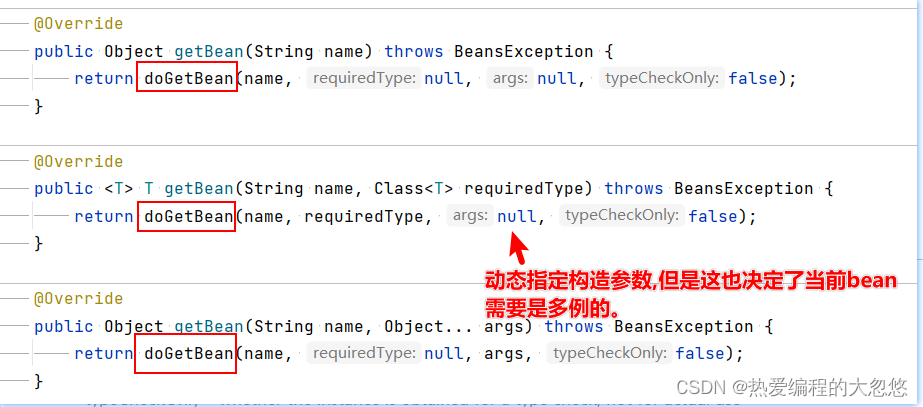
AbstractBeanFactory的doGetBean方法我们只关注单例Bean的创建流程:
protected <T> T doGetBean(
			String name, @Nullable Class<T> requiredType, @Nullable Object[] args, boolean typeCheckOnly)
			throws BeansException {
         //获取真正的beanName
         //1、如果是FactoryBean,会去掉Bean开头的&符号
		 // 2、如存在多层别名映射A->B->C->D,传入D,最终会返回A
		String beanName = transformedBeanName(name);
		Object beanInstance;

		//1.尝试从缓存中获取已经实例化好的单例bean
		//2.存在循环依赖,从signleFactory中获取提早暴露的bean
		Object sharedInstance = getSingleton(beanName);
		//缓存中获取到了对应的bean
		if (sharedInstance != null && args == null) {
			if (logger.isTraceEnabled()) {
			    //如果singletonsCurrentlyInCreation集合中包含了该beanName
			    //说明此时获取到的是提早暴露出来的bean--此时存在循环依赖
				if (isSingletonCurrentlyInCreation(beanName)) {
					logger.trace("Returning eagerly cached instance of singleton bean '" + beanName +
							"' that is not fully initialized yet - a consequence of a circular reference");
				}
				else {
				    //说明获取到的是已经实例化好的bean
					logger.trace("Returning cached instance of singleton bean '" + beanName + "'");
				}
			}
			//对factoryBean进行特殊处理--下面会进行解释
			beanInstance = getObjectForBeanInstance(sharedInstance, name, beanName, null);
		}

		else {
			//原型对象不允许循环创建,如果是原型对象正在创建,那就抛异常
			if (isPrototypeCurrentlyInCreation(beanName)) {
				throw new BeanCurrentlyInCreationException(beanName);
			}

			//如果存在父容器,并且只在子容器中不包含当前bean定义的情况下,才会尝试从父容器中getBean
			// 这就是为何,我们扫描controller,哪怕不加排除什么的,也不会出问题的原因~
            //因为Spring中的单例Bean只会被实例化一次(即使父子容器都扫描了)
			BeanFactory parentBeanFactory = getParentBeanFactory();
			if (parentBeanFactory != null && !containsBeanDefinition(beanName)) {
			   //和transformedBeanName处理类似,多加了一个获取FactoryBean本身的判断条件
			    String nameToLookup = originalBeanName(name);
				if (parentBeanFactory instanceof AbstractBeanFactory) {
					return ((AbstractBeanFactory) parentBeanFactory).doGetBean(
							nameToLookup, requiredType, args, typeCheckOnly);
				}
				else if (args != null) {
					return (T) parentBeanFactory.getBean(nameToLookup, args);
				}
				else if (requiredType != null) {
					return parentBeanFactory.getBean(nameToLookup, requiredType);
				}
				else {
					return (T) parentBeanFactory.getBean(nameToLookup);
				}
			}

            //在alreadyCreated记录一下当前beanName,表示当前bean已经创建或者将要创建
			if (!typeCheckOnly) {
				markBeanAsCreated(beanName);
			}

			...
			try {
				...
				//将一开始通过包扫描或者注解扫描等方式得到的不同类型的BeanDefinition都转换为RootBeanDefinition
				RootBeanDefinition mbd = getMergedLocalBeanDefinition(beanName);
				//当前beanDefinition不能是抽象的
				checkMergedBeanDefinition(mbd, beanName, args);

				//如果bean上标注了@DependsOn注解,那么解析的时候会将注解信息都存放到当前BeanDefinition的dependsOn属性中去
				String[] dependsOn = mbd.getDependsOn();
				//将依赖的bean先进行初始化
				if (dependsOn != null) {
					for (String dep : dependsOn) {
					    //判断是否存在A dependsOn B,然后B又dependsOn A的情况,或者是涉及到更多bean之间的循环依赖
						if (isDependent(beanName, dep)) {
							throw new BeanCreationException(mbd.getResourceDescription(), beanName,
									"Circular depends-on relationship between '" + beanName + "' and '" + dep + "'");
						}
						//不存在因为@DependsOn注解产生的循环依赖,就正常将依赖的bean进行初始化
						registerDependentBean(dep, beanName);
						try {
							getBean(dep);
						}
						catch (NoSuchBeanDefinitionException ex) {
							throw new BeanCreationException(mbd.getResourceDescription(), beanName,
									"'" + beanName + "' depends on missing bean '" + dep + "'", ex);
						}
					}
				}

				//单例bean的创建过程
				if (mbd.isSingleton()) {
					sharedInstance = getSingleton(beanName, () -> {
						try {
							return createBean(beanName, mbd, args);
						}
						catch (BeansException ex) {
							// Explicitly remove instance from singleton cache: It might have been put there
							// eagerly by the creation process, to allow for circular reference resolution.
							// Also remove any beans that received a temporary reference to the bean.
							destroySingleton(beanName);
							throw ex;
						}
					});
					//处理factoryBean的转换情况
					beanInstance = getObjectForBeanInstance(sharedInstance, name, beanName, mbd);
				}
		    //其他scope类型bean的处理
		    ....
			catch (BeansException ex) {
				beanCreation.tag("exception", ex.getClass().toString());
				beanCreation.tag("message", String.valueOf(ex.getMessage()));
				cleanupAfterBeanCreationFailure(beanName);
				throw ex;
			}
			finally {
				beanCreation.end();
			}
		}
         //通过TypeConverter将bean转换为指定的类型
		return adaptBeanInstance(name, beanInstance, requiredType);
	}
getSingleton
DefaultSingletonBeanRegistr的getSingleton方法:
public Object getSingleton(String beanName, ObjectFactory<?> singletonFactory) {
		Assert.notNull(beanName, "Bean name must not be null");
		synchronized (this.singletonObjects) {
		    //先尝试从单例缓冲池中获取已经实例化好的bean
			Object singletonObject = this.singletonObjects.get(beanName);
			if (singletonObject == null) {
			    //一般缓存中此时是还没有创建好当前bean的
			    //如果调用了destroySingletons方法销毁所有单例bean,那么此时bean就不允许再被创建了
				if (this.singletonsCurrentlyInDestruction) {
					throw new BeanCreationNotAllowedException(beanName,
							"Singleton bean creation not allowed while singletons of this factory are in destruction " +
							"(Do not request a bean from a BeanFactory in a destroy method implementation!)");
				}
				if (logger.isDebugEnabled()) {
					logger.debug("Creating shared instance of singleton bean '" + beanName + "'");
				}
		        // 创建前置检查:
		        //1、若在inCreationCheckExclusions里面,表示不需要进行创建中检查
				//2、如果需要进行创建中检查,就把当前bean加入singletonsCurrentlyInCreation去,表示这个Bean正在创建中
				beforeSingletonCreation(beanName);
				boolean newSingleton = false;
				...
				try {
				    //getObject方法最终调用的是createBean方法
					singletonObject = singletonFactory.getObject();
					newSingleton = true;
				}
				//异常捕获
				...
				finally {
					if (recordSuppressedExceptions) {
						this.suppressedExceptions = null;
					}
					// 创建完成后再检查一遍。做的操作为:从正在创建缓存中移除
					afterSingletonCreation(beanName);
				}
				if (newSingleton) {
				    //将关于当前bean提前暴露出来的bean都清理掉,然后将当前bean加入单例缓冲池中
					addSingleton(beanName, singletonObject);
				}
			}
			return singletonObject;
		}
	}
createBean
开始创建Bean AbstractAutowireCapableBeanFactory#createBean 提供此方法的抽象类为:AbstractBeanFactory,由子类去实现创建的逻辑。
	@Override
	protected Object createBean(String beanName, RootBeanDefinition mbd, @Nullable Object[] args)
			throws BeanCreationException {

		if (logger.isTraceEnabled()) {
			logger.trace("Creating instance of bean '" + beanName + "'");
		}
		RootBeanDefinition mbdToUse = mbd;

		// 通过classLoader加载beanDefinition中保存的className得到对应的class
		//这一步用于确定对应的bean是可以被实例化的
		Class<?> resolvedClass = resolveBeanClass(mbd, beanName);
		if (resolvedClass != null && !mbd.hasBeanClass() && mbd.getBeanClassName() != null) {
			mbdToUse = new RootBeanDefinition(mbd);
			mbdToUse.setBeanClass(resolvedClass);
		}

		// Prepare method overrides.
		try {
			// 这里主要是解析<lookup-method name="getFruit" bean="bananer"/>类似这种方式的依赖注入(Spring支持lookup-method,replace-method两个依赖注入的方式)
			// 它相当于调用指定类里面的指定方法进行注入,所以需要考虑到方法重载的情况,因此这个方法解析的就是这种情况
			// 由于项目中一般这么使用,也非常的不大众,具体原理此处省略
			mbdToUse.prepareMethodOverrides();
		}
		catch (BeanDefinitionValidationException ex) {
			throw new BeanDefinitionStoreException(mbdToUse.getResourceDescription(),
					beanName, "Validation of method overrides failed", ex);
		}

		try {
		     // 从doc解释:给BeanPostProcessors一个机会来返回一个代理对象代替目标对象
			// 1、具体逻辑是判断当前Spring容器是否注册了实现了InstantiationAwareBeanPostProcessor接口的后置处理器如果有,则依次调用其中的applyBeanPostProcessorsBeforeInstantiation方法,如果中间任意一个方法返回不为null,直接结束调用。
			// 2、applyBeanPostProcessorsBeforeInstantiation返回不为null的情况下,然后依次所有注册的BeanPostProcessor的postProcessAfterInitialization方法。
			//默认情况下,默认注册的bean后置处理器,在该处都不会做任何事情
			Object bean = resolveBeforeInstantiation(beanName, mbdToUse);
			if (bean != null) {
				return bean;
			}
		}
		catch (Throwable ex) {
			throw new BeanCreationException(mbdToUse.getResourceDescription(), beanName,
					"BeanPostProcessor before instantiation of bean failed", ex);
		}

		try {
		    //真正尝试创建bean
			Object beanInstance = doCreateBean(beanName, mbdToUse, args);
			if (logger.isTraceEnabled()) {
				logger.trace("Finished creating instance of bean '" + beanName + "'");
			}
			return beanInstance;
		}
		...
	}
后置处理器类型区分
BeanPostProcessor和InstantiationAwareBeanPostProcessor这两个接口,是比较容易搞混的,需要这里注意区分一下。
InstantiationAwareBeanPostProcessor代表了Spring的另外一段生命周期:实例化。先区别一下Spring Bean的实例化和初始化两个阶段的主要作用:
- 实例化:实例化的过程是一个创建Bean的过程,即调用Bean的构造函数,单例的Bean放入单例池中
- 初始化:初始化的过程是一个赋值的过程,即调用Bean的setter,设置Bean的属性
所以现在就清楚了:InstantiationAwareBeanPostProcessor是作用于 实例化 前后,所以是先执行的。
BeanPostProcessor是作用于 初始化 前后,给Bean各个属性赋值的时候执行的(比如我们的属性依赖注入,都是这个时候生效的)
// Instantiation:[ɪnstænʃɪ'eɪʃən] 实例化,例示
// Initialization:[ɪˌnɪʃəlaɪ'zeɪʃn] 初始化,设定初始值

public interface BeanPostProcessor {
	@Nullable
	default Object postProcessBeforeInitialization(Object bean, String beanName) throws BeansException {
		return bean;
	}
	@Nullable
	default Object postProcessAfterInitialization(Object bean, String beanName) throws BeansException {
		return bean;
	}
}
子接口:InstantiationAwareBeanPostProcessor
public interface InstantiationAwareBeanPostProcessor extends BeanPostProcessor {
	@Nullable
	default Object postProcessBeforeInstantiation(Class<?> beanClass, String beanName) throws BeansException {
		return null;
	}
	default boolean postProcessAfterInstantiation(Object bean, String beanName) throws BeansException {
		return true;
	}
	@Nullable
	default PropertyValues postProcessPropertyValues(
			PropertyValues pvs, PropertyDescriptor[] pds, Object bean, String beanName) throws BeansException {

		return pvs;
	}
    @Nullable
	default PropertyValues postProcessProperties(PropertyValues pvs, Object bean, String beanName)
			throws BeansException {

		return null;
	}
}
ApplicationListenerDetector重点实现了postProcessAfterInitialization方法:将那些实现ApplicationListener接口的bean,在它们初始化之后,将它们注册到applicationContext的事件多播器上。并在这些ApplicationListener bean销毁之前,将它们从applicationContext的事件多播器上移除。
子接口SmartInstantiationAwareBeanPostProcessor 继承自 InstantiationAwareBeanPostProcessor;
但是SmartInstantiationAwareBeanPostProcessor多了三个方法:
// 从名字上,它有个Smart,是比较智能一些的
public interface SmartInstantiationAwareBeanPostProcessor extends InstantiationAwareBeanPostProcessor {
	// 预测Bean的类型,返回第一个预测成功的Class类型,如果不能预测返回null
	default Class<?> predictBeanType(Class<?> beanClass, String beanName) throws BeansException {
		return null;
	}

	// 选择合适的构造器,比如目标对象有多个构造器,在这里可以进行一些定制化,选择合适的构造器
	// beanClass参数表示目标实例的类型,beanName是目标实例在Spring容器中的name
	// 返回值是个构造器数组,如果返回null,会执行下一个PostProcessor的determineCandidateConstructors方法;否则选取该PostProcessor选择的构造器
	default Constructor<?>[] determineCandidateConstructors(Class<?> beanClass, String beanName)
			throws BeansException {

		return null;
	}

	// 获得提前暴露的bean引用。主要用于解决循环引用的问题
	// 只有单例对象才会调用此方法
	default Object getEarlyBeanReference(Object bean, String beanName) throws BeansException {
		return bean;
	}
}
在对bean进行依赖注入时,定位bean实例化使用的构造器,就是通过搜寻容器中所有SmartInstantiationAwareBeanPostProcessor类型后置处理器实现,然后依次调用其determineCandidateConstructors方法对bean进行解析获取的。

默认只有自动代理创建重写了getEarlyBeanReference方法,尝试将提早暴露出来的bean也进行代理。
MergedBeanDefinitionPostProcessor:
public interface MergedBeanDefinitionPostProcessor extends BeanPostProcessor {
	void postProcessMergedBeanDefinition(RootBeanDefinition beanDefinition, Class<?> beanType, String beanName);

	default void resetBeanDefinition(String beanName) {
	}
}
用来将RootBeanDefinition暴露出来的回调。看看它的一些主要实现:
//InitDestroyAnnotationBeanPostProcessor
	@Override
	public void postProcessMergedBeanDefinition(RootBeanDefinition beanDefinition, Class<?> beanType, String beanName) {
		LifecycleMetadata metadata = findLifecycleMetadata(beanType);
		metadata.checkConfigMembers(beanDefinition);
	}

//CommonAnnotationBeanPostProcessor
	@Override
	public void postProcessMergedBeanDefinition(RootBeanDefinition beanDefinition, Class<?> beanType, String beanName) {
		super.postProcessMergedBeanDefinition(beanDefinition, beanType, beanName);
		InjectionMetadata metadata = findResourceMetadata(beanName, beanType, null);
		metadata.checkConfigMembers(beanDefinition);
	}

//AutowiredAnnotationBeanPostProcessor
	@Override
	public void postProcessMergedBeanDefinition(RootBeanDefinition beanDefinition, Class<?> beanType, String beanName) {
		InjectionMetadata metadata = findAutowiringMetadata(beanName, beanType, null);
		metadata.checkConfigMembers(beanDefinition);
	}

//ApplicationListenerDetector
	@Override
	public void postProcessMergedBeanDefinition(RootBeanDefinition beanDefinition, Class<?> beanType, String beanName) {
		this.singletonNames.put(beanName, beanDefinition.isSingleton());
	}
稍微总结下:
-
InstantiationAwareBeanPostProcessor接口的主要作用在于目标对象的实例化过程中需要处理的事情,包括实例化对象的前后过程以及实例的属性设置 -
postProcessBeforeInstantiation方法是最先执行的方法,它在目标对象实例化之前调用,该方法的返回值类型是Object,我们可以返回任何类型的值。由于这个时候目标对象还未实例化,所以这个返回值可以用来代替原本该生成的目标对象的实例(比如代理对象)。如果该方法的返回值代替原本该生成的目标对象,后续只有postProcessAfterInitialization方法会调用,其它方法不再调用;否则按照正常的流程走 -
postProcessAfterInstantiation方法在目标对象实例化之后调用,这个时候对象已经被实例化,但是该实例的属性还未被设置,都是null。因为它的返回值是决定要不要调用postProcessPropertyValues方法的其中一个因素(因为还有一个因素是mbd.getDependencyCheck());如果该方法返回false,并且不需要check,那么postProcessPropertyValues就会被忽略不执行;如果返回true,postProcessPropertyValues就会被执行 -
postProcessPropertyValues方法对属性值进行修改(这个时候属性值还未被设置,但是我们可以修改原本该设置进去的属性值)。如果postProcessAfterInstantiation方法返回false,该方法可能不会被调用。可以在该方法内对属性值进行修改 - 父接口
BeanPostProcessor的2个方法postProcessBeforeInitialization和postProcessAfterInitialization都是在目标对象被实例化之后,并且属性也被设置之后调用的
doCreateBean
	protected Object doCreateBean(String beanName, RootBeanDefinition mbd, @Nullable Object[] args)
			throws BeanCreationException {

		// Instantiate the bean.
		BeanWrapper instanceWrapper = null;
		//如果是单例的话,则先把缓存中的同名bean清除(同名的)
		if (mbd.isSingleton()) {
			instanceWrapper = this.factoryBeanInstanceCache.remove(beanName);
		}
	    //实际创建的交给createBeanInstance来完成,
	    //bean的生成,这里会使用默认的类生成器,包装成BeanWrapperImpl类,为了下面的populateBean方法的属性注入做准备
		if (instanceWrapper == null) {
			instanceWrapper = createBeanInstance(beanName, mbd, args);
		}
		Object bean = instanceWrapper.getWrappedInstance();
		Class<?> beanType = instanceWrapper.getWrappedClass();
		if (beanType != NullBean.class) {
			mbd.resolvedTargetType = beanType;
		}

		// Allow post-processors to modify the merged bean definition.
		synchronized (mbd.postProcessingLock) {
			if (!mbd.postProcessed) {
				try {
				// 此处处理这个接口的处理器:MergedBeanDefinitionPostProcessor,他在BeanPostProcessor的基础上增加了postProcessMergedBeanDefinition方法,在此处就被调用了
				// 主要是处理@PostConstruct,@Autowire,@Value,@Resource,@PreDestory等这些注解。(显然对应哪去处理器,一目了然了) 下面会举例看看AutowiredAnnotationBeanPostProcessor的处理
					applyMergedBeanDefinitionPostProcessors(mbd, beanType, beanName);
				}
				catch (Throwable ex) {
					throw new BeanCreationException(mbd.getResourceDescription(), beanName,
							"Post-processing of merged bean definition failed", ex);
				}
				mbd.postProcessed = true;
			}
		}

		// 是否允许提前暴露bean,需要满足三个条件:
		//1.bean是单例的 2.允许循环依赖 3.当前bean正处于创建状态
		boolean earlySingletonExposure = (mbd.isSingleton() && this.allowCircularReferences &&
				isSingletonCurrentlyInCreation(beanName));
		if (earlySingletonExposure) {
			if (logger.isTraceEnabled()) {
				logger.trace("Eagerly caching bean '" + beanName +
						"' to allow for resolving potential circular references");
			}
			//通过加入sigletonFactory集合将当前正在创建的bean提前暴露出去
			addSingletonFactory(beanName, () -> getEarlyBeanReference(beanName, mbd, bean));
		}

		// Initialize the bean instance.
		Object exposedObject = bean;
		try {
		    //属性注入--中间会调用属性处理的两个生命周期回调接口
			populateBean(beanName, mbd, instanceWrapper);
			//调用相关初始化方法和aware接口注入,以及相关初始化前后的生命周期回调接口
			exposedObject = initializeBean(beanName, exposedObject, mbd);
		}
		catch (Throwable ex) {
			...
		}
        //如果当前bean允许提前暴露,那么需要防止提前暴露的是原始bean,而返回的是被代理过的bean的问题
		if (earlySingletonExposure) {
			...
		}

		// Register bean as disposable.
		try {
		// 如果有需要,就注册DisposableBean,这样Bean销毁的时候此种后置处理器也会生效了
			registerDisposableBeanIfNecessary(beanName, bean, mbd);
		}
		...
		return exposedObject;
	}
关于doCreateBean方法最后对循环依赖检查的理解可以看本篇文章学习
getBean的基本流程就结束了,但是懂了基本流程没啥用,因为这些都很简单,我们必须要深入细节进行理解,下面我们将上述过程中涉及到的核心方法进行讲解。
createBeanInstance 是如何创建bean的实例的
	protected BeanWrapper createBeanInstance(String beanName, RootBeanDefinition mbd, @Nullable Object[] args) {
		// 确保bean是可实例化
		Class<?> beanClass = resolveBeanClass(mbd, beanName);
        //无法为非public类进行实例化
		if (beanClass != null && !Modifier.isPublic(beanClass.getModifiers()) && !mbd.isNonPublicAccessAllowed()) {
			throw new BeanCreationException(mbd.getResourceDescription(), beanName,
					"Bean class isn't public, and non-public access not allowed: " + beanClass.getName());
		}

        // 配置的一种特殊的callback回调方法,通过这个callback创建bean
		// Supplier返回的Obj,最终会交给obtainFromSupplier包装成BeanWrapper
		Supplier<?> instanceSupplier = mbd.getInstanceSupplier();
		if (instanceSupplier != null) {
			return obtainFromSupplier(instanceSupplier, beanName);
		}

        // 这是Spring支持的又一种方式:使用工厂方法来进行bean的实例化
		if (mbd.getFactoryMethodName() != null) {
			return instantiateUsingFactoryMethod(beanName, mbd, args);
		}

		// Shortcut when re-creating the same bean...
		// 一个类可能有多个构造器,所以Spring得根据参数个数、类型确定需要调用的构造器
		// 在使用构造器创建实例后,Spring会将解析过后确定下来的构造器或工厂方法保存在缓存中,避免再次创建相同bean时再次解析
		boolean resolved = false;
		boolean autowireNecessary = false;
		if (args == null) {
			synchronized (mbd.constructorArgumentLock) {
			    //resolvedConstructorOrFactoryMethod不为null,说明当前beanDefinition已经被解析过了
			    //当前beanDefinition使用哪个构造器或者工厂方法进行实例化是已经确定的了
				if (mbd.resolvedConstructorOrFactoryMethod != null) {
					resolved = true;
					autowireNecessary = mbd.constructorArgumentsResolved;
				}
			}
		}
		//如果当前bean的构造器已经解析出来了,那么下面就直接进行实例化即可
		if (resolved) {
			if (autowireNecessary) {
				return autowireConstructor(beanName, mbd, null, null);
			}
			else {
				return instantiateBean(beanName, mbd);
			}
		}

		// 通过此方法,去检测到一个可用的构造器:这里面只能使用SmartInstantiationAwareBeanPostProcessor啦,它通过循环调用处理器的determineCandidateConstructors方法,谁第一个发现一个可用的构造器,就return,否则返回null
		// 这里需要注意:如果你的Bean没有空的构造函数(比如只有一个参数的构造函数,那么Spring会用这个构造函数给你实例化Bean,并且入参会自动帮你从容器里去找出来)
		Constructor<?>[] ctors = determineConstructorsFromBeanPostProcessors(beanClass, beanName);
        ....
我们先来看看如何通过后置处理的determineCandidateConstructors接口来确定当前beanClass的可用构造器有哪些:
	protected Constructor<?>[] determineConstructorsFromBeanPostProcessors(@Nullable Class<?> beanClass, String beanName)
			throws BeansException {
		if (beanClass != null && hasInstantiationAwareBeanPostProcessors()) {
			for (SmartInstantiationAwareBeanPostProcessor bp : getBeanPostProcessorCache().smartInstantiationAware) {
				Constructor<?>[] ctors = bp.determineCandidateConstructors(beanClass, beanName);
				if (ctors != null) {
					return ctors;
				}
			}
		}
		return null;
	}
这里默认干活的只有AutowiredAnnotationBeanPostProcessor:
检测Bean的构造器,可以检测出多个候选构造器,再有相应的策略决定使用哪一个。它将自动扫描通过@Autowired/@Value注解的构造器从而可以完成构造器注入
AutowiredAnnotationBeanPostProcessor的determineCandidateConstructors方法实现如下:
public Constructor<?>[] determineCandidateConstructors(Class<?> beanClass, final String beanName)
			throws BeanCreationException {

		//检测@Lookup注解,这个注解的注入方式,已经不推荐使用了
		if (!this.lookupMethodsChecked.contains(beanName)) {
			 //直接跳过这部分内容解析
			 ...
		}

		//  先从缓存里去看,有没有解析过此类的构造函数~~~
	   //   对每个类的构造函数只解析一次,解析完会存储结果,以备下次复用
		Constructor<?>[] candidateConstructors = this.candidateConstructorsCache.get(beanClass);
		if (candidateConstructors == null) {
			// Fully synchronized resolution now...
			synchronized (this.candidateConstructorsCache) {
				candidateConstructors = this.candidateConstructorsCache.get(beanClass);
				if (candidateConstructors == null) {
					Constructor<?>[] rawCandidates;
					try {
					    //拿到当前bean的所有构造器
						rawCandidates = beanClass.getDeclaredConstructors();
					}
					catch (Throwable ex) {
						...
					}
					// candidates集合存放所有候选构造器
					List<Constructor<?>> candidates = new ArrayList<>(rawCandidates.length);
					Constructor<?> requiredConstructor = null;
					Constructor<?> defaultConstructor = null;
					// 兼容Kotlin类型做的处理
					Constructor<?> primaryConstructor = BeanUtils.findPrimaryConstructor(beanClass);
					int nonSyntheticConstructors = 0;
					//遍历每个构造器
					for (Constructor<?> candidate : rawCandidates) {
					    ...
					    //找到构造器里有@Aotowaired或者@Value注解的直接信息们
						MergedAnnotation<?> ann = findAutowiredAnnotation(candidate);
						//如果构造器上没有标注相关注解
						if (ann == null) {
						// 此方法的目的是拿到目标类:比如若是被cglib代理过的,那就拿到父类(因为cglib是通过子类的形式加强的)
							Class<?> userClass = ClassUtils.getUserClass(beanClass);
							// 说明确实是被CGLIB代理过的,那就再解析一次  看看父类是否有@Autowaired这种构造器
							if (userClass != beanClass) {
								try {
									Constructor<?> superCtor =											userClass.getDeclaredConstructor(candidate.getParameterTypes());
									ann = findAutowiredAnnotation(superCtor);
								}
								catch (NoSuchMethodException ex) {
									// Simply proceed, no equivalent superclass constructor found...
								}
							}
						}
						//如果构造器上存在相关注解
						if (ann != null) {
					        // 这个判断很有必要,表示要求的构造器最多只能有一个
							//画外音:@Autowired标注的构造器数量最多只能有一个(当然,required=true的只能有一个,=false的可以有多个)
							if (requiredConstructor != null) {
								throw new BeanCreationException(beanName,
										"Invalid autowire-marked constructor: " + candidate +
										". Found constructor with 'required' Autowired annotation already: " +
										requiredConstructor);
							}
							//获取autowire注解中required属性值
							boolean required = determineRequiredStatus(ann);
							// 只有是true,就往下走(默认值为true)
							if (required) {
								if (!candidates.isEmpty()) {
									throw new BeanCreationException(beanName,
											"Invalid autowire-marked constructors: " + candidates +
											". Found constructor with 'required' Autowired annotation: " +
											candidate);
								}
								// 这样子,这个构造器就是必须的了,记录下来
								requiredConstructor = candidate;
							}
							// 把标注有@Autowired注解的构造器,记录下来,作为候选的构造器
							candidates.add(candidate);
						}
						// 这个就重要了,处理精妙
						// 若该构造器没有被标注@Autowired注解,但是它是无参构造器,那就当然候选的构造器(当然是以标注了@Autowired的为准)
						else if (candidate.getParameterCount() == 0) {
							defaultConstructor = candidate;
						}
					}
					//如果候选构造器集合不为空,即存在某个构造器上标注了@Autowired注解
					if (!candidates.isEmpty()) {
						// 如果不存在某个构造器上标注了@Autowired(required=true)的情况
						if (requiredConstructor == null) {
						    //并且默认构造器存在,那么将默认构造器也加入候选构造器集合
							if (defaultConstructor != null) {
								candidates.add(defaultConstructor);
							}
							//如果没有默认的无参构造函数,且有@Autowired(required = false)的构造函数,则发出警告信息
							else if (candidates.size() == 1 && logger.isInfoEnabled()) {
								logger.info("Inconsistent constructor declaration on bean with name '" + beanName +
										"': single autowire-marked constructor flagged as optional - " +
										"this constructor is effectively required since there is no " +
										"default constructor to fall back to: " + candidates.get(0));
							}
						}
						candidateConstructors = candidates.toArray(new Constructor<?>[0]);
					}
					// 这个意思是:有且仅有一个构造器,并且该构造器的参数大于0个,那就是我们要找的构造器了
					// 这种情况,也是平时我们使用得比较多的情况
					else if (rawCandidates.length == 1 && rawCandidates[0].getParameterCount() > 0) {
						candidateConstructors = new Constructor<?>[] {rawCandidates[0]};
					}
						// 处理primaryConstructor以及nonSyntheticConstructors    兼容Kotlin一般都达不到
					else if (nonSyntheticConstructors == 2 && primaryConstructor != null &&
							defaultConstructor != null && !primaryConstructor.equals(defaultConstructor)) {
						candidateConstructors = new Constructor<?>[] {primaryConstructor, defaultConstructor};
					}
					else if (nonSyntheticConstructors == 1 && primaryConstructor != null) {
						candidateConstructors = new Constructor<?>[] {primaryConstructor};
					}
					// 啥构造器都没找到,那就是空数组
					else {
						candidateConstructors = new Constructor<?>[0];
					}
					this.candidateConstructorsCache.put(beanClass, candidateConstructors);
				}
			}
		}
		//返回候选构造器集合
		return (candidateConstructors.length > 0 ? candidateConstructors : null);
	}
返回多个构造器的情况如下:
    private ApplicationContext applicationContext;
    private BeanFactory beanFactory;

    HelloServiceImpl() {
        System.out.println("我是空构造~");
    }

    @Autowired(required = false)
    public HelloServiceImpl(ApplicationContext applicationContext) {
        this.applicationContext = applicationContext;
    }

    @Autowired(required = false)
    public HelloServiceImpl(ApplicationContext applicationContext, BeanFactory beanFactory) {
        this.applicationContext = applicationContext;
        this.beanFactory = beanFactory;
    }
Spring默认策略是执行构造参数最多的那个构造器。
通过后置处理器解析得到bean的构造器后,下一步就需要挑选出合适构造器进行实例化了,我们回到createBeanInstance方法继续往下看:
        ...
		Constructor<?>[] ctors = determineConstructorsFromBeanPostProcessors(beanClass, beanName);
		if (ctors != null ||
				// 或者标注了处理机制是构造器注入方式 AbstractBeanDefinition#setAutowireMode可以设置模式
				mbd.getResolvedAutowireMode() == RootBeanDefinition.AUTOWIRE_CONSTRUCTOR ||
				mbd.hasConstructorArgumentValues() || !ObjectUtils.isEmpty(args))  {

			// 构造器选择策略,注入逻辑
			return autowireConstructor(beanName, mbd, ctors, args);
		}


		// Preferred constructors for default construction?
		ctors = mbd.getPreferredConstructors();
		if (ctors != null) {
			return autowireConstructor(beanName, mbd, ctors, null);
		}

		// No special handling: simply use no-arg constructor.
		return instantiateBean(beanName, mbd);
	}
ConstructorResolver#autowireConstructor:这个方法作用是获取被包装后的bean,包装后的对象是BeanWrapper对象,这个对象的实现类是BeanWrapperImpl。其中包含被封装后待处理的bean,和设置bean属性的属性编辑器。
	protected BeanWrapper autowireConstructor(
			String beanName, RootBeanDefinition mbd, @Nullable Constructor<?>[] ctors, @Nullable Object[] explicitArgs) {

		return new ConstructorResolver(this).autowireConstructor(beanName, mbd, ctors, explicitArgs);
	}
// ConstructorResolver#autowireConstructor
	public BeanWrapper autowireConstructor(final String beanName, final RootBeanDefinition mbd,
			@Nullable Constructor<?>[] chosenCtors, @Nullable final Object[] explicitArgs) {

		//先实例化一个BeanWrapperImpl类对象
		BeanWrapperImpl bw = new BeanWrapperImpl();
		// initBeanWrapper做了一些事,比如注册解析器、value解析器等等
		this.beanFactory.initBeanWrapper(bw);

		Constructor<?> constructorToUse = null;
		ArgumentsHolder argsHolderToUse = null;
		Object[] argsToUse = null;

		 //如果构造参数不为空就直接使用这些参数即可
		if (explicitArgs != null) {
			argsToUse = explicitArgs;
		}
		// 否则构造函数的入参,交给Spring处理。它会去容器里拿~~~~~
		else {
			Object[] argsToResolve = null;
			synchronized (mbd.constructorArgumentLock) {

				//获取已缓存解析的构造函数或工厂方法(resolvedConstructorOrFactoryMethod----用于缓存已解析的构造函数或工厂方法)
                constructorToUse = (Constructor<?>) mbd.resolvedConstructorOrFactoryMethod;

				//如果缓存不为空,并且构造参数已经解析缓存了,(constructorArgumentsResolved为包可见,用于表示构造参数状态是否已经解析)
				// 显然首次进来,都是为null并且没有被解析的
				constructorToUse = (Constructor<?>) mbd.resolvedConstructorOrFactoryMethod;
				if (constructorToUse != null && mbd.constructorArgumentsResolved) {
					// Found a cached constructor...
					argsToUse = mbd.resolvedConstructorArguments;
					if (argsToUse == null) {
						argsToResolve = mbd.preparedConstructorArguments;
					}
				}
			}
			// 如果上面没有解析过,显然这里参数就是null了,argsToUse也就还为null Spring下面继续解析
			if (argsToResolve != null) {
				argsToUse = resolvePreparedArguments(beanName, mbd, bw, constructorToUse, argsToResolve);
			}
		}
		//如果缓存的构造器不存在,就说明没有bean进行过解析,需要去关联对应的bean的构造器
		if (constructorToUse == null) {
			// 我们的传值chosenCtors 显然不为null,所以此值为true
			boolean autowiring = (chosenCtors != null ||
					mbd.getResolvedAutowireMode() == RootBeanDefinition.AUTOWIRE_CONSTRUCTOR);
			ConstructorArgumentValues resolvedValues = null;

			int minNrOfArgs;
			//若传入的构造参数不为空,那最小参数长度一塔为准
			if (explicitArgs != null) {
				minNrOfArgs = explicitArgs.length;
			}
			else {
				// 这里相当于要解析出构造函数的参数了
				//解析对应的构造参数然后添加到ConstructorArgumentValues中
				ConstructorArgumentValues cargs = mbd.getConstructorArgumentValues();
				resolvedValues = new ConstructorArgumentValues();
				minNrOfArgs = resolveConstructorArguments(beanName, mbd, bw, cargs, resolvedValues);
			}

			// Take specified constructors, if any.
			//如果传入的构造器为空,则获取bean的Class对象,然后根据bean是不是public修饰的来按照不同的方式获取所有的构造器
			// 显然,我们这里(大都都会有构造器)
			// 但是此处我们发现,即使构造器不是public的,这里也能够遭到构造器来进行实例化
			Constructor<?>[] candidates = chosenCtors;
			if (candidates == null) {
				Class<?> beanClass = mbd.getBeanClass();
				try {
					//getDeclaredConstructors返回所有的构造器(包括public和private修饰的),getConstructors返回public修饰的
					candidates = (mbd.isNonPublicAccessAllowed() ? beanClass.getDeclaredConstructors() : beanClass.getConstructors());
				} catch (Throwable ex) {
					throw new BeanCreationException(mbd.getResourceDescription(), beanName,
							"Resolution of declared constructors on bean Class [" + beanClass.getName() +
							"] from ClassLoader [" + beanClass.getClassLoader() + "] failed", ex);
				}
			}
			// 这个构造器排序有点意思
			//按照访问方式和数量对构造器进行排序;public>protect>private,在同为public时构造器入参多的排在前面
			// 所以排在第一位的,是public的,参数最多的构造器
			AutowireUtils.sortConstructors(candidates);
			int minTypeDiffWeight = Integer.MAX_VALUE;

			// 记录下,引起歧义的构造器们。就是记录下来,如果存在这种歧义,抛异常的时候用来告诉调用者
			Set<Constructor<?>> ambiguousConstructors = null;
			LinkedList<UnsatisfiedDependencyException> causes = null;
			// 开始遍历排序后的构造器了==========================
			for (Constructor<?> candidate : candidates) {
				// 拿到构造器参数的类型们
				Class<?>[] paramTypes = candidate.getParameterTypes();

				// constructorToUse不为null(表示已经找到了合适构造器),但是呢,连参数个数的长度都对应不上,那就直接break,后面的构造器全都不用看了
				if (constructorToUse != null && argsToUse.length > paramTypes.length) {
					// Already found greedy constructor that can be satisfied ->
					// do not look any further, there are only less greedy constructors left.
					break;
				}
				// 如果参数个数比最小个数还小,那就继续下一个构造器吧。
				if (paramTypes.length < minNrOfArgs) {
					continue;
				}

				ArgumentsHolder argsHolder;
				if (resolvedValues != null) {
					try {

						//兼容JDK6提供的@ConstructorProperties这个注解,如果它标注了参数名,那就以它的名字为准
						//@ConstructorProperties的作用=======》构造函数上的注解,显示该构造函数的参数如何与构造对象的getter方法相对应
						String[] paramNames = ConstructorPropertiesChecker.evaluate(candidate, paramTypes.length);

						// 否则,就自己解析
						if (paramNames == null) {
							// 一般都是Bean工厂默认的DefaultParameterNameDiscoverer 解析出变量名
							ParameterNameDiscoverer pnd = this.beanFactory.getParameterNameDiscoverer();
							if (pnd != null) {
								paramNames = pnd.getParameterNames(candidate);
							}
						}

						//根据获取到的参数名和已经查到的构造参数和构造参数类型来创建用户创建构造器用的构造参数数组
						//这个数组中包含了原始的参数列表和构造后的参数列表,用来对比用
						argsHolder = createArgumentArray(beanName, mbd, resolvedValues, bw, paramTypes, paramNames,
								getUserDeclaredConstructor(candidate), autowiring);
					} catch (UnsatisfiedDependencyException ex) {
						if (this.beanFactory.logger.isTraceEnabled()) {
							this.beanFactory.logger.trace(
									"Ignoring constructor [" + candidate + "] of bean '" + beanName + "': " + ex);
						}
						// Swallow and try next constructor.
						if (causes == null) {
							causes = new LinkedList<>();
						}
						causes.add(ex);
						continue;
					}
				} else {
					// Explicit arguments given -> arguments length must match exactly.
					if (paramTypes.length != explicitArgs.length) {
						continue;
					}
					argsHolder = new ArgumentsHolder(explicitArgs);
				}
				//lenientConstructorResolution的值ture与false有什么区别:
				//这个属性默认值是true,在大部分情况下都是使用[宽松模式],即使多个构造函数的参数数量相同、类型存在父子类、接口实现类关系也能正常创建bean。
				// false表示严格模式。与上面相反
				// typeDiffWeight:返回不同的个数的权重(权重概念?)
				int typeDiffWeight = (mbd.isLenientConstructorResolution() ?
						argsHolder.getTypeDifferenceWeight(paramTypes) : argsHolder.getAssignabilityWeight(paramTypes));
				// Choose this constructor if it represents the closest match.
				// 根据权重,选择一个最为合适的构造器
				if (typeDiffWeight < minTypeDiffWeight) {
					// 大都进这里来,然后是木有ambiguousConstructors 的
					constructorToUse = candidate;
					argsHolderToUse = argsHolder;
					argsToUse = argsHolder.arguments;
					minTypeDiffWeight = typeDiffWeight;
					ambiguousConstructors = null;
				}
				else if (constructorToUse != null && typeDiffWeight == minTypeDiffWeight) {
					if (ambiguousConstructors == null) {
						ambiguousConstructors = new LinkedHashSet<>();
						ambiguousConstructors.add(constructorToUse);
					}
					ambiguousConstructors.add(candidate);
				}
			}

			// 如果此时还没发现可用的构造器,那这里就开始处理异常吧~
			if (constructorToUse == null) {
				if (causes != null) {
					UnsatisfiedDependencyException ex = causes.removeLast();
					for (Exception cause : causes) {
						this.beanFactory.onSuppressedException(cause);
					}
					throw ex;
				}
				throw new BeanCreationException(mbd.getResourceDescription(), beanName,
						"Could not resolve matching constructor " +
						"(hint: specify index/type/name arguments for simple parameters to avoid type ambiguities)");
			} else if (ambiguousConstructors != null && !mbd.isLenientConstructorResolution()) {
				throw new BeanCreationException(mbd.getResourceDescription(), beanName,
						"Ambiguous constructor matches found in bean '" + beanName + "' " +
						"(hint: specify index/type/name arguments for simple parameters to avoid type ambiguities): " +
						ambiguousConstructors);
			}

			if (explicitArgs == null) {
				argsHolderToUse.storeCache(mbd, constructorToUse);
			}
		}


		//下面步骤都是通用的,用上面得到的构造器(无论是从bean对象中获取的还是spring自己构建的)
		// 和参数来反射创建bean实例,并放到BeanWrapperImpl对象中然后返回
		try {
			// 拿到生成Bean实例化策略,默认值为CglibSubclassingInstantiationStrategy  用CGLIB生成子类的方式
			final InstantiationStrategy strategy = beanFactory.getInstantiationStrategy();
			Object beanInstance;

			if (System.getSecurityManager() != null) {
				final Constructor<?> ctorToUse = constructorToUse;
				final Object[] argumentsToUse = argsToUse;
				beanInstance = AccessController.doPrivileged((PrivilegedAction<Object>) () ->
						strategy.instantiate(mbd, beanName, beanFactory, ctorToUse, argumentsToUse),
						beanFactory.getAccessControlContext());
			}
			else {
				// 主要就是调用了策略器的instantiate,对Bean进行了最终的实例化
				// 此方法为重载方法,此处因为不需要代理,所以执行的直接是SimpleInstantiationStrategy#instantiate
				// 到此处,有一个HelloServiceImpl正式创建   然后继续到doCreateBean方法去吧
				beanInstance = strategy.instantiate(mbd, beanName, this.beanFactory, constructorToUse, argsToUse);
			}

			bw.setBeanInstance(beanInstance);
			return bw;
		} catch (Throwable ex) {
			throw new BeanCreationException(mbd.getResourceDescription(), beanName,
					"Bean instantiation via constructor failed", ex);
		}
	}

