文章目录
- Groovy 迁移到 KTS
- 概述
- 迁移流程
- setting.gradle
- project/build.gradle
- module/build.gradle
- 处理ext扩展函数
- 依次创建如下目录和文件
- 使用
- 源码
Groovy 迁移到 KTS
概述
Android Studio是使用Gradle来编译,而默认的构建语言是Groovy,但是Gradle实际上是支持Kotlin来编写Gradle构建脚本的,常见的构建脚本是.gradle结尾,而Koltin语法编写的脚本则是.gradle.kts 。
官方文档
主要修改以下配置文件:
- settings.gradle
- project/build.gradle
- app/build.gradle
迁移流程
setting.gradle
以前代码:
rootProject.name = "My Application"
include ':app'
修改为:
rootProject.name = "My Application"
include(":app")
project/build.gradle
以前代码:
buildscript {
    repositories {
        google()
        jcenter()
    }
    dependencies {
        classpath("com.android.tools.build:gradle:${Deploy.gradleVersion}")
        classpath(kotlin("gradle-plugin", Deploy.kotlinVersion))
    }
}

allprojects {
    repositories {
        google()
        jcenter()
    }
}

tasks {
    val clean by registering(Delete::class) {
        delete(buildDir)
    }
}
修改为:
buildscript {
    val kotlinVersion = "1.5.31"
    repositories {
        google()
        mavenCentral()
    }
    dependencies {
        classpath("com.android.tools.build:gradle:4.2.2")

//        classpath("org.jetbrains.kotlin:kotlin-gradle-plugin:$kotlinVersion")
        //上面可简写为:
        classpath(kotlin("gradle-plugin", kotlinVersion))
    }
}

allprojects {
    repositories {
        google()
        mavenCentral()
        jcenter()
    }
}

tasks {
    val clean by registering(Delete::class) {
        delete(buildDir)
    }
}
module/build.gradle
在 Gradle 的 Kotlin DSL(KTS)中,register 和 create 都是用于创建和配置对象的方法,但它们的行为有所不同。
- register:这个方法会创建一个新的对象,但不会立即配置它。配置会在对象被实际需要时(即懒加载)进行。这意味着如果你的构建脚本中没有使用到这个对象,那么它就不会被创建和配置,从而节省了构建时间。
- create:这个方法会立即创建和配置对象。这意味着无论你的构建脚本中是否使用到这个对象,它都会被创建和配置。 在大多数情况下,你应该优先使用 register,因为它可以提高构建性能。然而,如果你需要立即访问和修改新创建的对象,那么你应该使用 create。
以前代码:
plugins {
    id 'com.android.application'
    id 'kotlin-android'
}

android {
    compileSdkVersion 30
    buildToolsVersion "30.0.0"

    defaultConfig {
        applicationId "com.example.myapplication"
        minSdkVersion 22
        targetSdkVersion 30
        versionCode 1
        versionName "1.0"

        testInstrumentationRunner "androidx.test.runner.AndroidJUnitRunner"
    }

    buildTypes {
        release {
            minifyEnabled false
            proguardFiles getDefaultProguardFile('proguard-android-optimize.txt'), 'proguard-rules.pro'
        }
    }
    signingConfigs {
        debug {
            storeFile file('./myjks.jks')
            storePassword "123456"
            keyAlias "app"
            keyPassword "123456"
        }
        release {
            storeFile file('./myjks.jks')
            storePassword "123456"
            keyAlias "app"
            keyPassword "123456"
        }
    }
    compileOptions {
        sourceCompatibility JavaVersion.VERSION_1_8
        targetCompatibility JavaVersion.VERSION_1_8
    }
    kotlinOptions {
        jvmTarget = '1.8'
    }
}

dependencies {
    implementation "org.jetbrains.kotlin:kotlin-stdlib:$kotlin_version"
    implementation 'androidx.core:core-ktx:1.3.1'
    implementation 'androidx.appcompat:appcompat:1.2.0'
    implementation 'com.google.android.material:material:1.2.1'
    implementation 'androidx.constraintlayout:constraintlayout:2.0.1'
    testImplementation 'junit:junit:4.+'
    androidTestImplementation 'androidx.test.ext:junit:1.1.2'
    androidTestImplementation 'androidx.test.espresso:espresso-core:3.3.0'
}
修改为:
plugins {
    id("com.android.application")

//    id("kotlin-android")
    //上面可简写为:
    kotlin("android")
}

android {
    compileSdkVersion(30)
    buildToolsVersion("30.0.3")

    defaultConfig {
        applicationId = "com.example.myapplication"
        minSdkVersion(22)
        targetSdkVersion(30)
        versionCode = 1
        versionName = "1.0"

        testInstrumentationRunner = "androidx.test.runner.AndroidJUnitRunner"
    }

    // 配置签名
    signingConfigs {
        getByName("debug") {
            storeFile = file("./myjks.jks")
            storePassword = "123456"
            keyAlias = "app"
            keyPassword = "123456"
        }
        register("release") {
            storeFile = file("./myjks.jks")
            storePassword = "123456"
            keyAlias = "app"
            keyPassword = "123456"
        }
    }

    // 编译类型
    buildTypes {
        getByName("debug") {
            isMinifyEnabled = false
            proguardFiles(
                getDefaultProguardFile("proguard-android-optimize.txt"),
                "proguard-rules.pro"
            )
            signingConfig = signingConfigs.getByName("debug")
        }
        getByName("release") {
            isMinifyEnabled = false
            proguardFiles(
                getDefaultProguardFile("proguard-android-optimize.txt"),
                "proguard-rules.pro"
            )
            signingConfig = signingConfigs.getByName("release")
        }
    }

    // 输出文件名称
    android.applicationVariants.all {
        val buildType = this.buildType.name
        outputs.all {
            if (this is com.android.build.gradle.internal.api.ApkVariantOutputImpl) {
                if (buildType == "debug") {
                    this.outputFileName = "app_V${defaultConfig.versionName}_${buildType}.apk"
                } else if (buildType == "release") {
                    this.outputFileName = "app_V${defaultConfig.versionName}_${buildType}.apk"
                }
            }
        }
    }

    // 部署资源文件
    fun listSubFile(): ArrayList<String> {
        // 新资源目录
        val resFolder = "src/main/res/layouts"
        // 新资源目录下的文件夹
        val files = file(resFolder).listFiles()
        val folders = ArrayList<String>()
        // 遍历路径
        files?.let {
            it.forEach { file ->
                folders.add(file.absolutePath)
            }
        }
        // 资源整合
        folders.add(file(resFolder).parentFile.absolutePath)
        return folders
    }

    // 资源重定向
    sourceSets {
        getByName("main") {
            res.srcDirs(listSubFile())
        }
    }

    // 指定JDK
    compileOptions {
        sourceCompatibility = JavaVersion.VERSION_1_8
        targetCompatibility = JavaVersion.VERSION_1_8
    }

    kotlinOptions {
        jvmTarget = "1.8"
    }

    // 开启ViewBinding
    buildFeatures {
        viewBinding = true
    }
}

dependencies {
    implementation(fileTree(mapOf("dir" to "libs", "include" to listOf("*jar"))))
    implementation("org.jetbrains.kotlin:kotlin-stdlib:1.5.31")
    implementation("androidx.core:core-ktx:1.3.1")
    implementation("androidx.appcompat:appcompat:1.2.0")
    implementation("com.google.android.material:material:1.2.1")
    implementation("androidx.constraintlayout:constraintlayout:2.0.1")
    testImplementation("junit:junit:4.+")
    androidTestImplementation("androidx.test.ext:junit:1.1.2")
    androidTestImplementation("androidx.test.espresso:espresso-core:3.3.0")
    implementation("com.google.code.gson:gson:2.10.1")
}
处理ext扩展函数
在使用 Groovy 语言构建的时候,一般都会抽取一个 config.gradle 来作为全局的变量控制,而ext扩展函数则是必须要使用到的,而在我们的 Gradle Kotlin DSL 中,如果想要使用全局控制,则需要 buildSrc。
buildSrc官网
依次创建如下目录和文件
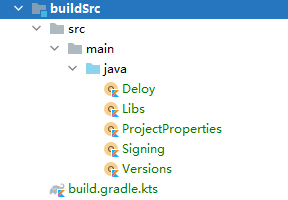
build.gradle.kts:
plugins {
    `kotlin-dsl`
}

repositories {
    jcenter()
}
Versions.kt:
object Versions {
    //Android
    const val appCompat = "1.2.0"
    const val constraintlayout = "2.0.1"
    const val junit = "4.+"
    const val testExt = "1.1.2"
    const val espresso = "3.3.0"
    const val lifecycle = "2.5.0"
    const val material = "1.2.1"

    //Kotlin
    const val kotlinVersion = "1.5.31"
    const val coreKtx = "1.3.1"
    const val coroutines = "1.4.3"

    //KTX
    const val activityKtx = "1.2.3"
    const val fragmentKtx = "1.3.6"

    //other
    const val retrofit = "2.9.0"
    const val gson = "2.8.6"
    const val moshi = "1.9.3"
    const val glide = "4.11.0"
}
Libs:
object Libs {
    //Android
    const val appCompat = "androidx.appcompat:appcompat:${Versions.appCompat}"
    const val constraintlayout =
        "androidx.constraintlayout:constraintlayout:${Versions.constraintlayout}"
    const val junit = "junit:junit:${Versions.junit}"
    const val testExt = "androidx.test.ext:junit:${Versions.testExt}"
    const val espresso = "androidx.test.espresso:espresso-core:${Versions.espresso}"
    const val viewmodel = "androidx.lifecycle:lifecycle-viewmodel-ktx:${Versions.lifecycle}"
    const val livedata = "androidx.lifecycle:lifecycle-livedata-ktx:${Versions.lifecycle}"
    const val lifecycle = "androidx.lifecycle:lifecycle-common-java8:${Versions.lifecycle}"
    const val lifecycleRT = "androidx.lifecycle:lifecycle-runtime-ktx:${Versions.lifecycle}"
    const val material = "com.google.android.material:material:${Versions.material}"

    //Kotlin
    const val kotlinStdLib = "org.jetbrains.kotlin:kotlin-stdlib:${Versions.kotlinVersion}"
    const val coreKtx = "androidx.core:core-ktx:${Versions.coreKtx}"
    const val coroutines = "org.jetbrains.kotlinx:kotlinx-coroutines-core:${Versions.coroutines}"
    const val coroutinesTest =
        "org.jetbrains.kotlinx:kotlinx-coroutines-test:${Versions.coroutines}"
    const val coroutinesAndroid =
        "org.jetbrains.kotlinx:kotlinx-coroutines-android:${Versions.coroutines}"

    //KTX
    const val activityKtx = "androidx.activity:activity-ktx:${Versions.activityKtx}"
    const val fragmentKtx = "androidx.fragment:fragment-ktx:${Versions.fragmentKtx}"

    //other
    const val gson = "com.google.code.gson:gson:${Versions.gson}"
    const val moshi = "com.squareup.moshi:moshi:${Versions.moshi}"
    const val moshiCodeGen = "com.squareup.moshi:moshi-kotlin-codegen:${Versions.moshi}"
    const val converterMoshi = "com.squareup.retrofit2:converter-moshi:${Versions.retrofit}"
    const val retrofit = "com.squareup.retrofit2:retrofit:${Versions.retrofit}"
    const val glide = "com.github.bumptech.glide:glide:${Versions.glide}"
    const val glideCompiler = "com.github.bumptech.glide:compiler:${Versions.glide}"
}
ProjectProperties:
object ProjectProperties {
    const val compileSdk = 31
    const val buildTools = "31.0.0"
    const val minSdk = 22
    const val targetSdk = 31

    const val applicationId = "com.example.myapplication"
    const val versionCode = 1
    const val versionName = "1.0.0"

    const val agpVersion = "4.2.2"
}
Deloy:
object Deloy {

    fun getSystemTime(): String {
        val dateFormat = SimpleDateFormat("yyyyMMddHHmmss", Locale.CHINA)
        return dateFormat.format(System.currentTimeMillis())
    }
}
Signing:
object Signing {
    const val StoreFile = "./myjks.jks"
    const val StorePassword = "123456"
    const val KeyAlias = "app"
    const val KeyPassword = "123456"
}
使用
project/build.gradle:
buildscript {
    repositories {
        google()
        mavenCentral()
        jcenter()
    }
    dependencies {
        classpath("com.android.tools.build:gradle:${ProjectProperties.agpVersion}")

        classpath(kotlin("gradle-plugin", Versions.kotlinVersion))
    }
}

allprojects {
    repositories {
        google()
        mavenCentral()
        jcenter()
        maven { url = uri("https://www.jitpack.io") }
        maven { url = uri("https://jitpack.io") }
    }
}

tasks {
    val clean by registering(Delete::class) {
        delete(buildDir)
    }
}
module/build.gradle:
plugins {
    id("com.android.application")
    id("kotlin-android")
    kotlin("android")
    kotlin("kapt")
}

android {
    compileSdkVersion(ProjectProperties.compileSdk)
//    buildToolsVersion(ProjectProperties.buildTools)

    defaultConfig {
        applicationId = ProjectProperties.applicationId
        minSdkVersion(ProjectProperties.minSdk)
        targetSdkVersion(ProjectProperties.targetSdk)
        versionCode = ProjectProperties.versionCode
        versionName = ProjectProperties.versionName

        testInstrumentationRunner = "androidx.test.runner.AndroidJUnitRunner"
    }

    // 配置签名
    signingConfigs {
        getByName("debug") {
            storeFile = file(Signing.StoreFile)
            storePassword = Signing.StorePassword
            keyAlias = Signing.KeyAlias
            keyPassword = Signing.KeyPassword
        }
        register("release") {
            storeFile = file(Signing.StoreFile)
            storePassword = Signing.StorePassword
            keyAlias = Signing.KeyAlias
            keyPassword = Signing.KeyPassword
        }
    }

    // 编译类型
    buildTypes {
        getByName("debug") {
            isMinifyEnabled = false
            proguardFiles(
                getDefaultProguardFile("proguard-android-optimize.txt"),
                "proguard-rules.pro"
            )
            signingConfig = signingConfigs.getByName("debug")
        }
        getByName("release") {
            isMinifyEnabled = false
            proguardFiles(
                getDefaultProguardFile("proguard-android-optimize.txt"),
                "proguard-rules.pro"
            )
            signingConfig = signingConfigs.getByName("release")
        }
    }

    // 输出文件名称
    android.applicationVariants.all {
        val buildType = this.buildType.name
        outputs.all {
            if (this is com.android.build.gradle.internal.api.ApkVariantOutputImpl) {
                if (buildType == "debug") {
                    this.outputFileName = "app_V${defaultConfig.versionName}_${buildType}.apk"
                } else if (buildType == "release") {
                    this.outputFileName =
                        "app_V${defaultConfig.versionName}_${buildType}_${Deloy.getSystemTime()}.apk"
                }
            }
        }
    }

    // 部署资源文件
    fun listSubFile(): ArrayList<String> {
        // 新资源目录
        val resFolder = "src/main/res/layouts"
        // 新资源目录下的文件夹
        val files = file(resFolder).listFiles()
        val folders = ArrayList<String>()
        // 遍历路径
        files?.let {
            it.forEach { file ->
                folders.add(file.absolutePath)
            }
        }
        // 资源整合
        folders.add(file(resFolder).parentFile.absolutePath)
        return folders
    }

    // 资源重定向
    sourceSets {
        getByName("main") {
            res.srcDirs(listSubFile())
        }
    }

    // 指定JDK
    compileOptions {
        sourceCompatibility = JavaVersion.VERSION_1_8
        targetCompatibility = JavaVersion.VERSION_1_8
    }

    kotlinOptions {
        jvmTarget = "1.8"
    }

    // 开启ViewBinding
    buildFeatures {
        viewBinding = true
    }
}

dependencies {
    // Android
    implementation(fileTree(mapOf("dir" to "libs", "include" to listOf("*.jar"))))
    implementation(Libs.appCompat)
    implementation(Libs.constraintlayout)
    implementation(Libs.viewmodel)
    implementation(Libs.livedata)
    implementation(Libs.lifecycle)
    implementation(Libs.lifecycleRT)
    implementation(Libs.material)
    testImplementation(Libs.junit)
    androidTestImplementation(Libs.testExt)
    androidTestImplementation(Libs.espresso)

    // Kotlin
    implementation(Libs.kotlinStdLib)
    implementation(Libs.coreKtx)
    implementation(Libs.coroutines)
    implementation(Libs.coroutinesTest)
    implementation(Libs.coroutinesAndroid)

    //KTX
    implementation(Libs.activityKtx)
    implementation(Libs.fragmentKtx)

    // Network
    implementation(Libs.gson)
    implementation(Libs.retrofit)
    implementation(Libs.moshi)
    implementation(Libs.converterMoshi)
    kapt(Libs.moshiCodeGen)

    // Image
    implementation(Libs.glide)
    kapt(Libs.glideCompiler)
}






![[转载]C++序列化框架介绍和对比](https://img-blog.csdnimg.cn/img_convert/626db3829d8200190b7daca52735bfcf.webp?x-oss-process=image/format,png)


