Swagger
解决的问题
随着互联网技术的发展,现在的网站架构基本都由原来的后端渲染,变成了前后端分离的形态,而且前端技术和后端技术在各自的道路上越走越远。前端和后端的唯一联系,变成了 API 接口,所以 API 文档变成了前后端开发人员联系的纽带,变得越来越重要。
那么问题来了,随着代码的不断更新,开发人员在开发新的接口或者更新旧的接口后,由于开发任务的繁重,往往文档很难持续跟着更新,Swagger 就是用来解决该问题的一款重要的工具,对使用接口的人来说,开发人员不需要给他们提供文档,只要告诉他们一个 Swagger 地址,即可展示在线的 API 接口文档,除此之外,调用接口的人员还可以在线测试接口数据,同样地,开发人员在开发接口时,同样也可以利用 Swagger 在线接口文档测试接口数据,这给开发人员提供了便利。
Swagger 官方
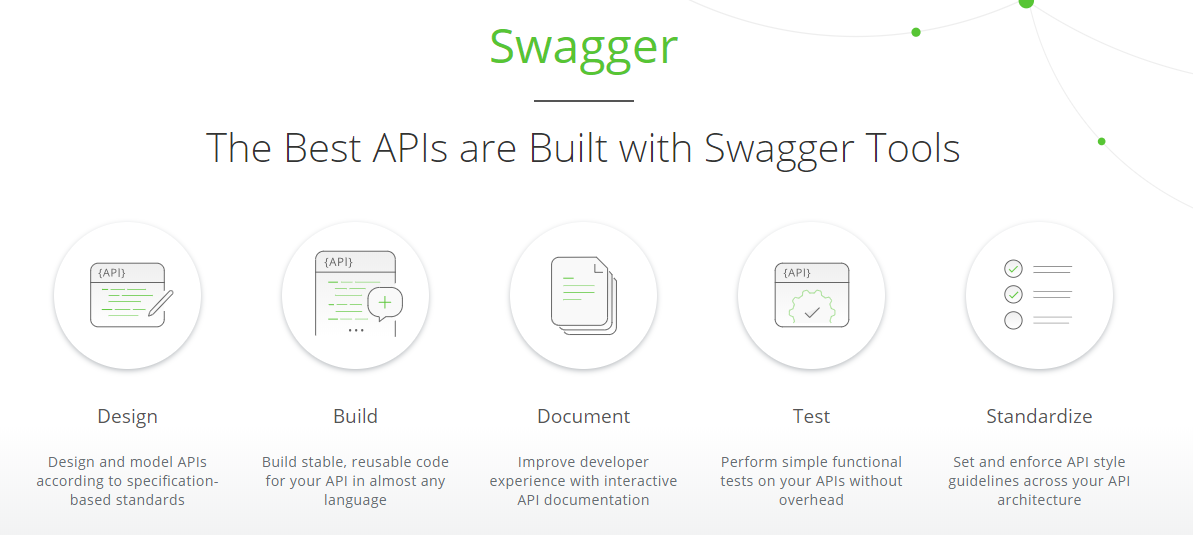
我们打开 Swagger 官网,官方对 Swagger 的定义为:
The Best APIs are Built with Swagger Tools
翻译成中文是:“最好的 API 是使用 Swagger 工具构建的”。由此可见,Swagger 官方对其功能和所处的地位非常自信,由于其非常好用,所以官方对其定位也合情合理。如下图所示:
本文主要讲解在 Spring Boot 中如何导入 Swagger2 工具来展现项目中的接口文档。本节课使用的 Swagger 版本为 2.2.2。下面开始进入 Swagger2 之旅。
Swagger2 的 maven 依赖
使用 Swagger2 工具,必须要导入 maven 依赖,当前官方最高版本是 2.9.0,感觉页面展示的效果不太好,而且不够紧凑,不利于操作。另外,最新版本并不一定是最稳定版本,当前我们实际项目中使用的是 2.2.2 版本,该版本稳定,界面友好,所以本节课主要围绕着 2.2.2 版本来展开,依赖如下:
<!-- swagger -->
<swagger.version>2.9.2</swagger.version>
<!-- swagger -->
<dependency>
    <groupId>io.springfox</groupId>
    <artifactId>springfox-swagger2</artifactId>
    <version>${swagger.version}</version>
</dependency>
<dependency>
    <groupId>io.springfox</groupId>
    <artifactId>springfox-swagger-ui</artifactId>
    <version>${swagger.version}</version>
</dependency>
Swagger2 的配置
使用 Swagger2 需要进行配置,Spring Boot 中对 Swagger2 的配置非常方便,新建一个配置类,Swagger2 的配置类上除了添加必要的 @Configuration 注解外,还需要添加 @EnableSwagger2 注解。
.enable(flag) 可以通过配置文件来获取所属于的环境,赋值flag


import org.springframework.context.annotation.Bean;
import org.springframework.context.annotation.Configuration;
import springfox.documentation.builders.PathSelectors;
import springfox.documentation.builders.RequestHandlerSelectors;
import springfox.documentation.service.ApiInfo;
import springfox.documentation.service.Contact;
import springfox.documentation.spi.DocumentationType;
import springfox.documentation.spring.web.plugins.Docket;
import springfox.documentation.swagger2.annotations.EnableSwagger2;

import java.util.ArrayList;

/**
 * Title:Swagger2公共配置
 * Description:API在线文档
 * @author WZQ
 * @version 1.0.0
 * @date 2020/2/25
 */
@Configuration
@EnableSwagger2
public class Swagger2Config {

    @Bean
    public Docket docket1() {
        return new Docket(DocumentationType.SWAGGER_2).groupName("内容1") // 分组名
                // 指定构建api文档的详细信息的方法:apiInfo()
                .apiInfo(apiInfo())
                //.enable(false) // 是否开启Swagger2,生产环境就要false,默认true
                .select()
                // 指定要生成api接口的包路径,.basePackage把controller作为包路径,生成controller中的所有接口
                // withClassAnnotation(RestController.class) RestController注解的类都要被描扫
                // withMethodAnnotation(GetMapping.class) GetMapping注解的方法都要被描扫
                .apis(RequestHandlerSelectors.basePackage("com.soft.one.ewms.business.user.controller.v1"))
                .paths(PathSelectors.any())
                // PathSelectors.ant("/url") 可限制url
                .build();
    }

    @Bean
    public Docket docket2() {
        return new Docket(DocumentationType.SWAGGER_2).groupName("内容2") // 分组名
                // 指定构建api文档的详细信息的方法:apiInfo()
                .apiInfo(apiInfo())
                //.enable(false) // 是否开启Swagger2,发布环境就要false,默认true
                .select()
                // 指定要生成api接口的包路径,.basePackage把controller作为包路径,生成controller中的所有接口
                // withClassAnnotation(RestController.class) RestController注解的类都要被描扫
                // withMethodAnnotation(GetMapping.class) GetMapping注解的方法都要被描扫
                .apis(RequestHandlerSelectors.basePackage("com.soft.one.ewms.business.user.controller.v1"))
                .paths(PathSelectors.any())
                // PathSelectors.ant("/url") 可限制url
                .build();
    }

    // localhost:8080/swagger-ui.html
    /**
     * 构建api文档的详细信息,作者信息,标题等
     * @return
     */
    private ApiInfo apiInfo() {
        // 作者信息
        Contact contact = new Contact("吴泽强","https://www.baidu.com/","@qq.com");
        // ApiInfo只有一个构造器
        return new ApiInfo(
                "Swagger2在线API文档",
                "Swagger2描述",
                "v1.0",
                "https://www.baidu.com/",
                contact,
                "Apache 2.0",
                "http://www.apache.org/licenses/LICENSE-2.0",
                new ArrayList<>()
        );
    }
}
微服务模块引用
import org.springframework.context.annotation.ComponentScan;
import org.springframework.context.annotation.Configuration;

@Configuration
@ComponentScan({"com.soft.one.ewms.configuration.swagger"}) //包名
public class SwaggerConfig {
}
启动项目,在浏览器中输入 localhost:8080/swagger-ui.html,即可看到 swagger2 的接口页面,如下图所示,说明Swagger2 集成成功。

Token验证ApiKey
加了认证权限框架,就需要验证,静态资源被拦截,即是需要token放在请求头。

如果加了spring security,只需要在对应服务上的WebSecurityConfiguration中配置
    // 忽略该地址,无需携带token,直接就可以被访问授权
    // 静态资源被拦截
    @Override
    public void configure(WebSecurity web) throws Exception {
        web.ignoring()
                .antMatchers(AUTH_WHITELIST); // 忽略swagger ui静态资源
    }

    // -- swagger ui忽略
    private static final String[] AUTH_WHITELIST = {
            // -- swagger ui
            "/swagger-resources/**",
            "/swagger-ui.html",
            "/v2/api-docs",
            "/webjars/**"
    };
Swagger2 的使用
上面我们已经配置好了 Swagger2,并且也启动测试了一下,功能正常,下面我们开始使用 Swagger2,主要来介绍 Swagger2 中的几个常用的注解,分别在实体类上、 Controller 类上以及 Controller 中的方法上,最后我们看一下 Swagger2 是如何在页面上呈现在线接口文档的,并且结合 Controller 中的方法在接口中测试一下数据。
实体类注解
本节我们建一个 User 实体类,主要介绍一下 Swagger2 中的 @ApiModel 和 @ApiModelProperty 注解,同时为后面的测试做准备。
required = true指该参数前端必须给,不可空
import io.swagger.annotations.ApiModel;
import io.swagger.annotations.ApiModelProperty;

@ApiModel(value = "用户实体类")
public class User {

    @ApiModelProperty(value = "用户唯一标识", required = true)
    private Long id;

    @ApiModelProperty(value = "用户姓名")
    private String username;

    @ApiModelProperty(value = "用户密码")
    private String password;

	// 省略set和get方法
}
解释下 @ApiModel 和 @ApiModelProperty 注解:
@ApiModel注解用于实体类,表示对类进行说明,用于参数用实体类接收。
@ApiModelProperty注解用于类中属性,表示对 model 属性的说明或者数据操作更改。
该注解在在线 API 文档中的具体效果在下文说明。
Controller 类中相关注解
写几个接口,Controller 中和 Swagger2 相关的注解。
@RestController
@RequestMapping("/swagger")
@Api(tags = "Swagger2 在线接口文档")
public class TestController {

    @ApiOperation(value = "Sku条件分页查询",notes = "分页条件查询Sku方法详情",tags = {"SkuController"})
    @ApiImplicitParams({
            @ApiImplicitParam(paramType = "path", name = "page", value = "当前页", required = true, dataType = "Integer"),
            @ApiImplicitParam(paramType = "path", name = "size", value = "每页显示条数", required = true, dataType = "Integer")
    })

    @GetMapping("/get/{id}")
    @ApiOperation(value = "根据用户唯一标识获取用户信息")
    public ResponseResult<User> getUserInfo(@PathVariable @ApiParam(value = "用户唯一标识") Long id) {
        // 模拟数据库中根据id获取User信息
        User user = new User(id, "倪升武", "123456");
        return new ResponseResult(user);
    }
}
我们来学习一下 @Api tags、 @ApiOperation 和 @ApiParam 注解。
@Api注解用于类上,表示标识这个类是 swagger 的资源。
@ApiOperation注解用于方法,表示一个 http 请求的操作。
@ApiParam注解用于参数上,用来标明参数信息。实体类。
@ApiImplicitParams多参
@ApiImplicitParam单个参数,不为实体
在浏览器中输入 localhost:8080/swagger-ui.html 看一下 Swagger 页面的接口状态。
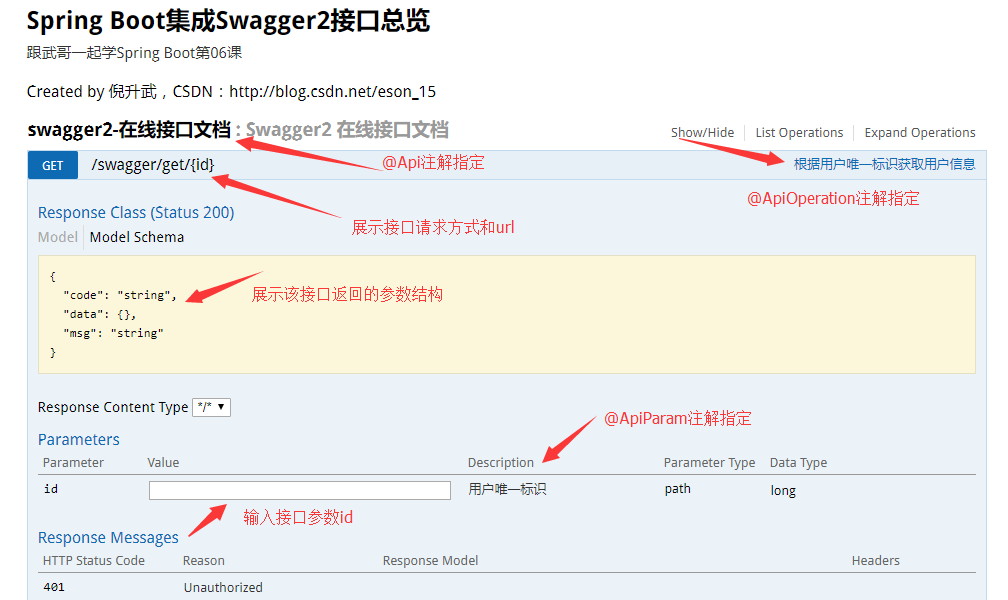
可以看出,Swagger 页面对该接口的信息展示的非常全面,每个注解的作用以及展示的地方在上图中已经标明,通过页面即可知道该接口的所有信息,那么我们直接在线测试一下该接口返回的信息,输入id为1,看一下返回数据:
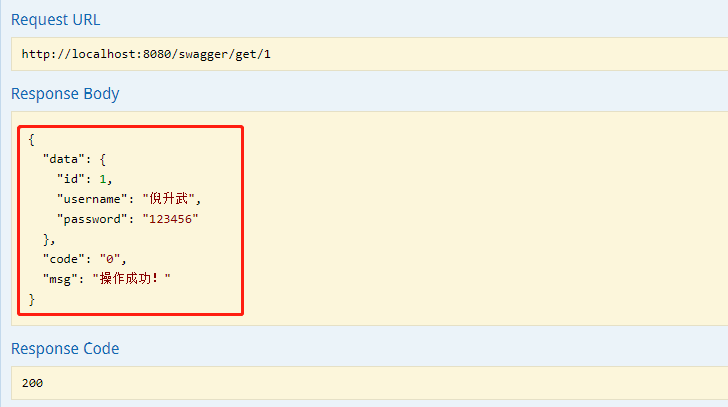
可以看出,直接在页面返回了 json 格式的数据,开发人员可以直接使用该在线接口来测试数据的正确与否,非常方便。上面是对于单个参数的输入,如果输入参数为某个对象这种情况,Swagger 是什么样子呢?我们再写一个接口。
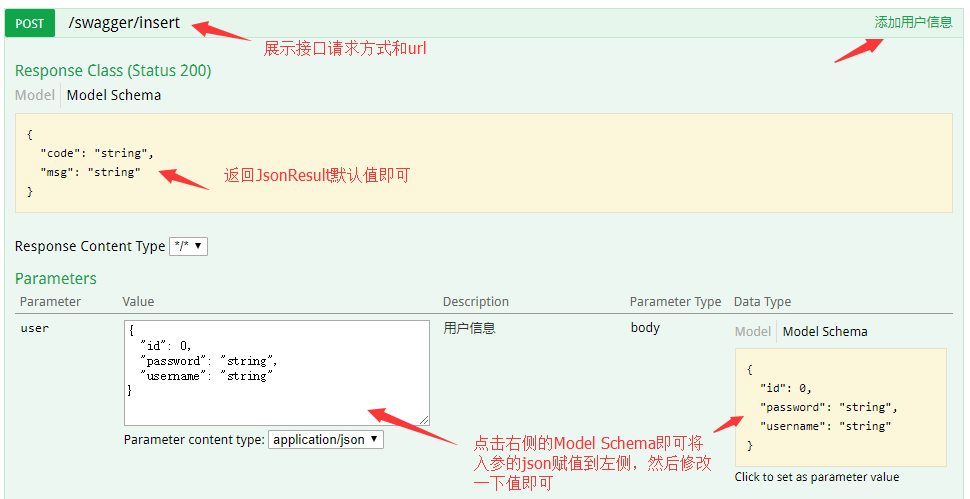
    @PostMapping("/insert")
    @ApiOperation(value = "添加用户信息")
    public ResponseResult<Void> insertUser(@RequestBody @ApiParam(value = "用户信息") User user) {
        // 处理添加逻辑
        return new ResponseResult<>();
    }
重启项目,在浏览器中输入 localhost:8080/swagger-ui.html 看一下效果:
Swagger2全局response
参考:https://www.jianshu.com/p/4539e312ce87
通过Swagger的全局配置,可以自定义默认的Response Model。
首先,在任何一个Controller上,添加至少一个@ApiResponses注解,标明response的类。
@ApiResponses({@ApiResponse(code = 500, message = "服务器内部错误", response = ApiError.class)})
然后,在Swagger配置类的Docket上加入globalResponseMessage,就是自定义状态码和消息,swagger2默认2**的。
@Bean
public Docket userApi() {
    List<ResponseMessage> responseMessageList = new ArrayList<>();
    responseMessageList.add(new ResponseMessageBuilder().code(404).message("找不到资源").responseModel(new ModelRef("ApiError")).build());
    responseMessageList.add(new ResponseMessageBuilder().code(409).message("业务逻辑异常").responseModel(new ModelRef("ApiError")).build());
    responseMessageList.add(new ResponseMessageBuilder().code(422).message("参数校验异常").responseModel(new ModelRef("ApiError")).build());
    responseMessageList.add(new ResponseMessageBuilder().code(500).message("服务器内部错误").responseModel(new ModelRef("ApiError")).build());
    responseMessageList.add(new ResponseMessageBuilder().code(503).message("Hystrix异常").responseModel(new ModelRef("ApiError")).build());

    return new Docket(DocumentationType.SWAGGER_2)

            .globalResponseMessage(RequestMethod.GET, responseMessageList)
            .globalResponseMessage(RequestMethod.POST, responseMessageList)
            .globalResponseMessage(RequestMethod.PUT, responseMessageList)
            .globalResponseMessage(RequestMethod.DELETE, responseMessageList)

            .build()
            .apiInfo(apiInfo());

}
请注意第一条不能省略,new ModelRef(“ApiError”),会查询之前定义@ApiResponse的response中指定的class
Swagger2导出html/pdf文件
依赖
<!-- swagger导出 -->
<swagger2markup.version>1.3.3</swagger2markup.version>
<!-- swagger导出 -->
<dependency>
    <groupId>io.github.swagger2markup</groupId>
    <artifactId>swagger2markup</artifactId>
    <version>${swagger2markup.version}</version>
</dependency>
插件
对应微服务中加入插件:
http://localhost:8080/v2/api-docs 对应微服务的端口号,原理有swagger把注解上的数据信息从v2/api-docs传json到swagger-ui页面显示的,这里我们获取json数据来生成。
生成路径是src/docs/asciidoc/generated
src/docs/asciidoc/html
src/docs/asciidoc/pdf
    <build>
        <plugins>
            <plugin>
                <groupId>io.github.swagger2markup</groupId>
                <artifactId>swagger2markup-maven-plugin</artifactId>
                <version>1.3.7</version>
                <configuration>
                    <!--此处定要是当前项目启动所用的端口-->
                    <swaggerInput>http://localhost:8080/v2/api-docs</swaggerInput>
                    <!-- adoc文档所在目录 -->
                    <outputDir>src/docs/asciidoc/generated</outputDir>
                    <config>
                        <!-- 除了ASCIIDOC之外,还有MARKDOWN和CONFLUENCE_MARKUP可选 -->
                        <swagger2markup.markupLanguage>ASCIIDOC</swagger2markup.markupLanguage>
                    </config>
                </configuration>
            </plugin>
            <!--此插件生成HTML和PDF-->
            <plugin>
                <groupId>org.asciidoctor</groupId>
                <artifactId>asciidoctor-maven-plugin</artifactId>
                <version>2.0.0-RC.1</version>
                <!-- Include Asciidoctor PDF for pdf generation -->
                <dependencies>
                    <dependency>
                        <groupId>org.asciidoctor</groupId>
                        <artifactId>asciidoctorj-pdf</artifactId>
                        <version>1.5.0-alpha.18</version>
                    </dependency>
                    <dependency>
                        <groupId>org.jruby</groupId>
                        <artifactId>jruby-complete</artifactId>
                        <version>9.2.7.0</version>
                    </dependency>
                </dependencies>
                <!-- Configure generic document generation settings -->
                <configuration>
                    <sourceDirectory>src/docs/asciidoc/generated</sourceDirectory>
                    <sourceHighlighter>coderay</sourceHighlighter>
                    <attributes>
                        <toc>left</toc>
                    </attributes>
                </configuration>
                <!-- Since each execution can only handle one backend, run
                     separate executions for each desired output type -->
                <executions>
                    <execution>
                        <id>output-html</id>
                        <phase>generate-resources</phase>
                        <goals>
                            <goal>process-asciidoc</goal>
                        </goals>
                        <configuration>
                            <backend>html5</backend>
                            <outputDirectory>src/docs/asciidoc/html</outputDirectory>
                        </configuration>
                    </execution>
                    <execution>
                        <id>output-pdf</id>
                        <phase>generate-resources</phase>
                        <goals>
                            <goal>process-asciidoc</goal>
                        </goals>
                        <configuration>
                            <backend>pdf</backend>
                            <outputDirectory>src/docs/asciidoc/pdf</outputDirectory>
                        </configuration>
                    </execution>

                </executions>
            </plugin>
        </plugins>
    </build>
执行
先mvn swagger2markup:convertSwagger2markup生成adoc文件(或者 mvn asciidoctor process-asciidoc)
这样也行,一般第二个就可以了,第一个可能异常。

然后使用命令:mvn generate-resources 生成html和pdf文件
插件命令可能找不到依赖,在父工程加入:
   <pluginRepositories>
        <pluginRepository>
            <id>spring-io</id>
            <name>Spring Io</name>
            <url>https://repo.spring.io/plugins-release</url>
            <snapshots>
                <enabled>true</enabled>
            </snapshots>
        </pluginRepository>
    </pluginRepositories>
或者无法读取http://localhost:8080/v2/api-docs
可能是swagger加了分组,需要http://localhost:8080/v2/api-docs?group=分组名
如果分组名是中文也会报错,改成英文或者如下注入"UTF-8"
@Bean
public TomcatEmbeddedServletContainerFactory tomcatEmbeddedServletContainerFactory() {
   TomcatEmbeddedServletContainerFactory tomcat=new TomcatEmbeddedServletContainerFactory();
   tomcat.setUriEncoding(Charset.forName("UTF-8"));
   tomcat.setPort(8080);
   return tomcat;
}
pdf中文展示
可能有点麻烦,一般建议html就行,pdf中文展示会报大量错误,如果需要,参考:
https://www.jianshu.com/p/7f96f3c30587
swagger-bootstrap-ui
文档页面更友好。
该开源项目中文文档地址: https://doc.xiaominfo.com/
依赖:
<!-- swagger -->
<swagger.version>2.9.2</swagger.version>
<!-- swagger bootstrap ui -->
<swagger-bootstrap.version>1.9.6</swagger-bootstrap.version>

<!-- swagger -->
<dependency>
    <groupId>io.springfox</groupId>
    <artifactId>springfox-swagger2</artifactId>
    <version>${swagger.version}</version>
</dependency>

<dependency>
    <groupId>com.github.xiaoymin</groupId>
    <artifactId>swagger-bootstrap-ui</artifactId>
    <version>${swagger-bootstrap.version}</version>
</dependency>
配置:
package com.wzq.garbage.security.config;

import com.github.xiaoymin.swaggerbootstrapui.annotations.EnableSwaggerBootstrapUI;
import org.springframework.context.annotation.Bean;
import org.springframework.context.annotation.Configuration;
import springfox.documentation.builders.ApiInfoBuilder;
import springfox.documentation.builders.PathSelectors;
import springfox.documentation.builders.RequestHandlerSelectors;
import springfox.documentation.service.ApiInfo;
import springfox.documentation.spi.DocumentationType;
import springfox.documentation.spring.web.plugins.Docket;
import springfox.documentation.swagger2.annotations.EnableSwagger2;

/**
 * Title:swagger-Bootstrap-ui
 * Description:配置
 * @author WZQ
 * @version 1.0.0
 * @date 2021/3/28
 */
@Configuration
@EnableSwagger2
@EnableSwaggerBootstrapUI
public class SwaggerConfiguration {

    @Bean
    public Docket createRestApi() {
        return new Docket(DocumentationType.SWAGGER_2)
                .apiInfo(apiInfo())
                .select()
                .apis(RequestHandlerSelectors.basePackage("com.wzq.garbage.security.controller"))
                .paths(PathSelectors.any())
                .build();
    }
    private ApiInfo apiInfo() {
        return new ApiInfoBuilder()
                .title("垃圾减量分类系统在线文档API")
                .description("登录认证微服务模块swagger-bootstrap-ui RESTful APIs")
                .termsOfServiceUrl("http://localhost:8001/")
                .contact("developer@mail.com")
                .version("1.0")
                .build();
    }
}
然后访问地址:http://ip:port/doc.html 即可,注解用法跟swagger一样。
SpringSecurity配置过滤
WebSecurityConfiguration类
 	@Override
    public void configure(WebSecurity web) throws Exception {
        web.ignoring()
                .antMatchers(AUTH_WHITELIST); // 忽略swagger ui静态资源
    }

    // -- swagger ui忽略
    private static final String[] AUTH_WHITELIST = {
            // -- swagger ui
            "/swagger-resources/**",
            "/swagger-ui.html",
            "/v2/api-docs",
            "/webjars/**",
            // swagger-boostrap-ui
            "/doc.html"
    };




![玩转GPT--在线文本生成项目[可入坑~科普系列]](https://img-blog.csdnimg.cn/e7e03038689d451fa9d873ddd6ce8d89.png)

