上篇文章(Netty 入门 — Bootstrap,一切从这里开始),我们了解了 Netty 的第一个核心组件:Bootstrap,它是 Netty 程序的开端。今天我们来熟悉 Netty 的第二个组件:ByteBuf,Netty 数据传输的载体。在 Netty 中,数据的读写都是以 ByteBuf 为单位进行交互的。
为什么要造轮子?
在学习 Java NIO 的时候,Java NIO 有一个原生的 ByteBuffer,为什么 Netty 不直接使用原生的,要重复造一个呢?因为不好用啊。为什么不好用呢?因为 Java NIO 的 ByteBuffer 有一些设计上的缺陷和痛点。
我们先看 ByteBuffer 内部结构。

Java NIO 的 ByteBuffer 有四个属性
- capacity:容量,表示当前 ByteBuffer 最大可写的数据量。
- limit:ByteBuffer 中有效的数据长度大小,具体含义与当前 ByteBuffer 处于哪种模式有关
- 写模式:limit 是指能够往 Buffer 中写入多少数据,其值等于 capacity。
- 读模式:limit 表示能够从 Buffer 中最多能够读取多少数据出来。当从写模式切换到读模式时,limit 的写模式的 position。
- position:当前位置,与 limit 一样,具体含义与当前 ByteBuffer 处于哪种模式有关
- 写模式:当前写的位置,初始值为 0 ,最大值为 capacity - 1,当往 ByteBuffer 中写入一个数据时,position 就会向前移动到下一个待写入的位置。
- 读模式:当前读的位置,读一个数据,position 就往前移一位。
- mark:标志位,一般都是用这个属性来标识某个特殊的位置,方便我们到时候回退到该位置。
从 ByteBuffer 的内部结构我们可以看出它有如下几个缺陷:
- 只有一个标识位置的指针 position,在我们使用过程中需要频繁调用
flip()、rewind()来进行读写模式的切换,我们需要非常清晰地知道这些 API 具体的含义,知道他们的使用场景,否则就会导致程序出错。 - 长度固定。我们在申请一个 ByteBuffer 的时候就已经固定了它的容量了,它无法扩容,然后在实际开发过程中,我们是无法来衡量一个具体的容量的,所以很难控制需要分配的容量。分配太多,容易造成内存浪费;分配太少,则会引发索引越界异常 BufferOverflowException。
- 提供的 API 不够丰富,一些高级和实用的特性它不支持,需要我们自己动手实现。
而作为 Netty 的数据传输的载体,ByteBuffer 显然无法满足 Netty 的需求,所以 Netty 就另起炉灶实现了一个性能更高,灵活性更强的 ByteBuf。作为 ByteBuffer 的替代者,ByteBuf 具有如下几个优点:
- 容量可以动态扩容
- 读写索引分开,读写模式可以随意切换,不需要调用
flip()方法 - 支持引用计数
- 支持池化
- 通过内置的复合缓冲区类型实现透明的零拷贝
- 支持方法的链式调用
ByteBuf 原理
ByteBuf内部结构
我们首先看 ByteBuf 的内部结构:

从 ByteBuf 的内部结构可以看出,它包含有三个指针:
- readerIndex:读指针
- writerIndex:写指针
- maxCapacity:最大容量
三个指针将整个 ByteBuf 分为四个部分:
- 废弃字节:表示已经丢弃的无效字节,我们可以调用
discardReadBytes()释放这部分空间。 - 可读字节:表示可以从 ByteBuf 中读取到的数据,这部分内容等于 writerIndex - readerIndex。readerIndex 随着我们读取 ByteBuf 中的数据而递增,当从 ByteBuf 中读取 N 个字节, readerIndex 就会自增 N,直到 readerIndex = writerIndex 时,就表示 ByteBuf 不可读。
- 可写字节:表示可以向 ByteBuf 可写入的字节。writerIndex 也是随着我们向 ByteBuf 中写入数据而自增,当想 ByteBuf 中写入 N 个字节,writerIndex 就会自增 N,当 writerIndex 超过 capacity 时,就需要扩容了。
- 可扩容字节:表示 ByteBuf 最多可扩容多少字节 。当向 ByteBuf 写入的数据超过了 capacity 时,就会触发扩容,但是最多可扩容到 maxCapacity ,超过时就会报错。
从这里就可以看出,ByteBuf 很好地解决了原生 NIO ByteBuffer 的不可扩容及读写模式切换的问题。Netty 为什么要设计两个指针呢?主要是为了能够更加高效、更加灵活地处理数据,有两个指针有如下几个优势:
- 读写分离:使用两个指针可以将读写两个操作进行有效地分离,而不会相互影响。这使得在同一时间,我们可以在不破坏数据完整性的前提下,进行同时的读取和写入操作。
- 更加灵活:两个指针意味着互相独立,我们可以在不影响读指针的情况下,自由地移动写指针,或者在不影响写指针的情况下,自由地移动读指针,这种分离的设计为数据处理提哦乖乖女了更大的灵活性。
ByteBuf 索引变化
清楚了 ByteBuf 的内部结构,我们还需要了解它内部索引的变化情况。
- 初始分配:这个时候 readerIndex = writerIndex = 0

- 当我们向 ByteBuf 中写入 N 个字节后,readerIndex = 0,writerIndex = N

- 当我们从 ByteBuf 中读取 M(M < N)个字节后,readerIndex = M,writerIndex = N

- 当我们继续往 ByteBuf 中写入数据时,writerIndex = capacity 时,就无法再写了,这个时候会触发扩容( X )

- 对弈失效的那部分,我们可以调用
discardReadBytes()来释放这部分空间,释放完成后,readerIndex = 0,writerIndex =(N + X ) - M
ByteBuf 分类
Netty 提供的 ByteBuf 有多种实现类,每种都有不同的特性和使用场景,主要分为三种类型:
- Pooled 和 Unpooled:池化和非池化;
- Heap 和 Direct:堆内存和直接内存;
- Safe 和 Unsafe:安全和非安全。
- Pooled 和 Unpooled
Pooled 就是从预先分配好的内存中取出来,使用完成后又放回 ByteBuf 内存中,等待下一次分配。而 Unpooled 是直接调用系统 API 来申请内存的,使用完成后需要立刻销毁的。
从性能上来说,Pooled 要比 Unpooled 性能好,因为它可以重复利用,不需要每次都创建
- Heap 和 Direct
Heap 就是在 JVM 堆内分配的,其生命周期受 JVM 管理,我们不需要主动回收他们。而 Direct 则由操作系统管理,使用完成后需要主动释放这部分内存,否则容易造成内存溢出。
- Safe 和 Unsafe
主要是 Java 底层操作数据的一种安全和非安全的方式。Unsafe 表示每次调用 JDK 的 Unsafe 对象操作物理内存的,而 Safe 则不需要依赖 JDK 的 Unsafe 对象,直接通过数组下标的方式来操作。
6 中类型,可以根据不同类型进行组合,在 Netty 中一共有 8 种:
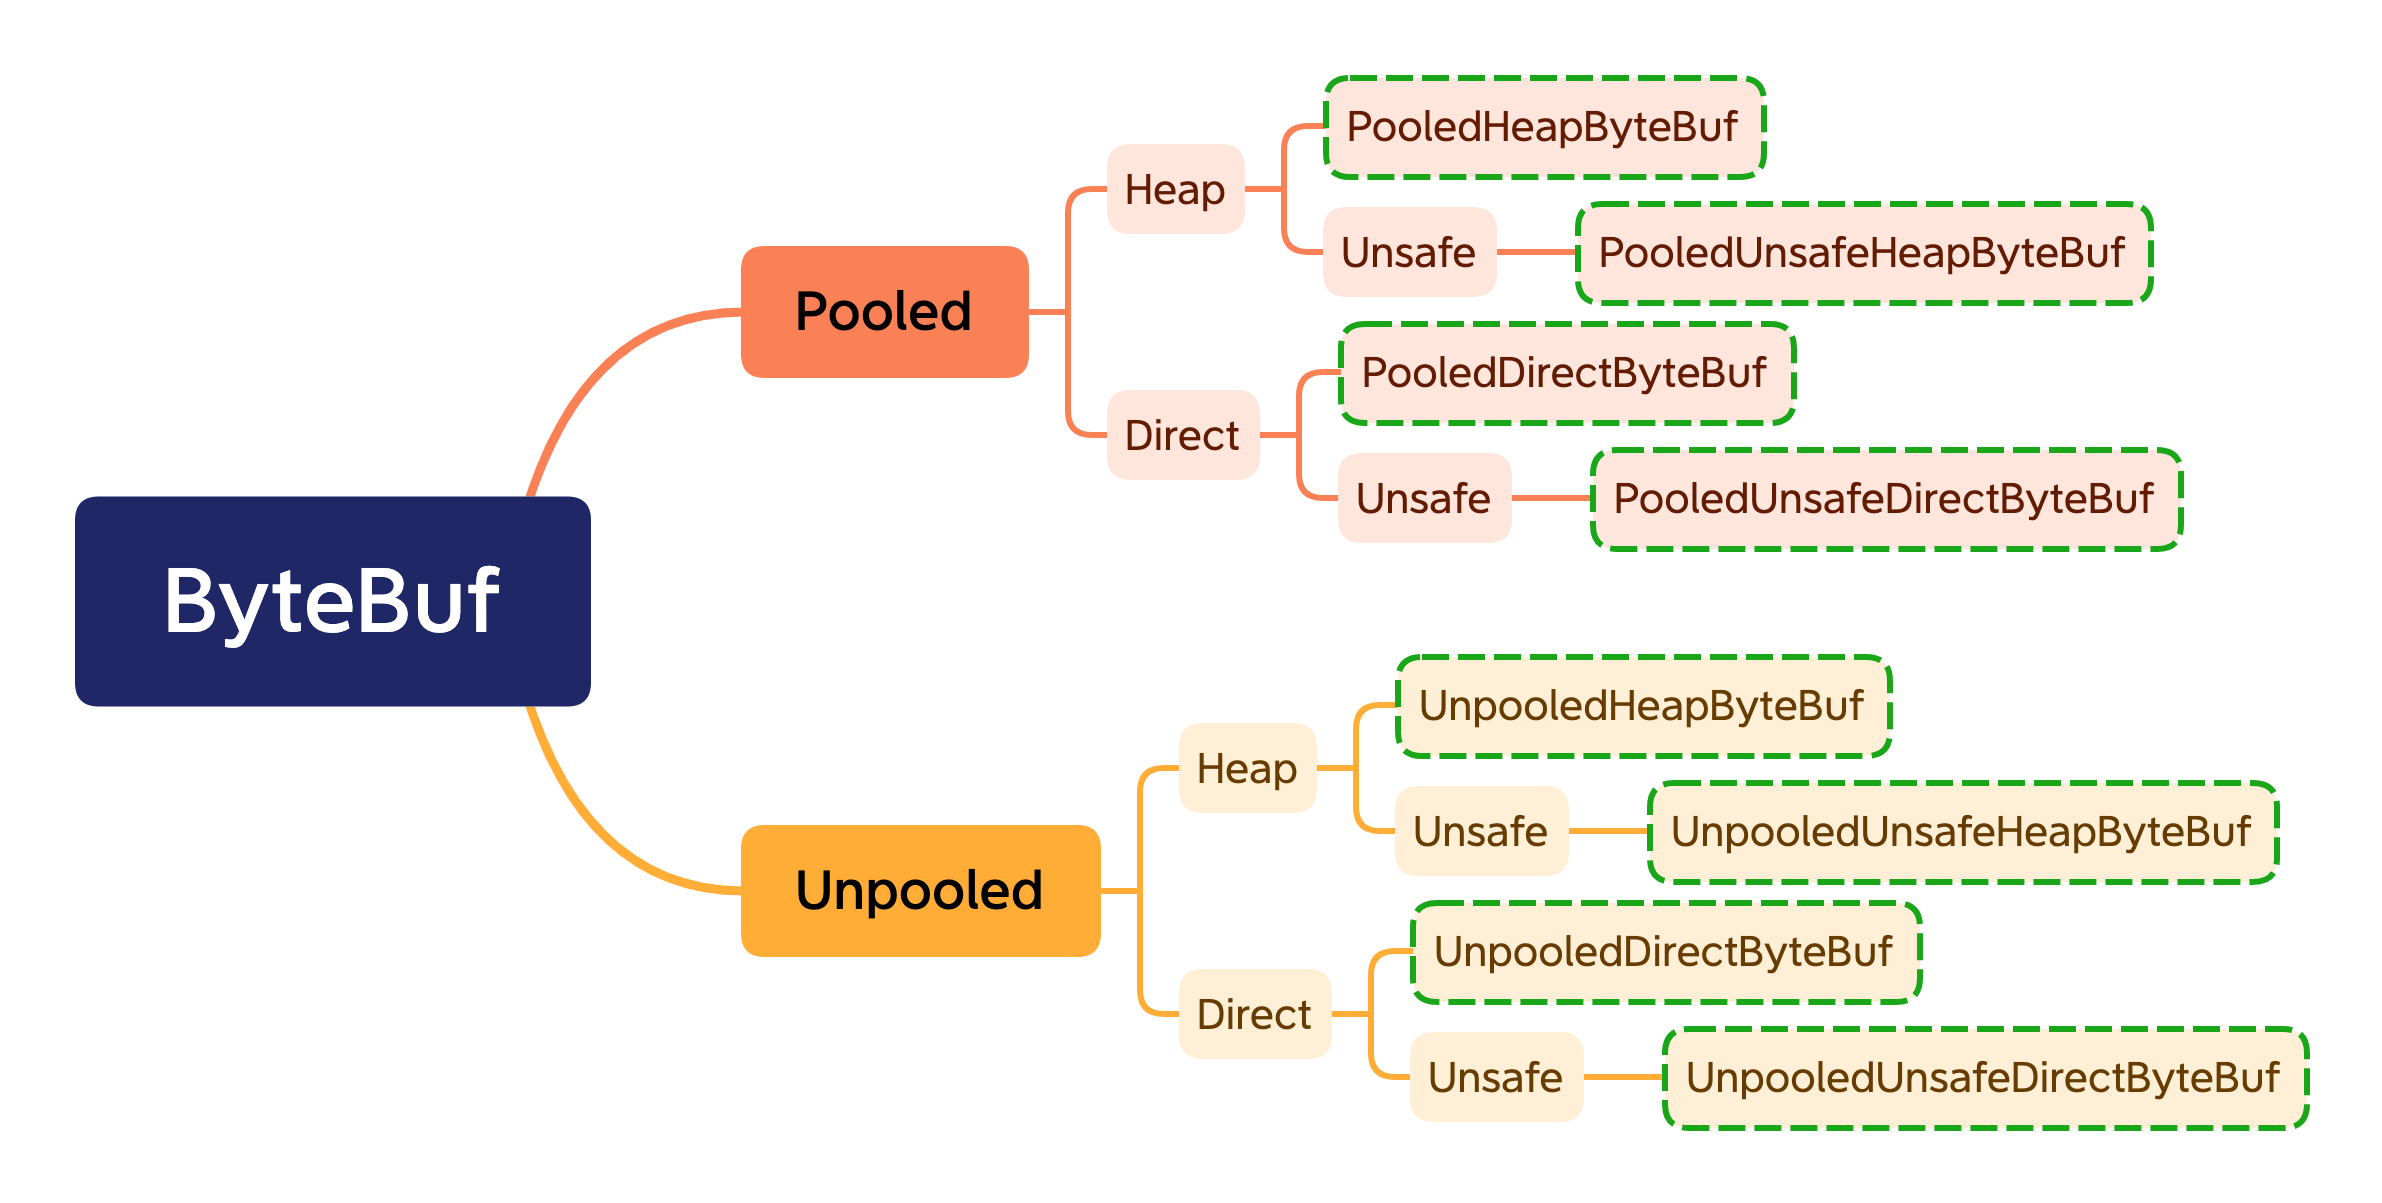
- 池化 + 堆内存:PooledHeapByteBuf
- 池化 + 直接内存:PooledDirectByteBuf
- 池化 + 堆内存 + 不安全:PooledUnsafeHeapByteBuf
- 池化 + 直接内存 + 不安全:PooledUnsafeDirectByteBuf
- 非池化 + 堆内存:UnpooledHeapByteBuf
- 非池化 + 直接内存:UnpooledDirectByteBuf
- 非池化 + 堆内存 + 不安全:UnpooledUnsafeHeapByteBuf
- 非池化 + 直接内存 + 不安全:UnpooledUnsafeDirectByteBuf
ByteBuf 核心 API
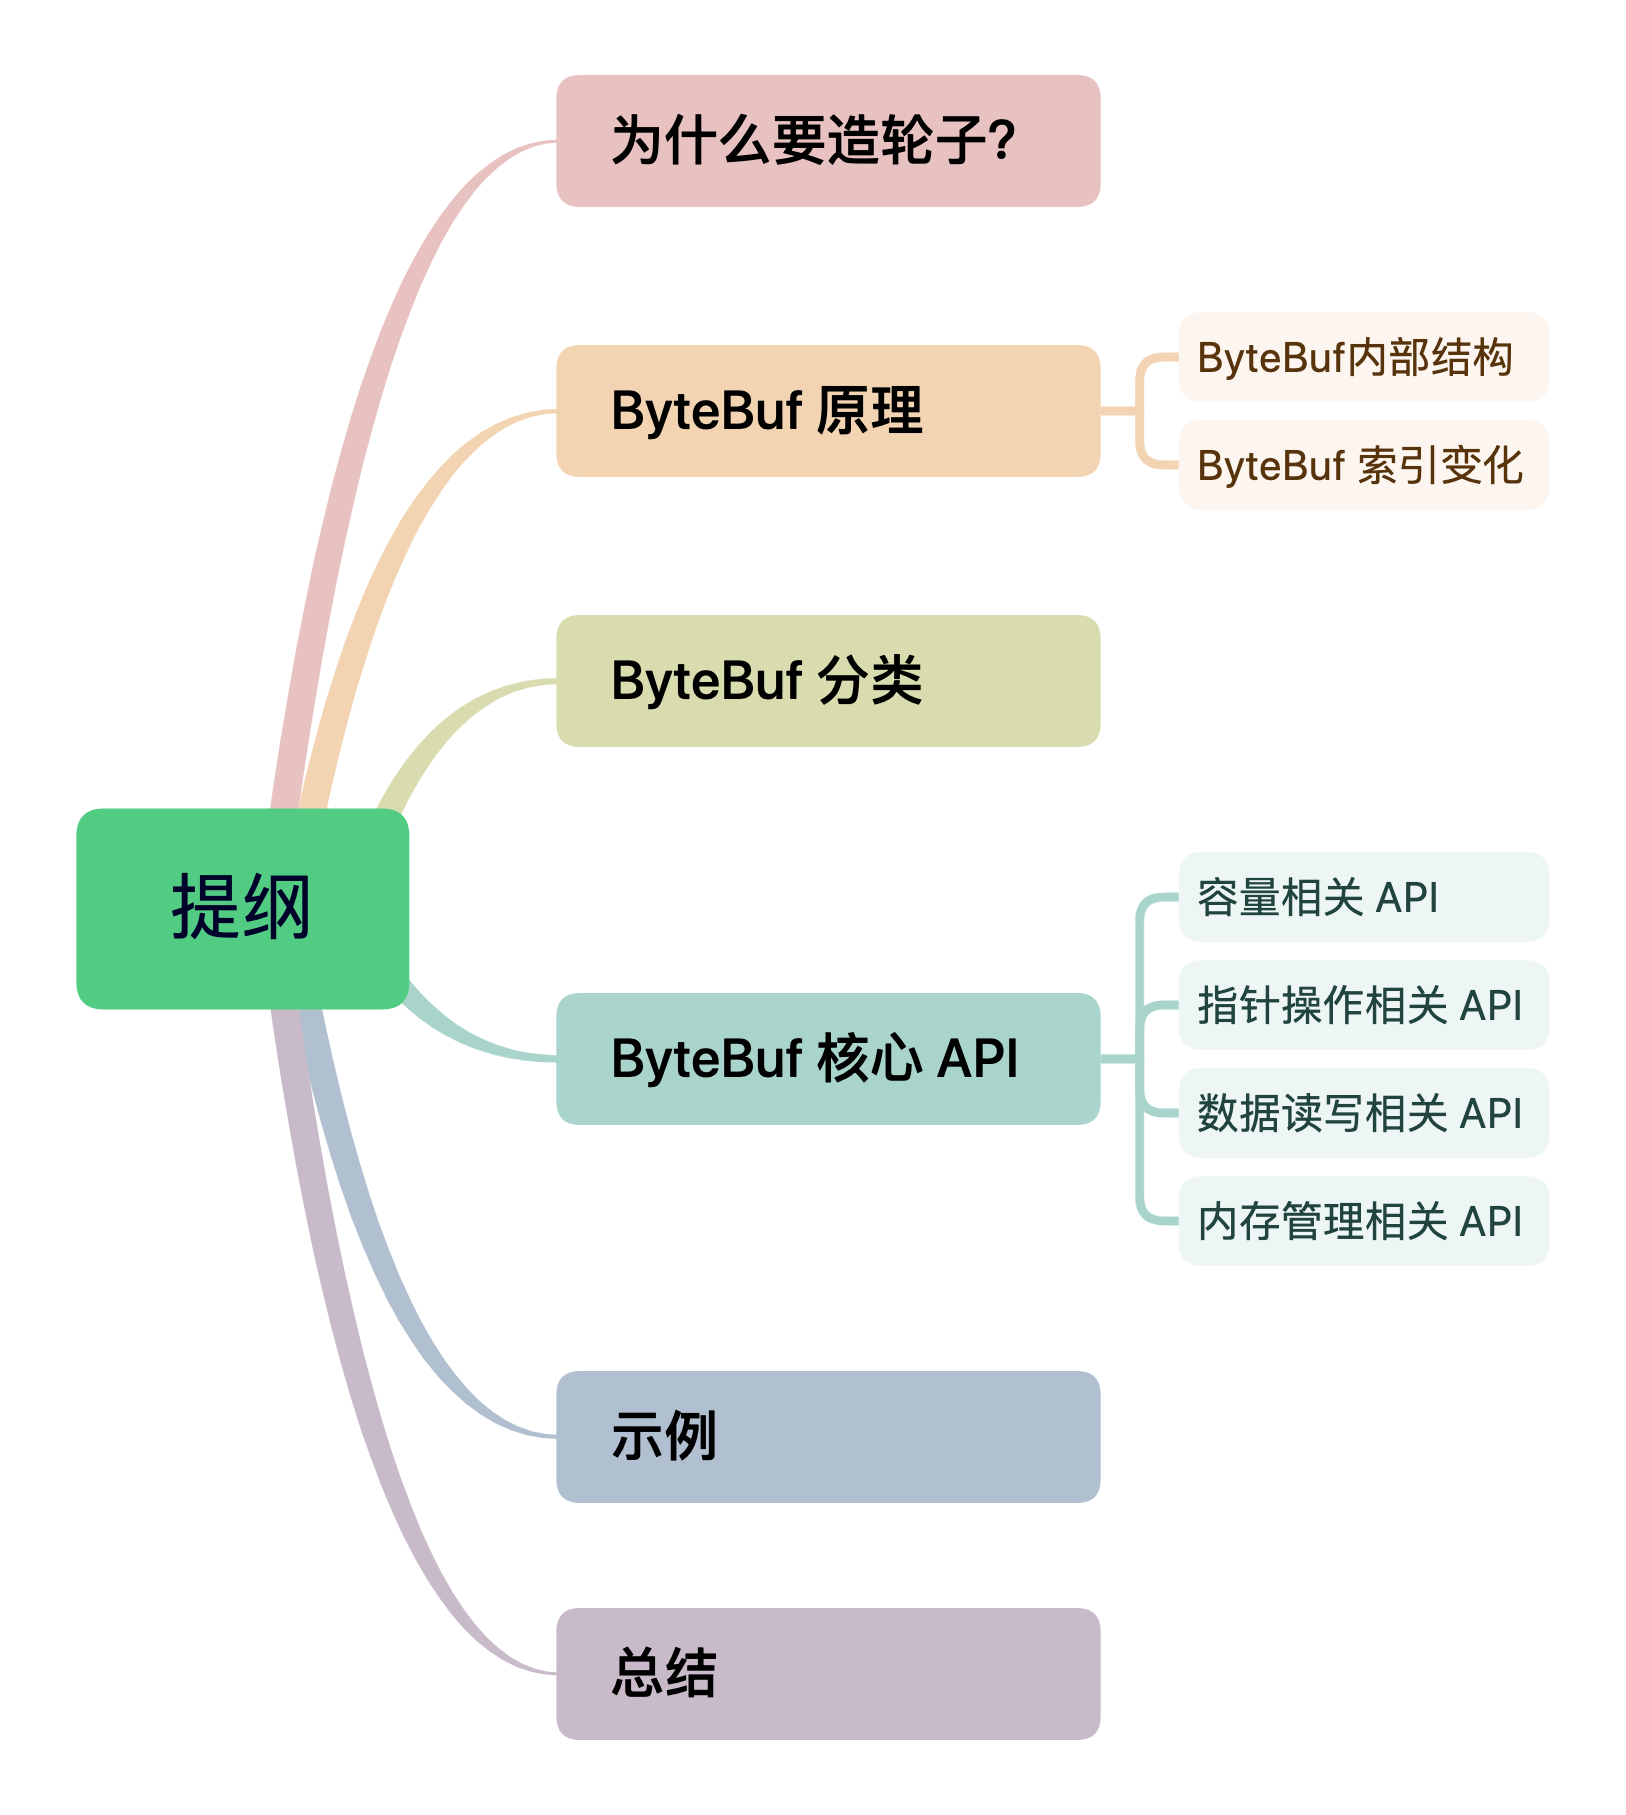
ByteBuf 的核心 API 分为四类:
- 容量相关 API
- 指针操作相关 API
- 数据读写相关 API
- 内存管理相关 API
下面我们依次来了解这些 API。
容量相关 API
容量相关的 API 主要用来获取 ByteBuf 的容量的。
- capacity()
表示 ByteBuf 占用了多少字节的内存,它包括已放弃 + 可读 + 可写。
- maxCapacity()
表示 ByteBuf 最大能占用多少字节的内存。当不断向 ByteBuf 中写入数据的时候,如果发现容量不足时(writerIndex 超过 capacity)就会触发扩容,最大可扩容到 maxCapacity,如果超过 maxCapacity 时就会抛出异常。
指针操作相关 API
指针操作相关 API 就是操作读写指针的。
- readerIndex() & readerIndex(int)
前置返回读指针 readerIndex 的位置,而后者是设置读指针 readerIndex 的位置。
- writerIndex() & writerIndex(int)
前者返回写指针 writerIndex 的位置,而后者是设置写指针 writerIndex 的位置。
- markReaderIndex() & resetReaderIndex()
markReaderIndex()用于标注当前 readerIndex 的位置,即把当前 readerIndex 保存起来。而 resetReaderIndex() 则是将当前的 readerIndex 指针恢复到之前保存的位置。
- markWriterIndex() & resetWriterIndex()
与 readerIndex 的一致。
数据读写相关 API
- readableBytes() & isReadable()
readableBytes() 表示 ByteBuf 中有多少字节可以读,它的值等于 writerIndex - readerIndex。isReadable() 用于判断 ByteBuf 是否可读,若 readableBytes() 返回的值大于 0 ,则 isReadable() 则为 true。
- readByte() & writeByte(byte b)
readByte() 是从 ByteBuf 中读取一个字节,则 readerIndex + 1。同理 writeByte(byte b) 是向 ByteBuf 中写入一个字节,相应的 writerIndex + 1。
在 Netty 中,它提供了 8 种基础数据类型的读取和写入 API,如 readInt(),readLong(),readShort() 等等,这里就不一一阐述了。
- readBytes(byte[] dst) & writeBytes(byte[] src)
readBytes(byte[] dst) 是将 ByteBuf 里面的数据全部读取到 dst 中,这里 dst 数据的大小通常等于 readableBytes()。
writeBytes(byte[] src) 则是将 src 数组里面的内容全部写到 ByteBuf 中。
- getByte(int) & setByte(int,int)
这两个方法与 readByte() & writeByte(byte b) 方法类似,两者区别在于 readByte() 会改变 readerIndex 的位置,而 getByte(int) 则不会改变 readerIndex 的位置。
内存管理相关 API
- retain() & release()
ByteBuf 是基于引用计数设计的,它实现了 ReferenceCounted 接口。在默认情况下,我们创建一个 ByteBuf 时,它的计数为 1。
当计数大于 0 ,就说该 ByteBuf 还在被使用,当计数等于 0 的时候,说明该 ByteBuf 不再被其他对象所引用。
我们每调用一个 retain() ,计数就 + 1,每调用一次 release() 计数就 - 1,当计数减到 0 的时候,就会被回收。
- slice() & duplicate() & copy()
slice()从 ByteBuf 中截取一段从 readerIndex 到 writerIndex 之间的数据,该新的 ByteBuf 的最大容量为原始 ByteBuf 的 readableBytes()。新的 ByteBuf 其底层分配的内存、引用计数与原始的 ByteBuf 共享,这样就会有一个问题:如果我们调用新的 ByteBuf 的 write 系列方法,就会影响到原始的 ByteBuf 的底层数据。
duplicate() 也是从 ByteBuf 中截取一段数据,返回一个新的 ByteBuf,但是它截取的是整个原始的 ByteBuf,与 slice() 一样,duplicate() 返回新的 ByteBuf 其底层分配的内存、引用计数与原始 ByteBuf 共享。
copy() 从原始 ByteBuf 中拷贝所有信息,包括读写指针、底层分配的内存、引用计数等等所有的信息,所以新的 ByteBuf 是一个独立的个体,它与原始的 ByteBuf 不再共享。
在使用这三个方法的时候一定要切记如下点:
slice()和duplicate()新的 ByteBuf 与原始的 ByteBuf 内存共享、引用计数共享、读写指针不共享copy()新的 ByteBuf 与原始 ByteBuf 底层内存、引用计数、读写指针都不共享
这三个方法相比其他的方法稍微有那么点难理解,下面大明哥将会通过示例来详细讲解。
示例
下面大明哥就用一个完整的示例来演示 ByteBuf 的核心 API。
private static void printByteBuf(ByteBuf byteBuf,String action) {
    System.out.println("============== " + action + " ================");
    System.out.println("capacity = " + byteBuf.capacity());
    System.out.println("maxCapacity = " + byteBuf.maxCapacity());
    System.out.println("readerIndex = " + byteBuf.readerIndex());
    System.out.println("writerIndex = " + byteBuf.writerIndex());
    System.out.println("readableBytes = " + byteBuf.readableBytes());
    System.out.println("isWritable = " + byteBuf.isWritable());

    System.out.println();
}
先加一个打印 ByteBuf 核心属性的方法,后面都用该方法来查看 ByteBuf 的相关信息
ByteBuf byteBuf = ByteBufAllocator.DEFAULT.buffer(15,20);
printByteBuf(byteBuf,"new buffer(15,20)");

//===== 执行结果 ======
============== new buffer(15,20) ================
capacity = 15
maxCapacity = 20
readerIndex = 0
writerIndex = 0
readableBytes = 0
isWritable = true
申请一个 capacity = 15 ,maxCapacity = 20 的 ByteBuf ,由于是新申请的,所以 readerIndex = writerIndex = 0,示例图如下:

- 我们往该 ByteBuf 写入 6 个字节。
// 写入四个字节
byteBuf.writeBytes(new byte[]{1,2,3,4,5,6});
printByteBuf(byteBuf,"写入 6 个字节");

//===== 执行结果 ======
============== 写入 6 个字节 ================
capacity = 15
maxCapacity = 20
readerIndex = 0
writerIndex = 6
readableBytes = 6
isWritable = true
写入四个字节后,writerIndex = 6,可读字节数为 6,示例图如下:

- 这个时候 ByteBuf 中有 6 个可以读的字节,我们先读取 4 个字节
// 读取 4 个字节
byteBuf.readInt();
printByteBuf(byteBuf,"读取 4 个字节");

//===== 执行结果 ======
============== 读取 4 个字节 ================
capacity = 15
maxCapacity = 20
readerIndex = 4
writerIndex = 6
readableBytes = 2
isWritable = true
读取 4 个字节后,readerIndex = 4,writerIndex = 6,可读字节数 readableBytes = 2,示例图如下:

- 如果我们继续读取两个字段
// 读取两个字节
byteBuf.readBytes(new byte[2]);
printByteBuf(byteBuf,"读取 2 个字节");

//===== 执行结果 ======
============== 读取 2 个字节 ================
capacity = 15
maxCapacity = 20
readerIndex = 6
writerIndex = 6
readableBytes = 0
isWritable = true
这个时候你会发现 readableBytes = 0 ,那么 isReadable() 就为 false,意味着该 ByteBuf 当前不可读,此时 readerIndex = writerIndex = 6,示例图如下:

- 我们再往该 ByteBuf 中写入 8 个字节
// 写入 8 个字节
byteBuf.writeBytes(new byte[]{7,8,9,10,11,12,13,14});
printByteBuf(byteBuf,"写入 8 个字节");

// getXx 获取 ByteBuf 中的值
System.out.println("getByte(3) = " + byteBuf.getByte(3));
printByteBuf(byteBuf,"getByte(3)");

// setBytes
byteBuf.setByte(8,1);
printByteBuf(byteBuf,"setByte(8,1)");

//===== 执行结果 ======
============== 写入 8 个字节 ================
capacity = 15
maxCapacity = 20
readerIndex = 6
writerIndex = 14
readableBytes = 8
isWritable = true

getByte(3) = 4
============== getByte(3) ================
capacity = 15
maxCapacity = 20
readerIndex = 6
writerIndex = 14
readableBytes = 8
isWritable = true

============== setByte(8,1) ================
capacity = 15
maxCapacity = 20
readerIndex = 6
writerIndex = 14
readableBytes = 8
isWritable = true
到这里我们发现 getXxx() 和 setXxx() 不会改变 readerIndex 和 writerIndex 的位置。示例图如下:

- 下面我们再使用
slice()、duplicate()、copy()三个拷贝方法来演示下
// slice
ByteBuf sliceByte = byteBuf.slice();
printByteBuf(sliceByte,"sliceByte");

// duplicateByte
ByteBuf duplicateByte = byteBuf.duplicate();
printByteBuf(duplicateByte,"duplicateByte");

//===== 执行结果 ======
============== sliceByte ================
capacity = 8
maxCapacity = 8
readerIndex = 0
writerIndex = 8
readableBytes = 8
isWritable = false

============== duplicateByte ================
capacity = 15
maxCapacity = 20
readerIndex = 6
writerIndex = 14
readableBytes = 8
isWritable = true
从执行结果可以看出,slice() 截取的是原始 ByteBuf 的 readerIndex 到 writerIndex 的部分,其中 capacity = maxCapacity = writerIndex = writerIndex - readerIndex ,这也就预示着该 ByteBuf 不可读。而 duplicate() 则是截取的整个原始 ByteBuf 的信息。
现在我们对这两个 ByteBuf 做一番操作。
// 读取 sliceByte
sliceByte.readInt();
printByteBuf(sliceByte,"sliceByte.readInt()");

// 读取
duplicateByte.readInt();
printByteBuf(duplicateByte,"duplicateByte.readInt()");

// 读取后原始 ByteBuf
printByteBuf(byteBuf,"读取后,原始 ByteBuf");

//===== 执行结果 ======
============== sliceByte.readInt() ================
capacity = 8
maxCapacity = 8
readerIndex = 4
writerIndex = 8
readableBytes = 4
isWritable = false

============== duplicateByte.readInt() ================
capacity = 15
maxCapacity = 20
readerIndex = 10
writerIndex = 14
readableBytes = 4
isWritable = true

============== 读取后,原始 ByteBuf ================
capacity = 15
maxCapacity = 20
readerIndex = 6
writerIndex = 14
readableBytes = 8
isWritable = true
从运行结果我们知道对 slice() 和 duplicateByte() 进行读操作后,完全不会影响原始的 ByteBuf,那写呢?
// 写 duplicateByte
duplicateByte.writeBytes(new byte[]{1});
printByteBuf(duplicateByte,"duplicateByte.writeByte(0)");

// 写后原始 ByteBuf
printByteBuf(byteBuf,"写后,原始 ByteBuf");

System.out.println("setByte(8,123) 之前,duplicateByte = " + duplicateByte.getByte(8));
System.out.println("setByte(8,123) 之前,byteBuf = " + byteBuf.getByte(8));

duplicateByte.setByte(8,123);
System.out.println("setByte(8,123) 之后,duplicateByte = " + duplicateByte.getByte(8));
System.out.println("setByte(8,123) 之后,byteBuf = " + byteBuf.getByte(8));

//===== 执行结果 ======
============== duplicateByte.writeByte(0) ================
capacity = 15
maxCapacity = 20
readerIndex = 10
writerIndex = 15
readableBytes = 5
isWritable = false

============== 写后,原始 ByteBuf ================
capacity = 15
maxCapacity = 20
readerIndex = 6
writerIndex = 14
readableBytes = 8
isWritable = true

setByte(8,123) 之前,duplicateByte = 1
setByte(8,123) 之前,byteBuf = 1
setByte(8,123) 之后,duplicateByte = 123
setByte(8,123) 之后,byteBuf = 123
仔细观察运行结果,发现 duplicateByte.writeBytes() 之后,原始 ByteBuf 的结构其实并没有发生变化,他的 readerIndex 依旧 = 6,writerIndex = 14。但是 duplicateByte.setByte(8,123) 之后,原始 ByteBuf 的值发生了变化,这就是我在前面提到过的:**使用 **slice() 和 duplicate() 生成出来的新 ByteBuf 与原生 ByteBuf 是共享底层数据和引用计数,但是不共享读写指针的。这点在使用过程中要格外注意。
- 我们继续往 ByteBuf 里面写入数据
// 继续写 2 个字节
byteBuf.writeBytes(new byte[]{15,16});
printByteBuf(byteBuf,"写 2 个字节后");

// 再写 1 个
byteBuf.writeBytes(new byte[]{17});
printByteBuf(byteBuf,"写 1 个字节后");

//===== 执行结果 ======
============== 写 2 个字节后 ================
capacity = 16
maxCapacity = 20
readerIndex = 6
writerIndex = 16
readableBytes = 10
isWritable = false

============== 写 1 个字节后 ================
capacity = 20
maxCapacity = 20
readerIndex = 6
writerIndex = 17
readableBytes = 11
isWritable = true
当我们写入两个字节后,isWritable = false 说明该 ByteBuf 已经满容量了,不可写了,我们再写入后就触发了扩容,这个时候 capacity = maxCapacity = 20。示例图如下:

如果这个时候我们再往里面写 5 个字节就会报错,抛出异常:
java.lang.IndexOutOfBoundsException: writerIndex(17) + minWritableBytes(5) exceeds maxCapacity(20): PooledUnsafeDirectByteBuf(ridx: 6, widx: 17, cap: 20/20)
- 在讲述 ByteBuf 的原理的时候,大明哥说过,对于已废弃的内容,我们可以使用
discardReadBytes()来释放这部分空间。
byteBuf.discardReadBytes();
printByteBuf(byteBuf,"discardReadBytes 之后");

//===== 执行结果 ======
============== discardReadBytes 之后 ================
capacity = 20
maxCapacity = 20
readerIndex = 0
writerIndex = 11
readableBytes = 11
isWritable = true
释放已废弃内存空间后,ByteBuf 的 readerIndex = 0,writerIndex = writerIndex - readerIndex。示意图如下:

总结
到这里大明哥相信各位小伙伴对 ByteBuf 应该有了初步的认识,当然这篇文章只是入门篇而已,里面还有很多细节都没有涉及到,但是不要着急,因为后面还有进阶篇,源码篇,一定会将它讲的明明白白的。最后做一个简单的总结:
- ByteBuf 是Netty 的数据传输的载体,它是为了解决 JDK NIO 原生 ByteBuffer 的设计缺陷和不易用而重新设计的,它具备如下几个特性:
- 容量可以动态扩容
- 读写索引(readerIndex、writerIndex)分开,读写模式可以随意切换,不需要调用
flip()方法 - 支持引用计数
- 支持池化
- 通过内置的复合缓冲区类型实现透明的零拷贝
- 支持方法的链式调用
- read 系列方法改变 readerIndex 索引,write 系列方法改变 writerIndex 索引,当 readerIndex = writerIndex 时,ByteBuf 不可读。当 writerIndex = capacity 时,如果再继续写入数据则触发扩容操作,扩容最大范围为 maxCapacity。当写入的数据超过 maxCapacity 时会报错。
- ByteBuf 有三种类型,三种类型自由组合为 8 个 ByteBuf。
- 池化 + 堆内存:PooledHeapByteBuf
- 池化 + 直接内存:PooledDirectByteBuf
- 池化 + 堆内存 + 不安全:PooledUnsafeHeapByteBuf
- 池化 + 直接内存 + 不安全:PooledUnsafeDirectByteBuf
- 非池化 + 堆内存:UnpooledHeapByteBuf
- 非池化 + 直接内存:UnpooledDirectByteBuf
- 非池化 + 堆内存 + 不安全:UnpooledUnsafeHeapByteBuf
- 非池化 + 直接内存 + 不安全:UnpooledUnsafeDirectByteBuf
源码:http://suo.nz/1KV2b1


