概念
本文在上一文之上,针对管理员,经理,普通员工身份的用户操作用户管理模块功能。
功能实现
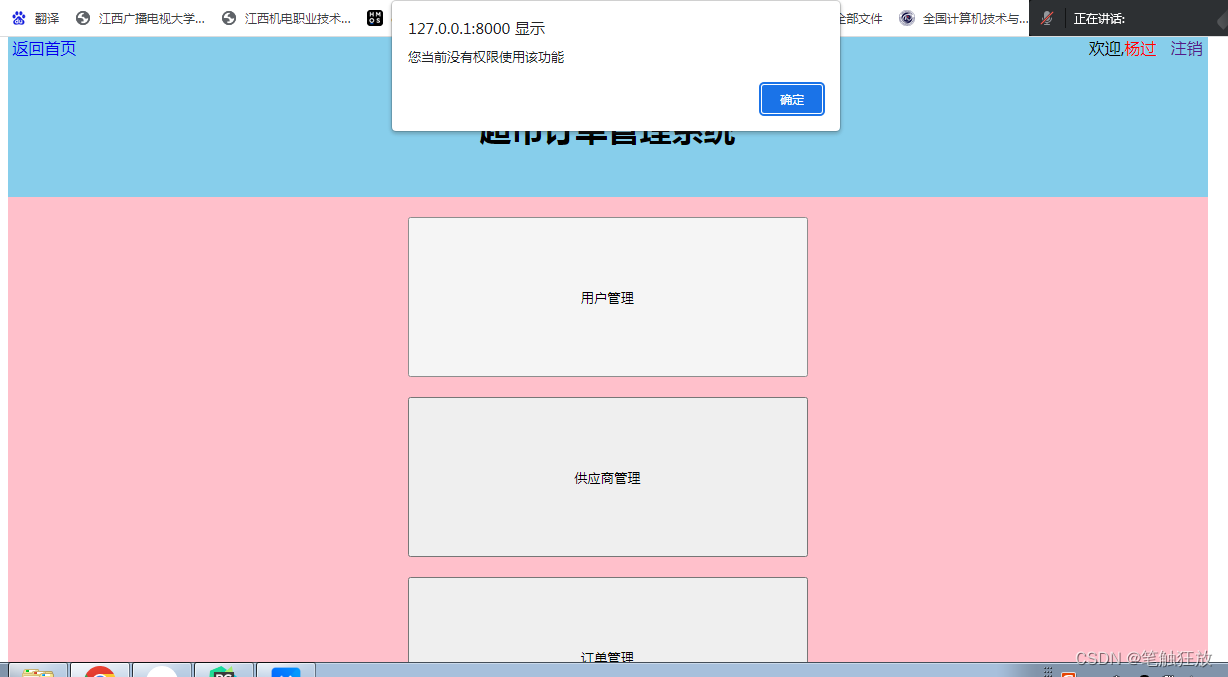
1.普通员工登录系统后,对于用户管理模块不具备操作其他用户信息的权限。因此当普通员工登录后,弹出对话框提示用户。
2.经理身份登录的用户,操作用户管理功能时,只能查看所有普通员工的用户信息,因此当经理点击用户管理按钮的时候,需要给服务器发送请求地址 yhgl/
在服务器的urls.py文件中定义接收该地址的代码
# 接收不同用户身份操作用户管理的地址
    path('yhgl/',views.yhgl),
在views.py文件中定义针对经理身份的代码处理
# 创建方法,通过参数进行判断当前登录的用户身份
def yhgl(request):
    # 接收用户身份的参数
    type=request.GET["type"]
    global user
    if type =="1":
        # 管理员登录了
        # 从用户表中查询除了管理员自己以外的所有员工信息,发送到用户信息列表上显示
        # 查询用户表中用户角色不等于1的所有员工信息
        list1=User.objects.exclude(userRole=1).values()
        return render(request,"userList.html",{"uList":list1,"user":user[0]})
    elif type =="2":
        # 经理登录了
        # 从用户表中查询出所有的普通员工的信息,发送到用户信息列表页面上显示
        # 将查询的数据转换成字典
        userList=User.objects.filter(userRole=3).values()
        return render(request,"normalUserList.html",{"uList":userList,"user":user[0]})
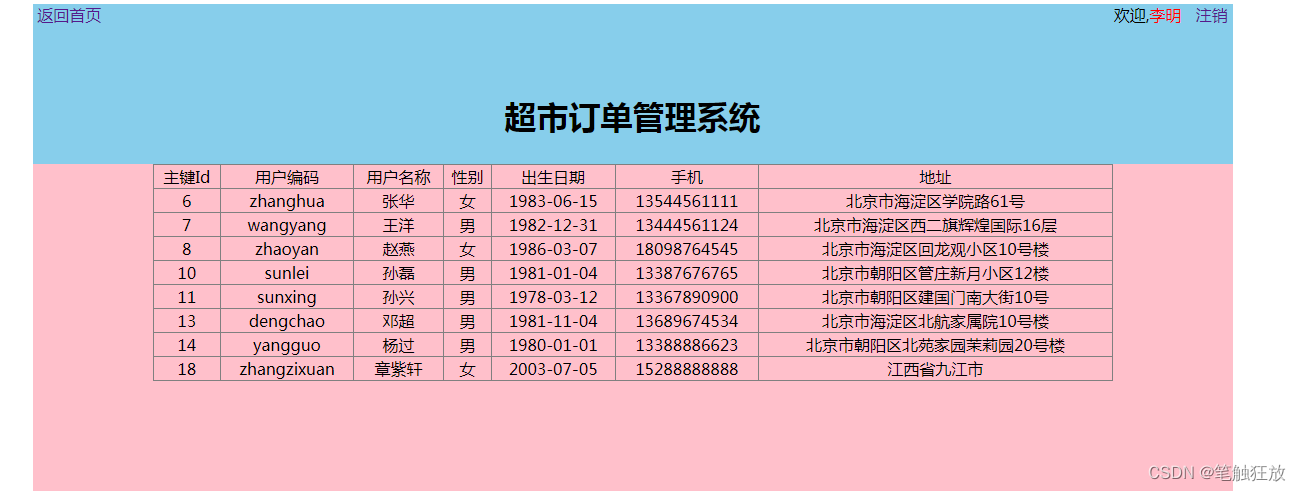
当type参数为2时,说明当前登录的用户身份为经理,因此从数据库中查询出所有普通员工信息,并发送给指定的html页面上显示,其html代码如下
normalUserList.html
<!DOCTYPE html>
<html>
<head>
<meta charset="UTF-8">
<title>超市订单管理系统--用户信息列表</title>
</head>
<body>
<div style="width: 1200px;height: 800px;margin: auto;">
<div style="width: 100%;height: 160px;background-color:skyblue;">
<div style="width: 100%;height: 20px;">
<div align="left" style="width: 20%;height: 100%;float: left;" >
<a href="/login/?username={{ user.userName }}&password={{ user.userPassword }}" style="text-decoration: none;">返回首页</a>
</div>
<div align="right" style="width: 80%;height: 100%;float: right;">
<a>欢迎,<span style="color: red;">{{user.userName}}</span></a>
<a href="/" style="text-decoration: none;">注销</a>
</div>
</div>
<div align="center" style="width: 100%;height: 140px;line-height: 140px;"><h1>超市订单管理系统</h1></div>
</div>
<div align="center" style="width: 100%;height: 640px;background-color: pink;">
<table border="1" style="width: 80%;text-align: center;border-collapse: collapse;">
<tr>
<td>主键Id</td>
<td>用户编码</td>
<td>用户名称</td>
<td>性别</td>
<td>出生日期</td>
<td>手机</td>
<td>地址</td>
</tr>
{% for foo in uList %}
<tr>
<td>{{ foo.id }}</td>
<td>{{ foo.userCode }}</td>
<td>{{ foo.userName }}</td>
{% if foo.gender == 1 %}
<td>女</td>
{% elif foo.gender == 2 %}
<td>男</td>
{% endif %}
<td>{{ foo.birthday }}</td>
<td>{{ foo.phone }}</td>
<td>{{ foo.address }}</td>
</tr>
{% endfor %}
</table>
</div>
</div>
</body>
</html>其页面效果如下
3.管理员具备较高的权限,对所有的经理和普通员工的信息进行查询,修改,添加和删除用户信息。这里使用的还是 yhgl/这个地址,只是发送的type参数值不同,在views.py文件中执行以下代码:
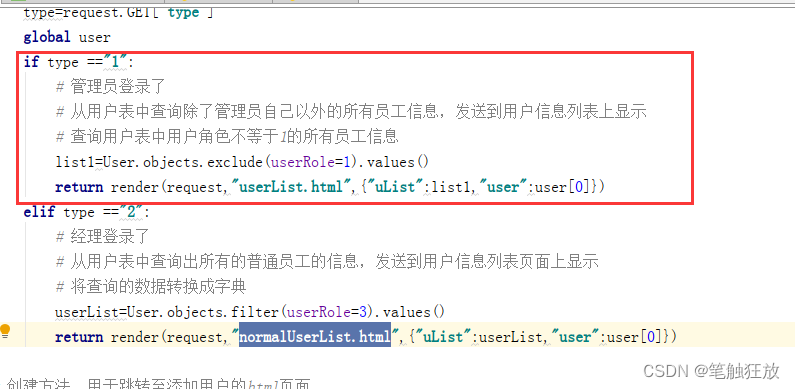
通过从数据库中查询出所有的经理和员工信息发送给userList.html页面展示
userList.html
<!DOCTYPE html>
<html>
<head>
<meta charset="UTF-8">
<title>超市订单管理系统--用户信息列表</title>
<style type="text/css">
tr {
height: 40px;
}
</style>
</head>
<body>
<div style="width: 1200px;height: 800px;margin: auto;">
<div style="width: 100%;height: 160px;background-color:skyblue;">
<div style="width: 100%;height: 20px;">
<div align="left" style="width: 20%;height: 100%;float: left;" >
<a href="/login/?username={{ user.userName }}&password={{ user.userPassword }}"
style="text-decoration: none;">返回首页</a>
</div>
<div align="right" style="width: 80%;height: 100%;float: right;">
<a>欢迎,<span style="color: red;">{{user.userName}}</span></a>
<a href="/" style="text-decoration: none;">注销</a>
</div>
</div>
<div align="center" style="width: 100%;height: 140px;line-height: 140px;"><h1>超市订单管理系统</h1></div>
</div>
<div align="center" style="width: 100%;height: 640px;background-color: pink;">
<div align="left" style="height: 40px;" >
<a href="/addUser/" style="text-decoration: none;
text-align:center; width: 50px;
height: 20px;
color: white;font-weight: bold;
margin-top:20px;margin-left:10px;
border-radius: 5px;">添加用户</a>
</div>
<table border="1" style="width: 90%;text-align: center;border-collapse: collapse;">
<tr>
<td>主键Id</td>
<td>用户编码</td>
<td>用户名称</td>
<td>性别</td>
<td>出生日期</td>
<td>手机</td>
<td>地址</td>
<td>身份</td>
<td>操作</td>
</tr>
{% for foo in uList %}
<tr>
<td>{{ foo.id }}</td>
<td>{{ foo.userCode }}</td>
<td>{{ foo.userName }}</td>
{% if foo.gender == 1 %}
<td>女</td>
{% elif foo.gender == 2 %}
<td>男</td>
{% endif %}
<td>{{ foo.birthday }}</td>
<td>{{ foo.phone }}</td>
<td>{{ foo.address }}</td>
{% if foo.userRole == 2 %}
<td>经理</td>
{% elif foo.userRole == 3 %}
<td>普通员工</td>
{% endif %}
<td><a href="/updateUser/?id={{ foo.id }}">
<input type="button" value="修改" style="background-color: green;border: none;
border-radius: 5px;color: white;" /></a>
<a href="/delUser/?id={{ foo.id }}">
<input type="button" value="删除" style="background-color: red;border: none;
border-radius: 5px;color: white;"/></a></td>
</tr>
{% endfor %}
</table>
{% comment %}<!-- 分页页码导航栏 -->
<br>
<div align="center">
<!-- 判断当前页是否存在上一页,不存在则不显示上一页的按钮 -->
<%if(pi.getPrePage()>0){ %>
<a href="yhgl.do?type=1&ym=<%=pi.getPrePage()%>"><input type="button" value="上一页"/></a>
<%} %>
<% for(int i:pi.getNavigatepageNums()){ %>
<a href="yhgl.do?type=1&ym=<%=i%>"><%=i %></a>
<%} %>
<!-- 判断当前页是否存在下一页,不存在则不显示下一页的按钮 -->
<% if(pi.getPageNum()<pi.getLastPage()){ %>
<a href="yhgl.do?type=1&ym=<%=pi.getNextPage()%>"><input type="button" value="下一页"/></a>
<%} %>
</div>{% endcomment %}
</div>
</div>
</body>
</html>其界面效果如下:

管理员添加新用户,点击添加用户发送 addUser/ 地址请求给服务器,urls.py文件中定义该地址进行接收请求
urls.py
# 管理员添加用户的地址
    path('addUser/',views.addUser),
views.py
# 创建方法,用于跳转至添加用户的html页面
def addUser(request):
    return render(request,"addUser.html",{"user":user[0]})
addUser.html
<!DOCTYPE html>
<html>
<head>
<meta charset="UTF-8">
<title>超市订单管理系统--添加用户</title>
</head>
<body>
<div style="width: 1200px;height: 800px;margin: auto;">
<div style="width: 100%;height: 160px;background-color:skyblue;">
<div style="width: 100%;height: 20px;">
<div align="left" style="width: 20%;height: 100%;float: left;" >
<a href="/login/?username={{ user.userName }}&password={{ user.userPassword }}" style="text-decoration: none;">返回首页</a>
</div>
<div align="right" style="width: 80%;height: 100%;float: right;">
<a>欢迎,<span style="color: red;">{{user.userName}}</span></a>
<a href="/" style="text-decoration: none;">注销</a>
</div>
</div>
<div align="center" style="width: 100%;height: 140px;line-height: 140px;"><h1>超市订单管理系统</h1></div>
</div>
<div align="center" style="width: 100%;height: 640px;background-color: pink;">
<form action="/addUserInfo/" method="post">
{% csrf_token %}
<div style="padding: 5px 0px">
<label for="userCode">用户名:</label>
<input id="userCode" name="userCode" type="text" placeholder="请输入用户名" />
</div>
<div style="padding: 5px 0px">
<label for="userName">姓名:</label>
<input id="userName" name="userName" type="text" placeholder="请输入用户名" />
</div>
<div style="padding: 5px 0px">
<label >性别:</label>
<input type="radio" name="gender" checked="checked" value="2">男
<input type="radio" name="gender" value="1">女
</div>
<div style="padding: 5px 0px">
<label >出生年月:</label>
<input type="date" name="birthday" >
</div>
<div style="padding: 5px 0px">
<label >手机号:</label>
<input type="number" name="phone" placeholder="请输入手机号" >
</div>
<div style="padding: 5px 0px">
<label >家庭地址:</label>
<input type="text" name="address" placeholder="请输入家庭地址" >
</div>
<div style="padding: 5px 0px">
<label >身份:</label>
<input type="radio" name="userRole" checked="checked" value="3">普通员工
<input type="radio" name="userRole" value="2">经理
</div>
<div style="padding: 5px 0px">
<input type="submit"
value="创建"
style="width: 120px;background-color: green;
border: none;padding: 5px;border-radius: 5px;
color: white;"/>
</div>
</form>
</div>
</div>
</body>
</html>界面效果如下

用管理员填写完新用户信息后,通过表单的提交 addUserInfo/ 发送给服务器接收
urls.py
# 接收管理员添加新用户的地址
    path('addUserInfo/',views.addUserInfo),
views.py
# 创建方法,用于接收管理员添加新用户的数据信息
def addUserInfo(request):
    # 用户名
    userCode=request.POST["userCode"]
    # 姓名
    userName=request.POST["userName"]
    # 性别
    gender=request.POST["gender"]
    # 出生年月
    birthday=request.POST["birthday"]
    # 手机号
    phone=request.POST["phone"]
    # 家庭地址
    address=request.POST["address"]
    # 用户身份
    userRole=request.POST["userRole"]
    # 默认密码
    userPassword="0000000"
    global user
    # 当前系统管理员的id
    createdBy=user[0].id
    # 获得当前实时时间 year  month day  hour minute second
    creationDate=time.strftime("%Y-%m-%d %H:%M:%S",time.localtime())
    # 设置修改功能的id为0
    modifyBy=0
    # z设置修改的时间为空
    modifyDate=""
    # 将管理员创建的新用户的数据添加至数据库的用户表
    User.objects.create(userRole=userRole,userCode=userCode,userName=userName,
                        userPassword=userPassword,phone=phone,address=address,
                        gender=gender,birthday=birthday,createdBy=createdBy,
                        creationDate=creationDate,modifyBy=modifyBy,modifyDate=modifyDate)
    return HttpResponseRedirect("/yhgl/?type=1")
添加成功后,会刷新管理员操作的用户管理列表页面。
当管理员选择某一个用户信息进行修改的时候,将该用户信息的主键id发送给服务器

因此urls.py文件中定义该地址接收请求和id参数
 # 接收管理员修改用户的信息的获取的地址
    path('updateUser/',views.updateUser),
将从数据库中查询到该要修改的用户信息,并发送到修改页面上进行显示
# 创建方法,接收管理要修改的用户的id,根据id查询用户表中对应的用户信息
def updateUser(request):
    id=request.GET["id"]
    # 根据id查询的是用户对象
    u=User.objects.get(id=id)
    return render(request,"updateUser.html",{"u":u,"user":user[0]})
修改页面代码如下
<!DOCTYPE html>
<html>
<head>
<meta charset="UTF-8">
<title>超市订单管理系统--修改用户</title>
</head>
<body>
<div style="width: 1200px;height: 800px;margin: auto;">
<div style="width: 100%;height: 160px;background-color:skyblue;">
<div style="width: 100%;height: 20px;">
<div align="left" style="width: 20%;height: 100%;float: left;" >
<a href="/login/?username={{ user.userName }}&password={{ user.userPassword }}" style="text-decoration: none;">返回首页</a>
</div>
<div align="right" style="width: 80%;height: 100%;float: right;">
<a>欢迎,<span style="color: red;">{{user.userName}}</span></a>
<a href="/" style="text-decoration: none;">注销</a>
</div>
</div>
<div align="center" style="width: 100%;height: 140px;line-height: 140px;"><h1>超市订单管理系统</h1></div>
</div>
<div align="center" style="width: 100%;height: 640px;background-color: pink;">
<form action="/updateUserInfo/" method="post">
{% csrf_token %}
<!-- 定义一个隐藏的文本框,用于临时存储要修改的这个用户的id -->
<input type="hidden" name="id" value="{{ u.id }}">
<div style="padding: 5px 0px">
<label for="userCode">用户名:</label>
<input id="userCode" name="userCode" type="text" value="{{ u.userCode }}" placeholder="请输入用户名" />
</div>
<div style="padding: 5px 0px">
<label for="userName">姓名:</label>
<input id="userName" name="userName" type="text" value="{{ u.userName }}" placeholder="请输入用户名" />
</div>
<div style="padding: 5px 0px">
<label >性别:</label>
{% if u.gender == 2 %}
<input type="radio" name="gender" checked="checked" value="2">男
<input type="radio" name="gender" value="1">女
{% else %}
<input type="radio" name="gender" value="2">男
<input type="radio" checked="checked" name="gender" value="1">女
{% endif %}
</div>
<div style="padding: 5px 0px">
<label >出生年月:</label>
<input type="date" value="{{ u.birthday }}" name="birthday" >
</div>
<div style="padding: 5px 0px">
<label >手机号:</label>
<input type="number" name="phone" value="{{ u.phone }}" placeholder="请输入手机号" >
</div>
<div style="padding: 5px 0px">
<label >家庭地址:</label>
<input type="text" name="address" value="{{ u.address }}" placeholder="请输入家庭地址" >
</div>
<div style="padding: 5px 0px">
<label >身份:</label>
{% if u.userRole == 3 %}
<input type="radio" name="userRole" checked="checked" value="3">普通员工
<input type="radio" name="userRole" value="2">经理
{% elif u.userRole == 2 %}
<input type="radio" name="userRole" value="3">普通员工
<input type="radio" name="userRole" checked="checked" value="2">经理
{% endif %}
</div>
<div style="padding: 5px 0px">
<input type="submit"
value="修改"
style="width: 120px;background-color: green;
border: none;padding: 5px;border-radius: 5px;
color: white;"/>
</div>
</form>
</div>
</div>
</body>
</html>其界面效果如下

当管理员修改用户信息后,将更新后的用户信息发送给服务器,地址为 updateUserInfo/
同时urls.py文件中要定义接收该地址
# 接收管理员更新用户的所有信息
    path('updateUserInfo/',views.updateUserInfo),
views.py
# 创建方法,接收管理员更新用户的信息
def updateUserInfo(request):
    # id
    id=request.POST["id"]
    # 用户名
    userCode = request.POST["userCode"]
    # 姓名
    userName = request.POST["userName"]
    # 性别
    gender = request.POST["gender"]
    # 出生年月
    birthday = request.POST["birthday"]
    # 手机号
    phone = request.POST["phone"]
    # 家庭地址
    address = request.POST["address"]
    # 用户身份
    userRole = request.POST["userRole"]
    global user
    # 设置修改功能的id
    modifyBy = user[0].id
    # 设置修改的时间
    modifyDate = time.strftime("%Y-%m-%d %H:%M:%S", time.localtime())
    # 根据id将要修改的用户的旧数据查询出来
    u=User.objects.filter(id=id)
    u.update(userCode=userCode,userName=userName,gender=gender,
             birthday=birthday,phone=phone,address=address,
             userRole=userRole,modifyBy=modifyBy,modifyDate=modifyDate)
    return HttpResponseRedirect("/yhgl/?type=1")
修改成功后,刷新用户列表页面,即可看到更新后的数据
当管理员要删除已离职或者是无效的用户信息时,选择某一个用户信息点击删除,将该用户的主键id通过

该地址发送请求给服务器,服务器需要定义地址接收请求和参数id
# 接收管理员删除用户的地址
    path('delUser/',views.delUser),
# 创建方法,接收管理员删除用户的指定id
def delUser(request):
id=request.GET["id"]
# 根据id从数据库的用户表中删除对应的用户信息
u=User.objects.filter(id=id)
u.delete()
return HttpResponseRedirect("/yhgl/?type=1")删除成功后,即刷新用户列表页面


