按键原理图:按键选用PE4

创建两个文件一个.c文件一个.h文件来写按键的代码
.c文件
#include "Key.h"


void Key_Init(void)
{

	RCC_APB2PeriphClockCmd(RCC_APB2Periph_GPIOE,ENABLE);

	GPIO_InitTypeDef  GPIO_InitStruct;
	GPIO_InitStruct.GPIO_Mode = GPIO_Mode_IPU;   //上拉输入
	GPIO_InitStruct.GPIO_Pin = GPIO_Pin_4;
	GPIO_InitStruct.GPIO_Speed = GPIO_Speed_50MHz;
	GPIO_Init(GPIOE,&GPIO_InitStruct);  //初始化PE端口

}


uint8_t key_scan(void)
{
	if(GPIO_ReadInputDataBit(GPIOE,GPIO_Pin_4) == KEY_ON)  //判断按键的按下
	{
		while(GPIO_ReadInputDataBit(GPIOE,GPIO_Pin_4) == KEY_ON);  //确认按键的按下

		return KEY_ON;   //返回1
	}
	else
	{
		return KEY_OFF;  //返回0
	}

}
.h文件
#ifndef __KEY_H
#define __KEY_H

#include "stm32f10x.h"                  // Device header

#define KEY_ON  1    //宏定义
#define KEY_OFF 0

uint8_t key_scan(void);
void Key_Init(void);

#endif
LED灯原理图: 选用PE5
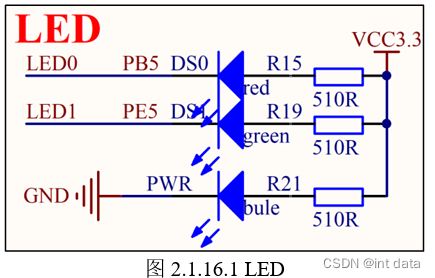
创建两个文件一个.c文件一个.h文件来写LED灯的代码
.c文件
#include "Led.h"


void LED_Init(void)
{
	RCC_APB2PeriphClockCmd(RCC_APB2Periph_GPIOE,ENABLE);  //开启时钟

	GPIO_InitTypeDef  GPIO_InitStruct;				//定义GPIO结构体
	GPIO_InitStruct.GPIO_Mode = GPIO_Mode_Out_PP;  //推挽输出
	GPIO_InitStruct.GPIO_Pin = GPIO_Pin_5; 			//选用引脚5
	GPIO_InitStruct.GPIO_Speed = GPIO_Speed_50MHz;

	GPIO_Init(GPIOE,&GPIO_InitStruct);

	GPIO_SetBits(GPIOE,GPIO_Pin_5);   //上电默认熄灭

}


void LED_ON()
{

	GPIO_ResetBits(GPIOE,GPIO_Pin_5);   //灯亮
}

void LED_OFF()
{

	GPIO_SetBits(GPIOE,GPIO_Pin_5);     //灯灭
}
.h文件
#ifndef __LED_H
#define __LED_H

#include "stm32f10x.h"     // Device header


void LED_Init(void);
void LED_ON(void);
void LED_OFF(void);


#define LED1_TOGGLE		{GPIOE->ODR ^=GPIO_Pin_5;} //绿灯状态翻转    异或操作


#endif
main函数
#include "stm32f10x.h"                  // Device header
#include "Key.h"
#include "Led.h"

int main(void)
{

	LED_Init();
	Key_Init();

	while(1)
	{
		if(key_scan() == KEY_ON)  //获取按键返回值
		{
			LED1_TOGGLE;   //LED灯翻转
		}
	}

}


