**
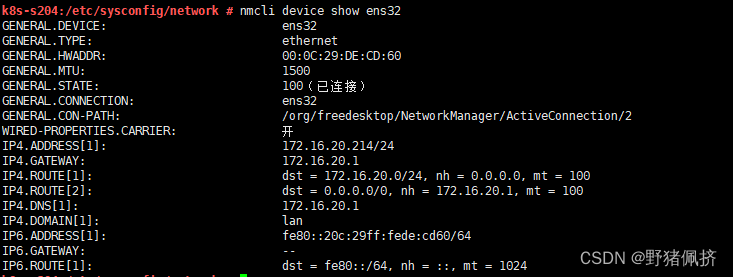
#查看你的网卡信息
nmcli device show

#设置你的静态IP
nmcli connection modify ens32 ipv4.method manual \
	ipv4.addresses 172.16.20.214/24 ipv4.gateway 172.16.20.1 \
	ipv4.dns 114.114.114.114

#重启网卡生效
nmcli c down ens32 && nmcli c up ens32

#添加DNS
nmcli con mod ens32 ipv4.dns 114.114.114.114
删除配置的静态IP
nmcli connection modify ens3 ipv4.addresses "" ipv4.gateway "" ipv4.dns ""
修改网卡为dhcp模式
nmcli connection modify eth0 ipv4.method auto
重启网卡
nmcli c down ens3 && nmcli c up ens3
配置国内源
# 禁用原有软件源
zypper mr -da

#添加国内源

zypper ar -fcg 'https://mirrors.ustc.edu.cn/opensuse/tumbleweed/repo/oss' USTC:OSS
zypper ar -fcg 'https://mirrors.ustc.edu.cn/opensuse/tumbleweed/repo/non-oss' USTC:NON-OSS
zypper ar -fcg 'https://mirrors.ustc.edu.cn/opensuse/update/tumbleweed' USTC:UPDATE
手动修改一下vim /etc/zypp/repos.d/USTC:NON-OSS.repo如下:
[USTC:NON-OSS]
enabled=1
autorefresh=1
baseurl=https://mirrors.ustc.edu.cn/opensuse/tumbleweed/repo/oss
gpgcheck=1
开始部署K8s
#!/bin/bash
systemctl disable firewalld
systemctl stop firewalld

cat > /etc/sysctl.d/k8s.conf <<EOF
net.bridge.bridge-nf-call-iptables=1
net.bridge.bridge-nf-call-ip6tables=1
net.ipv4.ip_forward=1
net.ipv4.tcp_tw_recycle=0
vm.swappiness=0 # 禁止使用 swap 空间,只有当系统 OOM 时才允许使用它 vm.overcommit_memory=1 # 不检查物理内存是否够用
vm.panic_on_oom=0 # 开启 OOM
fs.inotify.max_user_instances=8192
fs.inotify.max_user_watches=1048576
fs.file-max=52706963
fs.nr_open=52706963
net.ipv6.conf.all.disable_ipv6=1
net.netfilter.nf_conntrack_max=2310720
EOF

swapoff -a
sed -i 's/.*swap.*/#&/' /etc/fstab
cat <<EOF |  tee /etc/modules-load.d/k8s.conf
br_netfilter
EOF
modprobe br_netfilter
lsmod | grep br_netfilter
sysctl --system
#安装cri-o的时候依赖所有的k8s的组件,所以就不需要再安装kubernetes的任何软件包了
zypper in cri-o
systemctl enable kubelet.service
#替换国内加速器
sed -i "s#registry.opensuse.org#0k0953tv.mirror.aliyuncs.com#g" /etc/containers/registries.conf
cat > /etc/crictl.yaml <<EOF
runtime-endpoint: unix:///var/run/crio/crio.sock
image-endpoint: unix:///var/run/crio/crio.sock
timeout: 10
debug: false
EOF
systemctl start crio.service
systemctl enable crio.service
echo "测试拉取镜像"
crictl pull nginx
crictl images
#输出镜像就部署好了
初始化你的集群
kubeadm init --image-repository registry.aliyuncs.com/google_containers --pod-network-cidr=10.244.0.0/16

###不提供kubectl请自己下载
