1.vue快速入门
vue概述
Vue是一套构建用户界面的渐进式前端框架
只关注视图层,并且非常容易学习,还可以很方便的与其它库或已有项目整合
通过尽可能简单的API来实现响应数据的绑定和组合的视图组件
特点
易用:在有HTMLCSSJavaScript的基础上,快速上手。
灵活:简单小巧的核心,渐进式技术栈,足以应付任何规模的应用。
性能:20kbmin+gzip运行大小、超快虚拟DOM、最省心的优化
快速入门
1.下载和引入vue.js文件
2.编写入门程序
视图:负责页面渲染,主要由HTML+CSS构成
脚本:负责业务数据模型(Model)以及数据的处理逻辑
<!DOCTYPE html>
<html lang="en">
<head>
    <meta charset="UTF-8">
    <meta name="viewport" content="width=device-width, initial-scale=1.0">
    <title>快速入门</title>
</head>
<body>
    <!-- 视图 -->
    <div id="div">
        {{msg}}
    </div>
</body>
<script src="vue.js"></script>
<script>
    //脚本
    new Vue({
        el:"#div",
        data:{
            msg:"Hello Vue"
        }
    });
</script>
</html>
Vue 核心对象:每一个 Vue 程序都是从一个 Vue 核心对象开始的
let vm = new Vue({
	选项列表;
});
选项列表
el选项:用于接收获取到页面中的元素。(根据常用选择器获取)
data选项:用于保存当前Vue对象中的数据。在视图中声明的变量需要在此处赋值
methods选项:用于定义方法。方法可以直接通过对象名调用,this代表当前Vue对象
数据绑定
在视图部分获取脚本部分的数据。
{{变量名}}
快速入门升级
<!DOCTYPE html>
<html lang="en">
<head>
    <meta charset="UTF-8">
    <meta name="viewport" content="width=device-width, initial-scale=1.0">
    <title>快速入门升级</title>
</head>
<body>
    <!-- 视图 -->
    <div id="div">
        <div>姓名:{{name}}</div>
        <div>班级:{{classRoom}}</div>
        <button onclick="hi()">打招呼</button>
        <button onclick="update()">修改班级</button>
    </div>
</body>
<script src="vue.js"></script>
<script>
    // 脚本
    let vm = new Vue({
        el:"#div",
        data:{
            name:"张三",
            classRoom:"一班"
        },
        methods:{
            study(){
                alert(this.name + "正在" + this.classRoom + "好好学习!");
            }
        }
    });

    //定义打招呼方法
    function hi(){
        vm.study();
    }

    //定义修改班级
    function update(){
        vm.classRoom = "二班";
    }
</script>
</html>
2.vue常用指令
1.指令的介绍
指令:是带有 v- 前缀的特殊属性,不同指令具有不同含义。例如 v-html,v-if,v-for
使用指令时,通常编写在标签的属性上,值可以使用 JS 的表达式
指令:vue框架定义的,一些标签的自定义的属性
常用指令
| 指令 | 作用 |
|---|---|
| v-html | 把文本解析为HTML代码 |
| v-bind | 为HTML标签绑定属性值 |
| v-if | 条件性的渲染某元素,判定为true时渲染,否则不渲染 |
| v-else | |
| v-else-if | |
| v-show | 根据条件展示某元素,区别在于切换的是display属性的值 |
| v-for | 列表渲染,遍历容器的元素或者对象的属性 |
| v-on | 为HTML标签绑定事件 |
| v-model | 为表单元素上创建双向数据绑定 |
2.文本插值
v-html:把文本解析为 HTML 代码
<!DOCTYPE html>
<html lang="en">
<head>
    <meta charset="UTF-8">
    <meta name="viewport" content="width=device-width, initial-scale=1.0">
    <title>文本插值</title>
</head>
<body>
    <div id="div">
        <div>{{msg}}</div>
        <div v-html="msg"></div>
    </div>
</body>
<script src="vue.js"></script>
<script>
    new Vue({
        el:"#div",
        data:{
            msg:"<b>Hello Vue</b>"
        }
    });
</script>
</html>
3.绑定属性
v-bind:为 HTML 标签绑定属性值
<!DOCTYPE html>
<html lang="en">
<head>
    <meta charset="UTF-8">
    <meta name="viewport" content="width=device-width, initial-scale=1.0">
    <title>绑定属性</title>
    <style>
        .my{
            border: 1px solid red;
        }
    </style>
</head>
<body>
    <div id="div">
        <a v-bind:href="url">百度一下</a>
        <br>
        <a :href="url">百度一下</a>
        <br>
        <div :class="cls">我是div</div>
    </div>
</body>
<script src="vue.js"></script>
<script>
    new Vue({
        el:"#div",
        data:{
            url:"https://www.baidu.com",
            cls:"my"
        }
    });
</script>
</html>
4.条件渲染
v-if:条件性的渲染某元素,判定为真时渲染,否则不渲染
v-else:条件性的渲染
v-else-if:条件性的渲染
v-show:根据条件展示某元素,区别在于切换的是display属性的值
<!DOCTYPE html>
<html lang="en">
<head>
    <meta charset="UTF-8">
    <meta name="viewport" content="width=device-width, initial-scale=1.0">
    <title>条件渲染</title>
</head>
<body>
    <div id="div">
        <!-- 判断num的值,对3取余  余数为0显示div1  余数为1显示div2  余数为2显示div3 -->
        <div v-if="num % 3 == 0">div1</div>
        <div v-else-if="num % 3 == 1">div2</div>
        <div v-else="num % 3 == 2">div3</div>

        <div v-show="flag">div4</div>
    </div>
</body>
<script src="vue.js"></script>
<script>
    new Vue({
        el:"#div",
        data:{
            num:1,
            flag:false
        }
    });
</script>
</html>
5.列表渲染
v-for:列表渲染,遍历容器的元素或者对象的属性
<!DOCTYPE html>
<html lang="en">
<head>
    <meta charset="UTF-8">
    <meta name="viewport" content="width=device-width, initial-scale=1.0">
    <title>列表渲染</title>
</head>
<body>
    <div id="div">
        <ul>
            <li v-for="name in names">
                {{name}}
            </li>
            <li v-for="value in student">
                {{value}}
            </li>
        </ul>
    </div>
</body>
<script src="vue.js"></script>
<script>
    new Vue({
        el:"#div",
        data:{
            names:["张三","李四","王五"],
            student:{
                name:"张三",
                age:23
            }
        }
    });
</script>
</html>
6.事件绑定
v-on:为 HTML 标签绑定事件
<!DOCTYPE html>
<html lang="en">
<head>
    <meta charset="UTF-8">
    <meta name="viewport" content="width=device-width, initial-scale=1.0">
    <title>事件绑定</title>
</head>
<body>
    <div id="div">
        <div>{{name}}</div>
        <button v-on:click="change()">改变div的内容</button>
        <button v-on:dblclick="change()">改变div的内容</button>

        <button @click="change()">改变div的内容</button>
    </div>
</body>
<script src="vue.js"></script>
<script>
    new Vue({
        el:"#div",
        data:{
            name:"周杰伦"
        },
        methods:{
            change(){
                this.name = "王力宏"
            }
        }
    });
</script>
</html>
7.表单绑定
表单绑定
v-model:在表单元素上创建双向数据绑定
双向数据绑定
更新data数据,页面中的数据也会更新
更新页面数据,data数据也会更新
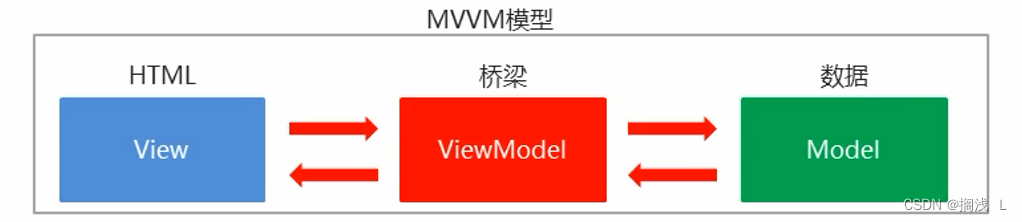
MVVM模型(ModelViewViewModel):是MVC模式的改进版
在前端页面中,JS对象表示Model,页面表示View,两者做到了最大限度的分离
将Model和View关联起来的就是ViewModel,它是桥梁
ViewModel负责把Model的数据同步到View显示出来,还负责把View修改的数据同步回Model
<!DOCTYPE html>
<html lang="en">
<head>
    <meta charset="UTF-8">
    <meta name="viewport" content="width=device-width, initial-scale=1.0">
    <title>表单绑定</title>
</head>
<body>
    <div id="div">
        <form autocomplete="off">
            姓名:<input type="text" name="username" v-model="username">
            <br>
            年龄:<input type="number" name="age" v-model="age">
        </form>
    </div>
</body>
<script src="vue.js"></script>
<script>
    new Vue({
        el:"#div",
        data:{
            username:"张三",
            age:23
        }
    });
</script>
</html>
3.Element基本使用
1.Element概述
Element:网站快速成型工具。是饿了么公司前端开发团队提供的一套基于Vue的网站组件库。
使用Element前提必须要有Vue。
组件:组成网页的部件,例如超链接、按钮、图片、表格等等
Element官网:https://element.eleme.cn/#/zh-CN
2.Element快速入门
1.下载 Element 核心库。
2.引入 Element 样式文件。
3.引入 Vue 核心 js 文件。
4.引入 Element 核心 js 文件。
5.编写按钮标签。
6.通过 Vue 核心对象加载元素
<!DOCTYPE html>
<html lang="en">
<head>
    <meta charset="UTF-8">
    <meta name="viewport" content="width=device-width, initial-scale=1.0">
    <title>快速入门</title>
    <link rel="stylesheet" href="element-ui/lib/theme-chalk/index.css">
    <script src="vue.js"></script>
    <script src="element-ui/lib/index.js"></script>
</head>
<body>
    <button>我是按钮</button>
    <br>
    <div id="div">
        <el-row>
            <el-button>默认按钮</el-button>
            <el-button type="primary">主要按钮</el-button>
            <el-button type="success">成功按钮</el-button>
            <el-button type="info">信息按钮</el-button>
            <el-button type="warning">警告按钮</el-button>
            <el-button type="danger">危险按钮</el-button>
          </el-row>
          <br>
          <el-row>
            <el-button plain>朴素按钮</el-button>
            <el-button type="primary" plain>主要按钮</el-button>
            <el-button type="success" plain>成功按钮</el-button>
            <el-button type="info" plain>信息按钮</el-button>
            <el-button type="warning" plain>警告按钮</el-button>
            <el-button type="danger" plain>危险按钮</el-button>
          </el-row>
          <br>
          <el-row>
            <el-button round>圆角按钮</el-button>
            <el-button type="primary" round>主要按钮</el-button>
            <el-button type="success" round>成功按钮</el-button>
            <el-button type="info" round>信息按钮</el-button>
            <el-button type="warning" round>警告按钮</el-button>
            <el-button type="danger" round>危险按钮</el-button>
          </el-row>
          <br>
          <el-row>
            <el-button icon="el-icon-search" circle></el-button>
            <el-button type="primary" icon="el-icon-edit" circle></el-button>
            <el-button type="success" icon="el-icon-check" circle></el-button>
            <el-button type="info" icon="el-icon-message" circle></el-button>
            <el-button type="warning" icon="el-icon-star-off" circle></el-button>
            <el-button type="danger" icon="el-icon-delete" circle></el-button>
          </el-row>
    </div>
</body>
<script>
    new Vue({
        el:"#div"
    });
</script>
</html>
3.基础布局
将页面分成最多 24 个部分,自由切分
<!DOCTYPE html>
<html lang="en">
<head>
    <meta charset="UTF-8">
    <meta name="viewport" content="width=device-width, initial-scale=1.0">
    <title>基础布局</title>
    <link rel="stylesheet" href="element-ui/lib/theme-chalk/index.css">
    <script src="vue.js"></script>
    <script src="element-ui/lib/index.js"></script>
    <style>
        .el-row {
            /* 行距为20px */
            margin-bottom: 20px;
        }
        .bg-purple-dark {
            background: red;
        }
        .bg-purple {
            background: blue;
        }
        .bg-purple-light {
            background: green;
        }
        .grid-content {
            /* 边框圆润度 */
            border-radius: 4px;
            /* 行高为36px */
            min-height: 36px;
        }
      </style>
</head>
<body>
    <div id="div">
        <el-row>
            <el-col :span="24"><div class="grid-content bg-purple-dark"></div></el-col>
          </el-row>
          <el-row>
            <el-col :span="12"><div class="grid-content bg-purple"></div></el-col>
            <el-col :span="12"><div class="grid-content bg-purple-light"></div></el-col>
          </el-row>
          <el-row>
            <el-col :span="8"><div class="grid-content bg-purple"></div></el-col>
            <el-col :span="8"><div class="grid-content bg-purple-light"></div></el-col>
            <el-col :span="8"><div class="grid-content bg-purple"></div></el-col>
          </el-row>
          <el-row>
            <el-col :span="6"><div class="grid-content bg-purple"></div></el-col>
            <el-col :span="6"><div class="grid-content bg-purple-light"></div></el-col>
            <el-col :span="6"><div class="grid-content bg-purple"></div></el-col>
            <el-col :span="6"><div class="grid-content bg-purple-light"></div></el-col>
          </el-row>
          <el-row>
            <el-col :span="4"><div class="grid-content bg-purple"></div></el-col>
            <el-col :span="4"><div class="grid-content bg-purple-light"></div></el-col>
            <el-col :span="4"><div class="grid-content bg-purple"></div></el-col>
            <el-col :span="4"><div class="grid-content bg-purple-light"></div></el-col>
            <el-col :span="4"><div class="grid-content bg-purple"></div></el-col>
            <el-col :span="4"><div class="grid-content bg-purple-light"></div></el-col>
          </el-row>
    </div>
</body>
<script>
    new Vue({
        el:"#div"
    });
</script>
</html>
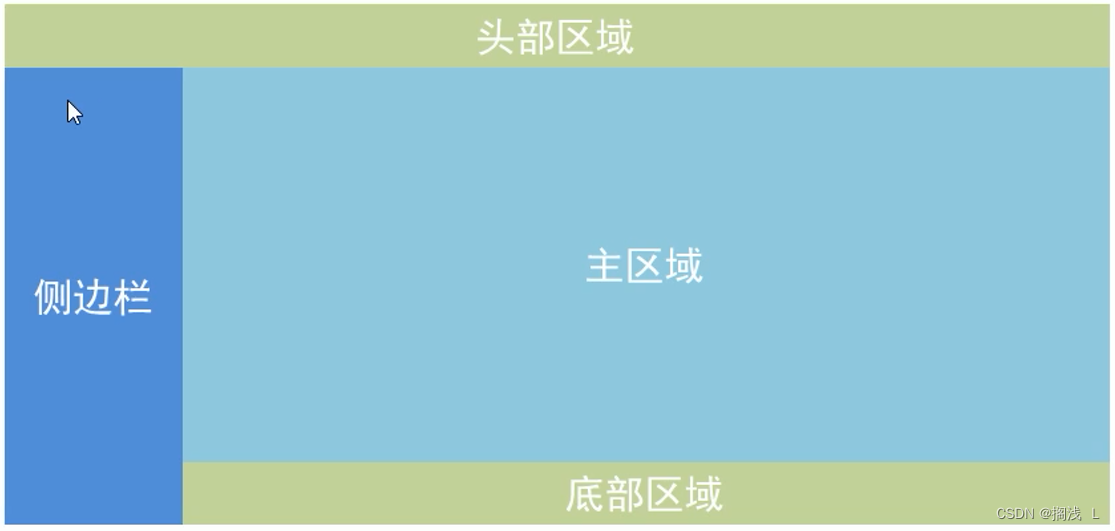
4.容器布局
将页面分成头部区域、侧边栏区域、主区域、底部区域
<!DOCTYPE html>
<html lang="en">
<head>
    <meta charset="UTF-8">
    <meta name="viewport" content="width=device-width, initial-scale=1.0">
    <title>容器布局</title>
    <link rel="stylesheet" href="element-ui/lib/theme-chalk/index.css">
    <script src="vue.js"></script>
    <script src="element-ui/lib/index.js"></script>
    <style>
        .el-header, .el-footer {
            background-color: #d18e66;
            color: #333;
            text-align: center;
            height: 100px;
        }
        .el-aside {
            background-color: #55e658;
            color: #333;
            text-align: center;
            height: 580px;
        }
        .el-main {
            background-color: #5fb1f3;
            color: #333;
            text-align: center;
            height: 520px;
        }
    </style>
</head>
<body>
    <div id="div">
        <el-container>
            <el-header>头部区域</el-header>
            <el-container>
              <el-aside width="200px">侧边栏区域</el-aside>
              <el-container>
                <el-main>主区域</el-main>
                <el-footer>底部区域</el-footer>
              </el-container>
            </el-container>
          </el-container>
    </div>
</body>
<script>
    new Vue({
        el:"#div"
    });
</script>
</html>
5.表单组件
表单:由输入框、下拉列表、单选框、多选框等控件组成,用以收集、校验、提交数据
<!DOCTYPE html>
<html lang="en">
<head>
    <meta charset="UTF-8">
    <meta name="viewport" content="width=device-width, initial-scale=1.0">
    <title>表单组件</title>
    <link rel="stylesheet" href="element-ui/lib/theme-chalk/index.css">
    <script src="vue.js"></script>
    <script src="element-ui/lib/index.js"></script>
</head>
<body>
    <div id="div">
        <el-form :model="ruleForm" :rules="rules" ref="ruleForm" label-width="100px" class="demo-ruleForm">
            <el-form-item label="活动名称" prop="name">
              <el-input v-model="ruleForm.name"></el-input>
            </el-form-item>
            <el-form-item label="活动区域" prop="region">
              <el-select v-model="ruleForm.region" placeholder="请选择活动区域">
                <el-option label="区域一" value="shanghai"></el-option>
                <el-option label="区域二" value="beijing"></el-option>
              </el-select>
            </el-form-item>
            <el-form-item label="活动时间" required>
              <el-col :span="11">
                <el-form-item prop="date1">
                  <el-date-picker type="date" placeholder="选择日期" v-model="ruleForm.date1" style="width: 100%;"></el-date-picker>
                </el-form-item>
              </el-col>
              <el-col class="line" :span="2">-</el-col>
              <el-col :span="11">
                <el-form-item prop="date2">
                  <el-time-picker placeholder="选择时间" v-model="ruleForm.date2" style="width: 100%;"></el-time-picker>
                </el-form-item>
              </el-col>
            </el-form-item>
            <el-form-item label="即时配送" prop="delivery">
              <el-switch v-model="ruleForm.delivery"></el-switch>
            </el-form-item>
            <el-form-item label="活动性质" prop="type">
              <el-checkbox-group v-model="ruleForm.type">
                <el-checkbox label="美食/餐厅线上活动" name="type"></el-checkbox>
                <el-checkbox label="地推活动" name="type"></el-checkbox>
                <el-checkbox label="线下主题活动" name="type"></el-checkbox>
                <el-checkbox label="单纯品牌曝光" name="type"></el-checkbox>
              </el-checkbox-group>
            </el-form-item>
            <el-form-item label="特殊资源" prop="resource">
              <el-radio-group v-model="ruleForm.resource">
                <el-radio label="线上品牌商赞助"></el-radio>
                <el-radio label="线下场地免费"></el-radio>
              </el-radio-group>
            </el-form-item>
            <el-form-item label="活动形式" prop="desc">
              <el-input type="textarea" v-model="ruleForm.desc"></el-input>
            </el-form-item>
            <el-form-item>
              <el-button type="primary" @click="submitForm('ruleForm')">立即创建</el-button>
              <el-button @click="resetForm('ruleForm')">重置</el-button>
            </el-form-item>
          </el-form>
    </div>
</body>
<script>
    new Vue({
        el:"#div",
        data:{
            ruleForm: {
                name: '',
                region: '',
                date1: '',
                date2: '',
                delivery: false,
                type: [],
                resource: '',
                desc: ''
                },
        rules: {
          name: [
            { required: true, message: '请输入活动名称', trigger: 'blur' },
            { min: 3, max: 5, message: '长度在 3 到 5 个字符', trigger: 'blur' }
          ],
          region: [
            { required: true, message: '请选择活动区域', trigger: 'change' }
          ],
          date1: [
            { type: 'date', required: true, message: '请选择日期', trigger: 'change' }
          ],
          date2: [
            { type: 'date', required: true, message: '请选择时间', trigger: 'change' }
          ],
          type: [
            { type: 'array', required: true, message: '请至少选择一个活动性质', trigger: 'change' }
          ],
          resource: [
            { required: true, message: '请选择活动资源', trigger: 'change' }
          ],
          desc: [
            { required: true, message: '请填写活动形式', trigger: 'blur' }
          ]
        }
        },
        methods:{
            submitForm(formName) {
                this.$refs[formName].validate((valid) => {
                if (valid) {
                    alert('submit!');
                } else {
                    console.log('error submit!!');
                    return false;
                }
                });
            },
            resetForm(formName) {
                this.$refs[formName].resetFields();
            }
        }
    });
</script>
</html>
6.表格组件
表格:用于展示多条结构类似的数据,可对数据进行编辑、删除或其他自定义操作
<!DOCTYPE html>
<html lang="en">
<head>
    <meta charset="UTF-8">
    <meta name="viewport" content="width=device-width, initial-scale=1.0">
    <title>表格组件</title>
    <link rel="stylesheet" href="element-ui/lib/theme-chalk/index.css">
    <script src="vue.js"></script>
    <script src="element-ui/lib/index.js"></script>
</head>
<body>
    <div id="div">
        <template>
            <el-table
              :data="tableData"
              style="width: 100%">
              <el-table-column
                prop="date"
                label="日期"
                width="180">
              </el-table-column>
              <el-table-column
                prop="name"
                label="姓名"
                width="180">
              </el-table-column>
              <el-table-column
                prop="address"
                label="地址">
              </el-table-column>

              <el-table-column
                label="操作"
                width="180">
                <el-button type="warning">编辑</el-button>
                <el-button type="danger">删除</el-button>
              </el-table-column>
            </el-table>
          </template>
    </div>
</body>
<script>
    new Vue({
        el:"#div",
        data:{
            tableData: [{
                date: '2016-05-02',
                name: '王小虎',
                address: '上海市普陀区金沙江路 1518 弄'
            }, {
                date: '2016-05-04',
                name: '王小虎',
                address: '上海市普陀区金沙江路 1517 弄'
            }, {
                date: '2016-05-01',
                name: '王小虎',
                address: '上海市普陀区金沙江路 1519 弄'
            }, {
                date: '2016-05-03',
                name: '王小虎',
                address: '上海市普陀区金沙江路 1516 弄'
            }]
        }
    });
</script>
</html>
7.顶部导航栏组件

<!DOCTYPE html>
<html lang="en">
<head>
    <meta charset="UTF-8">
    <meta name="viewport" content="width=device-width, initial-scale=1.0">
    <title>顶部导航栏</title>
    <link rel="stylesheet" href="element-ui/lib/theme-chalk/index.css">
    <script src="vue.js"></script>
    <script src="element-ui/lib/index.js"></script>
</head>
<body>
    <div id="div">
      <el-menu
      :default-active="activeIndex2"
      class="el-menu-demo"
      mode="horizontal"
      @select="handleSelect"
      background-color="#545c64"
      text-color="#fff"
      active-text-color="#ffd04b">
      <el-menu-item index="1">处理中心</el-menu-item>
      <el-submenu index="2">
        <template slot="title">我的工作台</template>
        <el-menu-item index="2-1">选项1</el-menu-item>
        <el-menu-item index="2-2">选项2</el-menu-item>
        <el-menu-item index="2-3">选项3</el-menu-item>
        <el-submenu index="2-4">
          <template slot="title">选项4</template>
          <el-menu-item index="2-4-1">选项1</el-menu-item>
          <el-menu-item index="2-4-2">选项2</el-menu-item>
          <el-menu-item index="2-4-3">选项3</el-menu-item>
        </el-submenu>
      </el-submenu>
      <el-menu-item index="3" disabled>消息中心</el-menu-item>
      <el-menu-item index="4"><a href="https://www.ele.me" target="_blank">订单管理</a></el-menu-item>
    </el-menu>
    </div>
</body>
<script>
    new Vue({
        el:"#div"
    });
</script>
</html>
8.侧边导航栏组件
<!DOCTYPE html>
<html lang="en">
<head>
    <meta charset="UTF-8">
    <meta name="viewport" content="width=device-width, initial-scale=1.0">
    <title>侧边导航栏</title>
    <link rel="stylesheet" href="element-ui/lib/theme-chalk/index.css">
    <script src="vue.js"></script>
    <script src="element-ui/lib/index.js"></script>
</head>
<body>
    <div id="div">
      <el-col :span="6">
        <el-menu
          default-active="2"
          class="el-menu-vertical-demo"
          @open="handleOpen"
          @close="handleClose"
          background-color="#545c64"
          text-color="#fff"
          active-text-color="#ffd04b">
          <el-submenu index="1">
            <template slot="title">
              <i class="el-icon-location"></i>
              <span>导航一</span>
            </template>
            <el-menu-item-group>
              <template slot="title">分组一</template>
              <el-menu-item index="1-1">选项1</el-menu-item>
              <el-menu-item index="1-2">选项2</el-menu-item>
            </el-menu-item-group>
            <el-menu-item-group title="分组2">
              <el-menu-item index="1-3">选项3</el-menu-item>
            </el-menu-item-group>
            <el-submenu index="1-4">
              <template slot="title">选项4</template>
              <el-menu-item index="1-4-1">选项1</el-menu-item>
            </el-submenu>
          </el-submenu>
          <el-menu-item index="2">
            <i class="el-icon-menu"></i>
            <span slot="title">导航二</span>
          </el-menu-item>
          <el-menu-item index="3" disabled>
            <i class="el-icon-document"></i>
            <span slot="title">导航三</span>
          </el-menu-item>
          <el-menu-item index="4">
            <i class="el-icon-setting"></i>
            <span slot="title">导航四</span>
          </el-menu-item>
        </el-menu>
      </el-col>
    </div>
</body>
<script>
    new Vue({
        el:"#div"
    });
</script>
</html>
4.vue高级使用
1.自定义组件
组件其实就是自定义的标签。例如<el-button>就是对<button>的封装
本质上,组件是带有一个名字且可复用的 Vue 实例,完全可以自己定义
定义格式
Vue.component(组件名称, {
    props:组件的属性,
    data: 组件的数据函数,
    template: 组件解析的标签模板
})
<!DOCTYPE html>
<html lang="en">
<head>
    <meta charset="UTF-8">
    <meta name="viewport" content="width=device-width, initial-scale=1.0">
    <title>自定义组件</title>
    <script src="vue.js"></script>
</head>
<body>
    <div id="div">
        <my-button>我的按钮</my-button>
    </div>
</body>
<script>
    Vue.component("my-button",{
        // 属性
        props:["style"],
        // 数据函数
        data: function(){
            return{
                msg:"我的按钮"
            }
        },
        //解析标签模板
        template:"<button style='color:red'>{{msg}}</button>"
    });

    new Vue({
        el:"#div"
    });
</script>
</html>
2.vue的生命周期
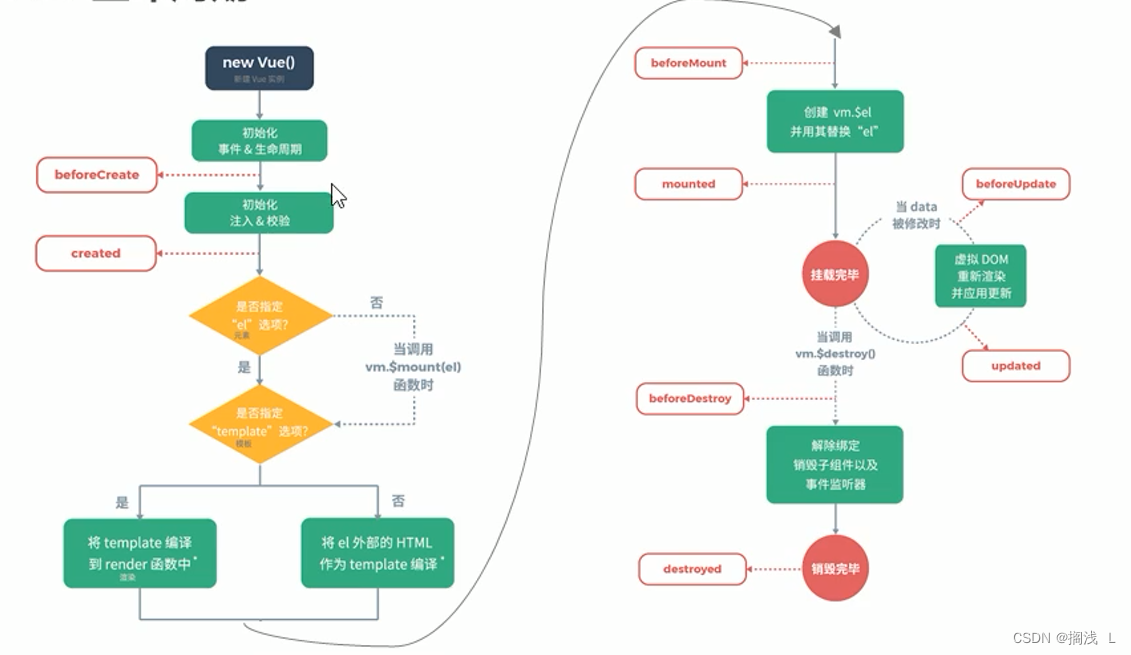
生命周期的八个状态
| 状态 | 阶段周期 |
|---|---|
| beforeCreate | 创建前 |
| created | 创建后 |
| beforeMount | 载入前 |
| mounted | 载入后 |
| beforeUpdate | 更新前 |
| updated | 更新后 |
| beforeDestory | 销毁前 |
| destoryed | 销毁后 |
<!DOCTYPE html>
<html lang="en">
<head>
    <meta charset="UTF-8">
    <meta name="viewport" content="width=device-width, initial-scale=1.0">
    <title>生命周期</title>
    <script src="vue.js"></script>
</head>
<body>
    <div id="app">
        {{message}}
    </div>
</body>
<script>
    let vm = new Vue({
				el: '#app',
				data: {
					message: 'Vue的生命周期'
				},
				beforeCreate: function() {
					console.group('------beforeCreate创建前状态------');
					console.log("%c%s", "color:red", "el     : " + this.$el); //undefined
					console.log("%c%s", "color:red", "data   : " + this.$data); //undefined
					console.log("%c%s", "color:red", "message: " + this.message);//undefined
				},
				created: function() {
					console.group('------created创建完毕状态------');
					console.log("%c%s", "color:red", "el     : " + this.$el); //undefined
					console.log("%c%s", "color:red", "data   : " + this.$data); //已被初始化
					console.log("%c%s", "color:red", "message: " + this.message); //已被初始化
				},
				beforeMount: function() {
					console.group('------beforeMount挂载前状态------');
					console.log("%c%s", "color:red", "el     : " + (this.$el)); //已被初始化
					console.log(this.$el);
					console.log("%c%s", "color:red", "data   : " + this.$data); //已被初始化
					console.log("%c%s", "color:red", "message: " + this.message); //已被初始化
				},
				mounted: function() {
					console.group('------mounted 挂载结束状态------');
					console.log("%c%s", "color:red", "el     : " + this.$el); //已被初始化
					console.log(this.$el);
					console.log("%c%s", "color:red", "data   : " + this.$data); //已被初始化
					console.log("%c%s", "color:red", "message: " + this.message); //已被初始化
				},
				beforeUpdate: function() {
					console.group('beforeUpdate 更新前状态===============》');
					let dom = document.getElementById("app").innerHTML;
					console.log(dom);
					console.log("%c%s", "color:red", "el     : " + this.$el);
					console.log(this.$el);
					console.log("%c%s", "color:red", "data   : " + this.$data);
					console.log("%c%s", "color:red", "message: " + this.message);
				},
				updated: function() {
					console.group('updated 更新完成状态===============》');
					let dom = document.getElementById("app").innerHTML;
					console.log(dom);
					console.log("%c%s", "color:red", "el     : " + this.$el);
					console.log(this.$el);
					console.log("%c%s", "color:red", "data   : " + this.$data);
					console.log("%c%s", "color:red", "message: " + this.message);
				},
				beforeDestroy: function() {
					console.group('beforeDestroy 销毁前状态===============》');
					console.log("%c%s", "color:red", "el     : " + this.$el);
					console.log(this.$el);
					console.log("%c%s", "color:red", "data   : " + this.$data);
					console.log("%c%s", "color:red", "message: " + this.message);
				},
				destroyed: function() {
					console.group('destroyed 销毁完成状态===============》');
					console.log("%c%s", "color:red", "el     : " + this.$el);
					console.log(this.$el);
					console.log("%c%s", "color:red", "data   : " + this.$data);
					console.log("%c%s", "color:red", "message: " + this.message);
				}
			});

			// 销毁Vue对象
			//vm.$destroy();
			//vm.message = "hehe";	// 销毁后 Vue 实例会解绑所有内容

			// 设置data中message数据值
			vm.message = "good...";
</script>
</html>
3.异步操作
在Vue中发送异步请求,本质上还是AJAX。我们可以使用axios这个插件来简化操作
使用步骤
1.引入axios核心js文件
2.调用axios对象的方法来发起异步请求
3.调用axios对象的方法来处理响应的数据
| 方法名 | 作用 |
|---|---|
| get(请求的资源路径与请求的参数) | 发起GET请求 |
| post(请求的资源路径,请求的参数) | 发起POST方式请求 |
| then(response) | 请求成功后的回调函数,通过response获取响应的数据 |
| catch(error) | 请求失败后的回调函数,通过error获取错误信息 |
<!DOCTYPE html>
<html lang="en">
<head>
    <meta charset="UTF-8">
    <title>异步操作</title>
    <script src="js/vue.js"></script>
    <script src="js/axios.js"></script>
</head>
<body>
<div id="div">
    {{name}}
    <button @click="send()">发起请求</button>
</div>
</body>
<script>
    new Vue({
        el:"#div",
        data:{
            name: "张三"
        },
        methods:{
            send(){
                //GET方式请求
                // axios.get("testServlet?name=" + this.name)
                //     .then(resp => {
                //         alert(resp.data);
                //     })
                //     .catch(error => {
                //         alert(error);
                //     })

                // POST方式请求
                axios.post("testServlet","name="+this.name)
                    .then(resp => {
                        alert(resp.data);
                    })
                    .catch(error => {
                        alert(error);
                    })
            }
        }
    });
</script>
</html>
import javax.servlet.ServletException;
import javax.servlet.annotation.WebServlet;
import javax.servlet.http.HttpServlet;
import javax.servlet.http.HttpServletRequest;
import javax.servlet.http.HttpServletResponse;
import java.io.IOException;

@WebServlet("/testServlet")
public class TestServlet extends HttpServlet {
    @Override
    protected void doGet(HttpServletRequest req, HttpServletResponse resp) throws ServletException, IOException {
        //设置请求和响应的编码
        req.setCharacterEncoding("UTF-8");
        resp.setContentType("text/html;charset=UTF-8");

        //获取请求参数
        String name = req.getParameter("name");
        System.out.println(name);

        //响应客户端
        resp.getWriter().write("请求成功");
    }

    @Override
    protected void doPost(HttpServletRequest req, HttpServletResponse resp) throws ServletException, IOException {
        this.doGet(req,resp);
    }
}