目录
- 引言
- 基础知识
- 简单模型
- 重复模型
- 常见视图
- ListView
- Repeater
- ListModel
- QbjectModel
- 容器模型
- 数组
- QStringList
- QList<XX *>
- QAbstractItemModel
- QSortFilterProxyModel
- 总结
引言
Qt Quick的基础组件中大量使用到模型,如ListView、Repeater等。视图所支持模型类型的也非常多,除了Qt提供的抽象模型QAbstractItemModel 、标准模型QStandardItemModel 之外,还支持队列QList、数组QJsonArray,甚至是数字。相对宽松的自由度也给后期代码维护带来困难,本文旨在对比QML中各种模型优劣(实现复杂度、可读性、可拓展性等),总结相对较好的实现方式。
基础知识

上图是Qt Widget中模型/视图的框架图,虽然Qt Quick中有些许差异,但基本继承原有框架,可进行对比参考。与MVC架构类似,但是又不相同,MVC包括模型、视图和控制。模型表示数据,视图表示用户界面,控制定义了用户的操作。它能够有效将数据和显示分离,提高了代码的灵活性。Qt的模型视图同样有这样的效果。但是Qt的模型视图将视图和控制放在一起,以便简化框架。另外,为了能够更好地处理用户输入,Qt的模型视图加入了代理(也称作委托)。通过代理能够自定义item的显示和编辑。
简单模型

模型是数据的集合,当然也可以用来表示单个数据,作为视图关键数据的抽象,但模型更新时视图被动更新,最简单的模型通过QObject的属性即可完成。例如,为实现上图中单张卡片信息展示,需要如下代码:
模型类:
class SimpleModel : public QObject
{
    Q_OBJECT
    Q_PROPERTY(QString url READ url WRITE setUrl NOTIFY urlChanged FINAL)
    Q_PROPERTY(QString name READ name WRITE setName NOTIFY nameChanged FINAL)
    Q_PROPERTY(int duration READ duration WRITE setDuration NOTIFY durationChanged FINAL)

public:
    explicit SimpleModel(QObject *parent = nullptr);

public:
    QString url() const;
    void setUrl(const QString &url);

    QString name() const;
    void setName(const QString &name);

    int duration() const;
    void setDuration(int duration);

signals:
    void urlChanged();
    void nameChanged();
    void durationChanged();

private:
    QString url_ = "qrc:/image/default_style.png";
    QString name_ = "VID_003.insv";
    int duration_ = 61;
};
卡片视图:
import QtQuick 2.15
import QtQuick.Layouts 1.15

Rectangle {
    property var itemModel

    function secondConvertToTime(second) {
        let mininue = Math.floor(second / 60.0)
        let hour = Math.floor(mininue / 60.0)
        mininue %= 60
        second %= 60
        let dateTime = new Date(0, 0, 0, hour, mininue, second)
        let timeFormat = hour > 0 ? "hh:mm:ss" : "mm:ss"
        return Qt.formatTime(dateTime, timeFormat)
    }

    width: 290
    height: 180
    radius: 10
    color: '#FFD200'

    ColumnLayout {
        anchors.fill: parent
        anchors.margins: 10
        spacing: 6

        Image {
            Layout.fillWidth: true
            Layout.fillHeight: true
            source: itemModel.url

            Text {
                anchors.right: parent.right
                anchors.bottom: parent.bottom
                anchors.margins: 6
                color: "white"
                font.family: "Microsoft YaHei UI"
                text: secondConvertToTime(itemModel.duration)
            }
        }

        Text {
            color: "white"
            font.family: "Microsoft YaHei UI"
            text: itemModel.name
        }
    }
}
注册上下文:
// 设置上下文属性
QQmlContext *context = engine.rootContext();
context->setContextProperty("SimpleModel", new SimpleModel);
视图组件使用:
import QtQuick 2.15
import QtQuick.Window 2.15

Window {
    width: 640
    height: 480
    visible: true
    title: qsTr("Hello World")

    FootageCard {
        anchors.centerIn: parent
        itemModel: SimpleModel
    }
}
重复模型
在实际开发中,视图除了上述单张卡片之外,为了提高信息密度通常以列表的形式展示,可以是列表,可以是表格展示,也可以是流布局形式的栅格视图。而这种我们需要讨论的重复模型,则依赖于上述视图,因此需要想简单介绍Qt Quick中所提供的视图。
常见视图
![[图片]](https://img-blog.csdnimg.cn/c619a3f51b414da998fdde60c1c081bc.png#pic_center)
ListView与GridView、TableView类似,使用较为简单,Repeater则有一定差别,需要其他组件的配合或者是特殊处理。后面Model的例子中将主要配合ListView进行展示。
ListView
A ListView displays data from models created from built-in QML types like ListModel and XmlListModel, or custom model classes defined in C++ that inherit from QAbstractItemModel or QAbstractListModel.
A ListView has a model, which defines the data to be displayed, and a delegate, which defines how the data should be displayed. Items in a ListView are laid out horizontally or vertically. List views are inherently flickable because ListView inherits from Flickable.
相对可用视图组件,需要设置model和delegate才能正常使用,创建出来的组件能够自动布局,支持行布局、列布局,可通过orientation修改方向。由于父类是Flickable,继承有诸多鼠标操作,如滚动、拖拽等,但在子项中有MouseArea时,易出现冲突,需要通过MouseArea的pressedButtons属性去方式鼠标事件被抢夺。
ListView {
    width: 180
    height: 200

    model: ListModel {
        ListElement {
            name: "Bill Smith"
            number: "555 3264"
        }
        ListElement {
            name: "John Brown"
            number: "555 8426"
        }
        ListElement {
            name: "Sam Wise"
            number: "555 0473"
        }
    }

    delegate: Text {
        text: name + ": " + number
    }
}
Repeater
The Repeater type is used to create a large number of similar items. Like other view types, a Repeater has a model and a delegate: for each entry in the model, the delegate is instantiated in a context seeded with data from the model. A Repeater item is usually enclosed in a positioner type such as Row or Column to visually position the multiple delegate items created by the Repeater.
Repeater和ListView类似,是重复类的创建器,同样是需要设置model和delegate,但是并没有布局,也就是创建的组件x、y值并不会被修改,通常需要搭配布局组件使用,亦或者可以通过模型内的数据控制位置。
Row {
    anchors.fill: parent
    Repeater {
        model: 3
        Rectangle {
            width: 100; height: 40
            border.width: 1
            color: "yellow"
        }
    }
}
ListModel
直接使用Qt Quick中的已经封装好的元素ListModel,代码如下:
ListView {
    anchors.fill: parent
    spacing: 5

    model: ListModel {
        ListElement {
            name: "Bill Smith"
            url: "qrc:/image/default_style.png"
            duration: "61"
        }
        ListElement {
            name: "John Brown"
            url: "qrc:/image/default2_style.png"
            duration: "231"
        }
        ListElement {
            name: "Sam Wise"
            url: "qrc:/image/default3_style.png"
            duration: "15"
        }
    }

    delegate: FootageCard {
        itemModel: model
    }
}
上述代码中需要注意的是delegate内的model节点,和ListView中的model节点并不相同,delegate中表示的是单个item,而ListView中表示的整个数据集合。为了更加直观的表示,可增加点击修改模型信息的功能,如下所示:
    delegate: FootageCard {
        itemModel: model

        MouseArea {
            id: mouseArea
            anchors.fill: parent
        }

        Connections {
            target: mouseArea
            function onClicked() {
                model.name = "Jojo"
            }
        }
    }
![[图片]](https://img-blog.csdnimg.cn/539e76070bd64869b0ce6c38af24bd39.png#pic_center)
QbjectModel
比较特殊,可以省去delegate,代码如下:
ObjectModel {
    id: itemModel
    Rectangle { height: 30; width: 80; color: "red" }
    Rectangle { height: 40; width: 80; color: "green" }
    Rectangle { height: 15; width: 80; color: "blue" }
}

ListView {
    anchors.fill: parent
    model: itemModel
}
容器模型
数组
通过简单的数组或者是队列实现,一般使用在简单场景下。需要注意的是使用的时候简单数组,delegate能用到的item属性就不再是model而是modelData,如下所示:
ListView {
    anchors.fill: parent
    spacing: 5

    model: ["Bill Smith", "John Brown", "Sam Wise"]
    delegate: Text {
        text: modelData
    }
}
QStringList
也可以使用QStringList作为模型,如下所示(同样需要注册到上下文):
class CommonModel : public QObject
{
    Q_OBJECT
    Q_PROPERTY(QStringList stringList READ stringList WRITE setStringList NOTIFY stringListChanged FINAL)

public:
    explicit CommonModel(QObject *parent = nullptr) : QObject{parent} {
        string_list_ << "Bill Smith" << "John Brown" << "Sam Wise";
    };

public:
    QStringList stringList() const;
    void setStringList(const QStringList &string_list);

signals:
    void stringListChanged();

private:
    QStringList string_list_;
};
ListView {
    anchors.fill: parent
    spacing: 5

    model: CommonModel.stringList
    delegate: Text {
        text: modelData
    }
}
QList<XX *>
使用上述代码在实际开发中存在问题,就是每个item只有一个属性,没法达到之前ListModel中的单个item有多个属性,可以采用QList<XX *>的方式(QVector相同),如下所示:
class CommonModel : public QObject
{
    Q_OBJECT
    Q_PROPERTY(QList<SimpleModel*> modelList READ modelList WRITE setModelList NOTIFY modelListChanged FINAL)

public:
    explicit CommonModel(QObject *parent = nullptr) : QObject{parent} {
        qRegisterMetaType<SimpleModel *>("SimpleModel *");
        model_list_ << new SimpleModel(this) << new SimpleModel(this) << new SimpleModel(this);
        model_list_[0]->setName("Bill Smith");
        model_list_[1]->setName("John Brown");
        model_list_[2]->setName("Sam Wise");
    };

public:
    QList<SimpleModel *> modelList() const;
    void setModelList(const QList<SimpleModel *> &model_list);

signals:
    void modelListChanged();

private:
    QList<SimpleModel *> model_list_;
};
上述代码使用的SimpleModel与前文相同,在使用时需要注册元对象类型,否则QML中将无法识别。注册完成后的使用方式与前文类似,只是需要将model改为modelData,如下所示:
ListView {
    anchors.fill: parent
    spacing: 5

    model: CommonModel.modelList

    delegate: FootageCard {
        itemModel: modelData
    }
}
QAbstractItemModel
![[图片]](https://img-blog.csdnimg.cn/fb7e3d644c554113aae23b19b130d83c.png#pic_center)
![[图片]](https://img-blog.csdnimg.cn/36d60d6aff6c4fd39d38a7ba83929655.png#pic_center)
由于是抽象类重写纯虚函数以及部分虚函数,还需要准备容器用于记录数据,最后为了在QML中使用需要重写roleNames进行映射,代码如下:
class AbstractItemModel : public QAbstractItemModel
{
    Q_OBJECT

public:
    explicit AbstractItemModel(QObject *parent = nullptr);
    enum ItemRole {
        ItemRoleUrl = Qt::UserRole,
        ItemRoleName,
        ItemRoleDuration,
    };

public:
    // 重写纯虚函数:
    QModelIndex index(int row, int column,
                      const QModelIndex &parent = QModelIndex()) const override;
    QModelIndex parent(const QModelIndex &index) const override;

    int rowCount(const QModelIndex &parent = QModelIndex()) const override;
    int columnCount(const QModelIndex &parent = QModelIndex()) const override;

    QVariant data(const QModelIndex &index, int role = Qt::DisplayRole) const override;

public:
    // 修改属性
    bool setData(const QModelIndex &index, const QVariant &value, int role = Qt::EditRole) override;

    // QML属性映射
    QHash<int, QByteArray> roleNames() const override;

private:
    QList<SimpleModel*> item_list_;
    QHash<int, QByteArray> role_names_;
};
AbstractItemModel::AbstractItemModel(QObject *parent)
    : QAbstractItemModel(parent)
{
    role_names_.insert(ItemRoleUrl, "url");
    role_names_.insert(ItemRoleName, "name");
    role_names_.insert(ItemRoleDuration, "duration");

    item_list_ << new SimpleModel(this) << new SimpleModel(this) << new SimpleModel(this);
    item_list_[0]->setName("Bill Smith");
    item_list_[1]->setName("John Brown");
    item_list_[2]->setName("Sam Wise");
}

QModelIndex AbstractItemModel::index(int row, int column, const QModelIndex &parent) const
{
    return hasIndex(row, column, parent) ? createIndex(row, column) : QModelIndex();
}

QModelIndex AbstractItemModel::parent(const QModelIndex &index) const
{
    Q_UNUSED(index);
    return QModelIndex();
}

int AbstractItemModel::rowCount(const QModelIndex &parent) const
{
    return parent.isValid() ? 0 : item_list_.count();
}

int AbstractItemModel::columnCount(const QModelIndex &parent) const
{
    return parent.isValid() ? 0 : 1;
}

QVariant AbstractItemModel::data(const QModelIndex &index, int role) const
{
    if (!index.isValid())
        return QVariant();

    if(index.row() >= rowCount()){
        return QVariant();
    }

    auto info = item_list_[index.row()];
    switch (role) {
    case ItemRoleUrl:
        return info->url();
    case ItemRoleName:
        return info->name();
    case ItemRoleDuration:
        return info->duration();
    }
    return QVariant();
}

bool AbstractItemModel::setData(const QModelIndex &index, const QVariant &value, int role)
{
    if (!index.isValid())
        return false;

    if(index.row() >= rowCount()){
        return false;
    }

    auto info = item_list_[index.row()];
    switch (role) {
    case ItemRoleUrl:
        info->setUrl(value.toString());
        break;
    case ItemRoleName:
        info->setName(value.toString());
        break;
    case ItemRoleDuration:
        info->setDuration(value.toInt());
        break;
    }

    emit dataChanged(index, index, QVector<int>{role});
    return true;
}

QHash<int, QByteArray> AbstractItemModel::roleNames() const
{
    return role_names_;
}
QAbstractListModel与QAbstractItemModel类似,只是少了几个纯虚函数的实现,繁琐程度依旧。
看到这里大家应该会有疑惑,既然AbstractItemModel模型类内有一个容器item_list_,那为什么不直接用容器模型就可以了,还耗费时间增加一个模型类,凭空增加后续维护成本。
主要是为了增量更新,原本的容器模型是作为类的一个属性存在的,尽管item的属性变化是通过信号推送的,但item的增加和删除只能通过整个变更信号通知视图更新,也就是将原有的元素整体删除后再重建视图的全量更新。
当然因为是抽象类,还是需要实现部分代码才能有增加、删除功能,代码如下:
bool AbstractItemModel::insertRows(int row, int count, const QModelIndex &parent)
{
    if(!count){
        return false;
    }

    if(row >= rowCount()){
        row = rowCount();
    }
    else {
        if(!hasIndex(row, 0, parent)) {
            return false;
        }
    }

    beginInsertRows(QModelIndex(), row, row + count - 1);
    for(int i = 0; i < count; i++) {
        item_list_.insert(row, new SimpleModel(this));
    }
    endInsertRows();
    return true;
}

bool AbstractItemModel::removeRows(int row, int count, const QModelIndex &parent)
{
    if(!count){
        return false;
    }

    if(!hasIndex(row, 0, parent)){
        return false;
    }

    beginRemoveRows(QModelIndex(), row, row + count - 1);
    for(int i = 0; i < count; i++) {
        item_list_.at(i)->deleteLater();
        item_list_.removeAt(i);
    }
    endRemoveRows();

    return true;
}
里面比较关键的就是beginInsertRows、endInsertRows和beginRemoveRows、endRemoveRows,也可以不重写insertRows、removeRows,只要保证前面的函数成组出现即可,里面会发送信号给视图进行处理。
QStandardItemModel
上述使用抽象模型的方式非常繁琐,过高的使用难度必然导致该方法的使用频率不高,甚至是在后期的维护中逐渐消亡。那有没有一种既使用简单,又能保证增量更新的方法。
可以直接使用QStandardItemModel,只需要将数据转换为标准元素QStandardItem。因为需要在QML中使用,再重写roleNames()即可。代码如下:
class StandardItemModel : public QStandardItemModel
{
    Q_OBJECT

public:
    explicit StandardItemModel(QObject *parent = nullptr);
    enum ItemRole {
        ItemRoleUrl = Qt::UserRole,
        ItemRoleName,
        ItemRoleDuration,
    };

public:
    // QML属性映射
    QHash<int, QByteArray> roleNames() const override;

public:
    Q_INVOKABLE void append();
    Q_INVOKABLE void remove();

private:
    QHash<int, QByteArray> role_names_;
};
StandardItemModel::StandardItemModel(QObject *parent)
    : QStandardItemModel(parent)
{
    role_names_ = QStandardItemModel::roleNames();
    role_names_.insert(ItemRoleUrl, "url");
    role_names_.insert(ItemRoleName, "name");
    role_names_.insert(ItemRoleDuration, "duration");

    // 初始化
    auto item1 = new QStandardItem;
    item1->setData("qrc:/image/default_style.png", ItemRoleUrl);
    item1->setData("Bill Smith", ItemRoleName);
    item1->setData(61, ItemRoleDuration);

    auto item2 = new QStandardItem;
    item2->setData("qrc:/image/default2_style.png", ItemRoleUrl);
    item2->setData("John Brown", ItemRoleName);
    item2->setData(233, ItemRoleDuration);

    auto item3 = new QStandardItem;
    item3->setData("qrc:/image/default3_style.png", ItemRoleUrl);
    item3->setData("Sam Wise", ItemRoleName);
    item3->setData(15, ItemRoleDuration);

    appendRow(item1);
    appendRow(item2);
    appendRow(item3);
}

QHash<int, QByteArray> StandardItemModel::roleNames() const
{
    return role_names_;
}

void StandardItemModel::append()
{
    auto item = new QStandardItem;
    item->setData("qrc:/image/default_style.png", ItemRoleUrl);
    item->setData("Bill Smith", ItemRoleName);
    item->setData(61, ItemRoleDuration);
    appendRow(item);
}

void StandardItemModel::remove()
{
    removeRow(rowCount() - 1);
}
QSortFilterProxyModel
代理模型在使用时需要源模型,也就是原始数据模型,针对原始模型进行代理,而QSortFilterProxyModel顾名思义是针对源模型的排序和过滤的代理。
在实际开发中,排序和过滤是对模型的高频操作,不同界面的模型内容可能只是因为排序方式、过滤内容的不同而被迫分为两个模型,例如界面A需要显示升序,而界面B需要显示降序,这里如果不对视图进行特殊操作就只能存在两种模型。
使用两种只有细微差别的模型显然不是明智的决定,这里则可以使用QSortFilterProxyModel完成过滤及排序,代理只是调整了两个数据集索引的映射关系,不是原Model的拷贝,尽管存在一部分维护映射关系的开销,但相比于维护两份相同的数据开销要小得多。同时将过滤和排序拆分出来,则属于非常合适的解耦,在数据格式类似的源模型之间还可以复用代理模型。
下面进行代理模型的实际应用展示,Demo整体分为三个ListView,第一列使用的是源模型,第二列是只有收藏的数据(卡片右侧的实心黄色圆形代表收藏,空心黄色圆圈代表未收藏),第三列使用的名称降序排序数据。
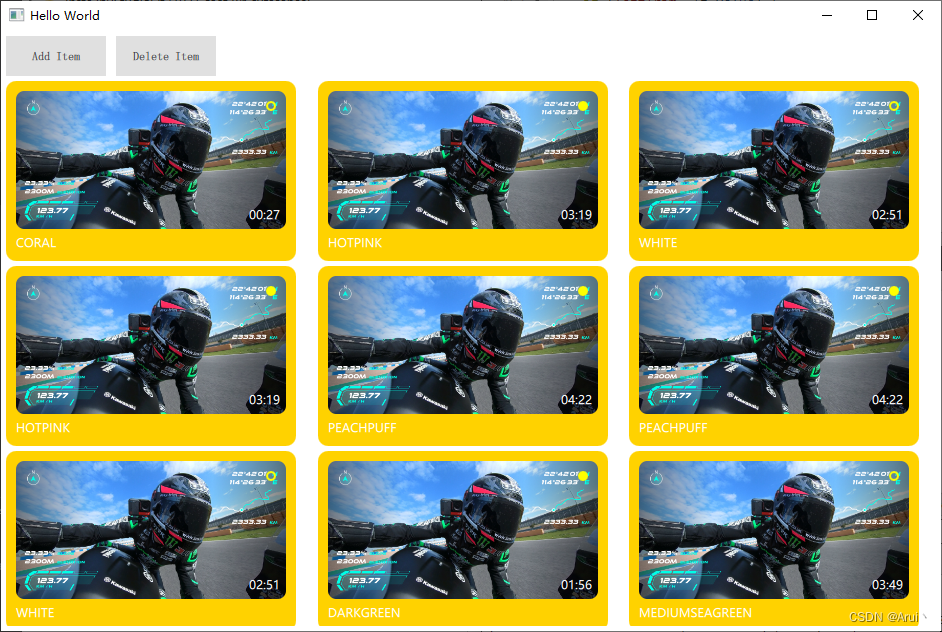
完整代码见QML常见模型使用源码。
总结
综上所述,对于简单模型可以采用QObject的属性系统,通过属性完成视图的被动刷新。对于重复模型建议使用QStandardItemModel,能够实现增量更新,后续也可以进行代理模型的拓展。元素数量极少且后续没有拓展需求才考虑使用容器模型。


![2023年中国纸箱机械优点、市场规模及发展前景分析[图]](https://img-blog.csdnimg.cn/img_convert/1627efa273e9d7f4a633393bb15c4acf.png)


