JUC系列整体栏目
| 内容 | 链接地址 |
|---|---|
| 【一】深入理解JMM内存模型的底层实现原理 | https://zhenghuisheng.blog.csdn.net/article/details/132400429 |
| 【二】深入理解CAS底层原理和基本使用 | https://blog.csdn.net/zhenghuishengq/article/details/132478786 |
| 【三】熟练掌握Atomic原子系列基本使用 | https://blog.csdn.net/zhenghuishengq/article/details/132543379 |
| 【四】精通Synchronized底层的实现原理 | https://blog.csdn.net/zhenghuishengq/article/details/132740980 |
| 【五】通过源码分析AQS和ReentrantLock的底层原理 | https://blog.csdn.net/zhenghuishengq/article/details/132857564 |
| 【六】深入理解Semaphore底层原理和基本使用 | https://blog.csdn.net/zhenghuishengq/article/details/132908068 |
| 【七】深入理解CountDownLatch底层原理和基本使用 | https://blog.csdn.net/zhenghuishengq/article/details/133343440 |
| 【八】深入理解CyclicBarrier底层原理和基本使用 | https://blog.csdn.net/zhenghuishengq/article/details/133378623 |
| 【九】深入理解ReentrantReadWriteLock 读写锁的底层实现 | https://blog.csdn.net/zhenghuishengq/article/details/133629550 |
| 【十】深入理解ArrayBlockingQueue的基本使用和底层实现 | https://blog.csdn.net/zhenghuishengq/article/details/133692023 |
| 【十一】深入理解LinkedBlockingQueue的基本使用和底层实现 | https://blog.csdn.net/zhenghuishengq/article/details/133723652 |
| 【十二】深入理解PriorityQueue的基本使用和底层实现 | https://blog.csdn.net/zhenghuishengq/article/details/133788655 |
| 【十三】深入理解DelayQueue的基本使用和底层实现 | https://blog.csdn.net/zhenghuishengq/article/details/133820599 |
| 【十四】深入理解线程池的基本使用和底层源码 | https://blog.csdn.net/zhenghuishengq/article/details/133850545 |
| 【十五】深入理解CompletableFuture的基本使用 | https://blog.csdn.net/zhenghuishengq/article/details/133957222 |
深入理解线程池的基本使用和底层源码
- 一,深入理解CompletableFuture的基本使用
- 1,Callable的基本使用
- 2,Future
- 3,CompletableFuture
- 3.1,创建CompletableFuture异步操作四种方式
- 3.2,get和join获取值
- 3.3,处理结果whenCompleteAsync
- 3.3.1,没有异常的情况
- 3.3.2,有异常时
- 3.4,多任务链路中的结果处理
- 3.4.1,thenApply
- 3.4.2,thenCombine
- 3.4.2,thenAccept
- 3.4.3,runAfterEither
- 3.4.4,anyOf
一,深入理解CompletableFuture的基本使用
在上一篇文章中讲了线程池,线程任务类是通过实现Runnable实现的,但是Runnable接口会有缺点,一个是不能直接在提交任务之后有返回值,另一个是不能在run方法上面抛异常,因此为了解决这两个问题,jdk中引入了一个新的接口 Callable
1,Callable的基本使用
如直接先定义一个线程任务类Task,实现Callable方法
/**
 * @Author: zhenghuisheng
 * @Date: 2023/10/19 1:02
 */
public class Task implements Callable {
    @Override
    public Object call() throws Exception {
        return 1;
    }
}
随后创建一个Demo类,用于测试。在jdk中,new Thread的参数只能是Runnable类或者其具体的实现类,因此先将Callable类的具体实现作为参数,加入FutureTask中,而FutureTask是一个Runnable的具体的实现类
/**
 * @Author: zhenghuisheng
 * @Date: 2023/10/19 1:04
 */
public class FutureTaskDemo {
    public static void main(String[] args) throws Exception {
        //创建一个线程
        Task task = new Task();
        //将线程作为FutureTask的参数
        FutureTask futureTask = new FutureTask(task);
        new Thread(futureTask).start();
        //将结果返回
        System.out.println(futureTask.get());
    }
}
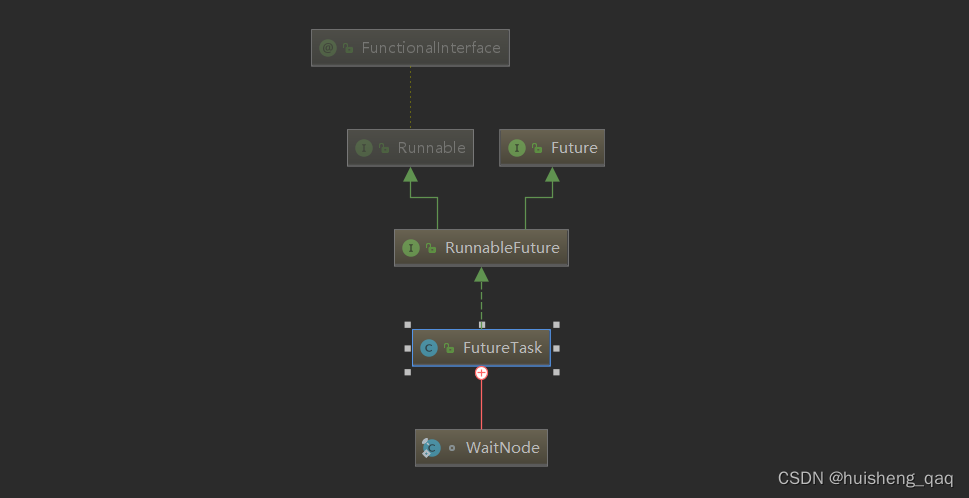
这样就成功的将Callable引入进来,成为一个创建线程的一种方式。并且通过这种方式可以将需要的返回值直接获取。
2,Future
上面这张图可以看出这个FutureTask也是Future的一个实现类,接下来查看这个接口中的抽象方法
Future f = new FutureTask(task);
在这个接口中,主要有两个方法,一个是任务执行是否完成,一个是获取任务完成的结果值。get方法在获取到结果之前,内部会进行阻塞
public interface Future<V> {
    boolean isDone();	//是否已经执行完成
    V get();			//获取执行完的结果
}
如下面这段代码,总共就四个步骤,当线程任务完成之后,会将结果填充到这个FutureTask中,随后通过这个实例获取结果即可。
Task task = new Task();					//构建一个线程任务,实现了callable接口
FutureTask f = new FutureTask(task);	//将task类作为参数添加到FutureTask中
threadPool.execute(f);					//加入到线程池
System.out.println(f.get());			//获取结果
除了上面最重要的两个方法之外,Future接口中还有下面这些方法
boolean cancel(boolean mayInterruptIfRunning);	//取消线程任务
boolean isCancelled();							//判断是否已取消
V get(long timeout, TimeUnit unit)				//超时机制获取
3,CompletableFuture
Future可以通过多个异步任务来解决多个同步任务的效率问题,但是其本身也存在着一些缺陷,如无法进行任务与任务之间的链式调用、无法组合多个任务、以及无法在任务处理时做异常处理。为了解决这个问题,因此在juc包中,又引入了一个新的任务类 CompletableFuture
先查看这个CompletableFuture实现类,该类是Future的一个具体实现类,同时还实现了这个 CompletionStage 接口,也就是说该类要全部实现这两个接口中的全部方法,那么该类的方法相必是特别多的,因此该类的功能也非常的强大
public class CompletableFuture<T> implements Future<T>, CompletionStage<T> {}
在这个类中,如果没有自定义线程池,则采用的是 ForkJoinPool 线程池,专门处理cpu密集型任务的线程池。
private static final Executor asyncPool = useCommonPool ?
        ForkJoinPool.commonPool() : new ThreadPerTaskExecutor();
本文主要讲解的是这个类的使用,因此主要是对内部的一些方法,结合一定的场景来举例。在举例之前,先熟悉一下这些方法中的参数的某些含义。在了解这些规律之后,接下来结合场景对部分api进行讲解
CompletionStage<? extends T> other		//表示要创建一个任务
Consumer<? super T> action				//表示消费一个任务
Function<? super T,? extends V> fn		//表示可以携带上一个任务的返回值到先一个任务
Executor executor						//默认的forkjoin或者自定义实现的线程池
3.1,创建CompletableFuture异步操作四种方式
主要分为线程时runnable的实现类和callable的实现类,以及是否自定义线程池等。通过runAsync的方法是没有返回值的,通过supplyAsync的方法是有返回值的,但是在使用get方法时,会进行阻塞。如果没有自定义的实现线程池,则会使用默认的forkjoinpool线程池。
static ThreadPoolExecutor threadPool = ThreadPoolUtil.getThreadPool();
public static void main(String[] args) throws Exception {
	//没有返回值,参数为runnable,线程池为forkjoin
	CompletableFuture future1 = CompletableFuture.runAsync(() -> System.out.println("run1"));
	//没有返回值,参数为runnable,线程池为自定义线程池
	CompletableFuture future2 = CompletableFuture.runAsync(() -> System.out.println("run2"),threadPool);
	//有返回值,参数为callable,线程池为forkjoin
	CompletableFuture future3 = CompletableFuture.supplyAsync(() -> {return 0;});
	//有返回值,参数为callable,线程池为自定义线程池
	CompletableFuture future4 = CompletableFuture.supplyAsync(() -> {return 0;},threadPool);
3.2,get和join获取值
先看这个get方法,如下面这段代码
CompletableFuture future = CompletableFuture.supplyAsync(() -> {return 0;});
future.get();
由于是线程池,内部肯定要执行对应的run方法,因此定位到这个 AsyncSupply 类,对应的run方法如下。可以发现在执行这个run方法时,会对这个方法进行回调操作
public void run() {
    CompletableFuture<T> d; Supplier<T> f;
    if ((d = dep) != null && (f = fn) != null) {
        dep = null; fn = null;
        if (d.result == null) {
            try {
                d.completeValue(f.get());	//设置值
            } catch (Throwable ex) {
                d.completeThrowable(ex);	//抛异常
            }
        }
        d.postComplete();		//接口回调
    }
}
回调的具体实现如下,通过cas的方式对这个 CompletableFuture 类中的result值赋值,随后就可以直接通过get的方式进行获取的操作。
final boolean completeValue(T t) {
    //通过cas对result赋值
    return UNSAFE.compareAndSwapObject(this, RESULT, null,
                                       (t == null) ? NIL : t);
}
除了get方法能获取到值之外,还能通过join的方式获取值
CompletableFuture future = CompletableFuture.supplyAsync(() -> {return 0;});
future.join();
join方法的具体实现如下,就是没拿到结果就一直阻塞,拿到才能返回。和get最大的区别就是get使用get方法时,需要手动的抛出异常,而join不需要开发者强制抛出或者捕获异常
public T join() {
    Object r;
    //拿到结果就返回,没拿到结果就一直阻塞
    return reportJoin((r = result) == null ? waitingGet(false) : r);
}
3.3,处理结果whenCompleteAsync
3.3.1,没有异常的情况
当结果获取成功之后,如对某个值的计算,对整体流程都执行成功时,可以使用以下方法,参数同样也是区分了是否需要返回值,是否自定义线程池等
public CompletableFuture<T> whenComplete(BiConsumer<? super T,? super Throwa
ble> action)
public CompletableFuture<T> whenCompleteAsync(BiConsumer<? super T,? super T
hrowable> action)
public CompletableFuture<T> whenCompleteAsync(BiConsumer<? super T,? super T
hrowable> action, Executor executor)
举个例子,如当对某个值计算后,成功拿到结果时
public static void main(String[] args) throws Exception {
    //创建异步对象
    CompletableFuture future = CompletableFuture.supplyAsync(() -> {
        int number = 0;
        for (int i = 0; i < 100; i++) {
            number = number + i;
        }
        return number;
    });
    //处理上面的结果
    future.whenCompleteAsync(new BiConsumer<Integer,Throwable>() {
        @Override
        public void accept(Integer data, Throwable throwable) {
            System.out.println(data);
        }
    });
}
3.3.2,有异常时
当结果可能会出现异常时,那么就需要使用到这个 exceptionally 方法
public CompletableFuture<T> exceptionally(Function<Throwable,? extends T>
fn)
接下来对这个方法的使用举例,就是自定义一个简单的异常,随后通过创建的future对象调用获取结果
public static void main(String[] args) throws Exception {
    CompletableFuture future = CompletableFuture.supplyAsync(() -> {
        int number = 10 / 0;
        return number;
    });
    //处理上面的结果
    future.exceptionally(new Function<Throwable, String>() {
        @Override
        public String apply(Throwable throwable) {
            System.out.println("异常信息为:" + throwable.getMessage());
            return throwable.getMessage();
        }
    });
}
没有异常时是需要消费者继续处理消费的,因此参数是一个 BiConsumer 类,而有异常时不需要消费者处理,因此只需创建一个Function处理异常即可。
3.4,多任务链路中的结果处理
3.4.1,thenApply
如果在一个需要多个异步任务的调用链路中,比如B需要A的执行结果,c需要b的执行结果,一直下去,那么就需要使用这个thenApply 了,当然这个方法也区分是否有返回值,是否定义线程池等方法
CompletableFuture future = CompletableFuture.supplyAsync(() -> {
    int number = 0;
    for (int i = 0; i < 100; i++) {
        number = number + i;
    }
    System.out.println(number);
    return number;
}).thenApplyAsync(data -> {		//链路调用1
    return data + 999;
}).thenApplyAsync(data -> {		//链路调用2
    return data + 888;
});
3.4.2,thenCombine
如果需要结合两个任务的计算,那么可以考虑使用这种thenCombine,比如一个任务算当月的总收入,一个任务算当月的总支出
CompletableFuture future = CompletableFuture.supplyAsync(() -> {
    int income = 1000 * 30;
    System.out.println("总收入为" + income);
    return income;
}).thenCombine(CompletableFuture.supplyAsync(() -> {
    int expend = 0;
    for (int i = 1; i <= 30; i++) {
        expend = expend + i + 500;
    }
    System.out.println("总支出为:" + expend);
    return expend;
}),(income,expend)->{
    return income - expend;
});
//获取结果
System.out.println(future.get());
3.4.2,thenAccept
当存在链路调用中,只需关注自身任务的求值,而不需要求总值时,可以直接通过这个thenAccept。如计算一年中走的步数,参数是一个Consumer消费者,会将结果消费,因此在后续的get中,获取到的值为null。
CompletableFuture future = CompletableFuture.supplyAsync(() -> {
    int runData = 0;
    for (int i = 0; i < 30; i++) {
        runData = runData + 10000 + i;
    }
    System.out.println("第一个月的总步数为:" + runData);
    return runData;
}).thenAccept(runData ->{
    for (int i = 0; i < 30; i++) {
        runData = runData + 10000 + i;
    }
    System.out.println("前两个月的总步数为:" + runData);
});
System.out.println(future.get());
3.4.3,runAfterEither
如在重试接口中,无论同时发送多少次请求,只要有一个请求成功,就可以不管后续的发出的请求的执行结果
public static void main(String[] args) throws Exception {
    CompletableFuture future1 = CompletableFuture.supplyAsync(() -> {
        try {
            Thread.sleep(10000);
        } catch (InterruptedException e) {
            e.printStackTrace();
        }
        return 1;
    });
    CompletableFuture future2 = CompletableFuture.supplyAsync(() -> {
        try {
            Thread.sleep(5000);
        } catch (InterruptedException e) {
            e.printStackTrace();
        }
        return 2;
    });
    future1.runAfterEither(future2, new Runnable() {
        @Override
        public void run() {
            System.out.println("已经有一个任务执行完成");
        }
    }).join();
}
runAfterBoth这个使用和上面的一样,但是得同时满足两个请求
3.4.4,anyOf
原理和上面的一样,就是在多任务中,只要满足一个就可以将对应的请求的返回值返回。而对应的allOf就是可以将所有任务的返回值返回
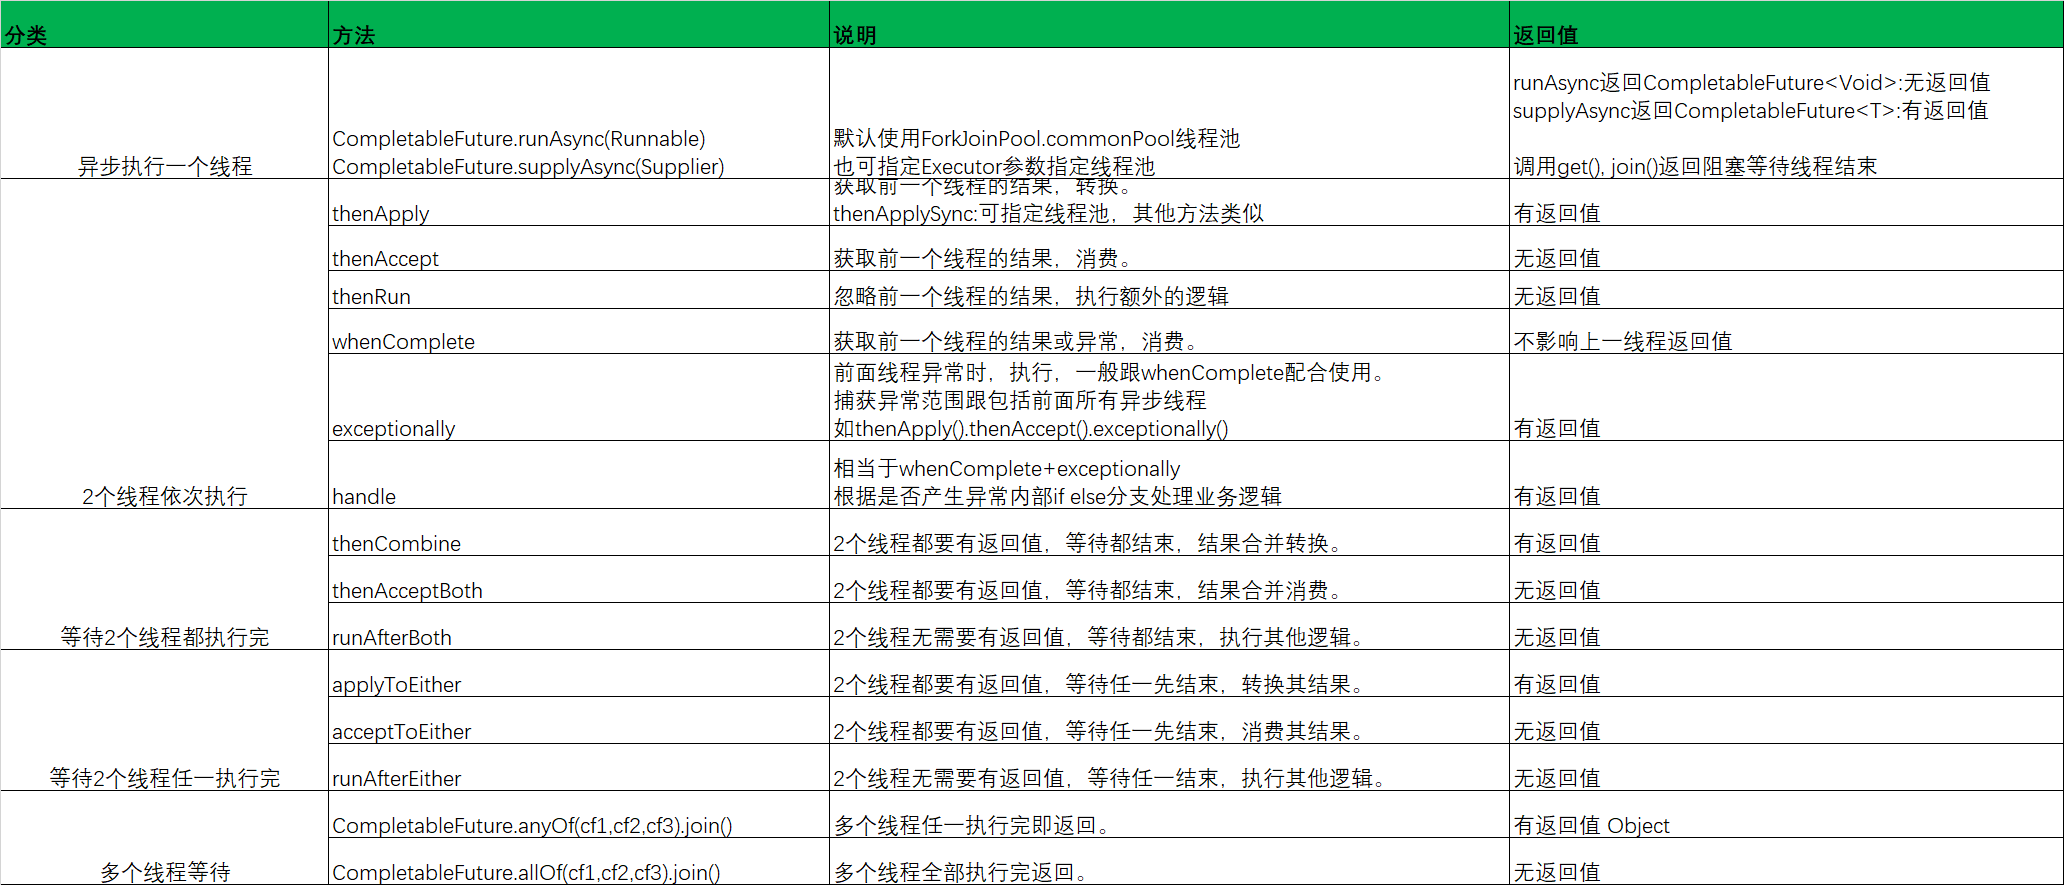
总的来说可以分为下面这图所示










![2023年中国煤气节能器产量及市场规模分析[图]](https://img-blog.csdnimg.cn/img_convert/b0301e3633f0d0e765597949de645b50.png)
