第一种:在自己的项目中将点云通过ros的topic发布,用octomap_server订阅点云消息,在octomap_server中生成ocTree
再用rviz进行可视化。
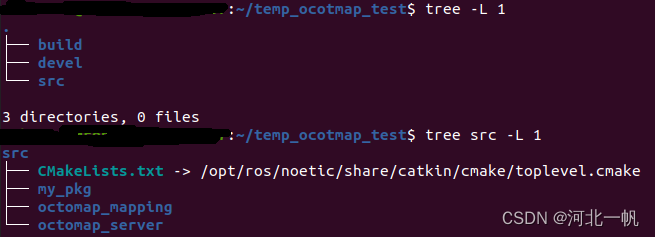
创建工作空间,记得source
mkdir temp_ocotmap_test/src
cd temp_ocotmap_test
catkin_make
source devel/setup.bash
将这两个功能包下载放进自己的ros项目
再创建一个用于发布点云的功能包
cd src
catkin_create_pkg my_pkg std_msgs roscpp
形成这样的目录结构
这里使用:Octomap 在ROS环境下实时显示_ros octomap-CSDN博客
的点云数据进行说明。
进入自己的功能包,创建一个data文件,将那位博主的点云文件test.pcd放进data文件夹
cd my_pkg
mkdir data
接下来写自己节点的cpp文件和自己功能包的CMakeLists.txt
cd my_pkg/src
vim my_pkg.cpp
my_pkg.cpp写入如下内容
#include<iostream>
#include<string>
#include <stdlib.h>
#include <stdio.h>
#include <sstream>
#include <vector>

#include<ros/ros.h>
#include<pcl/point_cloud.h>
#include<pcl_conversions/pcl_conversions.h>
#include<sensor_msgs/PointCloud2.h>
#include<pcl/io/pcd_io.h>

#include <octomap_msgs/OctomapWithPose.h>
#include <octomap_msgs/Octomap.h>
#include <geometry_msgs/Pose.h>

#include <octomap/octomap.h>
#include <octomap_msgs/Octomap.h>
#include <octomap_msgs/conversions.h>

#include <geometry_msgs/TransformStamped.h>


#define TESTCLOUDPOINTS 1
#define TESTOCTOTREE 0

int main (int argc, char **argv)
{
    std::string topic,path,frame_id;
    int hz=5;

    ros::init (argc, argv, "publish_pointcloud");
    ros::NodeHandle nh;

    nh.param<std::string>("path", path, "/home/username/Downloads/temp_for_run_octomap_server/src/publish_pointcloud/data/test.pcd");
    nh.param<std::string>("frame_id", frame_id, "your_frame_id");
    nh.param<std::string>("topic", topic, "your_pointcloud_topic");
    nh.param<int>("hz", hz, 5);

    // load cloudpoint
    pcl::PointCloud<pcl::PointXYZ> pcl_cloud;
    pcl::io::loadPCDFile (path, pcl_cloud);

#if TESTCLOUDPOINTS
    ros::Publisher pcl_pub = nh.advertise<sensor_msgs::PointCloud2> (topic, 10);

    // 转换成ROS下的数据类型 通过topic发布
    sensor_msgs::PointCloud2 output;
    pcl::toROSMsg(pcl_cloud, output);

    output.header.stamp=ros::Time::now();
    output.header.frame_id  =frame_id;

    std::cout<<"path = "<<path<<std::endl;
    std::cout<<"frame_id = "<<frame_id<<std::endl;
    std::cout<<"topic = "<<topic<<std::endl;
    std::cout<<"hz = "<<hz<<std::endl;

    ros::Rate loop_rate(hz);
    while (ros::ok())
    {
        pcl_pub.publish(output);
        ros::spinOnce();
        loop_rate.sleep();
    }

#endif

#if TESTOCTOTREE
    ros::Publisher octomap_pub = nh.advertise<octomap_msgs::Octomap>(topic, 1);

    octomap::OcTree tree(0.1);  // You can adjust the resolution as needed

    for (const auto& point : pcl_cloud.points) {
        tree.updateNode(point.x, point.y, point.z, true);
    }

    // Publish the octree as an OctoMap message
    octomap_msgs::Octomap octomap_msg;
    octomap_msgs::fullMapToMsg(tree, octomap_msg);

    // Assuming you have a publisher for the octomap
    octomap_msg.header.stamp=ros::Time::now();
    octomap_msg.header.frame_id  =frame_id;

    std::cout<<"path = "<<path<<std::endl;
    std::cout<<"frame_id = "<<frame_id<<std::endl;
    std::cout<<"topic = "<<topic<<std::endl;
    std::cout<<"hz = "<<hz<<std::endl;

    ros::Rate loop_rate(hz);
    while (ros::ok())
    {
        octomap_pub.publish(octomap_msg);
        ros::spinOnce();
        loop_rate.sleep();
    }

#endif

    return 0;
}
CMakeLists.txt这样写
cmake_minimum_required(VERSION 3.0.2)
project(my_pkg)

## Compile as C++11, supported in ROS Kinetic and newer
# add_compile_options(-std=c++11)

## Find catkin macros and libraries
## if COMPONENTS list like find_package(catkin REQUIRED COMPONENTS xyz)
## is used, also find other catkin packages
find_package(catkin REQUIRED COMPONENTS
  roscpp
  std_msgs
  sensor_msgs
  octomap_msgs
  geometry_msgs
)
find_package(PCL REQUIRED)
find_package(octomap REQUIRED)

## System dependencies are found with CMake's conventions
# find_package(Boost REQUIRED COMPONENTS system)


## Uncomment this if the package has a setup.py. This macro ensures
## modules and global scripts declared therein get installed
## See http://ros.org/doc/api/catkin/html/user_guide/setup_dot_py.html
# catkin_python_setup()

################################################
## Declare ROS messages, services and actions ##
################################################

## To declare and build messages, services or actions from within this
## package, follow these steps:
## * Let MSG_DEP_SET be the set of packages whose message types you use in
##   your messages/services/actions (e.g. std_msgs, actionlib_msgs, ...).
## * In the file package.xml:
##   * add a build_depend tag for "message_generation"
##   * add a build_depend and a exec_depend tag for each package in MSG_DEP_SET
##   * If MSG_DEP_SET isn't empty the following dependency has been pulled in
##     but can be declared for certainty nonetheless:
##     * add a exec_depend tag for "message_runtime"
## * In this file (CMakeLists.txt):
##   * add "message_generation" and every package in MSG_DEP_SET to
##     find_package(catkin REQUIRED COMPONENTS ...)
##   * add "message_runtime" and every package in MSG_DEP_SET to
##     catkin_package(CATKIN_DEPENDS ...)
##   * uncomment the add_*_files sections below as needed
##     and list every .msg/.srv/.action file to be processed
##   * uncomment the generate_messages entry below
##   * add every package in MSG_DEP_SET to generate_messages(DEPENDENCIES ...)

## Generate messages in the 'msg' folder
# add_message_files(
#   FILES
#   Message1.msg
#   Message2.msg
# )

## Generate services in the 'srv' folder
# add_service_files(
#   FILES
#   Service1.srv
#   Service2.srv
# )

## Generate actions in the 'action' folder
# add_action_files(
#   FILES
#   Action1.action
#   Action2.action
# )

## Generate added messages and services with any dependencies listed here
# generate_messages(
#   DEPENDENCIES
#   std_msgs
# )

################################################
## Declare ROS dynamic reconfigure parameters ##
################################################

## To declare and build dynamic reconfigure parameters within this
## package, follow these steps:
## * In the file package.xml:
##   * add a build_depend and a exec_depend tag for "dynamic_reconfigure"
## * In this file (CMakeLists.txt):
##   * add "dynamic_reconfigure" to
##     find_package(catkin REQUIRED COMPONENTS ...)
##   * uncomment the "generate_dynamic_reconfigure_options" section below
##     and list every .cfg file to be processed

## Generate dynamic reconfigure parameters in the 'cfg' folder
# generate_dynamic_reconfigure_options(
#   cfg/DynReconf1.cfg
#   cfg/DynReconf2.cfg
# )

###################################
## catkin specific configuration ##
###################################
## The catkin_package macro generates cmake config files for your package
## Declare things to be passed to dependent projects
## INCLUDE_DIRS: uncomment this if your package contains header files
## LIBRARIES: libraries you create in this project that dependent projects also need
## CATKIN_DEPENDS: catkin_packages dependent projects also need
## DEPENDS: system dependencies of this project that dependent projects also need
catkin_package(
#  INCLUDE_DIRS include
#  LIBRARIES my_pkg
#  CATKIN_DEPENDS roscpp std_msgs
#  DEPENDS system_lib
)

###########
## Build ##
###########

## Specify additional locations of header files
## Your package locations should be listed before other locations
include_directories(
# include
  ${catkin_INCLUDE_DIRS}
  ${PCL_INCLUDE_DIRS}
  ${OCTOMAP_INCLUDE_DIRS}
)

## Declare a C++ library
# add_library(${PROJECT_NAME}
#   src/${PROJECT_NAME}/my_pkg.cpp
# )

## Add cmake target dependencies of the library
## as an example, code may need to be generated before libraries
## either from message generation or dynamic reconfigure
# add_dependencies(${PROJECT_NAME} ${${PROJECT_NAME}_EXPORTED_TARGETS} ${catkin_EXPORTED_TARGETS})

## Declare a C++ executable
## With catkin_make all packages are built within a single CMake context
## The recommended prefix ensures that target names across packages don't collide
add_executable(publish_pointcloud src/my_pkg.cpp)

## Rename C++ executable without prefix
## The above recommended prefix causes long target names, the following renames the
## target back to the shorter version for ease of user use
## e.g. "rosrun someones_pkg node" instead of "rosrun someones_pkg someones_pkg_node"
# set_target_properties(${PROJECT_NAME}_node PROPERTIES OUTPUT_NAME node PREFIX "")

## Add cmake target dependencies of the executable
## same as for the library above
# add_dependencies(${PROJECT_NAME}_node ${${PROJECT_NAME}_EXPORTED_TARGETS} ${catkin_EXPORTED_TARGETS})

## Specify libraries to link a library or executable target against
target_link_libraries(publish_pointcloud
  ${catkin_LIBRARIES}
  ${PCL_LIBRARIES}
  ${OCTOMAP_LIBRARIES}
)

#############
## Install ##
#############

# all install targets should use catkin DESTINATION variables
# See http://ros.org/doc/api/catkin/html/adv_user_guide/variables.html

## Mark executable scripts (Python etc.) for installation
## in contrast to setup.py, you can choose the destination
# catkin_install_python(PROGRAMS
#   scripts/my_python_script
#   DESTINATION ${CATKIN_PACKAGE_BIN_DESTINATION}
# )

## Mark executables for installation
## See http://docs.ros.org/melodic/api/catkin/html/howto/format1/building_executables.html
# install(TARGETS ${PROJECT_NAME}_node
#   RUNTIME DESTINATION ${CATKIN_PACKAGE_BIN_DESTINATION}
# )

## Mark libraries for installation
## See http://docs.ros.org/melodic/api/catkin/html/howto/format1/building_libraries.html
# install(TARGETS ${PROJECT_NAME}
#   ARCHIVE DESTINATION ${CATKIN_PACKAGE_LIB_DESTINATION}
#   LIBRARY DESTINATION ${CATKIN_PACKAGE_LIB_DESTINATION}
#   RUNTIME DESTINATION ${CATKIN_GLOBAL_BIN_DESTINATION}
# )

## Mark cpp header files for installation
# install(DIRECTORY include/${PROJECT_NAME}/
#   DESTINATION ${CATKIN_PACKAGE_INCLUDE_DESTINATION}
#   FILES_MATCHING PATTERN "*.h"
#   PATTERN ".svn" EXCLUDE
# )

## Mark other files for installation (e.g. launch and bag files, etc.)
# install(FILES
#   # myfile1
#   # myfile2
#   DESTINATION ${CATKIN_PACKAGE_SHARE_DESTINATION}
# )

#############
## Testing ##
#############

## Add gtest based cpp test target and link libraries
# catkin_add_gtest(${PROJECT_NAME}-test test/test_my_pkg.cpp)
# if(TARGET ${PROJECT_NAME}-test)
#   target_link_libraries(${PROJECT_NAME}-test ${PROJECT_NAME})
# endif()

## Add folders to be run by python nosetests
# catkin_add_nosetests(test)
my_pkg.cpp中,先使用 宏TESTCLOUDPOINTS,发布点云数据
#define TESTCLOUDPOINTS 1
#define TESTOCTOTREE 0定义好frame_id 和topic
nh.param<std::string>("path", path, "/home/.../test.pcd");
nh.param<std::string>("frame_id", frame_id, "your_frame_id");
nh.param<std::string>("topic", topic, "your_pointcloud_topic");
nh.param<int>("hz", hz, 5);
回到工作空间,编译
cd temp_ocotmap_test
caikin_make
在工作空间中运行节点
rosrun my_pkg publish_pointcloud打开一个terminal,进入工作空间,新打开terminal要source一下
source devel/setup.bash接下来要运行octomap_server,通过octomap_server中的launch文件运行,launch文件在octomap_server/launch,运行之前,要修改其中的frame_id 和topic为你自己定义的frame_id和topic
<launch>
  <node pkg="octomap_server" type="octomap_server_node" name="octomap_server">

    <!-- resolution in meters per pixel -->
    <param name="resolution" value="0.05" />

    <!-- name of the fixed frame, needs to be "/map" for SLAM -->
    <param name="frame_id" type="string" value="your_frame_id" />

    <!-- max range / depth resolution of the kinect in meter -->
    <param name="sensor_model/max_range" value="100.0" />
    <param name="latch" value="true" />

    <!-- max/min height for occupancy map, should be in meters -->
    <param name="pointcloud_max_z" value="1000" />
    <param name="pointcloud_min_z" value="0" />

    <!-- topic from where pointcloud2 messages are subscribed -->
    <remap from="/cloud_in" to="your_pointcloud_topic" />

  </node>
</launch>
在工作空间中运行octomap_server
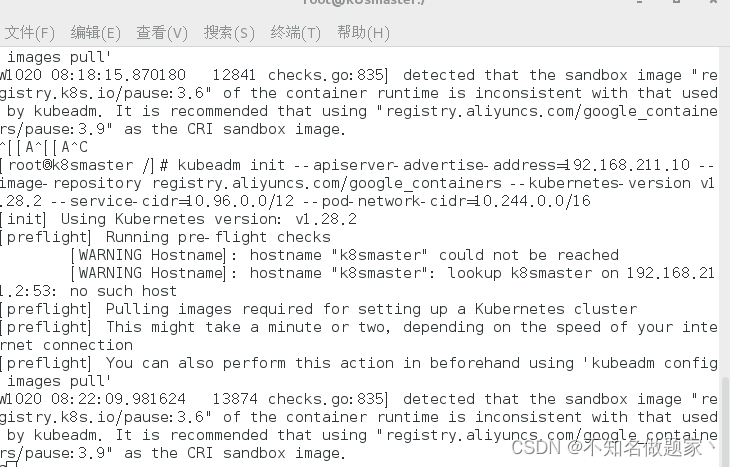
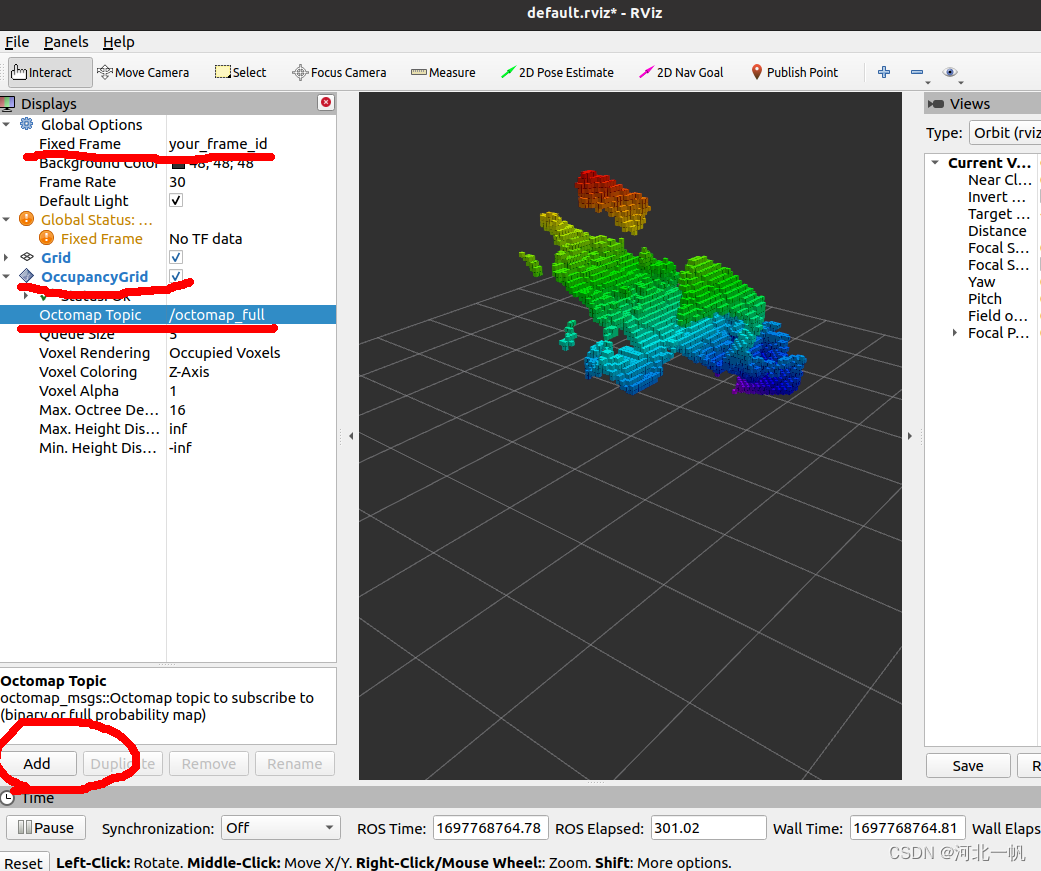
roslaunch octomap_server octomap_mapping.launch这时会出现

不用担心,其实octree已经生成,不知道为什么会显示这个,因为这个问题困扰了好久
再打开一个terminal,运行rviz,记得提前要安装rviz的octomap 插件
rosrun rviz rviz修改Fixed Frame,Add一个OccupancyGrid,订阅/ocotmap_full这个topic,就可以看到生成的octree了
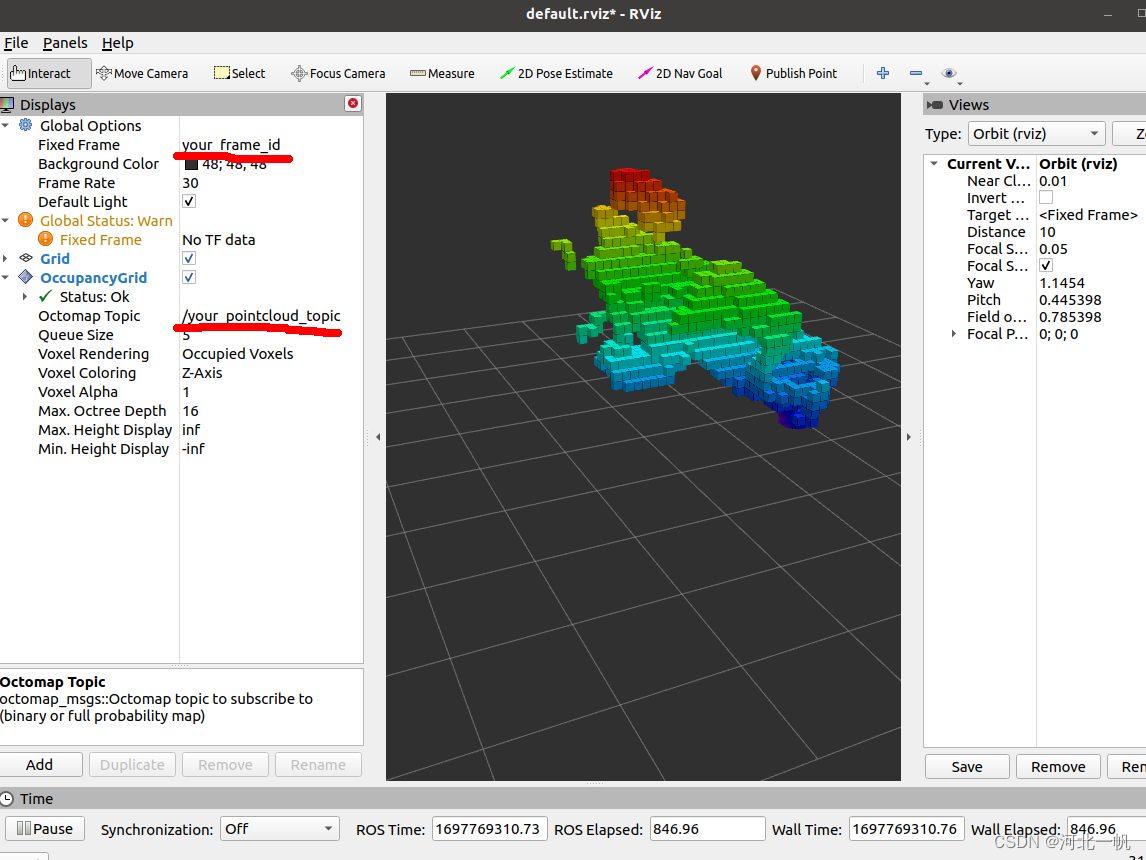
第二种:不使用octomap_server,在自己项目中引用octomap包,生成octree,直接发布octree的topic,rviz订阅topic进行可视化
将上面my_pkg.cpp中的宏改为
#define TESTCLOUDPOINTS 0
#define TESTOCTOTREE 1
这样就运行了直接生成octree并发布的那段代码,回到工作空间,编译,运行节点
cd temp_ocotmap_test
catkin_make
rosrun my_pkg publish_pointcloud
在rviz中修改topic和frame_id,便可以看到octree
以上!