文章目录
- 一、实操步骤
- 1、增加XML Test Module节点
- 2、配置XML Test Module节点
- 3、XML Test Module节点增加CAPL脚本(.can文件)
- 4、文件夹结构
- 5、使用仿真节点开始测试
- 6、测试结果与测试报告
- 7、同理,在Test Setup也可如此操作
一、实操步骤
1、增加XML Test Module节点

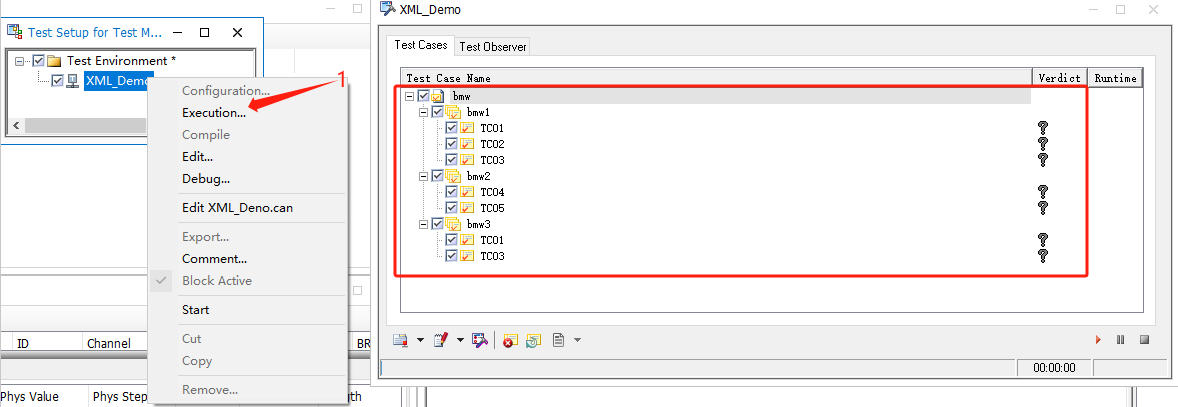
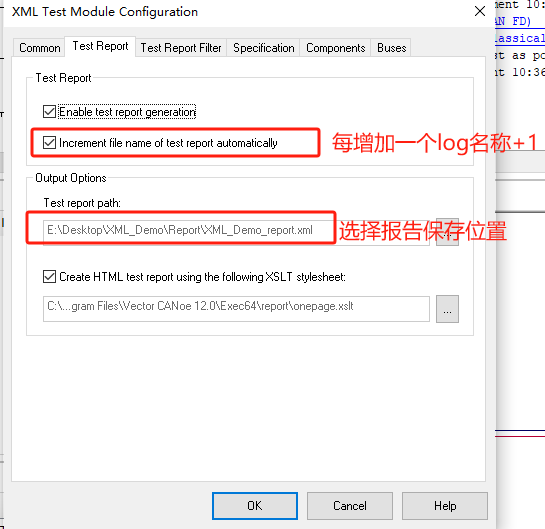
2、配置XML Test Module节点
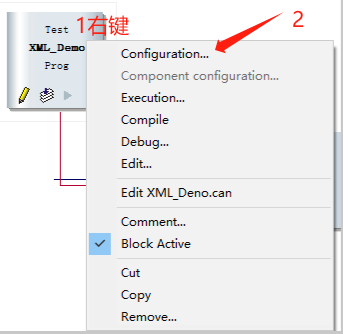


XML_Demo.xml文件代码如下:
<?xml version="1.0" encoding="iso-8859-1" standalone="yes"?>
<testmodule title="bmw" version="">
		<testgroup title="bmw1">
				<capltestcase name="TC01"></capltestcase>
				<capltestcase name="TC02"></capltestcase>
				<capltestcase name="TC03"></capltestcase>
		</testgroup>
		<testgroup title="bmw2">
				<capltestcase name="TC04"></capltestcase>
				<capltestcase name="TC05"></capltestcase>
		</testgroup>
		<testgroup title="bmw3">
				<capltestcase name="TC01"></capltestcase>
				<capltestcase name="TC03"></capltestcase>
		</testgroup>
</testmodule>
3、XML Test Module节点增加CAPL脚本(.can文件)


XML_Demo.can代码如下:
/*@!Encoding:936*/
includes
{

}

variables
{
  message CAN2.0x101 msg_101={dlc=8};
}

//KL15 ON【第一个bit】
Set_KL15_on()
{
  msg_101.byte(0)= msg_101.byte(0)|0x1;
  output(msg_101);
}

//KL15 OFF【第一个bit】
Set_KL15_off()
{
  msg_101.byte(0)=0xFE&msg_101.byte(0);//11111110&msg_101.byte(0)
  output(msg_101);
}


testcase TC01()
{
  TestCaseTitle("TC01","111");

  write("【1】发送指令:上15");
  Set_KL15_on();
  testStep("【1】","发送指令:上15");

  testwaitfortimeout(1000);
  write("【2】发送指令:下15");
  Set_KL15_off();
  testStep("【2】","发送指令:下15");

}
testcase TC02()
{
  TestCaseTitle("TC02","222");

  write("【1】发送指令:上15");
  Set_KL15_on();
  testStep("【1】","发送指令:上15");

  testwaitfortimeout(1000);
  write("【2】发送指令:下15");
  Set_KL15_off();
  testStep("【2】","发送指令:下15");}
testcase TC03()
{
  TestCaseTitle("TC03","333");

  write("【1】发送指令:上15");
  Set_KL15_on();
  testStep("【1】","发送指令:上15");

  testwaitfortimeout(1000);
  write("【2】发送指令:下15");
  Set_KL15_off();
  testStep("【2】","发送指令:下15");}
testcase TC04()
{
  TestCaseTitle("TC04","444");

  write("【1】发送指令:上15");
  Set_KL15_on();
  testStep("【1】","发送指令:上15");

  testwaitfortimeout(1000);
  write("【2】发送指令:下15");
  Set_KL15_off();
  testStep("【2】","发送指令:下15");}
testcase TC05()
{
  TestCaseTitle("TC05","555");

  write("【1】发送指令:上15");
  Set_KL15_on();
  testStep("【1】","发送指令:上15");

  testwaitfortimeout(1000);
  write("【2】发送指令:下15");
  Set_KL15_off();
  testStep("【2】","发送指令:下15");
}
//void MainTest ()
//{
//  write("-------------------【测试开始】-------------------");
//  write("");
//
//  stopLogging();
//  setLogFileName("Logging\\{Date}_{Time}\\{LocalTime}_TC01");
//  startLogging();
//  TC01();
//  stopLogging();
//
//  write("-------------------【测试结束】-------------------");
//}
//
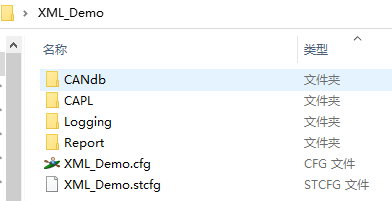
4、文件夹结构
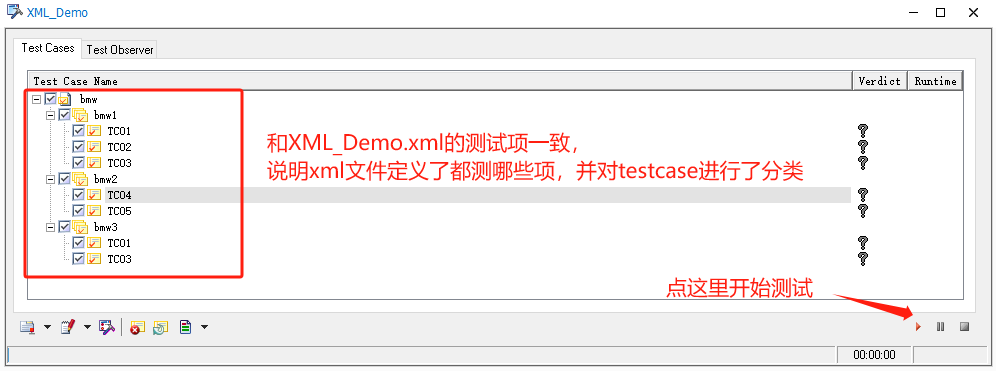
5、使用仿真节点开始测试
因为我没有连实际的设备,所以用仿真总线模拟

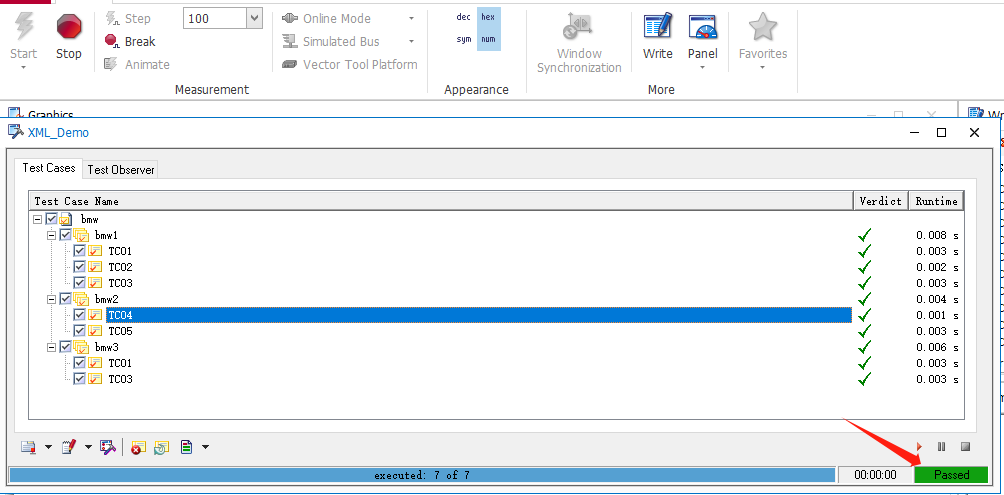
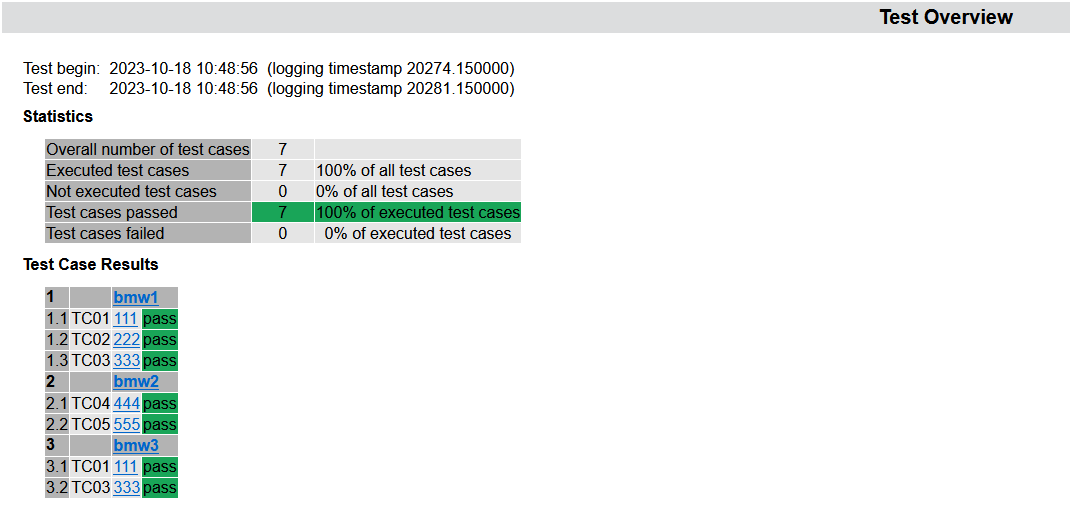
6、测试结果与测试报告
7、同理,在Test Setup也可如此操作

