文章目录
- 全局组件
- 批量注册全局组件
- 局部组件
- 递归组件
- 组件定义名称方式
- 1.增加一个script 通过 export 添加name
- 2.直接使用文件名当组件名
- 3.使用插件 unplugin-vue-define-options
- 动态组件
- 异步组件
一个 Vue 组件在使用前需要先被“注册”,这样 Vue 才能在渲染模板时找到其对应的实现。组件注册有两种方式:全局注册和局部注册。
全局组件
例如组件使用频率非常高(table,Input,button等)这些组件 几乎每个页面都在使用便可以封装成全局组件
使用方法
在main.ts 引入我们的组件跟随在createApp(App) 后面 ,切记不能放到mount 后面这是一个链式调用
import { createApp } from 'vue'
import App from './App.vue'
import './assets/css/reset/index.less'
import Card from './components/Card/index.vue'


createApp(App).component('Card',Card).mount('#app')
注册完之后直接在其他vue页面 立即使用即可 无需引入。
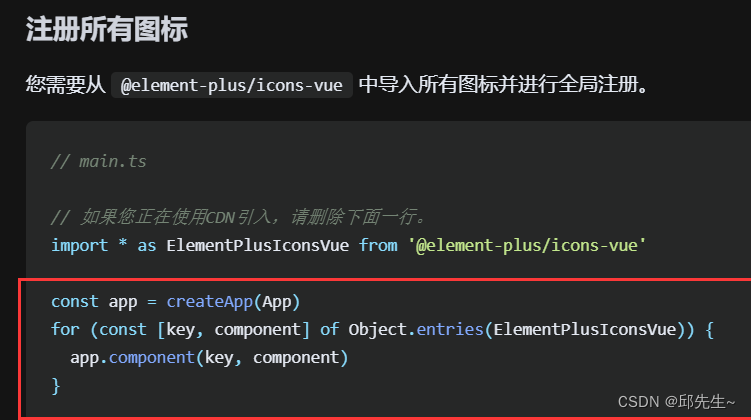
批量注册全局组件
可以参考element-ui 其实就是遍历一下然后通过 app.component 注册
局部组件
全局注册虽然很方便,但有以下几个问题:
-
全局注册,但并没有被使用的组件无法在生产打包时被自动移除 (也叫“tree-shaking”)。如果你全局注册了一个组件,即使它并没有被实际使用,它仍然会出现在打包后的 JS 文件中。
-
全局注册在大型项目中使项目的依赖关系变得不那么明确。在父组件中使用子组件时,不太容易定位子组件的实现。和使用过多的全局变量一样,这可能会影响应用长期的可维护性。
相比之下,局部注册的组件需要在使用它的父组件中显式导入,并且只能在该父组件中使用。它的优点是使组件之间的依赖关系更加明确,并且对 tree-shaking 更加友好。
在使用 <script setup> 的单文件组件中,导入的组件可以直接在模板中使用,无需注册:
<template>
  <ComponentA />
</template>

<script setup>
import ComponentA from './ComponentA.vue'
</script>
如果没有使用 <script setup>,则需要使用 components 选项来显式注册:
<template>
  <ComponentA />
</template>

<script>
import ComponentA from './ComponentA.vue'

export default {
  components: {
    ComponentA
  },
  setup() {
    // ...
  }
}
</script>
递归组件
原理跟我们写js递归是一样的,自己调用自己通过一个条件来结束递归,否则导致内存泄漏。
父组件
<template>
  <child :data="data"></child>
</template>

<script lang="ts" setup>
import { reactive } from 'vue'
import child from './child.vue'

type TreeList = {
  name: string
  checked?: boolean
  children?: TreeList[]
}
const data = reactive<TreeList[]>([
  {
    name: '1',
    checked: true,
    children: [
      {
        name: '1-1',
        checked: false,

        children: [
          {
            name: '1-1-1',
            checked: false,
            children: [
              {
                name: '1-1-1-1',
                checked: false,
              },
            ],
          },
        ],
      },
    ],
  },
  {
    name: '2',
    checked: false,

    children: [
      {
        name: '2-1',
        checked: false,
      },
    ],
  },
  {
    name: '3',
    checked: false,
  },
])
</script>

<style scoped></style>
子组件
<template>
  <div class="tree" v-for="item in data">
    <input type="checkbox" v-model="item.checked" />
    <span>{{ item.name }}</span>
    这里做的递归组件
    <recursion v-if="item?.children?.length" :data="item?.children"></recursion>
  </div>
</template>

<script lang="ts" setup>
import {} from 'vue'
type TreeList = {
  name: string
  checked?: boolean
  children?: TreeList[]
}
const props = defineProps<{
  data?: TreeList[]
}>()
</script>

这种写法可以直接使用name作为递归组件名称 新写一个script
<script lang="ts">
export default {
  name:'recursion'
}
</script>

<style scoped>
.tree{
  margin-left: 20px;
}
</style>
组件定义名称方式
1.增加一个script 通过 export 添加name
<script lang="ts">
export default {
  name:"TreeItem"
}
</script>
2.直接使用文件名当组件名
一个单文件组件可以通过它的文件名被其自己所引用。例如:名为 FooBar.vue 的组件可以在其模板中用 <FooBar/> 引用它自己。
请注意这种方式相比于导入的组件优先级更低。如果有具名的导入和组件自身推导的名字冲突了,可以为导入的组件添加别名:
import { FooBar as FooBarChild } from './components'
3.使用插件 unplugin-vue-define-options
npm i unplugin-vue-define-options -D
配置vite.config.ts
import { defineConfig } from 'vite'
import DefineOptions from 'unplugin-vue-define-options/vite'
import vue from '@vitejs/plugin-vue'

export default defineConfig({
  plugins: [vue(), DefineOptions()],
})
在tsconfig.json设置types(typescript项目中,如果不设置该属性,会报红。)
{
    "compilerOptions": {
       "types": ["unplugin-vue-define-options/macros-global" /* ... */]
    }
}
若是项目中使用了eslint,可以在.eslintrc.js配置文件中,配置globals选项
// .eslintrc.js
module.exports = {
    globals: { defineOptions: 'writable' }
}
使用
<template></template>

<script setup lang="ts">
import { ref } from 'vue'

defineOptions({
  name: 'ComponentName'
})
</script>

<style scoped></style>
动态组件
让多个组件使用同一个挂载点,并动态切换,这就是动态组件。
比如tab切换不同内容
主要通过Vue 的 <component> 元素和特殊的 is属性实现的。
先看下vue2和vue3的区别
vue2
<template>
  <div>
    <component :is="A"></component>
  </div>
</template>

<script>
import A from './A';
export default {
  name: 'paysuccess',
  data() {
    return {

    }
  },
  components: {
    A
  },
}
</script>

<style lang="less" scoped>


</style>
vue3
<template>
  <div class="tabs-content" @click="switchTab(tab)" v-for="(tab, index) in tabData" :key="index">
    {{ tab.name }}
  </div>
  <component :is="currentTab.tabComp"></component>
</template>
<script setup lang="ts">
import { reactive, markRaw } from 'vue'
import A from './A.vue'
import B from './B.vue'
import C from './C.vue'

type tabType = {
  name: string,
  tabComp: any
}

type Comp = Pick<tabType, 'tabComp'>
const tabData = reactive<tabType[]>([
  {
    name: 'A组件',
    // proxy会代理reactive中的所有内容
    // 无需对组件进行proxy代理
    // 必须使用markRaw跳过对组件的代理,否则vue会给警告
    tabComp: markRaw(A)
  },
  {
    name: 'B组件',
    tabComp: markRaw(B)
  },
  {
    name: 'C组件',
    tabComp: markRaw(C)
  },
])

let currentTab = reactive<Comp>({
  tabComp: tabData[0].tabComp
})

const switchTab = (tab: tabType) => {
  currentTab.tabComp = tab.tabComp
}
</script>
<style scoped lang="less">
.tabs-content {
  display: inline-block;
  width: 100px;
  border: 1px solid #ccc;
  background: rgb(175, 96, 96);
  color: white;
}
</style>
- 在
Vue2的时候is是通过组件名称切换的, 在Vue3 setup是通过组件实例切换的 vue3如果你把组件实例放到ReactiveVue会给你一个警告,这是因为reactive会进行proxy代理 而我们组件代理之后毫无用处 节省性能开销 推荐我们使用shallowRef或者markRaw跳过proxy代理
异步组件
在大型应用中,我们可能需要将应用分割成小一些的代码块 并且减少主包的体积,这时候就可以使用异步组件
<template>
  <Suspense>
          <template #default>
              <Dialog>
                  <template #default>
                      <div>我在哪儿</div>
                  </template>
              </Dialog>
          </template>

          <template #fallback>
              <div>loading...</div>
          </template>
      </Suspense>
</template>

<script setup lang="ts">
import { reactive, ref, markRaw, toRaw, defineAsyncComponent } from 'vue'

const Dialog = defineAsyncComponent(() => import('../../components/Dialog/index.vue'))

// 下边是完整写法

const AsyncComp = defineAsyncComponent({
  // 加载函数
  loader: () => import('../../components/Dialog/index.vue'),

  // 加载异步组件时使用的组件
  loadingComponent: LoadingComponent,
  // 展示加载组件前的延迟时间,默认为 200ms
  delay: 200,

  // 加载失败后展示的组件
  errorComponent: ErrorComponent,
  // 如果提供了一个 timeout 时间限制,并超时了
  // 也会显示这里配置的报错组件,默认值是:Infinity
  timeout: 3000
})
<suspense> 组件有两个插槽。它们都只接收一个直接子节点。default 插槽里的节点会尽可能展示出来。如果不能,则展示 fallback 插槽里的节点。一般用于加载异步组件,在组件没加载出来之前展示一个骨架屏
异步组件通过import()函数形式引入属于懒加载,只有在用到的时候才会加载,不会打包到主包里面这样也减少了主包的体积也算是性能上的优化