序、慢慢来才是最快的方法。
背景
OkHttp是一套处理HTTP网络请求的依赖库,由Square公司设计研发并开源,目前可以在Java和Kotlin中使用。对于Android App来说,OkHttp现在几乎已经占据了所有的网络请求操作。
OKHttp源码官网

版本
api 'com.squareup.okhttp3:okhttp:4.10.0'
发起网络请求示例代码
  val  okHttpClient = OkHttpClient()
        val request :Request = Request.Builder()
            .url("")
            .build()

        val newCall = okHttpClient.newCall(request)
        //同步请求
        newCall.execute()
        //异步请求
        newCall.enqueue(object : Callback {
            override fun onFailure(call: Call, e: IOException) {
                TODO("Not yet implemented")
            }

            override fun onResponse(call: Call, response: Response) {
                TODO("Not yet implemented")
            }
        })
核心类
OkHttpClient 、Request 、Call 、RealCall 、Dispatcher 、Deque 、AsyncCall 、Response
- OkHttpClient:
Okhttp用于请求的执行客户端 - Request: 通过Bulider设计模式,构建的一个请求对象
- Call: 是通过
client.newCall生成的请求执行对象,当执行了execute之后才会真正的开始执行网络请求 - Response: 是通过网络请求后,从服务器返回的信息都在里面。内含返回的状态码,以及代表响应消息正文的
ResponseBody
- interceptor 用户定义的拦截器,在重试拦截器之前执行
- retryAndFollowUpInterceptor 重试拦截器
- BridgeInterceptor 建立网络桥梁的拦截器,主要是为了给网络请求时候,添加各种各种必要参数。如Cookie,Content-type
- CacheInterceptor 缓存拦截器,主要是为了在网络请求时候,根据返回码处理缓存。
- ConnectInterceptor 连接拦截器,主要是为了从连接池子中查找可以复用的socket连接。
- networkInterceptors 用户定义的网络拦截器,在CallServerInterceptor(执行网络请求拦截器)之前运行。
- CallServerInterceptor 真正执行网络请求的逻辑。
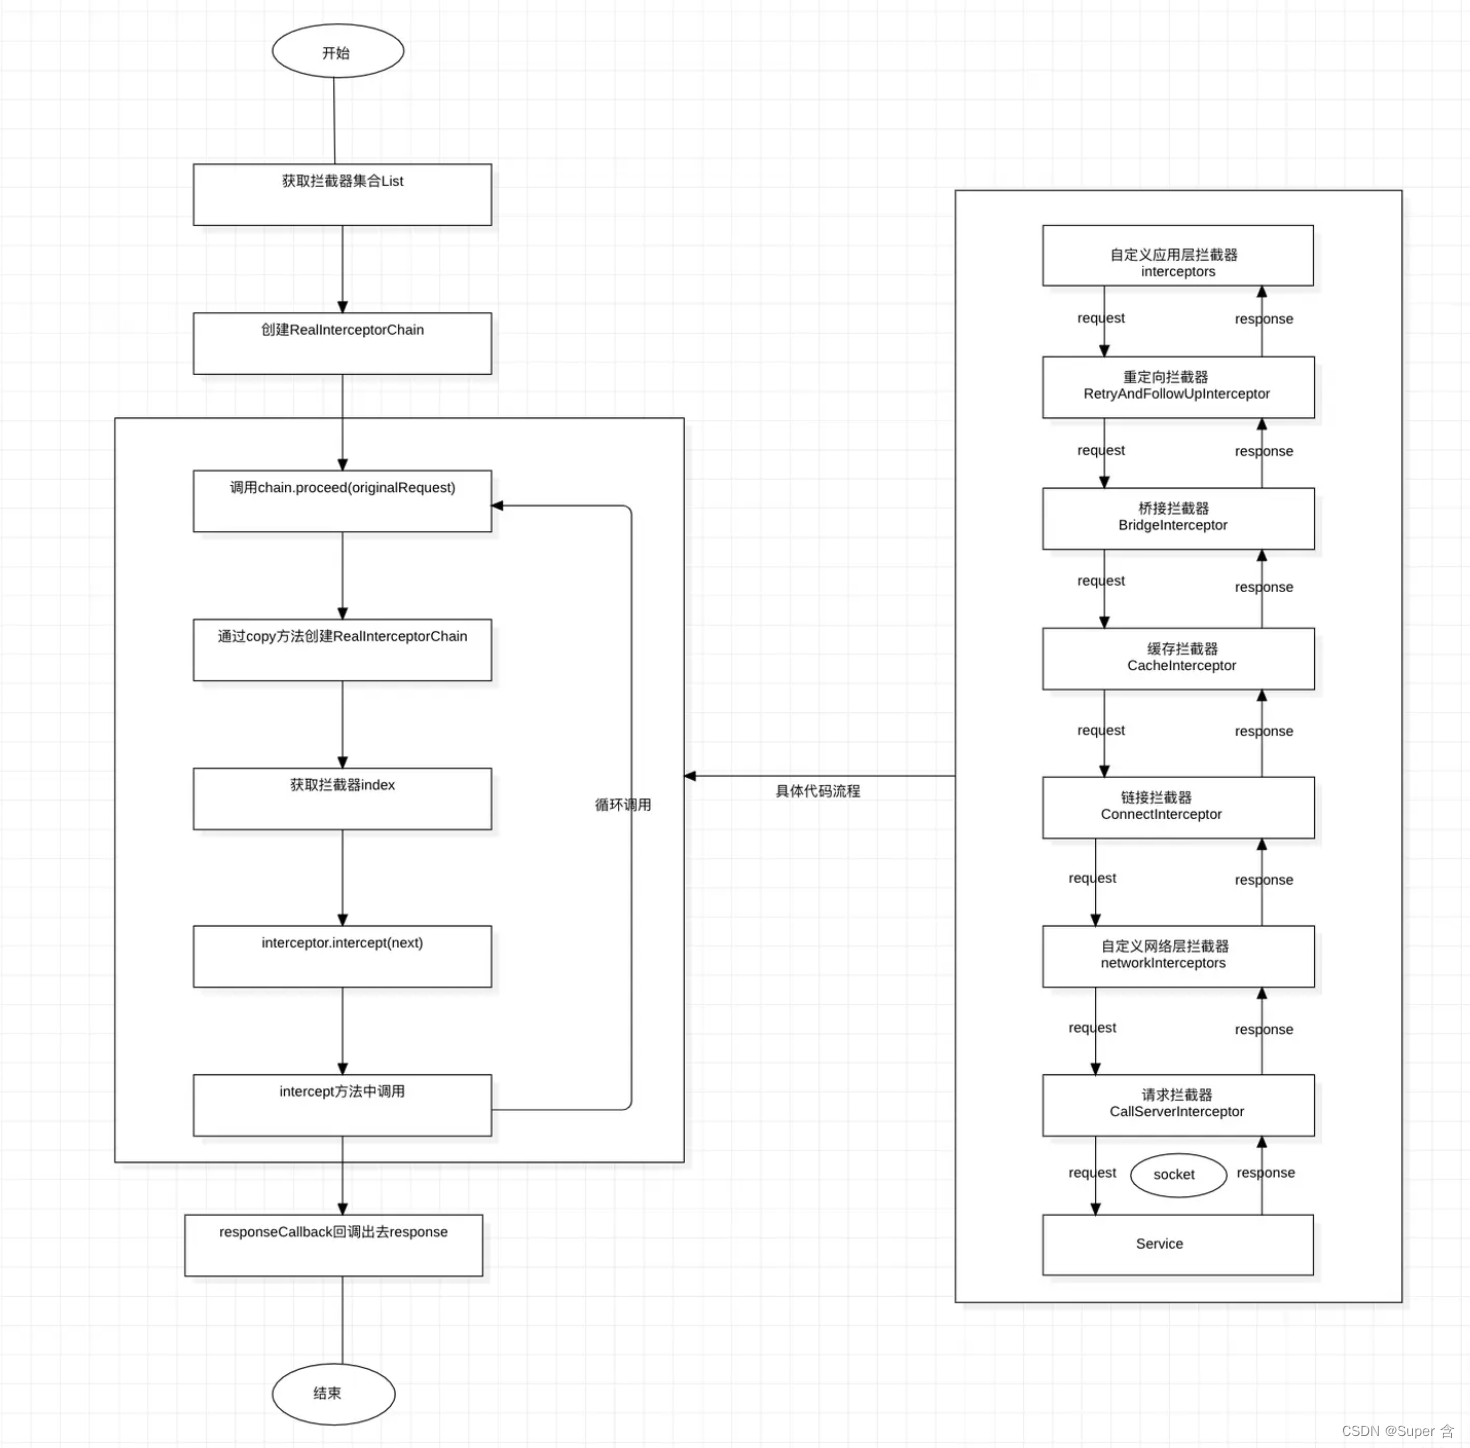
1.网路请求流程

OkHttpClient 网络配置层
class Builder constructor() {
   //Okhttp 请求分发器,是整个OkhttpClient的执行核心
  internal var dispatcher: Dispatcher = Dispatcher()
  //Okhttp连接池,不过会把任务委托给RealConnectionPool处理
  internal var connectionPool: ConnectionPool = ConnectionPool()
  //用户定义的拦截器,在重试拦截器之前执行
  internal val interceptors: MutableList<Interceptor> = mutableListOf()
  //用户定义的网络拦截器,在CallServerInterceptor(执行网络请求拦截器)之前运行。
  internal val networkInterceptors: MutableList<Interceptor> = mutableListOf()
  //流程监听器
  internal var eventListenerFactory: EventListener.Factory = EventListener.NONE.asFactory()
  //连接失败时是否重连
  internal var retryOnConnectionFailure = true
  //服务器认证设置
  internal var authenticator: Authenticator = Authenticator.NONE
  //是否重定向
  internal var followRedirects = true
  //是否重定向到https
  internal var followSslRedirects = true
  //cookie持久化的设置
  internal var cookieJar: CookieJar = CookieJar.NO_COOKIES
  //缓存设置
  internal var cache: Cache? = null
  //DNS设置
  internal var dns: Dns = Dns.SYSTEM
  //代理设置
  internal var proxy: Proxy? = null
  internal var proxySelector: ProxySelector? = null
  internal var proxyAuthenticator: Authenticator = Authenticator.NONE
  //默认的socket连接池
  internal var socketFactory: SocketFactory = SocketFactory.getDefault()
  //用于https的socket连接池
  internal var sslSocketFactoryOrNull: SSLSocketFactory? = null
  //用于信任Https证书的对象
  internal var x509TrustManagerOrNull: X509TrustManager? = null
  internal var connectionSpecs: List<ConnectionSpec> = DEFAULT_CONNECTION_SPECS
  //http协议集合
  internal var protocols: List<Protocol> = DEFAULT_PROTOCOLS
  //https对host的检验
  internal var hostnameVerifier: HostnameVerifier = OkHostnameVerifier
  internal var certificatePinner: CertificatePinner = CertificatePinner.DEFAULT
  internal var certificateChainCleaner: CertificateChainCleaner? = null
  //请求超时
  internal var callTimeout = 0
  //连接超时
  internal var connectTimeout = 10_000
  //读取超时
  internal var readTimeout = 10_000
  //写入超时
  internal var writeTimeout = 10_000
  internal var pingInterval = 0
  internal var minWebSocketMessageToCompress = RealWebSocket.DEFAULT_MINIMUM_DEFLATE_SIZE
  internal var routeDatabase: RouteDatabase? = null
  }
client.newCall(request):
override fun newCall(request: Request): Call = RealCall(this, request, forWebSocket = false)
在这里生成一个RealCall对象,这里第三个参数是否为websocket,默认是false。 在拿到RealCall对象之后,这里有两种方式起发送网络请求:
- execute() : 这种方式很少用
- enqueue() : 这种方式是将每个请求放在队列中,按照顺序逐个去进行消费。
RealCall.enqueue()
override fun enqueue(responseCallback: Callback) {
  check(executed.compareAndSet(false, true)) { "Already Executed" }

  callStart()
  client.dispatcher.enqueue(AsyncCall(responseCallback))
}


private fun callStart() {
  this.callStackTrace = Platform.get().getStackTraceForCloseable("response.body().close()")
  eventListener.callStart(this)
}
这里主要做了一下几步
- 首先回调eventListener的callStart()方法,
- 然后把创建AsyncCall对象将responseCallback传进去。
- 最后Dispatcher的enqueue()方法.
Dispatcher.enqueue()
class Dispatcher constructor() {

    ......

//按运行顺序准备异步调用的队列
private val readyAsyncCalls = ArrayDeque<AsyncCall>()

//正在运行的异步请求队列, 包含取消但是还未finish的AsyncCall
private val runningAsyncCalls = ArrayDeque<AsyncCall>()

//正在运行的同步请求队列, 包含取消但是还未finish的RealCall
private val runningSyncCalls = ArrayDeque<RealCall>()

    ......

internal fun enqueue(call: AsyncCall) {
  synchronized(this) {
    readyAsyncCalls.add(call)


    if (!call.call.forWebSocket) {
      val existingCall = findExistingCallWithHost(call.host)
      if (existingCall != null) call.reuseCallsPerHostFrom(existingCall)
    }
  }
  promoteAndExecute()
}

private fun findExistingCallWithHost(host: String): AsyncCall? {
  for (existingCall in runningAsyncCalls) {
    if (existingCall.host == host) return existingCall
  }
  for (existingCall in readyAsyncCalls) {
    if (existingCall.host == host) return existingCall
  }
  return null
}
- 首先将AsyncCall加入readyAsyncCalls队列中.
- 然后通过findExistingCallWithHost查找在runningAsyncCalls和readyAsyncCalls是否存在相同host的AsyncCall,如果存在则调用call.reuseCallsPerHostFrom()进行复用
- 最后调用 promoteAndExecute() 通过线程池执行队列中的AsyncCall对象
Dispatcher.promoteAndExecute()
private fun promoteAndExecute(): Boolean {
  this.assertThreadDoesntHoldLock()

  val executableCalls = mutableListOf<AsyncCall>()
    //判断是否有请求正在执行
  val isRunning: Boolean
   //加锁,保证线程安全
  synchronized(this) {
   //遍历 readyAsyncCalls 队列
    val i = readyAsyncCalls.iterator()
    while (i.hasNext()) {
      val asyncCall = i.next()
       //runningAsyncCalls的数量不能大于最大并发请求数 64
      if (runningAsyncCalls.size >= this.maxRequests) break // Max capacity.
      //同一Host的最大数是5
      if (asyncCall.callsPerHost.get() >= this.maxRequestsPerHost) continue // Host max capacity.
       //从readyAsyncCalls队列中移除并加入到executableCalls和runningAsyncCalls中
      i.remove()
      asyncCall.callsPerHost.incrementAndGet()
      executableCalls.add(asyncCall)
      runningAsyncCalls.add(asyncCall)
    }
    isRunning = runningCallsCount() > 0
  }
    //遍历executableCalls 执行asyncCall
  for (i in 0 until executableCalls.size) {
    val asyncCall = executableCalls[i]
    asyncCall.executeOn(executorService)
  }

  return isRunning
}
在这里遍历readyAsyncCalls队列,判断runningAsyncCalls的数量是否大于最大并发请求数64, 判断同一Host的请求是否大于5,然后将AsyncCall从readyAsyncCalls队列中移除,并加入到executableCalls和runningAsyncCalls中,遍历executableCalls 执行asyncCall.
RealCall.AsyncCall.exceuteOn()
internal inner class AsyncCall(
  private val responseCallback: Callback
) : Runnable {

     ......

  fun executeOn(executorService: ExecutorService) {
    client.dispatcher.assertThreadDoesntHoldLock()

    var success = false
    try {
       //执行AsyncCall 的run方法
      executorService.execute(this)
      success = true
    } catch (e: RejectedExecutionException) {
      val ioException = InterruptedIOException("executor rejected")
      ioException.initCause(e)
      noMoreExchanges(ioException)
      responseCallback.onFailure(this@RealCall, ioException)
    } finally {
      if (!success) {
        client.dispatcher.finished(this) // This call is no longer running!
      }
    }
  }

  override fun run() {
    threadName("OkHttp ${redactedUrl()}") {
      var signalledCallback = false
      timeout.enter()
      try {
         //执行OkHttp的拦截器  获取response对象
        val response = getResponseWithInterceptorChain()
        signalledCallback = true
        //通过该方法将response对象回调出去
        responseCallback.onResponse(this@RealCall, response)
      } catch (e: IOException) {
        if (signalledCallback) {

          Platform.get().log("Callback failure for ${toLoggableString()}", Platform.INFO, e)
        } else {
            //遇到IO异常  回调失败方法
          responseCallback.onFailure(this@RealCall, e)
        }
      } catch (t: Throwable) {
         //遇到其他异常  回调失败方法
        cancel()
        if (!signalledCallback) {
          val canceledException = IOException("canceled due to $t")
          canceledException.addSuppressed(t)
          responseCallback.onFailure(this@RealCall, canceledException)
        }
        throw t
      } finally {
        client.dispatcher.finished(this)
      }
    }
  }
}
这里可以看到AsyncCall就是一个Runable对象,线程执行就会调用该对象的run方法,而executeOn方法就是执行runable对象. 在run方法中主要执行了以下几步:
- 调用getResponseWithInterceptorChain()执行OkHttp拦截器,获取response对象
- 调用responseCallback的onResponse方法将Response对象回调出去
- 如果遇见IOException异常则调用responseCallback的onFailure方法将异常回调出去
- 如果遇到其他异常,调用cancel()方法取消请求,调用responseCallback的onFailure方法将异常回调出去
- 调用Dispatcher的finished方法结束执行
RealCall.getResponseWithInterceptorChain()
@Throws(IOException::class)
internal fun getResponseWithInterceptorChain(): Response {
  // 拦截器集合
  val interceptors = mutableListOf<Interceptor>()
  //添加用户自定义集合
  interceptors += client.interceptors
  interceptors += RetryAndFollowUpInterceptor(client)
  interceptors += BridgeInterceptor(client.cookieJar)
  interceptors += CacheInterceptor(client.cache)
  interceptors += ConnectInterceptor
  //如果不是sockect 添加newtwork拦截器
  if (!forWebSocket) {
    interceptors += client.networkInterceptors
  }
  interceptors += CallServerInterceptor(forWebSocket)
    //构建拦截器责任链
  val chain = RealInterceptorChain(
      call = this,
      interceptors = interceptors,
      index = 0,
      exchange = null,
      request = originalRequest,
      connectTimeoutMillis = client.connectTimeoutMillis,
      readTimeoutMillis = client.readTimeoutMillis,
      writeTimeoutMillis = client.writeTimeoutMillis
  )

  var calledNoMoreExchanges = false
  try {
     //执行拦截器责任链获取Response
    val response = chain.proceed(originalRequest)
    //如果取消了  则抛出异常
    if (isCanceled()) {
      response.closeQuietly()
      throw IOException("Canceled")
    }
    return response
  } catch (e: IOException) {
    calledNoMoreExchanges = true
    throw noMoreExchanges(e) as Throwable
  } finally {
    if (!calledNoMoreExchanges) {
      noMoreExchanges(null)
    }
  }
}
在这里主要执行了以下几步操作
- 首先构建一个可变interceptor集合,将所有拦截器添加进去,这里如果是websocket则不添加networkInterceptor拦截器,这个interceptor集合的添加顺序也就是OkHttp拦截器的执行顺序
- 构建一个RealInterceptorChain对象,将所有的拦截器包裹
- 调用RealInterceptorChain的proceed的方法,获得Response对象
简单的总结一下:这里才用了责任链设计模式,构建RealInterceptorChain对象,然后执行proceed方法获取response对象
2.Interceptor
fun interface Interceptor {
    //拦截方法
  @Throws(IOException::class)
  fun intercept(chain: Chain): Response

  companion object {
    inline operator fun invoke(crossinline block: (chain: Chain) -> Response): Interceptor =
      Interceptor { block(it) }
  }

  interface Chain {
     //获取Request对象
    fun request(): Request

    //处理请求获取Reponse
    @Throws(IOException::class)
    fun proceed(request: Request): Response

    ......
  }
}
class RealInterceptorChain(
  internal val call: RealCall,
  private val interceptors: List<Interceptor>,
  private val index: Int,
  internal val exchange: Exchange?,
  internal val request: Request,
  internal val connectTimeoutMillis: Int,
  internal val readTimeoutMillis: Int,
  internal val writeTimeoutMillis: Int
) : Interceptor.Chain {


  internal fun copy(
    index: Int = this.index,
    exchange: Exchange? = this.exchange,
    request: Request = this.request,
    connectTimeoutMillis: Int = this.connectTimeoutMillis,
    readTimeoutMillis: Int = this.readTimeoutMillis,
    writeTimeoutMillis: Int = this.writeTimeoutMillis
  ) = RealInterceptorChain(call, interceptors, index, exchange, request, connectTimeoutMillis,
      readTimeoutMillis, writeTimeoutMillis)

      ......

  override fun call(): Call = call

  override fun request(): Request = request

  @Throws(IOException::class)
  override fun proceed(request: Request): Response {
    check(index < interceptors.size)

     ......

    val next = copy(index = index + 1, request = request)
    val interceptor = interceptors[index]

    @Suppress("USELESS_ELVIS")
    val response = interceptor.intercept(next) ?: throw NullPointerException(
        "interceptor $interceptor returned null")

     ......

    return response
  }
}
这里看一看到copy()方法就是创建了一个RealInterceptorChain()对象,不过需要注意的是index在创建对象时是index = index + 1,这样就会执行index对应下标的拦截器,不断的调用下一个拦截器,直到有response对象返回,也就是chain.proceed(originalRequest)结束。
RetryAndFollowUpInterceptor(错误重定向拦截器)
主要处理了如下几个方向的问题:
- 1.异常,或者协议重试(408客户端超时,权限问题,503服务暂时不处理,retry-after为0)
- 2.重定向
- 3.重试的次数不能超过20次。
RetryAndFollowUpInterceptor.intercept()
@Throws(IOException::class)
override fun intercept(chain: Interceptor.Chain): Response {
val realChain = chain as RealInterceptorChain
var request = chain.request
val call = realChain.call
var followUpCount = 0
var priorResponse: Response? = null
var newExchangeFinder = true
var recoveredFailures = listOf<IOException>()
while (true) {
  //这里会新建一个ExchangeFinder,ConnectInterceptor会使用到
  call.enterNetworkInterceptorExchange(request, newExchangeFinder)

  var response: Response
  var closeActiveExchange = true
  try {
    if (call.isCanceled()) {
      throw IOException("Canceled")
    }

    try {
      response = realChain.proceed(request)
      newExchangeFinder = true
    } catch (e: RouteException) {
      //尝试通过路由连接失败。该请求将不会被发送。
      if (!recover(e.lastConnectException, call, request, requestSendStarted = false)) {
        throw e.firstConnectException.withSuppressed(recoveredFailures)
      } else {
        recoveredFailures += e.firstConnectException
      }
      newExchangeFinder = false
      continue
    } catch (e: IOException) {
      //尝试与服务器通信失败。该请求可能已发送。
      if (!recover(e, call, request, requestSendStarted = e !is ConnectionShutdownException)) {
        throw e.withSuppressed(recoveredFailures)
      } else {
        recoveredFailures += e
      }
      newExchangeFinder = false
      continue
    }

   //尝试关联上一个response,注意:body是为null
    if (priorResponse != null) {
      response = response.newBuilder()
          .priorResponse(priorResponse.newBuilder()
              .body(null)
              .build())
          .build()
    }

    val exchange = call.interceptorScopedExchange
    //会根据 responseCode 来判断,构建一个新的request并返回来重试或者重定向
    val followUp = followUpRequest(response, exchange)

    if (followUp == null) {
      if (exchange != null && exchange.isDuplex) {
        call.timeoutEarlyExit()
      }
      closeActiveExchange = false
      return response
    }
    //如果请求体是一次性的,不需要再次重试
    val followUpBody = followUp.body
    if (followUpBody != null && followUpBody.isOneShot()) {
      closeActiveExchange = false
      return response
    }

    response.body?.closeQuietly()
    //最大重试次数,不同的浏览器是不同的,比如:Chrome为21,Safari则是16
    if (++followUpCount > MAX_FOLLOW_UPS) {
        throw ProtocolException("Too many follow-up requests: $followUpCount")
    }


    request = followUp
    priorResponse = response
  } finally {
    call.exitNetworkInterceptorExchange(closeActiveExchange)
  }
}
}
-
1.调用RealCall的enterNetworkInterceptorExchange方法实例化一个
ExchangeFinder在RealCall对象中。 -
2.执行RealCall的proceed 方法,进入下一个拦截器,进行下一步的请求处理。
-
3.如果出现路由异常,则通过recover方法校验,当前的连接是否可以重试,不能重试则抛出异常,离开当前的循环。
private fun recover(
  e: IOException,
  call: RealCall,
  userRequest: Request,
  requestSendStarted: Boolean
): Boolean {
  //禁止重连
  if (!client.retryOnConnectionFailure) return false

  // 不能再次发送请求体
  if (requestSendStarted && requestIsOneShot(e, userRequest)) return false

  // 致命异常
  if (!isRecoverable(e, requestSendStarted)) return false

  // 没有更多线路可以重连
  if (!call.retryAfterFailure()) return false

  // 对于故障恢复,将相同的路由选择器与新连接一起使用
  return true
}
BridgeInterceptor(应用层和网络层的桥接拦截器)
主要处理了如下几个问题:
- 主要将Content-Type、Content-Length、Host等一些数据添加到头部。
- 拿到数据之后对数据进行处理,判断是否为gzip,进行对数据数据解压。
BridgeInterceptor.intercept()
@Throws(IOException::class)
override fun intercept(chain: Interceptor.Chain): Response {
  //获取原始请求数据
  val userRequest = chain.request()
  val requestBuilder = userRequest.newBuilder()
   //重新构建请求 添加一些必要的请求头信息
  val body = userRequest.body
  if (body != null) {
    val contentType = body.contentType()
    if (contentType != null) {
      requestBuilder.header("Content-Type", contentType.toString())
    }

    val contentLength = body.contentLength()
    if (contentLength != -1L) {
      requestBuilder.header("Content-Length", contentLength.toString())
      requestBuilder.removeHeader("Transfer-Encoding")
    } else {
      requestBuilder.header("Transfer-Encoding", "chunked")
      requestBuilder.removeHeader("Content-Length")
    }
  }

  if (userRequest.header("Host") == null) {
    requestBuilder.header("Host", userRequest.url.toHostHeader())
  }

  if (userRequest.header("Connection") == null) {
    requestBuilder.header("Connection", "Keep-Alive")
  }

  var transparentGzip = false
  if (userRequest.header("Accept-Encoding") == null && userRequest.header("Range") == null) {
    transparentGzip = true
    requestBuilder.header("Accept-Encoding", "gzip")
  }

  val cookies = cookieJar.loadForRequest(userRequest.url)
  if (cookies.isNotEmpty()) {
    requestBuilder.header("Cookie", cookieHeader(cookies))
  }

  if (userRequest.header("User-Agent") == null) {
    requestBuilder.header("User-Agent", userAgent)
  }
    //执行下一个拦截器
  val networkResponse = chain.proceed(requestBuilder.build())

  cookieJar.receiveHeaders(userRequest.url, networkResponse.headers)
  //创建一个新的responseBuilder,目的是将原始请求数据构建到response中
  val responseBuilder = networkResponse.newBuilder()
      .request(userRequest)

  if (transparentGzip &&
      "gzip".equals(networkResponse.header("Content-Encoding"), ignoreCase = true) &&
      networkResponse.promisesBody()) {
    val responseBody = networkResponse.body
    if (responseBody != null) {
      val gzipSource = GzipSource(responseBody.source())
      val strippedHeaders = networkResponse.headers.newBuilder()
          .removeAll("Content-Encoding")
          .removeAll("Content-Length")
          .build()

       //修改response header信息,移除Content-Encoding,Content-Length信息
      responseBuilder.headers(strippedHeaders)
      val contentType = networkResponse.header("Content-Type"
     //修改response body信息
      responseBuilder.body(RealResponseBody(contentType, -1L, gzipSource.buffer()))
    }
  }

  return responseBuilder.build()
}
- 设置头部的Content-Type.说明内容类型是什么
- 如果contentLength大于等于0,则设置头部的Content-Length(说明内容大小是多少);否则设置头部的Transfer-Encoding为chunked(说明传输编码为分块传输)
- 如果Host不存在,设置头部的Host(在Http 1.1之后出现,可以通过同一个URL访问到不同主机,从而实现服务器虚拟服务器的负载均衡。如果1.1之后不设置就会返回404)。
- 如果Connection不存在,设置头部的Connection为Keep-Alive(代表连接状态需要保持活跃)
- 如果Accept-Encoding且Range为空,则强制设置Accept-Encoding为gzip(说明请求将会以gzip方式压缩)
- 从CookieJar的缓存中取出cookie设置到头部的Cookie
- 如果User-Agent为空,则设置User-Agent到头部
CacheInterceptor(缓存拦截器)
用户通过OkHttpClient.cache来配置缓存,缓存拦截器通过CacheStrategy来判断是使用网络还是缓存来构建response。
CacheInterceptor.intercept()
@Throws(IOException::class)
override fun intercept(chain: Interceptor.Chain): Response {
  val call = chain.call()
  //通过request从OkHttpClient.cache中获取缓存
  val cacheCandidate = cache?.get(chain.request())

  val now = System.currentTimeMillis()
 //创建缓存策略
  val strategy = CacheStrategy.Factory(now, chain.request(), cacheCandidate).compute()
    //为空表示不使用网络,反之,则表示使用网络
    val networkRequest = strategy.networkRequest
    //为空表示不使用缓存,反之,则表示使用缓存
    val cacheResponse = strategy.cacheResponse
    //追踪网络与缓存的使用情况
    cache?.trackResponse(strategy)
    val listener = (call as? RealCall)?.eventListener ?: EventListener.NONE
    //有缓存但不适用,关闭它
    if (cacheCandidate != null && cacheResponse == null) {
      cacheCandidate.body?.closeQuietly()
    }


    //如果网络被禁止,但是缓存又是空的,构建一个code为504的response,并返回
  if (networkRequest == null && cacheResponse == null) {
    return Response.Builder()
        .request(chain.request())
        .protocol(Protocol.HTTP_1_1)
        .code(HTTP_GATEWAY_TIMEOUT)
        .message("Unsatisfiable Request (only-if-cached)")
        .body(EMPTY_RESPONSE)
        .sentRequestAtMillis(-1L)
        .receivedResponseAtMillis(System.currentTimeMillis())
        .build().also {
          listener.satisfactionFailure(call, it)
        }
  }

 //如果我们禁用了网络不使用网络,且有缓存,直接根据缓存内容构建并返回response
  if (networkRequest == null) {
    return cacheResponse!!.newBuilder()
        .cacheResponse(stripBody(cacheResponse))
        .build().also {
          listener.cacheHit(call, it)
        }
  }

   //为缓存添加监听
  if (cacheResponse != null) {
    listener.cacheConditionalHit(call, cacheResponse)
  } else if (cache != null) {
    listener.cacheMiss(call)
  }

  var networkResponse: Response? = null
  try {
      //执行下一个拦截器
    networkResponse = chain.proceed(networkRequest)
  } finally {
    //捕获I/O或其他异常,请求失败,networkResponse为空,且有缓存的时候,不暴露缓存内容
    if (networkResponse == null && cacheCandidate != null) {
       //否则关闭缓存响应体
      cacheCandidate.body?.closeQuietly()
    }
  }

    //如果有缓存
  if (cacheResponse != null) {
    //且网络返回response code为304的时候,使用缓存内容新构建一个Response返回。
    if (networkResponse?.code == HTTP_NOT_MODIFIED) {
      val response = cacheResponse.newBuilder()
          .headers(combine(cacheResponse.headers, networkResponse.headers))
          .sentRequestAtMillis(networkResponse.sentRequestAtMillis)
          .receivedResponseAtMillis(networkResponse.receivedResponseAtMillis)
          .cacheResponse(stripBody(cacheResponse))
          .networkResponse(stripBody(networkResponse))
          .build()

      networkResponse.body!!.close()
      cache!!.trackConditionalCacheHit()
      cache.update(cacheResponse, response)
      return response.also {
        listener.cacheHit(call, it)
      }
    } else {
    //否则关闭缓存响应体
      cacheResponse.body?.closeQuietly()
    }
  }

  //构建网络请求的response
  val response = networkResponse!!.newBuilder()
      .cacheResponse(stripBody(cacheResponse))
      .networkResponse(stripBody(networkResponse))
      .build()

    //如果cache不为null,即用户在OkHttpClient中配置了缓存,则将上一步新构建的网络请求response存到cache中
  if (cache != null) {
    //根据response的code,header以及CacheControl.noStore来判断是否可以缓存
    if (response.promisesBody() && CacheStrategy.isCacheable(response, networkRequest)) {
     // 将该response存入缓存
      val cacheRequest = cache.put(response)
      return cacheWritingResponse(cacheRequest, response).also {
        if (cacheResponse != null) {
          listener.cacheMiss(call)
        }
      }
    }

    //根据请求方法来判断缓存是否有效,只对Get请求进行缓存,其它方法的请求则移除
    if (HttpMethod.invalidatesCache(networkRequest.method)) {
      try {
         //缓存无效,将该请求缓存从client缓存配置中移除
        cache.remove(networkRequest)
      } catch (_: IOException) {

      }
    }
  }

  return response
}
网络请求前:
- 首先根据request从OkHttpClient.cache中获取缓存,通过
CacheStrategy获取本次请求的请求体及缓存的响应体。 - 如果 请求体
networkRequest和响应体cacheResponse都为空的话,则返回错误码为 504 - 如果 请求体
networkRequest为空 响应体cacheResponse不为空的话,则将该响应体返回 - 如果请求体
networkRequest不为空的话,则进入下一个拦截器。
网络请求后:
- 如果当前
cacheResponse不为空,且networkResponse状态码为304, 则代表数据没有变化,那么就会根据cacheResponse构建一个新的response,根据当前时间更新到缓存当中,并返回到上一拦截器中 - 如果
networkResponse状态码不为304,则判断是否进行缓存,最后返回到上一拦截器中
从LruCache中获取缓存
val cacheCandidate = cache?.get(chain.request())
internal fun get(request: Request): Response? {
  val key = key(request.url)
  val snapshot: DiskLruCache.Snapshot = try {
    cache[key] ?: return null
  } catch (_: IOException) {
    return null // Give up because the cache cannot be read.
  }

  val entry: Entry = try {
    Entry(snapshot.getSource(ENTRY_METADATA))
  } catch (_: IOException) {
    snapshot.closeQuietly()
    return null
  }

  val response = entry.response(snapshot)
  if (!entry.matches(request, response)) {
    response.body?.closeQuietly()
    return null
  }

  return response
}
@JvmStatic
fun key(url: HttpUrl): String = url.toString().encodeUtf8().md5().hex()
- 首先将url转化为urf-8,并且通过md5拿到摘要,再调用hex获取16进制的字符串,该字符串就是LruCache的key;
- 通过key获取到
DiskLruCache.Snapshot对象(这里在DiskLruCache中重写了get方法),根据DiskLruCache.Snapshot对象获取到okio 的source。
DiskLruCache:
@Synchronized @Throws(IOException::class)
operator fun get(key: String): Snapshot? {
  initialize()

  checkNotClosed()
  validateKey(key)
  val entry = lruEntries[key] ?: return null
  val snapshot = entry.snapshot() ?: return null

  redundantOpCount++
  journalWriter!!.writeUtf8(READ)
      .writeByte(' '.toInt())
      .writeUtf8(key)
      .writeByte('\n'.toInt())
  if (journalRebuildRequired()) {
    cleanupQueue.schedule(cleanupTask)
  }

  return snapshot
}
ConnectInterceptot(链接拦截器)
object ConnectInterceptor : Interceptor {
  @Throws(IOException::class)
  override fun intercept(chain: Interceptor.Chain): Response {
    val realChain = chain as RealInterceptorChain
    val exchange = realChain.call.initExchange(chain)
    val connectedChain = realChain.copy(exchange = exchange)
    return connectedChain.proceed(realChain.request)
  }
}
- 首先初始化一个可交换连接的对象
- 拷贝一个全新的
RealInterceptorChain对象,并且调用该对象的proceed方法执行下一拦截器
这个拦截器主要操作都在initExchange(chain)当中
initExchange()
internal fun initExchange(chain: RealInterceptorChain): Exchange {
  synchronized(this) {
    check(expectMoreExchanges) { "released" }
    check(!responseBodyOpen)
    check(!requestBodyOpen)
  }

  val exchangeFinder = this.exchangeFinder!!
  val codec = exchangeFinder.find(client, chain)
  val result = Exchange(this, eventListener, exchangeFinder, codec)
  this.interceptorScopedExchange = result
  this.exchange = result
  synchronized(this) {
    this.requestBodyOpen = true
    this.responseBodyOpen = true
  }

  if (canceled) throw IOException("Canceled")
  return result
}
exchangeFinder
fun find(
  client: OkHttpClient,
  chain: RealInterceptorChain
): ExchangeCodec {
  try {
    val resultConnection = findHealthyConnection(
        connectTimeout = chain.connectTimeoutMillis,
        readTimeout = chain.readTimeoutMillis,
        writeTimeout = chain.writeTimeoutMillis,
        pingIntervalMillis = client.pingIntervalMillis,
        connectionRetryEnabled = client.retryOnConnectionFailure,
        doExtensiveHealthChecks = chain.request.method != "GET"
    )
    return resultConnection.newCodec(client, chain)
  } catch (e: RouteException) {
    trackFailure(e.lastConnectException)
    throw e
  } catch (e: IOException) {
    trackFailure(e)
    throw RouteException(e)
  }
}
- 通过
findHealthyConnection找到一个健康的连接resultConnection,也就是一个活跃的连接, - 调用
resultConnection.newCodec(client, chain)获取到ExchangeCodec进行返回
findHealthyConnection
@Throws(IOException::class)
private fun findHealthyConnection(
  connectTimeout: Int,
  readTimeout: Int,
  writeTimeout: Int,
  pingIntervalMillis: Int,
  connectionRetryEnabled: Boolean,
  doExtensiveHealthChecks: Boolean
): RealConnection {
  while (true) {
    val candidate = findConnection(
        connectTimeout = connectTimeout,
        readTimeout = readTimeout,
        writeTimeout = writeTimeout,
        pingIntervalMillis = pingIntervalMillis,
        connectionRetryEnabled = connectionRetryEnabled
    )

    if (candidate.isHealthy(doExtensiveHealthChecks)) {
      return candidate
    }
    candidate.noNewExchanges()
    if (nextRouteToTry != null) continue
    val routesLeft = routeSelection?.hasNext() ?: true
    if (routesLeft) continue
    val routesSelectionLeft = routeSelector?.hasNext() ?: true
    if (routesSelectionLeft) continue
    throw IOException("exhausted all routes")
  }
}
findConnection从OkHttp的连接池中找到对应的RealConnection进行返回,如果没有的话,则创建一个candidate.isHealthy(doExtensiveHealthChecks)检查该连接是否活跃可用- 如果当前连接是不健康,则调用
candidate.noNewExchanges()将noNewExchanges设置为true,表示该连接存在问题 if (routesSelectionLeft) continue判断是否还有其他路由需要尝试,如果有的话则返回true,进入下一循环。
findConnection()
@Throws(IOException::class)
private fun findConnection(
  connectTimeout: Int,
  readTimeout: Int,
  writeTimeout: Int,
  pingIntervalMillis: Int,
  connectionRetryEnabled: Boolean
): RealConnection {
  if (call.isCanceled()) throw IOException("Canceled")
  val callConnection = call.connection
  if (callConnection != null) {
    var toClose: Socket? = null
    synchronized(callConnection) {
      if (callConnection.noNewExchanges || !sameHostAndPort(callConnection.route().address.url)) {
        toClose = call.releaseConnectionNoEvents()
      }
    }

    if (call.connection != null) {
      check(toClose == null)
      return callConnection
    }

    toClose?.closeQuietly()
    eventListener.connectionReleased(call, callConnection)
  }

  refusedStreamCount = 0
  connectionShutdownCount = 0
  otherFailureCount = 0

  if (connectionPool.callAcquirePooledConnection(address, call, null, false)) {
    val result = call.connection!!
    eventListener.connectionAcquired(call, result)
    return result
  }

  val routes: List<Route>?
  val route: Route
  if (nextRouteToTry != null) {
    routes = null
    route = nextRouteToTry!!
    nextRouteToTry = null
  } else if (routeSelection != null && routeSelection!!.hasNext()) {
    routes = null
    route = routeSelection!!.next()
  } else {
    var localRouteSelector = routeSelector
    if (localRouteSelector == null) {
      localRouteSelector = RouteSelector(address, call.client.routeDatabase, call, eventListener)
      this.routeSelector = localRouteSelector
    }
    val localRouteSelection = localRouteSelector.next()
    routeSelection = localRouteSelection
    routes = localRouteSelection.routes

    if (call.isCanceled()) throw IOException("Canceled")

    if (connectionPool.callAcquirePooledConnection(address, call, routes, false)) {
      val result = call.connection!!
      eventListener.connectionAcquired(call, result)
      return result
    }

    route = localRouteSelection.next()
  }

  val newConnection = RealConnection(connectionPool, route)
  call.connectionToCancel = newConnection
  try {
    newConnection.connect(
        connectTimeout,
        readTimeout,
        writeTimeout,
        pingIntervalMillis,
        connectionRetryEnabled,
        call,
        eventListener
    )
  } finally {
    call.connectionToCancel = null
  }
  call.client.routeDatabase.connected(newConnection.route())

  if (connectionPool.callAcquirePooledConnection(address, call, routes, true)) {
    val result = call.connection!!
    nextRouteToTry = route
    newConnection.socket().closeQuietly()
    eventListener.connectionAcquired(call, result)
    return result
  }

  synchronized(newConnection) {
    connectionPool.put(newConnection)
    call.acquireConnectionNoEvents(newConnection)
  }

  eventListener.connectionAcquired(call, newConnection)
  return newConnection
}
-
call.connection首先从RealCall对象中获取RealConnection。 -
在获取到
RealConnection对象时,存在三种情况RealConnection对象不为空,但是host和port不匹配RealConnection对象不为空,完全匹配RealConnection对象为空
-
判断
RealConnection对象是否为空, 如果不为空则检查一下host和port是否匹配。- 如果不匹配则调用
releaseConnectionNoEvents(),把RealConnection绑定的RealCall队列中对应的RealCall移除,并从ConnectionPool中移除该RealConnection,当前RealCall中绑定的RealConnection设置为空, 并获取当前缓存RealConnection的socket对象,并关闭该socket。 - 如果
noNewExchanges为false,并且host和port匹配,则返回该callConnection对象 - 如果
RealConnection对象为空,则会通过connectionPool和route生成一个新的RealConnection对象
- 如果不匹配则调用
.......省略。。。
NetWorkInterceptor(网络连接器)
CallServerInterceptor(请求拦截器)
@Throws(IOException::class)
override fun intercept(chain: Interceptor.Chain): Response {
  val realChain = chain as RealInterceptorChain
  val exchange = realChain.exchange!!
  val request = realChain.request
  val requestBody = request.body
  val sentRequestMillis = System.currentTimeMillis()

  exchange.writeRequestHeaders(request)

  var invokeStartEvent = true
  var responseBuilder: Response.Builder? = null
  if (HttpMethod.permitsRequestBody(request.method) && requestBody != null) {
    if ("100-continue".equals(request.header("Expect"), ignoreCase = true)) {
      exchange.flushRequest()
      responseBuilder = exchange.readResponseHeaders(expectContinue = true)
      exchange.responseHeadersStart()
      invokeStartEvent = false
    }
    if (responseBuilder == null) {
      if (requestBody.isDuplex()) {
        exchange.flushRequest()
        val bufferedRequestBody = exchange.createRequestBody(request, true).buffer()
        requestBody.writeTo(bufferedRequestBody)
      } else {
        val bufferedRequestBody = exchange.createRequestBody(request, false).buffer()
        requestBody.writeTo(bufferedRequestBody)
        bufferedRequestBody.close()
      }
    } else {
      exchange.noRequestBody()
      if (!exchange.connection.isMultiplexed) {
        exchange.noNewExchangesOnConnection()
      }
    }
  } else {
    exchange.noRequestBody()
  }

  if (requestBody == null || !requestBody.isDuplex()) {
    exchange.finishRequest()
  }
  if (responseBuilder == null) {
    responseBuilder = exchange.readResponseHeaders(expectContinue = false)!!
    if (invokeStartEvent) {
      exchange.responseHeadersStart()
      invokeStartEvent = false
    }
  }
  var response = responseBuilder
      .request(request)
      .handshake(exchange.connection.handshake())
      .sentRequestAtMillis(sentRequestMillis)
      .receivedResponseAtMillis(System.currentTimeMillis())
      .build()
  var code = response.code
  if (code == 100) {
    responseBuilder = exchange.readResponseHeaders(expectContinue = false)!!
    if (invokeStartEvent) {
      exchange.responseHeadersStart()
    }
    response = responseBuilder
        .request(request)
        .handshake(exchange.connection.handshake())
        .sentRequestAtMillis(sentRequestMillis)
        .receivedResponseAtMillis(System.currentTimeMillis())
        .build()
    code = response.code
  }

  exchange.responseHeadersEnd(response)

  response = if (forWebSocket && code == 101) {
    response.newBuilder()
        .body(EMPTY_RESPONSE)
        .build()
  } else {
    response.newBuilder()
        .body(exchange.openResponseBody(response))
        .build()
  }
  if ("close".equals(response.request.header("Connection"), ignoreCase = true) ||
      "close".equals(response.header("Connection"), ignoreCase = true)) {
    exchange.noNewExchangesOnConnection()
  }
  if ((code == 204 || code == 205) && response.body?.contentLength() ?: -1L > 0L) {
    throw ProtocolException(
        "HTTP $code had non-zero Content-Length: ${response.body?.contentLength()}")
  }
  return response
}
exchange.writeRequestHeaders(request)写入请求头信息- 判断请求方式是不是
GET或HEAD,如果不是则需要传入请求体,接着判断请求头中的Expect值是否为100-continue,如果是的话,则会读取响应体的头部信息,如果读出的Response.Builder为空,接着判断requestBody.isDuplex(),如果为true的话,则刷新缓冲区,通过exchange.createRequestBody(request, true).buffer()创建bufferedRequestBody,往请求的requestBody写入数据,如果为false的话,,通过exchange.createRequestBody(request, true).buffer()创建bufferedRequestBody,写入输出流中发送数据。 - 如果请求方式是
GET或HEAD的话,则没有请求体。 - 如果
requestBody为空,也就是没有请求体,或者requestBody.isDuplex()为false的话,则结束请求。 - 如果responseBuilder为空的话,则调用
exchange.readResponseHeaders方法 - 获取响应体
- 判断响应体的code是否为100,如果响应体为100 则是说后面还有数据需要传输,则会重新调用
exchange.readResponseHeaders方法,再次生成响应体 - 判断code是否为101 并且 为websocekt请求,如果是的话,则生成一个空的response,否则就会通过
exchange.openResponseBody(response)读取response中的数据生成一个响应体。 - 最后判断code是否为204、205并且响应体的body为空的话则抛出异常,否则正常返回
。。。。。。。省略
参考:
Overview - OkHttp
OkHttp-源码分析(一) - 掘金
OkHttp-源码分析(二) - 掘金
OkHttp-源码分析(三) - 掘金
OKHTTP 源码分析(1)调用流程梳理_okhttpclient().newbuilder().build();-CSDN博客


![2023年中国钢卷尺产量、销量、市场均价及市场规模分析[图]](https://img-blog.csdnimg.cn/img_convert/4b4a3257eb1f6b98588224effc6c9a04.png)