目录
一、axiox
1.1、axios 简介
1.2、axios 基本使用
1.2.1、下载核心 js 文件.
1.2.2、发送 GET 异步请求
1.2.3、发送 POST 异步请求
1.2.4、发送 GET、POST 请求最佳实践
1.3、请求响应拦截器
1.3.1、拦截器解释
1.3.2、请求拦截器的使用
1.3.3、响应拦截器的使用
一、axiox
1.1、axios 简介
axios 用来在前端页面发起一个异步请求,请求之后页面不动,响应回来刷新局部.
1.为什么不使用 ajax 呢?
官方:在 jQuery 中推荐使用 ajax 技术, Vue 里面不推荐使用 jQuery 框架,因此 Vue 更推荐使用 axiox 异步请求库(axios并不是 vue 官方库).
2.axios 特性
- 可以从浏览器中创建 XMLHttpRequests
- 可以从 node.js 中创建 http 请求.
- 支持 Promise API.
- 支持拦截请求和响应.
- 转换请求数据和响应数据.
- 取消请求.
- 自动转换 JSON 格式数据.
- 客户端支持防御 XSRF.
1.2、axios 基本使用
1.2.1、下载核心 js 文件.
<script src="https://unpkg.com/axios/dist/axios.min.js"></script>
Ps:建议提前下载下来,放到一个 js 文件夹中,需要的使用引用即可(方便不联网使用).
1.2.2、发送 GET 异步请求
例如对 http://localhost:8080/user/login?username=cyk&password=1111 发送 get 请求.
Ps:通过 get 请求发送请求中,携带的参数不会封装成 JSON 格式.
前端代码如下:
                    axios.get("http://localhost:8080/user/login?username=cyk&password=1111")
                        .then(function (success) { //success 是自定义响应的参数名
                            //返回成功的响应
                            console.log(success); //响应是一个 JSON 格式(axios 自动封装的)
                            console.log(success.data);
                        }).catch(function (error) { //error 是自定义的响应参数名
                            //返回失败的响应(例如,状态码为 403、500......)
                            console.log(error);
})- then:表示返回成功的响应需要执行的方法.
- catch:捕获错误的响应,执行对应的方法.
后端代码如下:
@RestController
@RequestMapping("/user")
public class UserController {

    @RequestMapping("/login")
    public String login(String username, String password) {
        if(!StringUtils.hasLength(username) || !StringUtils.hasLength(password)) {
            return "账号或密码错误,登录失败";
        }
        if(username.equals("cyk") && password.equals("1111")) {
            return "登录成功";
        }
        return "账号或密码错误,登录失败";
    }

}
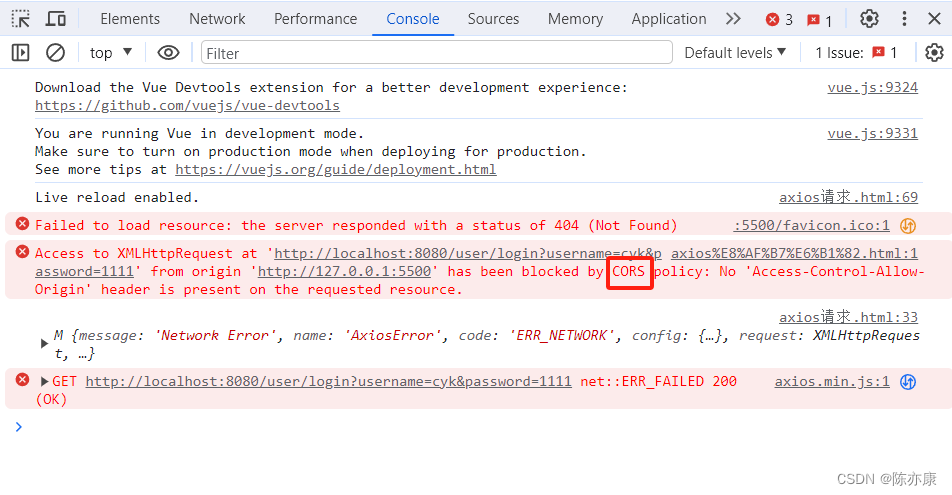
前端发送响应后,效果如下:
解释:
- CORS 就是解决跨域问题的办法(这里出现了跨域问题,系统给你提示解决办法). 因为是前端通过 Live Server 插件打开,自动分配 5500 端口,也就意味着,你的请求是从 5500 端口发出,而后端接收响应却是 8080 端口,这导致了跨域问题(浏览器禁止这个操作)
- 由于响应是错误的,因此被 axios 的 catch 捕获到,通过 console.log 显示在控制台上.
在微服务项目中,就需要通过 Gataway 来解决. 当前为了方便演示,使用 Spring Boot 处理,因此只需要在 controller 层上加 @CrossOrigin 注解即可解决跨域.
添加注解后后,重启后端服务,重新发送请求,效果如下:
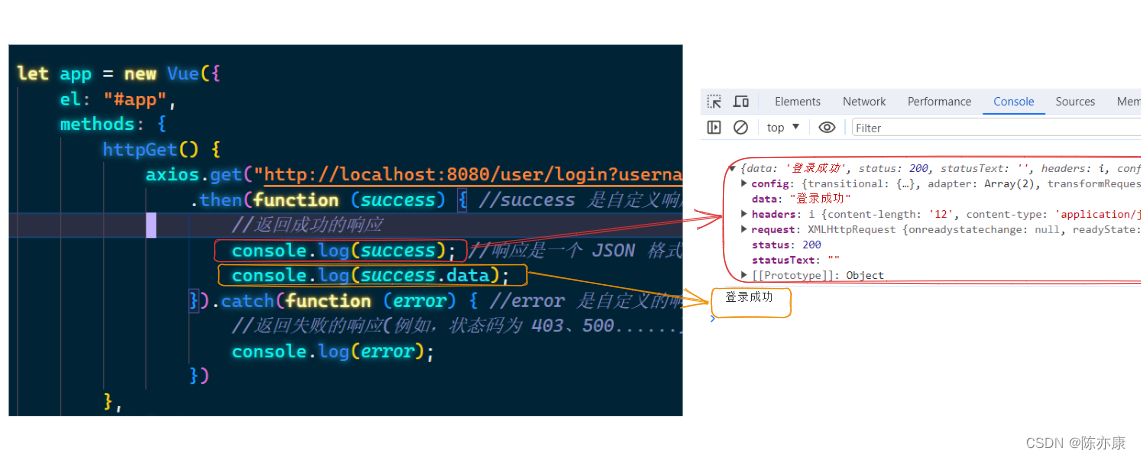
可以看到前端接收到的响应是一个 json 格式的响应.
1.2.3、发送 POST 异步请求
例如对 http://localhost:8080/user/login 发送 POST 请求,携带 JSON 格式参数(axios 自动转化):{ "username"="cyk", "password"='1111"}.
前端代码如下:
                    axios.post("http://localhost:8080/user/login", { username: "cyk", password: "1111" })
                        .then(function (success) {
                            //返回成功的响应
                            console.log(success); //响应是一个 JSON 格式(axios 自动封装的)
                            console.log(success.data);
                        }).catch(function (error) {
                            //返回失败的响应(例如,状态码为 403、500......)
                            console.log(error);
                        })
后端接收的时候,就要创建一个对应的实体类,并加上 @RequestBody 注解来接收 JSON 格式数据.
@Data
public class Userinfo {

    private String username;
    private String password;

}
@RestController
@RequestMapping("/user")
@CrossOrigin
public class UserController {

    @RequestMapping("/login")
    public String login(@RequestBody Userinfo userinfo) {
        if(userinfo == null || !StringUtils.hasLength(userinfo.getUsername())
                || !StringUtils.hasLength(userinfo.getPassword())) {
            return "账号或密码错误,登录失败";
        }
        if(userinfo.getUsername().equals("cyk") && userinfo.getPassword().equals("1111")) {
            return "登录成功";
        }
        return "账号或密码错误,登录失败";
    }

}
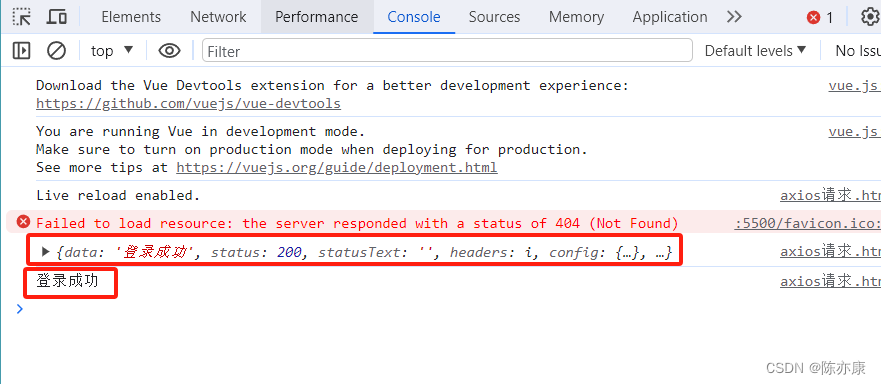
发送请求后,效果如下:
1.2.4、发送 GET、POST 请求最佳实践
通过上述方式,实现了 发送 GET 和 POST 请求,观察仔细的小伙伴会发现,每发送一个请求就需要写一次 请求的 ip 和 端口号,耦合度太高,后期一旦要跟换服务器的 ip 和端口号,所有地方都需要更改.
因此我们可以先创建好一份 axios 实例,将 服务器的 ip 和 port 提前写好,后期需要发送请求的时候再通过这里实例发送对应的路由即可.
具体的通过 axios.create({}) 来出创建实例,传入的是一个对象,对象中的参数有很多,我们只需要知道两个最常用的即可.
- baseURL:指定请求的目的服务器 ip 和 port.
- timeout:超时时间(单位是 ms),超过时间没有得到响应,就会直接报超时错误.
示例如下:
        let axiosInstance = axios.create({
            baseURL: "http://localhost:8080",
            timeout: 5000
        });

        let app = new Vue({
            el: "#app",
            methods: {
                httpGet() {
                    axiosInstance.get("/user/login?username=cyk&password=1111")
                        .then(function (success) { //success 是自定义响应的参数名
                            //返回成功的响应
                            console.log(success); //响应是一个 JSON 格式(axios 自动封装的)
                            console.log(success.data);
                        }).catch(function (error) { //error 是自定义的响应参数名
                            //返回失败的响应(例如,状态码为 403、500......)
                            console.log(error);
                        })
                },
                httpPost() {
                    axiosInstance.post("/user/login", { username: "cyk", password: "1111" })
                        .then(function (success) {
                            //返回成功的响应
                            console.log(success); //响应是一个 JSON 格式(axios 自动封装的)
                            console.log(success.data);
                        }).catch(function (error) {
                            //返回失败的响应(例如,状态码为 403、500......)
                            console.log(error);
                        })
                }
            }
        });
Ps:还有其他请求类型,请求格式和 POST 几乎一样. 除了 DELETE 请求和 GET 几乎一样,一般传递的参数只有 id(后端根据 id 删除信息).
1.3、请求响应拦截器
1.3.1、拦截器解释
用来将 axios 中公共参数,响应进行统一处理,减少 axios 发送请求时或者接收响应时代码的冗余.
1.3.2、请求拦截器的使用
请求拦截器:例如在微服务架构中,我们常常使用 Token 令牌作为用户身份认证标识,也就意味着,前端发送的每个请求中都需要在 header 中添加 Token,这就需要使用 请求拦截器 做统一处理.
这里我们打印出来看看请求拦截器,拦截了哪些东西:
        //创建统一的实例
        let axiosInstance = axios.create({
            baseURL: "http://localhost:8080",
        });

        // axios.interceptors.request.use 这里不使用这种单一创建的方法,而是使用统一的实例,如下

        //请求拦截器
        axiosInstance.interceptors.request.use(function (config) { //自定义参数名,拦截下来的是请求的配置
            console.log(config);
            return config; //这里必须要返回这个参数! 否则报错!
        });

        let app = new Vue({
            el: "#app",
            methods: {
                httpGET() {
                    axiosInstance.get("/user/sayHi")
                        .then(function (success) {
                            console.log(success.data);
                        });
                }
            }
        });
后端代码如下:
    @RequestMapping("/sayHi")
    public String sayHi(String token) {
        if(StringUtils.hasLength(token)) {
            System.out.println(token);
        }
        return "hello!";
    }
效果如下:

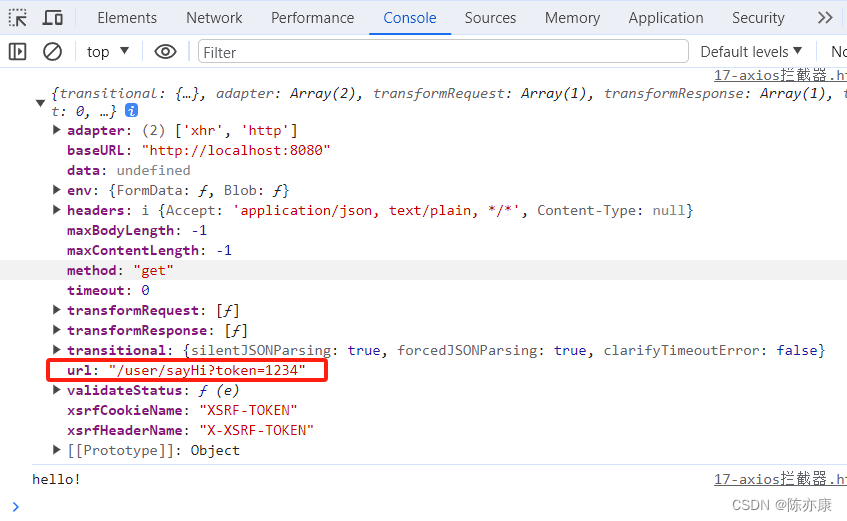
可以看到,我们通过 请求拦截器,在请求发到服务器之间,修改配置.
例如将请求拦截下来,在 url 最后加上 token 参数.
        axiosInstance.interceptors.request.use(function (config) {
            console.log(config);
            if (config.url.indexOf("?") == -1) {
                // url 后面没有设置参数. 添加参数时注意加上 "?"
                config.url += "?token=1234";
            } else {
                config.url += "&token=1234";
            }
            return config;
        });
效果如下:
1.3.3、响应拦截器的使用
响应拦截器:对后端发来的所有响应进行拦截,进行 统一处理.
例如可以对错误的响应(catch)进行统一的处理.
        axiosInstance.interceptors.response.use(function (response) { //自定义响应参数名
            console.log(response);
            if (response.status == 500) {
                alert("服务器出现错误");
            }
            //其他错误处理...
            return response; //这里必须返回 response,否则报错
        });
效果如下:

Ps:有了统一响应异常的统一处理之后,axios 中的 catch 部分就可以省略不写了.

