您好,如果喜欢我的文章,可以关注我的公众号「量子前端」,将不定期关注推送前端好文~
前言
本文将从项目搭建到实现从零到一开发一个登录、注册、鉴权的简易版注册登录系统,主要功能和技术选型如下:
- 服务端框架———
Midway.js; - 密码加密存储———
bcrypt.js; - 数据库存储———
typeorm、mysql; - 登录鉴权———
jwt;
准备工作
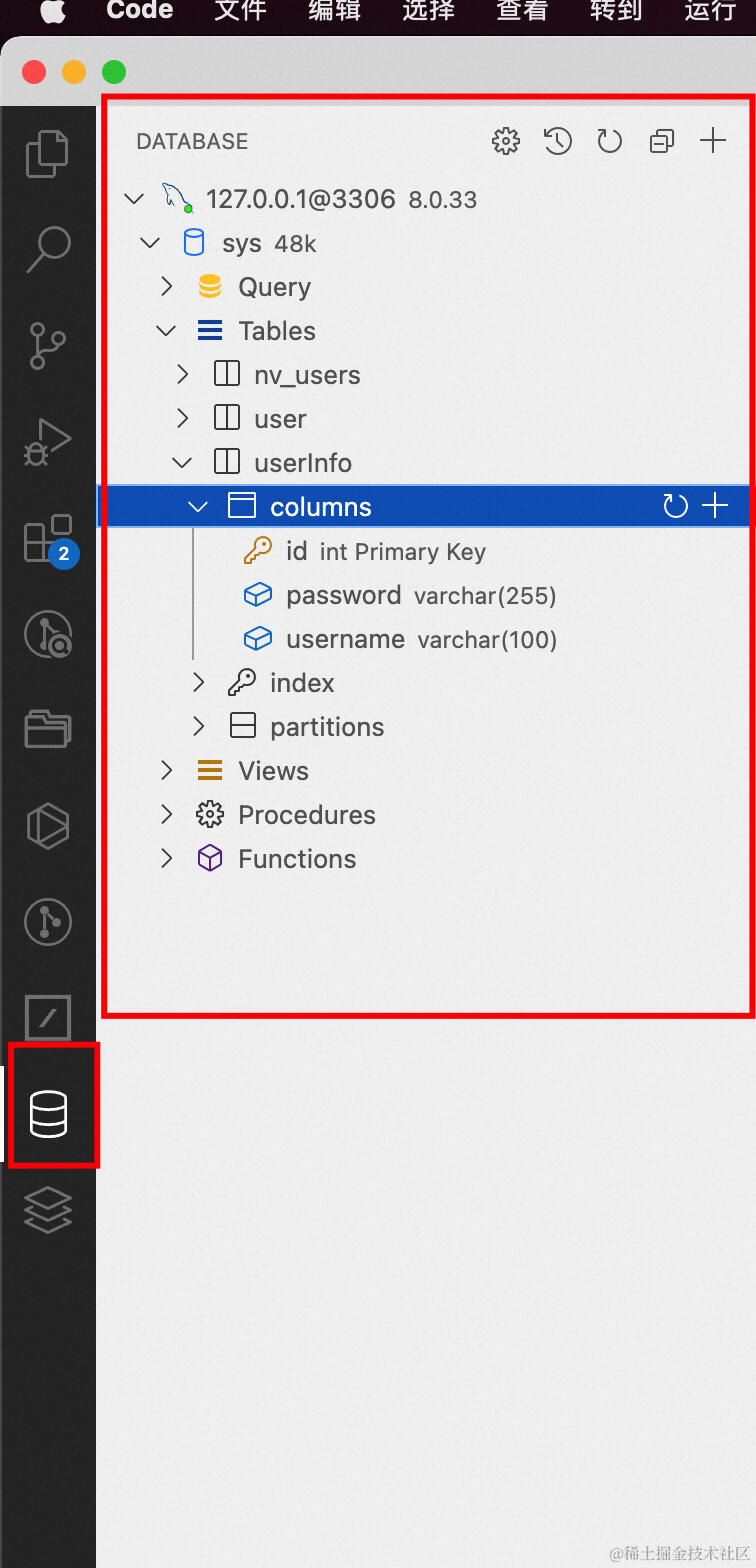
安装mysql环境、建好数据库和一张user表,Dbeaver或vscode database用于初始化表字段。
全流程
首先我们创建一个Midway项目。
npm init midway@latest -y
初始化数据库环境
然后第一步先初始化项目数据库环境,连接mysql,安装数据库相关依赖包。
npm i @midwayjs/typeorm@3 typeorm mysql2 --save
然后在configuration.ts中引入typeorm组件:
// configuration.ts
import { Configuration } from '@midwayjs/core';
import * as orm from '@midwayjs/typeorm';
import { join } from 'path';

@Configuration({
  imports: [
    // ...
    orm                                                         // 加载 typeorm 组件
  ],
  importConfigs: [
    join(__dirname, './config')
  ]
})
export class MainConfiguration {

}
然后在config目录中配置数据库信息:
import { MidwayConfig } from '@midwayjs/core';
import { User } from '../entity/user.entity';

export default {
  // use for cookie sign key, should change to your own and keep security
  keys: '1697424147281_6188',
  koa: {
    port: 7001,
  },
  typeorm: {
    dataSource: {
      default: {
        /**
         * 单数据库实例
         */
        type: 'mysql',
        host: 'localhost',
        port: 3306,
        username: 'root',
        password: 'xxxxx',
        database: '数据库名',
        synchronize: false, // 如果第一次使用,不存在表,有同步的需求可以写 true,注意会丢数据
        logging: false,

        // 配置实体模型
        entities: [User],
      },
    },
  },
} as MidwayConfig;
最后我们还需要一个数据表实例,新建/entity/user.entity.ts,代码如下:
import { Entity, Column, PrimaryColumn } from 'typeorm';

@Entity('userInfo')
export class User {
  @PrimaryColumn()
  id: number;

  @Column()
  username: string;

  @Column()
  password: string;
}
至此关于数据库配置环境已经OK了,项目已经和数据库关联起来了。
登录注册接口
然后新建一个user.controller.ts和user.service.ts,controller用于中转服务,service用于存放业务逻辑代码。
user.controller.ts:
import { Inject, Controller, Post } from '@midwayjs/core';
import { Context } from '@midwayjs/koa';
import { UserService } from '../service/user.service';

@Controller('/api')
export class APIController {
  @Inject()
  ctx: Context;

  @Inject()
  userService: UserService;

  @Post('/register')
  async register() {
    const params = this.ctx.request.body as {
      username: string;
      password: string;
    };
    const user = await this.userService.register(params);
    return { success: true, message: 'OK', data: user };
  }

  @Post('/login')
  async login() {
    const params = this.ctx.request.body as {
      username: string;
      password: string;
    };
    const user = await this.userService.login(params);
    return { success: true, message: 'OK', data: user };
  }
}
我们再把service的雏形给写出来,代码如下:
user.service.ts
import { Provide, httpError, Inject, Context } from '@midwayjs/core';
import { User } from '../entity/user.entity';
import { InjectEntityModel } from '@midwayjs/typeorm';
import { Repository } from 'typeorm';
const { v4: uuidv4 } = require('uuid');
import { JwtService } from '@midwayjs/jwt';

@Provide()
export class UserService {
  @InjectEntityModel(User)
  userModal: Repository<User>;

  @Inject()
  jwtService: JwtService;

  @Inject()
  ctx: Context;

  async register(options: { username: string; password: string }) {
    const { username, password } = options;
    return {
      success: true,
      username,
      res: '注册成功',
    };
  }

  async login(options: { username: string; password: string }) {
    const { username, password } = options;
    return {
      accessToken: 'xxxx',
    };
  }
}
前面已经让项目和数据库关联了,现在需要让接口与数据表绑定起来,我们可以通过InjectEntityModel在接口服务中注入表信息,来进行增删改查操作,有了操作数据库的能力,就可以开始开发主体逻辑了。
注册
user.service.ts:
/*
 * @Author: 幻澄
 * @Date: 2023-10-16 10:42:27
 * @LastEditors: 幻澄
 * @LastEditTime: 2023-10-16 16:06:07
 * @FilePath: /midway-jwt/src/service/user.service.ts
 */
import { Provide, httpError, Inject, Context } from '@midwayjs/core';
import { User } from '../entity/user.entity';
import { InjectEntityModel } from '@midwayjs/typeorm';
import { Repository } from 'typeorm';
const { v4: uuidv4 } = require('uuid');
import { JwtService } from '@midwayjs/jwt';

@Provide()
export class UserService {
  @InjectEntityModel(User)
  userModal: Repository<User>;

  @Inject()
  jwtService: JwtService;

  @Inject()
  ctx: Context;

  async register(options: { username: string; password: string }) {
    const { username, password } = options;
    const user = new User();
    const findRes = await this.userModal.findOne({
      where: {
        username,
      },
    });
    if (findRes) return new httpError.BadRequestError('用户已存在');
    user.id = uuidv4();
    user.username = username;
    user.password = password;
    const res = await this.userModal.save(user);

    return {
      success: true,
      username,
      res: '注册成功',
    };
  }

  async login(options: { username: string; password: string }) {
    const { username, password } = options;
    return {
      accessToken: 'xxxx',
    };
  }
}
注册接口的逻辑如下:
- 获取请求参数
username、password; - 去
user表查重,重复则响应异常; - 生成ID,落库,响应用户信息;
我们通过ApiScout来模拟请求:
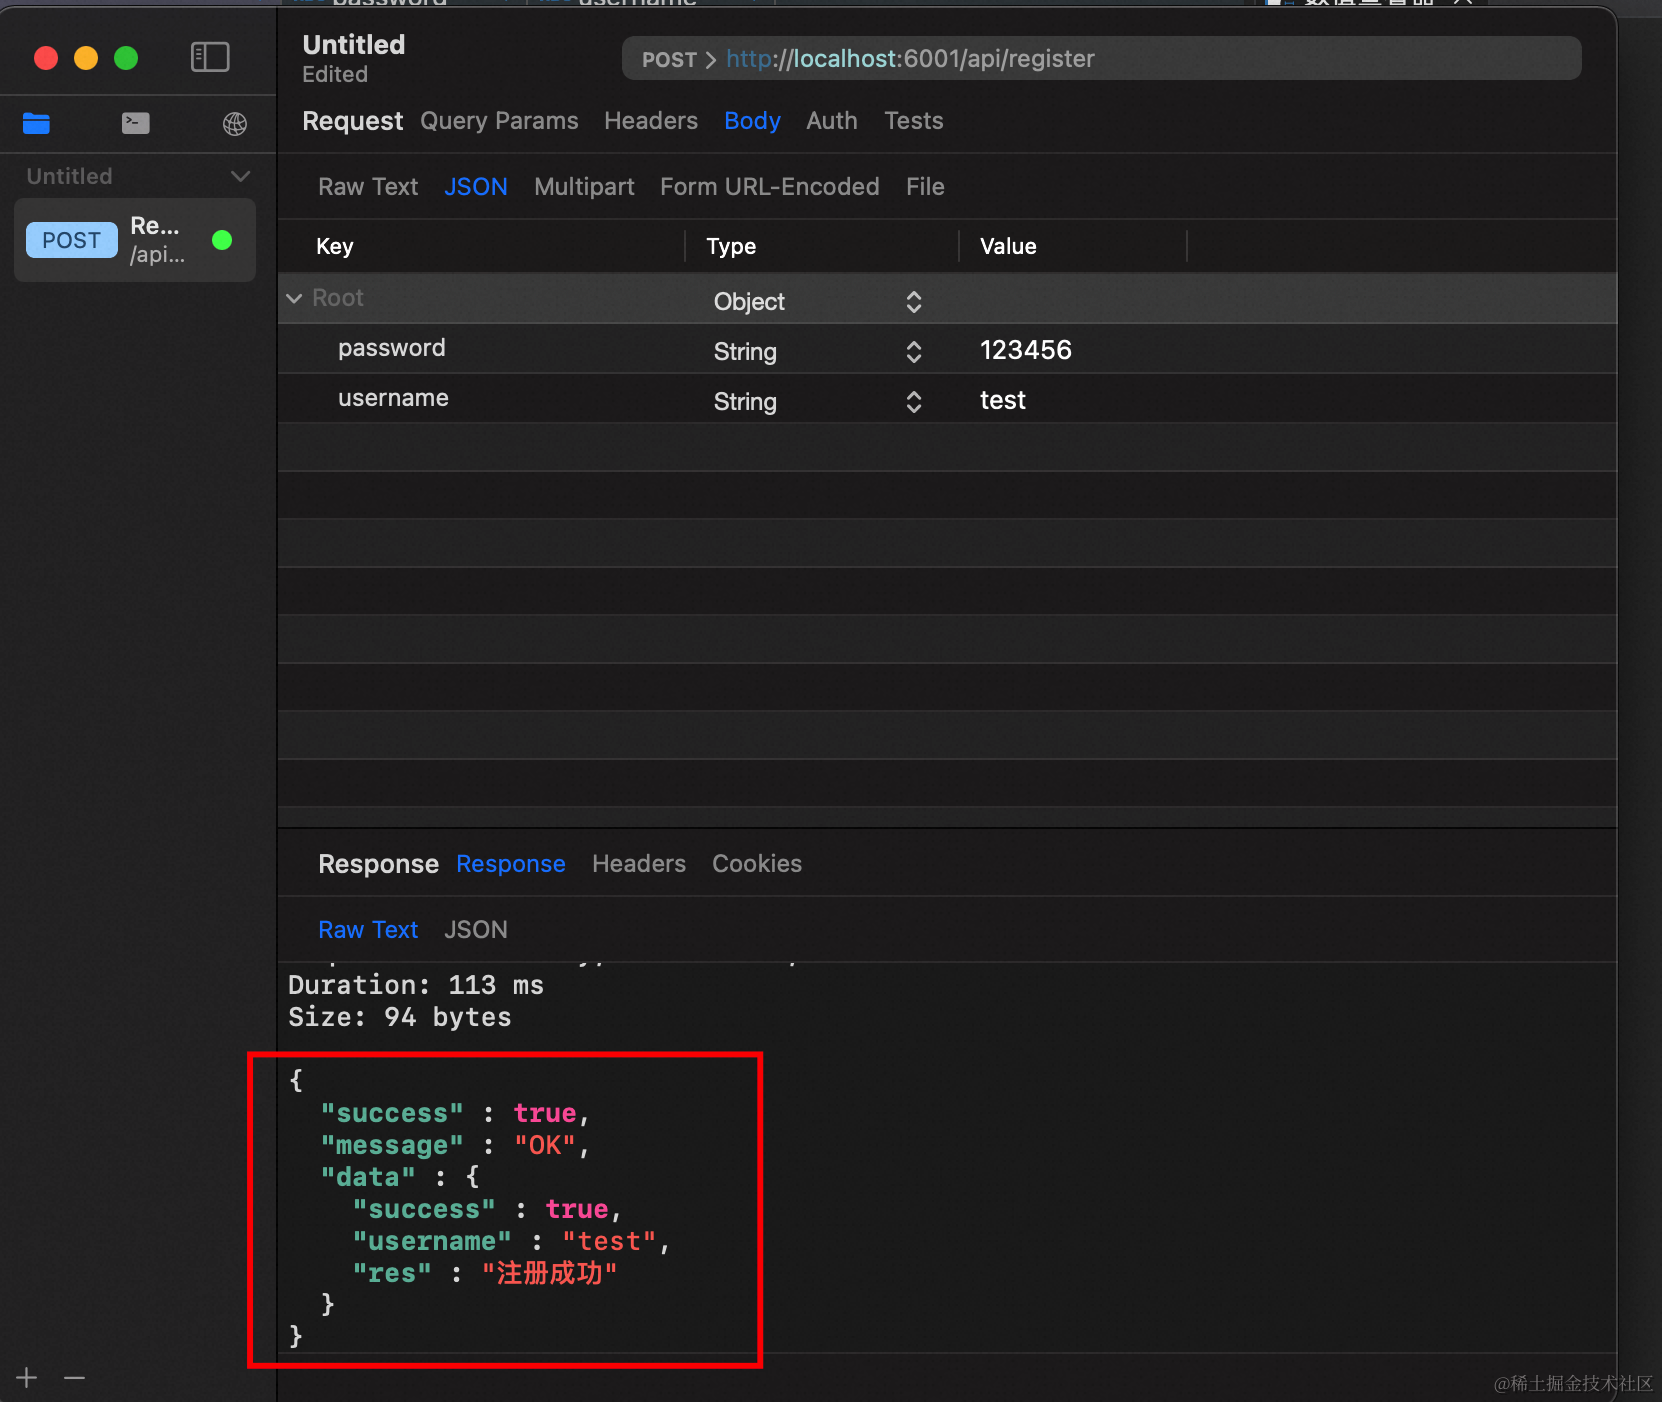
可以看到,注册信息被插入到数据表中了:

相同的入参再调一次,会返回重复用户的异常信息:
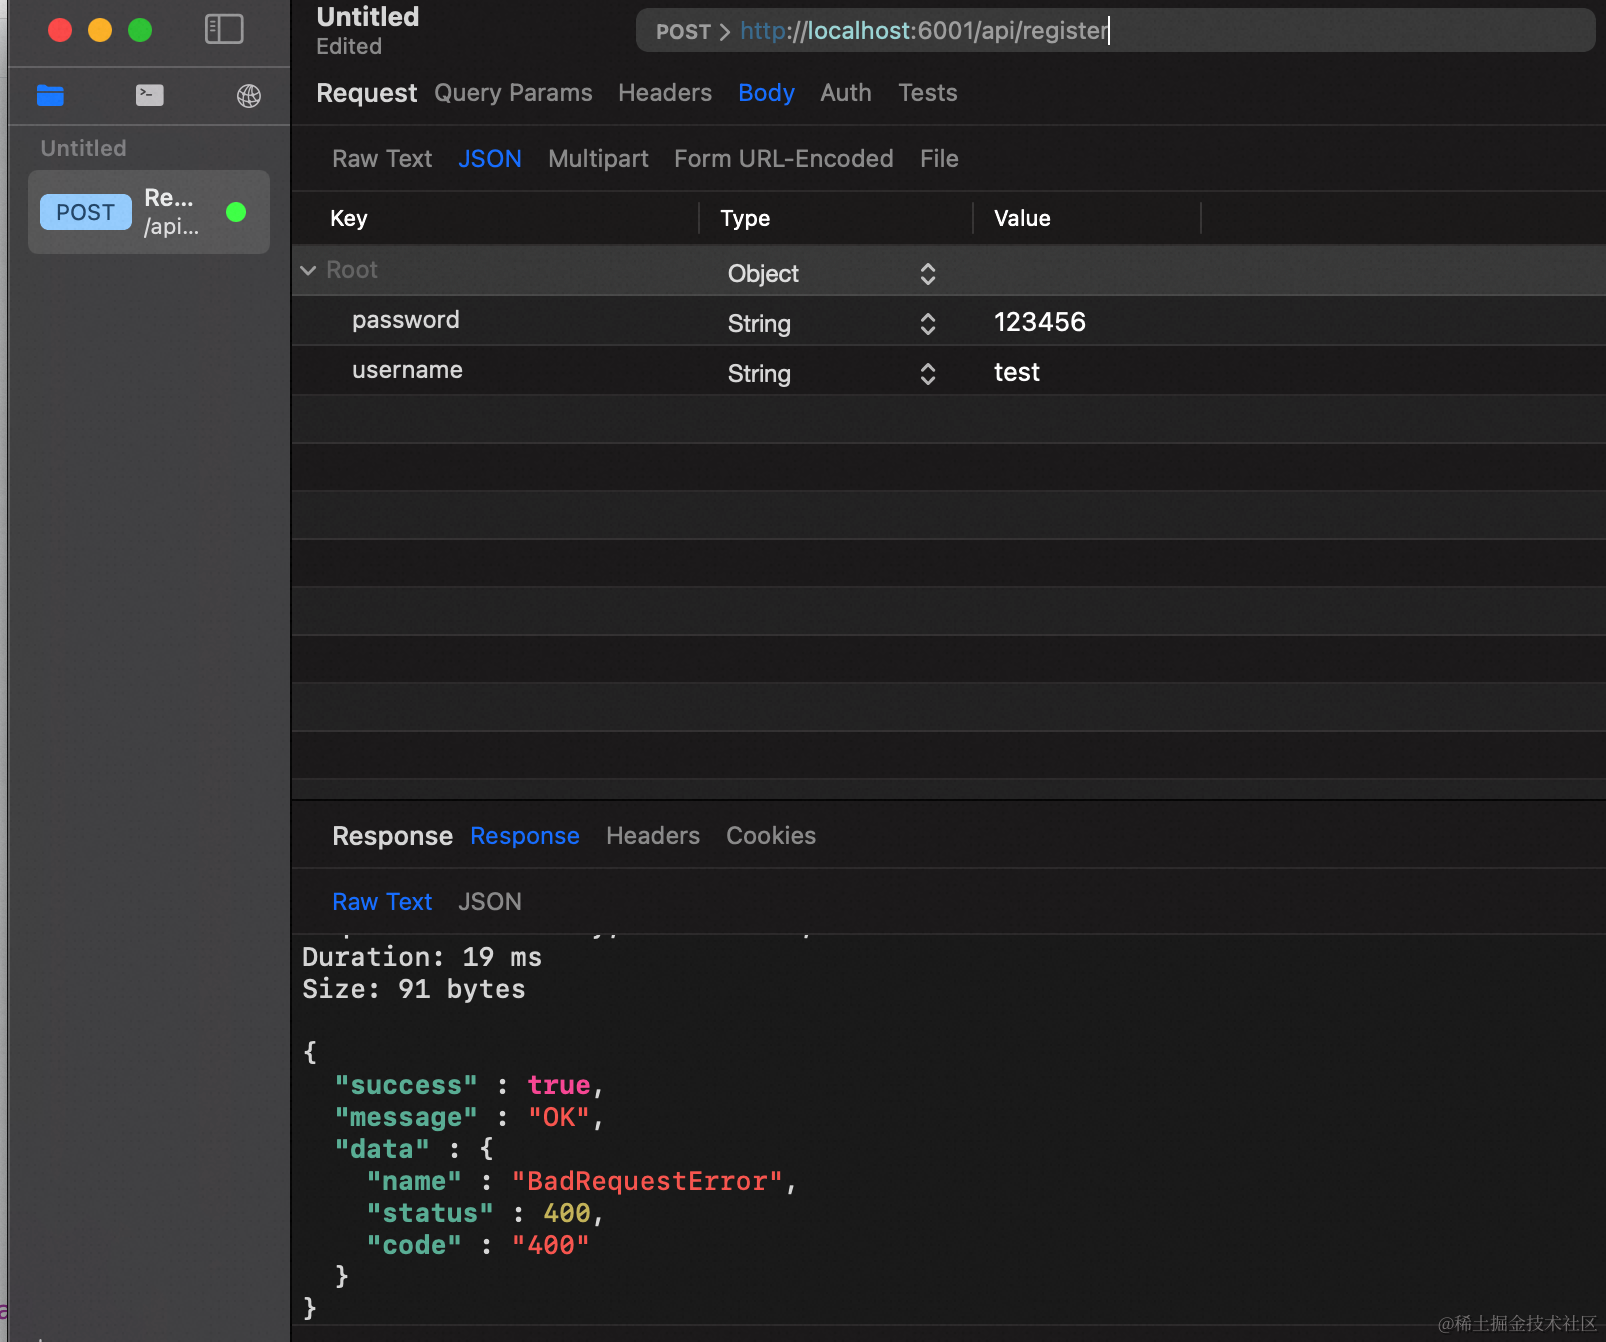
这样功能实现了,但是有个安全问题————账号密码应该加密存储在数据表中,因此我们使用bcryptjs来解决。
npm i bcryptjs --save
安装好之后我们将password加密一下,改造后的代码如下:
import { Provide, httpError, Inject, Context } from '@midwayjs/core';
import { User } from '../entity/user.entity';
import { InjectEntityModel } from '@midwayjs/typeorm';
import { Repository } from 'typeorm';
const { v4: uuidv4 } = require('uuid');
import { JwtService } from '@midwayjs/jwt';
import * as bcryptjs from 'bcryptjs';

@Provide()
export class UserService {
  @InjectEntityModel(User)
  userModal: Repository<User>;

  @Inject()
  jwtService: JwtService;

  @Inject()
  ctx: Context;

  async register(options: { username: string; password: string }) {
    const { username, password } = options;
    const user = new User();
    const findRes = await this.userModal.findOne({
      where: {
        username,
      },
    });
    if (findRes) return new httpError.BadRequestError('用户已存在');
    user.id = uuidv4();
    user.username = username;
    user.password = bcryptjs.hashSync(password, 10);
    const res = await this.userModal.save(user);

    return {
      success: true,
      username,
      res: '注册成功',
    };
  }

  async login(options: { username: string; password: string }) {
    const { username, password } = options;
    return {
      accessToken: 'xxxx',
    };
  }
}
OK,至此,注册接口就开发好了。
登录
有了注册,登录就大差不差了,简易版代码如下:
import { Provide, httpError, Inject, Context } from '@midwayjs/core';
import { User } from '../entity/user.entity';
import { InjectEntityModel } from '@midwayjs/typeorm';
import { Repository } from 'typeorm';
const { v4: uuidv4 } = require('uuid');
import { JwtService } from '@midwayjs/jwt';
import * as bcryptjs from 'bcryptjs';

@Provide()
export class UserService {
  @InjectEntityModel(User)
  userModal: Repository<User>;

  @Inject()
  jwtService: JwtService;

  @Inject()
  ctx: Context;

  async register(options: { username: string; password: string }) {
    const { username, password } = options;
    const user = new User();
    const findRes = await this.userModal.findOne({
      where: {
        username,
      },
    });
    if (findRes) return new httpError.BadRequestError('用户已存在');
    user.id = uuidv4();
    user.username = username;
    user.password = bcryptjs.hashSync(password, 10);
    const res = await this.userModal.save(user);
    console.log(55, res);

    return {
      success: true,
      username,
      res: '注册成功',
    };
  }

  async login(options: { username: string; password: string }) {
    const { username, password } = options;
    const findRes = await this.userModal.findOne({
      where: {
        username,
      },
    });
    if (!findRes) return new httpError.BadRequestError('不存在该用户');
    const compareRes: boolean = bcryptjs.compareSync(
      password,
      findRes.password
    );
    if (!compareRes) return new httpError.BadRequestError('密码错误');
    return {
      success: true
    };
  }
}
登录接口主要做了这些事情:
- 获取请求带来的
username、password; - 到
user表查用户名,不存在的话返回异常信息; - 通过
bcryptjs将登陆的明文密码和注册落库的加密密码比较,如果密码错误,返回异常信息; - 登录完成;
JWT
接下来我们加入鉴权,完善整个登录系统业务流程。
首先安装依赖包:
npm i @midwayjs/jwt --save
然后在configuration.ts中引入JWT组件:
import { Configuration, IMidwayContainer } from '@midwayjs/core';
import { IMidwayContainer } from '@midwayjs/core';
import * as jwt from '@midwayjs/jwt';

@Configuration({
  imports: [
    // ...
    jwt,
  ],
})
export class MainConfiguration {
  // ...
}
然后在config中加入JWT加密配置信息:
// src/config/config.default.ts
export default {
  // ...
  jwt: {
    secret: 'xxxxxxxxxxxxxx', // fs.readFileSync('xxxxx.key')
    expiresIn: '2d', // https://github.com/vercel/ms
  },
};
配置结束,接下来分两步走:
- 对于登录接口,产出token,返回给前端;
- 对于业务接口,依赖token,做中间件拦截判断鉴权;
先实现第一步,我们只需要在之前的login接口中增加token的逻辑即可。
user.service.ts:
export class UserService {
  @InjectEntityModel(User)
  userModal: Repository<User>;

  @Inject()
  jwtService: JwtService;

  @Inject()
  ctx: Context;

  async login(options: { username: string; password: string }) {
    const { username, password } = options;
    const findRes = await this.userModal.findOne({
      where: {
        username,
      },
    });
    if (!findRes) return new httpError.BadRequestError('不存在该用户');
    const compareRes: boolean = bcryptjs.compareSync(
      password,
      findRes.password
    );
    if (!compareRes) return new httpError.BadRequestError('密码错误');
    const token = this.jwtService.signSync({ username });
    return {
      accessToken: token,
    };
  }
}
当登录成功时,基于用户信息生成加密token,并返回给前端,前端保存在请求头的authorization,接下来每次请求都带给后端。
然后我们封装一个jwt.middleware.ts鉴权中间件,除了登录注册以外依赖个人账号相关的业务接口,都先走到中间件中,代码如下:
import { Inject, Middleware, httpError } from '@midwayjs/core';
import { Context, NextFunction } from '@midwayjs/koa';
import { JwtService } from '@midwayjs/jwt';

@Middleware()
export class JwtMiddleware {
  @Inject()
  jwtService: JwtService;

  resolve() {
    return async (ctx: Context, next: NextFunction) => {
      // 判断下有没有校验信息
      if (!ctx.headers['authorization']) {
        throw new httpError.UnauthorizedError();
      }
      // 从 header 上获取校验信息
      const parts = ctx.get('authorization').trim().split(' ');
      if (parts.length !== 2) {
        throw new httpError.UnauthorizedError();
      }

      const [scheme, token] = parts;

      if (/^Bearer$/i.test(scheme)) {
        //jwt.verify方法验证token是否有效
        await this.jwtService.verify(token, {
          complete: true,
        });
        await next();
      }
    };
  }

  // 配置忽略认证校验的路由地址
  public match(ctx: Context): boolean {
    const ignore = ['/api/login'].includes(ctx.path);
    return !ignore;
  }
}
然后在configuration.ts中引入中间件:
import { Configuration, App } from '@midwayjs/core';
import * as koa from '@midwayjs/koa';
import * as validate from '@midwayjs/validate';
import * as info from '@midwayjs/info';
import { join } from 'path';
import * as orm from '@midwayjs/typeorm';
import * as jwt from '@midwayjs/jwt';
import { JwtMiddleware } from './middleware/jwt.middleware';

@Configuration({
  imports: [
    koa,
    validate,
    {
      component: info,
      enabledEnvironment: ['local'],
    },
    orm,
    jwt,
  ],
  importConfigs: [join(__dirname, './config')],
})
export class ContainerLifeCycle {
  @App()
  app: koa.Application;

  async onReady() {
    // add middleware
    this.app.useMiddleware([JwtMiddleware]);
  }
}
这样除了中间件内部白名单的接口以外,都会先走到JWT中间件中。
简单测试一下,首先写一个/getShop接口,不在jwt白名单中,首先前端不带token发一次注册请求:
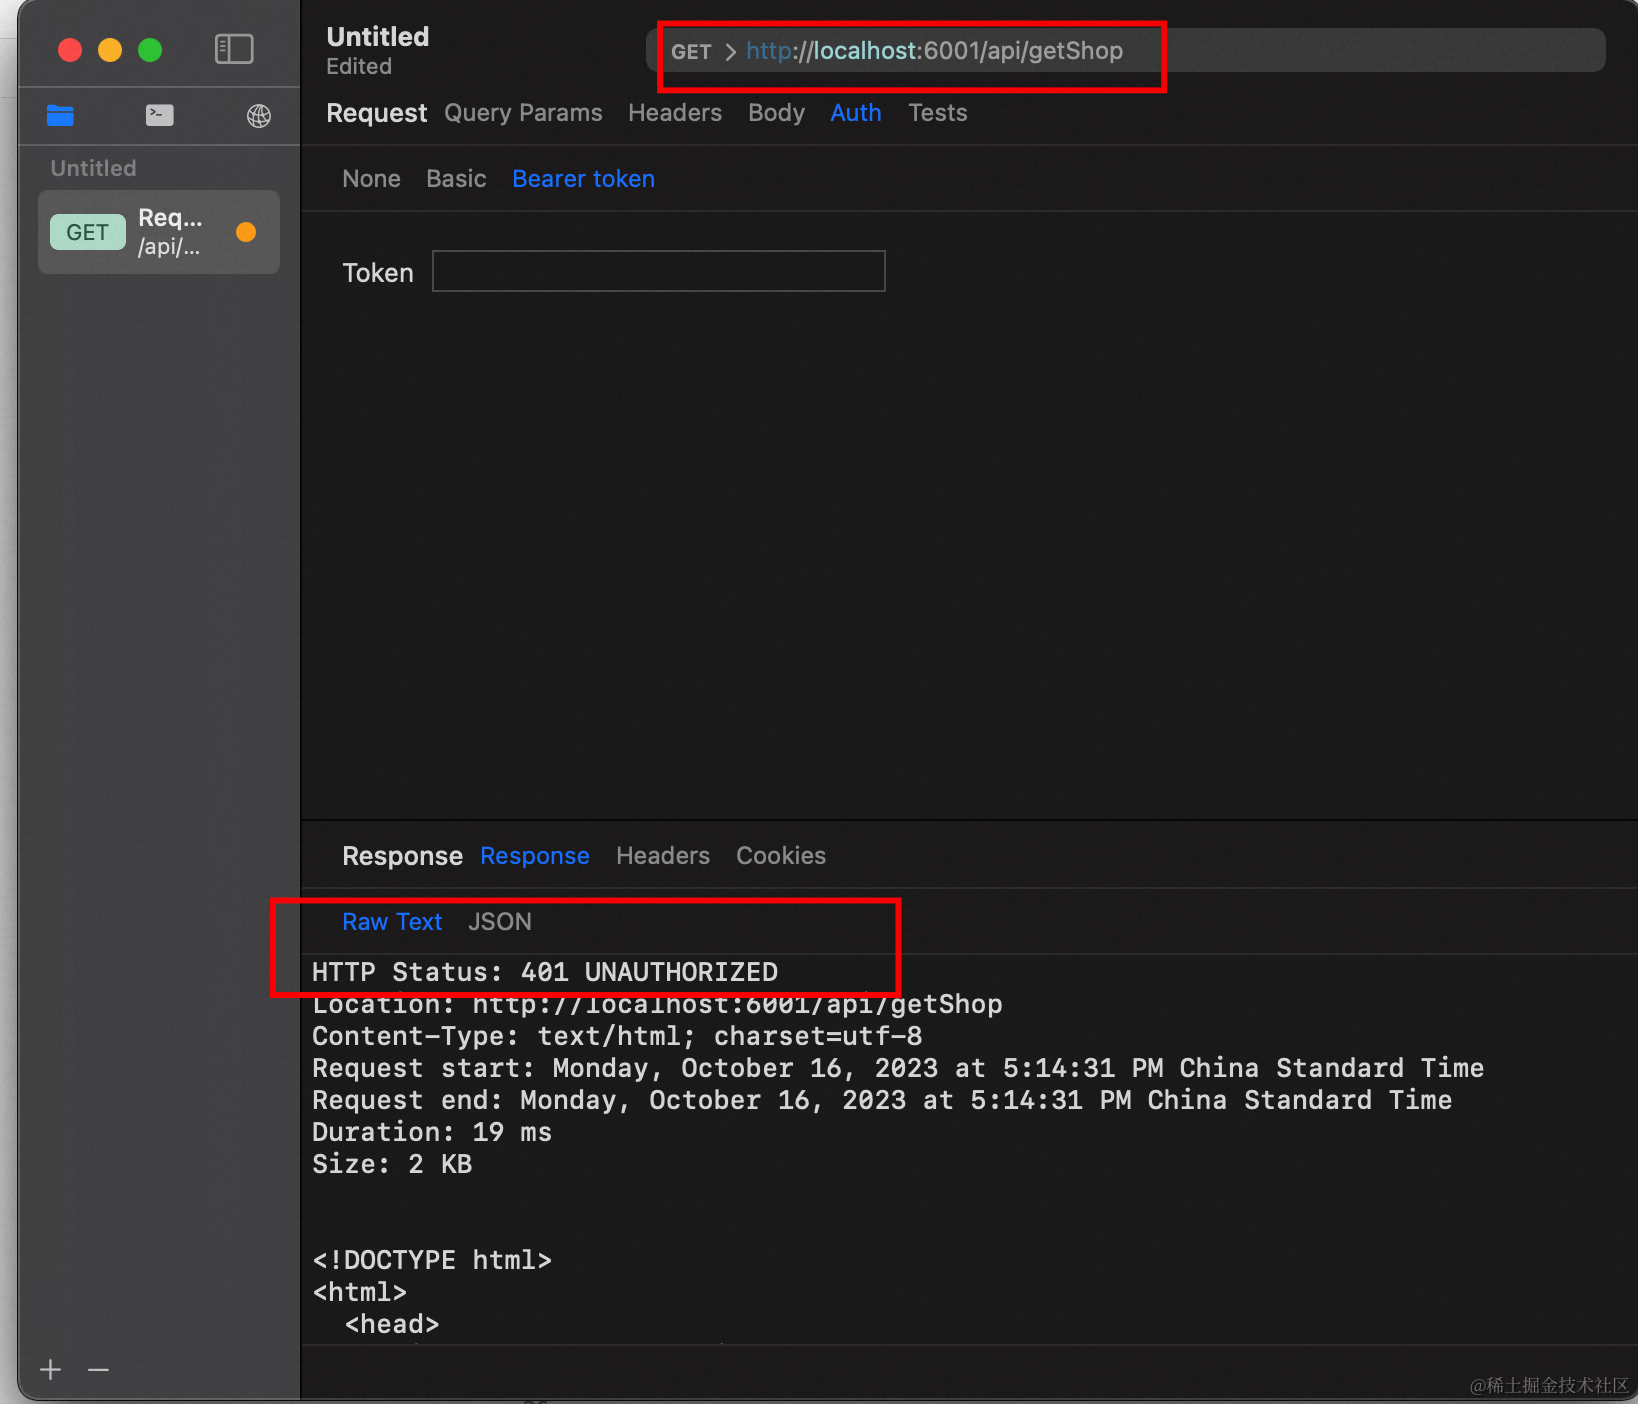
符合预期,无法访问,被中间件拦下来了。然后我们调一下/login接口,保存一下token,再带着去请求一下/getShop接口:
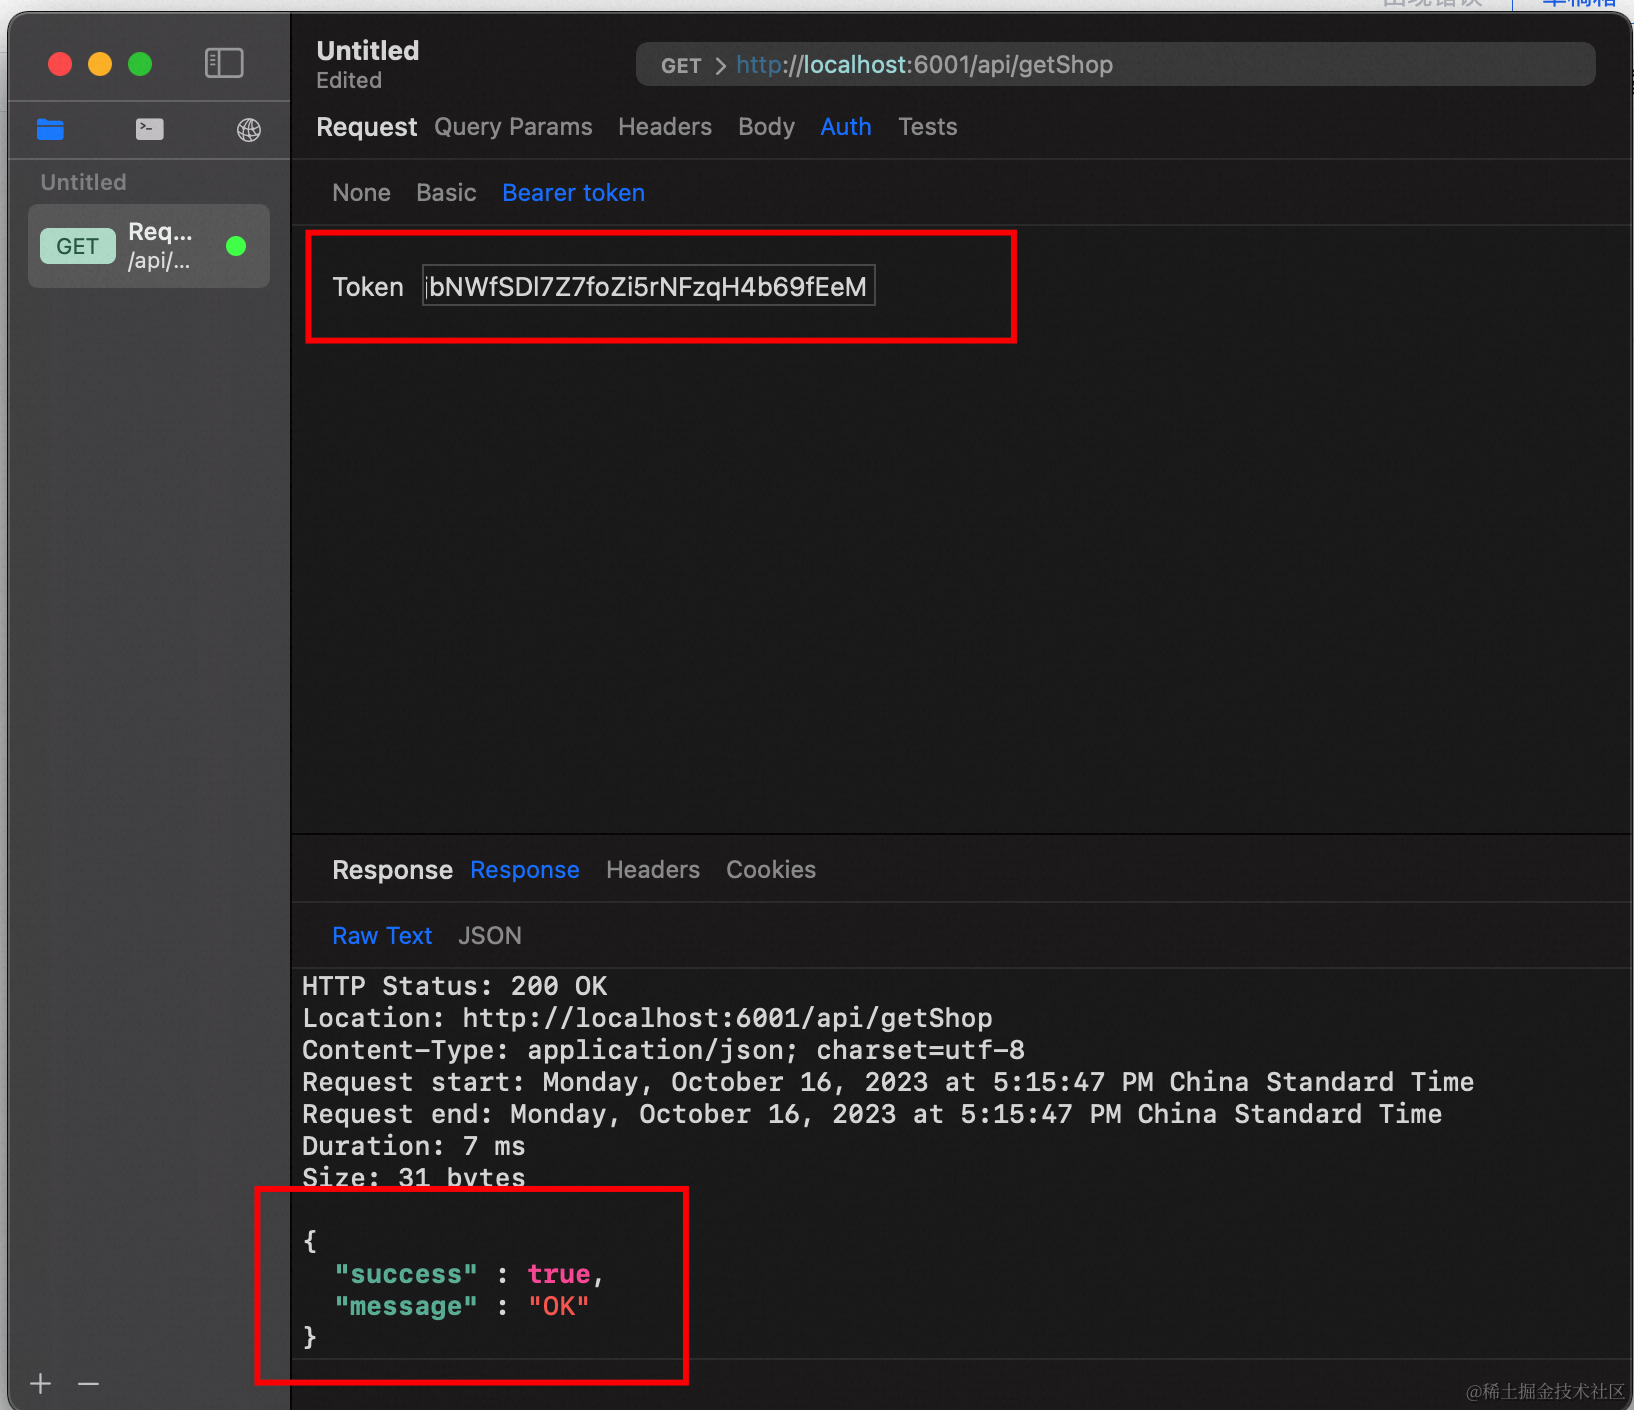
OK,至此,midway搭建的登录注册鉴权功能完成。
写在后面
这篇文章对你有帮助的话,非常荣幸。
如果喜欢我的文章,可以关注我的公众号「量子前端」,将不定期关注推送前端好文~


![解决java.lang.IllegalArgumentException: servlet映射中的<url pattern>[demo1]无效](https://img-blog.csdnimg.cn/f747bcdacd814f8aa03fe6b7ba5be712.png)


