十、 博客前台模块-异常处理
目前我们的项目在认证出错或者权限不足的时候响应回来的Json,默认是使用Security官方提供的响应的格式,但是这种响应的格式肯定是不符合我们项目的接口规范的。所以需要自定义异常处理
我们需要去实现AuthenticationEntryPoint(官方提供的认证失败处理器)类、AccessDeniedHandler(官方提供的授权失败处理器)类,然后配置给Security
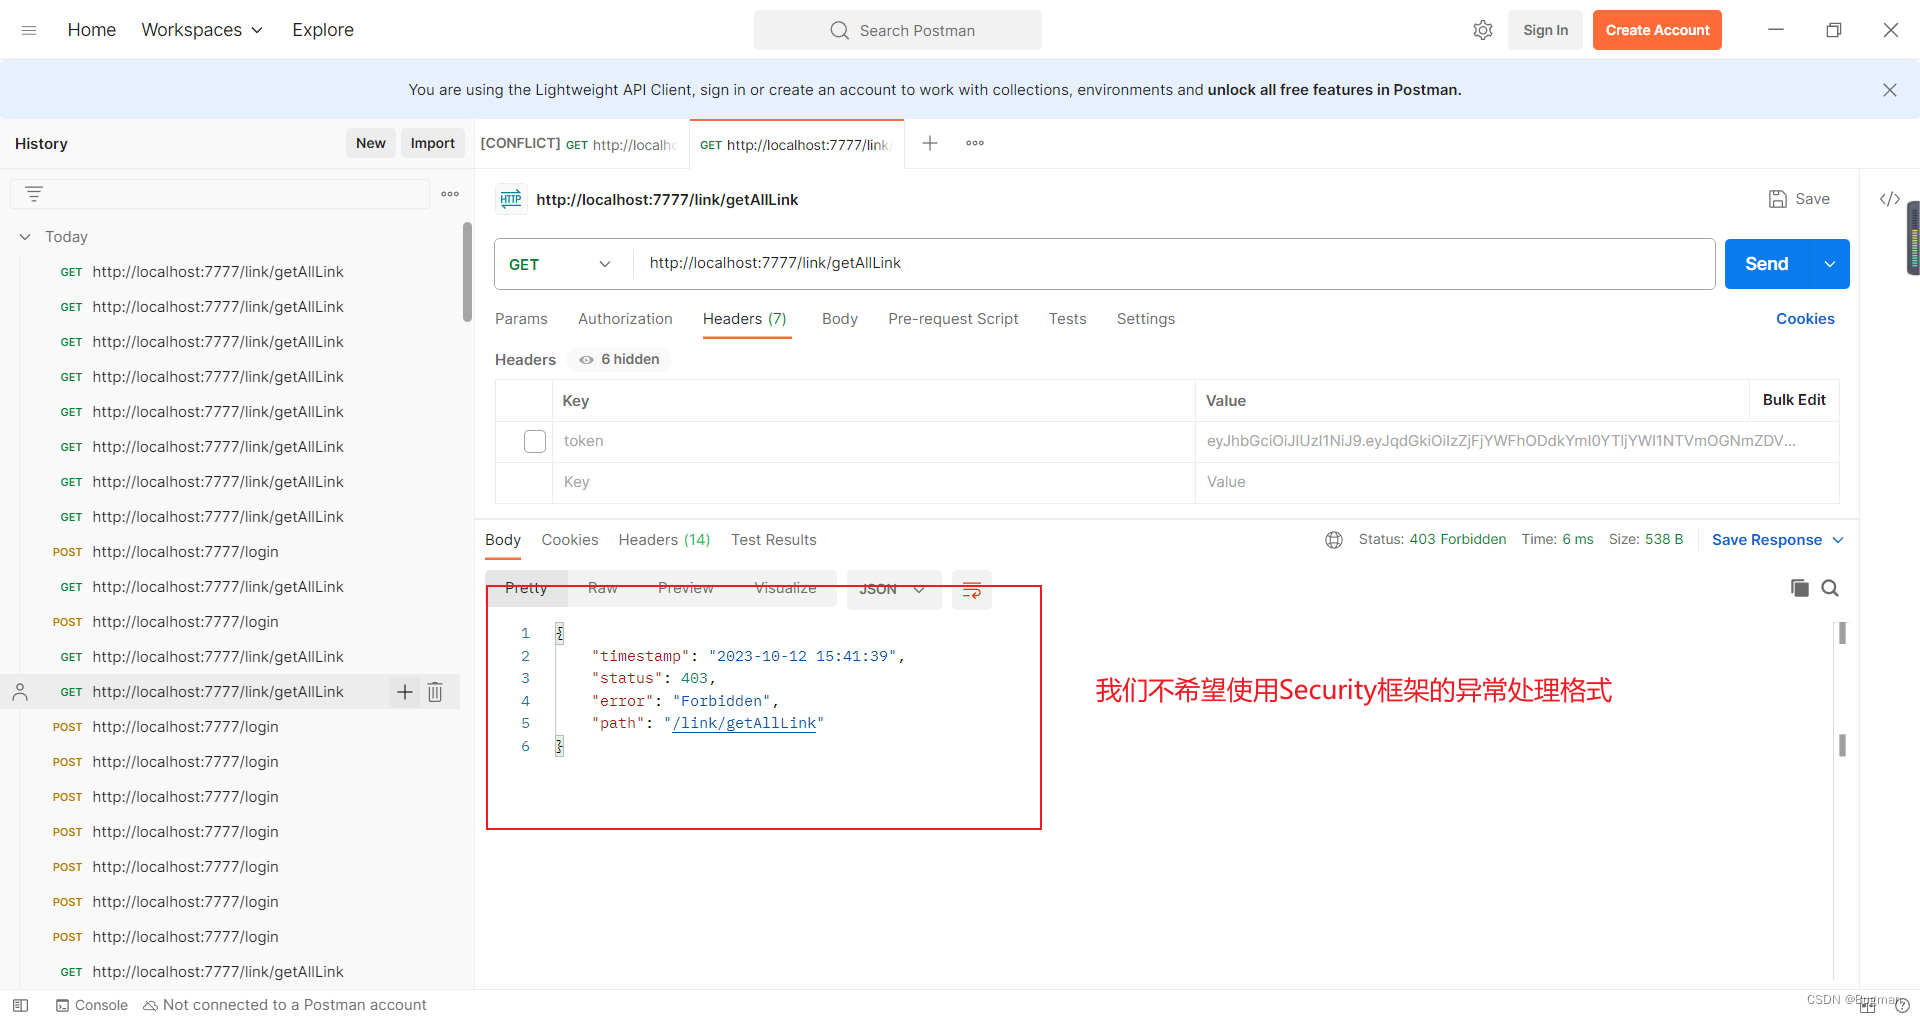
由于我们前台和后台的异常处理是一样的,所以我们在framework包下创建异常处理类
1. 认证的异常处理
在keke-framework工程的src/main/java/com.keke目录新建handler.security.AuthenticationEntryPointImpl类,写入如下
package com.keke.handler.security;

import com.alibaba.fastjson.JSON;
import com.keke.domain.ResponseResult;
import com.keke.enums.AppHttpCodeEnum;
import com.keke.utils.WebUtils;
import org.springframework.security.authentication.BadCredentialsException;
import org.springframework.security.authentication.InsufficientAuthenticationException;
import org.springframework.security.core.AuthenticationException;
import org.springframework.security.web.AuthenticationEntryPoint;
import org.springframework.stereotype.Component;

import javax.servlet.ServletException;
import javax.servlet.http.HttpServletRequest;
import javax.servlet.http.HttpServletResponse;
import java.io.IOException;

@Component
public class AuthenticationEntryPointImpl implements AuthenticationEntryPoint {
     @Override
     public void commence(HttpServletRequest httpServletRequest, HttpServletResponse httpServletResponse, AuthenticationException authException) throws IOException, ServletException {
          authException.printStackTrace();
          ResponseResult result = null;
          //BadCredentialsException 这个是我们测试输入错误账号密码出现的异常
          if(authException instanceof BadCredentialsException){
              result = ResponseResult.errorResult(AppHttpCodeEnum.LOGIN_ERROR.getCode(),authException.getMessage());
          } else if (authException instanceof InsufficientAuthenticationException) {
               //InsufficientAuthenticationException 这个是我们测试不携带token出现的异常
               result = ResponseResult.errorResult(AppHttpCodeEnum.NEED_LOGIN);
          }else {
               result = ResponseResult.errorResult(AppHttpCodeEnum.SYSTEM_ERROR,"认证或者授权失败");
          }
          //响应给前端
          WebUtils.renderString(httpServletResponse, JSON.toJSONString(result));
     }
}
2. 授权的异常处理
在keke-framework工程的src/main/java/com.keke目录新建handler.security.AccessDeniedHandlerImpl类,写入如下
package com.keke.handler.security;

import com.alibaba.fastjson.JSON;
import com.keke.domain.ResponseResult;
import com.keke.enums.AppHttpCodeEnum;
import com.keke.utils.WebUtils;
import org.springframework.security.access.AccessDeniedException;
import org.springframework.security.web.access.AccessDeniedHandler;
import org.springframework.stereotype.Component;

import javax.servlet.ServletException;
import javax.servlet.http.HttpServletRequest;
import javax.servlet.http.HttpServletResponse;
import java.io.IOException;

@Component
public class AccessDeniedHandlerImpl implements AccessDeniedHandler {
     @Override
     public void handle(HttpServletRequest httpServletRequest, HttpServletResponse httpServletResponse, AccessDeniedException accessDeniedException) throws IOException, ServletException {
          accessDeniedException.printStackTrace();
          ResponseResult result = ResponseResult.errorResult(AppHttpCodeEnum.NO_OPERATOR_AUTH);
          //响应给前端
          WebUtils.renderString(httpServletResponse, JSON.toJSONString(result));
     }
}
3. 认证授权异常处理配置到框架
把keke-blog工程的SecurityConfig类修改为如下
package com.keke.config;

import com.keke.filter.JwtAuthenticationTokenFilter;
import org.springframework.beans.factory.annotation.Autowired;
import org.springframework.context.annotation.Bean;
import org.springframework.context.annotation.Configuration;
import org.springframework.security.authentication.AuthenticationManager;
import org.springframework.security.config.annotation.web.builders.HttpSecurity;
import org.springframework.security.config.annotation.web.configuration.WebSecurityConfigurerAdapter;
import org.springframework.security.config.http.SessionCreationPolicy;
import org.springframework.security.crypto.bcrypt.BCryptPasswordEncoder;
import org.springframework.security.crypto.password.PasswordEncoder;
import org.springframework.security.web.AuthenticationEntryPoint;
import org.springframework.security.web.access.AccessDeniedHandler;
import org.springframework.security.web.authentication.UsernamePasswordAuthenticationFilter;


@Configuration
//WebSecurityConfigurerAdapter是Security官方提供的类
public class SecurityConfig extends WebSecurityConfigurerAdapter {

    //注入我们在keke-blog工程写的JwtAuthenticationTokenFilter过滤器
    @Autowired
    private JwtAuthenticationTokenFilter jwtAuthenticationTokenFilter;

    @Autowired
    AuthenticationEntryPoint authenticationEntryPoint;

    @Autowired
    AccessDeniedHandler accessDeniedHandler;


    @Override
    @Bean
    public AuthenticationManager authenticationManagerBean() throws Exception {
        return super.authenticationManagerBean();
    }

    @Bean
    //把官方的PasswordEncoder密码加密方式替换成BCryptPasswordEncoder
    public PasswordEncoder passwordEncoder(){
        return new BCryptPasswordEncoder();
    }

    @Override
    protected void configure(HttpSecurity http) throws Exception {
        http
                //关闭csrf
                .csrf().disable()
                //不通过Session获取SecurityContext
                .sessionManagement().sessionCreationPolicy(SessionCreationPolicy.STATELESS)
                .and()
                .authorizeRequests()
                // 对于登录接口 允许匿名访问
                .antMatchers("/login").anonymous()
                //为方便测试认证过滤器,我们把查询友链的接口设置为需要登录才能访问。然后我们去访问的时候就能测试登录认证功能了
                .antMatchers("/link/getAllLink").authenticated()
                // 除上面外的所有请求全部不需要认证即可访问
                .anyRequest().permitAll();

        //配置我们自己写的认证和授权的异常处理
        http.exceptionHandling()
                        .authenticationEntryPoint(authenticationEntryPoint)
                        .accessDeniedHandler(accessDeniedHandler);


        http.logout().disable();
        //将自定义filter加入security过滤器链中
        http.addFilterBefore(jwtAuthenticationTokenFilter, UsernamePasswordAuthenticationFilter.class);
        //允许跨域
        http.cors();
    }

}
4. 测试自定义异常处理
第一步:打开redis,启动工程
第二步:向login接口发送用户名或者密码错误的post请求
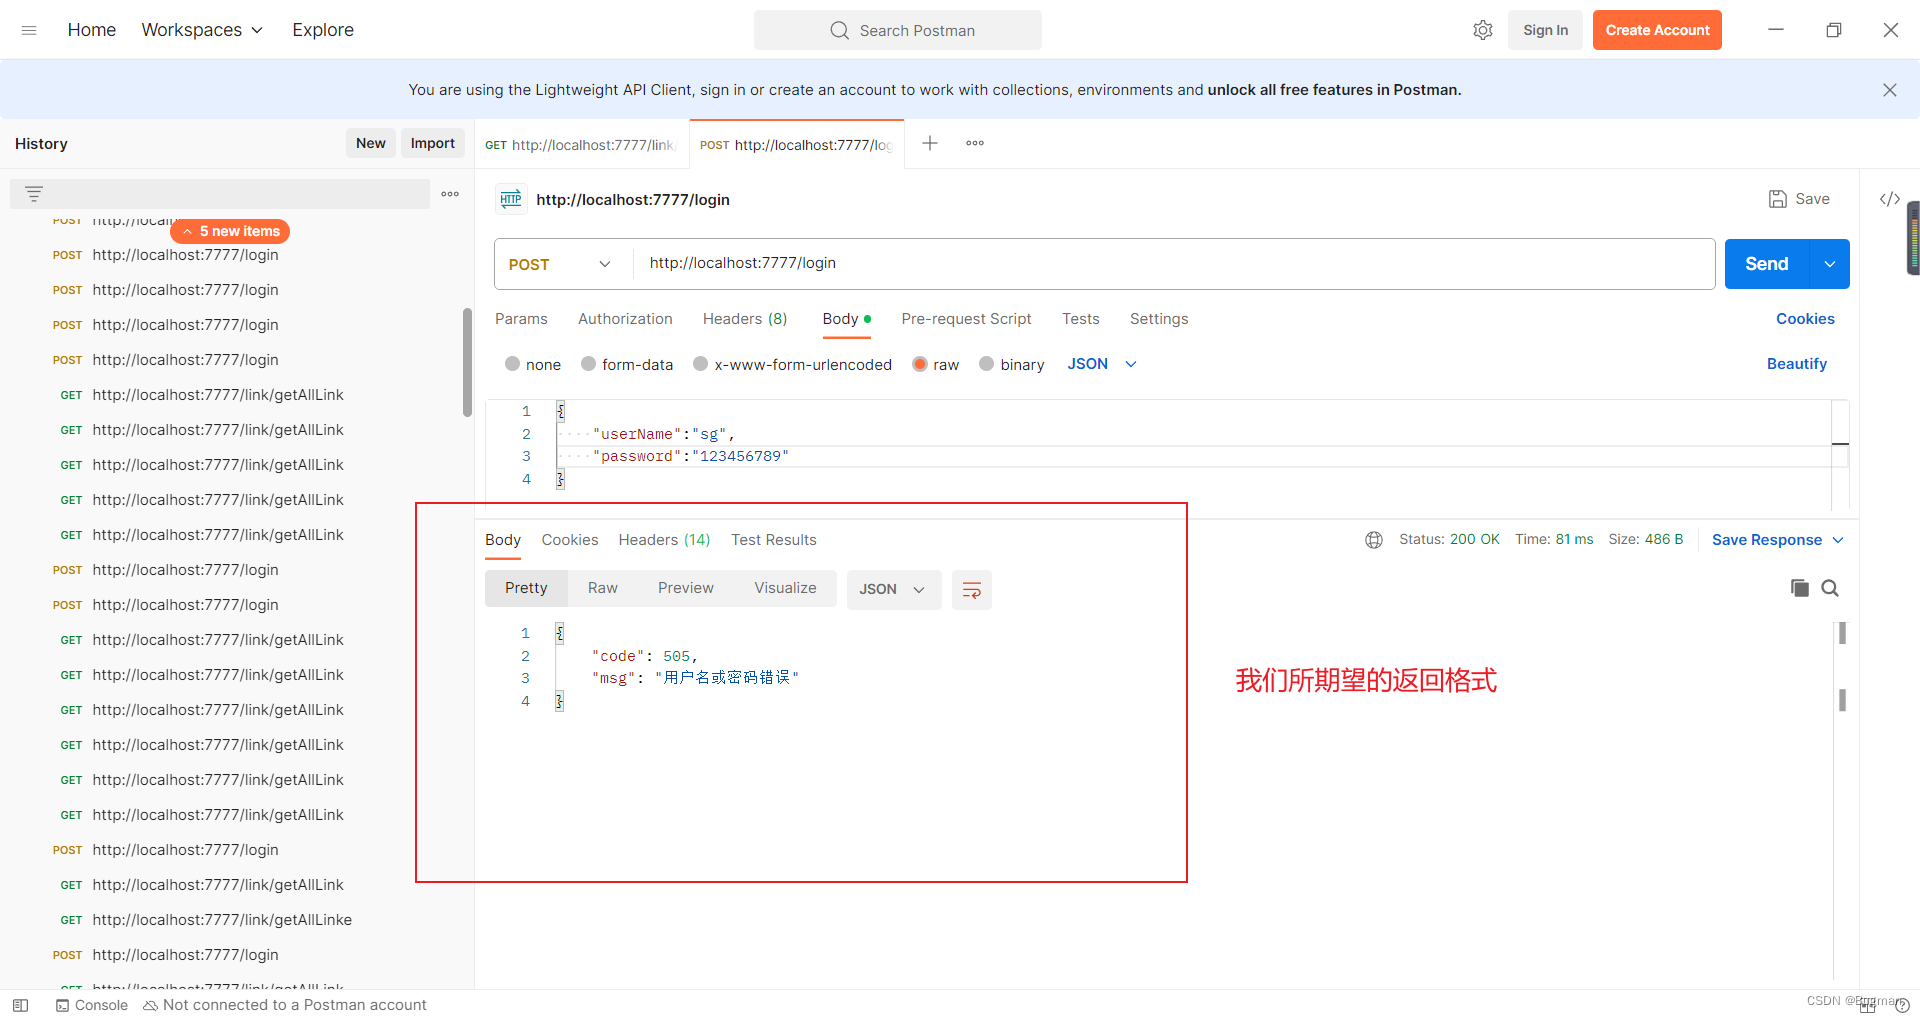
第三步:向link/getAllLink接口发送不携带token的get请求

5. 统一异常处理
实际我们在开发过程中可能需要做很多的判断校验,如果出现了非法情况我们是期望响应对应的提示的。但是如果我们每次都自己手动去处理就会非常麻烦。我们可以选择直接抛出异常的方式,然后对异常进行统一处理。把异常中的信息封装成ResponseResult响应给前端
5.1 自定义异常
在keke-framework工程的src/main/java/com.keke目录新建exception.SystemException类,写入如下
package com.keke.exception;


import com.keke.enums.AppHttpCodeEnum;

//统一异常处理
public class SystemException extends RuntimeException{

    private int code;

    private String msg;

    public int getCode() {
        return code;
    }

    public String getMsg() {
        return msg;
    }

    //定义一个构造方法,接收的参数是枚举类型,AppHttpCodeEnum是我们在huanf-framework工程定义的枚举类
    public SystemException(AppHttpCodeEnum httpCodeEnum) {
        super(httpCodeEnum.getMsg());
        //把某个枚举类里面的code和msg赋值给异常对象
        this.code = httpCodeEnum.getCode();
        this.msg = httpCodeEnum.getMsg();
    }
}
5.2 全局异常处理
在keke-framework的com.keke包下新建handler.exception.GlobalExceptionHandler 写入如下,登录和其他地方出现的异常都会被这里捕获,然后响应返回
package com.keke.handler.exception;

import com.keke.domain.ResponseResult;
import com.keke.enums.AppHttpCodeEnum;
import com.keke.exception.SystemException;
import lombok.extern.slf4j.Slf4j;
import org.springframework.web.bind.annotation.ExceptionHandler;
import org.springframework.web.bind.annotation.RestControllerAdvice;


//@ControllerAdvice //对controller层的增强
//@ResponseBody

//或者用下面一个注解代替上面的两个注解
@RestControllerAdvice
//使用Lombok提供的Slf4j注解,实现日志功能
@Slf4j
//全局异常处理。最终都会在这个类进行处理异常
public class GlobalExceptionHandler {

    //SystemException是我们写的类。用户登录的异常交给这里处理
    @ExceptionHandler(SystemException.class)
    public ResponseResult systemExceptionHandler(SystemException e){

        //打印异常信息,方便我们追溯问题的原因。{}是占位符,具体值由e决定
        log.error("出现了异常! {}",e);

        //从异常对象中获取提示信息封装,然后返回。ResponseResult是我们写的类
        return ResponseResult.errorResult(e.getCode(),e.getMsg());
    }

    //其它异常交给这里处理
    @ExceptionHandler(Exception.class)
    public ResponseResult exceptionHandler(Exception e){

        //打印异常信息,方便我们追溯问题的原因。{}是占位符,具体值由e决定
        log.error("出现了异常! {}",e);

        //从异常对象中获取提示信息封装,然后返回。ResponseResult、AppHttpCodeEnum是我们写的类
        return ResponseResult.errorResult(AppHttpCodeEnum.SYSTEM_ERROR.getCode(),e.getMessage());//枚举值是500
    }
}
5.3 Controller层逻辑
package com.keke.controller;


import com.keke.domain.ResponseResult;
import com.keke.domain.entity.User;
import com.keke.enums.AppHttpCodeEnum;
import com.keke.exception.SystemException;
import com.keke.service.BlogLoginService;
import org.springframework.beans.factory.annotation.Autowired;
import org.springframework.util.StringUtils;
import org.springframework.web.bind.annotation.PostMapping;
import org.springframework.web.bind.annotation.RequestBody;
import org.springframework.web.bind.annotation.RestController;

@RestController
public class BlogLoginController {

     @Autowired
     private BlogLoginService blogLoginService;

     @PostMapping("/login")
     public ResponseResult login(@RequestBody User user){
          if(!StringUtils.hasText(user.getUserName())){
               //提示必须要传用户名
               throw new SystemException(AppHttpCodeEnum.REQUIRE_USERNAME);
          }
          return blogLoginService.login(user);
     }
}
5.3 测试
向login接口发送一个没有用户名只有密码的post,响应如下
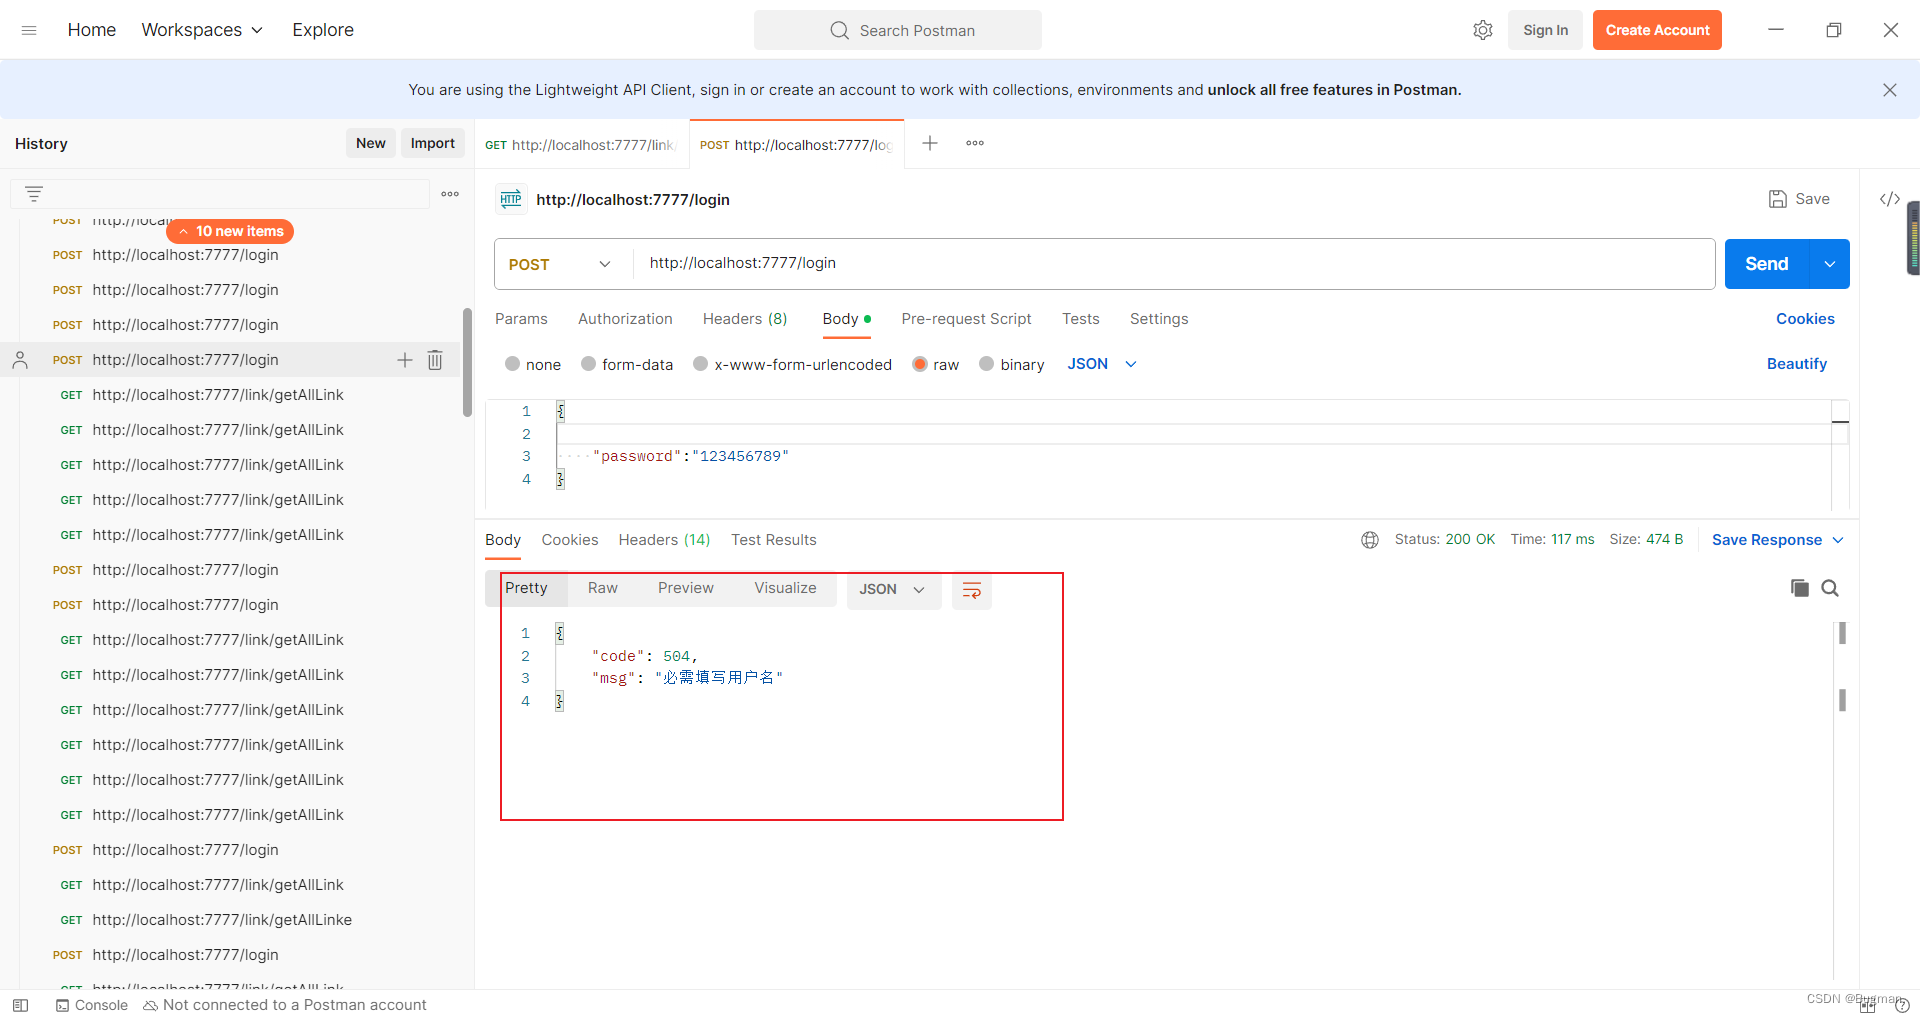
可以看到,响应回来的信息是正确的
5.4 总结
首相前端发送请求,controller层先判断是否携带用户名,如果没有携带,抛出SystemException异常,并把响应的枚举信息传给异常对象,然后全局异常类中的systemExceptionHandler处理器处理就会捕获到该异常,然后在这个位置去封装响应体返回
其他异常则是由exceptionHandler处理
这就是异常统一处理
十一、博客前台模块-退出登录
1. 接口分析
| 请求方式 | 请求地址 | 请求头 |
| POST | /logout | 需要token请求头 |
响应格式
{
    "code": 200,
    "msg": "操作成功"
}
2. 思路分析
获取token解析出userId
删除redis中的用户信息
3. 代码实现
第一步: 把keke-blog工程的BlogLoginController类修改为如下,新增了退出登录的接口
package com.keke.controller;


import com.keke.domain.ResponseResult;
import com.keke.domain.entity.User;
import com.keke.enums.AppHttpCodeEnum;
import com.keke.exception.SystemException;
import com.keke.service.BlogLoginService;
import org.springframework.beans.factory.annotation.Autowired;
import org.springframework.util.StringUtils;
import org.springframework.web.bind.annotation.PostMapping;
import org.springframework.web.bind.annotation.RequestBody;
import org.springframework.web.bind.annotation.RestController;

@RestController
public class BlogLoginController {

     @Autowired
     private BlogLoginService blogLoginService;

     @PostMapping("/login")
     public ResponseResult login(@RequestBody User user){
          if(!StringUtils.hasText(user.getUserName())){
               //提示必须要传用户名
               throw new SystemException(AppHttpCodeEnum.REQUIRE_USERNAME);
          }
          return blogLoginService.login(user);
     }

     @PostMapping("/logout")
     public ResponseResult logout(){
          return blogLoginService.logout();
     }
}
第二步: 把keke-framework工程的BlogLoginService接口修改为如下,新增了退出登录的方法
package com.keke.service;

import com.keke.domain.ResponseResult;
import com.keke.domain.entity.User;

public interface BlogLoginService {
     ResponseResult login(User user);

     ResponseResult logout();

}
第三步: 把keke-framework工程的BlogLoginServiceImpl类修改为如下,新增了退出登录的核心代码
package com.keke.service.impl;

import com.keke.domain.ResponseResult;
import com.keke.domain.entity.LoginUser;
import com.keke.domain.entity.User;
import com.keke.domain.vo.BlogLoginUserVo;
import com.keke.domain.vo.UserInfoVo;
import com.keke.service.BlogLoginService;
import com.keke.utils.BeanCopyUtils;
import com.keke.utils.JwtUtil;
import com.keke.utils.RedisCache;
import org.springframework.beans.factory.annotation.Autowired;
import org.springframework.security.authentication.AuthenticationManager;
import org.springframework.security.authentication.UsernamePasswordAuthenticationToken;
import org.springframework.security.core.Authentication;
import org.springframework.security.core.context.SecurityContextHolder;
import org.springframework.stereotype.Service;
import java.util.Objects;


@Service
public class BlogLoginServiceImpl implements BlogLoginService {

     @Autowired
     private AuthenticationManager authenticationManager;

     @Autowired
     private RedisCache redisCache;

     @Override
     public ResponseResult login(User user) {
          UsernamePasswordAuthenticationToken authenticationToken = new UsernamePasswordAuthenticationToken(user.getUserName(),user.getPassword());
          Authentication authenticate = authenticationManager.authenticate(authenticationToken);
          //authenticationManager会默认调用UserDetailsService从内存中进行用户认证,我们实际需求是从数据库,因此我们要重新创建一个UserDetailsService的实现类
          //判断是否认证通过
          if(Objects.isNull(authenticate)){
               throw new RuntimeException("用户名或者密码错误");
          }
          //获取Userid,生成token
          LoginUser loginUser = (LoginUser) authenticate.getPrincipal();
          String userId = loginUser.getUser().getId().toString();
          String jwt = JwtUtil.createJWT(userId);
          //把用户信息存入redis
          redisCache.setCacheObject("bloglogin:" + userId,loginUser);
          //把token和userInfo封装返回,因为响应回去的data有这两个属性,所以要封装Vo
          UserInfoVo userInfoVo = BeanCopyUtils.copyBean(loginUser.getUser(), UserInfoVo.class);
          BlogLoginUserVo blogLoginUserVo = new BlogLoginUserVo(jwt,userInfoVo);
          return ResponseResult.okResult(blogLoginUserVo);
     }

     @Override
     public ResponseResult logout() {
          //获取token解析获取userId
          Authentication authentication = SecurityContextHolder.getContext().getAuthentication();
          LoginUser loginUser = (LoginUser) authentication.getPrincipal();
          Long userId = loginUser.getUser().getId();
          //删除redis中的信息(根据key删除)
          redisCache.deleteObject("bloglogin:" + userId);
          return ResponseResult.okResult();
     }
}
第四步: 把keke-blog工程的SecurityConfig类修改为如下,增加了需要有登录状态才能执行退出登录,否则就报'401 需要登录后操作'
package com.keke.config;

import com.keke.filter.JwtAuthenticationTokenFilter;
import org.springframework.beans.factory.annotation.Autowired;
import org.springframework.context.annotation.Bean;
import org.springframework.context.annotation.Configuration;
import org.springframework.security.authentication.AuthenticationManager;
import org.springframework.security.config.annotation.web.builders.HttpSecurity;
import org.springframework.security.config.annotation.web.configuration.WebSecurityConfigurerAdapter;
import org.springframework.security.config.http.SessionCreationPolicy;
import org.springframework.security.crypto.bcrypt.BCryptPasswordEncoder;
import org.springframework.security.crypto.password.PasswordEncoder;
import org.springframework.security.web.AuthenticationEntryPoint;
import org.springframework.security.web.access.AccessDeniedHandler;
import org.springframework.security.web.authentication.UsernamePasswordAuthenticationFilter;


@Configuration
//WebSecurityConfigurerAdapter是Security官方提供的类
public class SecurityConfig extends WebSecurityConfigurerAdapter {

    //注入我们在keke-blog工程写的JwtAuthenticationTokenFilter过滤器
    @Autowired
    private JwtAuthenticationTokenFilter jwtAuthenticationTokenFilter;

    @Autowired
    AuthenticationEntryPoint authenticationEntryPoint;

    @Autowired
    AccessDeniedHandler accessDeniedHandler;


    @Override
    @Bean
    public AuthenticationManager authenticationManagerBean() throws Exception {
        return super.authenticationManagerBean();
    }

    @Bean
    //把官方的PasswordEncoder密码加密方式替换成BCryptPasswordEncoder
    public PasswordEncoder passwordEncoder(){
        return new BCryptPasswordEncoder();
    }

    @Override
    protected void configure(HttpSecurity http) throws Exception {
        http
                //关闭csrf
                .csrf().disable()
                //不通过Session获取SecurityContext
                .sessionManagement().sessionCreationPolicy(SessionCreationPolicy.STATELESS)
                .and()
                .authorizeRequests()
                // 对于登录接口 允许匿名访问
                .antMatchers("/login").anonymous()
//这里新增必须要是登录状态才能访问退出登录的接口,即是认证过的状态
                .antMatchers("/logout").authenticated()
                //为方便测试认证过滤器,我们把查询友链的接口设置为需要登录才能访问。然后我们去访问的时候就能测试登录认证功能了
                .antMatchers("/link/getAllLink").authenticated()
                // 除上面外的所有请求全部不需要认证即可访问
                .anyRequest().permitAll();

        //配置我们自己写的认证和授权的异常处理
        http.exceptionHandling()
                        .authenticationEntryPoint(authenticationEntryPoint)
                        .accessDeniedHandler(accessDeniedHandler);


        http.logout().disable();
        //将自定义filter加入security过滤器链中
        http.addFilterBefore(jwtAuthenticationTokenFilter, UsernamePasswordAuthenticationFilter.class);
        //允许跨域
        http.cors();
    }

}
4. 测试
首先测试logout是否真的实现了退出登录的效果,即删除了token在redis中的缓存,使得携带原token的请求失效
第一步,先登录 JSON格式的body可复制如下代码,登录成功
{
    "userName":"sg",
    "password":"1234"
}
第二步,拿着登录成功的token,去访问getAllLink接口,访问成功,到这里一切正常

第三步:携带该token向logout接口发送post请求,为什么要携带token呢,因为我们之前在SecurityConfig中配置过了,必须是已认证的状态,已认证的状态意味着必须是请求头携带token

postman结果如下,操作成功意味着退出登录成功

第四步:拿token再次访问getAllLink接口,发现已经不能访问

并且我们可以看到redis中也没有缓存的信息了

十二、博客前台模块-评论列表
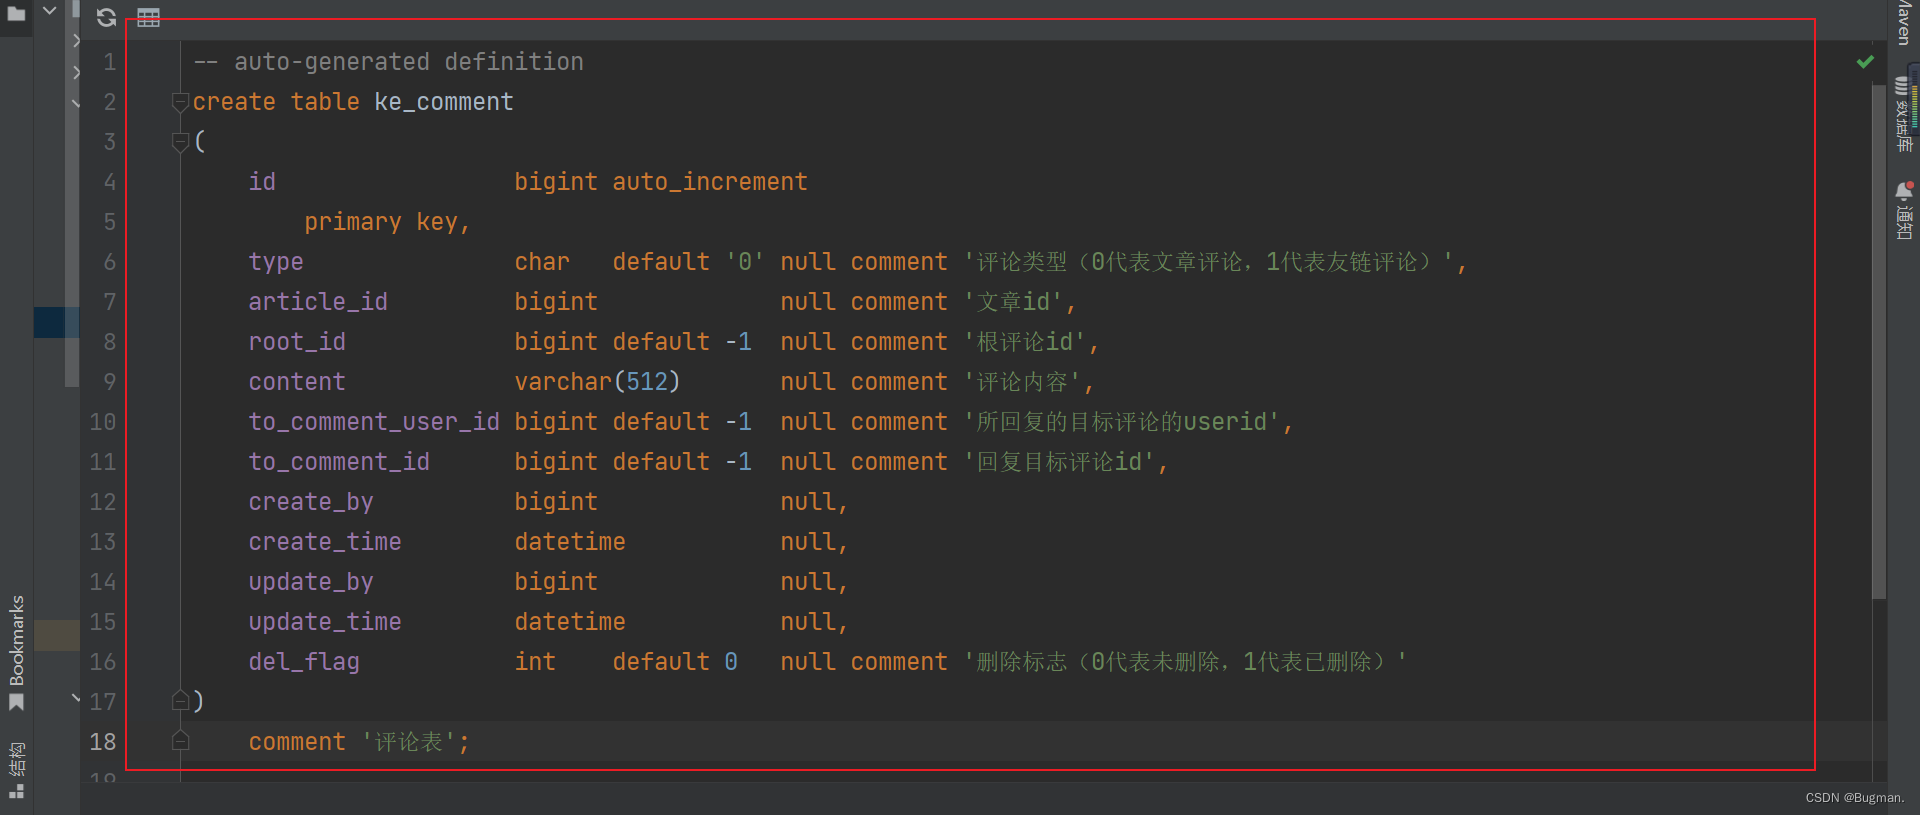
1. 评论表的字段

2. 接口分析
| 请求方式 | 请求地址 | 请求头 |
| GET | /comment/commentList | 不需要token请求头(未登录也能看到评论信息) |
请求格式为query格式,参数如下
articleId:文章id
pageNum:页码
pageSize:每页条数
响应格式如下
{
    "code": 200,
    "data": {
        "rows": [
            {
                "articleId": "1",
                "children": [
                    {
                        "articleId": "1",
                        "content": "评论内容(子评论)",
                        "createBy": "1",
                        "createTime": "2022-01-30 10:06:21",
                        "id": "20",
                        "rootId": "1",
                        "toCommentId": "1",
                        "toCommentUserId": "1",
                        "toCommentUserName": "这条评论(子评论)回复的是哪个人",
                        "username": "发这条评论(子评论)的人"
                    }
                ],
                "content": "评论内容(根评论)",
                "createBy": "1",
                "createTime": "2022-01-29 07:59:22",
                "id": "1",
                "rootId": "-1",
                "toCommentId": "-1",
                "toCommentUserId": "-1",
                "username": "发这条评论(根评论)的人"
            }
        ],
        "total": "15"
    },
    "msg": "操作成功"
}
3. 准备代码
第一步:实体类Comment创建在keke-framework的com.keke.domain.entity下
package com.keke.domain.entity;

import java.util.Date;
import java.io.Serializable;
import lombok.AllArgsConstructor;
import lombok.Data;
import lombok.NoArgsConstructor;
import com.baomidou.mybatisplus.annotation.TableName;

/**
 * 评论表(Comment)表实体类
 *
 * @author makejava
 * @since 2023-10-12 20:20:14
 */
@SuppressWarnings("serial")
@Data
@NoArgsConstructor
@AllArgsConstructor
@TableName("ke_comment")
public class Comment {

    private Long id;
    //评论类型(0代表文章评论,1代表友链评论)
    private String type;
    //文章id
    private Long articleId;
    //根评论id
    private Long rootId;
    //评论内容
    private String content;
    //所回复的目标评论的userid
    private Long toCommentUserId;
    //回复目标评论id
    private Long toCommentId;

    private Long createBy;

    private Date createTime;

    private Long updateBy;

    private Date updateTime;
    //删除标志(0代表未删除,1代表已删除)
    private Integer delFlag;

}
第二步:创建CommentMapper
package com.keke.mapper;

import com.baomidou.mybatisplus.core.mapper.BaseMapper;
import com.keke.domain.entity.Comment;


/**
 * 评论表(Comment)表数据库访问层
 *
 * @author makejava
 * @since 2023-10-12 20:20:41
 */
public interface CommentMapper extends BaseMapper<Comment> {

}
第三步:创建CommentService
package com.keke.service;

import com.baomidou.mybatisplus.extension.service.IService;
import com.keke.domain.entity.Comment;


/**
 * 评论表(Comment)表服务接口
 *
 * @author makejava
 * @since 2023-10-12 20:20:41
 */
public interface CommentService extends IService<Comment> {

}
第四步:创建CommentServiceImpl
package com.keke.service.impl;

import com.baomidou.mybatisplus.extension.service.impl.ServiceImpl;
import com.keke.domain.entity.Comment;
import com.keke.mapper.CommentMapper;
import com.keke.service.CommentService;
import org.springframework.stereotype.Service;

/**
 * 评论表(Comment)表服务实现类
 *
 * @author makejava
 * @since 2023-10-12 20:20:41
 */
@Service("commentService")
public class CommentServiceImpl extends ServiceImpl<CommentMapper, Comment> implements CommentService {

}


