【 声明:版权所有,欢迎转载,请勿用于商业用途。 联系信箱:feixiaoxing @163.com】
大家应该还记得我们在一开始学习ros的时候,如果需要启动一个节点的话,需要首先打开roscore,接着用rosrun打开对应的节点。如果节点比较少的话,这种方法,倒也可以接受,但是节点一多就不太方便了。比如,我们之前在学习slam的时候,需要依次打开gazebo、rviz、slam、rqt等多个节点软件,这就非常麻烦了。所以为了解决这个问题,人们想出了roslaunch的办法,它不但可以帮助我们自动打开roscore,还会自动打开脚本中每一个node节点,还能自由配置参数信息。
所以,对于我们来说,有必要学习好launch、用好launch。至于怎么学习,个人觉得最好的学习方法就是把曾经用过的launch文件直接拿过来分析就可以了。学完了,直接拿过来当模板修改使用。
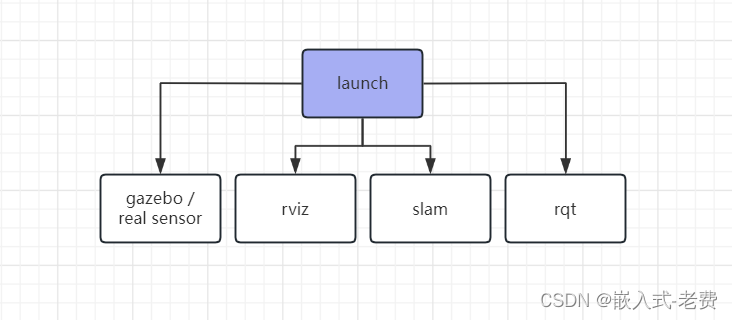
1、wpb_simple.launch
<launch>
  <!-- We resume the logic in empty_world.launch, changing only the name of the world to be launched -->
  <include file="$(find gazebo_ros)/launch/empty_world.launch">
    <arg name="world_name" value="$(find wpr_simulation)/worlds/wpb_simple.world"/>
    <arg name="paused" value="false"/>
    <arg name="use_sim_time" value="true"/>
    <arg name="gui" value="true"/>
    <arg name="recording" value="false"/>
    <arg name="debug" value="false"/>
  </include>

  <!-- Spawn the objects into Gazebo -->
  <node name="bookshelft" pkg="gazebo_ros" type="spawn_model" args="-file $(find wpr_simulation)/models/bookshelft.model -x 3.0 -y 0.2 -z 0 -Y 3.14159 -urdf -model bookshelft" />
  <node name="bottle" pkg="gazebo_ros" type="spawn_model" args="-file $(find wpr_simulation)/models/bottles/red_bottle.model -x 2.8 -y 0 -z 0.6 -Y 0 -urdf -model red_bottle" />

  <!-- Spawn a robot into Gazebo -->
  <node name="spawn_urdf" pkg="gazebo_ros" type="spawn_model" args="-file $(find wpr_simulation)/models/wpb_home.model -urdf -model wpb_home" />

  <!-- Robot Description -->
  <arg name="model" default="$(find wpr_simulation)/models/wpb_home.model"/>
  <param name="robot_description" command="$(find xacro)/xacro $(arg model)" />
  <node name="joint_state_publisher" pkg="joint_state_publisher" type="joint_state_publisher" />
  <node name="robot_state_publisher" pkg="robot_state_publisher" type="robot_state_publisher" />
</launch>
内容看上很多,其实大部分都是描述仿真环境的。从一开始的empty_world.launch,到后来的objects、robot都是如此,最后添加了一个robot的详细描述。注意,node就是调用节点的地方,pkg代表包名,type代表node名,次序不重要。
2、wpb_gmapping.launch
<launch>

  <!-- 载入 机器人 和 RoboCup@Home 的仿真场景 -->
  <include file="$(find wpr_simulation)/launch/wpb_stage_robocup.launch"/>

  <!-- Gmapping -->
  <node pkg="gmapping" type="slam_gmapping" name="slam_gmapping"/>

  <!-- Rviz -->
  <arg name="rvizconfig" default="$(find wpr_simulation)/rviz/slam.rviz" />
  <node name="rviz" pkg="rviz" type="rviz" args="-d $(arg rvizconfig)" required="true" />

  <!-- 手柄控制 -->
  <node respawn="true" pkg="joy" type="joy_node" name="joy_node" >
    <param name="dev" type="string" value="/dev/input/js0" />
    <param name="deadzone" value="0.12" />
  </node>
  <param name="axis_linear" value="1" type="int"/>
  <param name="axis_angular" value="0" type="int"/>
  <param name="scale_linear" value="0.5" type="double"/>
  <param name="scale_angular" value="1" type="double"/>
  <node pkg="wpr_simulation" type="teleop_js_node" name="teleop_js_node"/>

</launch>
相比较之前wpb_simple.launch文件,这个wpb_gmapping内容要丰富一些。首先,它嵌套了wpb_stage_robocup.launch的内容。接着启动gmapping和rviz,最后加载joy_node和teleop_js_node。不过印象中,实际调试的时候,最后还是通过rqt_robot_steering来调试的。
通过观察我们还发现,有些param是放在node里面的,这其实代表了私有参数;还有些param是放在外面的,这代表了公有参数,使用的时候需要稍微注意下。
3、wpb_corridor_hector.launch
<launch>

  <!-- 载入 机器人 和 长走廊 的仿真场景 -->
  <include file="$(find wpr_simulation)/launch/wpb_stage_corridor.launch"/>

  <!-- Hector -->
  <node pkg="hector_mapping" type="hector_mapping" name="hector_mapping"/>

  <!-- Rviz -->
  <arg name="rvizconfig" default="$(find wpr_simulation)/rviz/corridor.rviz" />
  <node name="rviz" pkg="rviz" type="rviz" args="-d $(arg rvizconfig)" required="true" />

  <!-- 运动控制 -->
  <node pkg="rqt_robot_steering" type="rqt_robot_steering" name="rqt_robot_steering"/>

</launch>
这个launch文件基本就是大家想要的那种launch文件。它包含了wpb_stage_corridor.launch的嵌套、hector算法、rviz和rqt_robot_steering。其中arg比较有意义,它本身相当于全局变量,供其他param参考使用的。
另外就是rviz里面的rvizconfig变量,它通过find找到corridor.rviz这个文件,最后被rviz这个node所使用。
4、总结
对于launch这类脚本的学习,个人建议直接看模板比较好一点,至少说先用起来。这样遇到问题再去找答案,或许效率更高一点。


