上一篇博客 Tomcat 源码解析一请求处理的整体过程-黄泉天怒(上)
NonLoginAuthenticator
NonLoginAuthenticator并没有实现invoke()方法,而是由父类AuthenticatorBase实现了invoke()方法,AuthenticatorBase类关系如下。

先弄清楚NonLoginAuthenticator这个管道是在何时被加入到StandardContext的Pipeline里的呢? 在StandardPipeline的addValve()方法中打断点。

最终发现在configureStart()方法中调用了authenticatorConfig(),实现了向StandardContext的Pipeline中添加Valve。

大家可能感到迷惑,什么时候调用configureStart()方法呢?这个需要去看之前的Tomcat 源码解析一容器加载-大寂灭指 相关的三篇博客了。 这里就不深入,先进入authenticatorConfig()方法 。
/**
 * Set up an Authenticator automatically if required, and one has not
 * already been configured.
 * 基于解析完Web容器,检测Web应用部署描述中使用的安全角色名,当发现使用示定义的角色时,提示警告将未定义的角色添加到Context 安全角色列表中。
 */
protected void authenticatorConfig() {
    LoginConfig loginConfig = context.getLoginConfig();
    if (loginConfig == null) {
        // Need an authenticator to support HttpServletRequest.login()
        loginConfig = DUMMY_LOGIN_CONFIG;
        context.setLoginConfig(loginConfig);
    }

    // Has an authenticator been configured already?
    if (context.getAuthenticator() != null)
        return;

    if (!(context instanceof ContainerBase)) {
        return;     // Cannot install a Valve even if it would be needed
    }

    // Has a Realm been configured for us to authenticate against?
    if (context.getRealm() == null) {
        log.error(sm.getString("contextConfig.missingRealm"));
        ok = false;
        return;
    }

    /*
     * First check to see if there is a custom mapping for the login
     * method. If so, use it. Otherwise, check if there is a mapping in
     * org/apache/catalina/startup/Authenticators.properties.
     */
    Valve authenticator = null;
    if (customAuthenticators != null) {
        authenticator = (Valve)
            customAuthenticators.get(loginConfig.getAuthMethod());
    }
    // 当Context 需要进行安全认证但是没有指定具体的Authenticator时,根据服务器配置自动创建默认的实例。
    if (authenticator == null) {
        if (authenticators == null) {
            log.error(sm.getString("contextConfig.authenticatorResources"));
            ok = false;
            return;
        }

        // Identify the class name of the Valve we should configure
        String authenticatorName = null;
        authenticatorName =
                authenticators.getProperty(loginConfig.getAuthMethod());
        if (authenticatorName == null) {
            log.error(sm.getString("contextConfig.authenticatorMissing",
                             loginConfig.getAuthMethod()));
            ok = false;
            return;
        }

        // Instantiate and install an Authenticator of the requested class
        try {
            Class<?> authenticatorClass = Class.forName(authenticatorName);
            authenticator = (Valve) authenticatorClass.newInstance();
        } catch (Throwable t) {
            ExceptionUtils.handleThrowable(t);
            log.error(sm.getString(
                                "contextConfig.authenticatorInstantiate",
                                authenticatorName),
                      t);
            ok = false;
        }
    }

    if (authenticator != null && context instanceof ContainerBase) {
        Pipeline pipeline = ((ContainerBase) context).getPipeline();
        if (pipeline != null) {
            ((ContainerBase) context).getPipeline().addValve(authenticator);
            if (log.isDebugEnabled()) {
                log.debug(sm.getString(
                                "contextConfig.authenticatorConfigured",
                                loginConfig.getAuthMethod()));
            }
        }
    }
}
想弄清楚上面代码,第一要看懂LoginConfig的由来,默认LoginConfig为protected static final LoginConfigDUMMY_LOGIN_CONFIG =
new LoginConfig(“NONE”, null, null, null); ,第二点明白authenticators属性什么时候赋值,赋的值是什么?请看ContextConfig的静态代码块。
static {
    // Load our mapping properties for the standard authenticators
    Properties props = new Properties();
    InputStream is = null;
    try {
        is = ContextConfig.class.getClassLoader().getResourceAsStream(
                "org/apache/catalina/startup/Authenticators.properties");
        if (is != null) {
            props.load(is);
        }
    } catch (IOException ioe) {
        props = null;
    } finally {
        if (is != null) {
            try {
                is.close();
            } catch (IOException e) {
            }
        }
    }
	authenticators = props;
    // Load the list of JARS to skip
    addJarsToSkip(Constants.DEFAULT_JARS_TO_SKIP);
    addJarsToSkip(Constants.PLUGGABILITY_JARS_TO_SKIP);
}
authenticators属性来源于org/apache/catalina/startup/Authenticators.properties文件,而Authenticators.properties的文件内容为

此时再来看authenticatorConfig()方法就简单多了,默认情况下loginConfig的authMethod值为NONE,因此从authenticators获取到的配置类名为org.apache.catalina.authenticator.NonLoginAuthenticator,再用反射创建NonLoginAuthenticator对象,添加到StandardContext的Pipeline的Valve中。
public void invoke(Request request, Response response) throws IOException, ServletException {
    if (log.isDebugEnabled()) {
        log.debug("Security checking request " + request.getMethod() + " " +
                request.getRequestURI());
    }
    LoginConfig config = this.context.getLoginConfig();

    // Have we got a cached authenticated Principal to record?
    if (cache) {
        Principal principal = request.getUserPrincipal();
        if (principal == null) {
            Session session = request.getSessionInternal(false);
            if (session != null) {
                principal = session.getPrincipal();
                if (principal != null) {
                    if (log.isDebugEnabled()) {
                        log.debug("We have cached auth type " + session.getAuthType() +
                                " for principal " + principal);
                    }
                    request.setAuthType(session.getAuthType());
                    request.setUserPrincipal(principal);
                }
            }
        }
    }

    boolean authRequired = isContinuationRequired(request);

    Realm realm = this.context.getRealm();
    // Is this request URI subject to a security constraint?
    SecurityConstraint[] constraints = realm.findSecurityConstraints(request, this.context);

    if (constraints == null && !context.getPreemptiveAuthentication() && !authRequired) {
        if (log.isDebugEnabled()) {
            log.debug(" Not subject to any constraint");
        }
        getNext().invoke(request, response);
        return;
    }
    // Make sure that constrained resources are not cached by web proxies
    // or browsers as caching can provide a security hole
    if (constraints != null && disableProxyCaching &&
            !"POST".equalsIgnoreCase(request.getMethod())) {
        if (securePagesWithPragma) {
            // Note: These can cause problems with downloading files with IE
            response.setHeader("Pragma", "No-cache");
            response.setHeader("Cache-Control", "no-cache");
        } else {
            response.setHeader("Cache-Control", "private");
        }
        response.setHeader("Expires", DATE_ONE);
    }

    if (constraints != null) {
        // Enforce any user data constraint for this security constraint
        if (log.isDebugEnabled()) {
            log.debug(" Calling hasUserDataPermission()");
        }
        if (!realm.hasUserDataPermission(request, response, constraints)) {
            if (log.isDebugEnabled()) {
                log.debug(" Failed hasUserDataPermission() test");
            }
            /*
             * ASSERT: Authenticator already set the appropriate HTTP status
             * code, so we do not have to do anything special
             */
            return;
        }
    }

    // Since authenticate modifies the response on failure,
    // we have to check for allow-from-all first.
    boolean hasAuthConstraint = false;
    if (constraints != null) {
        hasAuthConstraint = true;
        for (int i = 0; i < constraints.length && hasAuthConstraint; i++) {
            if (!constraints[i].getAuthConstraint()) {
                hasAuthConstraint = false;
            } else if (!constraints[i].getAllRoles()) {
                String[] roles = constraints[i].findAuthRoles();
                if (roles == null || roles.length == 0) {
                    hasAuthConstraint = false;
                }
            }
        }
    }

    if (!authRequired && hasAuthConstraint) {
        authRequired = true;
    }

    if (!authRequired && context.getPreemptiveAuthentication()) {
        authRequired =
                request.getCoyoteRequest().getMimeHeaders().getValue("authorization") != null;
    }

    if (!authRequired && context.getPreemptiveAuthentication() &&
            HttpServletRequest.CLIENT_CERT_AUTH.equals(getAuthMethod())) {
        X509Certificate[] certs = getRequestCertificates(request);
        authRequired = certs != null && certs.length > 0;
    }

    if (authRequired) {
        if (log.isDebugEnabled()) {
            log.debug(" Calling authenticate()");
        }
        if (!authenticate(request, response, config)) {
            if (log.isDebugEnabled()) {
                log.debug(" Failed authenticate() test");
            }
            /*
             * ASSERT: Authenticator already set the appropriate HTTP status
             * code, so we do not have to do anything special
             */
            return;
        }

    }

    if (constraints != null) {
        if (log.isDebugEnabled()) {
            log.debug(" Calling accessControl()");
        }
        if (!realm.hasResourcePermission(request, response, constraints, this.context)) {
            if (log.isDebugEnabled()) {
                log.debug(" Failed accessControl() test");
            }
            /*
             * ASSERT: AccessControl method has already set the appropriate
             * HTTP status code, so we do not have to do anything special
             */
            return;
        }
    }

    // Any and all specified constraints have been satisfied
    if (log.isDebugEnabled()) {
        log.debug(" Successfully passed all security constraints");
    }
    getNext().invoke(request, response);
}
因此对于NonLoginAuthenticator而方,走的是上面加粗代码。对于Tomcat权限这一块,目前不做深入分析,当然,如果想修改默认配置NonLoginAuthenticator,可以在WEB-INF/web.xml中添加login-config标签。如下图所示

最终在解析web.xml时,添加到StandardContext中。

大家可能感到好奇,我是怎么找到这样使用的呢?首先找到StandardContext的setLoginConfig()方法。 发现在WebXml使用了setLoginConfig()

WebXml的loginConfig最终来源于其setLoginConfig方法 。我们知道WebXml是web.xml的封装,而在Tomcat中所有的xml的解析都是由Degister框架,根据Degister框架的特性,肯定配置了"setLoginConfig" 字符串,因此全局搜索"setLoginConfig"。
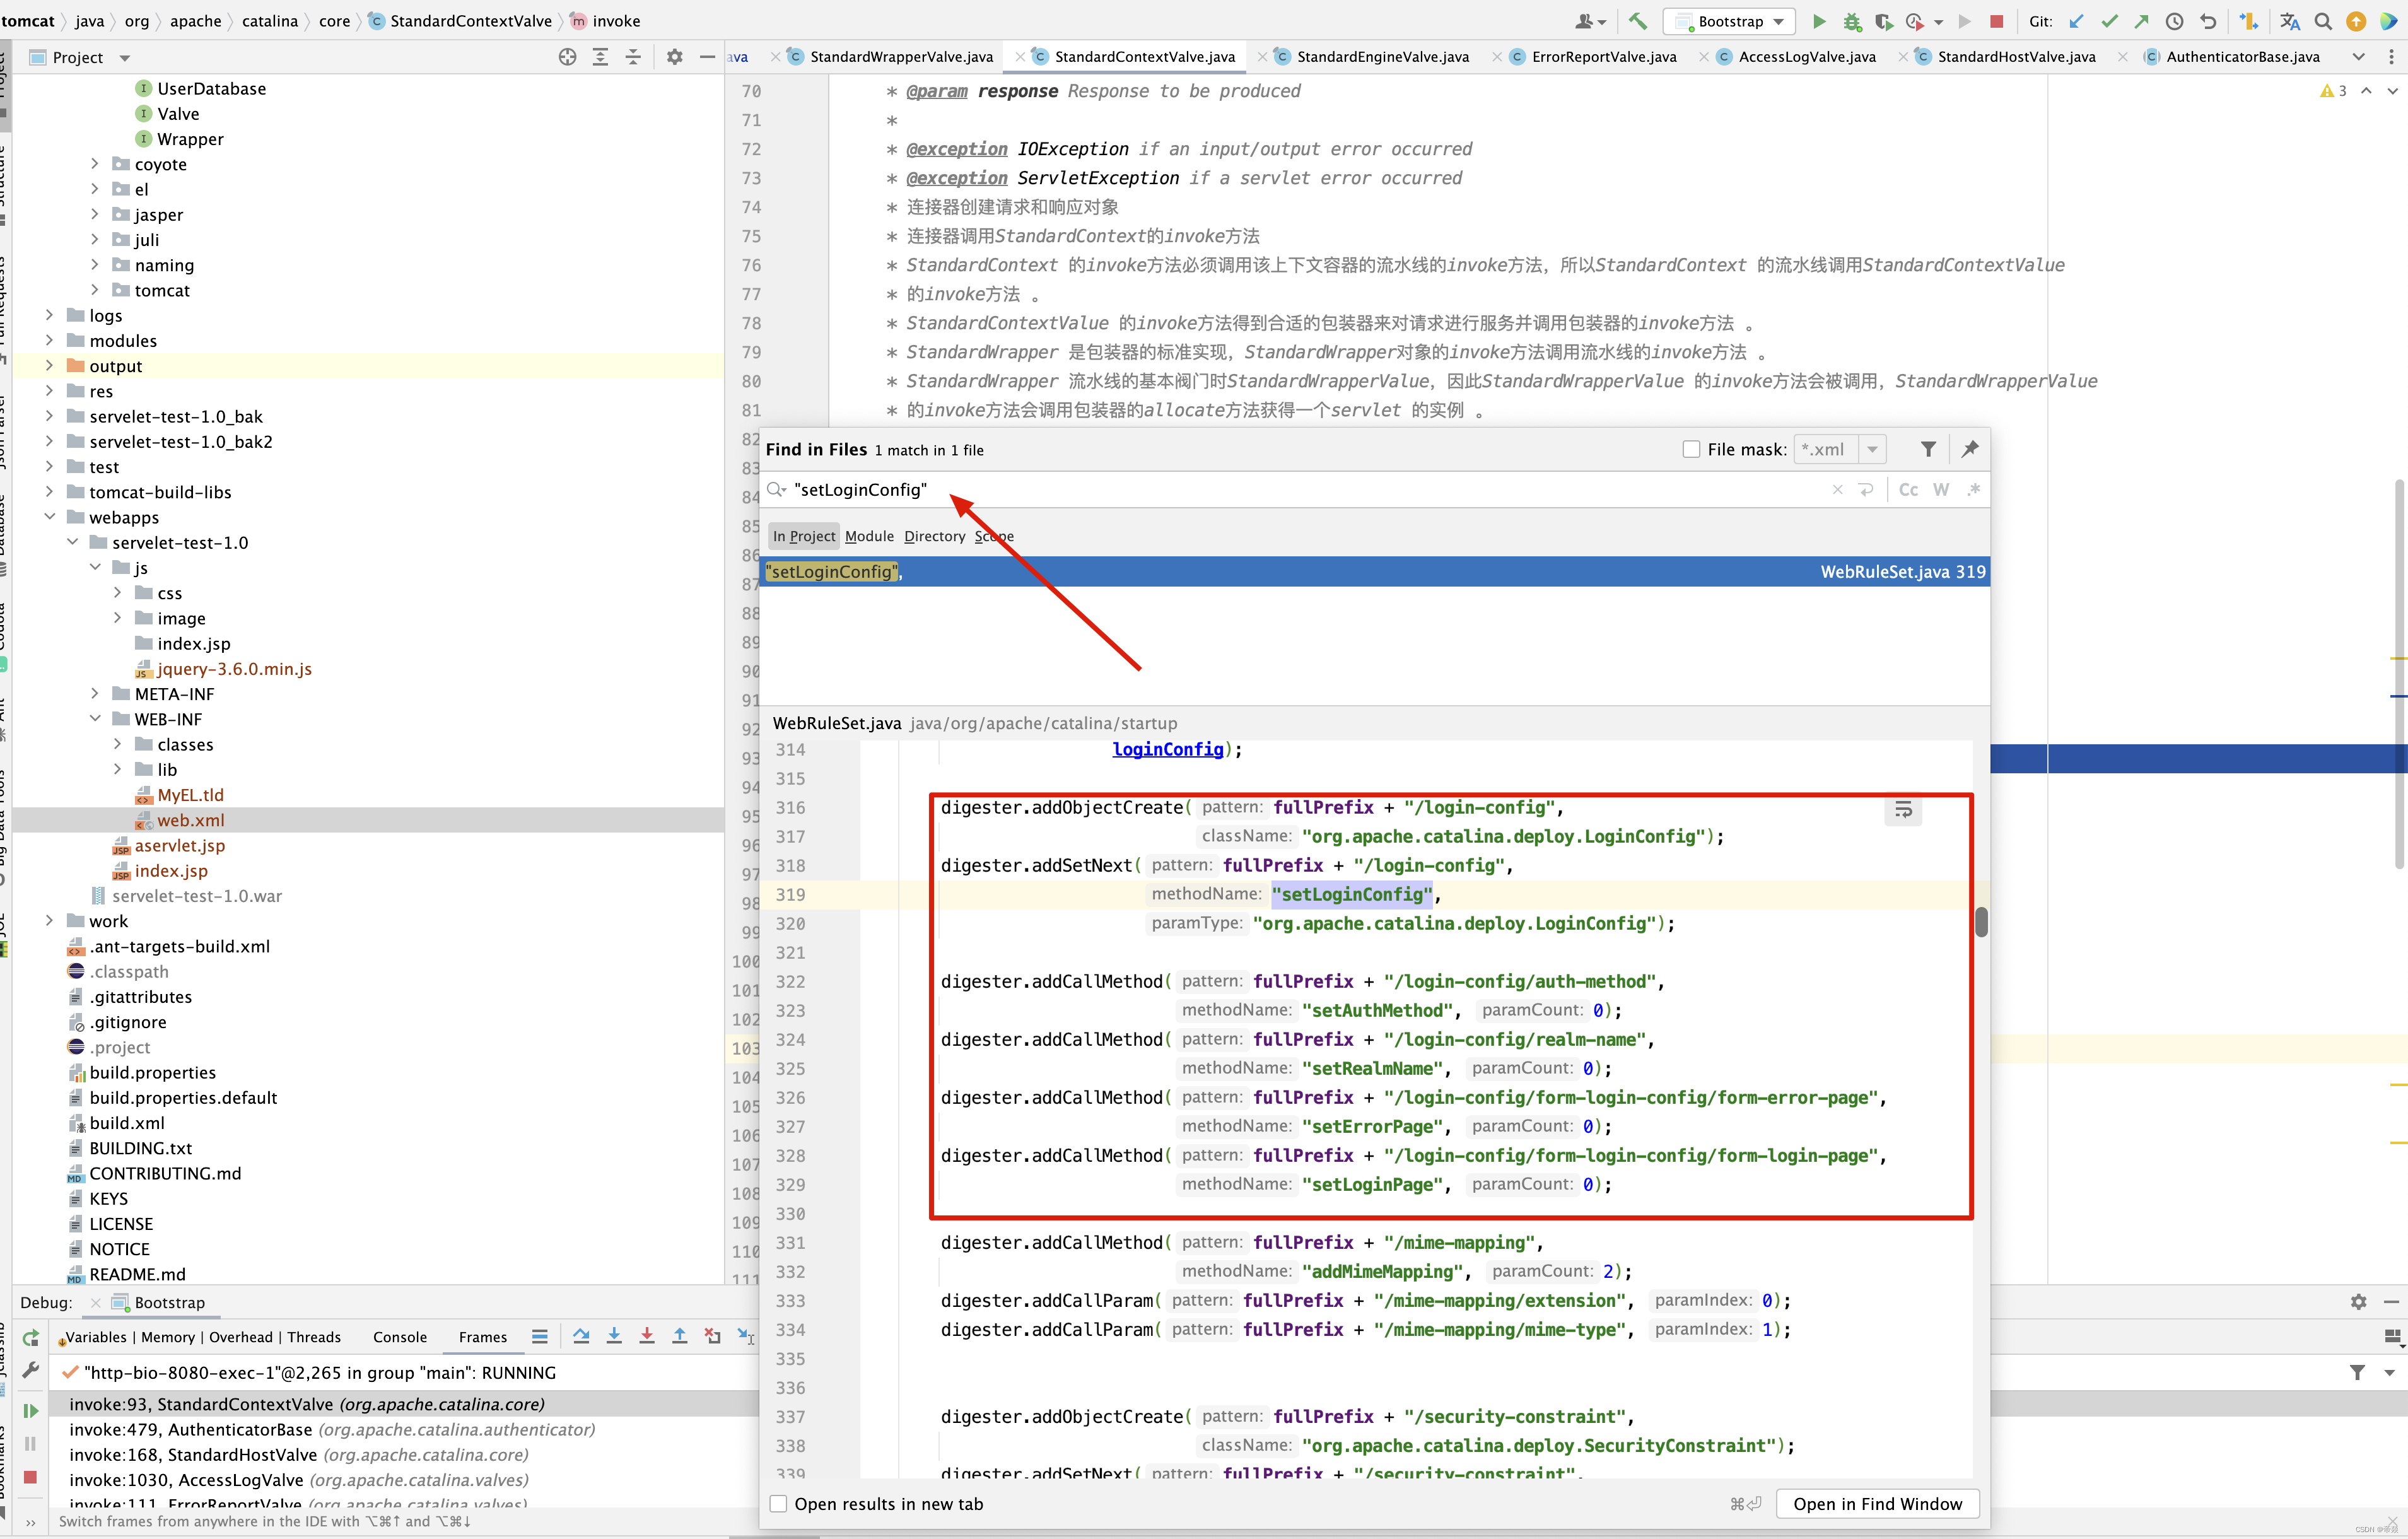
终于找到了login-config的配置,本例中只配置了auth-method,还可以倒置realm-name, form-login-config/form-error-page, form-login-config/form-login-page等信息。 接下来分析StandardContextValve类。
StandardContextValve
接下来看StandardContextValve的内部实现
public final void invoke(Request request, Response response)
    throws IOException, ServletException {

    // Disallow any direct access to resources under WEB-INF or META-INF
    // 当然禁止访问META-INF和WEB-INF的内容,如果访问,则抛出404异常
    MessageBytes requestPathMB = request.getRequestPathMB();
    if ((requestPathMB.startsWithIgnoreCase("/META-INF/", 0))
            || (requestPathMB.equalsIgnoreCase("/META-INF"))
            || (requestPathMB.startsWithIgnoreCase("/WEB-INF/", 0))
            || (requestPathMB.equalsIgnoreCase("/WEB-INF"))) {
        response.sendError(HttpServletResponse.SC_NOT_FOUND);
        return;
    }
    // Select the Wrapper to be used for this Request
    // 如果Wrapper不存在或者Wrapper不可用,则抛出404异常
    Wrapper wrapper = request.getWrapper();
    if (wrapper == null || wrapper.isUnavailable()) {
        response.sendError(HttpServletResponse.SC_NOT_FOUND);
        return;
    }

    // Acknowledge the request
    // 向客户端发送ack事件
    try {
        response.sendAcknowledgement();
    } catch (IOException ioe) {
        container.getLogger().error(sm.getString(
                "standardContextValve.acknowledgeException"), ioe);
        request.setAttribute(RequestDispatcher.ERROR_EXCEPTION, ioe);
        // 如果抛出异常,则返回505错误码
        response.sendError(HttpServletResponse.SC_INTERNAL_SERVER_ERROR);
        return;
    }

    if (request.isAsyncSupported()) {
        request.setAsyncSupported(wrapper.getPipeline().isAsyncSupported());
    }
    wrapper.getPipeline().getFirst().invoke(request, response);
}
接下来进入StandardWrapperValve的invoke()方法。
StandardWrapperValve
/**
 * StandardWrapperValve 是 StandardWrapper 实例上的基本阀门,该阀门做两件 事情:
 *  1.提交 Servlet 的所有相关过滤器
 *  2.调用发送者的 service 方法要实现这些内容,下面是 StandardWrapperValve 在他的 invoke 方法要实现的:
 *  3.调用 StandardWrapper 的 allocate 的方法来获得一个 servlet 实例
 *  4.调用它的 private createFilterChain 方法获得过滤链
 *  5.调用过滤器链的 doFilter 方法。包括调用 servlet 的 service 方法
 *  6.释放过滤器链
 *  7.调用包装器的 deallocate 方法
 *  8.如果 Servlet 无法使用了,调用包装器的 unload 方法
 */
@Override
public final void invoke(Request request, Response response)
    throws IOException, ServletException {

    // Initialize local variables we may need
    boolean unavailable = false;
    Throwable throwable = null;
    // This should be a Request attribute...
    long t1=System.currentTimeMillis();
    requestCount.incrementAndGet();
    StandardWrapper wrapper = (StandardWrapper) getContainer(); // 属于哪个Wrapper
    Servlet servlet = null;
    Context context = (Context) wrapper.getParent();  // 属于哪个Context

    // Check for the application being marked unavailable
    if (!context.getState().isAvailable()) {
    	// 如果容器的状态不可用,则返回503
        response.sendError(HttpServletResponse.SC_SERVICE_UNAVAILABLE,
                       sm.getString("standardContext.isUnavailable"));
        unavailable = true;
    }

    // Check for the servlet being marked unavailable
    // 如果Context可用,但是Wrapper不可用, 在定义servlet时,可以设置enabled
    if (!unavailable && wrapper.isUnavailable()) {
        container.getLogger().info(sm.getString("standardWrapper.isUnavailable",
                wrapper.getName()));
        long available = wrapper.getAvailable();
        if ((available > 0L) && (available < Long.MAX_VALUE)) {
            response.setDateHeader("Retry-After", available);
            response.sendError(HttpServletResponse.SC_SERVICE_UNAVAILABLE,
                    sm.getString("standardWrapper.isUnavailable",
                            wrapper.getName()));
        } else if (available == Long.MAX_VALUE) {
            response.sendError(HttpServletResponse.SC_NOT_FOUND,
                    sm.getString("standardWrapper.notFound",
                            wrapper.getName()));
        }
        unavailable = true;
    }

    // Allocate a servlet instance to process this request
    try {
        if (!unavailable) {
        	// 实例化,初始化servlet
            servlet = wrapper.allocate();
        }
    } catch (UnavailableException e) {
        container.getLogger().error(
                sm.getString("standardWrapper.allocateException",
                        wrapper.getName()), e);
        long available = wrapper.getAvailable();
        if ((available > 0L) && (available < Long.MAX_VALUE)) {
            response.setDateHeader("Retry-After", available);
            response.sendError(HttpServletResponse.SC_SERVICE_UNAVAILABLE,
                       sm.getString("standardWrapper.isUnavailable",
                                    wrapper.getName()));
        } else if (available == Long.MAX_VALUE) {
            response.sendError(HttpServletResponse.SC_NOT_FOUND,
                       sm.getString("standardWrapper.notFound",
                                    wrapper.getName()));
        }
    } catch (ServletException e) {
        container.getLogger().error(sm.getString("standardWrapper.allocateException",
                         wrapper.getName()), StandardWrapper.getRootCause(e));
        throwable = e;
        exception(request, response, e);
    } catch (Throwable e) {
        ExceptionUtils.handleThrowable(e);
        container.getLogger().error(sm.getString("standardWrapper.allocateException",
                         wrapper.getName()), e);
        throwable = e;
        exception(request, response, e);
        servlet = null;
    }

    // Identify if the request is Comet related now that the servlet has been allocated
    boolean comet = false;
    if (servlet instanceof CometProcessor && Boolean.TRUE.equals(request.getAttribute(
            Globals.COMET_SUPPORTED_ATTR))) {
        comet = true;
        request.setComet(true);
    }

    MessageBytes requestPathMB = request.getRequestPathMB();
    DispatcherType dispatcherType = DispatcherType.REQUEST;
    if (request.getDispatcherType()==DispatcherType.ASYNC) dispatcherType = DispatcherType.ASYNC;
    request.setAttribute(Globals.DISPATCHER_TYPE_ATTR,dispatcherType);
    request.setAttribute(Globals.DISPATCHER_REQUEST_PATH_ATTR,
            requestPathMB);
    // Create the filter chain for this request
    ApplicationFilterFactory factory =
        ApplicationFilterFactory.getInstance();

    // 最重要的方法是 createFilterChain 方法并调用过滤器链的 doFilter 方法。方 法 createFilterChain 创建了一个
    // ApplicationFilterChain 实例,并将所有的 过滤器添加到上面。ApplicationFilterChain 类将在下面的小节中介绍。
    // 要完 全的理解这个类,还需要理解 FilterDef 和 ApplicationFilterConfig 类。这些 内容将在下面介绍
    ApplicationFilterChain filterChain =
        factory.createFilterChain(request, wrapper, servlet);

    // Reset comet flag value after creating the filter chain
    request.setComet(false);

    // Call the filter chain for this request
    // NOTE: This also calls the servlet's service() method
    try {
        if ((servlet != null) && (filterChain != null)) {
            // Swallow output if needed
            if (context.getSwallowOutput()) {
                try {
                    SystemLogHandler.startCapture();
                    if (request.isAsyncDispatching()) {
                        request.getAsyncContextInternal().doInternalDispatch();
                    } else if (comet) {
                        filterChain.doFilterEvent(request.getEvent());
                        request.setComet(true);
                    } else {
                        filterChain.doFilter(request.getRequest(),
                                response.getResponse());
                    }
                } finally {
                    String log = SystemLogHandler.stopCapture();
                    if (log != null && log.length() > 0) {
                        context.getLogger().info(log);
                    }
                }
            } else {
                if (request.isAsyncDispatching()) {
                    request.getAsyncContextInternal().doInternalDispatch();
                } else if (comet) {
                    request.setComet(true);
                    filterChain.doFilterEvent(request.getEvent());
                } else {
                    filterChain.doFilter
                        (request.getRequest(), response.getResponse());
                }
            }

        }
    } catch (ClientAbortException e) {
        throwable = e;
        exception(request, response, e);
    } catch (IOException e) {
        container.getLogger().error(sm.getString(
                "standardWrapper.serviceException", wrapper.getName(),
                context.getName()), e);
        throwable = e;
        exception(request, response, e);
    } catch (UnavailableException e) {
        container.getLogger().error(sm.getString(
                "standardWrapper.serviceException", wrapper.getName(),
                context.getName()), e);
        //            throwable = e;
        //            exception(request, response, e);
        wrapper.unavailable(e);
        long available = wrapper.getAvailable();
        if ((available > 0L) && (available < Long.MAX_VALUE)) {
            response.setDateHeader("Retry-After", available);
            response.sendError(HttpServletResponse.SC_SERVICE_UNAVAILABLE,
                       sm.getString("standardWrapper.isUnavailable",
                                    wrapper.getName()));
        } else if (available == Long.MAX_VALUE) {
            response.sendError(HttpServletResponse.SC_NOT_FOUND,
                        sm.getString("standardWrapper.notFound",
                                    wrapper.getName()));
        }
        // Do not save exception in 'throwable', because we
        // do not want to do exception(request, response, e) processing
    } catch (ServletException e) {
        Throwable rootCause = StandardWrapper.getRootCause(e);
        if (!(rootCause instanceof ClientAbortException)) {
            container.getLogger().error(sm.getString(
                    "standardWrapper.serviceExceptionRoot",
                    wrapper.getName(), context.getName(), e.getMessage()),
                    rootCause);
        }
        throwable = e;
        exception(request, response, e);
    } catch (Throwable e) {
        ExceptionUtils.handleThrowable(e);
        container.getLogger().error(sm.getString(
                "standardWrapper.serviceException", wrapper.getName(),
                context.getName()), e);
        throwable = e;
        exception(request, response, e);
    }

    // Release the filter chain (if any) for this request
    if (filterChain != null) {
        if (request.isComet()) {
            // If this is a Comet request, then the same chain will be used for the
            // processing of all subsequent events.
            filterChain.reuse();
        } else {
            filterChain.release();
        }
    }

    // Deallocate the allocated servlet instance
    try {
        if (servlet != null) {
            wrapper.deallocate(servlet);
        }
    } catch (Throwable e) {
        ExceptionUtils.handleThrowable(e);
        container.getLogger().error(sm.getString("standardWrapper.deallocateException",
                         wrapper.getName()), e);
        if (throwable == null) {
            throwable = e;
            exception(request, response, e);
        }
    }

    // If this servlet has been marked permanently unavailable,
    // unload it and release this instance
    try {
        if ((servlet != null) &&
            (wrapper.getAvailable() == Long.MAX_VALUE)) {
            wrapper.unload();
        }
    } catch (Throwable e) {
        ExceptionUtils.handleThrowable(e);
        container.getLogger().error(sm.getString("standardWrapper.unloadException",
                         wrapper.getName()), e);
        if (throwable == null) {
            throwable = e;
            exception(request, response, e);
        }
    }
    long t2=System.currentTimeMillis();

    long time=t2-t1;
    processingTime += time;
    if( time > maxTime) maxTime=time;
    if( time < minTime) minTime=time;

}
先来看Servlet的实例化初始化方法
public Servlet allocate() throws ServletException {
    // If we are currently unloading this servlet, throw an exception
    if (unloading) {
        throw new ServletException(sm.getString("standardWrapper.unloading", getName()));
    }
    boolean newInstance = false;
    // If not SingleThreadedModel, return the same instance every time
    if (!singleThreadModel) {
        // Load and initialize our instance if necessary
        if (instance == null || !instanceInitialized) {
            synchronized (this) {
                if (instance == null) {
                    try {
                        if (log.isDebugEnabled()) {
                            log.debug("Allocating non-STM instance");
                        }
                        // Note: We don't know if the Servlet implements
                        // SingleThreadModel until we have loaded it.
                        // 一个Servlet只有被加载后才能知道是不是实现了SingleThreadModel接口
                        instance = loadServlet();
                        newInstance = true;
                        // 如果没有继承singleThreadModel接口
                        if (!singleThreadModel) {
                            // For non-STM, increment here to prevent a race
                            // condition with unload. Bug 43683, test case
                            // #3
                            // 分配实例的次数+1
                            countAllocated.incrementAndGet();
                        }
                    } catch (ServletException e) {
                        throw e;
                    } catch (Throwable e) {
                        ExceptionUtils.handleThrowable(e);
                        throw new ServletException(sm.getString("standardWrapper.allocate"), e);
                    }
                }
                if (!instanceInitialized) {
                    initServlet(instance);
                }
            }
        }

        if (singleThreadModel) {
            // 新生成了一个实例后,把实例放入instancePool
            if (newInstance) {
                // Have to do this outside of the sync above to prevent a
                // possible deadlock
                synchronized (instancePool) {
                    instancePool.push(instance);
                    nInstances++;
                }
            }
        } else {
            if (log.isTraceEnabled()) {
                log.trace("  Returning non-STM instance");
            }
            // For new instances, count will have been incremented at the
            // time of creation
            if (!newInstance) {
                // 分配实例的次数加1,如果是新创的实例,在上面就会加1
                countAllocated.incrementAndGet();
            }
            return instance;
        }
    }

    synchronized (instancePool) {
        // countAllocated表示当前需要的实例数
        // nInstances表示当前已经生成的实例数
        // 如果需要的大于或等于存在的实例数,那么则要新生成了,如果已经超过了最大限制,就只能等其他线程释放servlet了
        while (countAllocated.get() >= nInstances) {
            // Allocate a new instance if possible, or else wait
            // 如果现在生成的实例小于最大限制,则继续生成
            if (nInstances < maxInstances) {
                try {
                    instancePool.push(loadServlet());
                    nInstances++;
                } catch (ServletException e) {
                    throw e;
                } catch (Throwable e) {
                    ExceptionUtils.handleThrowable(e);
                    throw new ServletException(sm.getString("standardWrapper.allocate"), e);
                }
            } else {
                // 否则等等
                try {
                    instancePool.wait();
                } catch (InterruptedException e) {
                    // Ignore
                }
            }
        }
        if (log.isTraceEnabled()) {
            log.trace("  Returning allocated STM instance");
        }
        // 分配次数+1,直接从instancePool取
        countAllocated.incrementAndGet();
        return instancePool.pop();
    }
}
Servlet对象池
Servlet在不实现SingleThreadModel的情况下以单例实例模式运行,如图10.3所示,这种情况下,Wrapper容器只通过反射实例化一个Servlet对象,对此,Servlet的所有客户端请求都会共用此Servlet对象,而对于多个客户端请求Tomcat会使用多线程处理,所以要注意保证此Servlet对象的线程安全,多个线程不管执行顺序如何都能保证执行结果的正确性,关于线程安全问题,这里举一个刚做Web开发可能会犯的错误,在某个Servlet使用成员变量累加统计访问次数,这就存在线程安全问题。
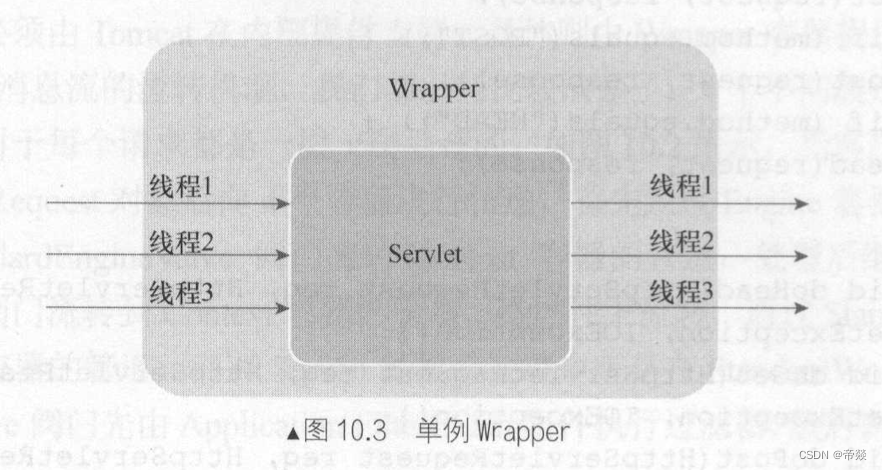
为了支持一个Servlet对象对一个线程,Servlet规范提出了一个SingleThreadModel接口,Tomcat容器必须要完成的机制是, 如果某个Servlet类实现了SingleThreadModel接口,则要保证一个线程独占一个Servlet对象,假如线程1正在使用Servlet1对象,则线程2不能再使用Servlet1对象,只能使用Servlet2对象 。
针对SingleThreadModel模式,Tomcat 的Wrapper 容器使用了对象池策略, Wrapper容器会有一个Servlet堆 ,负责保证若干个Servlet对象,当需要Servlet对象时从堆中pop()出一个对象,而当用完后则push回堆中,Wrapper 容器中最多可以有20个某个Servlet类对象,例如XXXServlet类的对象池, 已有20个线程占用了20个对象,于是第21个线程执行时就会因此阻塞而等待,直至对象池中有可用的对象才继续执行。
整个流程如图10.4所示,某个线程处理客户端请求时,它首先尝试从Servlet对象池中获取Servlet对象,此时如果对象池中可用的对象则直接返回一个对象,如果不够,则使用则继续实例化Servlet对象并push到对象池中, 但Servlet对象的总数量必须保证在20个以内, 如果20个Servlet对象都被其他线程使用了, 那么就必须要等到其他线程用完放回后才能获取,此时该线程会一直等待,从对象池中获取到Servlet对象后则调用Servlet对象的service()方法对客户端请求进行处理,处理完后将Servlet对象放回对象池中。

本节介绍了Servlet对象池, 它是为了支持Servlet规范SingleThreadModel接口而引入的它就是一个栈结构,需要时就pop出一个对象,使用完就push回去,请看下面代码实现 。
@Override
public void deallocate(Servlet servlet) throws ServletException {
    // If not SingleThreadModel, no action is required
    if (!singleThreadModel) {
        // 分配次数-1
        countAllocated.decrementAndGet();
        return;
    }

    // Unlock and free this instance
    synchronized (instancePool) {
        // 分配次数-1,
        countAllocated.decrementAndGet();
        instancePool.push(servlet);
        instancePool.notify();
    }
}
public synchronized Servlet loadServlet() throws ServletException {

    if (unloading) {
        throw new ServletException(
                sm.getString("standardWrapper.unloading", getName()));
    }

    // Nothing to do if we already have an instance or an instance pool
    if (!singleThreadModel && (instance != null))
        return instance;

    PrintStream out = System.out;
    if (swallowOutput) {
        SystemLogHandler.startCapture();
    }

    Servlet servlet;
    try {
        long t1=System.currentTimeMillis();
        // Complain if no servlet class has been specified
        if (servletClass == null) {
            unavailable(null);
            throw new ServletException
                (sm.getString("standardWrapper.notClass", getName()));
        }

        InstanceManager instanceManager = ((StandardContext)getParent()).getInstanceManager();
        try {
            // 有了类加载器和要加载的 Servlet 名字,就可以使用 loadServlet 方法来加载类 了。
            // 1. 创建Servlet实例,如果添加了JNDI 注解,将进行依赖注入
            servlet = (Servlet) instanceManager.newInstance(servletClass);
        } catch (ClassCastException e) {
            unavailable(null);
            // Restore the context ClassLoader
            throw new ServletException
                (sm.getString("standardWrapper.notServlet", servletClass), e);
        } catch (Throwable e) {
            e = ExceptionUtils.unwrapInvocationTargetException(e);
            ExceptionUtils.handleThrowable(e);
            unavailable(null);

            // Added extra log statement for Bugzilla 36630:
            // https://bz.apache.org/bugzilla/show_bug.cgi?id=36630
            if(log.isDebugEnabled()) {
                log.debug(sm.getString("standardWrapper.instantiate", servletClass), e);
            }

            // Restore the context ClassLoader
            throw new ServletException
                (sm.getString("standardWrapper.instantiate", servletClass), e);
        }

        if (multipartConfigElement == null) {
            // 2. 读取javax.servlet.annotation.MultipartConfig配置,以用于multipart/form-data请求处理,包括临时文件存储路径 。
            // 上传文件最大字节数,请求最大字节数,文件大小阈值。
            MultipartConfig annotation =
                    servlet.getClass().getAnnotation(MultipartConfig.class);
            if (annotation != null) {
                multipartConfigElement =
                        new MultipartConfigElement(annotation);
            }
        }

        // Special handling for ContainerServlet instances
        // 如果通过了安全性检查,接下来检查该 Servlet 是否是一个 ContainerServlet。 ContainerServlet 是实现了 org.apache.catalina.ContainerServlet
        // 接口的 Servlet,它可以访问 Catalina 的内部函数。如果该 Servlet 是 ContainerServlet,loadServlet 方法调用 ContainerServlet 的 setWrapper
        // 方法,传递该 StandardWrapper 实例。
        if ((servlet instanceof ContainerServlet) &&
                // isContainerProvidedServlet 方法返回 true 值。classLoader 会获得另一个 ClassLoader 的实例,这样就可以访问 Catalina 的内部了。
                (isContainerProvidedServlet(servletClass) ||
                        ((Context) getParent()).getPrivileged() )) {
            ((ContainerServlet) servlet).setWrapper(this);
        }

        classLoadTime=(int) (System.currentTimeMillis() -t1);

        // 实现了SingleThreadModel接口
        if (servlet instanceof SingleThreadModel) {
            if (instancePool == null) {
                instancePool = new Stack<Servlet>();
            }
            singleThreadModel = true;
        }

        // 4. 初始化servlet
        initServlet(servlet);

        fireContainerEvent("load", this);

        loadTime=System.currentTimeMillis() -t1;
    } finally {
        if (swallowOutput) {
            String log = SystemLogHandler.stopCapture();
            if (log != null && log.length() > 0) {
                if (getServletContext() != null) {
                    getServletContext().log(log);
                } else {
                    out.println(log);
                }
            }
        }
    }
    return servlet;

}
加载Servlet代码分为4步。
- 反射实例化Servlet。
- MultipartConfig注解处理
- 如果实现了ContainerServlet,则设置其Wrapper为this
- 初始化Servlet
其实上面代码中通过实现管理器servlet = (Servlet) instanceManager.newInstance(servletClass); 这一行代码虽然内部是通过反射实现servletClass的实例化。
public Object newInstance(String className) throws IllegalAccessException,
InvocationTargetException, NamingException, InstantiationException,
ClassNotFoundException, IllegalArgumentException, NoSuchMethodException, SecurityException {
    Class<?> clazz = loadClassMaybePrivileged(className, classLoader);
    return newInstance(clazz.getDeclaredConstructor().newInstance(), clazz);
}
细心的读者肯定会发现,竟然传了一个classLoader,那这个classLoader是什么呢? 在DefaultInstanceManager实例化时,传了了WebappClassLoader,因此在实例化Servlet时,其类加载器为StandardContext的类加载器,也就是WebappClassLoader加载器。 接下来就是initServlet()的实现了。
private synchronized void initServlet(Servlet servlet)
        throws ServletException {

    if (instanceInitialized && !singleThreadModel) return;

    // Call the initialization method of this servlet
    try {
        // 接下来 loadServlet 方法触发 BEFORE_INIT_EVENT 事件,并调用发送者的 init 方法。
        instanceSupport.fireInstanceEvent(InstanceEvent.BEFORE_INIT_EVENT,
                                          servlet);

        if( Globals.IS_SECURITY_ENABLED) {
            boolean success = false;
            try {
                Object[] args = new Object[] { facade };
                SecurityUtil.doAsPrivilege("init",
                                           servlet,
                                           classType,
                                           args);
                success = true;
            } finally {
                if (!success) {
                    // destroy() will not be called, thus clear the reference now
                    SecurityUtil.remove(servlet);
                }
            }
        } else {
            //因此,当 StandardWrapper 对象调用 Servlet 实例的 init 方法的时候,它传递 的是一个 StandardWrapperFacade 对象。
            // 在 Servlet 内部调用 ServletConfig 的 getServletName, getInitParameter, 和 getInitParameterNames 方法只需
            // 要调用它们在 StandardWrapper 的实现就行。
            servlet.init(facade);
        }

        instanceInitialized = true;

        instanceSupport.fireInstanceEvent(InstanceEvent.AFTER_INIT_EVENT,
                                          servlet);
    } catch (UnavailableException f) {
        instanceSupport.fireInstanceEvent(InstanceEvent.AFTER_INIT_EVENT,
                                          servlet, f);
        unavailable(f);
        throw f;
    } catch (ServletException f) {
        instanceSupport.fireInstanceEvent(InstanceEvent.AFTER_INIT_EVENT,
                                          servlet, f);
        // If the servlet wanted to be unavailable it would have
        // said so, so do not call unavailable(null).
        throw f;
    } catch (Throwable f) {
        ExceptionUtils.handleThrowable(f);
        getServletContext().log("StandardWrapper.Throwable", f );
        instanceSupport.fireInstanceEvent(InstanceEvent.AFTER_INIT_EVENT,
                                          servlet, f);
        // If the servlet wanted to be unavailable it would have
        // said so, so do not call unavailable(null).
        throw new ServletException
            (sm.getString("standardWrapper.initException", getName()), f);
    }
}
instanceInitialized控制只初始化一次,而Servlet真正的初始化代码在servlet.init(facade);这一行。 其他的都是一些事件处理,因此Servlet在每次创建时都会调用其init()方法,有且仅有一次,在具体分析Servlet的init()方法时,先来看看Servlet的种类。
Servlet种类
根据请求的的资源不同的种类,可以把Servlet分为三种类别,比如请求可能访问一个普通的Servlet,也可能访问一个JSP页面,也可以访问的是一个静态资源,根据对这些不同的类别的处理方式,可以分为三种Servlet,如图10.6所示,一个请求到达Tomcat后将由URI映射器根据请求的URI进行建模, 它会计算出请求发往哪个 Host 容器的哪个Context容器的哪个Wrapper 处理, 在路由的Wrapper 容器时会通过一定的算法选择不同的Servlet进行处理,比如,普通Servlet请求由路由到普通的Servlet,JSP则路由到JspServlet ,而静态资源则路由到DefaultServlet 。
Servlet路径的匹配规则如下
首先,尝试使用精确匹配法匹配精确的类型Servlet 的路径 。
然后,尝试使用前缀匹配通配符类型的Servlet。
接着,尝试使用扩展名匹配通配符类型的Servlet
最后匹配默认的Servlet。
如果一个请求到来,则通过以上规则匹配对应的Servlet,例如请求http://localhost:8080/test 精确匹配<url-pattern>test</url-pattern>的Servlet ,而http://localhost:8080/test.jsp,则会匹配<url-pattern>*.jsp</url-pattern> 的JspServlet ,下面分别讨论三种不同的Servlet 。
- 普通Servlet
普通Servlet就是我们最常见的Servlet,做Web开发都会涉及Servlet,要处理业务逻辑就会自己定义Servlet进行处理, 这就是普通的Servlet,编写好后Servlet通过配置web.xml文件就可以完成部署。 配置格式如下。
<servlet>
    <servlet-name>my</servlet-name>
    <servlet-class>com.example.servelettest.HelloServlet</servlet-class>
</servlet>

<servlet-mapping>
    <servlet-name>my</servlet-name>
    <url-pattern>/test</url-pattern>
</servlet-mapping>
- JspServlet
Web应用开发人员一般对这个Servlet比较陌生,因为他们不会直接与它打交道,既然是Servlet,那么肯定要声明后才被部署使用, 它被部署到Tomcat的安装目录下conf目录下的web.xml文件中,这里的web.xml文件是Tomcat的全局Web描述文件,JspServlet的配置如下 。
<servlet>
    <servlet-name>jsp</servlet-name>
    <servlet-class>org.apache.jasper.servlet.JspServlet</servlet-class>
    <init-param>
        <param-name>fork</param-name>
        <param-value>false</param-value>
    </init-param>
    <init-param>
        <param-name>xpoweredBy</param-name>
        <param-value>false</param-value>
    </init-param>
    <init-param>
        <param-name>trimSpaces</param-name>
        <param-value>false</param-value>
    </init-param>
    <load-on-startup>3</load-on-startup>

</servlet>


<servlet-mapping>
    <servlet-name>jsp</servlet-name>
    <url-pattern>*.jsp</url-pattern>
    <url-pattern>*.jspx</url-pattern>
</servlet-mapping>
可以看到,所以以.jsp 和.jspx 结尾的请求都会被JspServlet处理,它包揽了所有的JSP页面的处理, 我们知道JSP页面最终也是会被Tomcat 编译成相应的Servlet,如果想看详细的编译过程,请看之前的博客 Tomcat 源码解析一JSP编译器Jasper-佛怒火莲 系列, 而这些Servlet的处理都次给了JspServlet 。
JspServlet处理逻辑大致如下 。
a) 判断是不是第一次访问Servlet,如果是,则会先编译JSP页面,殷富一定的包和类名规则生成相应的Servlet类。
b) 加载刚刚编译好的JSP Serlvet类,并初始化它们
c) 调用刚刚加载好的JSP Servlet的service方法,处理请求。
至此完成了JSP页面的请求。
- DefaultServlet
同样是Tomcat内部使用的一个Servlet ,DefaultServlet是Tomcat专门提供用于处理静态资源的Servlet,它同样被部署到Tomcat安装目录下的conf目录下的web.xml文件中,DefaultServlet的配置如下 。
<servlet>
    <servlet-name>default</servlet-name>


    <servlet-class>org.apache.catalina.servlets.DefaultServlet</servlet-class>
    <init-param>
        <param-name>debug</param-name>
        <param-value>0</param-value>
    </init-param>
    <init-param>
        <param-name>listings</param-name>
        <!--<param-value>false</param-value>      -->
        <param-value>true</param-value>
    </init-param>
    <load-on-startup>1</load-on-startup>

</servlet>


<servlet-mapping>
    <servlet-name>default</servlet-name>
    <url-pattern>/</url-pattern>
</servlet-mapping>
可以看到所有的URI请求都会被匹配,但由于 Mapper组件匹配Servlet时将DefaultServlet放到最后才匹配,所以它并不会把所有的请求都拦截下来, 只有那些经过精确匹配,前缀匹配,扩展名匹配等还没有匹配上的,才会留给DefaultServlet,DefaultServlet通过JNDI根据URI在tomcat内部查找资源,然后以该资源响应客户端 。
首先来看DefaultServlet的初始化。在之前的博客也分析过这一块。 Tomcat 源码解析一容器加载-大寂灭指(下),但今天继续回顾一下。在DefaultServlet的init()中打一个断点。启动Tomcat

先看是哪里调用了DefaultServlet的初始化方法。

从调用链中得知,是StandardContext在启动时调用了所有子容器的load()方法。

进而调用了servlet.init(facade);方法,但StandardWrapper中,facade的默认值为StandardWrapperFacade facade = new StandardWrapperFacade(this); 而this就是StandardWrapper。

getServletConfig()事实上就是StandardWrapper
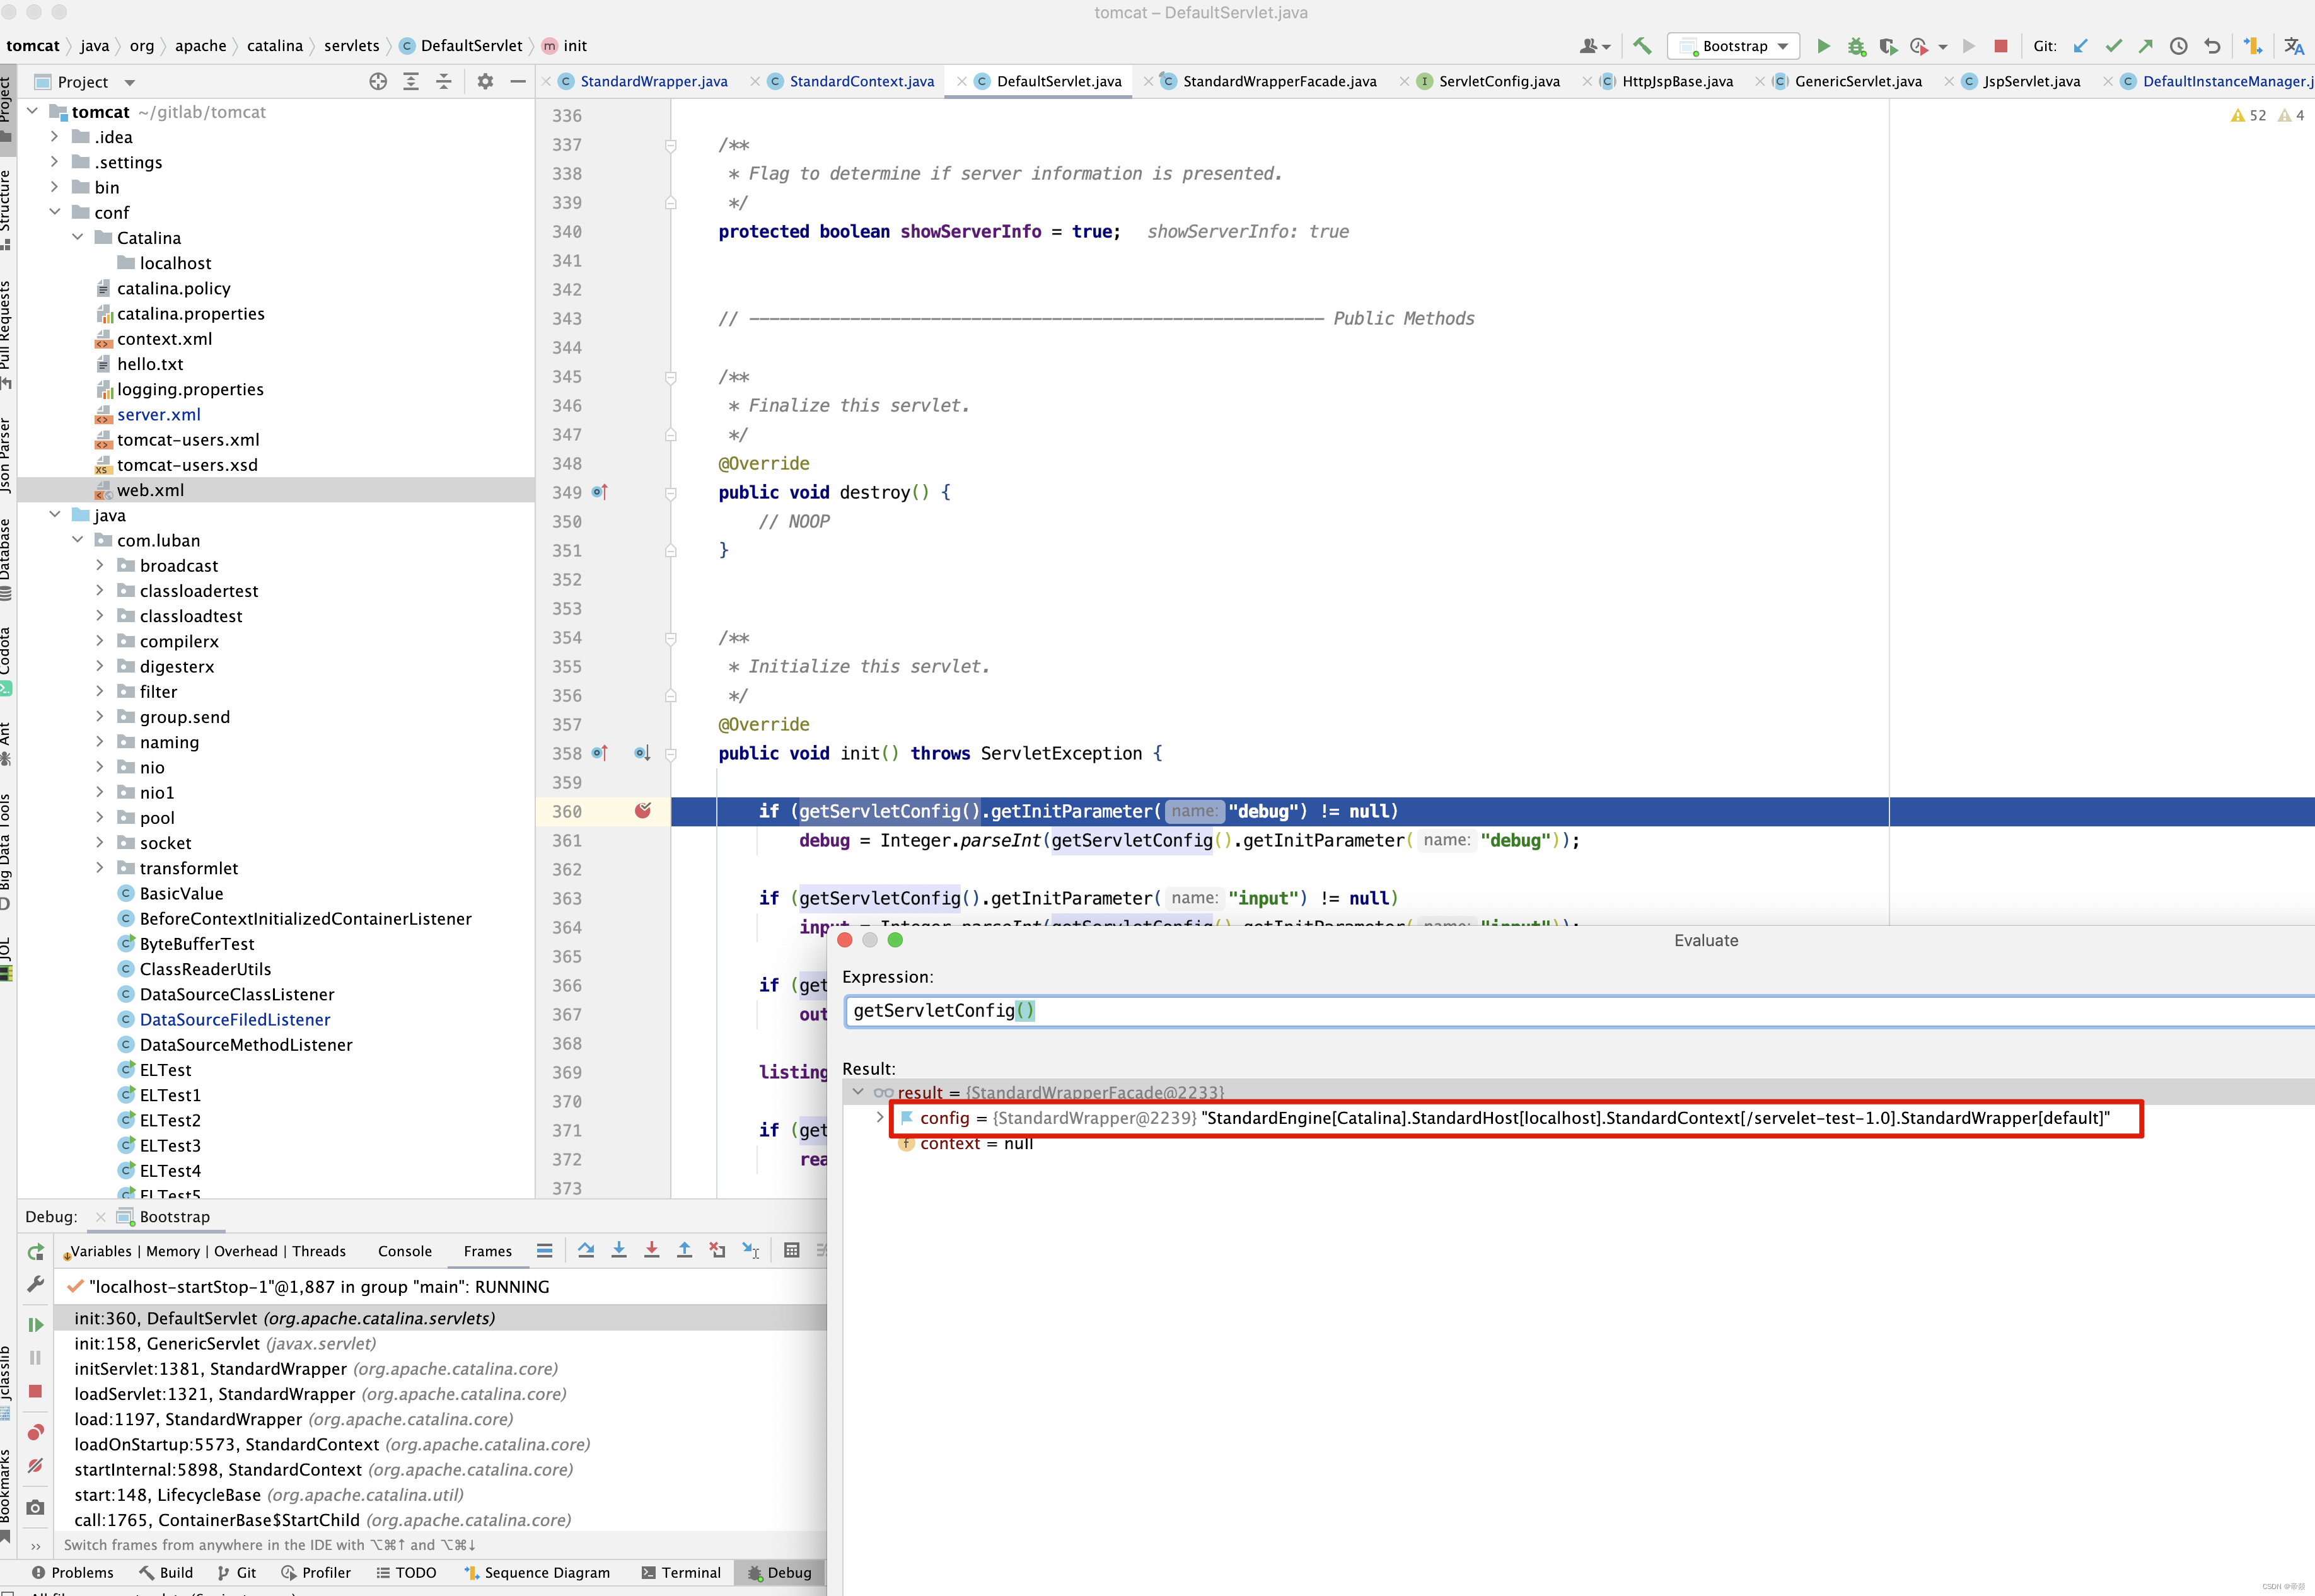
而里面的这些参数配置默认来源于catalina.base/conf/web.xml
<servlet>
    <servlet-name>default</servlet-name>


    <servlet-class>org.apache.catalina.servlets.DefaultServlet</servlet-class>
    <init-param>
        <param-name>debug</param-name>
        <param-value>0</param-value>
    </init-param>
    <init-param>
        <param-name>listings</param-name>
        <param-value>true</param-value>
    </init-param>
    <load-on-startup>1</load-on-startup>

</servlet>
先不分析这些参数有什么作用,后面使用到再来分析。
接下来看JspServlet的初始化。 同样JspServlet也是在StandardContext启动时进行初始化。

public void init(ServletConfig config) throws ServletException {

    super.init(config);
    this.config = config;
    this.context = config.getServletContext();

    // Initialize the JSP Runtime Context
    // Check for a custom Options implementation
    // 允许指定的类来配置 Jasper。如果没有指定,则使用默认的 Servlet 内置参数(EmbeddedServletOptions)。
    String engineOptionsName = config.getInitParameter("engineOptionsClass");
    if (Constants.IS_SECURITY_ENABLED && engineOptionsName != null) {
        log.info(Localizer.getMessage(
                "jsp.info.ignoreSetting", "engineOptionsClass", engineOptionsName));
        engineOptionsName = null;
    }
    if (engineOptionsName != null) {
        // Instantiate the indicated Options implementation
        try {
            ClassLoader loader = Thread.currentThread().getContextClassLoader();
            Class<?> engineOptionsClass = loader.loadClass(engineOptionsName);
            Class<?>[] ctorSig = { ServletConfig.class, ServletContext.class };
            Constructor<?> ctor = engineOptionsClass.getConstructor(ctorSig);
            Object[] args = { config, context };
            options = (Options) ctor.newInstance(args);
        } catch (Throwable e) {
            e = ExceptionUtils.unwrapInvocationTargetException(e);
            ExceptionUtils.handleThrowable(e);
            // Need to localize this.
            log.warn("Failed to load engineOptionsClass", e);
            // Use the default Options implementation
            options = new EmbeddedServletOptions(config, context);
        }
    } else {
        // Use the default Options implementation
        options = new EmbeddedServletOptions(config, context);
    }
    rctxt = new JspRuntimeContext(context, options);
    if (config.getInitParameter("jspFile") != null) {
        jspFile = config.getInitParameter("jspFile");
        try {
            if (null == context.getResource(jspFile)) {
                throw new ServletException("missing jspFile: [" + jspFile + "]");
            }
        } catch (MalformedURLException e) {
            throw new ServletException("Can not locate jsp file", e);
        }
        try {
            if (SecurityUtil.isPackageProtectionEnabled()){
               AccessController.doPrivileged(new PrivilegedExceptionAction<Object>(){
                    @Override
                    public Object run() throws IOException, ServletException {
                        serviceJspFile(null, null, jspFile, true);
                        return null;
                    }
                });
            } else {
                serviceJspFile(null, null, jspFile, true);
            }
        } catch (IOException e) {
            throw new ServletException("Could not precompile jsp: " + jspFile, e);
        } catch (PrivilegedActionException e) {
            Throwable t = e.getCause();
            if (t instanceof ServletException) throw (ServletException)t;
            throw new ServletException("Could not precompile jsp: " + jspFile, e);
        }
    }

    if (log.isDebugEnabled()) {
        log.debug(Localizer.getMessage("jsp.message.scratch.dir.is",
                options.getScratchDir().toString()));
        log.debug(Localizer.getMessage("jsp.message.dont.modify.servlets"));
    }
}
我们可以在jsp的init-param参数配置
<init-param>
    <param-name>engineOptionsClass</param-name>
    <param-value>xxx</param-value>
</init-param>
那配置这个参数有何意义呢?其实就是自定义EmbeddedServletOptions对象,那自定义这个对象有什么用呢?先来看EmbeddedServletOptions的构造方法。
public EmbeddedServletOptions(ServletConfig config,
        ServletContext context) {

    Enumeration<String> enumeration=config.getInitParameterNames();
    ...

    // 是否去掉模板文本中行为和指令间的空格,缺省为false
    String trimsp = config.getInitParameter("trimSpaces");
    ...

    this.isPoolingEnabled = true;
    //  确定是否共享标签处理器,true 或 false,缺省为 true。
    String poolingEnabledParam = config.getInitParameter("enablePooling");
    ...
    // 是否对每个输入行都用一条 print 语句来生成静态内容,以方便调试。true 或 false,缺省为 true。
    String mapFile = config.getInitParameter("mappedfile");
    ...

    // 类文件在编译时是否显示调试(debugging)信息? true 或 false,缺省为 true。
    String debugInfo = config.getInitParameter("classdebuginfo");
    ...

    // 如果“development”属性为 false 且“checkInterval”大于 0,则使用后台编译。“checkInterval”是查看 JSP 页面(包括其附属文件)
    String checkInterval = config.getInitParameter("checkInterval");
    ...
    // 是否让 Jasper 用于开发模式?如果是,检查 JSPs 修改的频率,将通过设置 modificationTestInterval 参数来完成。 true 或 false, 缺省为 true。
    String development = config.getInitParameter("development");
    if (development != null) {
        if (development.equalsIgnoreCase("true")) {
            this.development = true;
        } else if (development.equalsIgnoreCase("false")) {
            this.development = false;
        } else {
            if (log.isWarnEnabled()) {
                log.warn(Localizer.getMessage("jsp.warning.development"));
            }
        }
    }

    //  是否禁止 JSR45 调试时生成 SMAP 信息?true 或 false,缺省为 false。
    String suppressSmap = config.getInitParameter("suppressSmap");
    ...
    //  JSR45 调试的 SMAP 信息是否转存到文件?true 或 false,缺省为 false。当 suppressSmap 为 true 时,该参数为 false。
    String dumpSmap = config.getInitParameter("dumpSmap");
    ...
    // 在一个 useBean action 中,当类属性的值不是一个合法的 bean class 时,Jasper 是否抛出异常?true
    ...
    // 当使用标签时,发送给 Internet Explorer 的 class-id 的值。缺省为:8AD9C840-044E-11D1-B3E9-00805F499D93。
    ...
    /*
     * scratchdir  当编译 JSP 页面时使用的 scratch 目录。缺省为当前 WEB 应用的工作目录。
     */
    String dir = config.getInitParameter("scratchdir");
    if (dir != null && Constants.IS_SECURITY_ENABLED) {
        log.info(Localizer.getMessage("jsp.info.ignoreSetting", "scratchdir", dir));
        dir = null;
    }
    if (dir != null) {
        scratchDir = new File(dir);
    } else {
        // First try the Servlet 2.2 javax.servlet.context.tempdir property
        scratchDir = (File) context.getAttribute(ServletContext.TEMPDIR);
        if (scratchDir == null) {
            // Not running in a Servlet 2.2 container.
            // Try to get the JDK 1.2 java.io.tmpdir property
            dir = System.getProperty("java.io.tmpdir");
            if (dir != null)
                scratchDir = new File(dir);
        }
    }
    ...

    // 确定生成的 Servlet 是否加上 X-Powered-By 响应头?true 或 false,缺省为 false。
    String xpoweredBy = config.getInitParameter("xpoweredBy");
    if (xpoweredBy != null) {
        if (xpoweredBy.equalsIgnoreCase("true")) {
            this.xpoweredBy = true;
        } else if (xpoweredBy.equalsIgnoreCase("false")) {
            this.xpoweredBy = false;
        } else {
            if (log.isWarnEnabled()) {
                log.warn(Localizer.getMessage("jsp.warning.xpoweredBy"));
            }
        }
    }

    // 异常信息中是否包含出错的源代码片段?true 或 false,缺省为 true。
    String displaySourceFragment = config.getInitParameter("displaySourceFragment");
    ...
}
原来解析jsp生成 Servlet的相关配置都在EmbeddedServletOptions中,因此我们也可以自己定义一个类来设置这些配置参数,而不是通过XML配置文件。
接下来看另外一个问题,我们可以在初始化参数中配置jspFile,这个用意是什么呢?例如。
<servlet>
    <servlet-name>jsp</servlet-name>
    <servlet-class>org.apache.jasper.servlet.JspServlet</servlet-class>
    ...
    <init-param>
        <param-name>jspFile</param-name>
        <param-value>aservlet.jsp</param-value>
    </init-param>

    <load-on-startup>3</load-on-startup>

</servlet>
在启动StandardContext时,也就是在初始化JspServlet时,会将aservlet.jsp这个文件解析编译成Servlet,并加载到内存中,当Tomcat提供服务时,就省去了解析和编译和生成Servlet的步骤,因此就不会出现第一次访问这个jsp文件时感到慢的情况。当然啦,最重要的还是serviceJspFile()这个方法 ,在之前的博客中 已经对jsp 的解析编译,生成Servlet 等做了详细的分析,有兴趣可以自行去研究 Tomcat 源码解析一JSP编译器Jasper-佛怒火莲(上)这一篇博客 。
而普通的Servlet就是我们自己定义的Servlet,只要实现了init()方法,在Servlet创建时,会调用其init()方法初始化。
在StandardWrapperValve的invoke()方法中,还有另外一情况需要考虑。 Servlet不仅支持同步,还支持异步,因此先来看Servlet异步模式支持。
Comet 模式的支持
Comet模式是一种服务器端的推送技术,它的核心思想提供了一种能让服务器往客户端发送数据的方式,Comet模式为什么会出现,风开始人们在客户端通过不断的自动刷新整个页面更新数据,后来觉得体验不好, 又使用了Javax不断的从客户端轮询服务器以更新数据,然后使用Comet模式由服务器端通过长链接推送数据,Comet模式能大大的减少发送到服务器端的请求,从而避免了很多的开销, 而且它还具备了更好的实时性。
如图10.7所示,客户端发送一个请求到服务器,服务器接收到连接后, 一直保持着连接不关闭, 接着,客户端发送一个操作报文告诉服务器做什么操作,服务器处理完事件1后会给客户端响应,然后,处理完事件2后又会给客户端响应,接着,客户端继续发送操作报文给服务器,服务器再进行响应。

一般Comet模式需要NIO配合,而在BIO 中无法使用Commet 模式,在Tomcat内部集成Comet模式的思路比较清晰,引入了一个CometProcessor接口,此接口只有一个event方法,具体的接口代码如下 。
public interface CometProcessor extends Servlet{

    /**
     * Process the given Comet event.
     *
     * @param event The Comet event that will be processed
     * @throws IOException
     * @throws ServletException
     */
    public void event(CometEvent event)
        throws IOException, ServletException;

}
而CometEvent则表示Comet相关的事件,它包含了BEGIN,READ,END,ERROR四个事件,其含义分别如下。
- BEGIN ,表示请求开始,此时客户端连接已经被接收 。
- READ ,表示客户端连接已经建立,可以读取数据了,读取过程不会阻塞 。
- END 表示请求结束,此时客户端连接将断开
- ERROR ,表示发生了I/O异常,一般将会结束此次请求并且连接断开 。
请看一个例子。
public class CometServlet extends HttpServlet implements CometProcessor {


    protected ArrayList connections = new ArrayList();

    @Override
    public void event(CometEvent event) throws IOException, ServletException {
        HttpServletRequest request = event.getHttpServletRequest();
        HttpServletResponse response = event.getHttpServletResponse();
        if (event.getEventType() == CometEvent.EventType.BEGIN) {
            synchronized (connections) {
                connections.add(response);
            }
        } else if (event.getEventType() == CometEvent.EventType.ERROR) {
            synchronized (connections) {
                connections.remove(response);
            }
        } else if (event.getEventType() == CometEvent.EventType.END) {
            synchronized (connections) {
                connections.remove(response);
            }
        } else if (event.getEventType() == CometEvent.EventType.READ) {
            synchronized (connections) {
                InputStream is = request.getInputStream();
                byte[] buf = new byte[512];
                do {
                    int n = is.read(buf);
                    if (n > 0) {
                        System.out.println(new String(buf, 0, n));
                    } else if (n < 0) {
                        return;
                    }
                } while (is.available() > 0);
            }
        }
    }
}
这个例子中只是简单的接收客户端连接而不做任何处理,并且客户端发送过来的数据输出,就很容易理解,在BEGIN事件中接收连接并把响应对象放入到列表中,发生ERROR 或END事件时则将响应对象移除,当发生READ事件时则读取数据并输出 。
有了CometProcessor接口后,Tomcat内部就可以识别Commet模式的Servlet了,我们知道Tomcat对请求的处理是管道模式的, 所以在Wrapper 容器的管道中判断加载的Servlet是否继承了CometProcessor,如果继承则说明是Comet模式,并使用Comet方式处理, 它的处理过程如图10.8所示,录一个客户端连接到来时,被接收器接收后注册到NioChannel队列中,Poller组件不断轮询是否有NioChannel需要处理, 如果有,则调用前面的实例化的Comet模式的Servlet,这里主要用到CometProcessor接口的event方法,Poller会将对应的请求对象,响应对象和事件封装成CometEvent对象并传入event方法,此时即执行event方法的逻辑,完成对不同事件的处理,从而实现Comet模式 。

public ApplicationFilterChain createFilterChain
    (ServletRequest request, Wrapper wrapper, Servlet servlet) {

    // get the dispatcher type
    DispatcherType dispatcher = null;
    if (request.getAttribute(Globals.DISPATCHER_TYPE_ATTR) != null) {
        dispatcher = (DispatcherType) request.getAttribute(
                Globals.DISPATCHER_TYPE_ATTR);
    }
    String requestPath = null;
    Object attribute = request.getAttribute(
            Globals.DISPATCHER_REQUEST_PATH_ATTR);

    if (attribute != null){
        requestPath = attribute.toString();
    }

    // If there is no servlet to execute, return null
    if (servlet == null)
        return (null);

    boolean comet = false;

    // Create and initialize a filter chain object
    ApplicationFilterChain filterChain = null;
    if (request instanceof Request) {
        Request req = (Request) request;
        comet = req.isComet();
        if (Globals.IS_SECURITY_ENABLED) {
            // Security: Do not recycle
            filterChain = new ApplicationFilterChain();
            if (comet) {
                req.setFilterChain(filterChain);
            }
        } else {
            filterChain = (ApplicationFilterChain) req.getFilterChain();
            if (filterChain == null) {
                filterChain = new ApplicationFilterChain();
                req.setFilterChain(filterChain);
            }
        }
    } else {
        // Request dispatcher in use
        filterChain = new ApplicationFilterChain();
    }

    filterChain.setServlet(servlet);

    filterChain.setSupport
        (((StandardWrapper)wrapper).getInstanceSupport());

    // Acquire the filter mappings for this Context
    StandardContext context = (StandardContext) wrapper.getParent();
    FilterMap filterMaps[] = context.findFilterMaps();

    // If there are no filter mappings, we are done
    // 没有Filter映射关系
    if ((filterMaps == null) || (filterMaps.length == 0))
        return (filterChain);

    // Acquire the information we will need to match filter mappings
    String servletName = wrapper.getName();

    // Add the relevant path-mapped filters to this filter chain
    // 根据servletName找到匹配的filter
    for (int i = 0; i < filterMaps.length; i++) {
        if (!matchDispatcher(filterMaps[i] ,dispatcher)) {
            continue;
        }
        if (!matchFiltersURL(filterMaps[i], requestPath))
            continue;
        ApplicationFilterConfig filterConfig = (ApplicationFilterConfig)
            context.findFilterConfig(filterMaps[i].getFilterName());
        if (filterConfig == null) {
           // FIXME - log configuration problem
            continue;
        }
        boolean isCometFilter = false;
        if (comet) {
            try {
                isCometFilter = filterConfig.getFilter() instanceof CometFilter;
            } catch (Exception e) {
                // Note: The try catch is there because getFilter has a lot of
                // declared exceptions. However, the filter is allocated much
                // earlier
                Throwable t = ExceptionUtils.unwrapInvocationTargetException(e);
                ExceptionUtils.handleThrowable(t);
            }
            if (isCometFilter) {
                filterChain.addFilter(filterConfig);
            }
        } else {
            filterChain.addFilter(filterConfig);
        }
    }

    // Add filters that match on servlet name second
    for (int i = 0; i < filterMaps.length; i++) {
        if (!matchDispatcher(filterMaps[i] ,dispatcher)) {
            continue;
        }
        if (!matchFiltersServlet(filterMaps[i], servletName))
            continue;
        ApplicationFilterConfig filterConfig = (ApplicationFilterConfig)
            context.findFilterConfig(filterMaps[i].getFilterName());
        if (filterConfig == null) {
           // FIXME - log configuration problem
            continue;
        }
        boolean isCometFilter = false;
        if (comet) {
            try {
                isCometFilter = filterConfig.getFilter() instanceof CometFilter;
            } catch (Exception e) {
                // Note: The try catch is there because getFilter has a lot of
                // declared exceptions. However, the filter is allocated much
                // earlier
            }
            if (isCometFilter) {
                filterChain.addFilter(filterConfig);
            }
        } else {
            filterChain.addFilter(filterConfig);
        }
    }

    // Return the completed filter chain
    return (filterChain);

}
过滤器链
Context容器的过滤器模块包含了过滤器的相关信息, 过滤器链接的调用的思路其实也很简单,如图10.5 所示,请求通过管道流转到Wrapper 容器管道,经过若干阀门后达到基础阀门StandardWrapperValue ,它将创建一个过滤器链ApplicationFilterChain对象,创建时过滤器链对象做了如下逻辑处理。
- 从Context容器中获取所有过滤器相关的信息
- 通过URL匹配过滤器匹配加入的过滤链中
- 通过Servlet名称匹配过滤器,匹配加入过滤链中。

创建ApplicationFilterChain对象后,StandardWrapperValue将调用它的doFilter方法,它就会开始一个一个的调用过滤器,请求被一层一层的处理,最后才调用Servlet处理,至此,针对某个请求,过滤器链将Context中所有的过滤器中对象的请求的过滤器串联起来 ,实现过滤器的功能 。
先来看看url匹配算法。
public static boolean matchFiltersURL(String testPath, String requestPath) {

    if (testPath == null)
        return (false);

    // Case 1 - Exact Match
    if (testPath.equals(requestPath))
        return (true);

    // Case 2 - Path Match ("/.../*")
    if (testPath.equals("/*"))
        return (true);
    if (testPath.endsWith("/*")) {
        if (testPath.regionMatches(0, requestPath, 0,
                testPath.length() - 2)) {
            // testPath 为 /aaa/*
            // requestPath 为 /aaa 的情况
            if (requestPath.length() == (testPath.length() - 2)) {
                return (true);
                // testPath 为 /aaa/*
                // requestPath 为 /aaa
            } else if ('/' == requestPath.charAt(testPath.length() - 2)) {
                return (true);
            }
        }
        return (false);
    }

    // Case 3 - Extension Match
    // 如 testPath = *.jsp, requestPath = /aaa.jsp ,则匹配成功
    // 如 testPath = *.jsp, requestPath = /aaa.html 匹配失败
    // 如testPath = *.jsp, requestPath = /aaa. 匹配失败
    if (testPath.startsWith("*.")) {
        int slash = requestPath.lastIndexOf('/');
        int period = requestPath.lastIndexOf('.');
        if ((slash >= 0) && (period > slash)
                && (period != requestPath.length() - 1)
                && ((requestPath.length() - period)
                == (testPath.length() - 1))) {
            return (testPath.regionMatches(2, requestPath, period + 1,
                    testPath.length() - 2));
        }
    }

    // Case 4 - "Default" Match
    return (false); // NOTE - Not relevant for selecting filters

}
url 匹配分三种情况,模糊匹配,前缀匹配,后缀匹配,具体情况看注释。
接下来看servlet全称匹配,这就很简单了,如果servletName和过滤器中配置的servletName相等,当前过滤器需要添加到当前Servlet的过滤器链中。
private boolean matchFiltersServlet(FilterMap filterMap,
                                    String servletName) {
    if (servletName == null) {
        return (false);
    }
    // Check the specific "*" special servlet name
    else if (filterMap.getMatchAllServletNames()) {
        return (true);
    } else {
        String[] servletNames = filterMap.getServletNames();
        for (int i = 0; i < servletNames.length; i++) {
            if (servletName.equals(servletNames[i])) {
                return (true);
            }
        }
        return false;
    }
}
接下来就是过滤器链的调用了,过滤器的实现逻辑也很简单,请看下面例子。
public interface IFilter {

    public void doFilter(FilterChain filterChain);
}


public class Filter1  implements IFilter{

    @Override
    public void doFilter(FilterChain filterChain) {
        System.out.println("过滤器1执行");
        filterChain.doFilter();
    }
}

public class Filter2 implements IFilter{

    @Override
    public void doFilter(FilterChain filterChain) {
        System.out.println("过滤器2执行");
        filterChain.doFilter();
    }
}


public class FilterChain {

    public static List<IFilter> filters = new ArrayList<>();
    public void addFilter(IFilter filter) {
        filters.add(filter);
    }

    private int index;

    public void doFilter() {
        if (index > filters.size() - 1) {
            System.out.println("过滤器 已经执行完了");
            return;
        }
        filters.get(index++).doFilter(this);
    }

    public static void main(String[] args) {
        Filter1 filter1 = new Filter1();
        Filter2 filter2 = new Filter2();
        FilterChain filterChain = new FilterChain();
        filterChain.addFilter(filter1);
        filterChain.addFilter(filter2);
        filterChain.doFilter();
    }
}
结果输出
过滤器1执行
过滤器2执行
过滤器 已经执行完了
/**
 * @exception IOException if an input/output error occurs
 * @exception ServletException if a servlet exception occurs
 * ApplicationFilterChain 的 doFilter 方法,并将它自己作为第三个参数传递给 它。
 * 在他的 doFilter 方法中,一个过滤器可以调用另一个过滤器链的 doFilter 来唤 醒另一个过来出去。这里是一个过滤器的 doFilter 实现的例子
 */
@Override
public void doFilter(ServletRequest request, ServletResponse response)
    throws IOException, ServletException {

    if( Globals.IS_SECURITY_ENABLED ) {
        final ServletRequest req = request;
        final ServletResponse res = response;
        try {
            java.security.AccessController.doPrivileged(
                new java.security.PrivilegedExceptionAction<Void>() {
                    @Override
                    public Void run()
                        throws ServletException, IOException {
                        internalDoFilter(req,res);
                        return null;
                    }
                }
            );
        } catch( PrivilegedActionException pe) {
            Exception e = pe.getException();
            if (e instanceof ServletException)
                throw (ServletException) e;
            else if (e instanceof IOException)
                throw (IOException) e;
            else if (e instanceof RuntimeException)
                throw (RuntimeException) e;
            else
                throw new ServletException(e.getMessage(), e);
        }
    } else {
        internalDoFilter(request,response);
    }
}

private void internalDoFilter(ServletRequest request,
                              ServletResponse response)
    throws IOException, ServletException {

    // Call the next filter if there is one
    if (pos < n) {
        ApplicationFilterConfig filterConfig = filters[pos++];
        Filter filter = null;
        try {
            filter = filterConfig.getFilter();
            support.fireInstanceEvent(InstanceEvent.BEFORE_FILTER_EVENT,
                                      filter, request, response);

            if (request.isAsyncSupported() && "false".equalsIgnoreCase(
                    filterConfig.getFilterDef().getAsyncSupported())) {
                request.setAttribute(Globals.ASYNC_SUPPORTED_ATTR,
                        Boolean.FALSE);
            }
            if( Globals.IS_SECURITY_ENABLED ) {
                final ServletRequest req = request;
                final ServletResponse res = response;
                Principal principal =
                    ((HttpServletRequest) req).getUserPrincipal();

                Object[] args = new Object[]{req, res, this};
                SecurityUtil.doAsPrivilege
                    ("doFilter", filter, classType, args, principal);

            } else {
                // 执行filter的逻辑
                // 如你看到的,在 doFilter 方法最后一行,它调用过滤链的 doFilter 方法。如果 该过滤器是过滤链的最后一个过滤器,
                // 它叫调用请求的 Servlet 的 service 方法。 如果过滤器没有调用 chain.doFilter,下一个过滤器就不会被调用。
                filter.doFilter(request, response, this);
            }

            support.fireInstanceEvent(InstanceEvent.AFTER_FILTER_EVENT,
                                      filter, request, response);
        } catch (IOException e) {
            if (filter != null)
                support.fireInstanceEvent(InstanceEvent.AFTER_FILTER_EVENT,
                                          filter, request, response, e);
            throw e;
        } catch (ServletException e) {
            if (filter != null)
                support.fireInstanceEvent(InstanceEvent.AFTER_FILTER_EVENT,
                                          filter, request, response, e);
            throw e;
        } catch (RuntimeException e) {
            if (filter != null)
                support.fireInstanceEvent(InstanceEvent.AFTER_FILTER_EVENT,
                                          filter, request, response, e);
            throw e;
        } catch (Throwable e) {
            e = ExceptionUtils.unwrapInvocationTargetException(e);
            ExceptionUtils.handleThrowable(e);
            if (filter != null)
                support.fireInstanceEvent(InstanceEvent.AFTER_FILTER_EVENT,
                                          filter, request, response, e);
            throw new ServletException
              (sm.getString("filterChain.filter"), e);
        }
        return;
    }

    // We fell off the end of the chain -- call the servlet instance
    try {
        if (ApplicationDispatcher.WRAP_SAME_OBJECT) {
            lastServicedRequest.set(request);
            lastServicedResponse.set(response);
        }

        support.fireInstanceEvent(InstanceEvent.BEFORE_SERVICE_EVENT,
                                  servlet, request, response);
        if (request.isAsyncSupported()
                && !support.getWrapper().isAsyncSupported()) {
            request.setAttribute(Globals.ASYNC_SUPPORTED_ATTR,
                    Boolean.FALSE);
        }
        // Use potentially wrapped request from this point
        if ((request instanceof HttpServletRequest) &&
            (response instanceof HttpServletResponse)) {

            if( Globals.IS_SECURITY_ENABLED ) {
                final ServletRequest req = request;
                final ServletResponse res = response;
                Principal principal =
                    ((HttpServletRequest) req).getUserPrincipal();
                Object[] args = new Object[]{req, res};
                SecurityUtil.doAsPrivilege("service",
                                           servlet,
                                           classTypeUsedInService,
                                           args,
                                           principal);
            } else {
                // 执行servlet
                servlet.service(request, response);
            }
        } else {
            servlet.service(request, response);
        }
        support.fireInstanceEvent(InstanceEvent.AFTER_SERVICE_EVENT,
                                  servlet, request, response);
    } catch (IOException e) {
        support.fireInstanceEvent(InstanceEvent.AFTER_SERVICE_EVENT,
                                  servlet, request, response, e);
        throw e;
    } catch (ServletException e) {
        support.fireInstanceEvent(InstanceEvent.AFTER_SERVICE_EVENT,
                                  servlet, request, response, e);
        throw e;
    } catch (RuntimeException e) {
        support.fireInstanceEvent(InstanceEvent.AFTER_SERVICE_EVENT,
                                  servlet, request, response, e);
        throw e;
    } catch (Throwable e) {
        ExceptionUtils.handleThrowable(e);
        support.fireInstanceEvent(InstanceEvent.AFTER_SERVICE_EVENT,
                                  servlet, request, response, e);
        throw new ServletException
          (sm.getString("filterChain.servlet"), e);
    } finally {
        if (ApplicationDispatcher.WRAP_SAME_OBJECT) {
            lastServicedRequest.set(null);
            lastServicedResponse.set(null);
        }
    }
}
普通的Servlet工作机制
在研究Servlet在Tomcat中工作机制前, 必须先看看Servlet规范的一些重要规定,该规范提供了一个Servlet接口,接口中包含了重要的方法是init,service,destory等方法,Servlet在初始化时要调用init方法,在销毁时要调用destroy方法,而在对客户端请求处理时调用service方法,对于这些机制,都必须由Tomcat在内部提供支持,具体由Wrapper容器提供支持。
对于 Tomcat 中消息流的流转机制,我们已经比较清楚了,4个不同级别的容器是通过管道机制进行流转的, 对于每个请求都是一层一层处理,如图10.2所示,当客户端请求达到服务端后, 请求被抽象成Request 对象后向4个容器进行传递,首先经过Engine容器的管道通过若干阀门,最后通过StandardEngineValve阀门流转到Host容器的管道,处理后继续往下流转,通过StandardContextValve阀门流转到Wrapper 容器的管道,而对Servlet的核心处理也正是StandardWrapperValve阀门中,StandardWrapperValve阀门先由ApplicationFilterChain组件执行过滤器,然后调用Servlet的service()方法进行请求处理,然后对客户端响应。

下面更深入的讨论StandardWrapperValve阀门调用Servlet的过程 , Web应用的Servlet都依据Servlet接口,例如一般我们写业务处理Servlet类都会继承HttpServlet类,为了遵循Servlet规范,它其实最终也实现了Servlet接口,只是HttpServlet定义了HTTP协议的Servlet ,将协议共性的东西抽离出来复用。 Servlet处理客户端请求的核心方法为service方法,所以对于HttpServelt来说,它需要针对HTTP协议的GET,POST,PUT,DELETE, HEAD ,OPTIONS ,TRACE等请求方法做出不同的分发处理,为了方便理解,下面用个简单的代码展示 。
protected void service(HttpServletRequest req, HttpServletResponse resp)
    throws ServletException, IOException {

    String method = req.getMethod();

    if (method.equals(METHOD_GET)) {
        long lastModified = getLastModified(req);
        if (lastModified == -1) {
            // servlet doesn't support if-modified-since, no reason
            // to go through further expensive logic
            doGet(req, resp);
        } else {
            long ifModifiedSince;
            try {
                ifModifiedSince = req.getDateHeader(HEADER_IFMODSINCE);
            } catch (IllegalArgumentException iae) {
                // Invalid date header - proceed as if none was set
                ifModifiedSince = -1;
            }
            if (ifModifiedSince < (lastModified / 1000 * 1000)) {
                // If the servlet mod time is later, call doGet()
                // Round down to the nearest second for a proper compare
                // A ifModifiedSince of -1 will always be less
                maybeSetLastModified(resp, lastModified);
                doGet(req, resp);
            } else {
                resp.setStatus(HttpServletResponse.SC_NOT_MODIFIED);
            }
        }

    } else if (method.equals(METHOD_HEAD)) {
        long lastModified = getLastModified(req);
        maybeSetLastModified(resp, lastModified);
        doHead(req, resp);

    } else if (method.equals(METHOD_POST)) {
        doPost(req, resp);

    } else if (method.equals(METHOD_PUT)) {
        doPut(req, resp);

    } else if (method.equals(METHOD_DELETE)) {
        doDelete(req, resp);

    } else if (method.equals(METHOD_OPTIONS)) {
        doOptions(req,resp);

    } else if (method.equals(METHOD_TRACE)) {
        doTrace(req,resp);

    } else {
        //
        // Note that this means NO servlet supports whatever
        // method was requested, anywhere on this server.
        //

        String errMsg = lStrings.getString("http.method_not_implemented");
        Object[] errArgs = new Object[1];
        errArgs[0] = method;
        errMsg = MessageFormat.format(errMsg, errArgs);

        resp.sendError(HttpServletResponse.SC_NOT_IMPLEMENTED, errMsg);
    }
}
而如果是jsp ,则调用的是HttpJspBase的service()方法 。
public abstract class HttpJspBase extends HttpServlet implements HttpJspPage {

    private static final long serialVersionUID = 1L;

    protected HttpJspBase() {
    }

    @Override
    public final void init(ServletConfig config)
        throws ServletException
    {
        super.init(config);
        jspInit();
        _jspInit();
    }

    @Override
    public String getServletInfo() {
        return Localizer.getMessage("jsp.engine.info");
    }

    @Override
    public final void destroy() {
        jspDestroy();
        _jspDestroy();
    }

    /**
     * Entry point into service.
     */
    @Override
    public final void service(HttpServletRequest request, HttpServletResponse response)
        throws ServletException, IOException
    {
        _jspService(request, response);
    }

    @Override
    public void jspInit() {
    }

    public void _jspInit() {
    }

    @Override
    public void jspDestroy() {
    }

    protected void _jspDestroy() {
    }

    @Override
    public abstract void _jspService(HttpServletRequest request,
                                     HttpServletResponse response)
        throws ServletException, IOException;
}
看一下index.jsp生成的servlet文件。
public final class index_jsp extends HttpJspBase implements JspSourceDependent {
    private static ProtectedFunctionMapper _jspx_fnmap_0 = ProtectedFunctionMapper.getMapForFunction("MyEL:getTestDto", MyEL.class, "getTestDto", new Class[0]);
    private static final JspFactory _jspxFactory = JspFactory.getDefaultFactory();
    private static Map<String, Long> _jspx_dependants = new HashMap(1);
    private volatile ExpressionFactory _el_expressionfactory;
    private volatile InstanceManager _jsp_instancemanager;

    static {
        _jspx_dependants.put("/WEB-INF/MyEL.tld", 1666688090000L);
    }

    public index_jsp() {
    }

    public Map<String, Long> getDependants() {
        return _jspx_dependants;
    }

    public ExpressionFactory _jsp_getExpressionFactory() {
        if (this._el_expressionfactory == null) {
            synchronized(this) {
                if (this._el_expressionfactory == null) {
                    this._el_expressionfactory = _jspxFactory.getJspApplicationContext(this.getServletConfig().getServletContext()).getExpressionFactory();
                }
            }
        }

        return this._el_expressionfactory;
    }

    public InstanceManager _jsp_getInstanceManager() {
        if (this._jsp_instancemanager == null) {
            synchronized(this) {
                if (this._jsp_instancemanager == null) {
                    this._jsp_instancemanager = InstanceManagerFactory.getInstanceManager(this.getServletConfig());
                }
            }
        }

        return this._jsp_instancemanager;
    }

    public void _jspInit() {
    }

    public void _jspDestroy() {
    }

    public void _jspService(HttpServletRequest request, HttpServletResponse response) throws IOException, ServletException {
        JspWriter out = null;
        JspWriter _jspx_out = null;
        PageContext _jspx_page_context = null;

        try {
            response.setContentType("text/html; charset=UTF-8");
            PageContext pageContext = _jspxFactory.getPageContext(this, request, response, (String)null, true, 8192, true);
            _jspx_page_context = pageContext;
            pageContext.getServletContext();
            pageContext.getServletConfig();
            pageContext.getSession();
            out = pageContext.getOut();
            out.write("\n");
            out.write("<!-- tld中的uri和short-name -->\n");
            out.write("<!DOCTYPE html PUBLIC \"-//W3C//DTD HTML 4.01 Transitional//EN\" \"http://www.w3.org/TR/html4/loose.dtd\">\n");
            out.write("<html>\n");
            out.write("<head>\n");
            out.write("      <meta http-equiv=\"Content-Type\" content=\"text/html; charset=UTF-8\">\n");
            out.write("      <title>Insert title here</title>\n");
            out.write("</head>\n");
            out.write("<body>\n");
            out.write("\n");
            out.write((String)PageContextImpl.proprietaryEvaluate("${MyEL:getTestDto().getMyUsername(\"小明\") }", String.class, pageContext, _jspx_fnmap_0, false));
            out.write("<br>\n");
            out.write("\n");
            out.write("</body>\n");
            out.write("</html>");
        } catch (Throwable var13) {
            if (!(var13 instanceof SkipPageException)) {
                out = (JspWriter)_jspx_out;
                if (_jspx_out != null && ((JspWriter)_jspx_out).getBufferSize() != 0) {
                    try {
                        if (response.isCommitted()) {
                            out.flush();
                        } else {
                            out.clearBuffer();
                        }
                    } catch (IOException var12) {
                    }
                }

                if (_jspx_page_context == null) {
                    throw new ServletException(var13);
                }

                _jspx_page_context.handlePageException(var13);
            }
        } finally {
            _jspxFactory.releasePageContext(_jspx_page_context);
        }

    }
}
这个index_jsp.java文件继承了HttpJspBase,并重写了_jspService()方法。因此对于JspServlet的调用,实际上是调用生成的Servlet文件,关于jsp生成servlet的详细细节,请看之前的博客 。
protected void doGet(HttpServletRequest request,
                     HttpServletResponse response)
    throws IOException, ServletException {

    // Serve the requested resource, including the data content
    serveResource(request, response, true);

}


protected void serveResource(HttpServletRequest request,
                             HttpServletResponse response,
                             boolean content)
    throws IOException, ServletException {

    boolean serveContent = content;

    // Identify the requested resource path
    String path = getRelativePath(request, true);

    if (debug > 0) {
        if (serveContent)
            log("DefaultServlet.serveResource:  Serving resource '" +
                path + "' headers and data");
        else
            log("DefaultServlet.serveResource:  Serving resource '" +
                path + "' headers only");
    }

    if (path.length() == 0) {
        // Context root redirect
        doDirectoryRedirect(request, response);
        return;
    }

    CacheEntry cacheEntry = resources.lookupCache(path);
    boolean isError = DispatcherType.ERROR == request.getDispatcherType();

    if (!cacheEntry.exists) {
        // Check if we're included so we can return the appropriate
        // missing resource name in the error
        String requestUri = (String) request.getAttribute(
                RequestDispatcher.INCLUDE_REQUEST_URI);
        if (requestUri == null) {
            requestUri = request.getRequestURI();
        } else {
            // We're included
            // SRV.9.3 says we must throw a FNFE
            throw new FileNotFoundException(sm.getString(
                    "defaultServlet.missingResource", requestUri));
        }

        if (isError) {
            response.sendError(((Integer) request.getAttribute(
                    RequestDispatcher.ERROR_STATUS_CODE)).intValue());
        } else {
            response.sendError(HttpServletResponse.SC_NOT_FOUND, requestUri);
        }
        return;
    }

    // Check if the conditions specified in the optional If headers are
    // satisfied.
    if (cacheEntry.context == null) {
        // Checking If headers
        boolean included = (request.getAttribute(
                RequestDispatcher.INCLUDE_CONTEXT_PATH) != null);
        if (!included && !isError &&
        		// 每一次前端访问时,会带着这个文件的最后修改时间
        		// 如果服务器文件没有被修改过,此时直接返回304,这也是一种提升性能的考虑
                !checkIfHeaders(request, response, cacheEntry.attributes)) {
            return;
        }
    }

    // Find content type.
    String contentType = cacheEntry.attributes.getMimeType();
    if (contentType == null) {
        contentType = getServletContext().getMimeType(cacheEntry.name);
        cacheEntry.attributes.setMimeType(contentType);
    }

    ArrayList<Range> ranges = null;
    long contentLength = -1L;

    if (cacheEntry.context != null) {
        if (!path.endsWith("/")) {
            doDirectoryRedirect(request, response);
            return;
        }

        // Skip directory listings if we have been configured to
        // suppress them
        // 如果前端访问的不是一个文件,而是一个目录时,如果list为false,则不允许访问一个目录,返回404 状态码
        if (!listings) {
            response.sendError(HttpServletResponse.SC_NOT_FOUND,
                               request.getRequestURI());
            return;
        }
        contentType = "text/html;charset=UTF-8";
    } else {
        if (!isError) {
            if (useAcceptRanges) {
                // Accept ranges header
                response.setHeader("Accept-Ranges", "bytes");
            }

            // Parse range specifier
            ranges = parseRange(request, response, cacheEntry.attributes);

            // ETag header
            response.setHeader("ETag", cacheEntry.attributes.getETag());

            // Last-Modified header
            response.setHeader("Last-Modified",
                    cacheEntry.attributes.getLastModifiedHttp());
        }

        // Get content length
        contentLength = cacheEntry.attributes.getContentLength();
        // Special case for zero length files, which would cause a
        // (silent) ISE when setting the output buffer size
        if (contentLength == 0L) {
            serveContent = false;
        }
    }

    ServletOutputStream ostream = null;
    PrintWriter writer = null;

    if (serveContent) {
        // Trying to retrieve the servlet output stream
        try {
            ostream = response.getOutputStream();
        } catch (IllegalStateException e) {
            // If it fails, we try to get a Writer instead if we're
            // trying to serve a text file
            if ( (contentType == null)
                    || (contentType.startsWith("text"))
                    || (contentType.endsWith("xml"))
                    || (contentType.contains("/javascript")) ) {
                writer = response.getWriter();
                // Cannot reliably serve partial content with a Writer
                ranges = FULL;
            } else {
                throw e;
            }
        }
    }

    // Check to see if a Filter, Valve or wrapper has written some content.
    // If it has, disable range requests and setting of a content length
    // since neither can be done reliably.
    ServletResponse r = response;
    long contentWritten = 0;
    while (r instanceof ServletResponseWrapper) {
        r = ((ServletResponseWrapper) r).getResponse();
    }
    if (r instanceof ResponseFacade) {
        contentWritten = ((ResponseFacade) r).getContentWritten();
    }
    if (contentWritten > 0) {
        ranges = FULL;
    }

    if ( (cacheEntry.context != null)
            || isError
            || ( ((ranges == null) || (ranges.isEmpty()))
                    && (request.getHeader("Range") == null) )
            || (ranges == FULL) ) {

        // Set the appropriate output headers
        if (contentType != null) {
            if (debug > 0)
                log("DefaultServlet.serveFile:  contentType='" +
                    contentType + "'");
            response.setContentType(contentType);
        }
        if ((cacheEntry.resource != null) && (contentLength >= 0)
                && (!serveContent || ostream != null)) {
            if (debug > 0)
                log("DefaultServlet.serveFile:  contentLength=" +
                    contentLength);
            // Don't set a content length if something else has already
            // written to the response.
            if (contentWritten == 0) {
                if (contentLength < Integer.MAX_VALUE) {
                    response.setContentLength((int) contentLength);
                } else {
                    // Set the content-length as String to be able to use a
                    // long
                    response.setHeader("content-length",
                            "" + contentLength);
                }
            }
        }

        InputStream renderResult = null;
        if (cacheEntry.context != null) {

            if (serveContent) {
                // Serve the directory browser
                renderResult = render(getPathPrefix(request), cacheEntry);
            }

        }

        // Copy the input stream to our output stream (if requested)
        if (serveContent) {
            try {
                response.setBufferSize(output);
            } catch (IllegalStateException e) {
                // Silent catch
            }
            if (ostream != null) {
                if (!checkSendfile(request, response, cacheEntry, contentLength, null))
                    copy(cacheEntry, renderResult, ostream);
            } else {
                copy(cacheEntry, renderResult, writer);
            }
        }

    } else {

        if ((ranges == null) || (ranges.isEmpty()))
            return;

        // Partial content response.

        response.setStatus(HttpServletResponse.SC_PARTIAL_CONTENT);
        if (ranges.size() == 1) {
            Range range = ranges.get(0);
            response.addHeader("Content-Range", "bytes "
                               + range.start
                               + "-" + range.end + "/"
                               + range.length);
            long length = range.end - range.start + 1;
            if (length < Integer.MAX_VALUE) {
                response.setContentLength((int) length);
            } else {
                // Set the content-length as String to be able to use a long
                response.setHeader("content-length", "" + length);
            }

            if (contentType != null) {
                if (debug > 0)
                    log("DefaultServlet.serveFile:  contentType='" +
                        contentType + "'");
                response.setContentType(contentType);
            }

            if (serveContent) {
                try {
                    response.setBufferSize(output);
                } catch (IllegalStateException e) {
                    // Silent catch
                }
                if (ostream != null) {
                    if (!checkSendfile(request, response, cacheEntry, range.end - range.start + 1, range))
                        copy(cacheEntry, ostream, range);
                } else {
                    // we should not get here
                    throw new IllegalStateException();
                }
            }
        } else {
            response.setContentType("multipart/byteranges; boundary="
                                    + mimeSeparation);
            if (serveContent) {
                try {
                    response.setBufferSize(output);
                } catch (IllegalStateException e) {
                    // Silent catch
                }
                if (ostream != null) {
                    copy(cacheEntry, ostream, ranges.iterator(),
                         contentType);
                } else {
                    // we should not get here
                    throw new IllegalStateException();
                }
            }
        }
    }
}
如果访问的是一个文件,最终经过层层较验,通过copy()方法将文件内容写到前端。
protected void copy(CacheEntry cacheEntry, InputStream is,
                  ServletOutputStream ostream)
    throws IOException {

    IOException exception = null;
    InputStream resourceInputStream = null;

    // Optimization: If the binary content has already been loaded, send
    // it directly
    if (cacheEntry.resource != null) {
        byte buffer[] = cacheEntry.resource.getContent();
        if (buffer != null) {
            ostream.write(buffer, 0, buffer.length);
            return;
        }
        resourceInputStream = cacheEntry.resource.streamContent();
    } else {
        resourceInputStream = is;
    }

    InputStream istream = new BufferedInputStream
        (resourceInputStream, input);

    // Copy the input stream to the output stream
    exception = copyRange(istream, ostream);

    // Clean up the input stream
    istream.close();

    // Rethrow any exception that has occurred
    if (exception != null)
        throw exception;
}
protected IOException copyRange(InputStream istream,
                              ServletOutputStream ostream) {

    // Copy the input stream to the output stream
    IOException exception = null;
    byte buffer[] = new byte[input];
    int len = buffer.length;
    while (true) {
        try {
            len = istream.read(buffer);
            if (len == -1)
                break;
            ostream.write(buffer, 0, len);
        } catch (IOException e) {
            exception = e;
            len = -1;
            break;
        }
    }
    return exception;

}
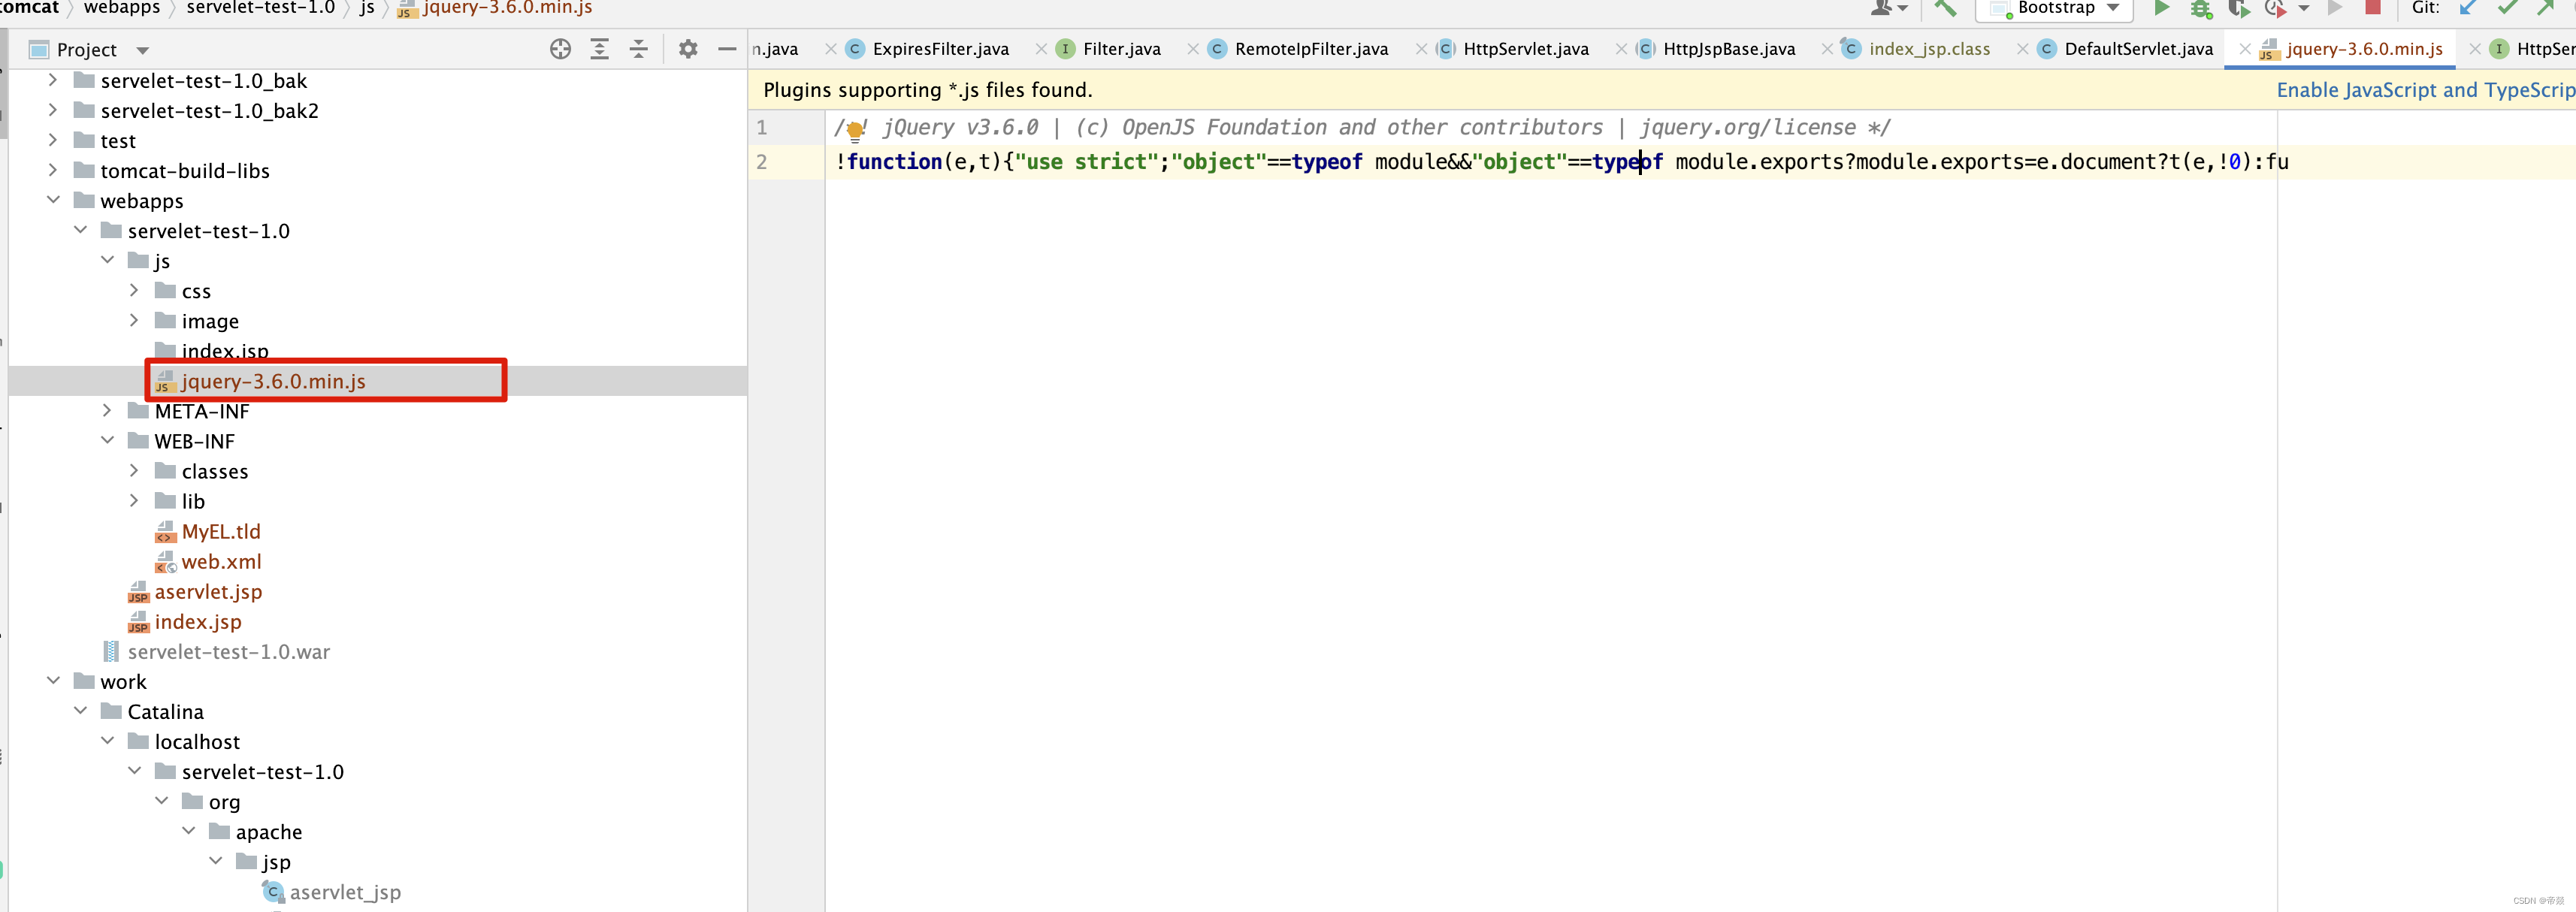
访问效果如下

如果访问的是一个目录时
protected InputStream render(String contextPath, CacheEntry cacheEntry)
    throws IOException, ServletException {

    Source xsltSource = findXsltInputStream(cacheEntry.context);

    if (xsltSource == null) {
        return renderHtml(contextPath, cacheEntry);
    }
    return renderXml(contextPath, cacheEntry, xsltSource);

}


protected InputStream renderHtml(String contextPath, CacheEntry cacheEntry)
    throws IOException, ServletException {

    String name = cacheEntry.name;

    // Prepare a writer to a buffered area
    ByteArrayOutputStream stream = new ByteArrayOutputStream();
    OutputStreamWriter osWriter = new OutputStreamWriter(stream, "UTF-8");
    PrintWriter writer = new PrintWriter(osWriter);

    StringBuilder sb = new StringBuilder();

    // rewriteUrl(contextPath) is expensive. cache result for later reuse
    String rewrittenContextPath =  rewriteUrl(contextPath);

    // Render the page header
    sb.append("<html>\r\n");
    sb.append("<head>\r\n");
    sb.append("<title>");
    sb.append(sm.getString("directory.title", name));
    sb.append("</title>\r\n");
    sb.append("<STYLE><!--");
    sb.append(org.apache.catalina.util.TomcatCSS.TOMCAT_CSS);
    sb.append("--></STYLE> ");
    sb.append("</head>\r\n");
    sb.append("<body>");
    sb.append("<h1>");
    sb.append(sm.getString("directory.title", name));

    // Render the link to our parent (if required)
    String parentDirectory = name;
    if (parentDirectory.endsWith("/")) {
        parentDirectory =
            parentDirectory.substring(0, parentDirectory.length() - 1);
    }
    int slash = parentDirectory.lastIndexOf('/');
    if (slash >= 0) {
        String parent = name.substring(0, slash);
        sb.append(" - <a href=\"");
        sb.append(rewrittenContextPath);
        if (parent.equals(""))
            parent = "/";
        sb.append(rewriteUrl(parent));
        if (!parent.endsWith("/"))
            sb.append("/");
        sb.append("\">");
        sb.append("<b>");
        sb.append(sm.getString("directory.parent", parent));
        sb.append("</b>");
        sb.append("</a>");
    }

    sb.append("</h1>");
    sb.append("<HR size=\"1\" noshade=\"noshade\">");

    sb.append("<table width=\"100%\" cellspacing=\"0\"" +
                 " cellpadding=\"5\" align=\"center\">\r\n");

    // Render the column headings
    sb.append("<tr>\r\n");
    sb.append("<td align=\"left\"><font size=\"+1\"><strong>");
    sb.append(sm.getString("directory.filename"));
    sb.append("</strong></font></td>\r\n");
    sb.append("<td align=\"center\"><font size=\"+1\"><strong>");
    sb.append(sm.getString("directory.size"));
    sb.append("</strong></font></td>\r\n");
    sb.append("<td align=\"right\"><font size=\"+1\"><strong>");
    sb.append(sm.getString("directory.lastModified"));
    sb.append("</strong></font></td>\r\n");
    sb.append("</tr>");

    try {

        // Render the directory entries within this directory
        NamingEnumeration<NameClassPair> enumeration =
            resources.list(cacheEntry.name);
        boolean shade = false;
        while (enumeration.hasMoreElements()) {

            NameClassPair ncPair = enumeration.nextElement();
            String resourceName = ncPair.getName();
            String trimmed = resourceName/*.substring(trim)*/;
            if (trimmed.equalsIgnoreCase("WEB-INF") ||
                trimmed.equalsIgnoreCase("META-INF"))
                continue;

            CacheEntry childCacheEntry =
                resources.lookupCache(cacheEntry.name + resourceName);
            if (!childCacheEntry.exists) {
                continue;
            }

            sb.append("<tr");
            if (shade)
                sb.append(" bgcolor=\"#eeeeee\"");
            sb.append(">\r\n");
            shade = !shade;

            sb.append("<td align=\"left\">  \r\n");
            sb.append("<a href=\"");
            sb.append(rewrittenContextPath);
            resourceName = rewriteUrl(name + resourceName);
            sb.append(resourceName);
            if (childCacheEntry.context != null)
                sb.append("/");
            sb.append("\"><tt>");
            sb.append(RequestUtil.filter(trimmed));
            if (childCacheEntry.context != null)
                sb.append("/");
            sb.append("</tt></a></td>\r\n");

            sb.append("<td align=\"right\"><tt>");
            if (childCacheEntry.context != null)
                sb.append(" ");
            else
                sb.append(renderSize(childCacheEntry.attributes.getContentLength()));
            sb.append("</tt></td>\r\n");

            sb.append("<td align=\"right\"><tt>");
            sb.append(childCacheEntry.attributes.getLastModifiedHttp());
            sb.append("</tt></td>\r\n");

            sb.append("</tr>\r\n");
        }

    } catch (NamingException e) {
        // Something went wrong
        throw new ServletException("Error accessing resource", e);
    }

    // Render the page footer
    sb.append("</table>\r\n");

    sb.append("<HR size=\"1\" noshade=\"noshade\">");

    String readme = getReadme(cacheEntry.context);
    if (readme!=null) {
        sb.append(readme);
        sb.append("<HR size=\"1\" noshade=\"noshade\">");
    }

    if (showServerInfo) {
        sb.append("<h3>").append(ServerInfo.getServerInfo()).append("</h3>");
    }
    sb.append("</body>\r\n");
    sb.append("</html>\r\n");

    // Return an input stream to the underlying bytes
    System.out.println("返回的html:" + sb.toString());
    writer.write(sb.toString());
    writer.flush();
    return new ByteArrayInputStream(stream.toByteArray());

}
当然,如果访问一个目录被允许的话,前提条件是

listing参数为true。
当然访问结果如下
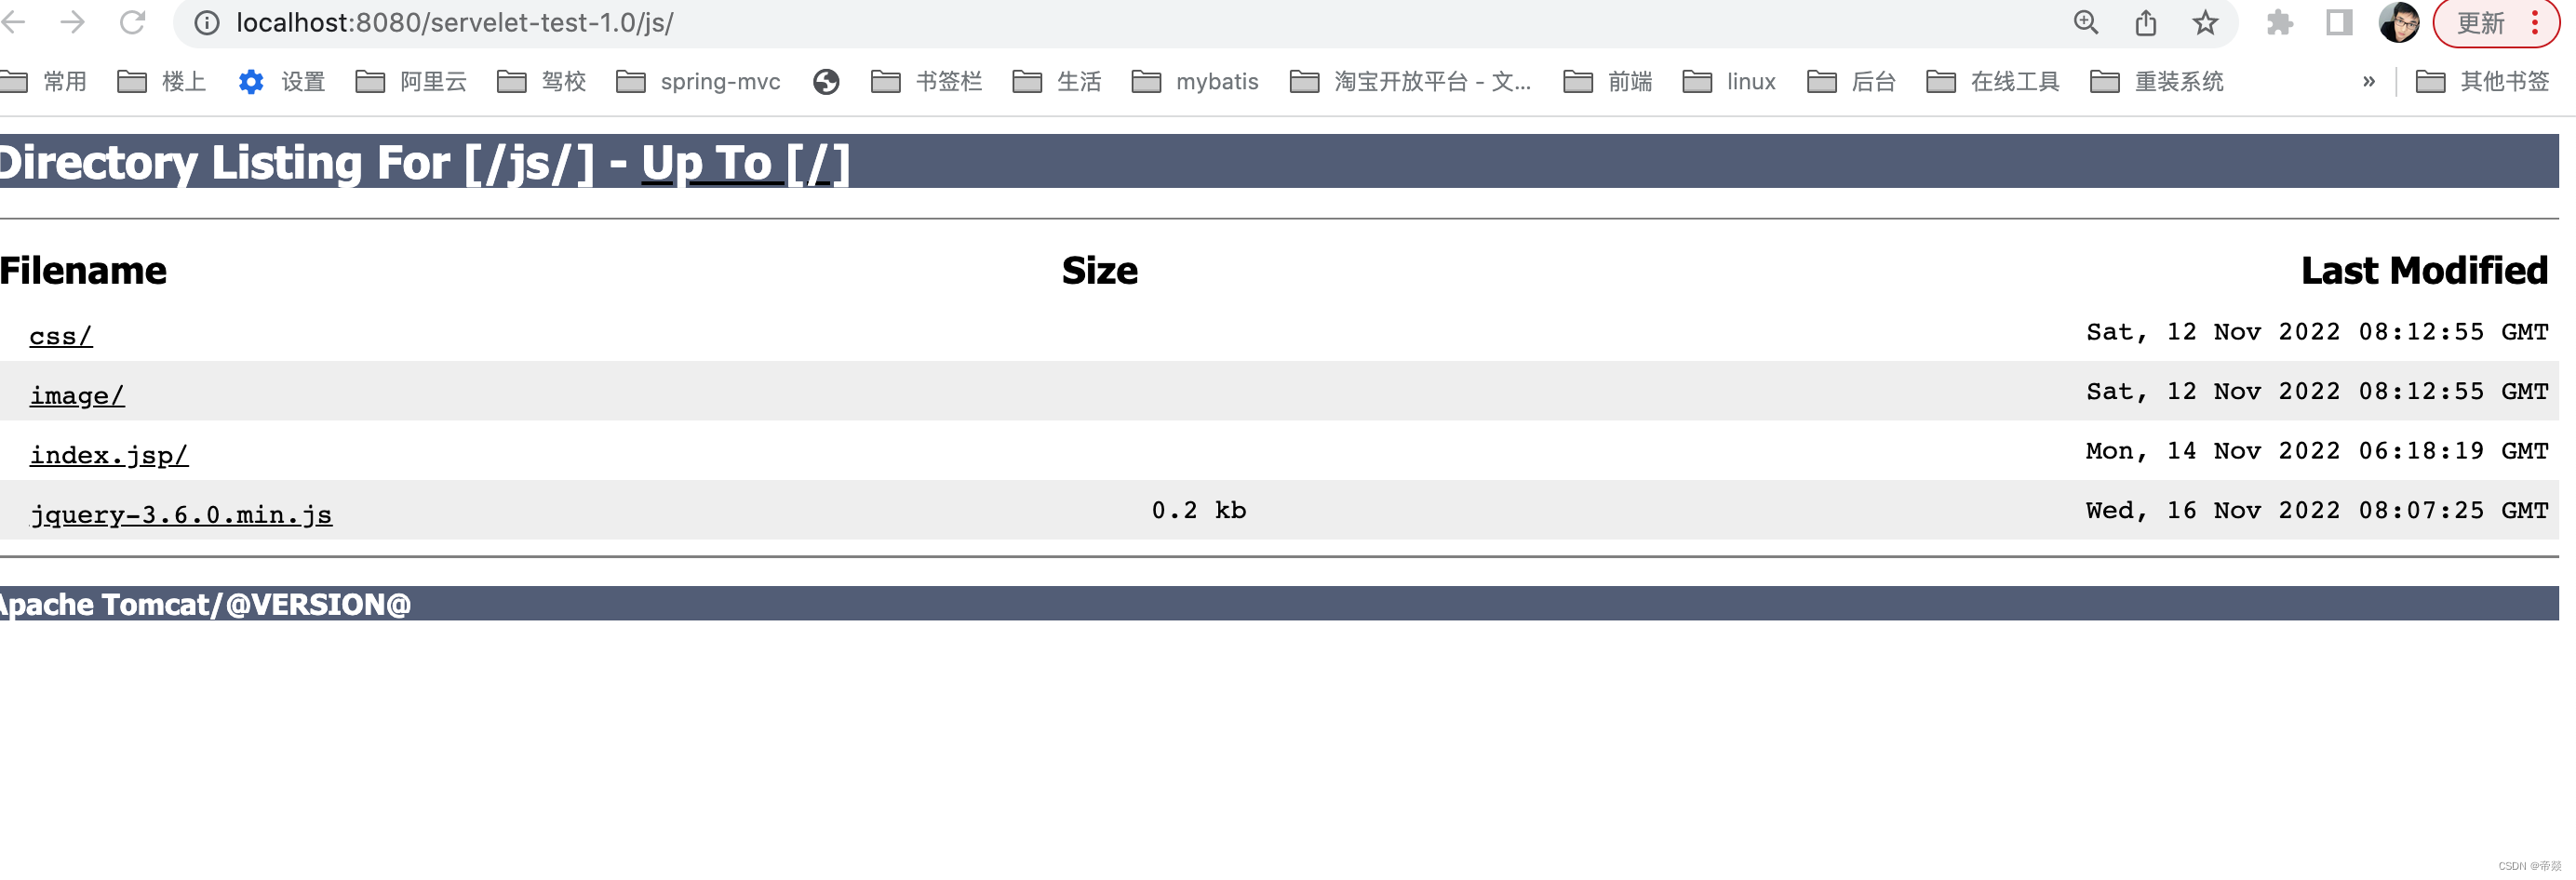
当然JNDI查找文件这一块的内容,可以去看之前的博客Tomcat 源码解析一JNDI
总节:
历时半年,终于将Tomcat的源码过了一遍,当然关于集群,权限这一块没有深入研究,其中的理论知识来源于《Tomcat内核设计剖析》和《Tomcat架构解析.刘光瑞》这两本书,在没有研究Tomcat之前,唯一知道就是怎样用Tomcat,将WAR包放到Tomcat的webapps下,运行start脚本,启动tomcat,到现在,至少我觉得我能去定制化Tomcat了, 刚开始非常痛苦,根本弄不清Tomcat的Server,Engine,Host,Context, Wrapper ,在请求过程中又有管道的流转,Tomcat各种类加载器,都能将你弄晕, 刚开始非常迷茫,之前写了一篇 Tomcat 源码解析一初识 博客,当发现Degister框架时,终于解答了我多年的疑惑,原来xml的解析如此简单,之前解析xml那是一个难受,现在终于找到了XML的解析完美方案,那我觉得Tomcat原来也没有那么难嘛,当写 Tomcat 源码解析一请求处理的整体过程-黄泉天怒 这篇博客时,简直从入门到放弃,里面有太多的东西不知道是什么,也知道管道是什么,不知道StandardContext是什么,又是何时初始化,何时来的呢?因此这篇博客就搁置了,没有办法,既然弄不明白,那就先放弃吧, 后面就先从边边角角的地方去研究,之后先研究了 Tomcat 源码解析一JNDI , Tomcat 源码解析一EL表达式源码解析
Tomcat 源码解析一JSP编译器Jasper-佛怒火莲(上) ,当然将JSP研究明白后,已用时一个多月了,此时发现这些边边角角的东西已经不再是我的羁绊,向Tomcat的核心功能出发,Tomcat 源码解析一容器加载-大寂灭指 系列, 又花了一个多月的时间,当再来看 Tomcat 源码解析一请求处理的整体过程 时,已经是水到渠成的事情,我看网上有一些源码课,老师花几节课就将整个过程讲得差不多了,但那也是老师理解,你依然还是不理解,最多你也只是知道这个现象,当一个牛逼的面试官问你时,你自己都不自信,面试官会信吗?当遇到具体的业务问题时,你依然还是不会,遇到问题还是老办法百度,最终也没有形成自己的思想,如果想自己写一个框架,当然还是无法从Tomcat源码中得到借鉴,当遇到一些问题时,依然无法从源码中找到答案,当然这里还有一个误区,有人说研究懂Spring源码,再去看其他源码就两三个星期就明白了,我个人觉得,如果只是林林散散的看看,那肯定是没有问题的,如果想将博客写出来,并且对里面的细节有一定认知,肯定是不够的,因此在研究源码时,要耐得住枯燥,耐得住寂寞,最好做到没有时间观念,舍得花时间,最终你才会有所收获。
历时半年,Tomcat的源码研究又告一段落了,我得到了什么呢? BIO,NIO的实现,Degister框架,Tomcat中对字节码结构解析,JSP 文件解析生成Servlet的过程,JSP的编译,SMAP修改字节码,EL 表达式的解析,以及EL表达式 从应用中获取值的过程,HostConfig的启动,StandardContext启动过程,管道的设计模式,过滤器的设计模式,Tomcat 热布署思想, JNDI框架的设计及应用,Tomcat中的类加载器等,当然Tomcat的权限,认证,集群,APR 通信方式,目前不做深入研究,因为我觉得目前市面上有很多的集群框架,如Double , Spring Clound 更值得研究,而APR 通信也是Tomcat 内部节点之间的通信,感觉没有太大的借鉴意义,目前放下,说不定以后我觉得他也很重要了,再来写相关博客。
接下来要去研究Netty,希望后面的博客再次相遇。
github相关源码
https://github.com/quyixiao/tomcat.git


