1、定时任务
在公司做项目时,经常遇到要用到定时任务的事情,但是对定时任务不熟练的时候会出现重复任务的情况,不深入,这次将定时任务好好学习分析一下
定时任务的原理
假如我将一个现场通过不断轮询的方式去判断,就能实现定时任务功能
public class Task {

    public static void main(String[] args) {
        // run in a second
        final long timeInterval = 1000;
        Runnable runnable = new Runnable() {
            @Override
            public void run() {
                while (true) {
                    System.out.println("Hello !!");
                    try {
                        Thread.sleep(timeInterval);
                    } catch (InterruptedException e) {
                        e.printStackTrace();
                    }
                }
            }
        };
        Thread thread = new Thread(runnable);
        thread.start();
    }
}
这里解释下InterruptedException异常
Thrown when a thread is waiting, sleeping, or otherwise occupied, and the thread is interrupted,
 either before or during the activity. Occasionally a method may wish to test whether the current
  thread has been interrupted, and if so, to immediately throw this exception.
   The following code can be used to achieve this effect:
简单来说就是当阻塞方法收到中断请求的时候就会抛出InterruptedException异常,当一个方法后面声明可能会抛出InterruptedException 异常时,说明该方法是可能会花一点时间,但是可以取消的方法。
抛InterruptedException的代表方法有:sleep(),wait(),join()
执行wait方法的线程,会进入等待区等待被notify/notify All。在等待期间,线程不会活动。
执行sleep方法的线程,会暂停执行参数内所设置的时间。
执行join方法的线程,会等待到指定的线程结束为止。
因此,上面的方法都是需要花点时间的方法。这三个方法在执行过程中会不断轮询中断状态(interrupted方法),从而自己抛出InterruptedException。
interrupt方法其实只是改变了中断状态而已。
所以,如果在线程进行其他处理时,调用了它的interrupt方法,线程也不会抛出InterruptedException的,只有当线程走到了sleep, wait, join这些方法的时候,才会抛出InterruptedException。若是没有调用sleep, wait, join这些方法,或者没有在线程里自己检查中断状态,自己抛出InterruptedException,那InterruptedException是不会抛出来的。
Timer实现
Java在1.3版本引入了Timer工具类,它是一个古老的定时器,搭配TimerTask和TaskQueue一起使用,示例
public class TimeTaskTest {
    public static void main(String[] args) {
        TimerTask timerTask = new TimerTask() {
            @Override
            public void run() {
                System.out.println("hell world");
            }
        };
        Timer timer = new Timer();
        timer.schedule(timerTask, 10, 3000);
    }
}
//Timer类
public void schedule(TimerTask task, long delay, long period) {
        if (delay < 0)
            throw new IllegalArgumentException("Negative delay.");
        if (period <= 0)
            throw new IllegalArgumentException("Non-positive period.");
        sched(task, System.currentTimeMillis()+delay, -period);
    }
private void sched(TimerTask task, long time, long period) {
        if (time < 0)
            throw new IllegalArgumentException("Illegal execution time.");

        // Constrain value of period sufficiently to prevent numeric
        // overflow while still being effectively infinitely large.
        if (Math.abs(period) > (Long.MAX_VALUE >> 1))
            period >>= 1;

        synchronized(queue) {
            if (!thread.newTasksMayBeScheduled)
                throw new IllegalStateException("Timer already cancelled.");

            synchronized(task.lock) {
                if (task.state != TimerTask.VIRGIN)
                    throw new IllegalStateException(
                        "Task already scheduled or cancelled");
                task.nextExecutionTime = time;
                task.period = period;
                task.state = TimerTask.SCHEDULED;
            }

            queue.add(task);
            if (queue.getMin() == task)
                queue.notify();
        }
    }
imer中用到的主要是两个成员变量:
1、TaskQueue:一个按照时间优先排序的队列,这里的时间是每个定时任务下一次执行的毫秒数(相对于1970年1月1日而言)
2、TimerThread:对TaskQueue里面的定时任务进行编排和触发执行,它是一个内部无限循环的线程。
主要方法:
// 在指定延迟时间后执行指定的任务(只执行一次)
schedule(TimerTask task,long delay);

// 在指定时间执行指定的任务。(只执行一次)
schedule(TimerTask task, Date time);

// 延迟指定时间(delay)之后,开始以指定的间隔(period)重复执行指定的任务
schedule(TimerTask task,long delay,long period);

// 在指定的时间开始按照指定的间隔(period)重复执行指定的任务
schedule(TimerTask task, Date firstTime , long period);

// 在指定的时间开始进行重复的固定速率执行任务
scheduleAtFixedRate(TimerTask task,Date firstTime,long period);

// 在指定的延迟后开始进行重复的固定速率执行任务
scheduleAtFixedRate(TimerTask task,long delay,long period);

// 终止此计时器,丢弃所有当前已安排的任务。
cancal();

// 从此计时器的任务队列中移除所有已取消的任务。
purge();
先说Fixed Delay模式
//从当前时间开始delay个毫秒数开始定期执行,周期是period个毫秒数
public void schedule(TimerTask task, long delay, long period) {...}
从指定的firstTime开始定期执行,往后每次执行的周期是period个毫秒数
public void schedule(TimerTask task, Date firstTime, long period){...}
它的工作方式是:
第一次执行的时间将按照指定的时间点执行(如果此时TimerThread不在执行其他任务),如有其他任务在执行,那就需要等到其他任务执行完成才能执行。
从第二次开始,每次任务的执行时间是上一次任务开始执行的时间加上指定的period毫秒数。
如何理解呢,我们还是看代码
public static void main(String[] args) {
        TimerTask task1 = new DemoTimerTask("Task1");
        TimerTask task2 = new DemoTimerTask("Task2");
        Timer timer = new Timer();
        timer.schedule(task1, 1000, 5000);
        timer.schedule(task2, 1000, 5000);
}

static class DemoTimerTask extends TimerTask {
        private String taskName;
        private DateFormat df = new SimpleDateFormat("HH:mm:ss---");

        public DemoTimerTask(String taskName) {
            this.taskName = taskName;
        }

        @Override
        public void run() {
            System.out.println(df.format(new Date()) + taskName + " is working.");
            try {
                Thread.sleep(2000);
            } catch (InterruptedException e) {
                // TODO Auto-generated catch block
                e.printStackTrace();
            }
            System.out.println(df.format(new Date()) + taskName + " finished work.");
        }
}
task1和task2是几乎同时执行的两个任务,而且执行时长都是2秒钟,如果此时我们把第六行注掉不执行,我们将得到如下结果(和第三种Fixed Rate模式结果相同):
13:42:58---Task1 is working.
13:43:00---Task1 finished work.
13:43:03---Task1 is working.
13:43:05---Task1 finished work.
13:43:08---Task1 is working.
13:43:10---Task1 finished work.
如果打开第六行,我们再看下两个任务的执行情况。我们是期望两个任务能够同时执行,但是Task2是在Task1执行完成后才开始执行(原因是TimerThread是单线程的,每个定时任务的执行也在该线程内完成,当多个任务同时需要执行时,只能是阻塞了),从而导致Task2第二次执行的时间是它上一次执行的时间(13:43:57)加上5秒钟(13:44:02)。
13:43:55---Task1 is working.
13:43:57---Task1 finished work.
13:43:57---Task2 is working.
13:43:59---Task2 finished work.
13:44:00---Task1 is working.
13:44:02---Task1 finished work.
13:44:02---Task2 is working.
13:44:04---Task2 finished work.
那如果此时还有个Task3也是同样的时间点和间隔执行会怎么样呢?
结论是:也将依次排队,执行的时间依赖两个因素:
1.上次执行的时间
2.期望执行的时间点上有没有其他任务在执行,有则只能排队了
Fixed Rate模式
public static void main(String[] args) {
        TimerTask task1 = new DemoTimerTask("Task1");
        TimerTask task2 = new DemoTimerTask("Task2");

        Timer timer = new Timer();
        timer.scheduleAtFixedRate(task1, 1000, 5000);
        timer.scheduleAtFixedRate(task2, 1000, 5000);
}

static class DemoTimerTask extends TimerTask {
        private String taskName;
        private DateFormat df = new SimpleDateFormat("HH:mm:ss---");

        public DemoTimerTask(String taskName) {
            this.taskName = taskName;
        }

        @Override
        public void run() {
            System.out.println(df.format(new Date()) + taskName + " is working.");
            try {
                Thread.sleep(2000);
            } catch (InterruptedException e) {
                // TODO Auto-generated catch block
                e.printStackTrace();
            }
            System.out.println(df.format(new Date()) + taskName + " finished work.");
        }
}
Task1和Task2还是在相同的时间点,按照相同的周期定时执行任务,我们期望Task1能够每5秒定时执行任务,期望的时间点是:14:21:47-14:21:52-14:21:57-14:22:02-14:22:07,实际上它能够交替着定期执行,原因是Task2也会定期执行,并且对TaskQueue的锁他们是交替着拿的(这个在下面分析TimerThread源码的时候会讲到)
14:21:47---Task1 is working.
14:21:49---Task1 finished work.
14:21:49---Task2 is working.
14:21:51---Task2 finished work.
14:21:52---Task2 is working.
14:21:54---Task2 finished work.
14:21:54---Task1 is working.
14:21:56---Task1 finished work.
14:21:57---Task1 is working.
14:21:59---Task1 finished work.
14:21:59---Task2 is working.
14:22:01---Task2 finished work.
TimerThread
上面我们主要讲了Timer的一些主要源码及定时模式,下面我们来分析下支撑Timer的定时任务线程TimerThread。
TimerThread大概流程图如下:
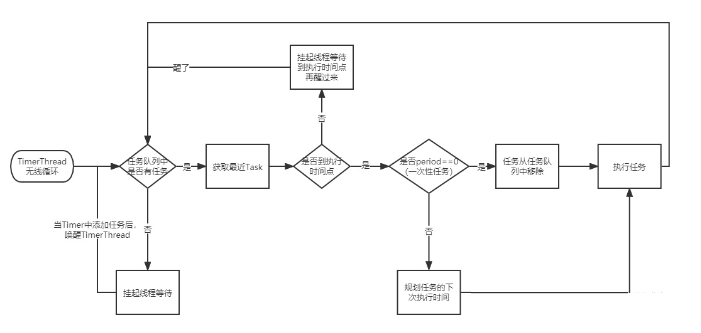
源码如下
private void mainLoop() {
        while (true) {
            try {
                TimerTask task;
                boolean taskFired;
                synchronized(queue) {
                    // 如果queue里面没有要执行的任务,则挂起TimerThread线程
                    while (queue.isEmpty() && newTasksMayBeScheduled)
                        queue.wait();
                    // 如果TimerThread被激活,queue里面还是没有任务,则介绍该线程的无限循环,不再接受新任务
                    if (queue.isEmpty())
                        break;

                    long currentTime, executionTime;
                    // 获取queue队列里面下一个要执行的任务(根据时间排序,也就是接下来最近要执行的任务)
                    task = queue.getMin();
                    synchronized(task.lock) {
                        if (task.state == TimerTask.CANCELLED) {
                            queue.removeMin();
                            continue;  // No action required, poll queue again
                        }
                        currentTime = System.currentTimeMillis();
                        executionTime = task.nextExecutionTime;
                        // taskFired表示是否需要立刻执行线程,当task的下次执行时间到达当前时间点时为true
                        if (taskFired = (executionTime<=currentTime)) {
                            //task.period==0表示这个任务只需要执行一次,这里就从queue里面删掉了
                            if (task.period == 0) {
                                queue.removeMin();
                                task.state = TimerTask.EXECUTED;
                            } else { // Repeating task, reschedule
                                //针对task.period不等于0的任务,则计算它的下次执行时间点
                                //task.period<0表示是fixed delay模式的任务
                                //task.period>0表示是fixed rate模式的任务
                                queue.rescheduleMin(
                                  task.period<0 ? currentTime   - task.period
                                                : executionTime + task.period);
                            }
                        }
                    }
                    // 如果任务的下次执行时间还没有到达,则挂起TimerThread线程executionTime - currentTime毫秒数,到达执行时间点再自动激活
                    if (!taskFired)
                        queue.wait(executionTime - currentTime);
                }
                // 如果任务的下次执行时间到了,则执行任务
                // 注意:这里任务执行没有另起线程,还是在TimerThread线程执行的,所以当有任务在同时执行时会出现阻塞
                if (taskFired)
                    // 这里没有try catch异常,当TimerTask抛出异常会导致整个TimerThread跳出循环,从而导致Timer失效
                    task.run();
            } catch(InterruptedException e) {
            }
        }
}
TimerThread中并没有处理好任务的异常,因此每个TimerTask的实现必须自己try catch防止异常抛出,导致Timer整体失效。同时,已经被安排单尚未执行的TimerTask也不会再执行了,新的任务也不能被调度。故如果TimerTask抛出未检查的异常,Timer将会产生无法预料的行为。
schedule与scheduleAtFixedRate区别
在了解schedule与scheduleAtFixedRate方法的区别之前,先看看它们的相同点:
任务执行未超时,下次执行时间 = 上次执行开始时间 + period; 任务执行超时,下次执行时间 = 上次执行结束时间;
在任务执行未超时时,它们都是上次执行时间加上间隔时间,来执行下一次任务。而执行超时时,都是立马执行。
它们的不同点在于侧重点不同,schedule方法侧重保持间隔时间的稳定,而scheduleAtFixedRate方法更加侧重于保持执行频率的稳定。
schedule侧重保持间隔时间的稳定
schedule方法会因为前一个任务的延迟而导致其后面的定时任务延时。计算公式为scheduledExecutionTime(第n+1次) = realExecutionTime(第n次) + periodTime。
也就是说如果第n次执行task时,由于某种原因这次执行时间过长,执行完后的systemCurrentTime>= scheduledExecutionTime(第n+1次),则此时不做时隔等待,立即执行第n+1次task。
而接下来的第n+2次task的scheduledExecutionTime(第n+2次)就随着变成了realExecutionTime(第n+1次)+periodTime。这个方法更注重保持间隔时间的稳定。
scheduleAtFixedRate保持执行频率的稳定
scheduleAtFixedRate在反复执行一个task的计划时,每一次执行这个task的计划执行时间在最初就被定下来了,也就是scheduledExecutionTime(第n次)=firstExecuteTime +n*periodTime。
如果第n次执行task时,由于某种原因这次执行时间过长,执行完后的systemCurrentTime>= scheduledExecutionTime(第n+1次),则此时不做period间隔等待,立即执行第n+1次task。
接下来的第n+2次的task的scheduledExecutionTime(第n+2次)依然还是firstExecuteTime+(n+2)*periodTime这在第一次执行task就定下来了。说白了,这个方法更注重保持执行频率的稳定。
如果用一句话来描述任务执行超时之后schedule和scheduleAtFixedRate的区别就是:schedule的策略是错过了就错过了,后续按照新的节奏来走;scheduleAtFixedRate的策略是如果错过了,就努力追上原来的节奏(制定好的节奏)。
ScheduledExecutorService
基于线程池设计的定时任务解决方案,每个调度任务都会分配到线程池中的一个线程去执行,解决 Timer 定时器无法并发执行的问题,支持 fixedRate 和 fixedDelay。
ScheduledExecutorService是JAVA 1.5后新增的定时任务接口,它是基于线程池设计的定时任务类,每个调度任务都会分配到线程池中的一个线程去执行。也就是说,任务是并发执行,互不影响。
需要注意:只有当执行调度任务时,ScheduledExecutorService才会真正启动一个线程,其余时间ScheduledExecutorService都是出于轮询任务的状态。
ScheduledFuture<?> schedule(Runnable command,long delay, TimeUnit unit);
<V> ScheduledFuture<V> schedule(Callable<V> callable,long delay, TimeUnit unit);
ScheduledFuture<?> scheduleAtFixedRate(Runnable command,long initialDelay,long period,TimeUnitunit);
ScheduledFuture<?> scheduleWithFixedDelay(Runnable command,long initialDelay,long delay,TimeUnitunit);
其中scheduleAtFixedRate和scheduleWithFixedDelay在实现定时程序时比较方便,运用的也比较多。
ScheduledExecutorService中定义的这四个接口方法和Timer中对应的方法几乎一样,只不过Timer的scheduled方法需要在外部传入一个TimerTask的抽象任务。
而ScheduledExecutorService封装的更加细致了,传Runnable或Callable内部都会做一层封装,封装一个类似TimerTask的抽象任务类(ScheduledFutureTask)。然后传入线程池,启动线程去执行该任务。
public class ScheduleAtFixedRateDemo implements Runnable{

    public static void main(String[] args) {
        ScheduledExecutorService executor = Executors.newScheduledThreadPool(1);
        executor.scheduleAtFixedRate(
                new ScheduleAtFixedRateDemo(),
                0,
                1000,
                TimeUnit.MILLISECONDS);
    }

    @Override
    public void run() {
        System.out.println(new Date() + " : 任务「ScheduleAtFixedRateDemo」被执行。");
        try {
            Thread.sleep(2000L);
        } catch (InterruptedException e) {
            e.printStackTrace();
        }
    }
}
上面是scheduleAtFixedRate方法的基本使用方式,但当执行程序时会发现它并不是间隔1秒执行的,而是间隔2秒执行。
这是因为,scheduleAtFixedRate是以period为间隔来执行任务的,如果任务执行时间小于period,则上次任务执行完成后会间隔period后再去执行下一次任务;但如果任务执行时间大于period,则上次任务执行完毕后会不间隔的立即开始下次任务。
