上文内容概括: Scala 概述与安装、变量、运算符、流程控制、函数式编程、面向对象
上文链接:两文学会scala (上)|保姆级别教程(超详细)_超爱慢的博客-CSDN博客
目录
第7章 集合
7.1 集合简介
7.1.1 不可变集合继承图
7.1.2 可变集合继承图
7.2 数组
7.2.1 不可变数组
7.2.2 可变数组
7.2.3 不可变数组与可变数组的转换
7.2.4 多维数组
7.3 Seq集合(List)
7.3.1 不可变List
7.3.2 可变ListBuffer
7.4 Set集合
7.4.1 不可变Set
7.4.2 可变mutable.Set
7.5 Map集合
7.5.1 不可变Map
7.5.2 可变Map
7.6 元组
7.7 集合常用函数
7.7.1 基本属性和常用操作
7.7.2 衍生集合
7.7.3 集合计算初级函数
7.7.4 集合计算高级函数
1)说明
2)实操
3)Reduce方法
4)Fold方法
7.7.5 普通WordCount案例
7.7.6 复杂WordCount案例
1)方式一
2)方式二
7.8 队列
7.9 并行集合
第8章 模式匹配
8.1 基本语法
8.2 模式守卫
8.3 模式匹配类型
8.3.1 匹配常量
8.3.2 匹配类型
8.3.3 匹配数组
8.3.4 匹配列表
8.3.5 匹配元组
8.3.6 匹配对象及样例类`
1)基本语法
2)样例类
8.4 变量声明中的模式匹配
8.5 for表达式中的模式匹配
8.6 偏函数中的模式匹配(了解)
1)偏函数定义
2)偏函数原理
3)偏函数使用
4)案例实操
第9章 异常
9.1 Java异常处理
9.2 Scala异常处理
第10章 隐式转换
10.1 隐式函数
10.2 隐式参数
10.3 隐式类
10.4 隐式解析机制
第11章 泛型
11.1 协变和逆变
11.2 泛型上下限
11.3 上下文限定
第12章 总结
12.1 开发环境
12.2 变量和数据类型
12.3 流程控制
12.4 函数式编程
12.5 面向对象
12.6 集合
12.7 模式匹配
12.8 下划线
12.9 异常
12.10 隐式转换
12.11 泛型
第13章 IDEA快捷键
第7章 集合
7.1 集合简介
1)Scala的集合有三大类:序列Seq、集Set、映射Map,所有的集合都扩展自Iterable特质。
2)对于几乎所有的集合类,Scala都同时提供了可变和不可变的版本,分别位于以下两个包。
不可变集合:scala.collection.immutable
可变集合: scala.collection.mutable
3)Scala不可变集合,就是指该集合对象不可修改,每次修改就会返回一个新对象,而不会对原对象进行修改。类似于java中的String对象
4)可变集合,就是这个集合可以直接对原对象进行修改,而不会返回新的对象。类似于java中StringBuilder对象
建议:在操作集合的时候,不可变用符号,可变用方法
7.1.1 不可变集合继承图
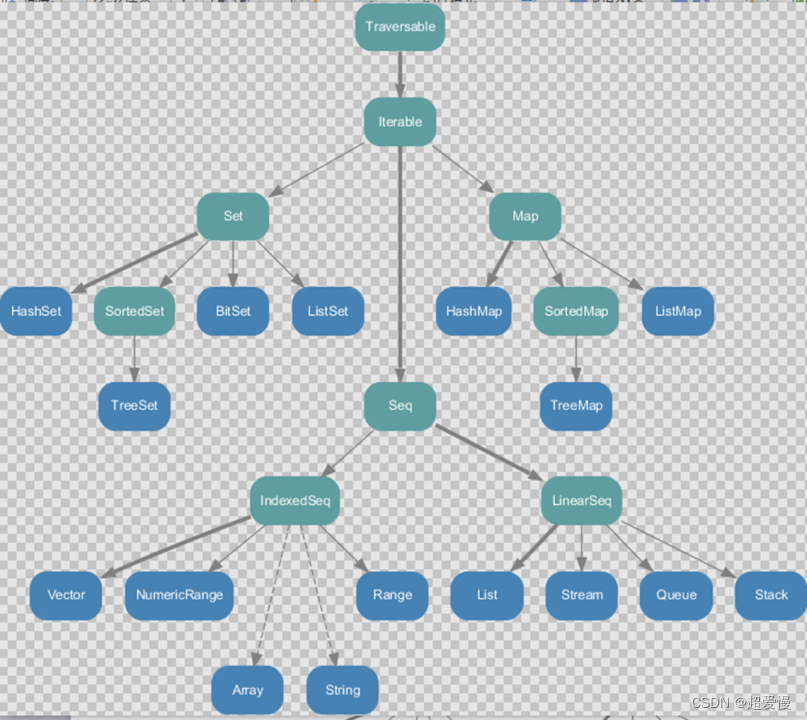
1)Set、Map是Java中也有的集合
2)Seq是Java没有的,我们发现List归属到Seq了,因此这里的List就和Java不是同一个概念了
3)我们前面的for循环有一个 1 to 3,就是IndexedSeq下的Range
4)String也是属于IndexedSeq
5)我们发现经典的数据结构比如Queue和Stack被归属到LinearSeq(线性序列)
6)大家注意Scala中的Map体系有一个SortedMap,说明Scala的Map可以支持排序
7)IndexedSeq和LinearSeq的区别:
(1)IndexedSeq是通过索引来查找和定位,因此速度快,比如String就是一个索引集合,通过索引即可定位
(2)LinearSeq是线型的,即有头尾的概念,这种数据结构一般是通过遍历来查找
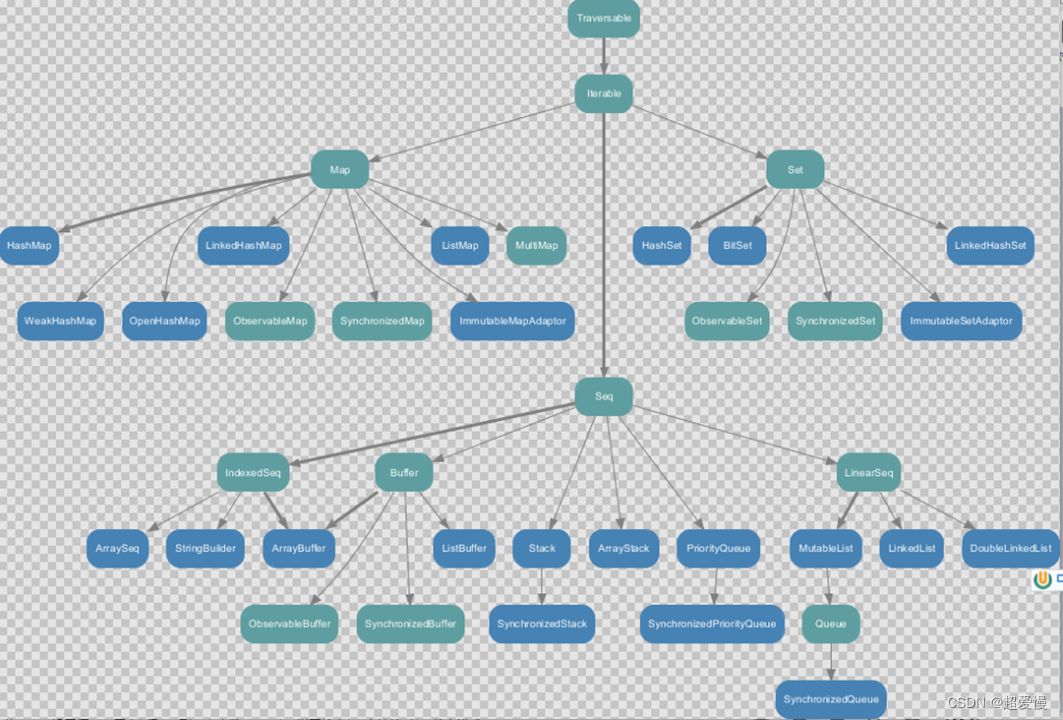
7.1.2 可变集合继承图
7.2 数组
7.2.1 不可变数组
1)第一种方式定义数组
定义:val arr1 = new Array[Int](10)
(1)new是关键字
(2)[Int]是指定可以存放的数据类型,如果希望存放任意数据类型,则指定Any
(3)(10),表示数组的大小,确定后就不可以变化
2)案例实操
package chapter07

object Test01_Array {
  def main(args: Array[String]): Unit = {
    // 创建不可变数组
    val array = new Array[Int](10)
    // 也可以使用伴生对象的apply方法
    val array1: Array[Int] = Array(1, 2, 3, 4)

    // 遍历读取array
    //    println(array)

    for (elem <- array1) {
      println(elem)
    }

    // 使用迭代器遍历数组
    val iterator: Iterator[Int] = array1.iterator

    while(iterator.hasNext){
      val i: Int = iterator.next()
      println(i)
    }

    println("===========================")

    // scala函数式编程的写法
    def myPrint(i:Int):Unit = {
      println(i)
    }

    // 放入自定义出来的函数
    array1.foreach(myPrint)
    // 直接使用匿名函数
    array1.foreach( i => println(i * 2) )
    // 最简单的打印形式 直接使用系统的函数
    array1.foreach(println)


    // 修改数组的元素
    println(array1(0))
    array1(0) = 10
    println(array1(0))

    // 添加元素
    // array1保持不变
    val array2: Array[Int] = array1 :+ 1

  }

}
7.2.2 可变数组
1)定义变长数组
val arr01 = ArrayBuffer[Any](3, 2, 5)
(1)[Any]存放任意数据类型
(2)(3, 2, 5)初始化好的三个元素
(3)ArrayBuffer需要引入scala.collection.mutable.ArrayBuffer
2)案例实操
(1)ArrayBuffer是有序的集合
(2)增加元素使用的是append方法(),支持可变参数
package chapter07

import scala.collection.mutable
import scala.collection.mutable.ArrayBuffer

object Test02_ArrayBuffer {
  def main(args: Array[String]): Unit = {
    // 可变数组
    // 默认使用的集合都是不可变的
    // 使用可变集合 需要自己提前导包
    val arrayBuffer: ArrayBuffer[Int] = new ArrayBuffer[Int]()
    val arrayBuffer1: ArrayBuffer[Int] = ArrayBuffer(1, 2, 3, 4)


    // 向可变数组中添加元素
    arrayBuffer.append(10)
    arrayBuffer1.appendAll(Array(1,2,3,4))

    // 遍历打印
    arrayBuffer.foreach(println)
    arrayBuffer1.foreach(println)

    println(arrayBuffer1)


    // 修改元素
    arrayBuffer1.update(0,100)
    arrayBuffer1(1) = 200
    println(arrayBuffer1)

    // 查看元素
    println(arrayBuffer1(0))

    // 删除元素
    arrayBuffer1.remove(0)
    println(arrayBuffer1)
    arrayBuffer1.remove(1,3)
    println(arrayBuffer1)
  }
}7.2.3 不可变数组与可变数组的转换
1)说明
arr1.toBuffer //不可变数组转可变数组
arr2.toArray //可变数组转不可变数组
(1)arr2.toArray返回结果才是一个不可变数组,arr2本身没有变化
(2)arr1.toBuffer返回结果才是一个可变数组,arr1本身没有变化
2)案例实操
 // 可变数组和不可变数组的转换和关系
    // 不可变
    val ints: Array[Int] = Array(1, 2, 3, 4)
    // 可变
    val ints1: ArrayBuffer[Int] = ArrayBuffer(5, 6, 7, 8)

    // 不可变的用符号
    val b: Array[Int] = ints :+ 1

    ints.foreach(println)
    b.foreach(println)

    // 可变的用方法
    ints1.append(1)
    println(ints1)

    val ints2: ArrayBuffer[Int] = ints1 :+ 2
    println(ints1)

    // 可变数组转换为不可变数组
    val array: Array[Int] = ints1.toArray
//    array.append

    // 不可变数组转可变数组
    // 结果用多态表示
    val buffer: mutable.Buffer[Int] = ints.toBuffer
    val buffer1: ArrayBuffer[Int] = buffer.asInstanceOf[ArrayBuffer[Int]]
    buffer.append(1)
7.2.4 多维数组
1)多维数组定义
val arr = Array.ofDim[Double](3,4)
说明:二维数组中有三个一维数组,每个一维数组中有四个元素
2)案例实操
package chapter07

object Test03_ArrayDim {
  def main(args: Array[String]): Unit = {
    // 多维数组
    val arrayDim = new Array[Array[Int]](3)

    arrayDim(0) = Array(1,2,3,4)
    arrayDim(1) = Array(1,2,3,4)
    arrayDim(2) = Array(1,2,3,4)

    for (array <- arrayDim) {
      for (elem <- array) {
        print(elem + "\t")
      }
      println()
    }


    // scala中的方法
    val arrayDim1: Array[Array[Int]] = Array.ofDim[Int](3, 4)

    arrayDim1(0)(1) = 100
    for (array <- arrayDim1) {
      for (elem <- array) {
        print(elem + "\t")
      }
      println()
    }
  }
}7.3 Seq集合(List)
7.3.1 不可变List
1)说明
(1)List默认为不可变集合
(2)创建一个List(数据有顺序,可重复)
(3)遍历List
(4)List增加数据
(5)集合间合并:将一个整体拆成一个一个的个体,称为扁平化
(6)取指定数据
(7)空集合Nil
2)案例实操
object Test04_List {
  def main(args: Array[String]): Unit = {

    //    (1)List默认为不可变集合
    //    (2)创建一个List(数据有顺序,可重复)
    val list: List[Any] = List(1,1,1, 1.0, "hello", 'c')
    val list3 = List(1, 2, 3, 4)


    //    (3)遍历List
    list.foreach(println)

    //    (4)List增加数据
    val list1: List[Any] = list :+ 1
    println(list1)

    val list2: List[Int] = 2 :: list3
    println(list2)

    val list5: List[Any] = list2 :: list3
    println(list5)


    //    (5)集合间合并:将一个整体拆成一个一个的个体,称为扁平化
    val list4: List[Int] = list2 ::: list3
    println(list4)

    //    (6)取指定数据
    val i: Int = list4(0)

    //    (7)空集合Nil
    val list6: List[Int] = 1 :: 2 :: 3 :: 4 :: Nil


  }
}
7.3.2 可变ListBuffer
1)说明
(1)创建一个可变集合ListBuffer
(2)向集合中添加数据
(3)删除元素
(4)查看修改元素
2)案例实操
import scala.collection.mutable.ListBuffer

object Test05_ListBuffer {
  def main(args: Array[String]): Unit = {
    // ( 1)可变list创建
    val listBuffer = new ListBuffer[Int]()

    val listBuffer1: ListBuffer[Int] = ListBuffer(1, 2, 3, 4)

    // ( 2)增加元素
    listBuffer1.append(5)
    listBuffer1.prepend(0)

    println(listBuffer1)

    // ( 3)删除元素
    listBuffer1.remove(0)
    println(listBuffer1)

    // ( 4)查看修改
    listBuffer1(0) = 1


  }
}7.4 Set集合
默认情况下,Scala使用的是不可变集合,如果你想使用可变集合,需要引用 scala.collection.mutable.Set 包
7.4.1 不可变Set
1)说明
(1)Set默认是不可变集合
(2)数据无序不可重复
(3)默认使用hash set
2)案例实操
object Test06_Set {
  def main(args: Array[String]): Unit = {
    // (1) 创建set  使用伴生对象的apply方法

    val set: Set[Int] = Set(4, 3, 2, 1)
    val set1 = Set(1, 2, 3, 4, 2, 8, 4, 3, 7)

    // (2) set的特点 无序不可重复
    println(set)

    // (3) 默认使用hash set
    // 如果元素少于等于4个  会创建特定类型的set
    println(set.isInstanceOf[HashSet[Int]])

    val hashSet: HashSet[Int] = HashSet(1, 2, 3, 4, 5)

    // 不可变使用符号
    val set2: Set[Int] = set + 1
    println(set2)

    // 作用 判断集合是否包含某个元素
val bool: Boolean = set.contains(2)
}
}
7.4.2 可变mutable.Set
1)说明
(1)创建可变集合mutable.Set
(2)集合添加元素
(3)删除数据
2)案例实操
object Test06_Set {
  def main(args: Array[String]): Unit = {
    // (1)可变的set
    val set3: mutable.Set[Int] = mutable.Set(1, 2, 3, 4, 4, 3, 2, 1)

    // 同样数据不可重复且无序
    println(set3)

    // (2) 添加元素
    // 会使用返回值来告诉你有没有加入进去
    val bool1: Boolean = set3.add(5)
    println(set3)

    // 遍历查询set
    set3.foreach(println)

    // (3)删除元素  填写的不是下标是删除的元素
    val bool2: Boolean = set3.remove(3)
    println(set3)


  }
}7.5 Map集合
Scala中的Map和Java类似,也是一个散列表,它存储的内容也是键值对(key-value)映射
7.5.1 不可变Map
1)说明
(1)创建不可变集合Map
(2)循环打印
(3)读取数据
2)案例实操
object Test07_Map {
  def main(args: Array[String]): Unit = {
    // (1) 创建不可变map
    val map: Map[String, Int] = Map("hello" -> 1, "world" -> 2)
    val map1 = Map(("hello", 1), ("world", 2))

    // (2) 遍历打印map
    for (elem <- map) {
      println(elem)
    }

    map.foreach(println)

    val keys: Iterable[String] = map.keys
    keys.foreach(println)

    val values: Iterable[Int] = map.values

    // 直接打印map
    println(map)


    // key是无序不可重复的
    val map2 = Map( ("z", 3),("a", 1), ("a", 2), ("c", 3),("f",4),("d",5))
    println(map2)


    // (3) 获取value的值
    val option: Option[Int] = map2.get("a")
    println(option)


    if (!map2.get("m").isEmpty) {
      val value: Int = map2.get("m").get
    }

    // option有区分是否有数据的方法 使用getOrElse  如果为None  去默认值
    option.getOrElse(1)


    // 如果不确认存在
    val i: Int = map2.getOrElse("m", 10)
    // 如果确认存在的话
    val i1: Int = map2("a")

    }
}
7.5.2 可变Map
1)说明
(1)创建可变集合
(2)向集合增加数据
(3)修改数据
(4)删除数据
2)案例实操
object Test07_Map {

  def main(args: Array[String]): Unit = {
    // (1) 创建可变map
    val map3: mutable.Map[String, Int] = mutable.Map(("z", 3), ("a", 1), ("a", 2), ("c", 3), ("f", 4), ("d", 5))

    // (2) 可变map可以使用put方法放入元素
    map3.put("z",10)
    println(map3)

    // (3) 修改元素的方法
    map3.update("z",20)
    map3("z") = 30

    // (4) 删除元素
    map3.remove("z")

  }
}7.6 元组
1)说明
元组也是可以理解为一个容器,可以存放各种相同或不同类型的数据。说的简单点,就是将多个无关的数据封装为一个整体,称为元组。
注意:元组中最大只能有22个元素。
2)案例实操
(1)声明元组的方式:(元素1,元素2,元素3)
(2)访问元组
(3)Map中的键值对其实就是元组,只不过元组的元素个数为2,称之为对偶
object TestTuple {

    def main(args: Array[String]): Unit = {

        //(1)声明元组的方式:(元素1,元素2,元素3)
        val tuple: (Int, String, Boolean) = (40,"bobo",true)

        //(2)访问元组
        //(2.1)通过元素的顺序进行访问,调用方式:_顺序号
        println(tuple._1)
        println(tuple._2)
        println(tuple._3)

        //(2.2)通过索引访问数据
        println(tuple.productElement(0))

        //(2.3)通过迭代器访问数据
        for (elem <- tuple.productIterator) {
            println(elem)
        }

        //(3)Map中的键值对其实就是元组,只不过元组的元素个数为2,称之为对偶
        val map = Map("a"->1, "b"->2, "c"->3)
        val map1 = Map(("a",1), ("b",2), ("c",3))

        map.foreach(tuple=>{println(tuple._1 + "=" + tuple._2)})
    }
}7.7 集合常用函数
7.7.1 基本属性和常用操作
1)说明
(1)获取集合长度
(2)获取集合大小
(3)循环遍历
(4)迭代器
(5)生成字符串
(6)是否包含
2)案例实操
object TestList {

  def main(args: Array[String]): Unit = {

    val list: List[Int] = List(1, 2, 3, 4, 5, 6, 7)

    //(1)获取集合长度
    println(list.length)

    //(2)获取集合大小,等同于length
    println(list.size)

    //(3)循环遍历
    list.foreach(println)

    //(4)迭代器
    for (elem <- list.itera	tor) {
      println(elem)
    }

    //(5)生成字符串
    println(list.mkString(","))

    //(6)是否包含
    println(list.contains(3))
  }
}
7.7.2 衍生集合
1)说明
(1)获取集合的头
(2)获取集合的尾(不是头的就是尾)
(3)集合最后一个数据
(4)集合初始数据(不包含最后一个)
(5)反转
(6)取前(后)n个元素
(7)去掉前(后)n个元素
(8)并集
(9)交集
(10)差集
(11)拉链
(12)滑窗
2)案例实操
object TestList {

  def main(args: Array[String]): Unit = {

    val list1: List[Int] = List(1, 2, 3, 4, 5, 6, 7)
    val list2: List[Int] = List(4, 5, 6, 7, 8, 9, 10)

    //(1)获取集合的头
    println(list1.head)

    //(2)获取集合的尾(不是头的就是尾)
    println(list1.tail)

    //(3)集合最后一个数据
    println(list1.last)

    //(4)集合初始数据(不包含最后一个)
    println(list1.init)

    //(5)反转
    println(list1.reverse)

    //(6)取前(后)n个元素
    println(list1.take(3))
    println(list1.takeRight(3))

    //(7)去掉前(后)n个元素
    println(list1.drop(3))
    println(list1.dropRight(3))

    //(8)并集
    println(list1.union(list2))

    //(9)交集
    println(list1.intersect(list2))

    //(10)差集
    println(list1.diff(list2))

    //(11)拉链 注:如果两个集合的元素个数不相等,那么会将同等数量的数据进行拉链,多余的数据省略不用
    println(list1.zip(list2))

    //(12)滑窗
    list1.sliding(2, 5).foreach(println)
  }
}7.7.3 集合计算初级函数
1)说明
(1)求和
(2)求乘积
(3)最大值
(4)最小值
(5)排序
2)实操
object Test11_LowFunc {
  def main(args: Array[String]): Unit = {
    val list: List[Int] = List(1, 5, -3, 4, 2, -7, 6)
    val list1: ListBuffer[Int] = ListBuffer(1, 5, -3, 4, 2, -7, 6)

    //    (1)求和
    val sum: Int = list.sum
    println(sum)

    //    (2)求乘积
    val product: Int = list.product
    println(product)

    //    (3)最大值
    val max: Int = list.max

    //    (4)最小值
    val min: Int = list.min

    //    (5)排序
    val sorted: List[Int] = list.sorted
    println(list)
    println(sorted)

    // 修改排序规则 从大到小
    val ints: List[Int] = list.sorted(Ordering[Int].reverse)
    println(ints)

    // 对元组进行排序
    val tuples = List(("hello", 10), ("world", 2), ("scala", 9), ("haha", 4),("hello", 1))

    // 按照元组的默认字典序排列
    val sorted1: List[(String, Int)] = tuples.sorted
    println(sorted1)

    // 按照后面数字从小到大排序
    val tuples1: List[(String, Int)] = tuples.sortBy((tuple: (String, Int)) => tuple._2)
    println(tuples1)

    // 按照后面数字从大到小排序
    val tuples2: List[(String, Int)] = tuples.sortBy((tuple: (String, Int)) => tuple._2)(Ordering[Int].reverse)
    println(tuples2)

    tuples.sortBy( _._2 )

    // 自定义排序规则
    val tuples3: List[(String, Int)] = tuples.sortWith((left: (String, Int), right: (String, Int)) => left._2 > right._2)
    println(tuples3)


    val tuples4: List[(String, Int)] = tuples.sortWith(_._2 > _._2)
    println(tuples4)

  }
}
(1)sorted
对一个集合进行自然排序,通过传递隐式的Ordering
(2)sortBy
对一个属性或多个属性进行排序,通过它的类型。
(3)sortWith
基于函数的排序,通过一个comparator函数,实现自定义排序的逻辑。
7.7.4 集合计算高级函数
1)说明
(1)过滤
遍历一个集合并从中获取满足指定条件的元素组成一个新的集合
(2)转化/映射(map)
将集合中的每一个元素映射到某一个函数
(3)扁平化
(4)扁平化+映射 注:flatMap相当于先进行map操作,在进行flatten操作
集合中的每个元素的子元素映射到某个函数并返回新集合
(5)分组(group)
按照指定的规则对集合的元素进行分组
(6)简化(归约)
(7)折叠
2)实操
object TestList {

    def main(args: Array[String]): Unit = {

        val list: List[Int] = List(1, 2, 3, 4, 5, 6, 7, 8, 9)
        val nestedList: List[List[Int]] = List(List(1, 2, 3), List(4, 5, 6), List(7, 8, 9))
        val wordList: List[String] = List("hello world", "hello atguigu", "hello scala")

        //(1)过滤
        println(list.filter(x => x % 2 == 0))

        //(2)转化/映射
        println(list.map(x => x + 1))

        //(3)扁平化
        println(nestedList.flatten)

        //(4)扁平化+映射 注:flatMap相当于先进行map操作,在进行flatten操作
        println(wordList.flatMap(x => x.split(" ")))

        //(5)分组
        println(list.groupBy(x => x % 2))
    }
}3)Reduce方法
Reduce简化(归约) :通过指定的逻辑将集合中的数据进行聚合,从而减少数据,最终获取结果。
案例实操
object TestReduce {

    def main(args: Array[String]): Unit = {

        val list = List(1,2,3,4)

        // 将数据两两结合,实现运算规则
        val i: Int = list.reduce( (x,y) => x-y )
        println("i = " + i)

        // 从源码的角度,reduce底层调用的其实就是reduceLeft
        //val i1 = list.reduceLeft((x,y) => x-y)

        // ((4-3)-2-1) = -2
        val i2 = list.reduceRight((x,y) => x-y)
        println(i2)
    }
}
4)Fold方法
Fold折叠:化简的一种特殊情况,可以添加初始值
(1)案例实操:fold基本使用
object TestFold {

    def main(args: Array[String]): Unit = {

        val list = List(1,2,3,4)

        // fold方法使用了函数柯里化,存在两个参数列表
        // 第一个参数列表为 : 零值(初始值)
        // 第二个参数列表为: 简化规则

        // fold底层其实为foldLeft
        val i = list.foldLeft(1)((x,y)=>x-y)

        val i1 = list.foldRight(10)((x,y)=>x-y)

        println(i)
        println(i1)
    }
}7.7.5 普通WordCount案例
1)需求
单词计数:将集合中出现的相同的单词,进行计数,取计数排名前三的结果
2)需求分析

3)案例实操
object TestWordCount {

    def main(args: Array[String]): Unit = {

        // 单词计数:将集合中出现的相同的单词,进行计数,取计数排名前三的结果
        val stringList = List("Hello Scala Hbase kafka", "Hello Scala Hbase", "Hello Scala", "Hello")

        // 1) 将每一个字符串转换成一个一个单词
        val wordList: List[String] = stringList.flatMap(str=>str.split(" "))
        //println(wordList)

        // 2) 将相同的单词放置在一起
        val wordToWordsMap: Map[String, List[String]] = wordList.groupBy(word=>word)
        //println(wordToWordsMap)

        // 3) 对相同的单词进行计数
        // (word, list) => (word, count)
        val wordToCountMap: Map[String, Int] = wordToWordsMap.map(tuple=>(tuple._1, tuple._2.size))

        // 4) 对计数完成后的结果进行排序(降序)
        val sortList: List[(String, Int)] = wordToCountMap.toList.sortWith {
            (left, right) => {
                left._2 > right._2
            }
        }

        // 5) 对排序后的结果取前3名
        val resultList: List[(String, Int)] = sortList.take(3)

        println(resultList)
    }
}7.7.6 复杂WordCount案例
1)方式一
object TestWordCount {

    def main(args: Array[String]): Unit = {

        // 第一种方式(不通用)
        val tupleList = List(("Hello Scala Spark World ", 4), ("Hello Scala Spark", 3), ("Hello Scala", 2), ("Hello", 1))

        val stringList: List[String] = tupleList.map(t=>(t._1 + " ") * t._2)

        //val words: List[String] = stringList.flatMap(s=>s.split(" "))
        val words: List[String] = stringList.flatMap(_.split(" "))

        //在map中,如果传进来什么就返回什么,不要用_省略
        val groupMap: Map[String, List[String]] = words.groupBy(word=>word)
        //val groupMap: Map[String, List[String]] = words.groupBy(_)

        // (word, list) => (word, count)
        val wordToCount: Map[String, Int] = groupMap.map(t=>(t._1, t._2.size))

        val wordCountList: List[(String, Int)] = wordToCount.toList.sortWith {
            (left, right) => {
                left._2 > right._2
            }
        }.take(3)

        //tupleList.map(t=>(t._1 + " ") * t._2).flatMap(_.split(" ")).groupBy(word=>word).map(t=>(t._1, t._2.size))
        println(wordCountList)
    }
}
2)方式二
object TestWordCount {

    def main(args: Array[String]): Unit = {

        val tuples = List(("Hello Scala Spark World", 4), ("Hello Scala Spark", 3), ("Hello Scala", 2), ("Hello", 1))

        // (Hello,4),(Scala,4),(Spark,4),(World,4)
        // (Hello,3),(Scala,3),(Spark,3)
        // (Hello,2),(Scala,2)
        // (Hello,1)
        val wordToCountList: List[(String, Int)] = tuples.flatMap {
            t => {
                val strings: Array[String] = t._1.split(" ")
                strings.map(word => (word, t._2))
            }
        }

        // Hello, List((Hello,4), (Hello,3), (Hello,2), (Hello,1))
        // Scala, List((Scala,4), (Scala,3), (Scala,2)
        // Spark, List((Spark,4), (Spark,3)
        // Word, List((Word,4))
        val wordToTupleMap: Map[String, List[(String, Int)]] = wordToCountList.groupBy(t=>t._1)

        val stringToInts: Map[String, List[Int]] = wordToTupleMap.mapValues {
            datas => datas.map(t => t._2)
        }
        stringToInts

        /*
        val wordToCountMap: Map[String, List[Int]] = wordToTupleMap.map {
            t => {
                (t._1, t._2.map(t1 => t1._2))
            }
        }

        val wordToTotalCountMap: Map[String, Int] = wordToCountMap.map(t=>(t._1, t._2.sum))
        println(wordToTotalCountMap)
        */
    }
}7.8 队列
1)说明
Scala也提供了队列(Queue)的数据结构,队列的特点就是先进先出。进队和出队的方法分别为enqueue和dequeue。
2)案例实操
object TestQueue {

    def main(args: Array[String]): Unit = {

        val que = new mutable.Queue[String]()

        que.enqueue("a", "b", "c")

        println(que.dequeue())
        println(que.dequeue())
        println(que.dequeue())
    }
}7.9 并行集合
1)说明
Scala为了充分使用多核CPU,提供了并行集合(有别于前面的串行集合),用于多核环境的并行计算。
2)案例实操
object TestPar {

    def main(args: Array[String]): Unit = {

        val result1 = (0 to 100).map{case _ => Thread.currentThread.getName}
        val result2 = (0 to 100).par.map{case _ => Thread.currentThread.getName}

        println(result1)
        println(result2)
    }
}第8章 模式匹配
Scala中的模式匹配类似于Java中的switch语法
int i = 10
switch (i) {
    case 10 :
System.out.println("10");
break;
    case 20 :
System.out.println("20");
break;
    default :
System.out.println("other number");
break;
}
但是scala从语法中补充了更多的功能,所以更加强大。
8.1 基本语法
模式匹配语法中,采用match关键字声明,每个分支采用case关键字进行声明,当需要匹配时,会从第一个case分支开始,如果匹配成功,那么执行对应的逻辑代码,如果匹配不成功,继续执行下一个分支进行判断。如果所有case都不匹配,那么会执行case _分支,类似于Java中default语句。
object TestMatchCase {

  def main(args: Array[String]): Unit = {

    var a: Int = 10
    var b: Int = 20
    var operator: Char = 'd'

    var result = operator match {
      case '+' => a + b
      case '-' => a - b
      case '*' => a * b
      case '/' => a / b
      case _ => "illegal"
    }

    println(result)
  }
}
1)说明
(1)如果所有case都不匹配,那么会执行case _ 分支,类似于Java中default语句,若此时没有case _ 分支,那么会抛出MatchError。
(2)每个case中,不需要使用break语句,自动中断case。
(3)match case语句可以匹配任何类型,而不只是字面量。
(4)=> 后面的代码块,直到下一个case语句之前的代码是作为一个整体执行,可以使用{}括起来,也可以不括。
8.2 模式守卫
1)说明
如果想要表达匹配某个范围的数据,就需要在模式匹配中增加条件守卫。
2)案例实操
object TestMatchGuard {

    def main(args: Array[String]): Unit = {

        def abs(x: Int) = x match {
            case i: Int if i >= 0 => i
            case j: Int if j < 0 => -j
            case _ => "type illegal"
        }

        println(abs(-5))
    }
}
8.3 模式匹配类型
8.3.1 匹配常量
1)说明
Scala中,模式匹配可以匹配所有的字面量,包括字符串,字符,数字,布尔值等等。
2)实操
object Test02_MatchValue {
  def main(args: Array[String]): Unit = {
    // 匹配常量
    def func1(x:Any):String = {
      x match {
        case 10 => "整数10"
        case 20.1 => "浮点数20.1"
        case 'x' => "字符x"
        case "hello" => "字符串hello"
        case _ => "其他数据"
      }
    }

    println(func1(10))
    println(func1(20.1))
    println(func1('x'))
    println(func1("hello"))
println(func1(180))
}
}
8.3.2 匹配类型
1)说明
需要进行类型判断时,可以使用前文所学的isInstanceOf[T]和asInstanceOf[T],也可使用模式匹配实现同样的功能。
2)案例实操
object Test02_MatchValue {

  def main(args: Array[String]): Unit = {
    // 匹配类型
    def func2(x:Any):String ={
      x match {
        case i:Int => "整数"
        case c:Char => "字符"
        case s:String => "字符串"
        case _ => "其他"
      }
    }

    println(func2(1515))
    println(func2('\t'))
    println(func2("1515"))
  }
}8.3.3 匹配数组
1)说明
scala模式匹配可以对集合进行精确的匹配,例如匹配只有两个元素的、且第一个元素为0的数组。
2)案例实操
object Test03_MatchArray {

  def main(args: Array[String]): Unit = {
    val arrays: Array[Array[_ >: Int]] = Array(Array(0), Array(1, 0), Array(0, 1, 0), Array(1, 1, 0), Array(1, 1, 0, 1), Array("hello", 90))


    for (array <- arrays) {
      array match {
        case Array(0) => println("只有一个元素0的数组")
        case Array(1, _) => println("以1开头两个元素的数组")
        case Array(x, 1, y) => println(s"3个元素中间是1,左边是$x 右边是$y")
        case Array(x,y) => println(s"两个元素的数组  一个是 $x 一个是$y")
        case a:Array[Int] => println("整数数组")
      }
    }
  }
}8.3.4 匹配列表
object Test04_MatchList {
  def main(args: Array[String]): Unit = {
    // 匹配泛型
    // 如果匹配的是数组  能够匹配泛型
    def func1(x:AnyRef):String = {
      x match {
        case i:Array[Int] => "泛型为整数"
        case c:Array[Char] => "泛型为字符"
        case s:Array[String] => "泛型为字符串"
        case _ => "其他"
      }
    }

    println(func1(Array(1, 2, 3)))
    println(func1(Array('x', 'a')))
    println(func1(Array("hello")))
    println(func1(Array(3.14)))


    println("===========================")

    // 泛型擦除
    def func2(x:AnyRef):String = {
      x match {
        case c:List[Char] => "泛型为字符"
        case s:List[String] => "泛型为字符串"
        case i:List[Int] => "泛型为整数"
        case _ => "其他"
      }
    }

    println(func2(List(1,2,3)))
    println(func2(List('c')))
    println(func2(List("hello")))
    println(func2(List(1.1)))


    // 特殊方法
    val list: List[Int] = List(1, 2, 5, 6, 7)

    list match {
      case first :: second :: rest => println(first + "-" + second + "-" + rest)
      case _ => println("something else")
    }
  }
}8.3.5 匹配元组
object TestMatchTuple {

    def main(args: Array[String]): Unit = {

        //对一个元组集合进行遍历
        for (tuple <- Array((0, 1), (1, 0), (1, 1), (1, 0, 2))) {

            val result = tuple match {
                case (0, _) => "0 ..." //是第一个元素是0的元组
                case (y, 0) => "" + y + "0" // 匹配后一个元素是0的对偶元组
                case (a, b) => "" + a + " " + b
                case _ => "something else" //默认

            }
            println(result)
        }
    }
}8.3.6 匹配对象及样例类`
1)基本语法
object Test05_MatchObject {
  def main(args: Array[String]): Unit = {
    val zhangsan = new Person05("zhangsan", 18)

    zhangsan match {
      case Person05("zhangsan",18) => println("找到张三啦")
      case _ => println("你不是zhangsan")
    }


  }
}


class Person05 (val name:String,var age:Int){

}

object Person05{
  // 创建对象的方法
  def apply(name: String, age: Int): Person05 = new Person05(name, age)

  // 解析对象的方法
  def unapply(arg: Person05): Option[(String, Int)] = {
    // 如果解析的参数为null
    if (arg == null ) None else Some((arg.name,arg.age))
  }
}
小结
- val user = Person05("zhangsan",11),该语句在执行时,实际调用的是Person05伴生对象中的apply方法,因此不用new关键字就能构造出相应的对象。
- 当将Person05 ("zhangsan", 11)写在case后时[case User("zhangsan", 11) => "yes"],会默认调用unapply方法(对象提取器),user作为unapply方法的参数,unapply方法将user对象的name和age属性提取出来,与User("zhangsan", 11)中的属性值进行匹配
- case中对象的unapply方法(提取器)返回Some,且所有属性均一致,才算匹配成功,属性不一致,或返回None,则匹配失败。
- 若只提取对象的一个属性,则提取器为unapply(obj:Obj):Option[T] 若提取对象的多个属性,则提取器为unapply(obj:Obj):Option[(T1,T2,T3…)] 若提取对象的可变个属性,则提取器为unapplySeq(obj:Obj):Option[Seq[T]]
2)样例类
(1)语法:
case class Person05 (name: String, age: Int)
(2)说明
1、样例类仍然是类,和普通类相比,只是其自动生成了伴生对象,并且伴生对象中自动提供了一些常用的方法,如apply、unapply、toString、equals、hashCode和copy。
2、样例类是为模式匹配而优化的类,因为其默认提供了unapply方法,因此,样例类可以直接使用模式匹配,而无需自己实现unapply方法。
3、构造器中的每一个参数都成为val,除非它被显式地声明为var(不建议这样做)
(3)实操
上述匹配对象的案例使用样例类会节省大量代码
case class Person05(var name: String, age: Int)8.4 变量声明中的模式匹配
case class Person(name: String, age: Int)

object TestMatchVariable {
    def main(args: Array[String]): Unit = {

        val (x, y) = (1, 2)
        println(s"x=$x,y=$y")

        val Array(first, second, _*) = Array(1, 7, 2, 9)
        println(s"first=$first,second=$second")

        val Person(name, age) = Person("zhangsan", 16)
        println(s"name=$name,age=$age")
    }
}
8.5 for表达式中的模式匹配
object TestMatchFor {

    def main(args: Array[String]): Unit = {

        val map = Map("A" -> 1, "B" -> 0, "C" -> 3)
        for ((k, v) <- map) { //直接将map中的k-v遍历出来
            println(k + " -> " + v) //3个
        }
        println("----------------------")

        //遍历value=0的 k-v ,如果v不是0,过滤
        for ((k, 0) <- map) {
            println(k + " --> " + 0) // B->0
        }

        println("----------------------")
        //if v == 0 是一个过滤的条件
        for ((k, v) <- map if v >= 1) {
            println(k + " ---> " + v) // A->1 和 c->33
        }
    }
}8.6 偏函数中的模式匹配(了解)
偏函数也是函数的一种,通过偏函数我们可以方便的对输入参数做更精确的检查。例如该偏函数的输入类型为List[Int],而我们需要的是第一个元素是0的集合,这就是通过模式匹配实现的。
1)偏函数定义
val second: PartialFunction[List[Int], Option[Int]] = {
    case x :: y :: _ => Some(y)
}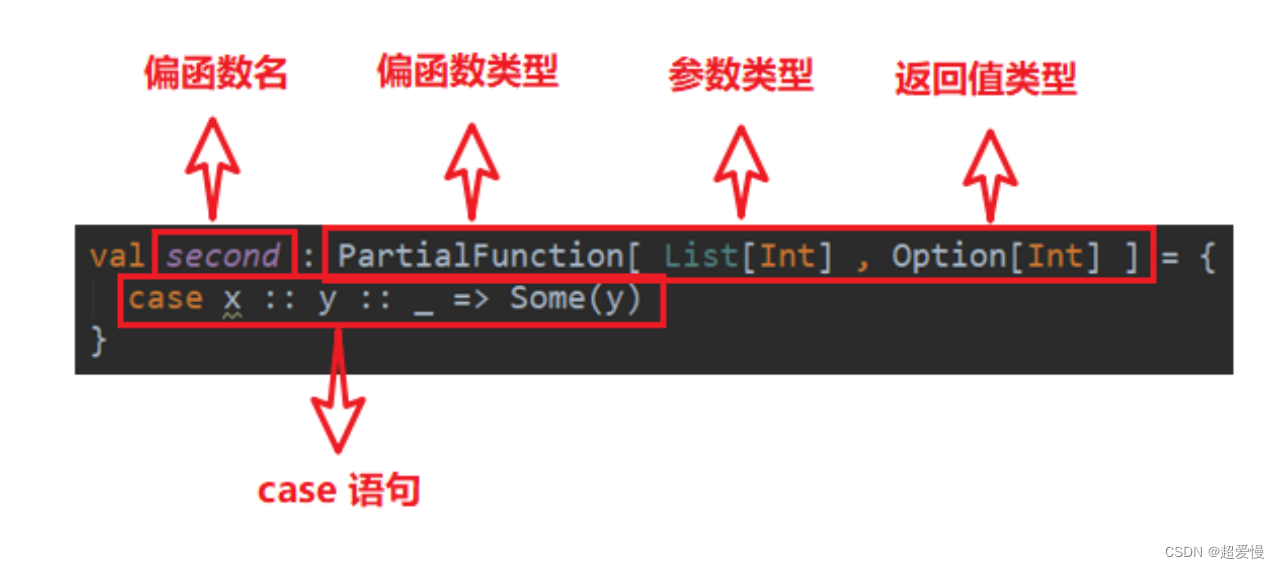
注:该偏函数的功能是返回输入的List集合的第二个元素
2)偏函数原理
上述代码会被scala编译器翻译成以下代码,与普通函数相比,只是多了一个用于参数检查的函数——isDefinedAt,其返回值类型为Boolean。
val second = new PartialFunction[List[Int], Option[Int]] {

    //检查输入参数是否合格
    override def isDefinedAt(list: List[Int]): Boolean = list match {
        case x :: y :: _ => true
        case _ => false
    }

    //执行函数逻辑
    override def apply(list: List[Int]): Option[Int] = list match {
        case x :: y :: _ => Some(y)
    }
}
3)偏函数使用
偏函数不能像second(List(1,2,3))这样直接使用,因为这样会直接调用apply方法,而应该调用applyOrElse方法,如下
second.applyOrElse(List(1,2,3), (_: List[Int]) => None)
applyOrElse方法的逻辑为 if (ifDefinedAt(list)) apply(list) else default。如果输入参数满足条件,即isDefinedAt返回true,则执行apply方法,否则执行defalut方法,default方法为参数不满足要求的处理逻辑。
4)案例实操
(1)需求
将该List(1,2,3,4,5,6,"test")中的Int类型的元素加一,并去掉字符串。
(2)实操
object Test06_PartitionFunc {

  def main(args: Array[String]): Unit = {
	// 将该List(1,2,3,4,5,6,"test")中的Int类型的元素加一,并去掉字符串。
    val list = List(1, 2, 3, 4, 5, 6, "test")

    // 步骤一: 过滤掉字符串
    val list1: List[Any] = list.filter((a: Any) => a match {
      case s: String => false
      case i: Int => true
    })

    // 步骤二: 对int值加一
    val list2: List[Int] = list1.map((a: Any) => {
      a match {
        case i: Int => i + 1
      }
    })

    println(list2)

    val list3: List[Int] = list.collect({
      case i: Int => i + 1
    })

    println(list3)

    val value:PartialFunction[Any, Int] =  {
      case i: Int => i + 1
    }

    // 函数的定义 需要多写一个math关键字
    // 偏函数将match关键字省略
    val function: Any => Int = (a: Any) => a match {
      case i: Int => i + 1
}
  }
}
方法一:
List(1,2,3,4,5,6,"test").filter(_.isInstanceOf[Int]).map(_.asInstanceOf[Int] + 1).foreach(println)
方法二:
List(1, 2, 3, 4, 5, 6, "test").collect { case x: Int => x + 1 }.foreach(println)
第9章 异常
语法处理上和Java类似,但是又不尽相同。
9.1 Java异常处理
public class ExceptionDemo {

    public static void main(String[] args) {

        try {
            int a = 10;
            int b = 0;
            int c = a / b;
        }catch (ArithmeticException e){
// catch时,需要将范围小的写到前面
            e.printStackTrace();
        }catch (Exception e){
            e.printStackTrace();
        }finally {
            System.out.println("finally");
        }
    }
}
注意事项
(1)Java语言按照try—catch—finally的方式来处理异常
(2)不管有没有异常捕获,都会执行finally,因此通常可以在finally代码块中释放资源。
(3)可以有多个catch,分别捕获对应的异常,这时需要把范围小的异常类写在前面,把范围大的异常类写在后面,否则编译错误。
9.2 Scala异常处理
def main(args: Array[String]): Unit = {

    try {
        var n= 10 / 0
    }catch {
        case ex: ArithmeticException=>{
            // 发生算术异常
            println("发生算术异常")
        }
        case ex: Exception=>{
            // 对异常处理
            println("发生了异常1")
            println("发生了异常2")
        }
    }finally {
        println("finally")
    }
}
1)我们将可疑代码封装在try块中。在try块之后使用了一个catch处理程序来捕获异常。如果发生任何异常,catch处理程序将处理它,程序将不会异常终止。
2)Scala的异常的工作机制和Java一样,但是Scala没有“checked(编译期)”异常,即Scala没有编译异常这个概念,异常都是在运行的时候捕获处理。
3)异常捕捉的机制与其他语言中一样,如果有异常发生,catch子句是按次序捕捉的。因此,在catch子句中,越具体的异常越要靠前,越普遍的异常越靠后,如果把越普遍的异常写在前,把具体的异常写在后,在Scala中也不会报错,但这样是非常不好的编程风格。
4)finally子句用于执行不管是正常处理还是有异常发生时都需要执行的步骤,一般用于对象的清理工作,这点和Java一样。
5)用throw关键字,抛出一个异常对象。所有异常都是Throwable的子类型。throw表达式是有类型的,就是Nothing,因为Nothing是所有类型的子类型,所以throw表达式可以用在需要类型的地方
def test():Nothing = {
    throw new Exception("不对")
}
6)java提供了throws关键字来声明异常。可以使用方法定义声明异常。它向调用者函数提供了此方法可能引发此异常的信息。它有助于调用函数处理并将该代码包含在try-catch块中,以避免程序异常终止。在Scala中,可以使用throws注解来声明异常
def main(args: Array[String]): Unit = {
  	f11()
}

@throws(classOf[NumberFormatException])
def f11()={
  	"abc".toInt
}第10章 隐式转换
当编译器第一次编译失败的时候,会在当前的环境中查找能让代码编译通过的方法,用于将类型进行转换,实现二次编译
10.1 隐式函数
1)说明
隐式转换可以在不需改任何代码的情况下,扩展某个类的功能。
2)案例实操
需求:通过隐式转化为Int类型增加方法。
class MyRichInt(val self: Int) {
    def myMax(i: Int): Int = {
        if (self < i) i else self
    }

    def myMin(i: Int): Int = {
        if (self < i) self else i
    }
}

object TestImplicitFunction {
    // 使用implicit关键字声明的函数称之为隐式函数
    implicit def convert(arg: Int): MyRichInt = {
        new MyRichInt(arg)
    }

def main(args: Array[String]): Unit = {
    // 当想调用对象功能时,如果编译错误,那么编译器会尝试在当前作用域范围内查找能调用对应功能的转换规则,这个调用过程是由编译器完成的,所以称之为隐式转换。也称之为自动转换
        println(2.myMax(6))
    }
}10.2 隐式参数
普通方法或者函数中的参数可以通过implicit关键字声明为隐式参数,调用该方法时,就可以传入该参数,编译器会在相应的作用域寻找符合条件的隐式值。
1)说明
(1)同一个作用域中,相同类型的隐式值只能有一个
(2)编译器按照隐式参数的类型去寻找对应类型的隐式值,与隐式值的名称无关。
(3)隐式参数优先于默认参数
2)案例实操
object TestImplicitParameter {

    implicit val str: String = "hello world!"

    def hello(implicit arg: String="good bey world!"): Unit = {
        println(arg)
    }

    def main(args: Array[String]): Unit = {
        hello
    }
}10.3 隐式类
在Scala2.10后提供了隐式类,可以使用implicit声明类,隐式类的非常强大,同样可以扩展类的功能,在集合中隐式类会发挥重要的作用。
1)隐式类说明
(1)其所带的构造参数有且只能有一个
(2)隐式类必须被定义在“类”或“伴生对象”或“包对象”里,即隐式类不能是顶级的。
2)案例实操
object TestImplicitClass {

    implicit class MyRichInt(arg: Int) {

        def myMax(i: Int): Int = {
            if (arg < i) i else arg
        }

        def myMin(i: Int) = {
            if (arg < i) arg else i
        }
    }

    def main(args: Array[String]): Unit = {
        println(1.myMax(3))
    }
}10.4 隐式解析机制
1)说明
(1)首先会在当前代码作用域下查找隐式实体(隐式方法、隐式类、隐式对象)。(一般是这种情况)
(2)如果第一条规则查找隐式实体失败,会继续在隐式参数的类型的作用域里查找。类型的作用域是指与该类型相关联的全部伴生对象以及该类型所在包的包对象。
第11章 泛型
11.1 协变和逆变
1)语法
class MyList[+T]{ //协变
}

class MyList[-T]{ //逆变
}

class MyList[T] //不变
2)说明
协变:Son是Father的子类,则MyList[Son] 也作为MyList[Father]的“子类”。
逆变:Son是Father的子类,则MyList[Son]作为MyList[Father]的“父类”。
不变:Son是Father的子类,则MyList[Father]与MyList[Son]“无父子关系”。
3)实操
object Test03_Genericity {
  def main(args: Array[String]): Unit = {
    // 协变和逆变
    var father: MyList[Father] = new MyList[Father]
    var son: MyList[Son] = new MyList[Son]

    // 多态
    // T表示不变  没有父子关系
    // +T 表示协变
    // -T 表示逆变
    //    father = son
    //    son = father

  }


  class MyList[-T] {

  }

  class Father {

  }

  class Son extends Father {

  }

}
11.2 泛型上下限
1)语法
Class PersonList[T <: Person]{ //泛型上限
}
Class PersonList[T >: Person]{ //泛型下限
}
2)说明
泛型的上下限的作用是对传入的泛型进行限定。
3)实操
class Parent{}
class Child extends Parent{}
class SubChild extends Child{}

object Scala_TestGeneric {
  def main(args: Array[String]): Unit = {

    //test(classOf[SubChild])
    //test[Child](new SubChild)
  }


  //泛型通配符之上限
  //def test[A <: Child](a:Class[A]): Unit ={
  //  println(a)
  //}

  //泛型通配符之下限
  //def test[A >: Child](a:Class[A]): Unit ={
  //  println(a)
  //}

  //泛型通配符之下限 形式扩展
  def test[A >: Child](a:A): Unit ={
    println(a.getClass.getName)
  }
}
11.3 上下文限定
1)语法
def f[A : B](a: A) = println(a) //等同于def f[A](a:A)(implicit arg:B[A])=println(a)
2)说明
上下文限定是将泛型和隐式转换的结合产物,以下两者功能相同,使用上下文限定[A : Ordering]之后,方法内无法使用隐式参数名调用隐式参数,需要通过implicitly[Ordering[A]]获取隐式变量,如果此时无法查找到对应类型的隐式变量,会发生出错误。
implicit val x = 1
val y = implicitly[Int]
val z = implicitly[Double]
3)实操
def f[A:Ordering](a:A,b:A)=implicitly[Ordering[A]].compare(a,b)

def f[A](a: A, b: A)(implicit ord: Ordering[A]) = ord.compare(a, b)第12章 总结
12.1 开发环境
要求掌握必要的Scala开发环境搭建技能。
12.2 变量和数据类型
掌握var和val的区别
掌握数值类型(Byte、Short、Int、Long、Float、Double、Char)之间的转换关系
12.3 流程控制
掌握if-else、for、while等必要的流程控制结构,掌握如何实现break、continue的功能。
12.4 函数式编程
掌握高阶函数、匿名函数、函数柯里化、闭包、函数参数以及函数至简原则。
12.5 面向对象
掌握Scala与Java继承方面的区别、单例对象(伴生对象)、构造方法、特质的用法及功能。
12.6 集合
掌握常用集合的使用、集合常用的计算函数。
12.7 模式匹配
掌握模式匹配的用法
12.8 下划线
掌握下划线不同场合的不同用法
12.9 异常
掌握异常常用操作即可
12.10 隐式转换
掌握隐式方法、隐式参数、隐式类,以及隐式解析机制
12.11 泛型
掌握泛型语法
第13章 IDEA快捷键
1)快速生成程序入口:main
输入main->回车

def main(args: Array[String]): Unit = {

}
2)自动补全变量:.var
输入1.var->回车

val i: Int = 2
3)快速打印:.sout
输入1.sout->回车

println(1)
4)快速生成for循环:遍历对象.for
输入1 to 3.for

for (elem <- 1 to 3) {

}
5)查看当前文件的结构:Ctrl + F12
6)格式化当前代码:Ctrl + Shift + L
7) 自动为当前代码补全变量声明:Ctrl + Shift + V

