接上篇【多模态融合】TransFusion学习笔记(1)。
从TransFusion-L到TransFusion
ok,终于可以给出论文中那个完整的框架图了,我第一眼看到这个图有几个疑问:
Q:Image Guidance这条虚线引出的Query Initialization是什么意思?
Q:图像分支中的Image Features as K,V是将整张图像的特征图都作为K,V么?
Q:有了第2阶段之后Initial Prediction还需要么?
Q:如果第一阶段的Q来自纯lidar bev feature map,用它来聚合Image Features靠普么,毕竟是两种模态的特征?
Q:第2阶段的Transformer Decoder Layer with SMCA,这个SMCA是什么意思?
Q:如果仅仅是纯Lidar分支产生的object query去聚合image featuers产生最终的预测肯定是不够的,你可能得到一个修正之后更准的边界框或者分类,但是lidar漏掉的框是没办法恢复的,所以应该还有补漏的环节?

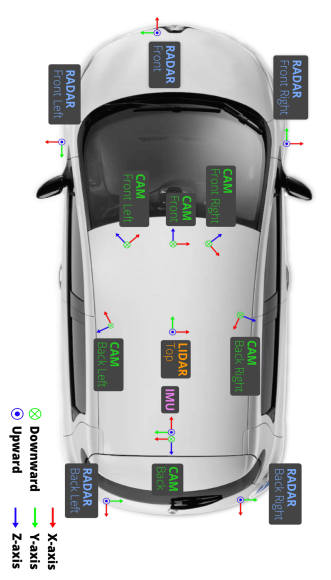
带着诸的疑问结合论文及代码继续分析,仍然假定batch为2,数据集为nuScenes。说到nuScenes需要大该了解以下他lidar和camera配置。他在车顶端配备了一个32线Lidar,然后按321队形配置了6个Camera。所以,代码中推理的时候每一个batch同时包含了6张图像。
#源文件mmdet3d/models/dense_heads/transfusion_head.py
    def forward(self, feats, img_feats, img_metas):
        """Forward pass.

        Args:
            feats (list[torch.Tensor]): Multi-level features, e.g.,
                features produced by FPN.

        Returns:
            tuple(list[dict]): Output results. first index by level, second index by layer
        """
        if img_feats is None:
            img_feats = [None]
        res = multi_apply(self.forward_single, feats, img_feats, [img_metas])
        assert len(res) == 1, "only support one level features."
        return res
现在再来看Tranfusion检测头推理入口forward函数的时候,img_feats和img_metas就包含了满满的图像及其特征信息了,其中img_feats的shape为(12,256,112,200),12为batch(2)*6(cameras的数量),它将batch和n_views整合在了一起,明白这一点很重要。
 def forward_single(self, inputs, img_inputs, img_metas):
        """Forward function for CenterPoint.

        Args:
            inputs (torch.Tensor): Input feature map with the shape of
                [B, 512, 128(H), 128(W)]. (consistent with L748)

        Returns:
            list[dict]: Output results for tasks.
        """
        batch_size = inputs.shape[0]
        lidar_feat = self.shared_conv(inputs)  ##=>[2, 128, 128, 128]

        lidar_feat_flatten = lidar_feat.view(batch_size, lidar_feat.shape[1], -1)  #=>[BS, C, H*W]
        bev_pos = self.bev_pos.repeat(batch_size, 1, 1).to(lidar_feat.device)

        if self.fuse_img:
            img_feat = self.shared_conv_img(img_inputs)  # [BS * n_views, C, H, W]
            img_h, img_w, num_channel = img_inputs.shape[-2], img_inputs.shape[-1], img_feat.shape[1]
            # =>[B, C, H, n_views, W]
            raw_img_feat = img_feat.view(batch_size, self.num_views, num_channel, img_h, img_w).permute(0, 2, 3, 1, 4)
            # =>[B, C, H, n_views*W]
            img_feat = raw_img_feat.reshape(batch_size, num_channel, img_h, img_w * self.num_views)
            # =>(B,C,n_view*W)
            img_feat_collapsed = img_feat.max(2).values

            # positional encoding for image guided query initialization
            if self.img_feat_collapsed_pos is None:
                img_feat_collapsed_pos = self.img_feat_collapsed_pos
                                       = self.create_2D_grid(1, img_feat_collapsed.shape[-1]).to(img_feat.device)
            else:
                img_feat_collapsed_pos = self.img_feat_collapsed_pos
            bev_feat = lidar_feat_flatten
            for idx_view in range(self.num_views):
                bev_feat = self.decoder[2 + idx_view](bev_feat, img_feat_collapsed[..., img_w * idx_view:img_w * (idx_view + 1)],
                    bev_pos, img_feat_collapsed_pos[:, img_w * idx_view:img_w * (idx_view + 1)])
从if self.fuse_img条件判断进入的这段代码逻辑用于生成融合了的LiDAR-Camera BEV feature map F-lc。

图:展示如何操作一个batch中的6张Image feature map,形成高度压缩后的K,V。
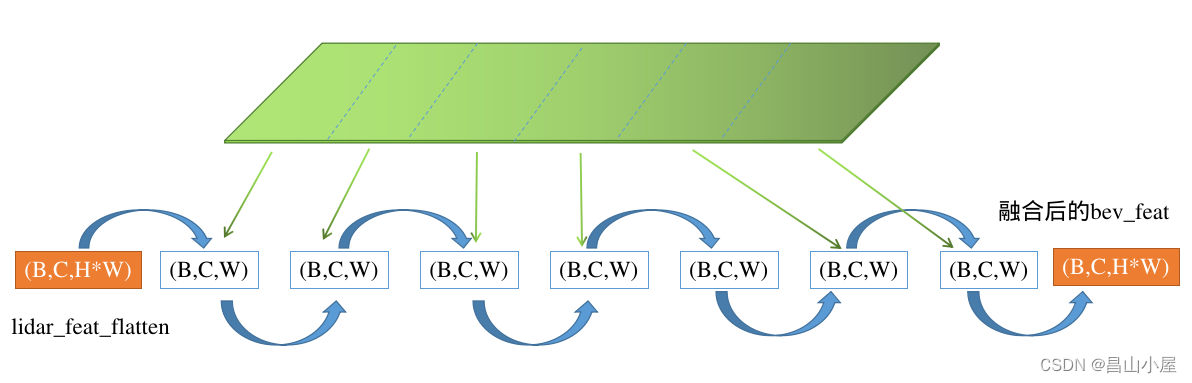
图:展示Lidar features和6张Height Collapsed Image features融合的过程
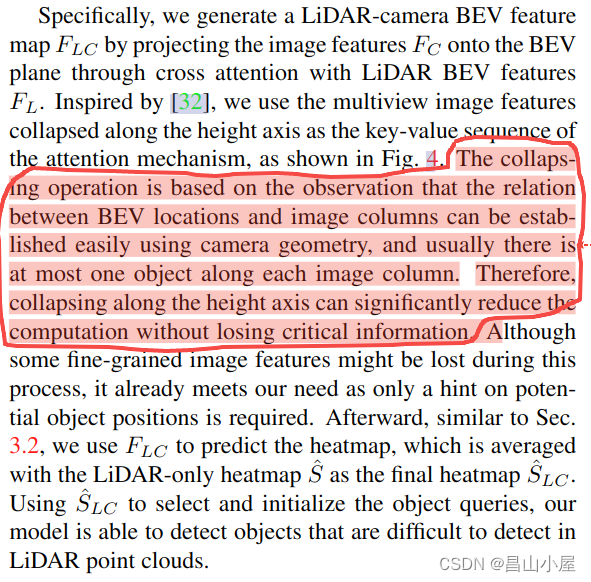
使用Dense的Lidar BEV features作为Q,使用高度压缩后的Image Features作为K,V。为什么要对Image Features进行高度压缩,作者在论文中也做了解释。
关于如何融合lidar bev features和image features得到一个更具表达能力的bev feature map,在若干其它论文中都有涉及,较为著名的比如以下图所示的BEVFusion。

BEVFusion这种特征融合的方式很直观,但是他需要将multi-view的图像特征通过LSS或其它方式编码到BEV空间,然后使用一个Dynamic Fusion Module得到融合后的特征。这种融合简单粗暴,也是Hard-Association的。
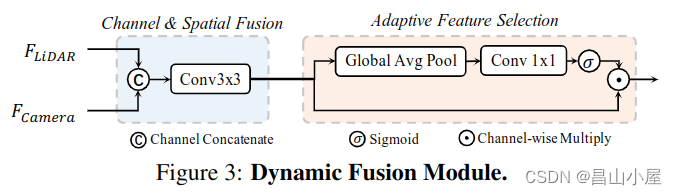
考虑一个问题,如果使用BEVFusion这种多模态融合的bev feature map替换TransFusion-L中纯Lidar产生的bev featuremap会有什么效果呢?bevfusion的作者就做了这个实验。
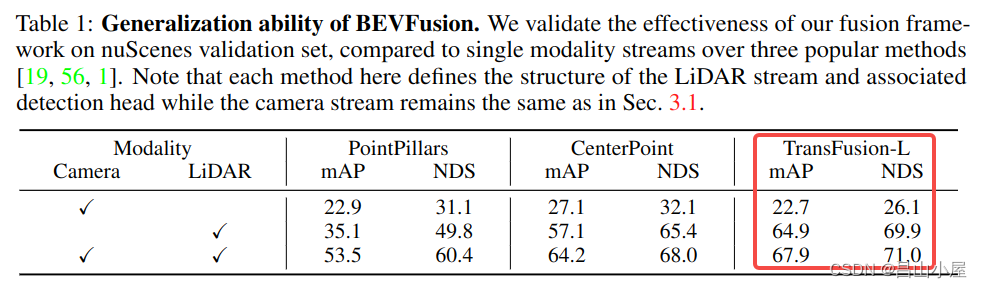
从最后一列的nuScenes Validation上的结果来看mAP和NDS分别提了3.%和1.1%。怎么说呢,有用,但好像又觉得没赚到啥。毕竟费了大力气把不同视角下的image特征提取出来再编码到BEV空间,融合完成后mAP相比纯Lidar只是涨了3个点,基本上还是Lidar在支撑着。
        #################################
        # image guided query initialization
        #################################
        if self.initialize_by_heatmap:
            ##=>[2, 10, 128, 128])
            dense_heatmap = self.heatmap_head(lidar_feat)
            dense_heatmap_img = None
            if self.fuse_img:
                dense_heatmap_img = self.heatmap_head_img(bev_feat.view(lidar_feat.shape))  # [BS, num_classes, H, W]
                heatmap = (dense_heatmap.detach().sigmoid() + dense_heatmap_img.detach().sigmoid()) / 2
            else:
                heatmap = dense_heatmap.detach().sigmoid()
            padding = self.nms_kernel_size // 2
            local_max = torch.zeros_like(heatmap)
            local_max_inner = F.max_pool2d(heatmap, kernel_size=self.nms_kernel_size, stride=1, padding=0)
            local_max[:, :, padding:(-padding), padding:(-padding)] = local_max_inner
            ## for Pedestrian & Traffic_cone in nuScenes
            if self.test_cfg['dataset'] == 'nuScenes':
                local_max[:, 8, ] = F.max_pool2d(heatmap[:, 8], kernel_size=1, stride=1, padding=0)
                local_max[:, 9, ] = F.max_pool2d(heatmap[:, 9], kernel_size=1, stride=1, padding=0)
            elif self.test_cfg['dataset'] == 'Waymo':  # for Pedestrian & Cyclist in Waymo
                local_max[:, 1, ] = F.max_pool2d(heatmap[:, 1], kernel_size=1, stride=1, padding=0)
                local_max[:, 2, ] = F.max_pool2d(heatmap[:, 2], kernel_size=1, stride=1, padding=0)
            ##非max-heat的地方就被set为0了
            heatmap = heatmap * (heatmap == local_max)
            ##torch.Size([2, 10, 16384]) <==
            heatmap = heatmap.view(batch_size, heatmap.shape[1], -1)

            # top #num_proposals among all classes
            top_proposals = heatmap.view(batch_size, -1).argsort(dim=-1, descending=True)[..., :self.num_proposals]
            top_proposals_class = top_proposals // heatmap.shape[-1]

            ##index有什么用??
            top_proposals_index = top_proposals % heatmap.shape[-1]
            query_feat = lidar_feat_flatten.gather(index=top_proposals_index[:, None, :].expand(-1, lidar_feat_flatten.shape[1], -1), dim=-1)
            self.query_labels = top_proposals_class

            one_hot = F.one_hot(top_proposals_class, num_classes=self.num_classes).permute(0, 2, 1)
            query_cat_encoding = self.class_encoding(one_hot.float())
            query_feat += query_cat_encoding

            query_pos = bev_pos.gather(index=top_proposals_index[:, None, :].permute(0, 2, 1).expand(-1, -1, bev_pos.shape[-1]), dim=1)
        else:
            query_feat = self.query_feat.repeat(batch_size, 1, 1)  # [BS, C, num_proposals]
            base_xyz = self.query_pos.repeat(batch_size, 1, 1).to(lidar_feat.device)  # [BS, num_proposals, 2]
回到TransFusion上面,在没有融合Image Features之前,heatmap需要从纯lidar feature map出。现在有了融合后的feature map,自然heatmap又多了一条出路。这就是代码中既有一个dense_heatmap,又多出来了一个dense_heatmap_img,他们最终通过以下代码进行了融合。
heatmap = (dense_heatmap.detach().sigmoid() + dense_heatmap_img.detach().sigmoid()) / 2不看代码我还以为就只是利用了从dense_heatmap_img出的heatmap,作者这里还是做了一下结合,结合方式也比较简单,各自simgoid之后相加取平均。
        ret_dicts = []
        for i in range(self.num_decoder_layers):
            prefix = 'last_' if (i == self.num_decoder_layers - 1) else f'{i}head_'
            # Transformer Decoder Layer
            # :param query: B C Pq    :param query_pos: B Pq 3/6
            query_feat = self.decoder[i](query_feat, lidar_feat_flatten, query_pos, bev_pos)

            # Prediction
            res_layer = self.prediction_heads[i](query_feat) ##FFN

            res_layer['center'] = res_layer['center'] + query_pos.permute(0, 2, 1)
            first_res_layer = res_layer
            if not self.fuse_img:
                ret_dicts.append(res_layer)

            # for next level positional embedding
            query_pos = res_layer['center'].detach().clone().permute(0, 2, 1)
这段代码和单模态的TransFusion-L比,query_feat还是从纯lidar bev feature map取的,lidar_feat_flatten也还是原来那个展开了的lidar bev featuremap。但是,此时的query_feat所在的热点位置因为是从融合的bev featuremap出的,所以就有了"Image Guidance"的一说。
        #################################
        # transformer decoder layer (img feature as K,V)
        #################################
        if self.fuse_img:
            # positional encoding for image fusion
            img_feat = raw_img_feat.permute(0, 3, 1, 2, 4) # [BS, n_views, C, H, W]
            img_feat_flatten = img_feat.view(batch_size, self.num_views, num_channel, -1)  # [BS, n_views, C, H*W]
            if self.img_feat_pos is None:
                (h, w) = img_inputs.shape[-2], img_inputs.shape[-1]
                img_feat_pos = self.img_feat_pos = self.create_2D_grid(h, w).to(img_feat_flatten.device)
            else:
                img_feat_pos = self.img_feat_pos

            prev_query_feat = query_feat.detach().clone()
            query_feat = torch.zeros_like(query_feat)  # create new container for img query feature

            query_pos_realmetric = query_pos.permute(0, 2, 1) * self.test_cfg['out_size_factor'] * self.test_cfg['voxel_size'][0] + self.test_cfg['pc_range'][0]
            query_pos_3d = torch.cat([query_pos_realmetric, res_layer['height']], dim=1).detach().clone()
            if 'vel' in res_layer:
                vel = copy.deepcopy(res_layer['vel'].detach())
            else:
                vel = None
            pred_boxes = self.bbox_coder.decode(
                copy.deepcopy(res_layer['heatmap'].detach()),
                copy.deepcopy(res_layer['rot'].detach()),
                copy.deepcopy(res_layer['dim'].detach()),
                copy.deepcopy(res_layer['center'].detach()),
                copy.deepcopy(res_layer['height'].detach()),
                vel,
            )
            on_the_image_mask = torch.ones([batch_size, self.num_proposals]).to(query_pos_3d.device) * -1

            for sample_idx in range(batch_size if self.fuse_img else 0):
                lidar2img_rt = query_pos_3d.new_tensor(img_metas[sample_idx]['lidar2img'])
                img_scale_factor = (
                    query_pos_3d.new_tensor(img_metas[sample_idx]['scale_factor'][:2]
                                            if 'scale_factor' in img_metas[sample_idx].keys() else [1.0, 1.0]))
                img_flip = img_metas[sample_idx]['flip'] if 'flip' in img_metas[sample_idx].keys() else False
                img_crop_offset = (
                    query_pos_3d.new_tensor(img_metas[sample_idx]['img_crop_offset'])
                    if 'img_crop_offset' in img_metas[sample_idx].keys() else 0)
                img_shape = img_metas[sample_idx]['img_shape'][:2]
                img_pad_shape = img_metas[sample_idx]['input_shape'][:2]

                boxes = LiDARInstance3DBoxes(pred_boxes[sample_idx]['bboxes'][:, :7], box_dim=7)
                query_pos_3d_with_corners = torch.cat([query_pos_3d[sample_idx], boxes.corners.permute(2, 0, 1).view(3, -1)], dim=-1)  # [3, num_proposals] + [3, num_proposals*8]
                # transform point clouds back to original coordinate system by reverting the data augmentation
                if batch_size == 1:  # skip during inference to save time
                    points = query_pos_3d_with_corners.T
                else:
                    points = apply_3d_transformation(query_pos_3d_with_corners.T, 'LIDAR', img_metas[sample_idx], reverse=True).detach()
                num_points = points.shape[0]

                for view_idx in range(self.num_views):
                    pts_4d = torch.cat([points, points.new_ones(size=(num_points, 1))], dim=-1)
                    pts_2d = pts_4d @ lidar2img_rt[view_idx].t()

                    ##相机内参前面那个1/z
                    pts_2d[:, 2] = torch.clamp(pts_2d[:, 2], min=1e-5)
                    pts_2d[:, 0] /= pts_2d[:, 2]
                    pts_2d[:, 1] /= pts_2d[:, 2]

                    # img transformation: scale -> crop -> flip
                    # the image is resized by img_scale_factor
                    img_coors = pts_2d[:, 0:2] * img_scale_factor  # Nx2
                    img_coors -= img_crop_offset

                    # grid sample, the valid grid range should be in [-1,1]
                    coor_x, coor_y = torch.split(img_coors, 1, dim=1)  # each is Nx1
                    if img_flip:
                        # by default we take it as horizontal flip
                        # use img_shape before padding for flip
                        orig_h, orig_w = img_shape
                        coor_x = orig_w - coor_x

                    ##e.g. 200个proposal总共有200 + 200*8 = 1800个坐标点
                    coor_x, coor_corner_x = coor_x[0:self.num_proposals, :], coor_x[self.num_proposals:, :]
                    coor_y, coor_corner_y = coor_y[0:self.num_proposals, :], coor_y[self.num_proposals:, :]
                    coor_corner_x = coor_corner_x.reshape(self.num_proposals, 8, 1)
                    coor_corner_y = coor_corner_y.reshape(self.num_proposals, 8, 1)
                    coor_corner_xy = torch.cat([coor_corner_x, coor_corner_y], dim=-1)
                    h, w = img_pad_shape
                    on_the_image = (coor_x > 0) * (coor_x < w) * (coor_y > 0) * (coor_y < h)
                    on_the_image = on_the_image.squeeze()
                    # skip the following computation if no object query fall on current image
                    if on_the_image.sum() <= 1:
                        continue
                    on_the_image_mask[sample_idx, on_the_image] = view_idx

                    # add spatial constraint
                    #out_size_factor_img是什么out的factor?
                    center_ys = (coor_y[on_the_image] / self.out_size_factor_img)
                    center_xs = (coor_x[on_the_image] / self.out_size_factor_img)

                    centers = torch.cat([center_xs, center_ys], dim=-1).int()  # center on the feature map
                    corners = (coor_corner_xy[on_the_image].max(1).values - coor_corner_xy[on_the_image].min(1).values) / self.out_size_factor_img

                    #gaosi ge
                    radius = torch.ceil(corners.norm(dim=-1, p=2) / 2).int()  # radius of the minimum circumscribed circle of the wireframe
                    sigma = (radius * 2 + 1) / 6.0
                    """
                    The 2D gaussian weight mask M is generated  in a similar way as Center-Net,
                    Mij = exp(((i-cx)^2+(j-cy)^2)/(sigma*radius^2)),where (i,j) is the spatial indices of the weight mask M,
                    (cx,cy) is the 2D center computed by projecting the query prediction onto the image plane
                    """
                    distance = (centers[:, None, :] - (img_feat_pos - 0.5)).norm(dim=-1) ** 2
                    gaussian_mask = (-distance / (2 * sigma[:, None] ** 2)).exp()
                    gaussian_mask[gaussian_mask < torch.finfo(torch.float32).eps] = 0  ##太远的地方权重太小,直接给0
                    attn_mask = gaussian_mask

                    query_feat_view = prev_query_feat[sample_idx, :, on_the_image]
                    query_pos_view = torch.cat([center_xs, center_ys], dim=-1)
                    query_feat_view = self.decoder[self.num_decoder_layers](query_feat_view[None],
                        img_feat_flatten[sample_idx:sample_idx + 1, view_idx],
                        query_pos_view[None], img_feat_pos, attn_mask=attn_mask.log())
                    query_feat[sample_idx, :, on_the_image] = query_feat_view.clone()
            self.on_the_image_mask = (on_the_image_mask != -1)


            res_layer = self.prediction_heads[self.num_decoder_layers](torch.cat([query_feat, prev_query_feat], dim=1))
            res_layer['center'] = res_layer['center'] + query_pos.permute(0, 2, 1)
            for key, value in res_layer.items():
                pred_dim = value.shape[1]
                res_layer[key][~self.on_the_image_mask.unsqueeze(1).repeat(1, pred_dim, 1)] = first_res_layer[key][~self.on_the_image_mask.unsqueeze(1).repeat(1, pred_dim, 1)]
            ret_dicts.append(res_layer)
上面这段代码是TransFusion的高潮部分,只是现在的为K,V取自Image features。之所以说"取",自然就是每个object query取聚合所有视图下的Image Features,那样效率太低,也难以收敛。问题的关键是一个object query和哪些Image Features建立关联。有了第一阶段预测出的Initial Predict Boxes这个问题就好办一些了。关于怎么利用第一阶段的predict boxes以及Gaussian Circule作者在论文中已经写的很清楚了,应该算是诸多论文中的常规操作。
看到这里其实大该明白了作者所说的"soft-association",虽然由predict boxes到image features借助了标定关系。但是通过object query聚合对应局部image featues这里利用了TransFormer,尤其是利用其中的cross attention做了跟当前object query上下文相关的特征聚合,即使传感器之间没有严格对齐也更加鲁棒。