文章目录
- 前言
- LetNet简介
- 程序的实现
- model.py的实现
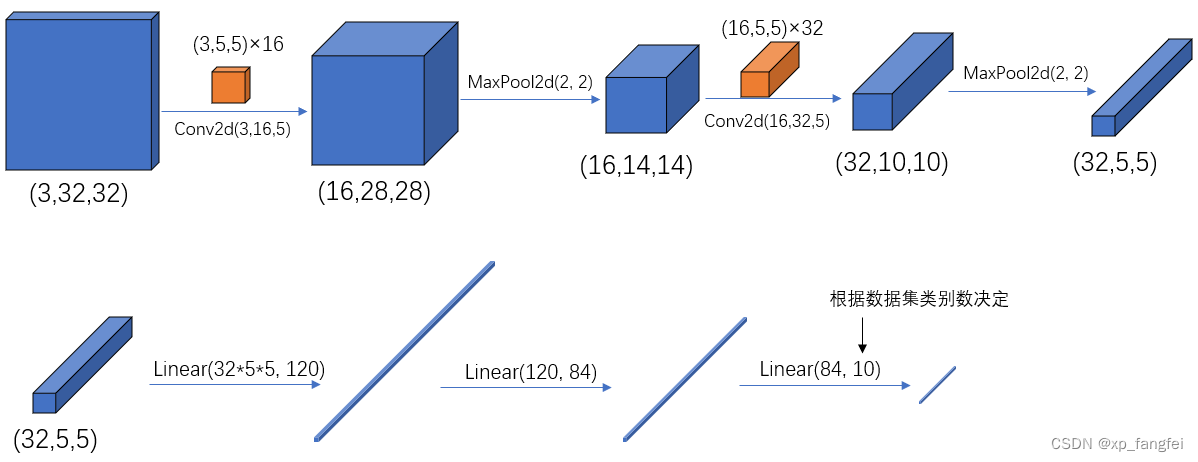
- LetNet模型操作流程
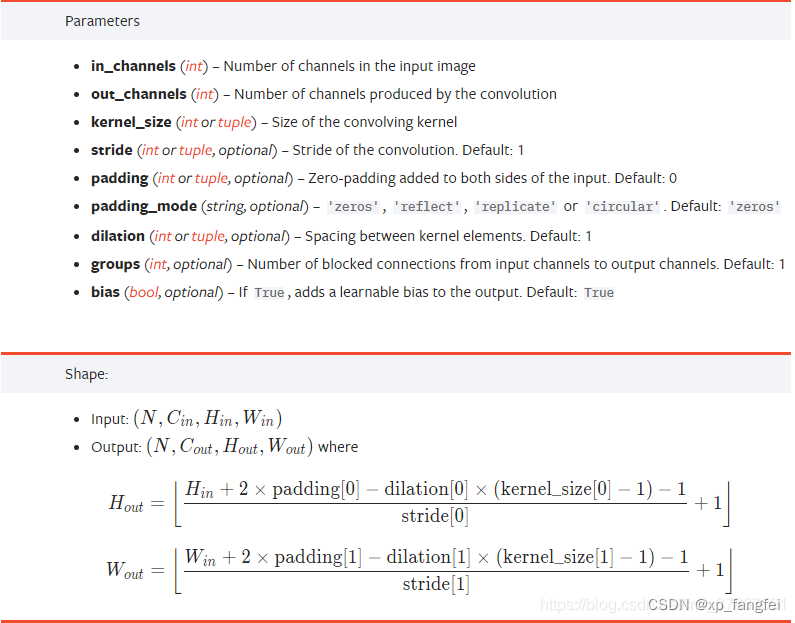
- 经过Conv卷积后输出尺寸的计算公式如下
- Conv2d()函数介绍
- MaxPool2d()函数介绍
- Tensor的展平:view()
- train.py
- 导入数据集
- 加载数据集
- 参数设置
- 训练数据
- 保存模型
- train_tool.py
- predict.py
前言
最近再由于工作需要正在研究图像分类和目标检测,为了方便后续查询,故作记录,同时也为了方便大家,一同进步。
在进行查阅资料的时候发现有针对目标分类有大牛的博客记录的很全面,让我走了不少弯路,现在贴出来,供大家一起学习:
pytorch图像分类篇:2.pytorch官方demo实现一个分类器(LeNet)
LetNet简介
LetNet是图像分类模型中比较经典的模型,该模型一共有五层:两个卷积层+两个池化层+三个全连接层(一般模型中说的多少层不包含池化层,只包含卷积层和全连接层)。

程序的实现
为了更加透彻的理解该模型,接下来用程序构建该模型,并进行训练和预测;
在工程中主要有四个文件:
model.py          #定义LeNet网络模型
train.py          #加载数据集并训练,保存训练好的网络参数
train_tool.py     #模型训练过程中用到的函数,训练集计算loss,测试集计算accuracy
predict.py        #得到训练好的网络参数后,用自己找的图像进行分类测试
model.py的实现
# 使用torch.nn包来构建神经网络.
import torch
import torch.nn as nn
import torch.nn.functional as F
from torchinfo import summary

class LetNet(nn.Module): 					# 继承于nn.Module这个父类
    def __init__(self):						# 初始化网络结构
        super(LetNet, self).__init__()    	# 多继承需用到super函数
        self.conv1 = nn.Conv2d(3, 16, 5)
        self.pool1 = nn.MaxPool2d(2, 2)
        self.conv2 = nn.Conv2d(16, 32, 5)
        self.pool2 = nn.MaxPool2d(2, 2)
        self.fc1 = nn.Linear(32*5*5, 120)
        self.fc2 = nn.Linear(120, 84)
        self.fc3 = nn.Linear(84, 10)

    def forward(self, x):			 # 正向传播过程
        x = F.relu(self.conv1(x))    # input(3, 32, 32) output(16, 28, 28)
        x = self.pool1(x)            # output(16, 14, 14)
        x = F.relu(self.conv2(x))    # output(32, 10, 10)
        x = self.pool2(x)            # output(32, 5, 5)
        x = x.view(-1, 32*5*5)       # output(32*5*5)
        x = F.relu(self.fc1(x))      # output(120)
        x = F.relu(self.fc2(x))      # output(84)
        x = self.fc3(x)              # output(10)
        return x


device = "cuda" if torch.cuda.is_available() else "cpu"   #判断机器用的GPU还是CPU
print("Using {} device".format(device))

model = LetNet().to(device)  #实例化网络
summary(model)      #对应结果1
print(model)        #对应结果2
结果1:
Using cpu device
=================================================================
Layer (type:depth-idx)                   Param #
=================================================================
LetNet                                   --
├─Conv2d: 1-1                            1,216
├─MaxPool2d: 1-2                         --
├─Conv2d: 1-3                            12,832
├─MaxPool2d: 1-4                         --
├─Linear: 1-5                            96,120
├─Linear: 1-6                            10,164
├─Linear: 1-7                            850
=================================================================
Total params: 121,182
Trainable params: 121,182
Non-trainable params: 0
=================================================================
结果2:
LetNet(
  (conv1): Conv2d(3, 16, kernel_size=(5, 5), stride=(1, 1))
  (pool1): MaxPool2d(kernel_size=2, stride=2, padding=0, dilation=1, ceil_mode=False)
  (conv2): Conv2d(16, 32, kernel_size=(5, 5), stride=(1, 1))
  (pool2): MaxPool2d(kernel_size=2, stride=2, padding=0, dilation=1, ceil_mode=False)
  (fc1): Linear(in_features=800, out_features=120, bias=True)
  (fc2): Linear(in_features=120, out_features=84, bias=True)
  (fc3): Linear(in_features=84, out_features=10, bias=True)
)
LetNet模型操作流程
pytorch 中 tensor(也就是输入输出层)的 通道排序为:[batch, channel, height, width]
经过Conv卷积后输出尺寸的计算公式如下
o
u
t
p
u
t
=
w
−
f
+
2
p
s
+
1
output = \frac{w-f+2p}{s}+1
output=sw−f+2p+1
上式中参数含义:
w : 输入图片大小 w×w(一般情况下Width=Height)
f : fifter(卷积核)大小f×f
p : padding大小(像素个数)
s : 步长大小
Conv2d()函数介绍
torch.nn.Conv2d(in_channels, out_channels, kernel_size, stride=1, padding=0, dilation=1, groups=1, bias=True, padding_mode='zeros')
MaxPool2d()函数介绍
class torch.nn.MaxPool2d(kernel_size, stride=None, padding=0, dilation=1, return_indices=False, ceil_mode=False)
Tensor的展平:view()
在经过第二个池化层后,数据还是一个三维的Tensor (32, 5, 5),需要先经过展平后(32×5×5)再传到全连接层:
  x = x.view(-1, 32*5*5)       # output(32*5*5)
  x = F.relu(self.fc1(x))      # output(120)
注意:view中一个参数指定为-1代表自动调整这个维度上的元素个数,以保证元素总数不变;
train.py
import torch
import torchvision
import torchvision.transforms as transforms
from train_tool import TrainTool
from model import LetNet
import torch.nn as nn
import torch.optim as optim

#判断GPU和CPU
device = torch.device("duda" if torch.cuda.is_available() else "cpu")

#导入训练集
train_dataset = torchvision.datasets.CIFAR10(root='./data', download=True, train=True, transform=transforms.Compose([transforms.ToTensor()]))
#导入测试集
test_dataset = torchvision.datasets.CIFAR10(root='./data',download=True,train=False,transform=transforms.Compose([transforms.ToTensor()]))
#加载训练集
train_loader = torch.utils.data.DataLoader(train_dataset,
                                                batch_size=50,
                                                shuffle=True,
                                                num_workers=0)
#加载测试集
test_loader = torch.utils.data.DataLoader(test_dataset,
                                               batch_size=50,
                                               shuffle=True,
                                               num_workers=0)


#定义超参数
letnet = LetNet()   #定义网络模型
loss_function = nn.CrossEntropyLoss()  #定义损失函数为交叉熵
optimizer = optim.Adam(letnet.parameters(), lr=0.001)  #定义优化器定义参数学习率

#正式训练
train_acc = []
train_loss = []
test_acc = []
test_loss = []

epoch = 0

#for epoch in range(epochs):
while True:
    epoch = epoch + 1;
    # letnet.train()
    epoch_train_acc, epoch_train_loss = TrainTool.train(train_loader, letnet, optimizer, loss_function, device)

    # letnet.eval()
    epoch_test_acc, epoch_test_loss = TrainTool.test(test_loader,letnet, loss_function,device)

    if epoch_train_acc < 0.98:
       template = ('Epoch:{:2d}, train_acc:{:.1f}%, train_loss:{:.2f}, test_acc:{:.1f}%, test_loss:{:.2f}')
       print(template.format(epoch, epoch_train_acc * 100, epoch_train_loss, epoch_test_acc * 100, epoch_test_loss))
       continue
    else:
       torch.save(letnet.state_dict(),'./model/letnet_params.pth')
       print('Done')
       break
导入数据集
导入torchvision中自带的数据集,此demo用的是CIFAR10数据集,也是一个很经典的图像分类数据集,由 Hinton 的学生 Alex Krizhevsky 和 Ilya Sutskever 整理的一个用于识别普适物体的小型数据集,一共包含 10 个类别的 RGB 彩色图片。
#导入训练集
train_dataset = torchvision.datasets.CIFAR10(root='./data', download=True, train=True, transform=transforms.Compose([transforms.ToTensor()]))
#导入测试集
test_dataset = torchvision.datasets.CIFAR10(root='./data',download=True,train=False,transform=transforms.Compose([transforms.ToTensor()]))
加载数据集
torch.utils.data.DataLoader(dataset, batch_size=1, shuffle=None, sampler=None, batch_sampler=None, num_workers=0, collate_fn=None, pin_memory=False, drop_last=False, timeout=0, worker_init_fn=None, multiprocessing_context=None, generator=None, *, prefetch_factor=2, persistent_workers=False, pin_memory_device='')
Parameters 解释:
-
dataset (Dataset) – dataset from which to load the data.
-
batch_size (int, optional) – how many samples per batch to load (default: 1).
-
shuffle (bool, optional) – set to True to have the data reshuffled at every epoch (default: False).
-
sampler (Sampler or Iterable, optional) – defines the strategy to draw samples from the dataset. Can be any Iterable with len implemented. If specified, shuffle must not be specified.
-
batch_sampler (Sampler or Iterable, optional) – like sampler, but returns a batch of indices at a time. Mutually exclusive with batch_size, shuffle, sampler, and drop_last.
-
num_workers (int, optional) – how many subprocesses to use for data loading. 0 means that the data will be loaded in the main process. (default: 0)
-
collate_fn (Callable, optional) – merges a list of samples to form a mini-batch of Tensor(s). Used when using batched loading from a map-style dataset.
-
pin_memory (bool, optional) – If True, the data loader will copy Tensors into device/CUDA pinned memory before returning them. If your data elements are a custom type, or your collate_fn returns a batch that is a custom type, see the example below.
-
drop_last (bool, optional) – set to True to drop the last incomplete batch, if the dataset size is not divisible by the batch size. If False and the size of dataset is not divisible by the batch size, then the last batch will be smaller. (default: False)
-
timeout (numeric, optional) – if positive, the timeout value for collecting a batch from workers. Should always be non-negative. (default: 0)
-
worker_init_fn (Callable, optional) – If not None, this will be called on each worker subprocess with the worker id (an int in [0, num_workers - 1]) as input, after seeding and before data loading. (default: None)
-
generator (torch.Generator, optional) – If not None, this RNG will be used by RandomSampler to generate random indexes and multiprocessing to generate base_seed for workers. (default: None)
-
prefetch_factor (int, optional, keyword-only arg) – Number of batches loaded in advance by each worker. 2 means there will be a total of 2 * num_workers batches prefetched across all workers. (default: 2)
-
persistent_workers (bool, optional) – If True, the data loader will not shutdown the worker processes after a dataset has been consumed once. This allows to maintain the workers Dataset instances alive. (default: False)
-
pin_memory_device (str, optional) – the data loader will copy Tensors into device pinned memory before returning them if pin_memory is set to true.
参数设置
#定义超参数
letnet = LetNet().to(device)   #定义网络模型
loss_function = nn.CrossEntropyLoss()  #定义损失函数为交叉熵
optimizer = optim.Adam(letnet.parameters(), lr=0.001)  #定义优化器定义参数学习率
训练数据
TrainTool.train()函数在train_tool.py文件中有定义
epoch_train_acc, epoch_train_loss = TrainTool.train(train_loader, letnet, optimizer, loss_function, device)
保存模型
这里只保存了模型的参数:
torch.save(letnet.state_dict(),'./model/letnet_params.pth')
模型的保存有两种形式:
(1)保存整个网络模型,网络结构+权重参数 ;(不推荐)
torch.save(model,'net.pth')   #保存
model=torch.load('net.pth')   #加载整个网络比较耗时
(2)只保存模型参数 (速度快,占内存少;推荐)
torch.save(model.state_dict(),'net_params.pth')   #保存模型的权重参数

model=myNet()                           #加载模型参数
model.load_state_dict(torch.load('./model/net_params.pth'))
train_tool.py
import torch
import matplotlib.pyplot as plt

class TrainTool:
      def image_show(images):
          print(images.shape)
          images = images.numpy()   #将图片有tensor转换成array
          print(images.shape)
          images = images.transpose((1, 2, 0))   # 将【3,224,256】-->【224,256,3】
          # std = [0.5, 0.5, 0.5]
          # mean = [0.5, 0.5, 0.5]
          # images = images * std + mean
          print(images.shape)
          plt.imshow(images)
          plt.show()


      def train(train_loader, letnet, optimizer, loss_function, device):
          train_size = len(train_loader.dataset)  # 训练集的大小
          num_batches = len(train_loader)  # 批次数目

          train_acc, train_loss = 0, 0  # 初始化正确率和损失
          # 获取图片及标签
          for images, labels in train_loader:
              images, labels = images.to(device), labels.to(device)
              # 计算预测误差
              pred_labels = letnet(images)
              loss = loss_function(pred_labels, labels)
              # 反向传播
              optimizer.zero_grad()  # grad属性归零
              loss.backward()  # 反向传播
              optimizer.step()  # 每一步自动更新
              # 记录acc和loss
              train_acc += (pred_labels.argmax(1) == labels).type(torch.float).sum().item()
              train_loss += loss.item()

          train_acc /= train_size
          train_loss /= num_batches

          return train_acc, train_loss


      def test(test_loader, letnet, loss_function, device):
          test_size = len(test_loader.dataset)  # 测试集的大小,一共10000张图片
          num_batches = len(test_loader)  # 批次数目,313(10000/32=312.5,向上取整)
          test_loss, test_acc = 0, 0

          # 当不进行训练时,停止梯度更新,节省计算内存消耗
          with torch.no_grad():
              for images, labels in test_loader:
                  images, labels = images.to(device), labels.to(device)

                  # 计算loss
                  pred_labels = letnet(images)
                  loss = loss_function(pred_labels, labels)

                  test_acc += (pred_labels.argmax(1) == labels).type(torch.float).sum().item()
                  test_loss += loss.item()

          test_acc /= test_size
          test_loss /= num_batches

          return test_acc, test_loss
文件中三个函数:
image_show() 加载图片后显示图片用函数
train() 计算训练集正确率和误差的函数
test() 计算测试集正确率和误差的函数
predict.py
import torch
import torchvision.transforms as transforms
from PIL import Image
from model import LetNet

#数据预处理
transforms = transforms.Compose([transforms.Resize((32, 32)),
                                 transforms.ToTensor(),
                                 transforms.Normalize((0.5, 0.5, 0.5),(0.5, 0.5, 0.5))])
#导入要测试的图像
image = Image.open('./data/1.jpeg')
image = transforms(image)
image = torch.unsqueeze(image, dim=0)

#实例化网络,加载训练好的模型参数
model = LetNet()
model.load_state_dict(torch.load('./model/letnet_params.pth'))

#预测
classes = ('plane', 'car', 'bird', 'cat',
           'deer', 'dog', 'frog', 'horse', 'ship', 'truck')

with torch.no_grad():
    outputs = model(image)
    print(outputs)
    predict = torch.max(outputs, dim=1)[1].data.numpy()
    print(predict)
print(classes[int(predict)])
如有错误欢迎指正!


