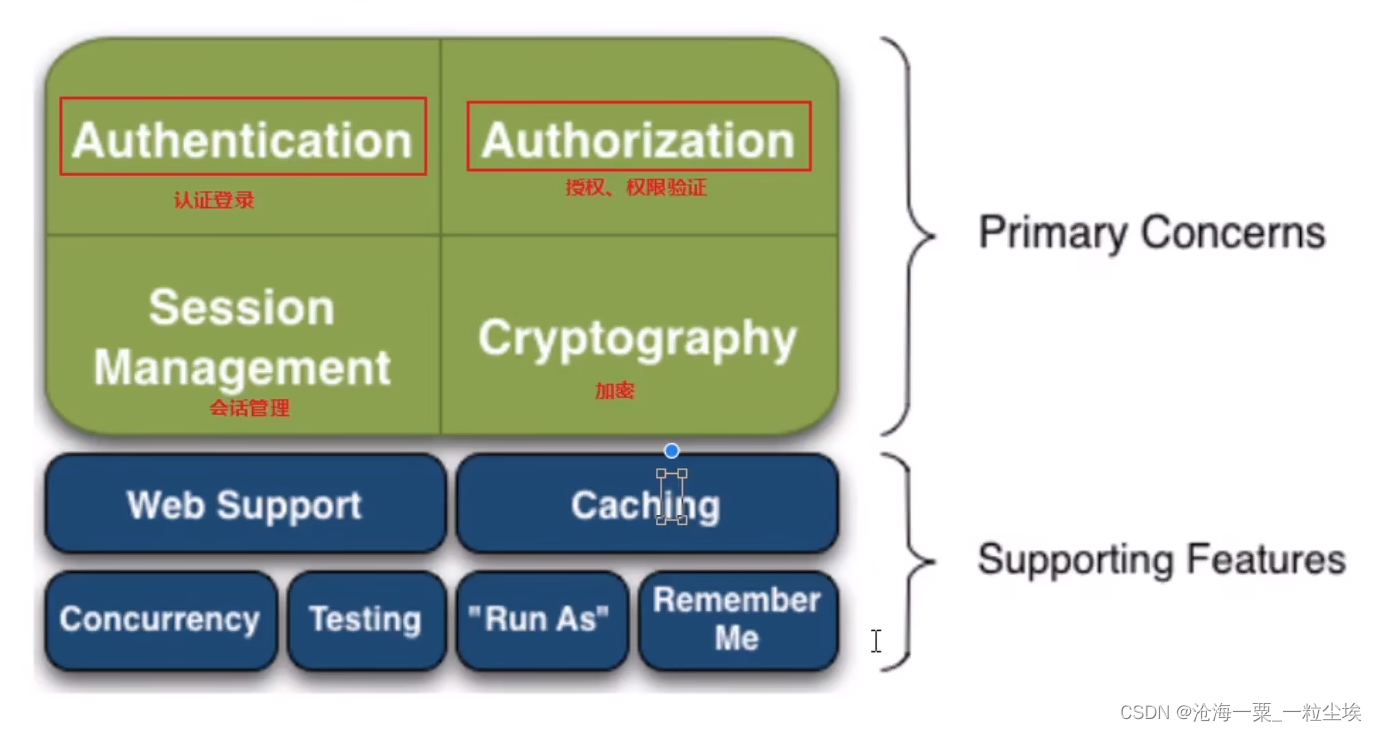
Apache Shiro是一个强大而灵活的开源安全框架,它干净利落地处理身份认证,授权,企业会话管理和加密。
官网:
http://shiro.apache.org/
源码:
https://github.com/apache/shiro
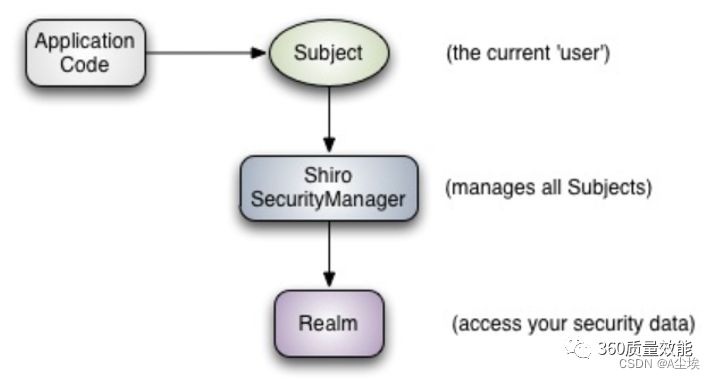
Subject:代表当前用户或者当前程序,在Shiro中Subject是一个接口,他定义了很多认证授权的方法。
认证就是判断你这个用户是不是合法用户,授权其实就是你认证成功之后,你的权限能访问系统的那些资源。
SecurityManage:安全管理器,Subject去认证的时候,需要通过SecurityManage安全管理器来负责认证和授权
安全管理器又要通过Authenticator认证器进行认证,通过Authorizer授权器进行授权,通过SessionManag会话管理器进行会话管理,有没有发现他就相当于一个中介,他来接收这些事情,而干这些事情的不是他来做的。
Authenticator:认证器,Realm从数据库中去获取到用户信息,然后认证器来做身份认证来进行身份认证。
Authorizer:授权器,通过认证器认证权限之后,得通过授权器来判断这个用户身份有什么权限,他可以访问那些资源
Realm:相当于数据源,从Realm中获取到用户的数据,比如用户的数据在MYSQL数据库,那么Realm就需要从MYSQL数据库中去获取到用户的信息,然后来做身份认证。
在Realm中也有一些认证授权相关的操作。
SessionManager:会话管理器,不依赖web容器的session,所以shiro可以使用在非web 应用上,也可以将分布式应用的会话集中在一点管理,此特性可使它实现单点登录。
SessionDAO:会话,比如要将Session存储到数据库,那么可以通过jdbc来存储到数据库。
一、引入依赖
<dependency>
  <groupId>org.apache.shiro</groupId>
  <artifactId>shiro-core</artifactId>
  <version>1.5.3</version>
</dependency>
二、shiro配置文件shiro.ini(用户名或者密码)
[users]
relaysec=123456
三、测试代码
public class ShiroDemo{

	public static void main(String[] args){

		//1.创建安全管理器对象
		DefaultSecurityManager securityManager = new DefaultSecurityManager();

		//2.给安全管理器设置realm
		securityManager.setRealm(new IniRealm("classpath:shiro.ini"));

		//3.SecurityUtils给全局安全工具类设置安全管理器
		SecurityUtils.setSecurityManager(securityManager);

		//4.关键对象subject主体
		Subject subject = SecurityUtils.getSubject();

		//5.创建令牌
		UsernamePasswordToken token = new UsernamePasswordToken("relaysec","123456");

		try{
			subject.login(token);//用户认证
            System.out.println("登录成功");
		}catch(UnknownAccountException e){
			e.printStackTrace();
            System.out.println("认证失败: 用户名不存在~");
		}catch(IncorrectCredentialsException e){
			e.printStackTrace();
            System.out.println("认证失败: 密码错误~");
		}
	}
}
SpringBoot整合shrio
一、创建一个war项目
<dependency>
 <groupId>org.springframework.boot</groupId>
 <artifactId>spring-boot-starter-web</artifactId>
</dependency>

        <dependency>
            <groupId>org.springframework.boot</groupId>
            <artifactId>spring-boot-devtools</artifactId>
            <scope>runtime</scope>
            <optional>true</optional>
        </dependency>

        <dependency>
            <groupId>org.apache.tomcat</groupId>
            <artifactId>tomcat-juli</artifactId>
            <version>8.5.23</version>
        </dependency>

        <dependency>
            <groupId>org.projectlombok</groupId>
            <artifactId>lombok</artifactId>
            <optional>true</optional>
        </dependency>
        <dependency>
            <groupId>org.springframework.boot</groupId>
            <artifactId>spring-boot-starter-test</artifactId>
            <scope>test</scope>
        </dependency>

        <!--引入JSP解析依赖-->
        <dependency>
            <groupId>org.apache.tomcat.embed</groupId>
            <artifactId>tomcat-embed-jasper</artifactId>
        </dependency>
        <dependency>
            <groupId>jstl</groupId>
            <artifactId>jstl</artifactId>
            <version>1.2</version>
        </dependency>

        <!--引入shiro整合Springboot依赖
			shiro-spring-boot-web-starter
		-->
        <!--CVE-2020-1957 Shiro <= 1.5.1-->
        <dependency>
            <groupId>org.apache.shiro</groupId>
            <artifactId>shiro-web</artifactId>
            <version>1.4.2</version>
        </dependency>
<!--        <dependency>-->
<!--            <groupId>org.apache.shiro</groupId>-->
<!--            <artifactId>shiro-spring</artifactId>-->
<!--            <version>1.4.2</version>-->
<!--        </dependency>-->
        <!--CVE-2020-11989 shiro < 1.5.3-->
<!--        <dependency>-->
<!--            <groupId>org.apache.shiro</groupId>-->
<!--            <artifactId>shiro-web</artifactId>-->
<!--            <version>1.4.2</version>-->
<!--        </dependency>-->
<!--        <dependency>-->
<!--            <groupId>org.apache.shiro</groupId>-->
<!--            <artifactId>shiro-spring</artifactId>-->
<!--            <version>1.4.2</version>-->
<!--        </dependency>-->

<!--        <dependency>-->
<!--            <groupId>org.apache.shiro</groupId>-->
<!--            <artifactId>shiro-spring</artifactId>-->
<!--            <version>1.5.3</version>-->
<!--        </dependency>-->
<!--        <dependency>-->
<!--            <groupId>org.apache.shiro</groupId>-->
<!--            <artifactId>shiro-web</artifactId>-->
<!--            <version>1.5.3</version>-->
<!--        </dependency>-->

        <dependency>
            <groupId>org.apache.shiro</groupId>
            <artifactId>shiro-web</artifactId>
            <version>1.7.0</version>
        </dependency>
        <dependency>
            <groupId>org.apache.shiro</groupId>
            <artifactId>shiro-spring</artifactId>
            <version>1.7.0</version>
        </dependency>
二、创建ShiroConfig(@Configuration修饰)
配置3个bean,ShiroFilterFactory、DefaultWebSecurityManager、Realm
@Configuration
public class ShiroConfig implements EnvironmentAware{

	private Environment env;
}
①、创建ShiroFilter
ShiroFilterFactoryBean shiroFilterFactoryBean = new ShiroFilterFactoryBean();
//给filter设置安全管理器
shiroFilterFactoryBean setSecrityManager(defaultWebSecurityManager);

//配置系统受限资源和系统公共资源
/**
	map的key值代表的是我们的资源,map的value值代表的是我们的权限
	authc代表我们是需要认证和授权的,anon代表我们不需要认证和授权
	其实代码审计去审的就是shiroConfig文件,看他的jar包,以及ShiroConfig配置文件
*/
Map<String,String> map = new HashMap<>();
//authc 请求这个资源需要认证和授权
map.put("/admin/**","anon");
map.put("/admin/users","authc");
map.put("/demo/**","anon");
map.put("/index.jsp","authc");
map.put("/hello/*", "authc");
map.put("/toJsonList/*","authc");

shiroFilterFactoryBean.setLoginUrl("/login.jsp");
shiroFilterFactoryBean.setFilterChainDefinitionMap(map);
return shiroFilterFactoryBean;
还有一种方式:
@Bean
public ShiroFilterFactoryBean getShiroFilterFactoryBean(DefaultWebSecurityManager sessionManager) {
//构建ShiroFilterFactoryBean对象,负责创建过滤器工厂
    ShiroFilterFactoryBean shiroFilterFactoryBean = new ShiroFilterFactoryBean();
//设置登录路径
    shiroFilterFactoryBean.setLoginUrl("/login");
//注意:必须设置SecuritManager
shiroFilterFactoryBean.setSecurityManager(sessionManager);
//设置访问未授权的需要跳转到的路径
    shiroFilterFactoryBean.setUnauthorizedUrl("/403");
//设置登录成功访问路径
    shiroFilterFactoryBean.setSuccessUrl("/");
//自定义的过滤设置注入到shiroFilter中
    shiroFilterFactoryBean.getFilters().put("apikey", new ApiKeyFilter());
    shiroFilterFactoryBean.getFilters().put("csrf", new CsrfFilter());
    shiroFilterFactoryBean.getFilters().put("user", new UserAuthcFilter());
//定义map指定请求过滤规则
    Map<String, String> filterChainDefinitionMap = shiroFilterFactoryBean.getFilterChainDefinitionMap();
    ShiroUtils.loadBaseFilterChain(filterChainDefinitionMap);
    ShiroUtils.ignoreCsrfFilter(filterChainDefinitionMap);
    filterChainDefinitionMap.put("/**", "apikey, csrf, authc");
    return shiroFilterFactoryBean;
}
Shiro有两种方式可进行精度控制,一种是过滤器方式,根据访问的URL进行控制,该种方式允许使用*匹配URL,可以进行粗粒度控制;另一种是注解的方式,实现细粒度控制,但只能是在方法上控制,无法控制类级别访问。
过滤器的类型有很多,本文代码只用到anon和authc两种类型
定义一个Map类型的filterChainDefinitionMap,使用ShiroFilterChainDefinition来控制请求路径的鉴权与授权。
创建ShiroUtils类,自定义静态方法loadBaseFilterChain()和ignoreCsrfFilter()方法,判断哪些请求路径需要用户登录才能访问,哪些不需要登录就能访问,实现粗粒度控制。
②、创建安全管理器
将用户认证信息源设置到安全管理器
@Bean
public DefaultWebSecurityManager getDefaultWebSecurityManager(Realm realm){

	DefaultWebSecurityManager defaultWebSecurityManager = new DefaultWebSecurityManager();
	defaultWebSecurityManager.setRealm(realm);
	return defaultWebSecurityManager;
}
还有一种方式:
管理内部组件实例,并通过它来提供安全管理的各种服务。
modularRealmAuthenticator是shiro提供的realm管理器,用来设置realm生效, 通过setAuthenticationStrategy来设置多个realm存在时的生效规则
@Bean(name="securityManager")
public DefaultWebSecurityManager securityManager(SessionManager sessionManager, MemoryConstrainedCacheManager memoryConstrainedCacheManager){

	DefaultWebSecurityManager dwsm = new DefaultWebSecurityManager();
    dwsm.setSessionManager(sessionManager);
    dwsm.setCacheManager(memoryConstrainedCacheManager);
    dwsm.setAuthenticator(modularRealmAuthenticator());
    return dwsm;
}
重写ModularRealmAuthenticator,只要有一个Realm验证成功即可,只返回第一个Realm身份验证成功的认证信息
@Bean
public ModularRealmAuthenticator modularRealmAuthenticator() {
    UserModularRealmAuthenticator modularRealmAuthenticator = new UserModularRealmAuthenticator();
    modularRealmAuthenticator.setAuthenticationStrategy(new FirstSuccessfulStrategy());
    return modularRealmAuthenticator;
}
securityManager不用直接注入Realm可能导致事务失效
可以定义一个handleContextRefresh方法,利用监听去初始化,等到ApplicationContext加载完成之后,完成shiroReaml
@EventListener
public void handleContextRefresh(ContextRefreshedEvent event){

	ApplicationContext context = event.getApplicationContext();
	List<Realm> realmList = new ArrayList<>();

	LocalRealm localRealm = context.getBean(LocalRealm.class);
	LdapRealm ldapRealm = context.getBean(LdapRealm.class);

	realmList.add(LocalRealm);
	realmList.add(ldapRealm);
	context.getBean(DefaultWebSecurityManager.class).setRealms(realmList);
}
③、自定义Realm
@Bean
public Realm getRealm(){

	CustomerRealm customerRealm = new CustomerRealm();
	return customerRealm;
}

/**
	自定义Realm一般继承AuthorizingRealm,然后实现getAuthenticationInfo()和getAuthorizationInfo()方法,来完成身份认证和权限获取。
*/
public class CustomerRealm extends AuthorizingRealm{

	/**
		用于授权
		PrincipalCollection 是一个身份集合
		首先通过getPrimaryPrincipal()得到传入的用户名,然后调用getAuthorizationInfo()方法。
		再根据用户名调用 UserService接口获取角色及权限信息,并将得到的用户roles放到authorizationInfo中,并返回。
	*/
	@Override
	protected AuthorizationInfo doGetAuthorizationInfo(PrincipalCollection principals){
		String userId = (String) principals.getPrimaryPrincipal();
		return getAuthorizationInfo(userId,usserService);
	}
	public static AuthorizationInfo getAuthorizationInfo(String userId,UserService userService){

		SimpleAuthorizationInfo authorizationInfo = new SimpleAuthorizationInfo();
		UserDTO userDTO = userService.getUserDTO(userId);
		Set<String> roles = userDTO.getRoles().stream().map(Role::getId).collect(Collectors.toSet());
		authorizationInfo.setRoles(roles);
		return authorizationInfo();
	}

	//用于验证账户和密码
	@Override
	protected AuthenticationInfo doGetAuthenticationInfo(AuthenticationToken token) throws AuthenticationException {

		/**
			//直接从参数中获取用户名和密码
			String username = token.getUsername();
			String password = String.valueOf(token.getPassword())
		*/
		 System.out.println("=============");

		//从传过来的token获取用户名
		String principal = (String) token.getPrincipal();
		System.out.println("用户名"+principal);

		//假设从数据库中获得用户名,密码
		String password_db="123";
        String username_db="zhangsan";
        if (username_db.equals(principal)){
//            SimpleAuthenticationInfo simpleAuthenticationInfo =
            return new SimpleAuthenticationInfo(principal,"123", this.getName());
        }

		return null;
	}
}
还有方式:
展示一个LdapReam Bean,注解@DependsOn表示组件依赖,下图中表示依赖lifecycleBeanPostProcessor
LifecycleBeanPostProcessor用来管理shiro Bean的生命周期,在LdapReam创建之前先创建lifecycleBeanPostProcessor
@Bean
@DependsOn(lifecycleBeanPostProcessor)
public LdapRealm ldapRealm(){

	return new LdapRealm();
}

@Bean(name="lifecycleBeanPostProcessor")
public LifecycleBeanPostProcessor lifecycleBeanPostProcessor(){
	return new LifecycleBeanPostProcessor();
}
三、Controller进行访问,登录成功之后转发到index.jsp,否则直接转发到login.jsp文件。
@RequestMapping("login")
public String login(String username,String password){

	Subject subject = Security.getSubject();
	try{
		//认证成功
		UsernamePasswordToken token = new UsernamePasswordToken(uername,password);
		subject.login(token);
		return "redirect:/index.jsp";
	}catch(UnknownAccountException e){
		e.printStackTrace();
		System.out.println("用户名错误");
	}catch(IncorrectCredentialsException e){
		e.printStackTrace();
		System.out.println("密码错误");
	}catch(Exception e){
		e.printStackTrace();
		System.out.println(e.getMessage());
	}

	return "redirect:/login.jsp";
}
漏洞复现
Shiro层面绕过之后,SpringBoot也需要解析路径的,所以如果Springboot版本过高的话,可能是复现不成功的。并且不能使用Springboot集成的shiro吗,那样子也有可能导致复现不成功
<groupId>org.springframework.boot</groupId>
 <artifactId>spring-boot-starter-parent</artifactId>
<version>2.2.6.RELEASE</version>

<dependency>
    <groupId>org.apache.shiro</groupId>
    <artifactId>shiro-web</artifactId>
    <version>1.5.0</version>
</dependency>
<dependency>
    <groupId>org.apache.shiro</groupId>
    <artifactId>shiro-spring</artifactId>
    <version>1.5.0</version>
</dependency>
ShiroConfig配置
LinkedHashMap<String, String> map = new LinkedHashMap<String, String>();
        map.put("/login","anon");//anon 设置为公共资源  放行资源放在下面
//        map.put("/user/register","anon");//anon 设置为公共资源  放行资源放在下面
//        map.put("/register.jsp","anon");//anon 设置为公共资源  放行资源放在下面
//        map.put("/user/getImage","anon");
        map.put("/doLogin", "anon");
        map.put("/demo/**","anon");
        map.put("/unauth", "user");
        map.put("/admin/*","authc");

        //默认认证界面路径---当认证不通过时跳转
        shiroFilterFactoryBean.setLoginUrl("/login.jsp");
        shiroFilterFactoryBean.setFilterChainDefinitionMap(map);

        return shiroFilterFactoryBean;
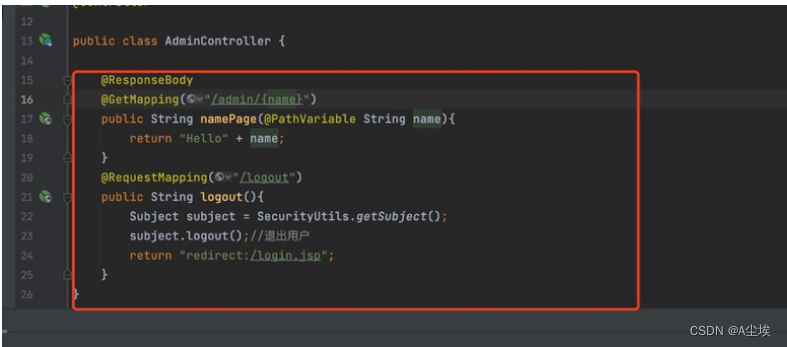
Controller:
绕过方式: /demo/…;/admin/index

漏洞分析:
定位到PathMatchingFilterChainResolver类的getchain方法,这个方法是处理过滤的
首先调用getPathWithinApplication方法获取路径,跟进去。
来到getPathWithinApplication方法,继续跟进WebUtils的getPathWithinApplication方法
首先getContextPath方法获取工程路径,调用getRequestUri获取访问路径,跟进去getRequestUri方法
来到getRequestUri方法,首先从域中获取,获取不到的话,调用getRequestURI方法获取路径,获取的就是我们访问的//demo/…;/admin/users 这个路径,然后调用decodeAndCleanUriString方法进行处理。
来到decodeAndCleanUriString方法,通过indexOf方法,因为我们的路径中存在分号,所以他获取到的位置是第9个,
然后判断如果不等于-1的话,调用substring方法进行字符串截取,从0到9 包前不包后 ,也就是说分号不需要截取,截取出来的字符串就是//demo/…。然后返回上一个方法。
来到normalize方法,这里进行了字符的替换,
替换反斜线
替换 // 为 /
替换 /./ 为 /
替换 /…/ 为 /
然后返回。
回到getChain方法,首先判断如果url不等于null并且他的最后一位是 / 的话,进行字符串截取然后赋值,我们拿到的字符串路径是/demo/… 所以往下走。
然后循环遍历我们的map中的内容,就是我们在Shiroconfig中写的那些过滤的内容,然后进行一一匹配,最后匹配到/demo/**的时候,然后调用proxy方法,我们跟进去。
来到proxy方法,首先调用getChain方法获取到请求路径对应的过滤器,然后调用过滤器的proxy方法,来到proxy方法
来到proxy方法,首先创建了一个ProxiedFilterChain对象,这个对象是一个代理对象。
基本上到这里我们的原始请求就会进入到 springboot中. springboot对于每一个进入的request请求也会有自己的处理方式,找到自己所对应的controller。
我们定位到Spring处理请求的地方。我们跟进去getPathWithinApplication方法
到getPathWithinApplication方法,调用getContextPath方法获取到工程路径,调用getRequestUri获取访问路径,我们跟进getRequestUri方法
来到getRequestUri方法,首先从域中获取,获取不到的话然后通过getRequestURI方法获取到url,然后调用decodeAndCleanUriString方法,我们跟进去。
来到decodeAndCleanUriString方法,跟进removeSemicolonContent方法。
首先获取到分号的位置,然后while循环如果不等于-1的话,然后进行字符串截取,将我们的分号截取掉 然后返回的路径就是//demo…
回到decodeAndCleanUriString方法,调用decodeRequestString进行decode解码,然后调用getSanitizedPath方法进行过滤 //
然后返回。
回到getPathWithinApplication方法,可以发现我们的分号已经被去掉了。
到这里基本上的流程就结束了,可以发现在Spring中会过滤分号,而在Shiro中不会。导致权限绕过。
===================================================
应用案例登录认证

- 客户端提交用户账号和密码,在Controller中拿到账号和密码封装到token对象.
- 然后借助subject的login方法,把数据提交给SecurityManager
- 使用Authenticator处理token,Authenticator从Realm列表中获取LdapRealm
- LdapRealm从token中获取数据,交给authenticate进行比对,对比通过返回AuthenticationInfo
一、创建maven工程,并导入相关依赖
shiro-core commons-logging
<dependency>
  <groupId>org.apache.shiro</groupId>
    <artifactId>shiro-spring</artifactId>
    <version>1.2.5</version>
</dependency>
<dependency>
    <groupId>org.apache.shiro</groupId>
    <artifactId>shiro-ehcache</artifactId>
    <version>1.2.5</version>
</dependency>
<dependency>
    <groupId>com.github.theborakompanioni</groupId>
    <artifactId>thymeleaf-extras-shiro</artifactId>
    <version>1.2.1</version>
</dependency>

 <dependency>
    <groupId>org.apache.shiro</groupId>
    <artifactId>shiro-quartz</artifactId>
 </dependency>
登录控制器Controller
@PostMapping(value="/signin")
public ResultHolder login(@RequestBody LoginRequest request){

	SessionUser sessionUser = SessionUtils.getUser();
	if(sessionUser!=null){
		if(!StringUtils.equals(sessionUser.getId(), request.getUsername())){

			return ResultHolder.error(Translator.get("please_logout_current_user"));
		}
		SecurityUtils.getSubject().getSession().setAttribute("authenticate", UserSource.LOCAL.name());
	}
	 return userService.login(request);
}
在login方法中,把用户名和密码封装为UsernamePasswordToken对象token,然后通过SecurityUtils.getSubject()获取Subject对象,并将前面获取token对象作为参数。若调用subject.login(token)时不抛出任何异常,说明认证通过,调用subject.isAuthenticated()返回true表示当前的用户已经登录。后续可以根据subject实例获取用户信息。
public ResultHolder login(LoginRequest request) {
        String login = (String) SecurityUtils.getSubject().getSession().getAttribute("authenticate");
        String username = StringUtils.trim(request.getUsername());
        String password = "";
        if (!StringUtils.equals(login, UserSource.LDAP.name())) {
            password = StringUtils.trim(request.getPassword());
            ……
        }
        UsernamePasswordToken token = new UsernamePasswordToken (username, password, login);
        Subject subject = SecurityUtils.getSubject();
        try {
            subject.login(token);
            if (subject.isAuthenticated()) {
                UserDTO user = (UserDTO) subject.getSession().getAttribute(ATTR_USER);
               ……
                                return ResultHolder.success(subject.getSession().getAttribute("user"));
} else {
        return ResultHolder.error(Translator.get("login_fail"));
    }
} catch (ExcessiveAttemptsException e) {
    throw new ExcessiveAttemptsException(Translator.get("excessive_attempts"));
}
……
}
=============================================================
案例二:
@RestController
@CrossOrigin
@RequestMapping("/")
public class LoginController{

	private static final Logger logger = LoggerFactory.getLogger(LoginController.class);

	@Reference //Dubbo远程调用的服务
	private UserService userService;

	@RequestMapping(value="/login",method=RequestMethod.POST)
	public ResponseEntity login(){
		//获取存储在系统的用户
		ShiroUser user = (ShiroUser)SecurityUtils.getSubject().getPrincipal();

		//为获取的用户添加token
		user.setToken(SecurityUtils.getSubpect().getSession().getId().toString());
		return ResponseEntity.ok(user);
	}

	/**
		获取当前登陆人的信息(包括角色权限)
	*/
	@GetMapping("/logininfo")
	public ResponsseEntity loginInfo(){
		ShiroUser shiroUser = (ShiroUser) SecurityUtils.getSubject().getPrincipal();

		Map<String,Object> map = new HashMap<>();
		Set<String> permissions = Sets.newHashSet();

		//将获取的角色和权限存入指定的map
		User user = userService.getById(shiroUser.getUserId().intValue());
		map.put("roleList",user.getRoles());
		map.put("permissionList",permissions);
		map.put("userId",shiroUser.getUserId());
		map.put("username",shiroUser.getLoginName());

		return ResponseEntity.ok(map);
	}
}
======================================================
